Note
Access to this page requires authorization. You can try signing in or changing directories.
Access to this page requires authorization. You can try changing directories.
Important
Azure CDN Standard from Microsoft (classic) will be retired on September 30, 2027. To avoid any service disruption, it's important that you migrate your Azure CDN Standard from Microsoft (classic) profiles to Azure Front Door Standard or Premium tier by September 30, 2027. For more information, see Azure CDN Standard from Microsoft (classic) retirement.
Azure CDN from Edgio was retired on January 15, 2025. For more information, see Azure CDN from Edgio retirement FAQ.
This tutorial shows how to add a custom domain to an Azure Content Delivery Network endpoint.
The endpoint name in your content delivery network profile is a subdomain of azureedge.net. By default when delivering content, the content delivery network profile domain gets included in the URL.
For example, https://*.azureedge.net/photo.png.
Azure Content Delivery Network provides the option of associating a custom domain with a content delivery network endpoint. This option delivers content with a custom domain in your URL instead of the default domain.
In this tutorial, you learn how to:
- Create a CNAME DNS record.
- Add a custom domain with your content delivery network endpoint.
- Verify the custom domain.
If you don't have an Azure account, create a free account before you begin.
Prerequisites
Before you can complete the steps in this tutorial, create a content delivery network profile and at least one content delivery network endpoint.
- For more information, see Quickstart: Create an Azure Content Delivery Network profile and endpoint.
If you don't have a custom domain, purchase one with a domain provider.
- For more information, see Buy a custom domain name.
If you're using Azure to host your DNS domains, delegate your custom domain to Azure DNS.
- For more information, see Delegate a domain to Azure DNS.
If you're using a domain provider to handle your DNS domain, continue to Create a CNAME DNS record.
Create a CNAME DNS record
Before you can use a custom domain with an Azure Content Delivery Network endpoint, you must first create a canonical name (CNAME) record with Azure DNS or your DNS provider to point to your content delivery network endpoint.
A CNAME record is a DNS record that maps a source domain name to a destination domain name.
For Azure Content Delivery Network, the source domain name is your custom domain name and the destination domain name is your content delivery network endpoint hostname.
Azure Content Delivery Network routes traffic addressed to the source custom domain to the destination content delivery network endpoint hostname after it verifies the CNAME record.
A custom domain and its subdomain can only get added to a single endpoint at a time.
Use multiple CNAME records for different subdomains from the same custom domain for different Azure services.
You can map a custom domain with different subdomains to the same content delivery network endpoint.
Note
- This tutorial uses the CNAME record type for multiple purposes:
- Traffic routing can be accomplished with a CNAME record as well as A or AAAA record types in Azure DNS. To apply, use the following steps to replace the CNAME record with the record type of your choice.
- A CNAME record is required for custom domain ownership validation and must be available when adding the custom domain to a content delivery network endpoint. More details in the following section.
Azure DNS uses alias records for Azure resources within the same subscription.
To add an alias record for your Azure Content Delivery Network endpoint:
Sign in to the Azure portal.
In the left-hand menu, select All resources then the Azure DNS zone for your custom domain.
In the DNS zone for your custom domain, select + Record set.
In Add record set enter or select the following information:
Setting Value Name Enter alias you want to use for your content delivery network endpoint. For example, www. Type Select CNAME. Alias record set Select Yes. Alias type Select Azure resource. Choose a subscription Select your subscription. Azure resource Select your Azure Content Delivery Network endpoint. Change the TTL for the record to your value.
Select OK.
Add a custom domain to your content delivery network endpoint
After you've registered your custom domain, you can then add it to your content delivery network endpoint.
Sign in to the Azure portal and browse to the content delivery network profile containing the endpoint that you want to map to a custom domain.
On the CDN profile page, select the content delivery network endpoint to add the custom domain.
Select + Custom domain.
In Add a custom domain, Endpoint hostname, gets generated and pre-filled from your content delivery network endpoint URL: <endpoint-hostname>.azureedge.net. You can't change this value.
For Custom hostname, enter your custom domain, including the subdomain, to use as the source domain of your CNAME record.
- For example,
www.contoso.comor cdn.contoso.com. Don't use the cdnverify subdomain name.
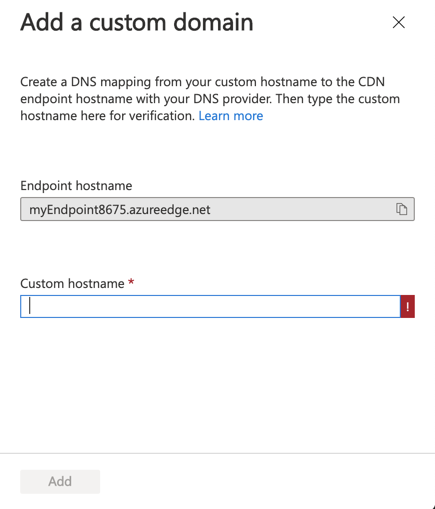
- For example,
Select Add.
Azure verifies that the CNAME record exists for the custom domain name you entered. If the CNAME is correct, your custom domain gets validated.
It can take up to 10 minutes for the new custom domain settings to propagate to all content delivery network edge nodes.
Verify the custom domain
After you've completed the registration of your custom domain, verify that the custom domain references your content delivery network endpoint.
Ensure that you have public content that you want cached at the endpoint. For example, if your content delivery network endpoint is associated with a storage account, Azure Content Delivery Network caches the content in a public container. Set your container to allow public access and it contains at least one file to test the custom domain.
In your browser, navigate to the address of the file by using the custom domain. For example, if your custom domain is
www.contoso.com, the URL to the cached file should be similar to the following URL:http://www.contoso.com/my-public-container/my-file.jpg. Verify that the result is that same as when you access the content delivery network endpoint directly at <endpoint-hostname>.azureedge.net.
Clean up resources
If you no longer want to associate your endpoint with a custom domain, remove the custom domain by doing the following steps:
Go to your DNS provider, delete the CNAME record for the custom domain, or update the CNAME record for the custom domain to a non-Azure Content Delivery Network endpoint.
Important
To prevent dangling DNS entries and the security risks they create, starting from April 9, 2021, Azure Content Delivery Network requires removal of the CNAME records to Azure Content Delivery Network endpoints before the resources can be deleted. Resources include Azure Content Delivery Network custom domains, Azure Content Delivery Network profiles/endpoints or Azure resource groups that have Azure Content Delivery Network custom domains enabled.
In your content delivery network profile, select the endpoint with the custom domain that you want to remove.
From the Endpoint page, under Custom domains, select and hold (or right-click) the custom domain that you want to remove, then select Delete from the context menu. Select Yes.
The custom domain gets removed from your endpoint.
Next steps
In this tutorial, you learned how to:
- Create a CNAME DNS record.
- Add a custom domain with your content delivery network endpoint.
- Verify the custom domain.
Advance to the next tutorial to learn how to configure HTTPS on an Azure Content Delivery Network custom domain.