Note
Access to this page requires authorization. You can try signing in or changing directories.
Access to this page requires authorization. You can try changing directories.
Important
- Starting August 15, 2025, Azure CDN from Microsoft (classic) will no longer support new domain onboarding or profile creation. Migrate to AFD Standard and Premium to create new domains or profiles and avoid service disruption. Learn more
- Starting August 15, 2025, Azure CDN from Microsoft (classic) will no longer support Managed certificates. To avoid service disruption, either switch to Bring Your Own Certificate (BYOC) or migrate to AFD Standard and Premium by this date. Existing managed certificates will be auto renewed before August 15, 2025, and remain valid until April 14, 2026. Learn more
- Azure CDN Standard from Microsoft (classic) will be retired on September 30, 2027. To avoid service disruption migrate to AFD Standard or Premium. Learn more.
- Azure CDN from Edgio was retired on January 15, 2025. Learn more.
Multi-origin support eliminates downtime and establishes global redundancy.
When you choose multiple origins within an Azure CDN endpoint, the redundancy provided spreads the risk by probing the health of each origin and failing over if necessary.
Setup one or more origin groups and choose a default origin group. Each origin group is a collection of one or more origins that can take similar workloads.
The first origin group is set as the default origin group. Multi-origin feature is enabled when a default origin group for the CDN endpoint is selected. Once the multi-origin feature is enabled, it can't be disabled, and the default origin group can't be deleted. The default origin group is used for routing requests to the origin. You're allowed to update the origin group configuration and switch to a single origin configuration. You're also allowed to change the default origin group designation to another origin group.
Note
Currently this feature is only available from Azure Content Delivery Network from Microsoft.
Create the origin group
Sign in to the Azure portal
Select your Azure CDN profile and then select the endpoint to be configured for multi-origin.
Select Origin under Settings in the endpoint configuration.
To enable multi-origin, you need at least one origin group. Select Create Origin Group.
In the Add Origin Group configuration, enter or select the following information:
Setting Value Origin group name Enter a name for your origin group. Probe status Select Enabled.
Azure CDN runs health probes from different points across the globe to determine origin health. Don't enable if the current origin group isn't active to avoid extra cost.Probe path The path in the origin that is used to determine the health. Probe interval Select a probe interval of 1, 2, or 4 minutes. Probe protocol Select HTTP or HTTPS. Probe method Select Head or Get. Default origin group Select the box to set as default origin group. Select Add.
Add multiple origins
In the origin settings for your endpoint, select + Create Origin.
Enter or select the following information in the Add Origin configuration:
Setting Value Name Enter a name for the origin. Origin Type Select Storage, Cloud Service, Web App, or Custom origin. Origin hostname Select or enter your origin hostname. The dropdown lists all available origins of the type you specified in the previous setting. If you selected Custom origin as your origin type, enter the domain of your customer origin server. Origin host header Enter the host header you want Azure CDN to send with each request, or leave the default. HTTP port Enter the HTTP port. HTTPS port Enter the HTTPS port. Priority Enter a number between 1 and 5. Weight Enter a number between 1 and 1000. Note
When an origin is created within an origin group, it must be accorded a priority and weight. If an origin group has only one origin, then the default priority and weight is set as 1. Traffic is routed to the highest priority origins if the origin is healthy. If an origin is determined to be unhealthy then the connections are diverted to another origin in the order of priority. If two origins have the same priority, then traffic is distributed as per weight specified for the origin.
Select Add.
Select Configure origin to set the origin path for all origins:
The origin path is used to rewrite the URL that Microsoft CDN uses when constructing the request forwarded to the origin. It also carries all the remaining parts of the incoming request. By default, this path isn't provided. As such, Microsoft CDN uses the incoming URL path in the request to the origin.
Origin path:
/fwd/Incoming URL path:
/foo/a/b/image1.jpg
URL from Microsoft CDN to origin:fwd/foo/a/b/image1.jpg.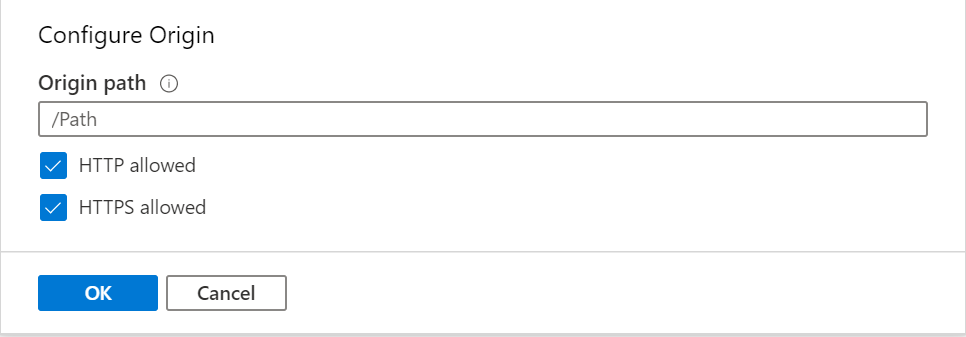
Select OK.
Configure origins and origin group settings
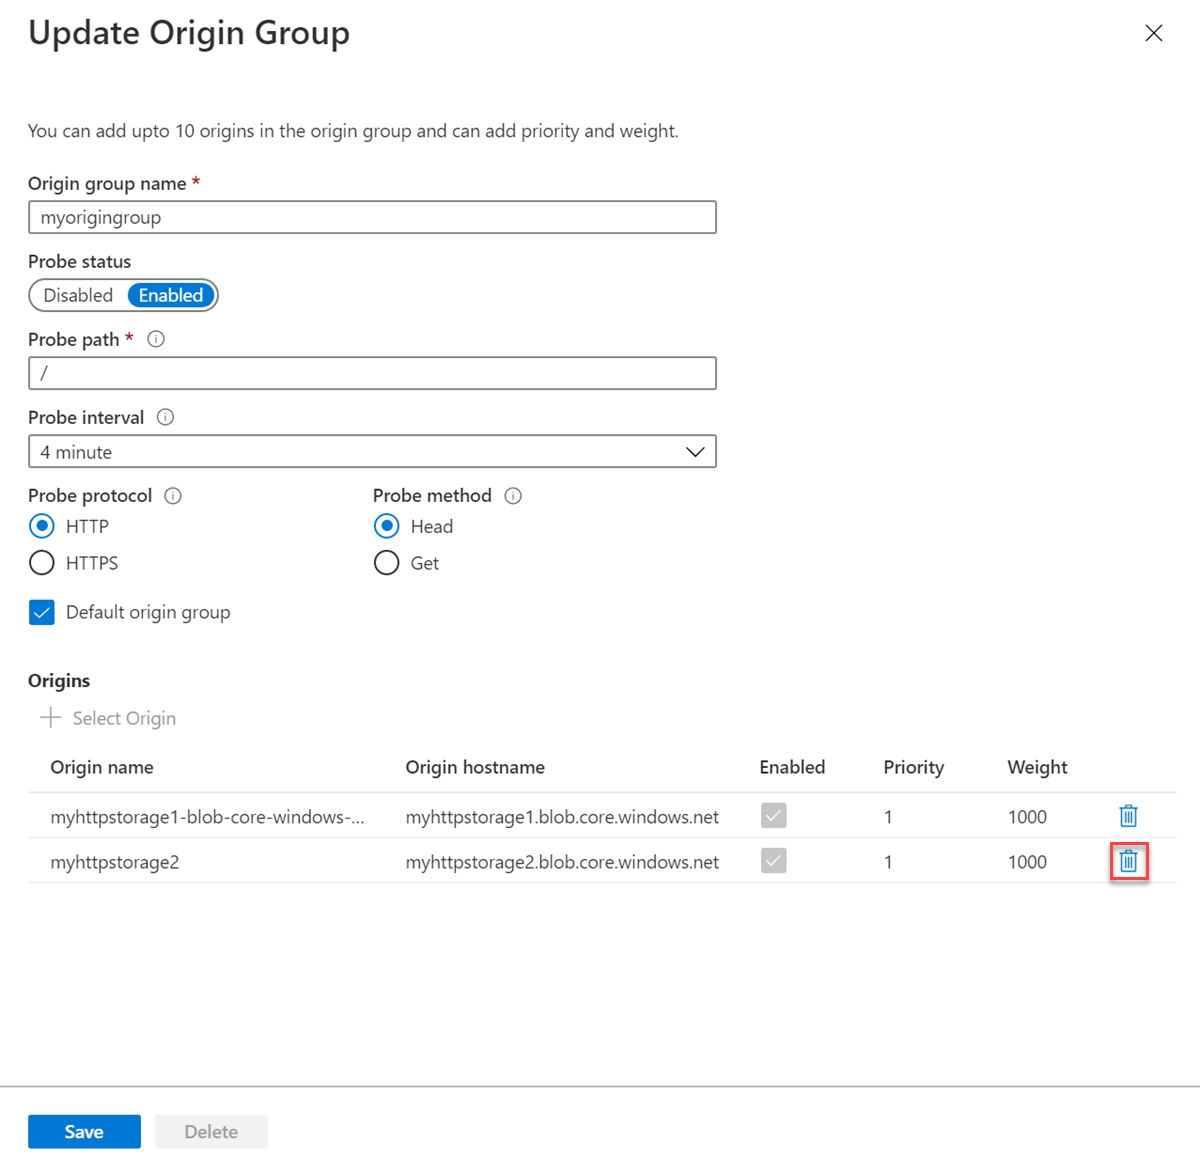
Once you have several origins and an origin group, you can add or remove the origins into different groups. Origins within the same group should serve similar workloads. Traffic is distributed into these origins based on their healthy status, priority, and weight value.
In the origin settings of the Azure CDN endpoint, select the name of the origin group you wish to configure.
In Update origin group, select + Select Origin.
Select the origin to be added to the group in the pull-down box and select OK.
Verify the origin has been added to the group, then select Save:

Remove origin from origin group
In the origin settings of the Azure CDN endpoint, select the name of the origin group.
To remove an origin from the origin group, select the trash can icon next to the origin and select Save:
Override origin group with rules engine
Customize how traffic is distributed to different origin groups by using the standard rules engine.
Distribute traffic to a different group based on the request URL.
In your CDN endpoint, select Rules engine under Settings.
Select + Add rule.
Enter a name for the rule in Name.
Select + Condition, then select URL path.
In the operator pull-down, select Contains.
In Value, enter /images.
Select + Add action, then select Origin group override.
In Origin group, select the origin group in the pull-down box.
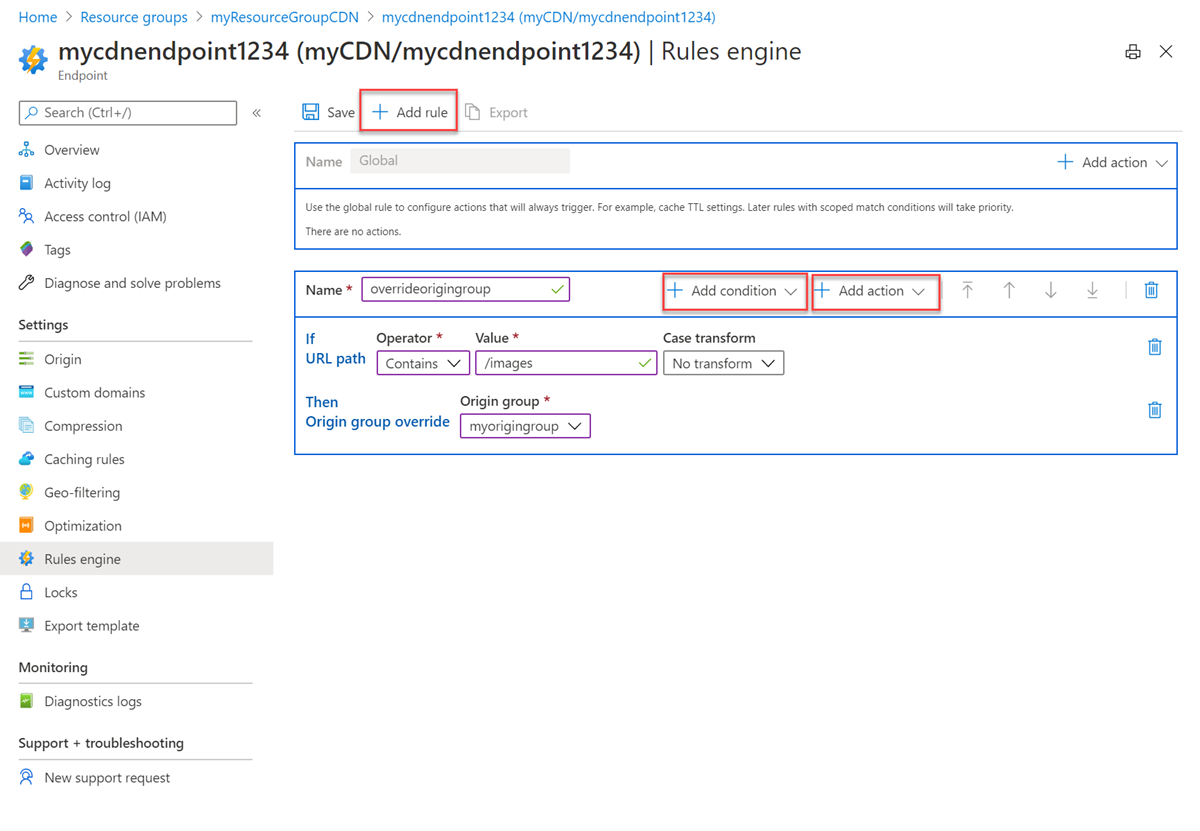
For all incoming requests if the URL path contains /images, then the request is assigned to the origin group in the action section (myorigingroup).
Next Steps
In this article, you enabled Azure CDN endpoint multi-origin.
For more information on Azure CDN and the other Azure services mentioned in this article, see: