Integrate Azure storage for notifications and backup
You can integrate your Custom Vision project with an Azure blob storage queue to get push notifications of project training/export activity. This feature is useful to avoid continually polling the service for results when long operations are running. Instead, you can integrate the storage queue notifications into your workflow.
You can also use Azure storage to store backup copies of your published models.
This guide shows you how to use these REST APIs with cURL. You can also use an HTTP request service, like the REST Client for Visual Studio Code, to make the requests.
Note
Push notifications depend on the optional notificationQueueUri parameter in the CreateProject API, and model backups require that you also use the optional exportModelContainerUri parameter. This guide will use both for the full set of features.
Prerequisites
- An Azure Custom Vision resource. If you don't have one, go to the Azure portal and create a new Custom Vision resource.
Note
This feature doesn't support the Azure AI services multi-service resource.
- An Azure Storage account with a blob container. Follow the Storage quickstart if you need help with this step.
- PowerShell version 6.0+, or a similar command-line application.
Set up Azure storage integration
Go to your Custom Vision training resource on the Azure portal, select the Identity page, and enable system assigned managed identity.
Next, go to your storage resource in the Azure portal. Go to the Access control (IAM) page and select Add role assignment (Preview). Then add a role assignment for either integration feature, or both:
- If you plan to use the model backup feature, select the Storage Blob Data Contributor role, and add your Custom Vision training resource as a member. Select Review + assign to complete.
- If you plan to use the notification queue feature, then select the Storage Queue Data Contributor role, and add your Custom Vision training resource as a member. Select Review + assign to complete.
For help with role assignments, see Assign Azure roles using the Azure portal.
Get integration URLs
Next, you'll get the URLs that allow your Custom Vision resource to access these endpoints.
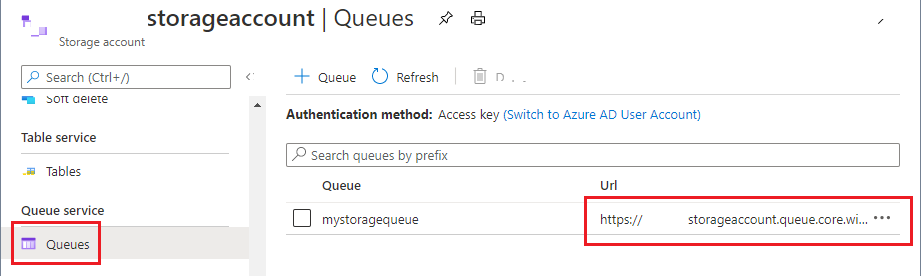
For the notification queue integration URL, go to the Queues page of your storage account, add a new queue, and save its URL to a temporary location.
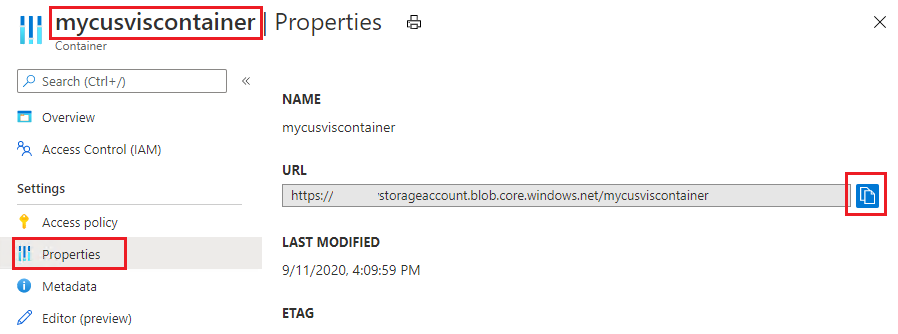
For the model backup integration URL, go to the Containers page of your storage account and create a new container. Then select it and go to the Properties page. Copy the URL to a temporary location.
Integrate a Custom Vision project
Now that you have the integration URLs, you can create a new Custom Vision project that integrates the Azure Storage features. You can also update an existing project to add the features.
When you call the CreateProject API, add the optional parameters exportModelContainerUri and notificationQueueUri. Assign the URL values you got in the previous section.
curl -v -X POST "{endpoint}/customvision/v3.3/Training/projects?exportModelContainerUri={inputUri}¬ificationQueueUri={inputUri}&name={inputName}"
-H "Training-key: {subscription key}"
If you receive a 200/OK response, that means the URLs have been set up successfully. You should see your URL values in the JSON response as well:
{
  "id": "00000000-0000-0000-0000-000000000000",
  "name": "string",
  "description": "string",
  "settings": {
    "domainId": "00000000-0000-0000-0000-000000000000",
    "classificationType": "Multiclass",
    "targetExportPlatforms": [
      "CoreML"
    ],
    "useNegativeSet": true,
    "detectionParameters": "string",
    "imageProcessingSettings": {
      "augmentationMethods": {}
},
"exportModelContainerUri": {url}
"notificationQueueUri": {url}
  },
  "created": "string",
  "lastModified": "string",
  "thumbnailUri": "string",
  "drModeEnabled": true,
  "status": "Succeeded"
}
Verify the connection
Your API call in the previous section should have already triggered new information in your Azure storage account.
In your designated container, there should be a test blob inside a CustomVision-TestPermission folder. This blob will only exist temporarily.
In your notification queue, you should see a test notification in the following format:
{
"version": "1.0" ,
"type": "ConnectionTest",
"Content":
    {
    "projectId": "00000000-0000-0000-0000-000000000000"
    }
}
Get event notifications
When you're ready, call the TrainProject API on your project to do an ordinary training operation.
In your Storage notification queue, you'll receive a notification once training finishes:
{
"version": "1.0" ,
"type": "Training",
"Content":
    {
    "projectId": "00000000-0000-0000-0000-000000000000",
    "iterationId": "00000000-0000-0000-0000-000000000000",
    "trainingStatus": "TrainingCompleted"
    }
}
The "trainingStatus" field may be either "TrainingCompleted" or "TrainingFailed". The "iterationId" field is the ID of the trained model.
Get model export backups
When you're ready, call the ExportIteration API to export a trained model into a specified platform.
In your designated storage container, a backup copy of the exported model will appear. The blob name will have the format:
{projectId} - {iterationId}.{platformType}
Also, you'll receive a notification in your queue when the export finishes.
{
"version": "1.0" ,
"type": "Export",
"Content":
    {
    "projectId": "00000000-0000-0000-0000-000000000000",
    "iterationId": "00000000-0000-0000-0000-000000000000",
    "exportStatus": "ExportCompleted",
    "modelUri": {url}
    }
}
The "exportStatus" field may be either "ExportCompleted" or "ExportFailed". The "modelUri" field will contain the URL of the backup model stored in your container, assuming you integrated queue notifications in the beginning. If you didn't, the "modelUri" field will show the SAS URL for your Custom Vision model blob.
Next steps
In this guide, you learned how to copy and back up a project between Custom Vision resources. Next, explore the API reference docs to see what else you can do with Custom Vision.
Feedback
Coming soon: Throughout 2024 we will be phasing out GitHub Issues as the feedback mechanism for content and replacing it with a new feedback system. For more information see: https://aka.ms/ContentUserFeedback.
Submit and view feedback for