Tutorial: Use Azure AI Vision to generate image metadata in Azure Storage
In this tutorial, you'll learn how to integrate the Azure AI Vision service into a web app to generate metadata for uploaded images. This is useful for digital asset management (DAM) scenarios, such as if a company wants to quickly generate descriptive captions or searchable keywords for all of its images.
You'll use Visual Studio to write an MVC Web app that accepts images uploaded by users and stores the images in Azure blob storage. You'll learn how to read and write blobs in C# and use blob metadata to attach additional information to the blobs you create. Then you'll submit each image uploaded by the user to the Azure AI Vision API to generate a caption and search metadata for the image. Finally, you can deploy the app to the cloud using Visual Studio.
This tutorial shows you how to:
- Create a storage account and storage containers using the Azure portal
- Create a Web app in Visual Studio and deploy it to Azure
- Use the Azure AI Vision API to extract information from images
- Attach metadata to Azure Storage images
- Check image metadata using Azure Storage Explorer
Tip
The section Use Azure AI Vision to generate metadata is most relevant to Image Analysis. Skip to there if you just want to see how Image Analysis is integrated into an established application.
If you don't have an Azure subscription, create a free account before you begin.
Prerequisites
- Visual Studio 2017 Community edition or higher, with the "ASP.NET and web development" and "Azure development" workloads installed.
- The Azure Storage Explorer tool installed.
Create a storage account
In this section, you'll use the Azure portal to create a storage account. Then you'll create a pair of containers: one to store images uploaded by the user, and another to store image thumbnails generated from the uploaded images.
Sign in to the Azure portal in your browser. If you're asked to sign in, do so using your Microsoft account.
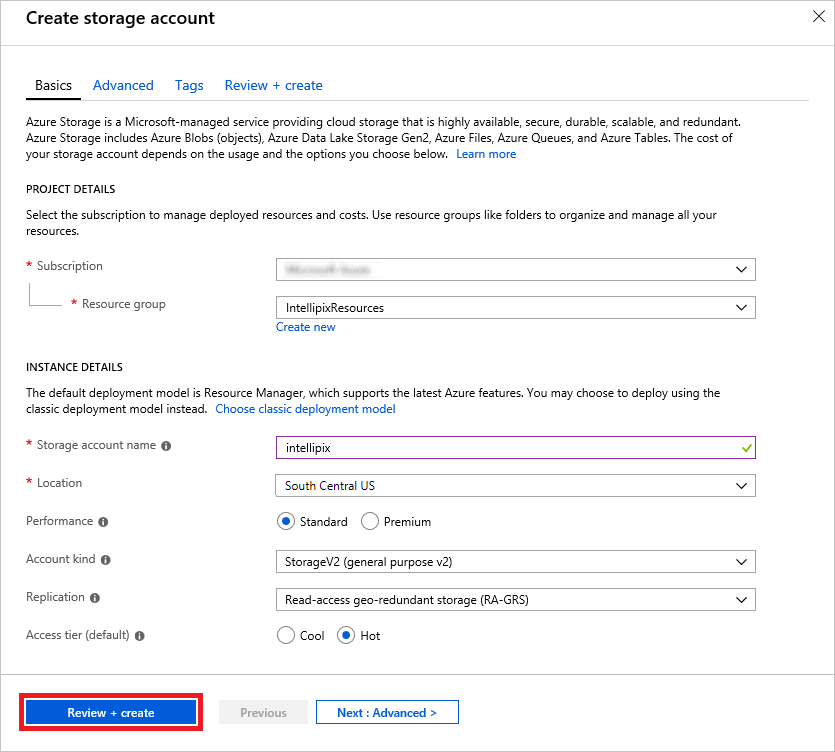
To create a storage account, select + Create a resource in the ribbon on the left. Then select Storage, followed by Storage account.

Enter a unique name for the storage account in Name field and make sure a green check mark appears next to it. The name is important, because it forms one part of the URL through which blobs created under this account are accessed. Place the storage account in a new resource group named "IntellipixResources," and select the region nearest you. Finish by selecting the Review + create button at the bottom of the screen to create the new storage account.
Note
Storage account names can be 3 to 24 characters in length and can only contain numbers and lowercase letters. In addition, the name you enter must be unique within Azure. If someone else has chosen the same name, you'll be notified that the name isn't available with a red exclamation mark in the Name field.
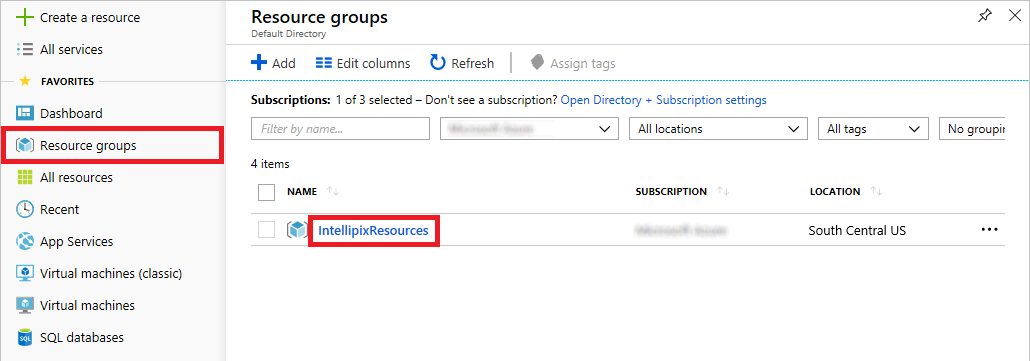
Select Resource groups in the ribbon on the left. Then select the "IntellipixResources" resource group.
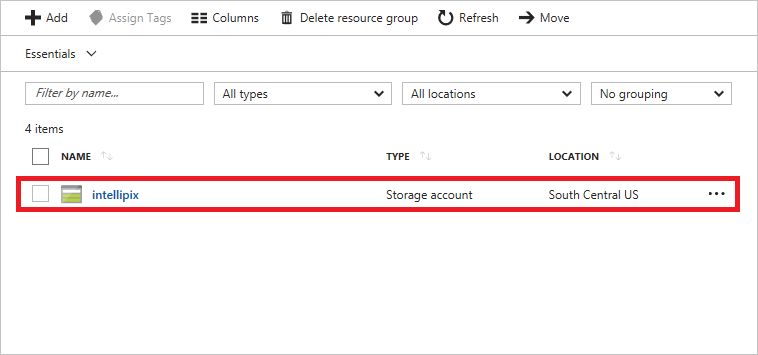
In the tab that opens for the resource group, select the storage account you created. If the storage account isn't there yet, you can select Refresh at the top of the tab until it appears.
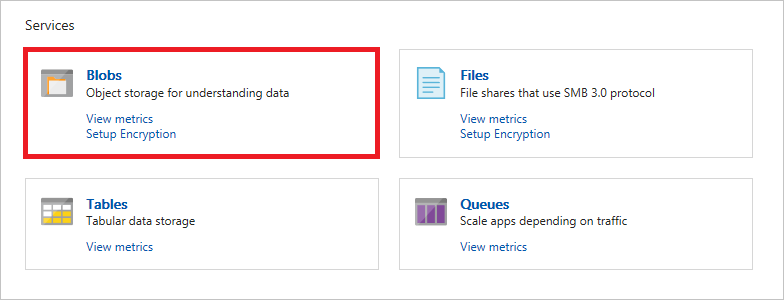
In the tab for the storage account, select Blobs to view a list of containers associated with this account.
The storage account currently has no containers. Before you can create a blob, you must create a container to store it in. Select + Container to create a new container. Type
photosinto the Name field and select Blob as the Public access level. Then select OK to create a container named "photos."By default, containers and their contents are private. Selecting Blob as the access level makes the blobs in the "photos" container publicly accessible, but doesn't make the container itself public. This is what you want because the images stored in the "photos" container will be linked to from a Web app.
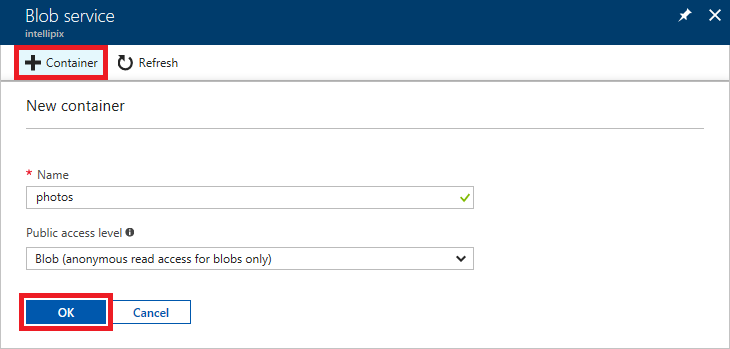
Repeat the previous step to create a container named "thumbnails," once more ensuring that the container's Public access level is set to Blob.
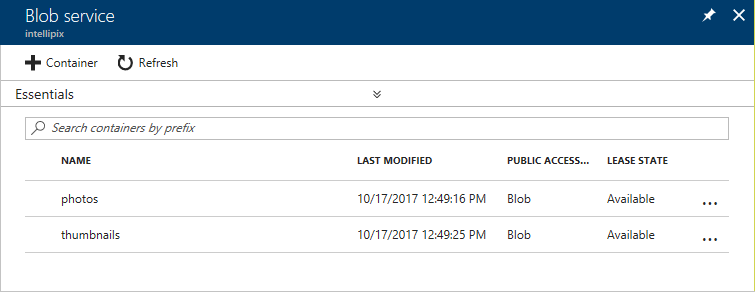
Confirm that both containers appear in the list of containers for this storage account, and that the names are spelled correctly.
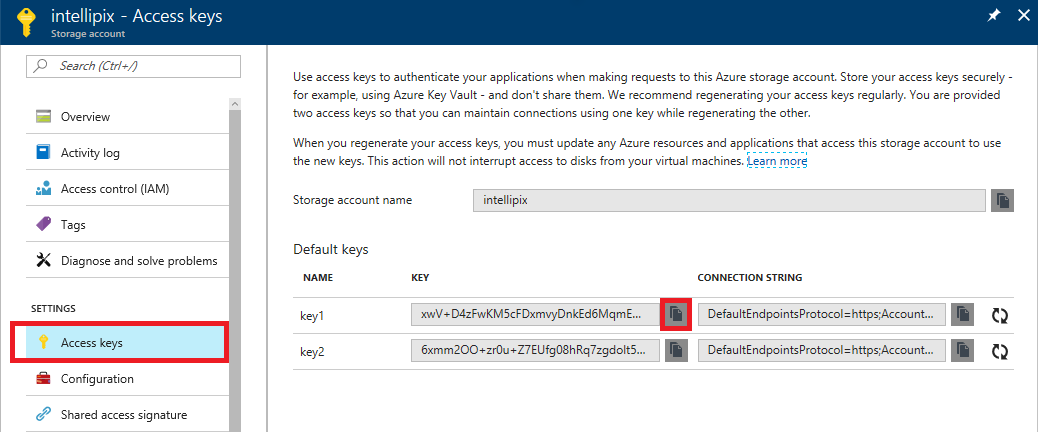
Close the "Blob service" screen. Select Access keys in the menu on the left side of the storage-account screen, and then select the Copy button next to KEY for key1. Paste this access key into your favorite text editor for later use.
You've now created a storage account to hold images uploaded to the app you're going to build, and containers to store the images in.
Run Azure Storage Explorer
Azure Storage Explorer is a free tool that provides a graphical interface for working with Azure Storage on PCs running Windows, macOS, and Linux. It provides most of the same functionality as the Azure portal and offers other features like the ability to view blob metadata. In this section, you'll use the Microsoft Azure Storage Explorer to view the containers you created in the previous section.
If you haven't installed Storage Explorer or would like to make sure you're running the latest version, go to http://storageexplorer.com/ and download and install it.
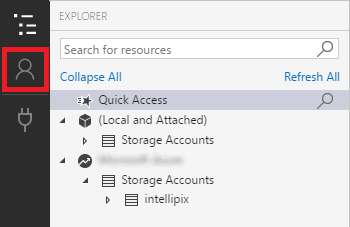
Start Storage Explorer. If you're asked to sign in, do so using your Microsoft account—the same one that you used to sign in to the Azure portal. If you don't see the storage account in Storage Explorer's left pane, select the Manage Accounts button highlighted below and make sure both your Microsoft account and the subscription used to create the storage account have been added to Storage Explorer.
Select the small arrow next to the storage account to display its contents, and then select the arrow next to Blob Containers. Confirm that the containers you created appear in the list.
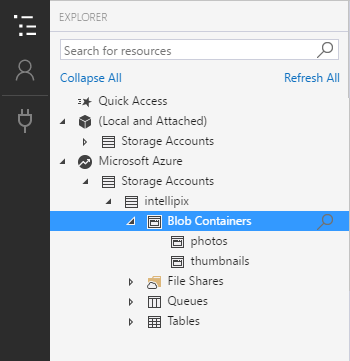
The containers are currently empty, but that will change once your app is deployed and you start uploading photos. Having Storage Explorer installed will make it easy for you to see what your app writes to blob storage.
Create a new Web app in Visual Studio
In this section, you'll create a new Web app in Visual Studio and add code to implement the basic functionality required to upload images, write them to blob storage, and display them in a Web page.
Start Visual Studio and use the File -> New -> Project command to create a new Visual C# ASP.NET Web Application project named "Intellipix" (short for "Intelligent Pictures").
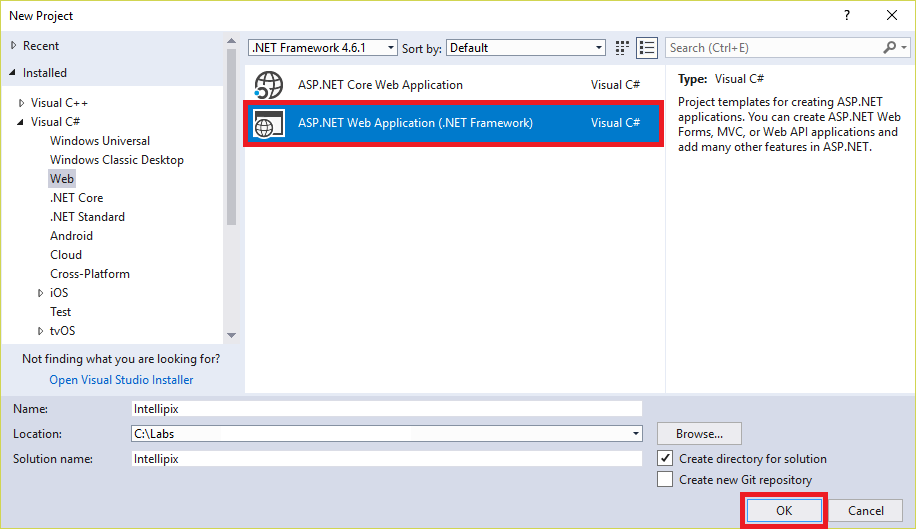
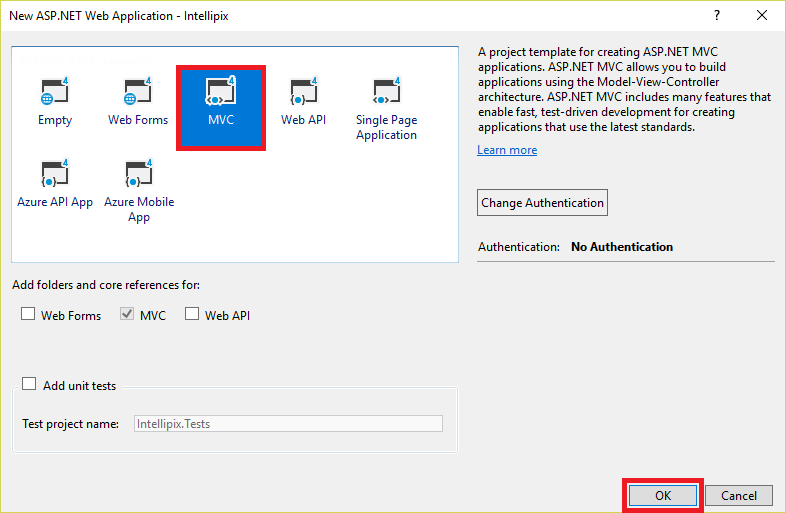
In the "New ASP.NET Web Application" dialog, make sure MVC is selected. Then select OK.
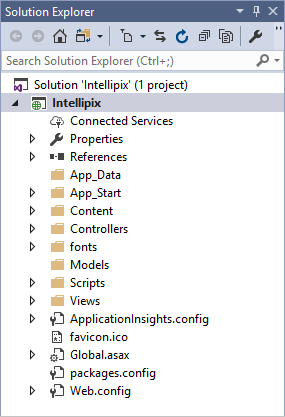
Take a moment to review the project structure in Solution Explorer. Among other things, there's a folder named Controllers that holds the project's MVC controllers, and a folder named Views that holds the project's views. You'll be working with assets in these folders and others as you implement the application.
Use Visual Studio's Debug -> Start Without Debugging command (or press Ctrl+F5) to launch the application in your browser. Here's how the application looks in its present state:
Close the browser and return to Visual Studio. In Solution Explorer, right-click the Intellipix project and select Manage NuGet Packages.... Select Browse. Then type
imageresizerinto the search box and select the NuGet package named ImageResizer. Finally, select Install to install the latest stable version of the package. ImageResizer contains APIs that you'll use to create image thumbnails from the images uploaded to the app. OK any changes and accept any licenses presented to you.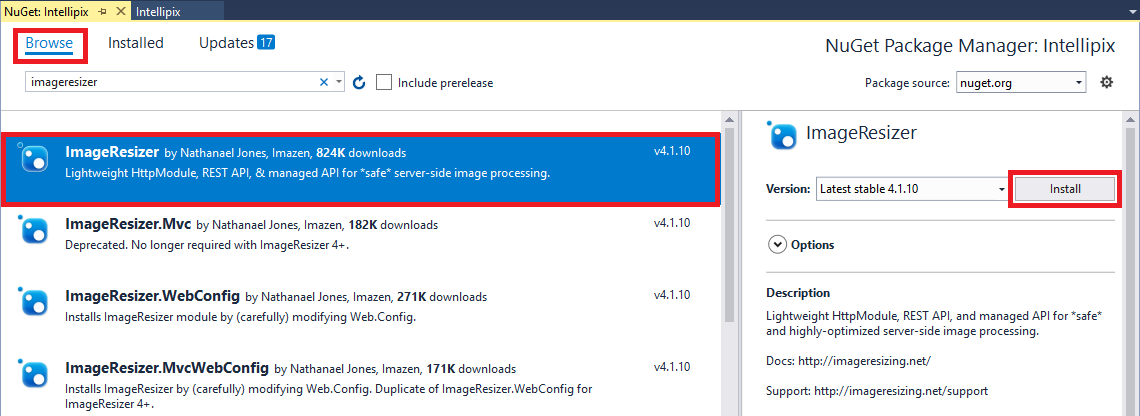
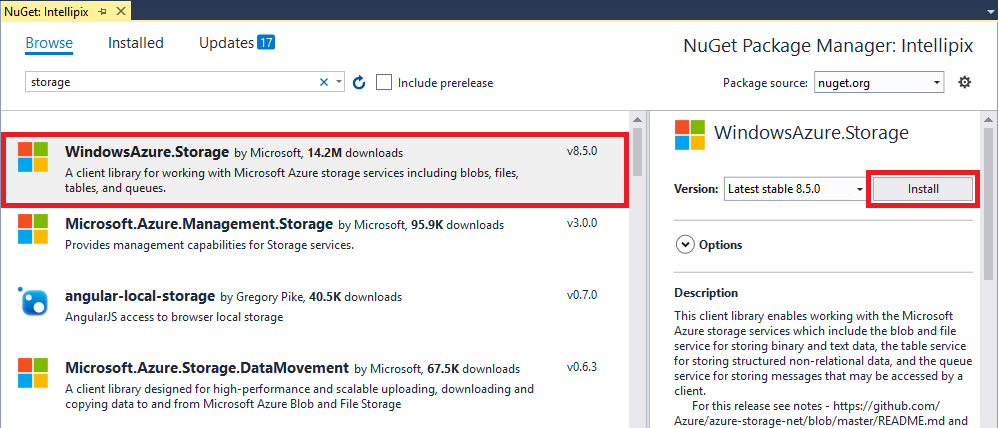
Repeat this process to add the NuGet package named WindowsAzure.Storage to the project. This package contains APIs for accessing Azure Storage from .NET applications. OK any changes and accept any licenses presented to you.
Open Web.config and add the following statement to the
<appSettings>section, replacing ACCOUNT_NAME with the name of the storage account you created in the first section, and ACCOUNT_KEY with the access key you saved.<add key="StorageConnectionString" value="DefaultEndpointsProtocol=https;AccountName=ACCOUNT_NAME;AccountKey=ACCOUNT_KEY" />Important
The Web.config file is meant to hold sensitive information like your subscription keys, and any HTTP request to a file with the .config extension is handled by the ASP.NET engine, which returns a "This type of page is not served" message. However, if an attacker is able to find some other exploit that allows them to view your Web.config contents, then they'll be able to expose that information. See Protecting Connection Strings and Other Configuration Information for extra steps you can take to further secure your Web.config data.
Open the file named _Layout.cshtml in the project's Views/Shared folder. On line 19, change "Application name" to "Intellipix." The line should look like this:
@Html.ActionLink("Intellipix", "Index", "Home", new { area = "" }, new { @class = "navbar-brand" })Note
In an ASP.NET MVC project, _Layout.cshtml is a special view that serves as a template for other views. You typically define header and footer content that is common to all views in this file.
Right-click the project's Models folder and use the Add -> Class... command to add a class file named BlobInfo.cs to the folder. Then replace the empty BlobInfo class with the following class definition:
public class BlobInfo
{
    public string ImageUri { get; set; }
    public string ThumbnailUri { get; set; }
    public string Caption { get; set; }
}
Open HomeController.cs from the project's Controllers folder and add the following
usingstatements to the top of the file:using ImageResizer; using Intellipix.Models; using Microsoft.WindowsAzure.Storage; using Microsoft.WindowsAzure.Storage.Blob; using System.Configuration; using System.Threading.Tasks; using System.IO;Replace the Index method in HomeController.cs with the following implementation:
public ActionResult Index()
{
    // Pass a list of blob URIs in ViewBag
    CloudStorageAccount account = CloudStorageAccount.Parse(ConfigurationManager.AppSettings["StorageConnectionString"]);
    CloudBlobClient client = account.CreateCloudBlobClient();
    CloudBlobContainer container = client.GetContainerReference("photos");
    List<BlobInfo> blobs = new List<BlobInfo>();

    foreach (IListBlobItem item in container.ListBlobs())
    {
        var blob = item as CloudBlockBlob;

        if (blob != null)
        {
            blobs.Add(new BlobInfo()
            {
                ImageUri = blob.Uri.ToString(),
                ThumbnailUri = blob.Uri.ToString().Replace("/photos/", "/thumbnails/")
            });
        }
    }

    ViewBag.Blobs = blobs.ToArray();
    return View();
}
The new Index method enumerates the blobs in the
"photos"container and passes an array of BlobInfo objects representing those blobs to the view through ASP.NET MVC's ViewBag property. Later, you'll modify the view to enumerate these objects and display a collection of photo thumbnails. The classes you'll use to access your storage account and enumerate the blobs—CloudStorageAccount, CloudBlobClient, and CloudBlobContainer—come from the WindowsAzure.Storage package you installed through NuGet.Add the following method to the HomeController class in HomeController.cs:
[HttpPost]
public async Task<ActionResult> Upload(HttpPostedFileBase file)
{
    if (file != null && file.ContentLength > 0)
    {
        // Make sure the user selected an image file
        if (!file.ContentType.StartsWith("image"))
        {
            TempData["Message"] = "Only image files may be uploaded";
        }
        else
        {
            try
            {
                // Save the original image in the "photos" container
                CloudStorageAccount account = CloudStorageAccount.Parse(ConfigurationManager.AppSettings["StorageConnectionString"]);
                CloudBlobClient client = account.CreateCloudBlobClient();
                CloudBlobContainer container = client.GetContainerReference("photos");
                CloudBlockBlob photo = container.GetBlockBlobReference(Path.GetFileName(file.FileName));
                await photo.UploadFromStreamAsync(file.InputStream);

                // Generate a thumbnail and save it in the "thumbnails" container
                using (var outputStream = new MemoryStream())
                {
                    file.InputStream.Seek(0L, SeekOrigin.Begin);
                    var settings = new ResizeSettings { MaxWidth = 192 };
                    ImageBuilder.Current.Build(file.InputStream, outputStream, settings);
                    outputStream.Seek(0L, SeekOrigin.Begin);
                    container = client.GetContainerReference("thumbnails");
                    CloudBlockBlob thumbnail = container.GetBlockBlobReference(Path.GetFileName(file.FileName));
                    await thumbnail.UploadFromStreamAsync(outputStream);
                }
            }
            catch (Exception ex)
            {
                // In case something goes wrong
                TempData["Message"] = ex.Message;
            }
        }
    }

    return RedirectToAction("Index");
}
This is the method that's called when you upload a photo. It stores each uploaded image as a blob in the
"photos"container, creates a thumbnail image from the original image using theImageResizerpackage, and stores the thumbnail image as a blob in the"thumbnails"container.Open Index.cshmtl in the project's Views/Home folder and replace its contents with the following code and markup:
@{
    ViewBag.Title = "Intellipix Home Page";
}

@using Intellipix.Models

<div class="container" style="padding-top: 24px">
    <div class="row">
        <div class="col-sm-8">
            @using (Html.BeginForm("Upload", "Home", FormMethod.Post, new { enctype = "multipart/form-data" }))
            {
                <input type="file" name="file" id="upload" style="display: none" onchange="$('#submit').click();" />
                <input type="button" value="Upload a Photo" class="btn btn-primary btn-lg" onclick="$('#upload').click();" />
                <input type="submit" id="submit" style="display: none" />
            }
        </div>
        <div class="col-sm-4 pull-right">
        </div>
    </div>

    <hr />

    <div class="row">
        <div class="col-sm-12">
            @foreach (BlobInfo blob in ViewBag.Blobs)
            {
                <img src="@blob.ThumbnailUri" width="192" title="@blob.Caption" style="padding-right: 16px; padding-bottom: 16px" />
            }
        </div>
    </div>
</div>

@section scripts
{
    <script type="text/javascript" language="javascript">
        if ("@TempData["Message"]" !== "") {
            alert("@TempData["Message"]");
        }
    </script>
}
The language used here is Razor, which lets you embed executable code in HTML markup. The
@foreachstatement in the middle of the file enumerates the BlobInfo objects passed from the controller in ViewBag and creates HTML<img>elements from them. Thesrcproperty of each element is initialized with the URI of the blob containing the image thumbnail.Download and unzip the photos.zip file from the GitHub sample data repository. This is an assortment of different photos you can use to test the app.
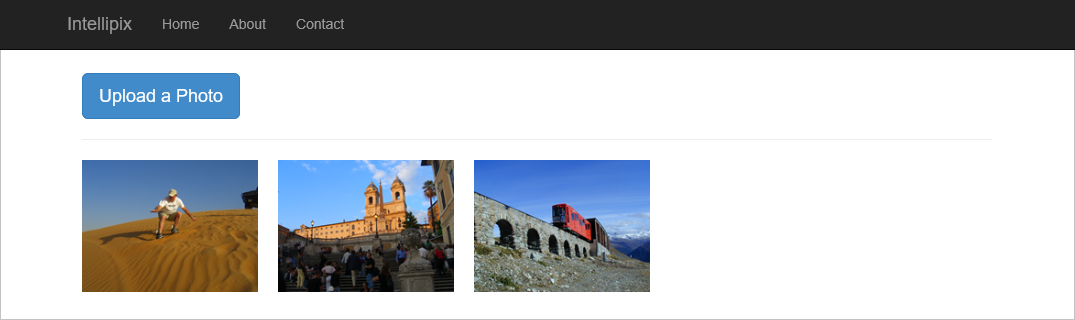
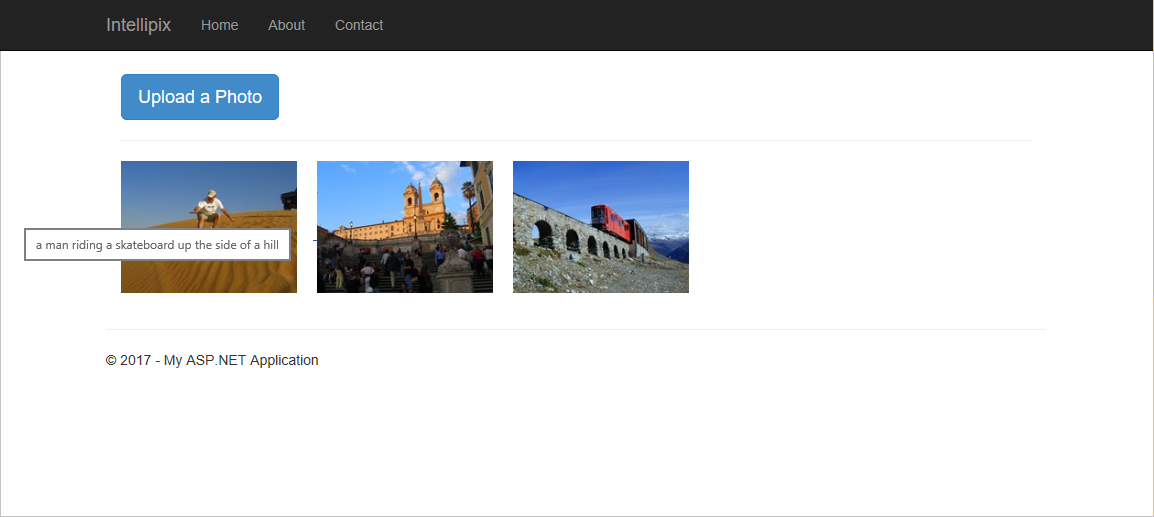
Save your changes and press Ctrl+F5 to launch the application in your browser. Then select Upload a Photo and upload one of the images you downloaded. Confirm that a thumbnail version of the photo appears on the page.
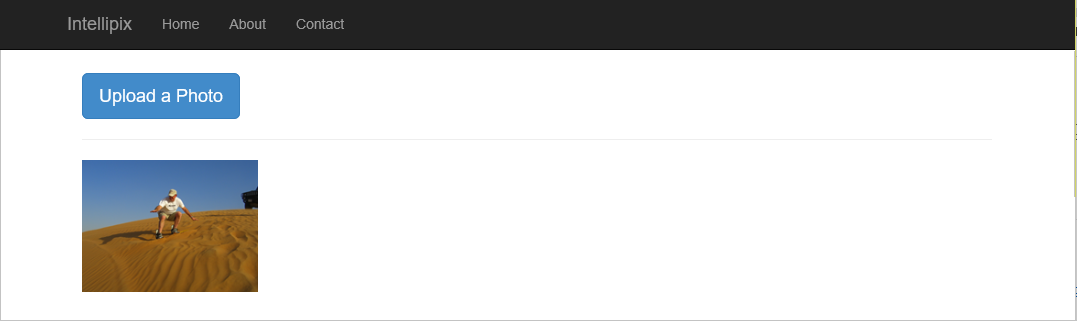
Upload a few more images from your photos folder. Confirm that they appear on the page, too:
Right-click in your browser and select View page source to view the source code for the page. Find the
<img>elements representing the image thumbnails. Observe that the URLs assigned to the images refer directly to blobs in blob storage. This is because you set the containers' Public access level to Blob, which makes the blobs inside publicly accessible.Return to Azure Storage Explorer (or restart it if you didn't leave it running) and select the
"photos"container under your storage account. The number of blobs in the container should equal the number of photos you uploaded. Double-click one of the blobs to download it and see the image stored in the blob.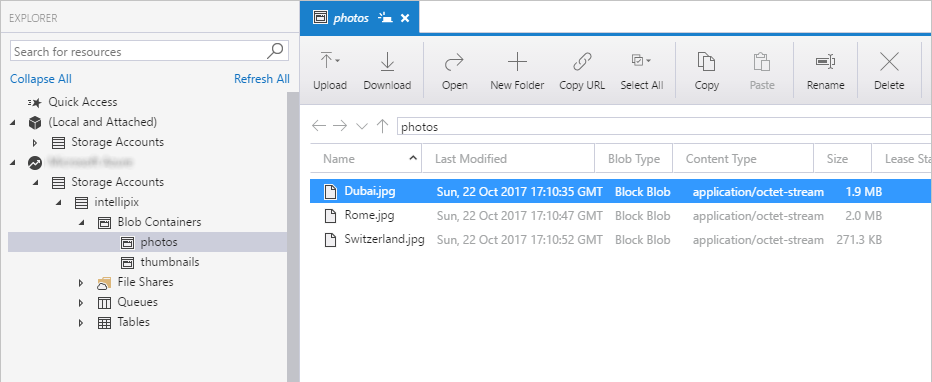
Open the
"thumbnails"container in Storage Explorer. Open one of the blobs to view the thumbnail images generated from the image uploads.
The app doesn't yet offer a way to view the original images that you uploaded. Ideally, selecting an image thumbnail should display the original image. You'll add that feature next.
Add a lightbox for viewing photos
In this section, you'll use a free, open-source JavaScript library to add a lightbox viewer that enables users to see the original images they've uploaded (rather than just the image thumbnails). The files are provided for you. All you have to do is integrate them into the project and make a minor modification to Index.cshtml.
Download the lightbox.css and lightbox.js files from the GitHub code repository.
In Solution Explorer, right-click your project's Scripts folder and use the Add -> New Item... command to create a lightbox.js file. Paste in the contents from the example file in the GitHub code repository.
Right-click the project's "Content" folder and use the Add -> New Item... command create a lightbox.css file. Paste in the contents from the example file in the GitHub code repository.
Download and unzip the buttons.zip file from the GitHub data files repository: https://github.com/Azure-Samples/cognitive-services-sample-data-files/tree/master/ComputerVision/storage-lab-tutorial. You should have four button images.
Right-click the Intellipix project in Solution Explorer and use the Add -> New Folder command to add a folder named "Images" to the project.
Right-click the Images folder and use the Add -> Existing Item... command to import the four images you downloaded.
Open BundleConfig.cs in the project's "App_Start" folder. Add the following statement to the
RegisterBundlesmethod in BundleConfig.cs:bundles.Add(new ScriptBundle("~/bundles/lightbox").Include( "~/Scripts/lightbox.js"));In the same method, find the statement that creates a
StyleBundlefrom "~/Content/css" and add lightbox.css to the list of style sheets in the bundle. Here is the modified statement:bundles.Add(new StyleBundle("~/Content/css").Include( "~/Content/bootstrap.css", "~/Content/site.css", "~/Content/lightbox.css"));Open _Layout.cshtml in the project's Views/Shared folder and add the following statement just before the
@RenderSectionstatement near the bottom:@Scripts.Render("~/bundles/lightbox")The final task is to incorporate the lightbox viewer into the home page. To do that, open Index.cshtml (it's in the project's Views/Home folder) and replace the
@foreachloop with this one:@foreach (BlobInfo blob in ViewBag.Blobs) { <a href="@blob.ImageUri" rel="lightbox" title="@blob.Caption"> <img src="@blob.ThumbnailUri" width="192" title="@blob.Caption" style="padding-right: 16px; padding-bottom: 16px" /> </a> }Save your changes and press Ctrl+F5 to launch the application in your browser. Then select one of the images you uploaded earlier. Confirm that a lightbox appears and shows an enlarged view of the image.

Select the X in the lower-right corner of the lightbox to dismiss it.
Now you have a way to view the images you uploaded. The next step is to do more with those images.
Use Azure AI Vision to generate metadata
Create a Vision resource
You'll need to create a Computer Vision resource for your Azure account; this resource manages your access to Azure's Azure AI Vision service.
Follow the instructions in Create an Azure AI services resource to create a multi-service resource or a Vision resource.
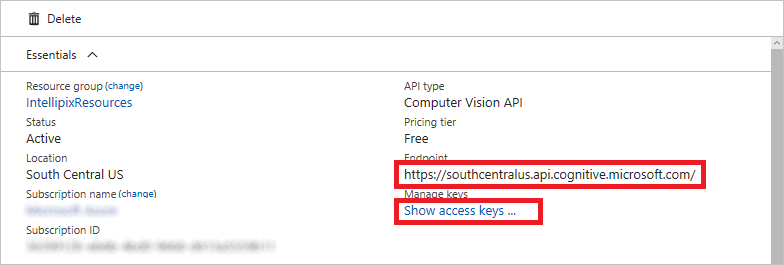
Then go to the menu for your resource group and select the Vision resource that you created. Copy the URL under Endpoint to somewhere you can easily retrieve it in a moment. Then select Show access keys.
Note
New resources created after July 1, 2019, will use custom subdomain names. For more information and a complete list of regional endpoints, see Custom subdomain names for Azure AI services.
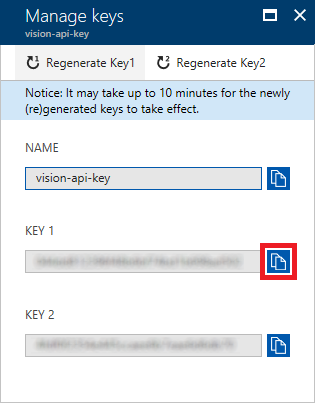
In the next window, copy the value of KEY 1 to the clipboard.
Add Azure AI Vision credentials
Next, you'll add the required credentials to your app so that it can access Vision resources.
Navigate to the Web.config file at the root of the project. Add the following statements to the <appSettings> section of the file, replacing VISION_KEY with the key you copied in the previous step, and VISION_ENDPOINT with the URL you saved in the step before.
<add key="SubscriptionKey" value="VISION_KEY" />
<add key="VisionEndpoint" value="VISION_ENDPOINT" />
In the Solution Explorer. right-click on the project solution and select Manage NuGet Packages. In the package manager that opens select Browse, check Include prerelease, and search for Azure.AI.Vision.ImageAnalysis. Select Install.
Add metadata generation code
Next, you'll add the code that actually uses the Azure AI Vision service to create metadata for images.
Open the HomeController.cs file in the project's Controllers folder and add the following
usingstatements at the top of the file:using Azure; using Azure.AI.Vision.ImageAnalysis; using System;Then, go to the Upload method; this method converts and uploads images to blob storage. Add the following code immediately after the block that begins with
// Generate a thumbnail(or at the end of your image-blob-creation process). This code takes the blob containing the image (photo), and uses Azure AI Vision to generate a description for that image. The Azure AI Vision API also generates a list of keywords that apply to the image. The generated description and keywords are stored in the blob's metadata so that they can be retrieved later on.// create a new ImageAnalysisClient ImageAnalysisClient client = new ImageAnalysisClient( new Uri(Environment.GetEnvironmentVariable(ConfigurationManager.AppSettings["VisionEndpoint"])), new AzureKeyCredential(ConfigurationManager.AppSettings["SubscriptionKey"])); VisualFeatures = visualFeatures = VisualFeatures.Caption | VisualFeatures.Tags; ImageAnalysisOptions analysisOptions = new ImageAnalysisOptions() { GenderNeutralCaption = true, Language = "en", }; Uri imageURL = new Uri(photo.Uri.ToString()); ImageAnalysisResult result = client.Analyze(imageURL,visualFeatures,analysisOptions); // Record the image description and tags in blob metadata photo.Metadata.Add("Caption", result.Caption.Text); for (int i = 0; i < result.Tags.Values.Count; i++) { string key = String.Format("Tag{0}", i); photo.Metadata.Add(key, result.Tags.Values[i]); } await photo.SetMetadataAsync();Next, go to the Index method in the same file. This method enumerates the stored image blobs in the targeted blob container (as IListBlobItem instances) and passes them to the application view. Replace the
foreachblock in this method with the following code. This code calls CloudBlockBlob.FetchAttributes to get each blob's attached metadata. It extracts the computer-generated description (caption) from the metadata and adds it to the BlobInfo object, which gets passed to the view.foreach (IListBlobItem item in container.ListBlobs()) { var blob = item as CloudBlockBlob; if (blob != null) { blob.FetchAttributes(); // Get blob metadata var caption = blob.Metadata.ContainsKey("Caption") ? blob.Metadata["Caption"] : blob.Name; blobs.Add(new BlobInfo() { ImageUri = blob.Uri.ToString(), ThumbnailUri = blob.Uri.ToString().Replace("/photos/", "/thumbnails/"), Caption = caption }); } }
Test the app
Save your changes in Visual Studio and press Ctrl+F5 to launch the application in your browser. Use the app to upload a few more images, either from the photo set you downloaded or from your own folder. When you hover the cursor over one of the new images in the view, a tooltip window should appear and display the computer-generated caption for the image.
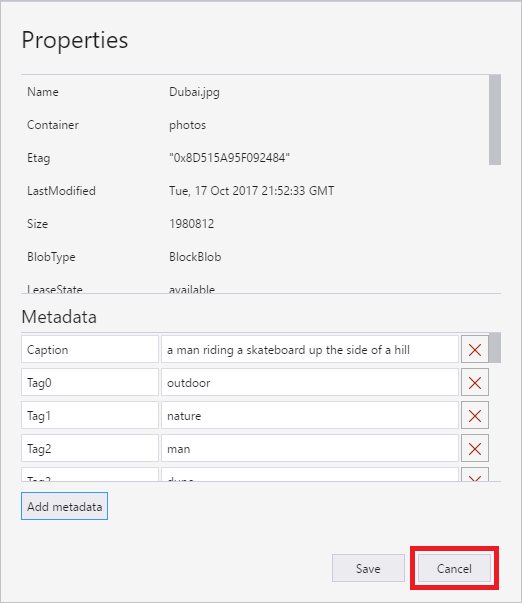
To view all of the attached metadata, use Azure Storage Explorer to view the storage container you're using for images. Right-click any of the blobs in the container and select Properties. In the dialog, you'll see a list of key-value pairs. The computer-generated image description is stored in the item Caption, and the search keywords are stored in Tag0, Tag1, and so on. When you're finished, select Cancel to close the dialog.
Add search to the app
In this section, you will add a search box to the home page, enabling users to do keyword searches on the images that they've uploaded. The keywords are the ones generated by the Azure AI Vision API and stored in blob metadata.
Open Index.cshtml in the project's Views/Home folder and add the following statements to the empty
<div>element with theclass="col-sm-4 pull-right"attribute:@using (Html.BeginForm("Search", "Home", FormMethod.Post, new { enctype = "multipart/form-data", @class = "navbar-form" })) { <div class="input-group"> <input type="text" class="form-control" placeholder="Search photos" name="term" value="@ViewBag.Search" style="max-width: 800px"> <span class="input-group-btn"> <button class="btn btn-primary" type="submit"> <i class="glyphicon glyphicon-search"></i> </button> </span> </div> }This code and markup adds a search box and a Search button to the home page.
Open HomeController.cs in the project's Controllers folder and add the following method to the HomeController class:
[HttpPost]
public ActionResult Search(string term)
{
    return RedirectToAction("Index", new { id = term });
}
This is the method that's called when the user selects the Search button added in the previous step. It refreshes the page and includes a search parameter in the URL.
Replace the Index method with the following implementation:
public ActionResult Index(string id)
{
    // Pass a list of blob URIs and captions in ViewBag
    CloudStorageAccount account = CloudStorageAccount.Parse(ConfigurationManager.AppSettings["StorageConnectionString"]);
    CloudBlobClient client = account.CreateCloudBlobClient();
    CloudBlobContainer container = client.GetContainerReference("photos");
    List<BlobInfo> blobs = new List<BlobInfo>();

    foreach (IListBlobItem item in container.ListBlobs())
    {
        var blob = item as CloudBlockBlob;

        if (blob != null)
        {
            blob.FetchAttributes(); // Get blob metadata

            if (String.IsNullOrEmpty(id) || HasMatchingMetadata(blob, id))
            {
                var caption = blob.Metadata.ContainsKey("Caption") ? blob.Metadata["Caption"] : blob.Name;

                blobs.Add(new BlobInfo()
                {
                    ImageUri = blob.Uri.ToString(),
                    ThumbnailUri = blob.Uri.ToString().Replace("/photos/", "/thumbnails/"),
                    Caption = caption
                });
            }
        }
    }

    ViewBag.Blobs = blobs.ToArray();
    ViewBag.Search = id; // Prevent search box from losing its content
    return View();
}
Observe that the Index method now accepts a parameter
idthat contains the value the user typed into the search box. An empty or missingidparameter indicates that all the photos should be displayed.Add the following helper method to the HomeController class:
private bool HasMatchingMetadata(CloudBlockBlob blob, string term)
{
    foreach (var item in blob.Metadata)
    {
        if (item.Key.StartsWith("Tag") && item.Value.Equals(term, StringComparison.InvariantCultureIgnoreCase))
            return true;
    }

    return false;
}
This method is called by the Index method to determine whether the metadata keywords attached to a given image blob contain the search term that the user entered.
Launch the application again and upload several photos. Feel free to use your own photos, not just the ones provided with the tutorial.
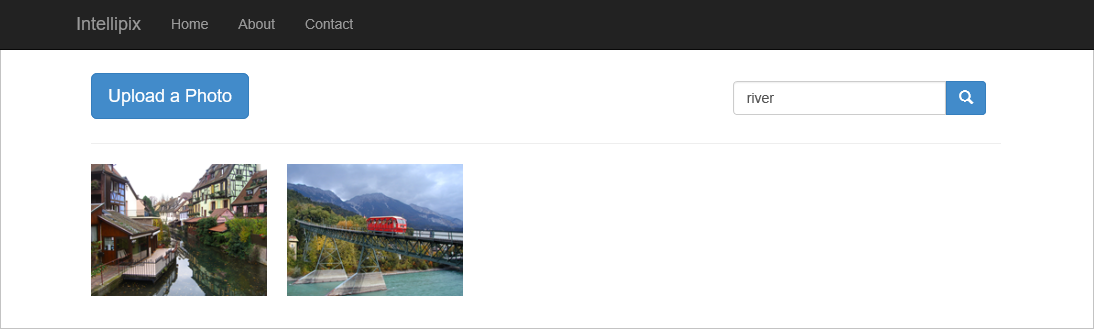
Type a keyword such as "river" into the search box. Then select the Search button.
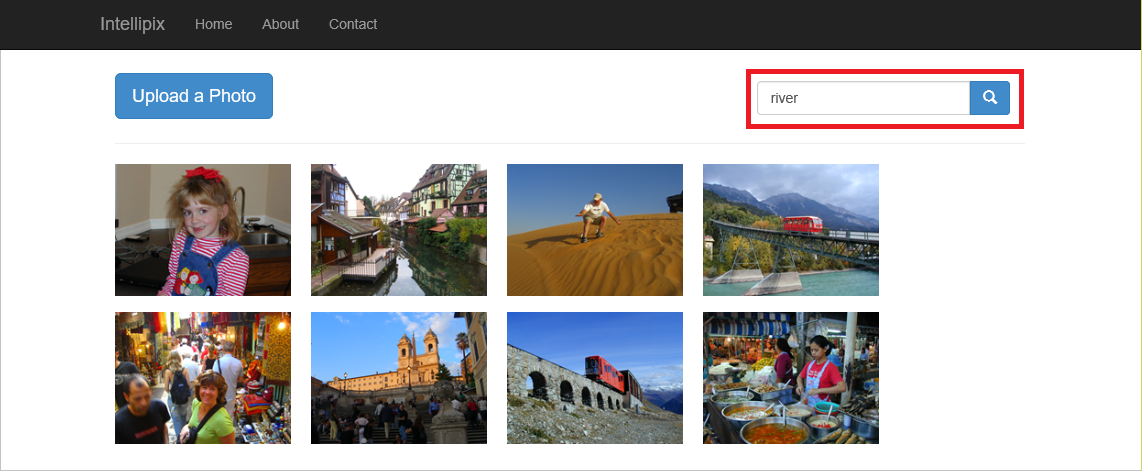
Search results will vary depending on what you typed and what images you uploaded. But the result should be a filtered list of images whose metadata keywords include all or part of the keyword that you typed.
Select the browser's back button to display all of the images again.
You're almost finished. It's time to deploy the app to the cloud.
Deploy the app to Azure
In this section, you'll deploy the app to Azure from Visual Studio. You will allow Visual Studio to create an Azure Web App for you, preventing you from having to go into the Azure portal and create it separately.
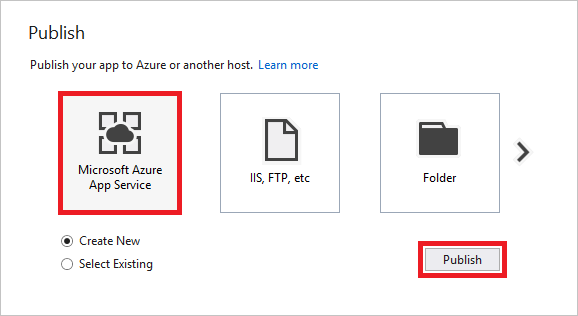
Right-click the project in Solution Explorer and select Publish... from the context menu. Make sure Microsoft Azure App Service and Create New are selected, and then select the Publish button.
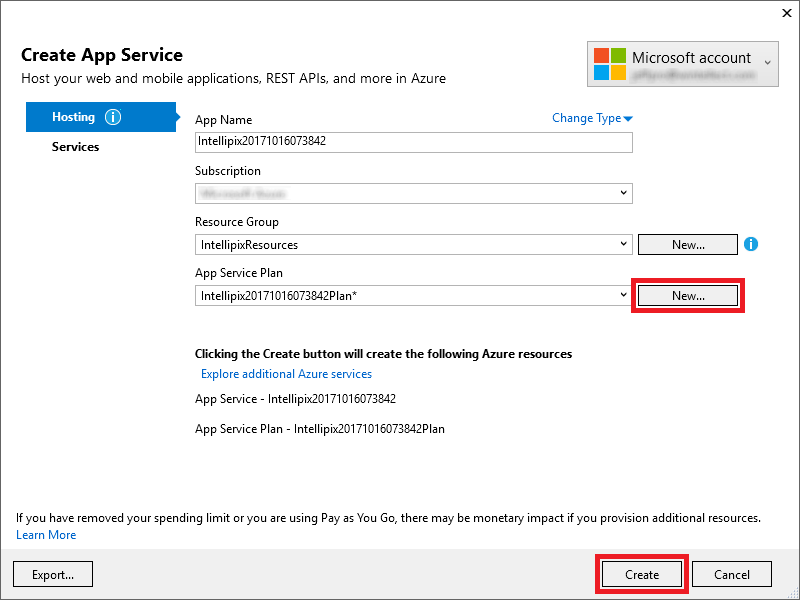
In the next dialog, select the "IntellipixResources" resource group under Resource Group. Select the New... button next to "App Service Plan" and create a new App Service Plan in the same location you selected for the storage account in Create a storage account, accepting the defaults everywhere else. Finish by selecting the Create button.
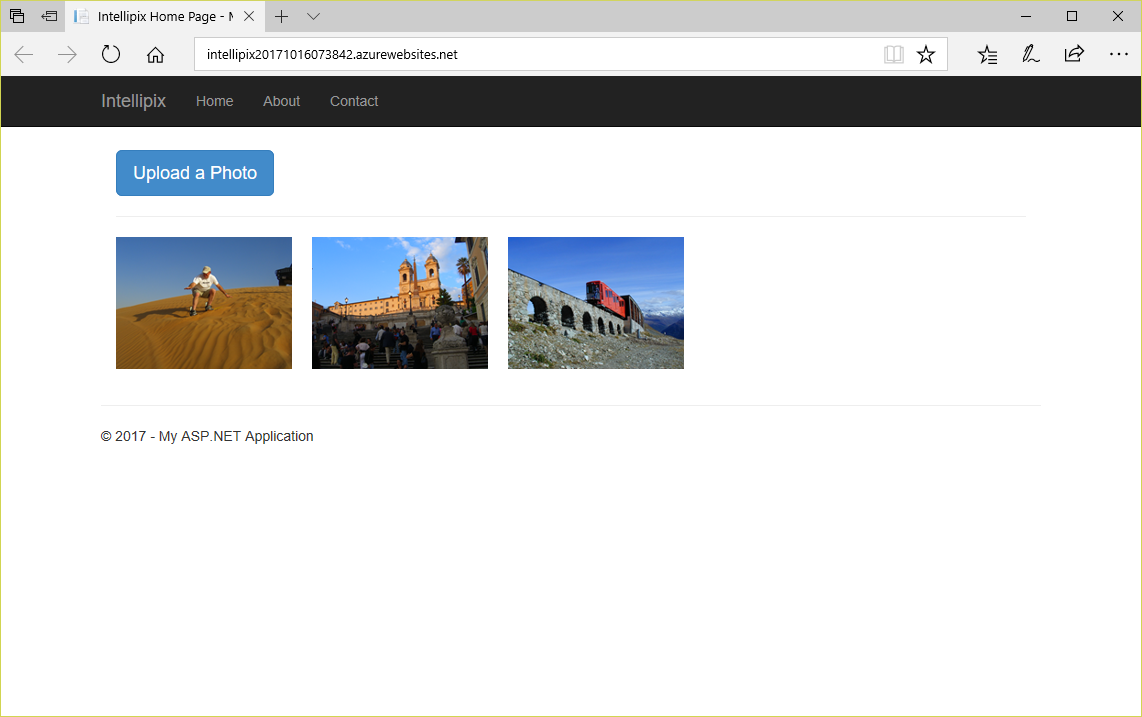
After a few moments, the app will appear in a browser window. Note the URL in the address bar. The app is no longer running locally; it's on the Web, where it's publicly reachable.
If you make changes to the app and want to push the changes out to the Web, go through the publish process again. You can still test your changes locally before publishing to the Web.
Clean up resources
If you'd like to keep working on your web app, see the Next steps section. If you don't plan to continue using this application, you should delete all app-specific resources. To do delete resources, you can delete the resource group that contains your Azure Storage subscription and Vision resource. This will remove the storage account, the blobs uploaded to it, and the App Service resource needed to connect with the ASP.NET web app.
To delete the resource group, open the Resource groups tab in the portal, navigate to the resource group you used for this project, and select Delete resource group at the top of the view. You'll be asked to type the resource group's name to confirm you want to delete it. Once deleted, a resource group can't be recovered.
Next steps
There's much more that you could do to use Azure and develop your Intellipix app even further. For example, you could add support for authenticating users and deleting photos, and rather than force the user to wait for Azure AI services to process a photo following an upload, you could use Azure Functions to call the Azure AI Vision API asynchronously each time an image is added to blob storage. You could also do any number of other Image Analysis operations on the image, outlined in the overview.
Feedback
Coming soon: Throughout 2024 we will be phasing out GitHub Issues as the feedback mechanism for content and replacing it with a new feedback system. For more information see: https://aka.ms/ContentUserFeedback.
Submit and view feedback for