Integrate conversational language understanding with Bot Framework
A dialog is the interaction that occurs between user queries and an application. Dialog management is the process that defines the automatic behavior that should occur for different customer interactions. While conversational language understanding can classify intents and extract information through entities, the Bot Framework SDK allows you to configure the applied logic for the responses returned from it.
This tutorial will explain how to integrate your own conversational language understanding (CLU) project for a flight booking project in the Bot Framework SDK that includes three intents: Book Flight, Get Weather, and None.
Prerequisites
- Create a Language resource in the Azure portal to get your key and endpoint. After it deploys, select Go to resource.
- You will need the key and endpoint from the resource you create to connect your bot to the API. You'll paste your key and endpoint into the code below later in the tutorial.
- Download the CoreBotWithCLU sample.
- Clone the entire samples repository to get access to this solution.
Import a project in conversational language understanding
Download the FlightBooking.json file in the Core Bot with CLU sample, in the Cognitive Models folder.
Sign into the Language Studio and select your Language resource.
Navigate to Conversational Language Understanding and select the service. This will route you the projects page. Select the Import button next to the Create New Project button. Import the FlightBooking.json file with the project name as FlightBooking. This will automatically import the CLU project with all the intents, entities, and utterances.
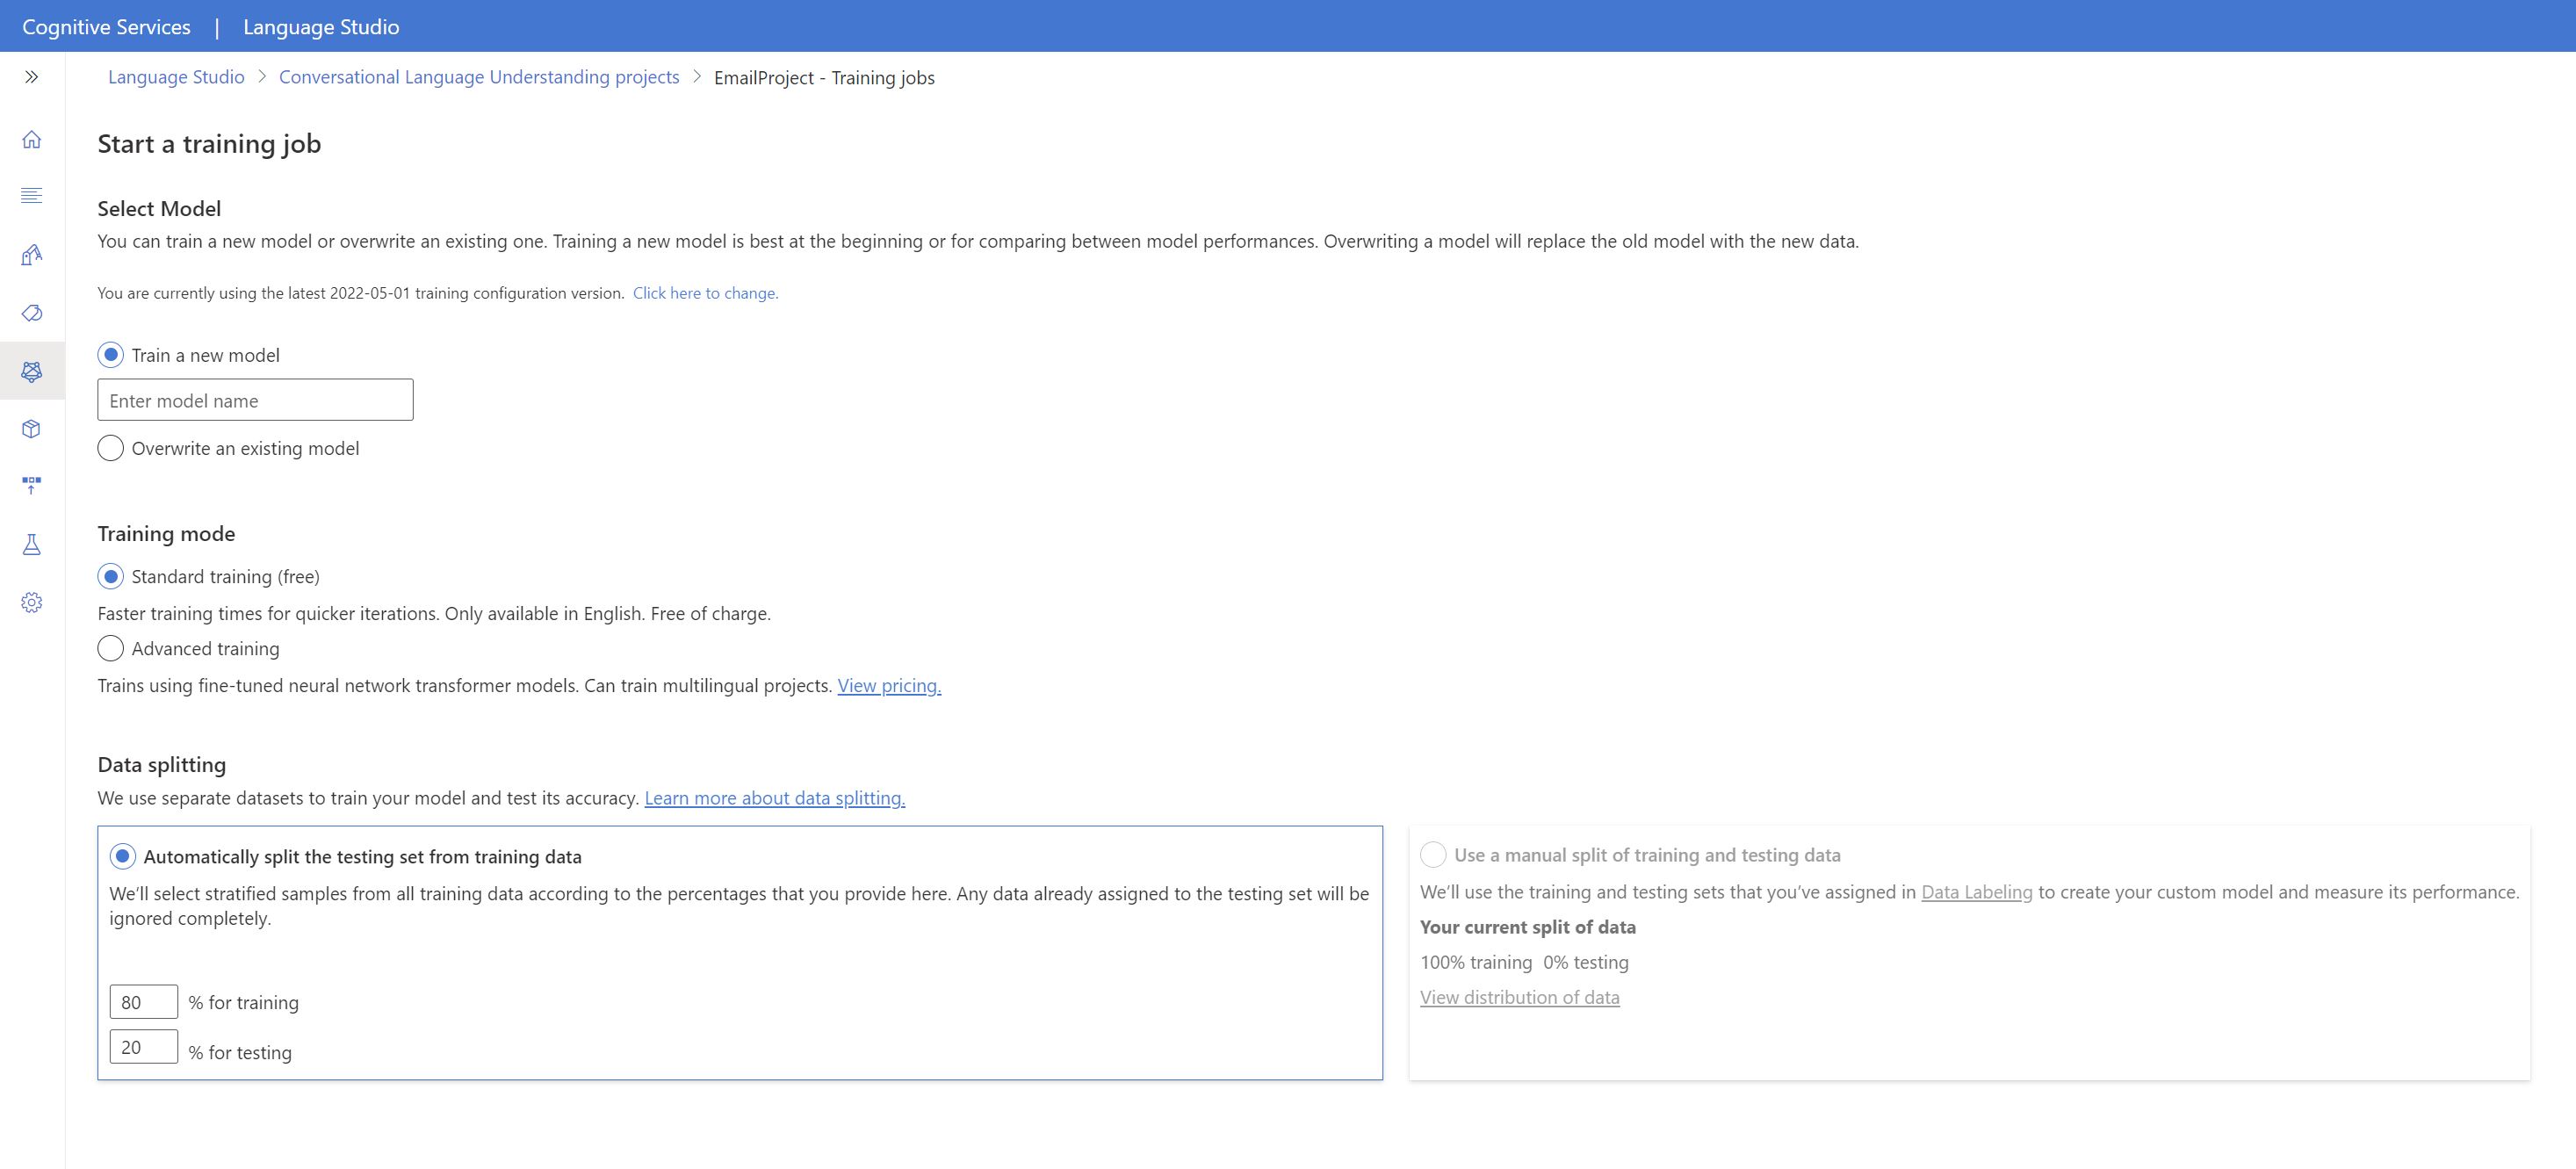
Once the project is loaded, select Training jobs on the left. Press on Start a training job, provide the model name v1 and press Train. All other settings such as Standard Training and the evaluation settings can be left as is.
Once training is complete, click to Deploying a model on the left. Select Add Deployment and create a new deployment with the name Testing, and assign model v1 to the deployment.


Update the settings file
Now that your CLU project is deployed and ready, update the settings that will connect to the deployment.
In the Core Bot sample, update your appsettings.json with the appropriate values.
- The CluProjectName is FlightBooking.
- The CluDeploymentName is Testing
- The CluAPIKey can be either of the keys in the Keys and Endpoint section for your Language resource in the Azure portal. You can also copy your key from the Project Settings tab in CLU.
- The CluAPIHostName is the endpoint found in the Keys and Endpoint section for your Language resource in the Azure portal. Note the format should be
<Language_Resource_Name>.cognitiveservices.azure.comwithouthttps://.
{
  "MicrosoftAppId": "",
  "MicrosoftAppPassword": "",
  "CluProjectName": "",
  "CluDeploymentName": "",
  "CluAPIKey": "",
  "CluAPIHostName": ""
}
Identify integration points
In the Core Bot sample, you can check out the FlightBookingRecognizer.cs file. Here is where the CLU API call to the deployed endpoint is made to retrieve the CLU prediction for intents and entities.
        public FlightBookingRecognizer(IConfiguration configuration)
        {
            var cluIsConfigured = !string.IsNullOrEmpty(configuration["CluProjectName"]) && !string.IsNullOrEmpty(configuration["CluDeploymentName"]) && !string.IsNullOrEmpty(configuration["CluAPIKey"]) && !string.IsNullOrEmpty(configuration["CluAPIHostName"]);
            if (cluIsConfigured)
            {
                var cluApplication = new CluApplication(
                    configuration["CluProjectName"],
                    configuration["CluDeploymentName"],
                    configuration["CluAPIKey"],
                    "https://" + configuration["CluAPIHostName"]);
                // Set the recognizer options depending on which endpoint version you want to use.
                var recognizerOptions = new CluOptions(cluApplication)
                {
                    Language = "en"
                };

                _recognizer = new CluRecognizer(recognizerOptions);
            }
Under the Dialogs folder, find the MainDialog which uses the following to make a CLU prediction.
var cluResult = await _cluRecognizer.RecognizeAsync<FlightBooking>(stepContext.Context, cancellationToken);
The logic that determines what to do with the CLU result follows it.
 switch (cluResult.TopIntent().intent)
            {
                case FlightBooking.Intent.BookFlight:
                    // Initialize BookingDetails with any entities we may have found in the response.
                    var bookingDetails = new BookingDetails()
                    {
                        Destination = cluResult.Entities.toCity,
                        Origin = cluResult.Entities.fromCity,
                        TravelDate = cluResult.Entities.flightDate,
                    };

                    // Run the BookingDialog giving it whatever details we have from the CLU call, it will fill out the remainder.
                    return await stepContext.BeginDialogAsync(nameof(BookingDialog), bookingDetails, cancellationToken);

                case FlightBooking.Intent.GetWeather:
                    // We haven't implemented the GetWeatherDialog so we just display a TODO message.
                    var getWeatherMessageText = "TODO: get weather flow here";
                    var getWeatherMessage = MessageFactory.Text(getWeatherMessageText, getWeatherMessageText, InputHints.IgnoringInput);
                    await stepContext.Context.SendActivityAsync(getWeatherMessage, cancellationToken);
                    break;

                default:
                    // Catch all for unhandled intents
                    var didntUnderstandMessageText = $"Sorry, I didn't get that. Please try asking in a different way (intent was {cluResult.TopIntent().intent})";
                    var didntUnderstandMessage = MessageFactory.Text(didntUnderstandMessageText, didntUnderstandMessageText, InputHints.IgnoringInput);
                    await stepContext.Context.SendActivityAsync(didntUnderstandMessage, cancellationToken);
                    break;
            }
Run the bot locally
Run the sample locally on your machine OR run the bot from a terminal or from Visual Studio:
Run the bot from a terminal
From a terminal, navigate to the cognitive-service-language-samples/CoreBotWithCLU folder.
Then run the following command
# run the bot
dotnet run
Run the bot from Visual Studio
- Launch Visual Studio
- From the top navigation menu, select File, Open, then Project/Solution
- Navigate to the
cognitive-service-language-samples/CoreBotWithCLUfolder - Select the
CoreBotCLU.csprojfile - Press
F5to run the project
Testing the bot using Bot Framework Emulator
Bot Framework Emulator is a desktop application that allows bot developers to test and debug their bots on localhost or running remotely through a tunnel.
- Install the latest Bot Framework Emulator.
Connect to the bot using Bot Framework Emulator
- Launch Bot Framework Emulator
- Select File, then Open Bot
- Enter a Bot URL of
http://localhost:3978/api/messagesand press Connect and wait for it to load - You can now query for different examples such as "Travel from Cairo to Paris" and observe the results
If the top intent returned from CLU resolves to "Book flight". Your bot will ask additional questions until it has enough information stored to create a travel booking. At that point it will return this booking information back to your user.
Next steps
Learn more about the Bot Framework SDK.