Develop Azure AI services applications with Azure Key Vault
Learn how to develop Azure AI services applications securely by using Azure Key Vault.
Key Vault reduces the risk that secrets may be accidentally leaked, because you avoid storing security information in your application.
Prerequisites
- A valid Azure subscription - Create one for free
- Visual Studio IDE
- An Azure Key Vault
- An Azure AI services resource
- A valid Azure subscription - Create one for free.
- Python 3.7 or later
- Azure CLI or Azure PowerShell
- An Azure Key Vault
- An Azure AI services resource
- A valid Azure subscription - Create one for free.
- Java Development Kit (JDK) version 8 or above
- Azure CLI or Azure PowerShell
- An Azure Key Vault
- An Azure AI services resource
- A valid Azure subscription - Create one for free.
- Current Node.js v14 LTS or later
- Azure CLI or Azure PowerShell
- An Azure Key Vault
- An Azure AI services resource
Note
Review the documentation and quickstart articles for the Azure AI service you're using to get an understanding of:
- The credentials and other information you will need to send API calls.
- The packages and code you will need to run your application.
Get your credentials from your Azure AI services resource
Before you add your credential information to your Azure key vault, you need to retrieve them from your Azure AI services resource. For example, if your service needs a key and endpoint you would find them using the following steps:
Navigate to your Azure resource in the Azure portal.
From the collapsible menu on the left, select Keys and Endpoint.
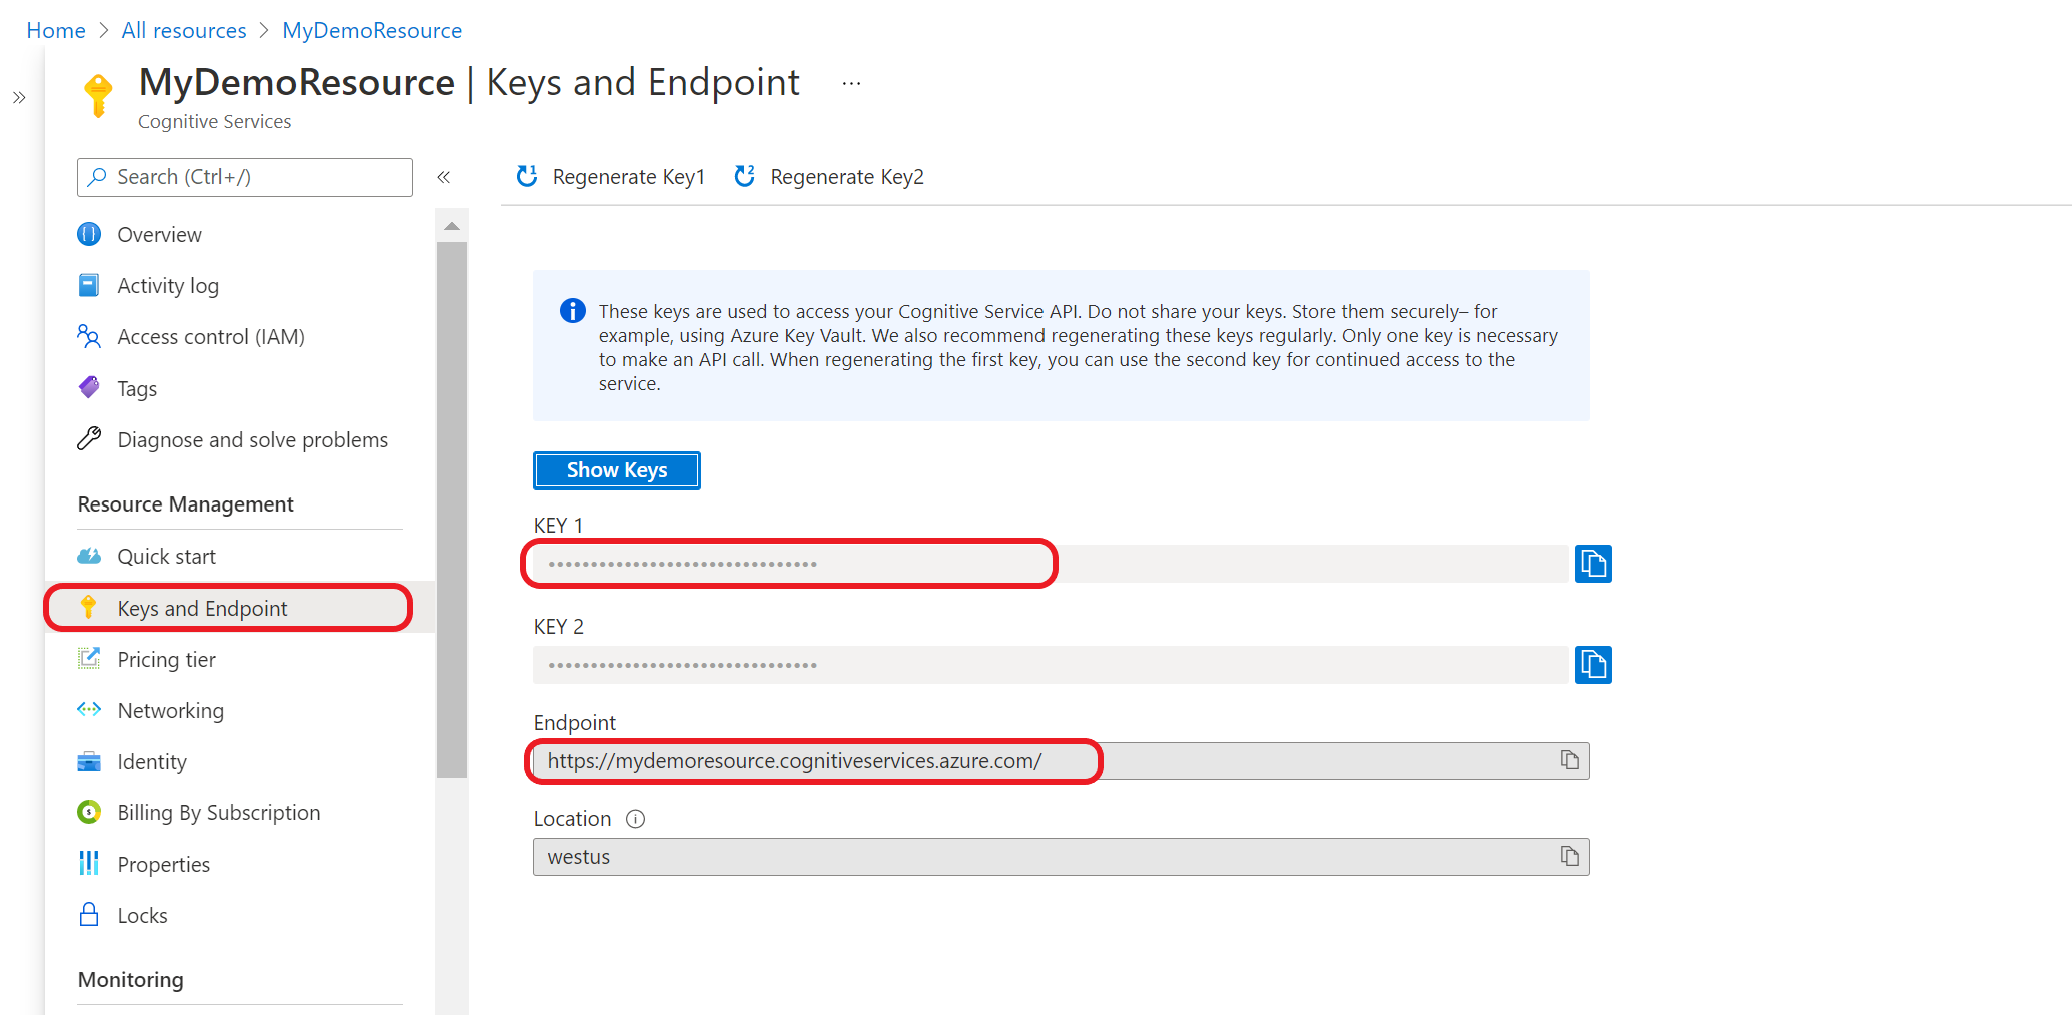

Some Azure AI services require different information to authenticate API calls, such as a key and region. Make sure to retrieve this information before continuing on.
Add your credentials to your key vault
For your application to retrieve and use your credentials to authenticate API calls, you will need to add them to your key vault secrets.
Repeat these steps to generate a secret for each required resource credential. For example, a key and endpoint. These secret names will be used later to authenticate your application.
Open a new browser tab or window. Navigate to your key vault in the Azure portal.
From the collapsible menu on the left, select Objects > Secrets.
Select Generate/Import.
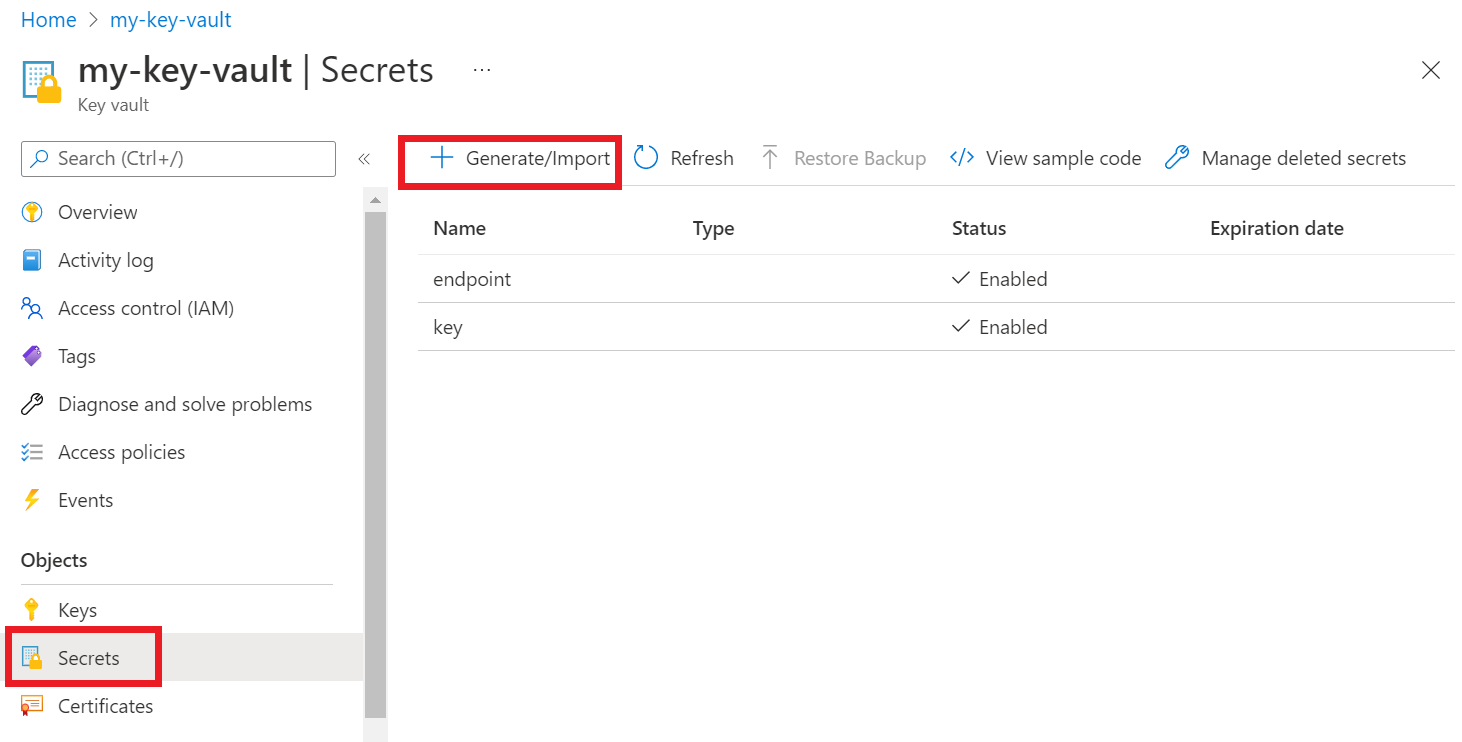
On the Create a secret screen, enter the following values:
Name Value Upload options Manual Name A secret name for your key or endpoint. For example: "CognitiveServicesKey" or "CognitiveServicesEndpoint" Value Your Azure AI services resource key or endpoint. Later your application will use the secret "Name" to securely access the "Value".
Leave the other values as their defaults. Select Create.
Tip
Make sure to remember the names that you set for your secrets, as you'll use them later in your application.

You should now have named secrets for your resource information.
Create an environment variable for your key vault's name
We recommend creating an environment variable for your Azure key vault's name. Your application will read this environment variable at runtime to retrieve your key and endpoint information.
To set environment variables, use one the following commands. KEY_VAULT_NAME with the name of the environment variable, and replace Your-Key-Vault-Name with the name of your key vault, which will be stored in the environment variable.
Create and assign persisted environment variable, given the value.
setx KEY_VAULT_NAME "Your-Key-Vault-Name"
In a new instance of the Command Prompt, read the environment variable.
echo %KEY_VAULT_NAME%
Authenticate to Azure using Visual Studio
Developers using Visual Studio 2017 or later can authenticate a Microsoft Entra account through Visual Studio. This enables you to access secrets in your key vault by signing into your Azure subscription from within the IDE.
To authenticate in Visual Studio, select Tools from the top navigation menu, and select Options. Navigate to the Azure Service Authentication option to sign in with your user name and password.
Authenticate using the command line
Before you can grant access to your key vault, you must authenticate with your Microsoft Entra user name and password.
To authenticate with the Azure CLI, run the az login command.
az login
On systems with a default web browser, the Azure CLI will launch the browser to authenticate. For systems without a default web browser, the az login command will use the device code authentication flow. You can also force the Azure CLI to use the device code flow rather than launching a browser by specifying the --use-device-code argument.
If you have multiple subscriptions, make sure to select the Azure subscription that contains your key vault.
Grant access to your key vault
Create an access policy for your key vault that grants secret permissions to your user account.
To set the access policy, run the az keyvault set-policy command. Replace Your-Key-Vault-Name with the name of your key vault. Replace user@domain.com with your Microsoft Entra user name.
az keyvault set-policy --name Your-Key-Vault-Name --upn user@domain.com --secret-permissions delete get list set purge
Create a new C# application
Using the Visual Studio IDE, create a new .NET Core console app. This will create a "Hello World" project with a single C# source file: program.cs.
Install the following client libraries by right-clicking on the solution in the Solution Explorer and selecting Manage NuGet Packages. In the package manager that opens select Browse and search for the following libraries, and select Install for each:
Azure.Security.KeyVault.SecretsAzure.Identity
Import the example code
Copy the following example code into your program.cs file. Replace Your-Key-Secret-Name and Your-Endpoint-Secret-Name with the secret names that you set in your key vault.
using System;
using System.Threading.Tasks;
using Azure;
using Azure.Identity;
using Azure.Security.KeyVault.Secrets;
using System.Net;

namespace key_vault_console_app
{
    class Program
    {
        static async Task Main(string[] args)
        {
            //Name of your key vault
            var keyVaultName = Environment.GetEnvironmentVariable("KEY_VAULT_NAME");

            //variables for retrieving the key and endpoint from your key vault.
            //Set these variables to the names you created for your secrets
            const string keySecretName = "Your-Key-Secret-Name";
            const string endpointSecretName = "Your-Endpoint-Secret-Name";

            //Endpoint for accessing your key vault
            var kvUri = $"https://{keyVaultName}.vault.azure.net";

            var keyVaultClient = new SecretClient(new Uri(kvUri), new DefaultAzureCredential());

            Console.WriteLine($"Retrieving your secrets from {keyVaultName}.");

            //Key and endpoint secrets retrieved from your key vault
            var keySecret = await keyVaultClient.GetSecretAsync(keySecretName);
            var endpointSecret = await keyVaultClient.GetSecretAsync(endpointSecretName);
            Console.WriteLine($"Your key secret value is: {keySecret.Value.Value}");
            Console.WriteLine($"Your endpoint secret value is: {endpointSecret.Value.Value}");
            Console.WriteLine("Secrets retrieved successfully");

        }
    }
}
Run the application
Run the application by selecting the Debug button at the top of Visual Studio. Your key and endpoint secrets will be retrieved from your key vault.
Send a test Language service call (optional)
If you're using a multi-service resource or Language resource, you can update your application by following these steps to send an example Named Entity Recognition call by retrieving a key and endpoint from your key vault.
Install the
Azure.AI.TextAnalyticslibrary by right-clicking on the solution in the Solution Explorer and selecting Manage NuGet Packages. In the package manager that opens select Browse and search for the following libraries, and select Install for each:Add the following directive to the top of your
program.csfile.using Azure.AI.TextAnalytics;Add the following code sample to your application.
// Example method for extracting named entities from text
private static void EntityRecognitionExample(string keySecret, string endpointSecret)
{
    //String to be sent for Named Entity Recognition
    var exampleString = "I had a wonderful trip to Seattle last week.";

    AzureKeyCredential azureKeyCredential = new AzureKeyCredential(keySecret);
    Uri endpoint = new Uri(endpointSecret);
    var languageServiceClient = new TextAnalyticsClient(endpoint, azureKeyCredential);

    Console.WriteLine($"Sending a Named Entity Recognition (NER) request");
    var response = languageServiceClient.RecognizeEntities(exampleString);
    Console.WriteLine("Named Entities:");
    foreach (var entity in response.Value)
    {
        Console.WriteLine($"\tText: {entity.Text},\tCategory: {entity.Category},\tSub-Category: {entity.SubCategory}");
        Console.WriteLine($"\t\tScore: {entity.ConfidenceScore:F2},\tLength: {entity.Length},\tOffset: {entity.Offset}\n");
    }
}
Add the following code to call
EntityRecognitionExample()from your main method, with your key and endpoint values.EntityRecognitionExample(keySecret.Value.Value, endpointSecret.Value.Value);Run the application.
Authenticate your application
Before you can grant access to your key vault, you must authenticate with your Microsoft Entra user name and password.
To authenticate with the Azure CLI, run the az login command.
az login
On systems with a default web browser, the Azure CLI will launch the browser to authenticate. For systems without a default web browser, the az login command will use the device code authentication flow. You can also force the Azure CLI to use the device code flow rather than launching a browser by specifying the --use-device-code argument.
If you have multiple subscriptions, make sure to select the Azure subscription that contains your key vault.
Grant access to your key vault
Create an access policy for your key vault that grants secret permissions to your user account.
To set the access policy, run the az keyvault set-policy command. Replace Your-Key-Vault-Name with the name of your key vault. Replace user@domain.com with your Microsoft Entra user name.
az keyvault set-policy --name Your-Key-Vault-Name --upn user@domain.com --secret-permissions delete get list set purge
Create a Python application
Create a new folder named keyVaultExample. Then use your preferred code editor to create a file named program.py inside the newly created folder.
Install Key Vault and Language service packages
In a terminal or command prompt, navigate to your project folder and install the Microsoft Entra identity library:
pip install azure-identityInstall the Key Vault secrets library:
pip install azure-keyvault-secrets
Import the example code
Add the following code sample to the file named program.py. Replace Your-Key-Secret-Name and Your-Endpoint-Secret-Name with the secret names that you set in your key vault.
import os
from azure.keyvault.secrets import SecretClient
from azure.identity import DefaultAzureCredential
from azure.core.credentials import AzureKeyCredential

keyVaultName = os.environ["KEY_VAULT_NAME"]

# Set these variables to the names you created for your secrets
keySecretName = "Your-Key-Secret-Name"
endpointSecretName = "Your-Endpoint-Secret-Name"

# URI for accessing key vault
KVUri = f"https://{keyVaultName}.vault.azure.net"

# Instantiate the client and retrieve secrets
credential = DefaultAzureCredential()
kv_client = SecretClient(vault_url=KVUri, credential=credential)

print(f"Retrieving your secrets from {keyVaultName}.")

retrieved_key = kv_client.get_secret(keySecretName).value
retrieved_endpoint = kv_client.get_secret(endpointSecretName).value

print(f"Your secret key value is {retrieved_key}.");
print(f"Your secret endpoint value is {retrieved_endpoint}.");
Run the application
Use the following command to run the application. Your key and endpoint secrets will be retrieved from your key vault.
python ./program.py
Send a test Language service call (optional)
If you're using a multi-service resource or Language resource, you can update your application by following these steps to send an example Named Entity Recognition call by retrieving a key and endpoint from your key vault.
Install the Language service library:
pip install azure-ai-textanalytics==5.1.0Add the following code to your application
from azure.ai.textanalytics import TextAnalyticsClient
# Authenticate the key vault secrets client using your key and endpoint
azure_key_credential = AzureKeyCredential(retrieved_key)
# Now you can use key vault credentials with the Language service
language_service_client = TextAnalyticsClient(
    endpoint=retrieved_endpoint,
    credential=azure_key_credential)

# Example of recognizing entities from text

print("Sending NER request")

try:
    documents = ["I had a wonderful trip to Seattle last week."]
    result = language_service_client.recognize_entities(documents = documents)[0]
    print("Named Entities:\n")
    for entity in result.entities:
        print("\tText: \t", entity.text, "\tCategory: \t", entity.category, "\tSubCategory: \t", entity.subcategory,
                "\n\tConfidence Score: \t", round(entity.confidence_score, 2), "\tLength: \t", entity.length, "\tOffset: \t", entity.offset, "\n")

except Exception as err:
    print("Encountered exception. {}".format(err))
Run the application.
Authenticate your application
Before you can grant access to your key vault, you must authenticate with your Microsoft Entra user name and password.
To authenticate with the Azure CLI, run the az login command.
az login
On systems with a default web browser, the Azure CLI will launch the browser to authenticate. For systems without a default web browser, the az login command will use the device code authentication flow. You can also force the Azure CLI to use the device code flow rather than launching a browser by specifying the --use-device-code argument.
If you have multiple subscriptions, make sure to select the Azure subscription that contains your key vault.
Grant access to your key vault
Create an access policy for your key vault that grants secret permissions to your user account.
To set the access policy, run the az keyvault set-policy command. Replace Your-Key-Vault-Name with the name of your key vault. Replace user@domain.com with your Microsoft Entra user name.
az keyvault set-policy --name Your-Key-Vault-Name --upn user@domain.com --secret-permissions delete get list set purge
Create a java application
In your preferred IDE, create a new Java console application project, and create a class named Example.
Add dependencies
In your project, add the following dependencies to your pom.xml file.
<dependencies>
    <dependency>
        <groupId>com.azure</groupId>
        <artifactId>azure-security-keyvault-secrets</artifactId>
        <version>4.2.3</version>
    </dependency>
    <dependency>
        <groupId>com.azure</groupId>
        <artifactId>azure-identity</artifactId>
        <version>1.2.0</version>
    </dependency>
</dependencies>
Import the example code
Copy the following code into a file named Example.java. Replace Your-Key-Secret-Name and Your-Endpoint-Secret-Name with the secret names that you set in your key vault.
import com.azure.identity.DefaultAzureCredentialBuilder;
import com.azure.security.keyvault.secrets.SecretClient;
import com.azure.security.keyvault.secrets.SecretClientBuilder;
import com.azure.core.credential.AzureKeyCredential;

public class Example {

    public static void main(String[] args) {

        String keyVaultName = System.getenv("KEY_VAULT_NAME");
        String keyVaultUri = "https://" + keyVaultName + ".vault.azure.net";

        //variables for retrieving the key and endpoint from your key vault.
        //Set these variables to the names you created for your secrets
        String keySecretName = "Your-Key-Secret-Name";
        String endpointSecretName = "Your-Endpoint-Secret-Name";

        //Create key vault secrets client
        SecretClient secretClient = new SecretClientBuilder()
                .vaultUrl(keyVaultUri)
                .credential(new DefaultAzureCredentialBuilder().build())
                .buildClient();

        //retrieve key and endpoint from key vault
        String keyValue = secretClient.getSecret(keySecretName).getValue();
        String endpointValue = secretClient.getSecret(endpointSecretName).getValue();
        System.out.printf("Your secret key value is: %s", keyValue)
        System.out.printf("Your secret endpoint value is: %s", endpointValue)
    }
}
Send a test Language service call (optional)
If you're using a multi-service resource or Language resource, you can update your application by following these steps to send an example Named Entity Recognition call by retrieving a key and endpoint from your key vault.
In your application, add the following dependency:
<dependency>
    <groupId>com.azure</groupId>
    <artifactId>azure-ai-textanalytics</artifactId>
    <version>5.1.12</version>
</dependency>
add the following import statements to your file.
import com.azure.ai.textanalytics.models.*;
import com.azure.ai.textanalytics.TextAnalyticsClientBuilder;
import com.azure.ai.textanalytics.TextAnalyticsClient;
Add the following code to the
main()method in your application:TextAnalyticsClient languageClient = new TextAnalyticsClientBuilder() .credential(new AzureKeyCredential(keyValue)) .endpoint(endpointValue) .buildClient(); // Example for recognizing entities in text String text = "I had a wonderful trip to Seattle last week."; for (CategorizedEntity entity : languageClient.recognizeEntities(text)) { System.out.printf( "Recognized entity: %s, entity category: %s, entity sub-category: %s, score: %s, offset: %s, length: %s.%n", entity.getText(), entity.getCategory(), entity.getSubcategory(), entity.getConfidenceScore(), entity.getOffset(), entity.getLength()); }Run your application
Authenticate your application
Before you can grant access to your key vault, you must authenticate with your Microsoft Entra user name and password.
To authenticate with the Azure CLI, run the az login command.
az login
On systems with a default web browser, the Azure CLI will launch the browser to authenticate. For systems without a default web browser, the az login command will use the device code authentication flow. You can also force the Azure CLI to use the device code flow rather than launching a browser by specifying the --use-device-code argument.
If you have multiple subscriptions, make sure to select the Azure subscription that contains your key vault.
Grant access to your key vault
Create an access policy for your key vault that grants secret permissions to your user account.
To set the access policy, run the az keyvault set-policy command. Replace Your-Key-Vault-Name with the name of your key vault. Replace user@domain.com with your Microsoft Entra user name.
az keyvault set-policy --name Your-Key-Vault-Name --upn user@domain.com --secret-permissions delete get list set purge
Create a new Node.js application
Create a Node.js application that uses your key vault.
In a terminal, create a folder named key-vault-js-example and change into that folder:
mkdir key-vault-js-example && cd key-vault-js-example
Initialize the Node.js project:
npm init -y
Install Key Vault and Language service packages
Using the terminal, install the Azure Key Vault secrets library, @azure/keyvault-secrets for Node.js.
npm install @azure/keyvault-secretsInstall the Azure Identity library, @azure/identity package to authenticate to a Key Vault.
npm install @azure/identity
Import the code sample
Add the following code sample to a file named index.js. Replace Your-Key-Secret-Name and Your-Endpoint-Secret-Name with the secret names that you set in your key vault.
const { SecretClient } = require("@azure/keyvault-secrets");
const { DefaultAzureCredential } = require("@azure/identity");
// Load the .env file if it exists
const dotenv = require("dotenv");
dotenv.config();

async function main() {
    const credential = new DefaultAzureCredential();

    const keyVaultName = process.env["KEY_VAULT_NAME"];
    const url = "https://" + keyVaultName + ".vault.azure.net";

    const kvClient = new SecretClient(url, credential);

    // Set these variables to the names you created for your secrets
    const keySecretName = "Your-Key-Secret-Name";
    const endpointSecretName = "Your-Endpoint-Secret-Name";

    console.log("Retrieving secrets from ", keyVaultName);
    const retrievedKey = await (await kvClient.getSecret(keySecretName)).value;
    const retrievedEndpoint = await (await kvClient.getSecret(endpointSecretName)).value;
    console.log("Your secret key value is: ", retrievedKey);
    console.log("Your secret endpoint value is: ", retrievedEndpoint);
}

main().catch((error) => {
  console.error("An error occurred:", error);
  process.exit(1);
});
Run the sample application
Use the following command to run the application. Your key and endpoint secrets will be retrieved from your key vault.
node index.js
Send a test Language service call (optional)
If you're using a multi-service resource or Language resource, you can update your application by following these steps to send an example Named Entity Recognition call by retrieving a key and endpoint from your key vault.
Install the Azure AI service for Language library, @azure/ai-text-analytics to send API requests to the Language service.
npm install @azure/ai-text-analytics@5.1.0Add the following code to your application:
const { TextAnalyticsClient, AzureKeyCredential } = require("@azure/ai-text-analytics");
// Authenticate the language client with your key and endpoint
const languageClient = new TextAnalyticsClient(retrievedEndpoint,  new AzureKeyCredential(retrievedKey));

// Example for recognizing entities in text
console.log("Sending NER request")
const entityInputs = [
    "I had a wonderful trip to Seattle last week."
];
const entityResults = await languageClient.recognizeEntities(entityInputs);
entityResults.forEach(document => {
    console.log(`Document ID: ${document.id}`);
    document.entities.forEach(entity => {
        console.log(`\tName: ${entity.text} \tCategory: ${entity.category} \tSubcategory: ${entity.subCategory ? entity.subCategory : "N/A"}`);
        console.log(`\tScore: ${entity.confidenceScore}`);
    });
});
Run the application.
Next steps
- See What are Azure AI services for available features you can develop along with Azure Key Vault.
- For additional information on secure application development, see: