Note
Access to this page requires authorization. You can try signing in or changing directories.
Access to this page requires authorization. You can try changing directories.
Important
This feature of Azure Communication Services is currently in preview. Features in preview are publicly available and can be used by all new and existing Microsoft customers.
Preview APIs and SDKs are provided without a service-level agreement. We recommend that you don't use them for production workloads. Certain features might not be supported or capabilities might be constrained.
For more information, see Supplemental Terms of Use for Microsoft Azure Previews.
This article provides a comprehensive guide to set up a Network Security Perimeter (NSP) with Azure Communication Services. The NSP ensures that your communication services are secure and protected from unauthorized access.
Prerequisites
An active Azure subscription.
The latest Azure CLI. This article requires Azure CLI version 2.38.0 or later.
After installing or upgrading to the latest version of Azure CLI, import the network security perimeter commands using:
az extension add –name nspImport the Azure communications commands using:
az extension add --name communication
Set up your Network Security Perimeter for Email
Step 1: Share the subscription ID to test NSP
Complete and submit the form at Network Security Perimeter for Azure Communication Services. You need to provide a company name, subscription ID, and scenario.
Register for the Azure Network Security Perimeter public preview. To register, add the
AllowNSPInPublicPreviewfeature flag to your subscription.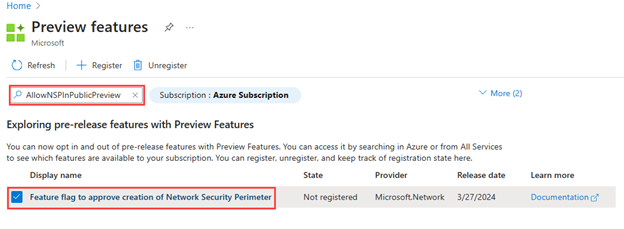
For more information on adding feature flags, see Set up preview features in Azure subscription.
After adding the feature flag, you need to re-register the
Microsoft.Networkresource provider in your subscription.az provider register --namespace Microsoft.Network
Step 2: Create a new resource or update an existing Azure Communication Services resource using Azure CLI/Cloud Shell
Use the following command to set PublicNetworkAccess to SecuredByPerimeter.
az rest --method PUT --uri https://management.azure.com/subscriptions/<subscription ID>/resourceGroups/<resource-group-name> /providers/Microsoft.Communication/communicationServices/<acs-resource name>?api-version=2023-12-25-preview --body "{'location': 'Global', 'properties': {'dataLocation': ''<acs-datalocation>, 'publicNetworkAccess': 'SecuredByPerimeter',}}"
Step 3: Create a network security perimeter
az network perimeter create --name <network-security-perimeter-name> --resource-group <resource-group-name> -l <location>
Step 4: Create a new profile for the perimeter
Provide the same network security perimeter name used in Step 3.
az network perimeter profile create --name <network-perimeter-profile-name> --resource-group <resource-group-name> --perimeter-name <network-security-perimeter-name>
Step 5: Create an inbound access rule with a public IP address prefix for the profile created with the following command
az network perimeter profile access-rule create --name <access-rule-name> --profile-name <network-perimeter-profile-name> --perimeter-name <network-security-perimeter-name> --resource-group <resource-group-name> --address-prefixes "[192.0.2.0/24]"
Note
NSP currently supports only IPV4 addresses. Use Microsoft Classless Inter-Domain Routing (CIDR), not just one IP address. For more information, see Understanding CIDR Notation when designing Azure Virtual Networks and Subnets.
Step 6: Associate the Azure Communication Services (PaaS resource) with the network security perimeter profile with the following commands
Get your Azure Communication Services resource ID.
az communication show --name <acs-resource-name> --resource-group <acs-resource-group> --query 'id'Get the profile ID.
az network perimeter profile show --name <network-perimeter-profile-name> --resource-group <network-perimeter-resource-group> --perimeter-name <network-security-perimeter-name> --query 'id'Associate your Azure Communication Services resource with the network security perimeter.
Replace
<ACSArmId>and<networkSecurityPerimeterProfileId>with the ID values for your ACS and profileaz network perimeter association create --name <network-perimeter-association-name> --perimeter-name <network-security-perimeter-name> --resource-group <network-perimeter-resource-group> --access-mode Enforced --private-link-resource "{id:<ACSArmId>}" --profile "{id:<networkSecurityPerimeterProfileId>}"
Step 7: Verify the allowlisted IP addresses can send email with NSP enabled
Make sure that the Azure Communication Services resource is connected to a verified email domain. For more information, see Connect a verified email domain.
You can send email by using Try Email feature on Azure portal or run the following command with your domain name and Azure Communication Services resource connection string.
az communication email send --connection-string "<Connection-string>" --sender "DoNotReply@XXXXXX.azurecomm.net" --to "<Recipient-email>" --subject "Welcome to Azure Communication Services Email" --text "Test Email"