Note
Access to this page requires authorization. You can try signing in or changing directories.
Access to this page requires authorization. You can try changing directories.
In this article, you learn how to integrate calling and chat functionality in your Android or iOS app by using the Azure Communication Services UI Library.
Prerequisites
- An Azure account and an active Azure subscription. Create an account for free.
- An OS running Android Studio.
- A deployed Azure Communication Services resource.
- An Azure Communication Services access token.
Get a complete sample
You can get a complete sample project from GitHub.
Set up the project
In Android Studio, create a new project:
On the File menu, select New > New Project.
In New Project, select the Empty Activity project template.
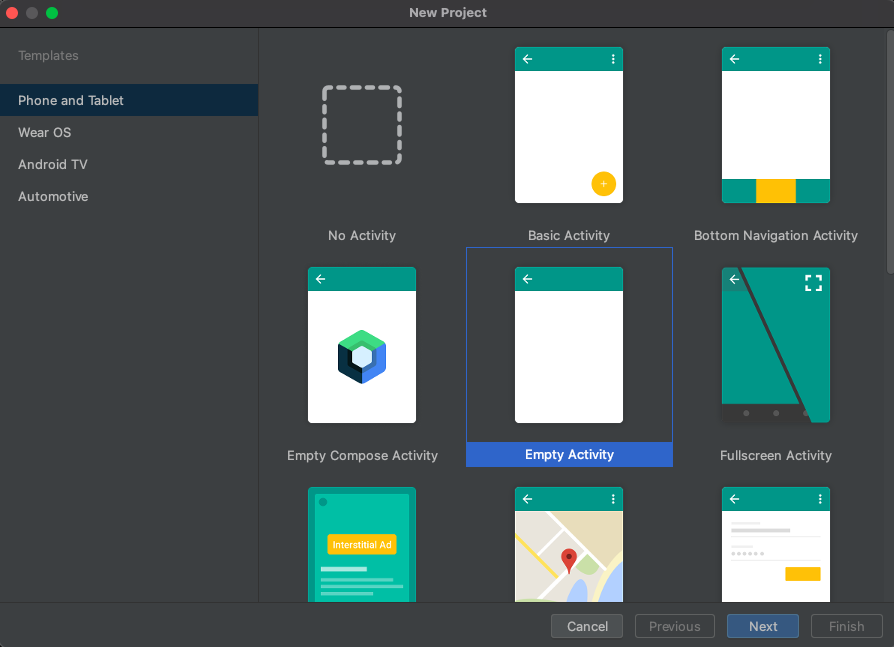
Select Next.
In Empty Activity, name the project UILibraryQuickStart. For language, select Java or Kotlin. For the minimum SDK, select API 26: Android 8.0 (Oreo) or later.
Select Finish.

Install the packages
Complete the following sections to install the required application packages.
Add a dependency
In your app-level UILibraryQuickStart/app/build.gradle file, add the following dependency:
dependencies {
    ...
    implementation("com.azure.android:azure-communication-ui-calling:+")
    implementation("com.azure.android:azure-communication-ui-chat:+")
    ...
}
Add a META-INF exclusion to the UILibraryQuickStart/app/build.gradle android section:
packaging {
    resources.excludes.add("META-INF/*")
}
Add Maven repositories
You need two Maven repositories to integrate the library:
The
mavenCentralrepositoryThe Azure package repository
repositories {
    ...
    mavenCentral()
    maven {
        url = URI("https://pkgs.dev.azure.com/MicrosoftDeviceSDK/DuoSDK-Public/_packaging/Duo-SDK-Feed/maven/v1")
    }
    ...
}
Connect to the Teams meeting with calling and chat
You use CallComposite to connect to the call. After a user is admitted to the call, CallComposite notifies you by changing the status to connected. Then the user can be connected to the chat thread.
When the user selects the Chat button, a custom button is added to CallComposite. CallComposite is minimized, and Chat appears in Teams.
Add a button and chat container view to Activity_main.xml
In the app/src/main/res/layout/activity_main.xml layout file, add the following code to create a button to start the composite:
<?xml version="1.0" encoding="utf-8"?>
<androidx.constraintlayout.widget.ConstraintLayout xmlns:android="http://schemas.android.com/apk/res/android"
    xmlns:app="http://schemas.android.com/apk/res-auto"
    xmlns:tools="http://schemas.android.com/tools"
    android:layout_width="match_parent"
    android:layout_height="match_parent"
    tools:context=".MainActivity">
    <LinearLayout
        android:id="@+id/buttonContainer"
        android:layout_width="match_parent"
        android:layout_height="wrap_content"
        android:orientation="horizontal"
        app:layout_constraintTop_toTopOf="parent"
        app:layout_constraintStart_toStartOf="parent"
        app:layout_constraintEnd_toEndOf="parent"
        >
        <Button
            android:id="@+id/startCallButton"
            android:layout_width="wrap_content"
            android:layout_height="wrap_content"
            android:text="Start Call"
            app:layout_constraintStart_toStartOf="parent"
            android:layout_marginStart="4dp"
            />
    </LinearLayout>
    <androidx.constraintlayout.widget.ConstraintLayout
        android:id="@+id/chatContainer"
        android:layout_width="match_parent"
        android:layout_height="0dp"
        app:layout_constraintTop_toBottomOf="@+id/buttonContainer"
        app:layout_constraintBottom_toBottomOf="parent"
        app:layout_constraintStart_toStartOf="parent"
        app:layout_constraintEnd_toEndOf="parent"
        >
    </androidx.constraintlayout.widget.ConstraintLayout>
</androidx.constraintlayout.widget.ConstraintLayout>
Download a Chat icon
- Download an icon from the GitHub repository.
- Save the icon to UILibraryQuickStart/app/src/main/res/drawable.
- Open the icon and change
android:fillColorto@color/white.
Initialize the composite
To initialize the call composite, go to MainActivity and update connection settings:
- Replace
TEAM_MEETING_LINKwith the Teams meeting link. - Replace
ACS_ENDPOINTwith your Azure Communication Services resource's endpoint. - Replace
DISPLAY_NAMEwith your name. - Replace
USER_IDwith your Azure Communication Services user ID. - Replace
USER_ACCESS_TOKENwith your token.
Get a Teams meeting chat thread for an Azure Communication Services user
You can retrieve Teams meeting details by using Graph APIs, as described in the Graph documentation. The Azure Communication Services Calling SDK accepts a full Teams meeting link or a meeting ID. They're returned as part of the onlineMeeting resource, which is accessible under the joinWebUrl property.
With the Graph APIs, you can also obtain the threadID value. The response has a chatInfo object that contains the threadID value.
package com.example.uilibraryquickstart

import androidx.appcompat.app.AppCompatActivity
import android.os.Bundle
import android.view.ViewGroup
import android.widget.Button
import androidx.constraintlayout.widget.ConstraintLayout
import com.azure.android.communication.common.CommunicationTokenCredential
import com.azure.android.communication.common.CommunicationTokenRefreshOptions
import com.azure.android.communication.common.CommunicationUserIdentifier
import com.azure.android.communication.ui.calling.CallComposite
import com.azure.android.communication.ui.calling.CallCompositeBuilder
import com.azure.android.communication.ui.calling.models.CallCompositeCallScreenHeaderViewData
import com.azure.android.communication.ui.calling.models.CallCompositeCallScreenOptions
import com.azure.android.communication.ui.calling.models.CallCompositeCallStateCode
import com.azure.android.communication.ui.calling.models.CallCompositeCustomButtonViewData
import com.azure.android.communication.ui.calling.models.CallCompositeLocalOptions
import com.azure.android.communication.ui.calling.models.CallCompositeMultitaskingOptions
import com.azure.android.communication.ui.calling.models.CallCompositeTeamsMeetingLinkLocator
import com.azure.android.communication.ui.chat.ChatAdapter
import com.azure.android.communication.ui.chat.ChatAdapterBuilder
import com.azure.android.communication.ui.chat.presentation.ChatThreadView
import java.util.UUID

class MainActivity : AppCompatActivity() {
    companion object {
        private var callComposite: CallComposite? = null
        private var chatAdapter: ChatAdapter? = null
    }

    private val displayName = "USER_NAME"
    private val endpoint = "ACS_ENDPOINT"
    private val teamsMeetingLink = "TEAM_MEETING_LINK"
    private val threadId = "CHAT_THREAD_ID"
    private val communicationUserId = "USER_ID"
    private val userToken = "USER_ACCESS_TOKEN"

    override fun onCreate(savedInstanceState: Bundle?) {
        super.onCreate(savedInstanceState)
        setContentView(R.layout.activity_main)

        findViewById<Button>(R.id.startCallButton).setOnClickListener {
            startCallComposite()
        }
    }

    private fun startCallComposite() {
        val communicationTokenRefreshOptions = CommunicationTokenRefreshOptions({ userToken }, true)
        val communicationTokenCredential = CommunicationTokenCredential(communicationTokenRefreshOptions)
        val locator = CallCompositeTeamsMeetingLinkLocator(teamsMeetingLink)

        val localOptions = CallCompositeLocalOptions()
            .setCallScreenOptions(
                CallCompositeCallScreenOptions().setHeaderViewData(
                    CallCompositeCallScreenHeaderViewData().setCustomButtons(
                        listOf(
                            CallCompositeCustomButtonViewData(
                                UUID.randomUUID().toString(),
                                R.drawable.ic_fluent_chat_24_regular,
                                "Open Chat",
                            ) {
                                callComposite?.sendToBackground()
                                showChatUI()
                            }
                        )
                    )
                ))
        val callComposite = CallCompositeBuilder()
            .applicationContext(this.applicationContext)
            .credential(communicationTokenCredential)
            .displayName(displayName)
            .multitasking(CallCompositeMultitaskingOptions(true, true))
            .build()

        callComposite.addOnCallStateChangedEventHandler { callState ->
            // When a user is admitted to the Teams meeting, the call state becomes connected.
            // Only users admitted to the meeting can connect to the meeting's chat thread.
            if (callState.code == CallCompositeCallStateCode.CONNECTED) {
                connectChat()
            }
        }

        callComposite.launch(this, locator, localOptions)
        MainActivity.callComposite = callComposite
    }

    private fun connectChat() {
        if (chatAdapter != null)
            return

        val communicationTokenRefreshOptions =
            CommunicationTokenRefreshOptions( { userToken }, true)
        val communicationTokenCredential =
            CommunicationTokenCredential(communicationTokenRefreshOptions)

        val chatAdapter = ChatAdapterBuilder()
            .endpoint(endpoint)
            .credential(communicationTokenCredential)
            .identity(CommunicationUserIdentifier(communicationUserId))
            .displayName(displayName)
            .threadId(threadId)
            .build()
        chatAdapter.connect(applicationContext)
        MainActivity.chatAdapter = chatAdapter
    }

    private fun showChatUI() {
        chatAdapter?.let {
            // Create Chat Composite View
            val chatView = ChatThreadView(this, chatAdapter)
            val chatContainer = findViewById<ConstraintLayout>(R.id.chatContainer)
            chatContainer.removeAllViews()
            chatContainer.addView(
                chatView,
                ViewGroup.LayoutParams(
                    ViewGroup.LayoutParams.MATCH_PARENT,
                    ViewGroup.LayoutParams.MATCH_PARENT
                )
            )
        }
    }
}
Prerequisites
- An Azure account and an active Azure subscription. Create an account for free.
- A Mac running Xcode 13 or later, and a valid developer certificate installed in your keychain. CocoaPods must also be installed to fetch dependencies.
- A deployed Azure Communication Services resource.
- An Azure Communication Services access token.
Get a complete sample
You can get a complete sample project from GitHub.
Set up the project
Complete the following sections to set up the quickstart project.
Create a new Xcode project
In Xcode, create a new project:
On the File menu, select New > Project.
In Choose a template for your new project, select the iOS platform and select the App application template. The quickstart uses the UIKit storyboards. The quickstart doesn't create tests, so you can clear the Include Tests checkbox.
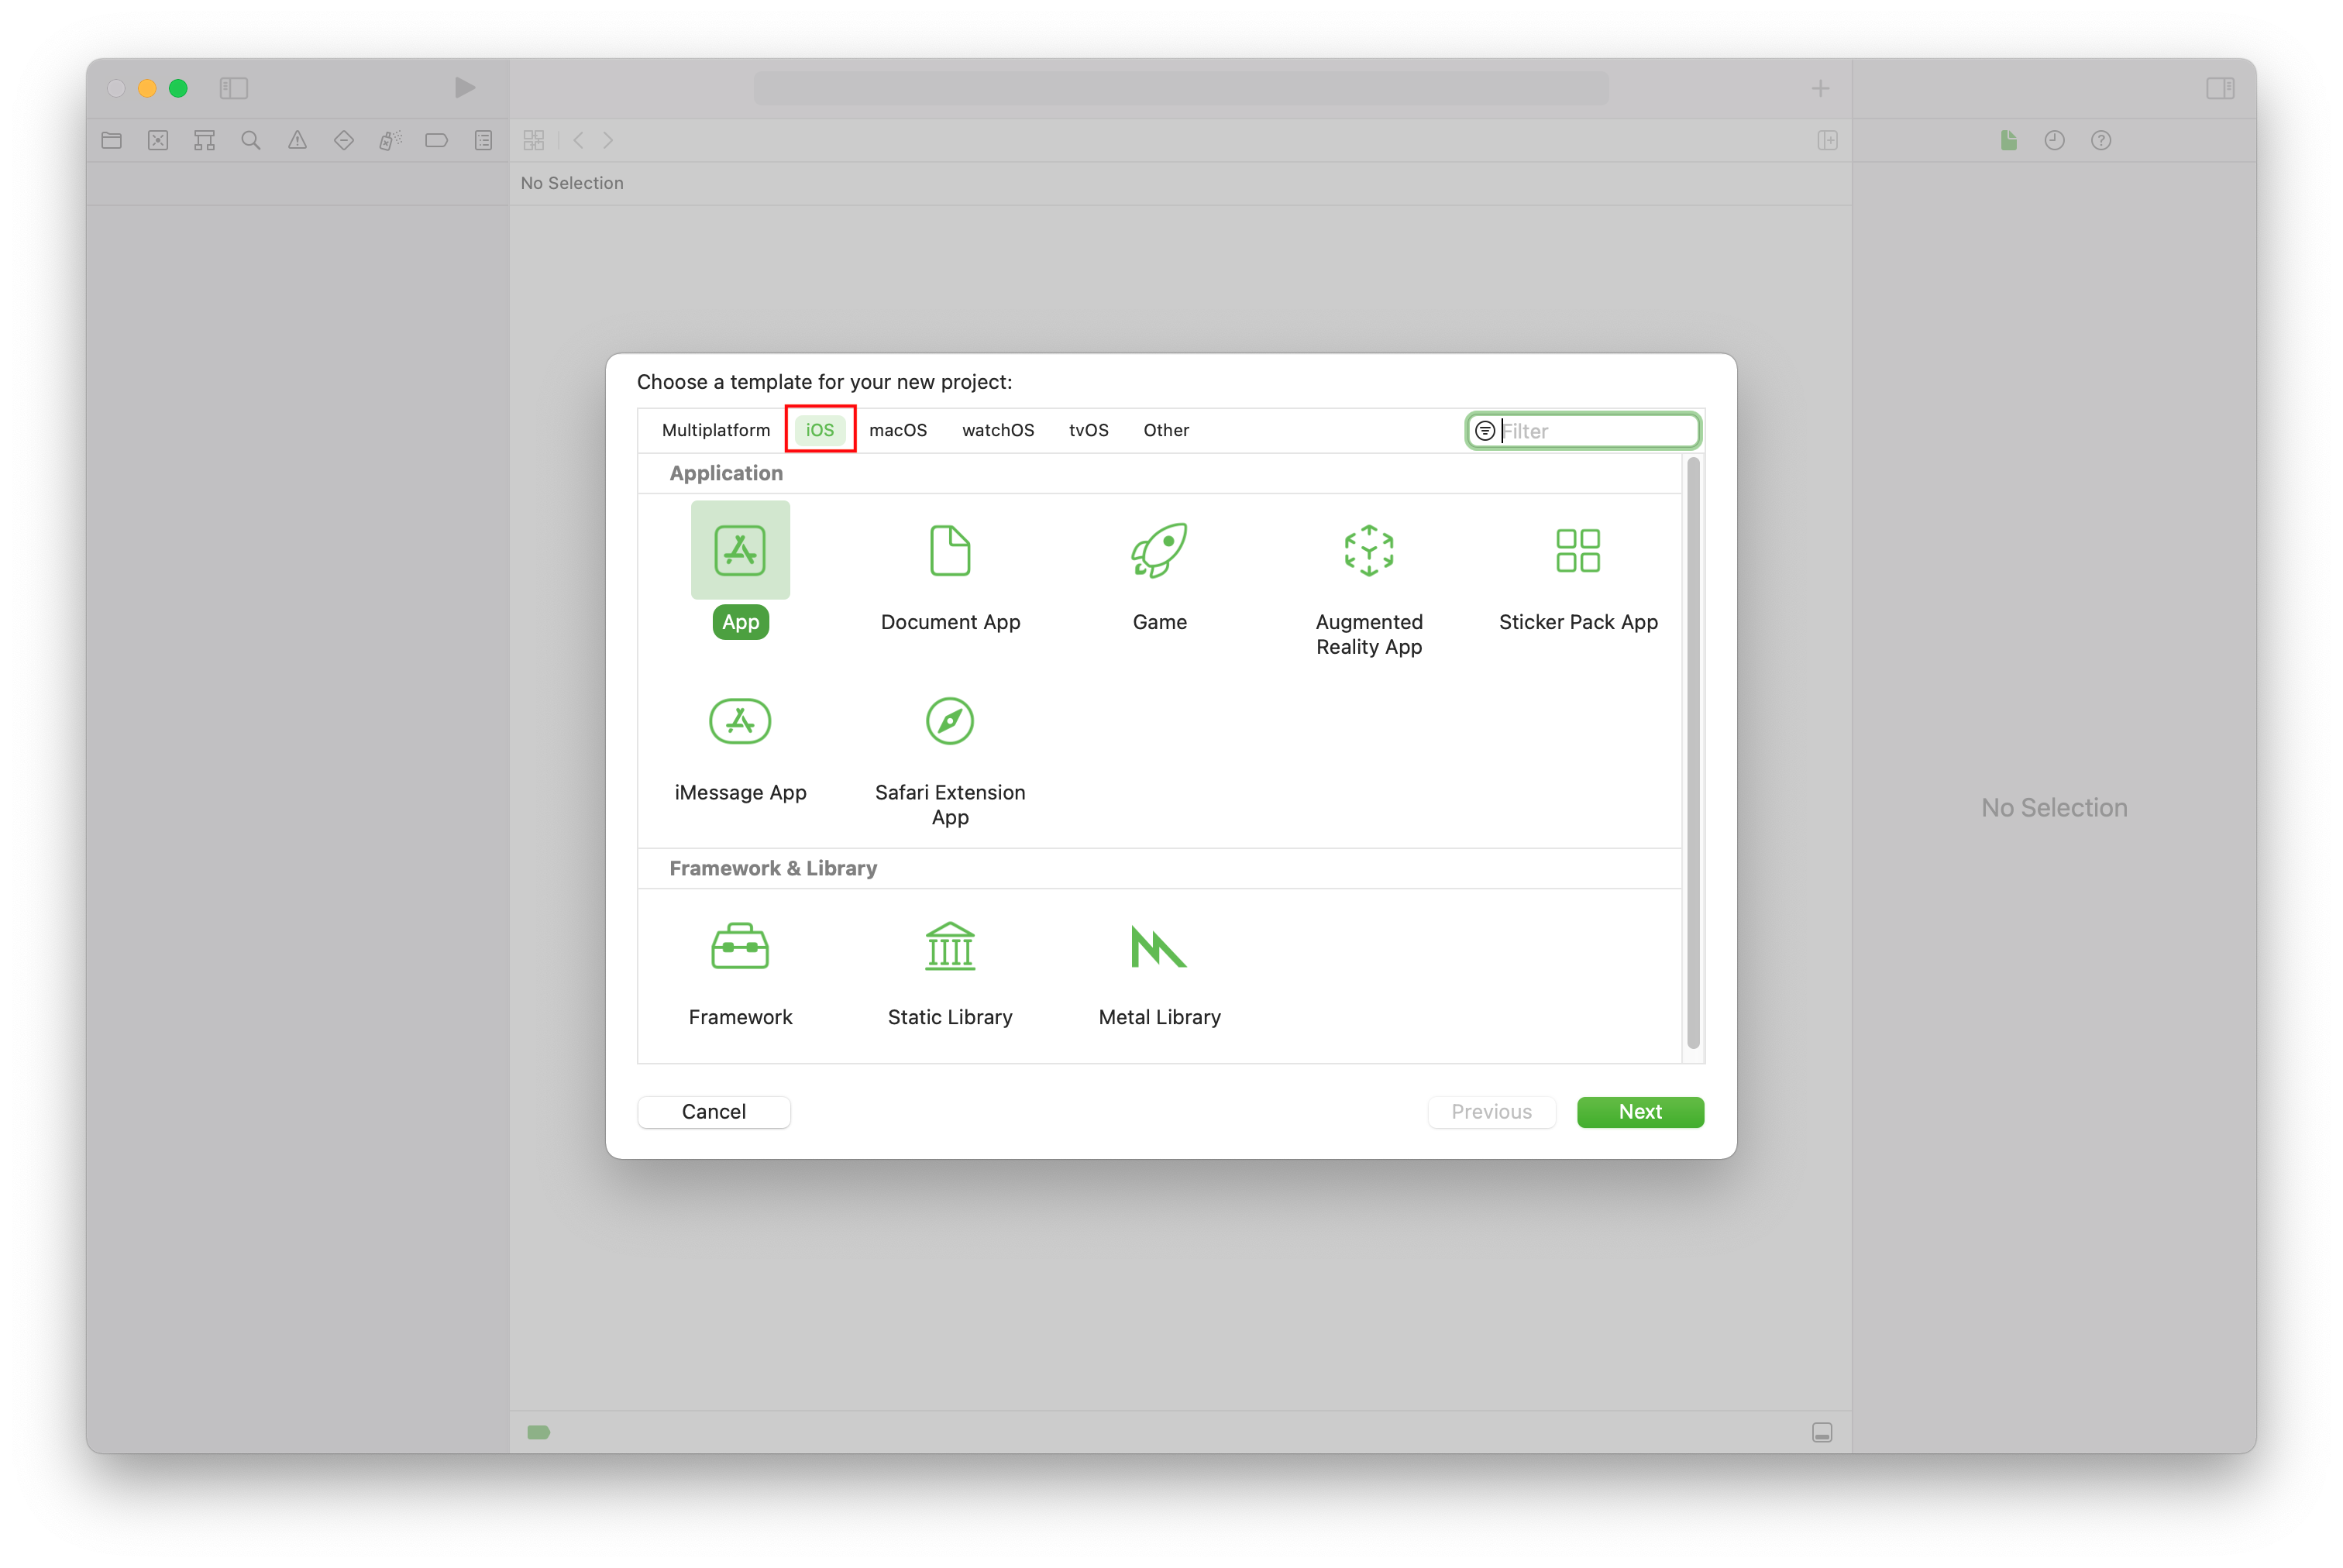
In Choose options for your new project, for the product name, enter UILibraryQuickStart. For the interface, select Storyboard.

Install the package and dependencies
(Optional) For MacBook with M1, install and enable Rosetta in Xcode.
In your project root directory, run
pod initto create a Podfile. If you encounter an error, update CocoaPods to the current version.Add the following code to your Podfile. Replace
UILibraryQuickStartwith your project name.platform :ios, '15.0' target 'UILibraryQuickStart' do use_frameworks! pod 'AzureCommunicationUICalling', '1.12.0-beta.1' pod 'AzureCommunicationUIChat', '1.0.0-beta.4' endRun
pod install --repo-update.In Xcode, open the generated.xcworkspace file.
Request access to device hardware
To access the device's hardware, including the microphone and camera, update your app's information property list. Set the associated value to a string that's included in the dialog that the system uses to request access from the user.
Right-click the
Info.plistentry of the project tree and select Open As > Source Code. Add the following lines to the top-level<dict>section, and then save the file.<key>NSCameraUsageDescription</key> <string></string> <key>NSMicrophoneUsageDescription</key> <string></string>Here's an example of the
Info.plistsource code in an Xcode file: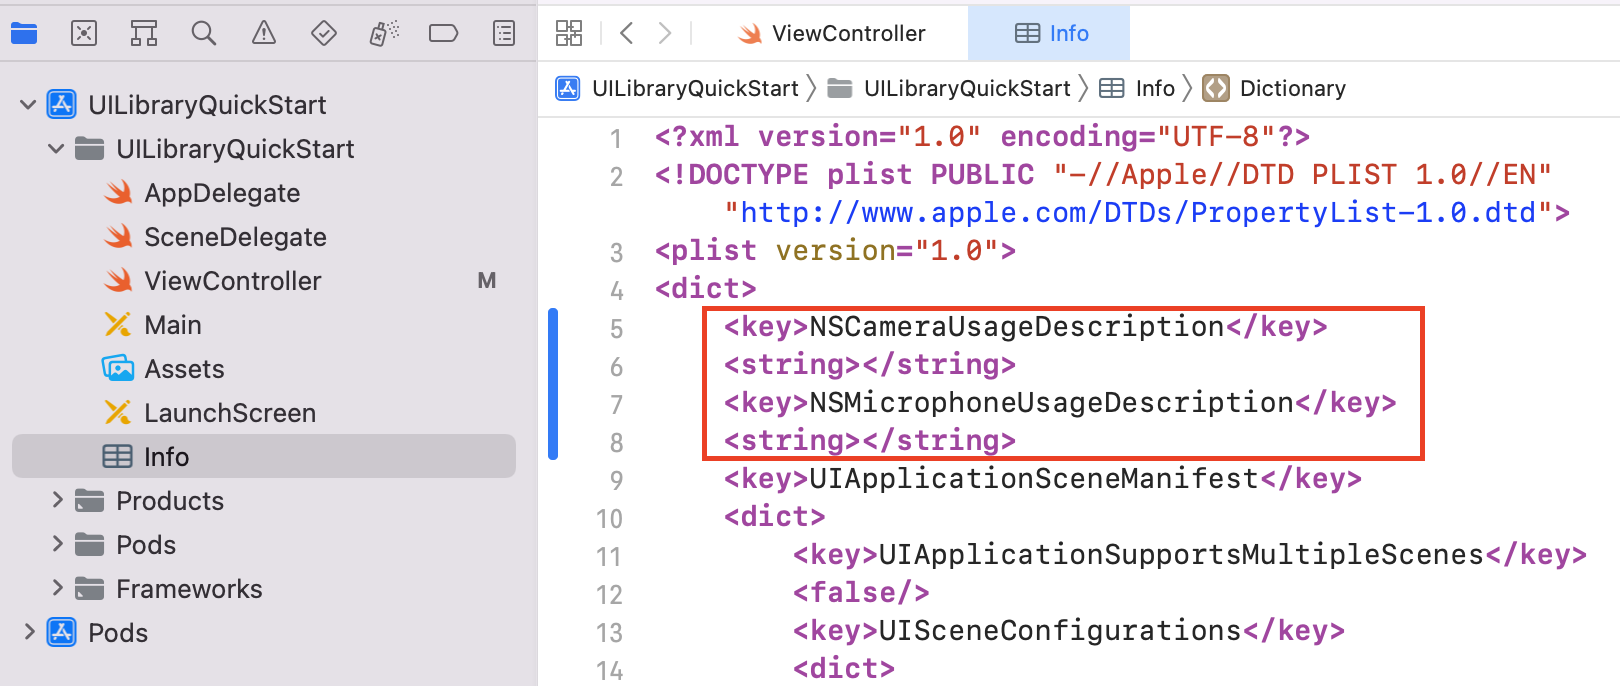
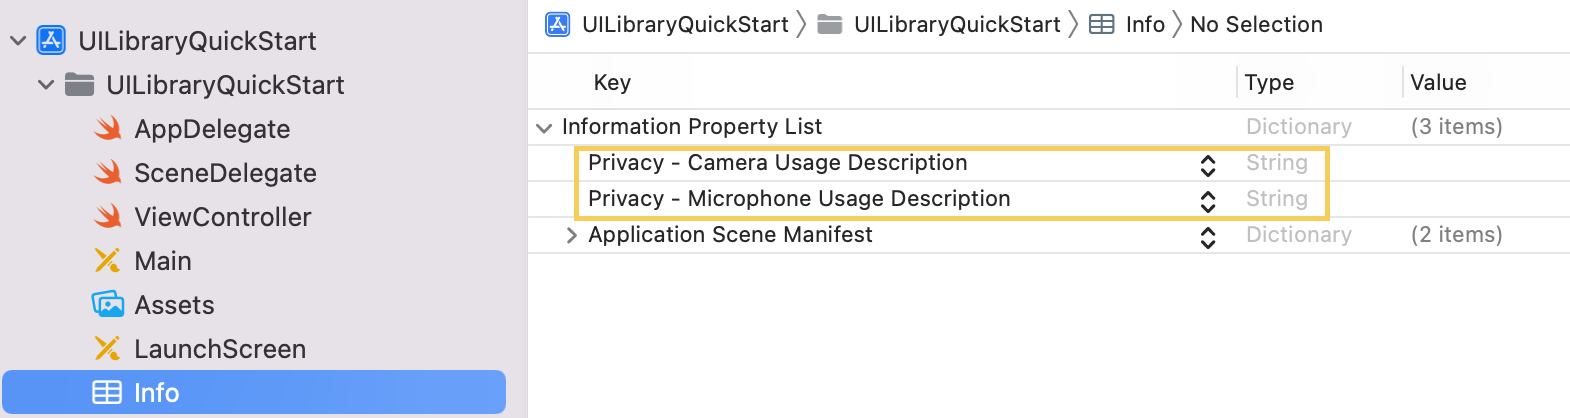
To verify that device permission requests are added correctly, select Open As > Property List. Check that the information property list looks similar to the following example:
Turn off Bitcode
In the Xcode project, under Build Settings, set the Enable Bitcode option to No. To find the setting, change the filter from Basic to All or use the search bar.

Download a Chat icon
- Download an icon from the GitHub repository.
- Open the downloaded file and change
filltofill="#FFFFFF". - In Xcode, go to Assets. Create a new image set and name it ic_fluent_chat_24_regular. Select the downloaded file as the universal icon.
Initialize the composite
To initialize the composite, go to ViewController and update connection settings:
- Replace
TEAM_MEETING_LINKwith the Teams meeting link. - Replace
ACS_ENDPOINTwith your Azure Communication Services resource's endpoint. - Replace
DISPLAY_NAMEwith your name. - Replace
USER_IDwith your Azure Communication Services user ID. - Replace
USER_ACCESS_TOKENwith your token.
Get a Teams meeting chat thread for an Azure Communication Services user
You can retrieve Teams meeting details by using Graph APIs, as described in the Graph documentation. The Azure Communication Services Calling SDK accepts a full Teams meeting link or a meeting ID. They're returned as part of the onlineMeeting resource, which is accessible under the joinWebUrl property.
With the Graph APIs, you can also obtain the threadID value. The response has a chatInfo object that contains the threadID value.
import UIKit
import AzureCommunicationCalling
import AzureCommunicationUICalling
import AzureCommunicationUIChat

class ViewController: UIViewController {
    private let displayName = "USER_NAME"
    private let endpoint = "ACS_ENDPOINT"
    private let teamsMeetingLink = "TEAM_MEETING_LINK"
    private let chatThreadId = "CHAT_THREAD_ID"
    private let communicationUserId = "USER_ID"
    private let userToken = "USER_ACCESS_TOKEN"


    private var callComposite: CallComposite?
    private var chatAdapter: ChatAdapter?
    private var chatCompositeViewController: ChatCompositeViewController?

    private var startCallButton: UIButton?
    private var chatContainerView: UIView?

    override func viewDidLoad() {
        super.viewDidLoad()
        view.backgroundColor = .systemBackground
        initControlBar()
    }

    @objc private func startCallComposite() {
        let callCompositeOptions = CallCompositeOptions(
            enableMultitasking: true,
            enableSystemPictureInPictureWhenMultitasking: true,
            displayName: displayName)

        let communicationTokenCredential = try! CommunicationTokenCredential(token: userToken)

        let callComposite = self.callComposite ?? CallComposite(credential: communicationTokenCredential, withOptions: callCompositeOptions)
        self.callComposite = callComposite

        callComposite.events.onCallStateChanged = { [weak self] callState in
            if callState.requestString == CallState.connected.requestString {
                self?.connectChat()
            }
        }

        let chatCustomButton = CustomButtonViewData(
            id: UUID().uuidString,
            image: UIImage(named: "ic_fluent_chat_24_regular")!,
            title: "Chat") { [weak self] _ in
                self?.callComposite?.isHidden = true
                self?.showChat()
            }
        let callScreenHeaderViewData = CallScreenHeaderViewData(customButtons: [chatCustomButton])
        let localOptions = LocalOptions(callScreenOptions: CallScreenOptions(headerViewData: callScreenHeaderViewData))
        callComposite.launch(locator: .teamsMeeting(teamsLink: teamsMeetingLink), localOptions: localOptions)
    }

    @objc private func connectChat() {
        let communicationIdentifier = CommunicationUserIdentifier(communicationUserId)
        guard let communicationTokenCredential = try? CommunicationTokenCredential(
            token: userToken) else {
            return
        }

        self.chatAdapter = ChatAdapter(
            endpoint: endpoint,
            identifier: communicationIdentifier,
            credential: communicationTokenCredential,
            threadId: chatThreadId,
            displayName: displayName)

        Task { @MainActor in
            guard let chatAdapter = self.chatAdapter else {
                return
            }
            try await chatAdapter.connect()
        }
    }

    @objc private func showChat() {
        guard let chatAdapter = self.chatAdapter,
              let chatContainerView = self.chatContainerView,
              self.chatCompositeViewController == nil else {
            return
        }

        let chatCompositeViewController = ChatCompositeViewController(with: chatAdapter)

        self.addChild(chatCompositeViewController)
        chatContainerView.addSubview(chatCompositeViewController.view)

        chatCompositeViewController.view.translatesAutoresizingMaskIntoConstraints = false
        NSLayoutConstraint.activate([
            chatCompositeViewController.view.topAnchor.constraint(equalTo: chatContainerView.topAnchor),
            chatCompositeViewController.view.bottomAnchor.constraint(equalTo: chatContainerView.bottomAnchor),
            chatCompositeViewController.view.leadingAnchor.constraint(equalTo: chatContainerView.leadingAnchor),
            chatCompositeViewController.view.trailingAnchor.constraint(equalTo: chatContainerView.trailingAnchor)
        ])

        chatCompositeViewController.didMove(toParent: self)
        self.chatCompositeViewController = chatCompositeViewController
    }

    private func initControlBar() {
        let startCallButton = UIButton()
        self.startCallButton = startCallButton
        startCallButton.layer.cornerRadius = 10
        startCallButton.contentEdgeInsets = UIEdgeInsets(top: 6, left: 16, bottom: 6, right: 16)
        startCallButton.backgroundColor = .systemBlue
        startCallButton.setTitle("Call", for: .normal)
        startCallButton.addTarget(self, action: #selector(startCallComposite), for: .touchUpInside)
        startCallButton.translatesAutoresizingMaskIntoConstraints = false

        let margin: CGFloat = 32.0

        let buttonsContainerView = UIView()
        buttonsContainerView.backgroundColor = .clear

        let buttonsStackView = UIStackView(arrangedSubviews: [startCallButton])
        buttonsStackView.axis = .horizontal
        buttonsStackView.alignment = .center
        buttonsStackView.distribution = .equalSpacing
        buttonsStackView.spacing = 10
        buttonsStackView.translatesAutoresizingMaskIntoConstraints = false
        buttonsStackView.heightAnchor.constraint(equalToConstant: 50).isActive = true

        buttonsContainerView.addSubview(buttonsStackView)

        buttonsContainerView.translatesAutoresizingMaskIntoConstraints = false
        NSLayoutConstraint.activate([
            buttonsStackView.topAnchor.constraint(equalTo: buttonsContainerView.topAnchor, constant: 8),
            buttonsStackView.bottomAnchor.constraint(equalTo: buttonsContainerView.bottomAnchor, constant: -8),
            buttonsStackView.leadingAnchor.constraint(equalTo: buttonsContainerView.leadingAnchor, constant: 16),
        ])

        let chatContainerView = UIView()
        self.chatContainerView = chatContainerView

        let verticalStackView = UIStackView(arrangedSubviews: [
            buttonsContainerView,
            chatContainerView
            ])
        verticalStackView.axis = .vertical
        verticalStackView.alignment = .fill
        verticalStackView.translatesAutoresizingMaskIntoConstraints = false
        view.addSubview(verticalStackView)

        let margins = view.safeAreaLayoutGuide
        let constraints = [
            verticalStackView.leadingAnchor.constraint(equalTo: margins.leadingAnchor),
            verticalStackView.trailingAnchor.constraint(equalTo: margins.trailingAnchor),
            verticalStackView.topAnchor.constraint(equalTo: margins.topAnchor, constant: margin),
            verticalStackView.bottomAnchor.constraint(equalTo: margins.bottomAnchor, constant: -margin)
        ]
        NSLayoutConstraint.activate(constraints)
    }
}
Run the code
Run the code to build and run your app on the device.
More features
The list of use cases has detailed information about more features.
Add notifications to your mobile app
Azure Communication Services integrates with Azure Event Grid and Azure Notification Hubs, so you can add push notifications to your apps in Azure. You can use push notifications to send information from your application to users' mobile devices. A push notification can show a dialog, play a sound, or display an incoming call UI.