Note
Access to this page requires authorization. You can try signing in or changing directories.
Access to this page requires authorization. You can try changing directories.
Note
DeepAR SDK is third-party software, which is licensed under its own terms. Microsoft doesn't make any representations or warranties concerning the use of third-party software.
In some usage scenarios, you might want to apply some video processing to the original camera video, such as background blur or background replacement. This change can provide a better user experience.
The Azure Communication Calling video effects package provides several video processing functions. However, this isn't the only choice. You can also integrate other video effects library with Azure Communication Services raw media access API.
We use DeepAR SDK(https://www.deepar.ai/) as an example to show how to integrate other effects libraries with Azure Communication Services Calling SDK. Let's try DeepAR to enrich your video with Augmented Reality!
Prerequisites
- An Azure account with an active subscription. Create an account for free.
- An Azure Communication Service resource. Further details can be found in the Create an Azure Communication Services resource quickstart.
- An Azure Communication Services voice and video calling enabled client. Add video calling to your app.
- DeepAR license key. Getting started | DeepAR.
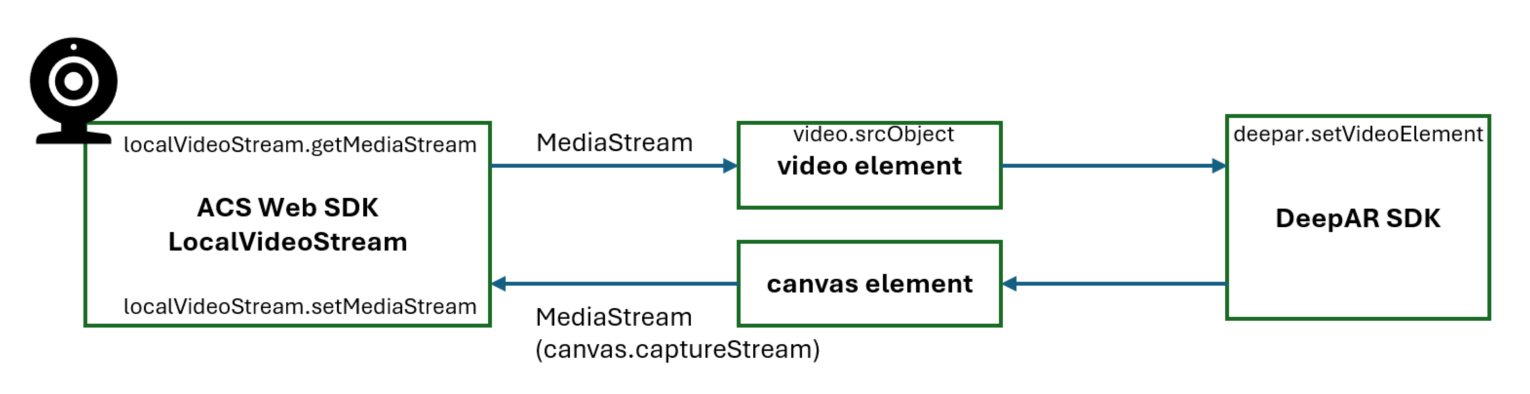
How video input and output work between Azure Communication Services Web SDK and DeepAR
Both Azure Communication Services Web SDK and DeepAR can read the camera device list and get the video stream directly from the device. We want to provide consistency in the app, and DeepAR SDK provides a way for us to directly input a video stream acquired from Azure Communication Services Web SDK.
Similarly, Azure Communication Services Web SDK needs the processed video stream output from DeepAR SDK and sends the video stream to the remote endpoint. DeepAR offers the option to use a canvas as an output. Azure Communication Services Web SDK can consume the raw video stream captured from the canvas.
Here's the data flow:
Initialize DeepAR SDK
To enable DeepAR filters, you need to initialize DeepAR SDK. Use the following code to invoke deepar.initialize API.
const canvas = document.createElement('canvas');
const deepAR = await deepar.initialize({
    licenseKey: 'YOUR_LICENSE_KEY',
    canvas: canvas,
    additionalOptions: {
        cameraConfig: {
            disableDefaultCamera: true
        }
    }
});
Here we disable the default camera because we want Azure Communication Services Web SDK to provide the source video stream.
The canvas is required for Azure Communication Services Web SDK to consume the video output from DeepAR SDK.
Connect the input and output
To start a video call, you need to create a LocalVideoStream object as the video input in SDK.
const deviceManager = await callClient.getDeviceManager();
const cameras = await deviceManager.getCameras();
const camera = cameras[0]
const localVideoStream = new LocalVideoStream(camera);
await call.startVideo(localVideoStream);
When you start the video call, Azure Communication Services SDK directly sends out the video from camera without processed by DeepAR.
We need to create a path to forward the video acquired from Azure Communication Services SDK to DeepAR SDK.
const deviceManager = await callClient.getDeviceManager();
const cameras = await deviceManager.getCameras();
const camera = cameras[0]
const inputVideoStream = new LocalVideoStream(camera);
const inputMediaStream = await inputVideoStream.getMediaStream();
const video = document.createElement('video');
const videoResizeCallback = () => {
    canvas.width = video.videoWidth;
    canvas.height = video.videoHeight;
};
video.addEventListener('resize', videoResizeCallback);
video.autoplay = true;
video.srcObject = inputMediaStream;
deepAR.setVideoElement(video, true);
Now we finished configuring the input video. To configure the output video, we need another LocalVideoStream.
const outputMediaStream = canvas.captureStream(30);
const outputVideoStream = new LocalVideoStream(outputMediaStream);
await call.startVideo(outputVideoStream);
Start the effect
In DeepAR, effects and background processing are independent, which means you can apply the filter while enabling the background blur or background replacement.
// apply the effect
await deepAR.switchEffect('https://cdn.jsdelivr.net/npm/deepar/effects/lion');
// enable the background blur
await deepAR.backgroundBlur(true, 8);

Stop the effect
If you want to stop the effect, you can invoke deepar.clearEffect API
await deepAR.clearEffect();
To disable the background blur, you can pass false to deepar.backgroundBlur API.
Disable DeepAR during the video call
In case you want to disable DeepAR during the video call, you need to call deepar.stopVideo.
Invoking deepar.stopVideo also ends the current media stream captured from the canvas.
await outputVideoStream.switchSource(cameras[0]);
await deepAR.stopVideo();
Next steps
- Learn about Video effects.
- Learn more about Manage video during calls.
- Learn about DeepAR at Getting started | DeepAR.