Note
Access to this page requires authorization. You can try signing in or changing directories.
Access to this page requires authorization. You can try changing directories.
Important
This feature of Azure Communication Services is currently in preview. Features in preview are publicly available and can be used by all new and existing Microsoft customers.
Preview APIs and SDKs are provided without a service-level agreement. We recommend that you don't use them for production workloads. Certain features might not be supported or capabilities might be constrained.
For more information, see Supplemental Terms of Use for Microsoft Azure Previews.
In this tutorial, we're using Azure Communication Services with the UI Library to create an experience that gets users ready to join a call. The UI Library provides a set of rich components and UI controls that can be used to produce a Call Readiness experience, and a rich set of APIs to understand the user state.
Prerequisites
- Follow the App setup process on the previous part of this tutorial: Call Readiness - Overview
Download code
Access the full code for this tutorial on GitHub.
Checking for Browser Support
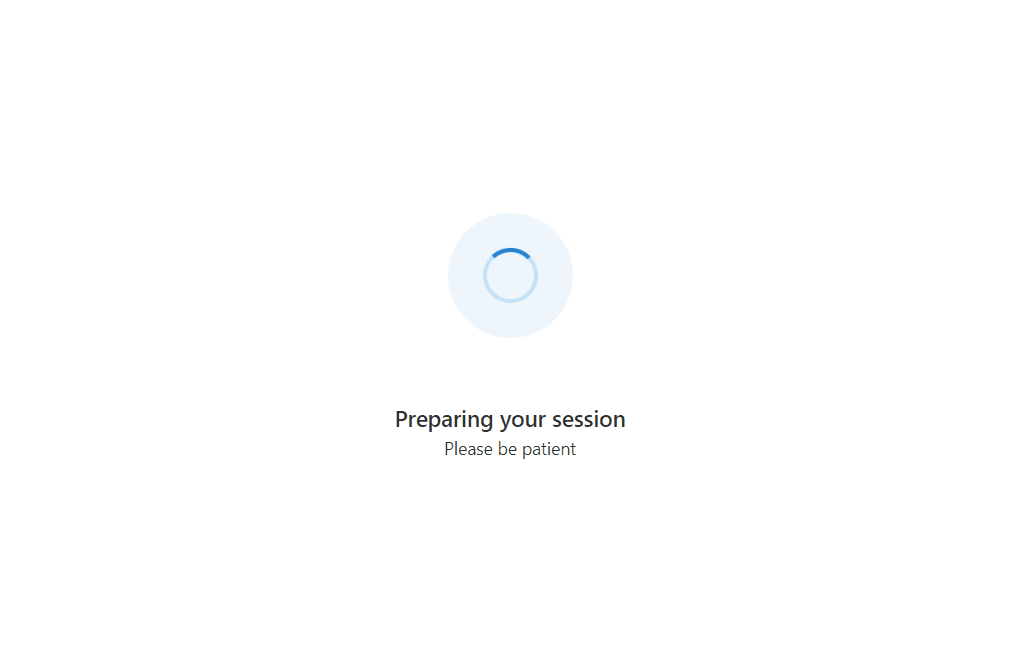
To ensure the user gets the best experience, we want to first make sure they're on a supported browser. In this section, we create a page that displays "Preparing your session" whilst we perform a quick support check in the background on the user's browser.
Preparing Your Session Page
Create a new file called PreparingYourSession.tsx where we create a spinner to show to the user while we perform asynchronous checks in the background:
src/PreparingYourSession.tsx
import { useTheme } from '@azure/communication-react';
import { ISpinnerStyles, IStackStyles, ITextStyles, ITheme, Spinner, Stack, Text } from '@fluentui/react';

/** This page displays a spinner to the user. This is used to show the user that background checks are being performed. */
export const PreparingYourSession = (): JSX.Element => {
  const theme = useTheme();
  return (
    <Stack verticalFill verticalAlign="center" horizontalAlign="center" tokens={{ childrenGap: '3rem' }}>
      <Stack styles={spinnerContainerStyles(theme)}>
        <Spinner styles={spinnerStyles} />
      </Stack>
      <Stack horizontalAlign="center">
        <Text styles={headingStyles} variant="large">Preparing your session</Text>
        <Text variant="medium">Please be patient</Text>
      </Stack>
    </Stack>
  );
};

const headingStyles: ITextStyles = {
  root: {
    fontWeight: '600',
    lineHeight: '2rem'
  }
};

const spinnerStyles: ISpinnerStyles = {
  circle: {
    height: '2.75rem',
    width: '2.75rem',
    borderWidth: '0.2rem'
  }
};

const spinnerContainerStyles = (theme: ITheme): IStackStyles => ({
  root: {
    padding: '1.75rem',
    borderRadius: '50%',
    background: theme.palette?.themeLighterAlt
  }
});
We can then hook up this Preparing your session screen into our App.
In the App.tsx and a variable testState to track the state of the app and while testState is in runningEnvironmentChecks state we show the Preparing Your Session Screen.
First, add the following imports to our App.tsx file that we created in the overview:
import { useState } from 'react';
import { PreparingYourSession } from './PreparingYourSession';
After that's done, update our App.tsx file to include the new spinner.
type TestingState = 'runningEnvironmentChecks' | 'finished';

const App = (): JSX.Element => {
  const [testState, setTestState] = useState<TestingState>('runningEnvironmentChecks');

  return (
    <FluentThemeProvider>
      <CallClientProvider callClient={callClient}>
        {/* Show a Preparing your session screen while running the call readiness checks */}
        {testState === 'runningEnvironmentChecks' && (
          <>
            <PreparingYourSession />
          </>
        )}

        {/* After the device setup is complete, take the user to the call. For this sample we show a test complete page. */}
        {testState === 'finished' && <TestComplete />}
      </CallClientProvider>
    </FluentThemeProvider>
  );
}
Performing an Environment information check
First create a utility file call environmentSupportUtils.ts. Inside this call, we add a method checkEnvironmentSupport. This method uses the Calling Stateful Client to perform a request for the environment information that the Calling Stateful Client is running on.
src/environmentSupportUtils.ts
import { Features, EnvironmentInfo } from "@azure/communication-calling";
import { StatefulCallClient } from "@azure/communication-react";

/** Use the CallClient's getEnvironmentInfo() method to check if the browser is supported. */
export const checkEnvironmentSupport = async (callClient: StatefulCallClient): Promise<EnvironmentInfo> => {
  const environmentInfo = await callClient.feature(Features.DebugInfo).getEnvironmentInfo();
  console.info(environmentInfo); // view console logs in the browser to see what environment info is returned
  return environmentInfo;
}
The data returned from checkEnvironmentSupport contains the following information:
- Browser support
- Browser version support
- Operating system (Platform) support
- Detailed environment information
Informing the user they are on an unsupported browser
Next, we need to use this information provided from the Calling SDK to inform the user of the state of their environment if there's an issue. The UI library provides three different components to serve this purpose depending on what the issue is.
UnsupportedOperatingSystemUnsupportedBrowserUnsupportedBrowserVersion
We start by hosting the UI Library's components inside a FluentUI Modal:
Create a new file called UnsupportedEnvironmentPrompts.tsx where we create the different prompts:
src/UnsupportedEnvironmentPrompts.tsx
import { UnsupportedOperatingSystem, UnsupportedBrowser, UnsupportedBrowserVersion } from '@azure/communication-react';
import { Modal } from '@fluentui/react';

/**
 * Modal dialog that shows a Browser Version Unsupported Prompt
 * Use the `onTroubleShootingClick` argument to redirect the user to further troubleshooting.
 * Use the `onContinueAnywayClick` argument to allow the user to continue to the next step even though they are on an unsupported browser version.
 */
export const BrowserVersionUnsupportedPrompt = (props: { isOpen: boolean, onContinueAnyway:() => void }): JSX.    Element => (
  <Modal isOpen={props.isOpen}>
    <UnsupportedBrowserVersion
      onTroubleshootingClick={() => alert('This callback should be used to take the user to further troubleshooting')}
      onContinueAnywayClick={() => props.onContinueAnyway()}
    />
  </Modal>
);

/**
 * Modal dialog that shows a Browser Unsupported Prompt
 * Use the `onTroubleShootingClick` argument to redirect the user to further troubleshooting.
 */
export const BrowserUnsupportedPrompt = (props: { isOpen: boolean }): JSX.Element => (
  <Modal isOpen={props.isOpen}>
    <UnsupportedBrowser
      onTroubleshootingClick={() => alert('This callback should be used to take the user to further troubleshooting')}
    />
  </Modal>
);

/**
 * Modal dialog that shows an Operating System Unsupported Prompt
 * Use the `onTroubleShootingClick` argument to redirect the user to further troubleshooting.
 */
export const OperatingSystemUnsupportedPrompt = (props: { isOpen: boolean }): JSX.Element => (
  <Modal isOpen={props.isOpen}>
    <UnsupportedOperatingSystem
      onTroubleshootingClick={() => alert('This callback should be used to take the user to further troubleshooting')}
    />
  </Modal>
);
We can then show these prompts in an Environment Check Component.
Create a file called EnvironmentChecksComponent.tsx that contains the logic for showing this prompt:
This component has a callback onTestsSuccessful that can take the user to the next page in the App.
src/EnvironmentChecksComponent.tsx
import { useEffect, useState } from 'react';
import { BrowserUnsupportedPrompt, BrowserVersionUnsupportedPrompt, OperatingSystemUnsupportedPrompt } from './UnsupportedEnvironmentPrompts';
import { useCallClient } from '@azure/communication-react';
import { checkEnvironmentSupport } from './environmentSupportUtils';

export type EnvironmentChecksState = 'runningEnvironmentChecks' |
  'operatingSystemUnsupported' |
  'browserUnsupported' |
  'browserVersionUnsupported';

/**
 * This component is a demo of how to use the StatefulCallClient with CallReadiness Components to get a user
 * ready to join a call.
 * This component checks the browser support.
 */
export const EnvironmentChecksComponent = (props: {
  /**
   * Callback triggered when the tests are complete and successful
   */
  onTestsSuccessful: () => void
}): JSX.Element => {
  const [currentCheckState, setCurrentCheckState] = useState<EnvironmentChecksState>('runningEnvironmentChecks');


  // Run call readiness checks when component mounts
  const callClient = useCallClient();
  useEffect(() => {
    const runEnvironmentChecks = async (): Promise<void> => {

      // First we get the environment information from the calling SDK.
      const environmentInfo = await checkEnvironmentSupport(callClient);

      if (!environmentInfo.isSupportedPlatform) {
        setCurrentCheckState('operatingSystemUnsupported');
        // If the platform or operating system is not supported we stop here and display a modal to the user.
        return;
      } else if (!environmentInfo.isSupportedBrowser) {
        setCurrentCheckState('browserUnsupported');
        // If browser support fails, we stop here and display a modal to the user.
        return;
      } else if (!environmentInfo.isSupportedBrowserVersion) {
        setCurrentCheckState('browserVersionUnsupported');
        /**
         *  If the browser version is unsupported, we stop here and show a modal that can allow the user
         *  to continue into the call.
         */
        return;
      } else {
        props.onTestsSuccessful();
      }
    };

    runEnvironmentChecks();
    // eslint-disable-next-line react-hooks/exhaustive-deps
  }, []);

  return (
    <>
      {/* We show this when the operating system is unsupported */}
      <OperatingSystemUnsupportedPrompt isOpen={currentCheckState === 'operatingSystemUnsupported'} />

      {/* We show this when the browser is unsupported */}
      <BrowserUnsupportedPrompt isOpen={currentCheckState === 'browserUnsupported'} />

      {/* We show this when the browser version is unsupported */}
      <BrowserVersionUnsupportedPrompt isOpen={currentCheckState === 'browserVersionUnsupported'} onContinueAnyway={props.onTestsSuccessful} />
    </>
  );
}
We can then add the EnvironmentChecksComponent to the App.tsx. The App then move the user to the Device Checks stage once the test is successful using the onTestsSuccessful callback:
Now we import the new component into our app in App.tsx
import { EnvironmentChecksComponent } from './EnvironmentChecksComponent';
Then let's update the App component in App.tsx:
const App = (): JSX.Element => {
  const [testState, setTestState] = useState<TestingState>('runningEnvironmentChecks');

  return (
    <FluentThemeProvider>
      <CallClientProvider callClient={callClient}>
        {/* Show a Preparing your session screen while running the call readiness checks */}
        {testState === 'runningEnvironmentChecks' && (
          <>
            <PreparingYourSession />
            <EnvironmentChecksComponent
              onTestsSuccessful={() => setTestState('finished')}
            />
          </>
        )}

        {/* After the device setup is complete, take the user to the call. For this sample we show a test complete page. */}
        {testState === 'finished' && <TestComplete />}
      </CallClientProvider>
    </FluentThemeProvider>
  );
}
You can now run the app. Try running on an unsupported browser and you see the unsupported browser prompt: