Note
Access to this page requires authorization. You can try signing in or changing directories.
Access to this page requires authorization. You can try changing directories.
Learn how to run your application in Azure confidential computing by using Fortanix Confidential Computing Manager and Node Agent from Fortanix.
Fortanix is a third-party software vendor that provides products and services that work with the Azure infrastructure. There are other third-party providers that offer similar confidential computing services for Azure.
Note
Some of the products referenced in this document aren't provided by Microsoft. Microsoft is providing this information only as a convenience. References to these non-Microsoft products doesn't imply endorsement by Microsoft.
This tutorial shows you how to convert your application image into a confidential compute-protected image. The environment uses Fortanix software, powered by Azure DCsv2-series Intel SGX-enabled virtual machines. The solution orchestrates critical security policies like identity verification and data access control.
For Fortanix support, join the Fortanix Slack community. Use the #enclavemanager channel.
Prerequisites
- If you don't have a Fortanix Confidential Computing Manager account, sign up before you start.
- You need a private Docker registry to push converted application images.
- If you don't have an Azure subscription, create an account before you start.
Note
Free trial accounts don't have access to the virtual machines used in this tutorial. To complete the tutorial, you need a pay-as-you-go subscription.
Add an application to Fortanix Confidential Computing Manager
Create and select an account
Sign in to Fortanix Confidential Computing Manager (Fortanix CCM).
Go to the Accounts page and select ADD ACCOUNT to create a new account:
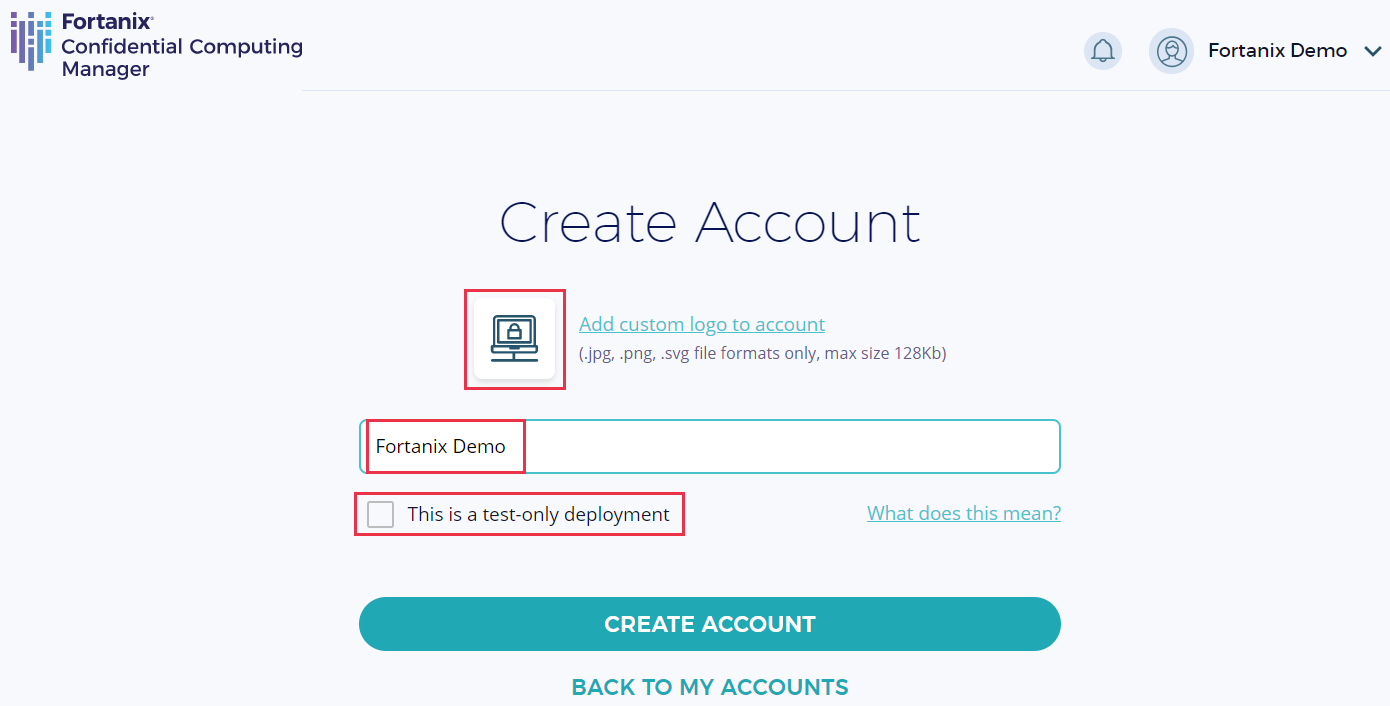
After your account is created, click SELECT ACCOUNT to select the newly created account. Click GO TO ACCOUNT to enter the account and start enrolling the compute nodes and creating applications.
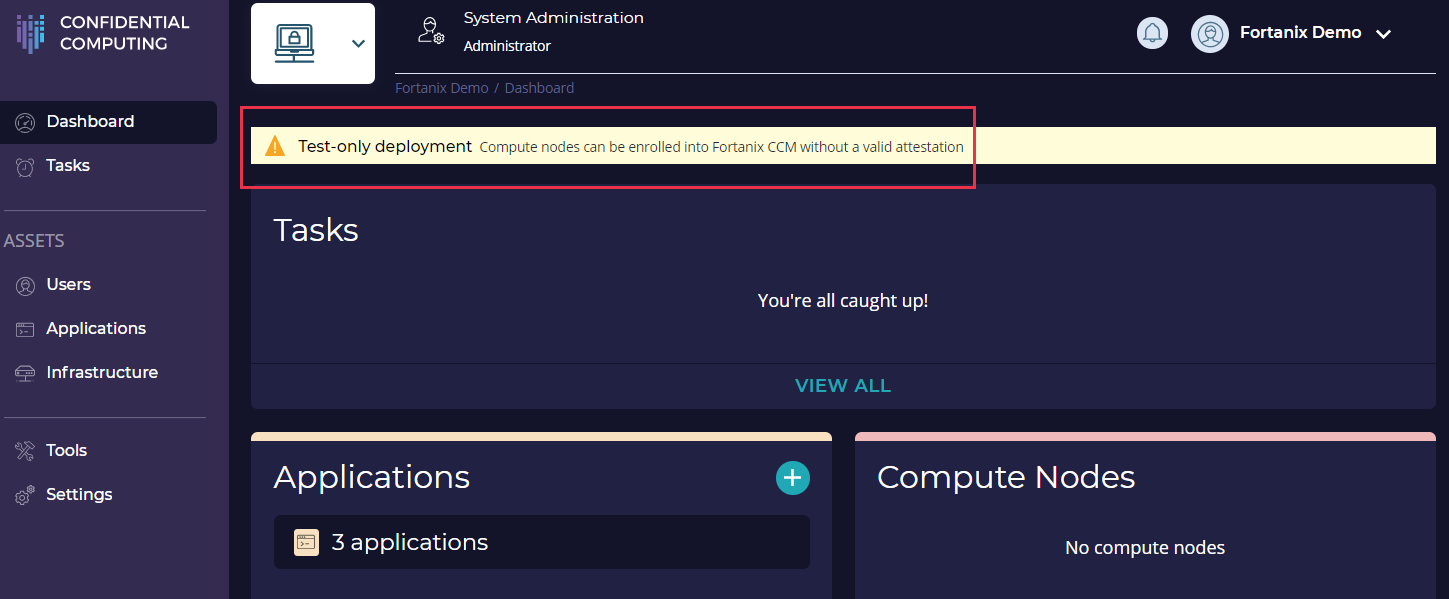
If you disabled the attestation for compute nodes, you would see a warning in the Fortanix CCM dashboard “Test-only deployment: Compute nodes can be enrolled into Fortanix CCM without attesting to Intel’s IAS attestation service”.
Add a group
Navigate to Groups from the menu list and click + ADD GROUP to add a group.
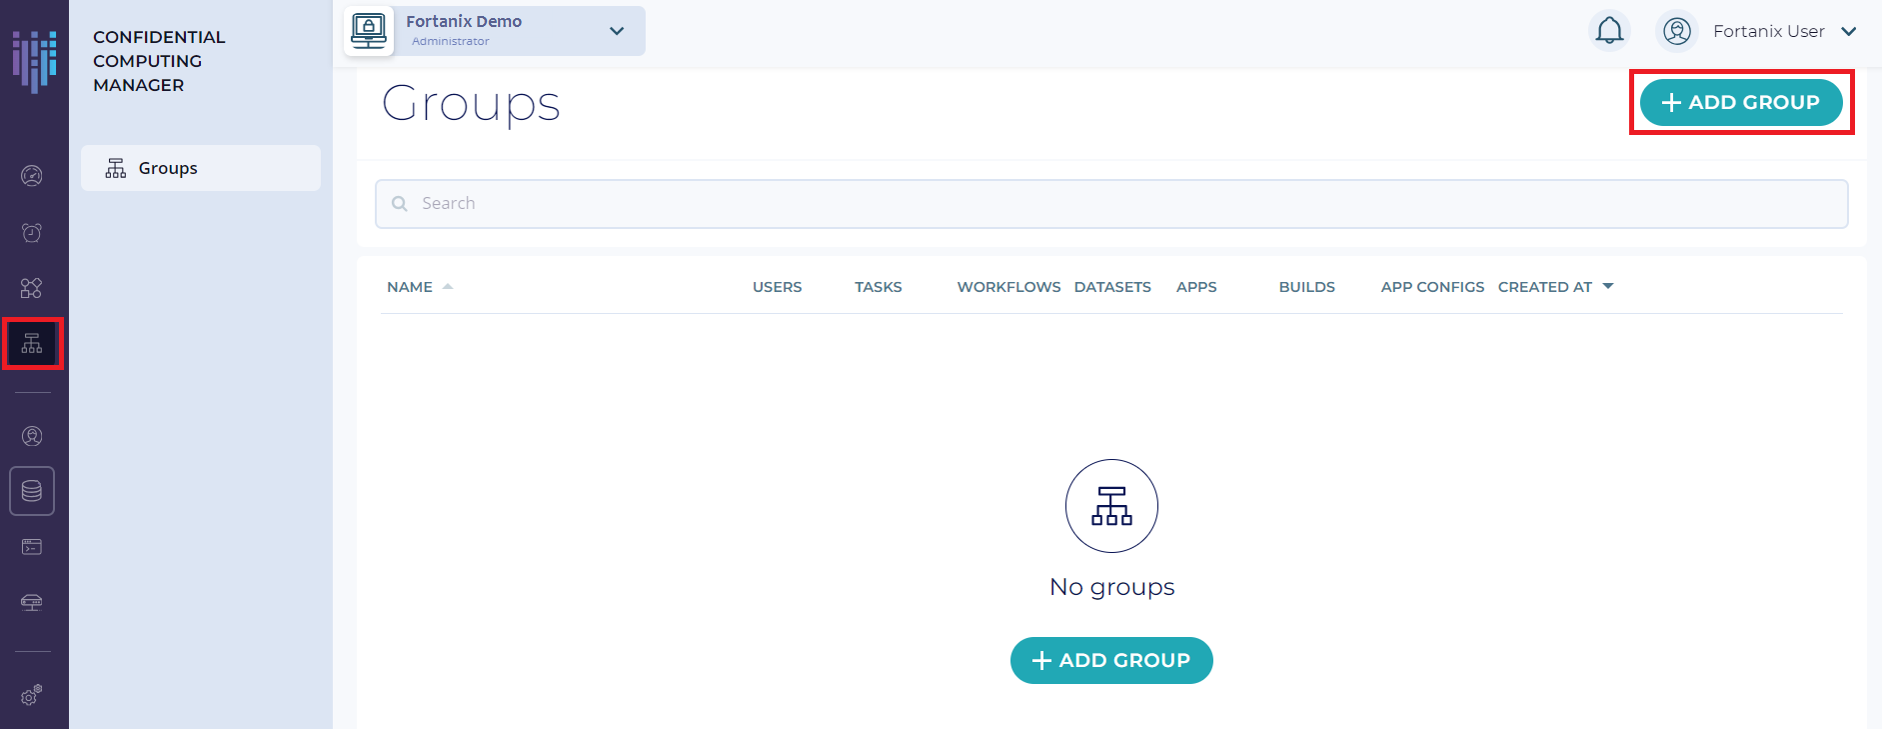
Click the ADD GROUP button to create a new group.
Enter the required Name for the group and add Labels with Key:Value pairs.
Click the CREATE GROUP button. The group is now successfully created.
Add an application
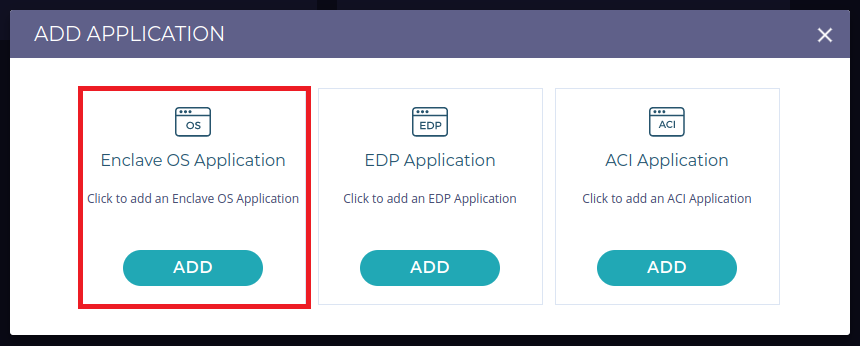
Navigate to the Applications menu item from the CCM UI left navigation bar and click + ADD APPLICATION to add an application. In this example, we'll be adding a Flask Server Enclave OS application.
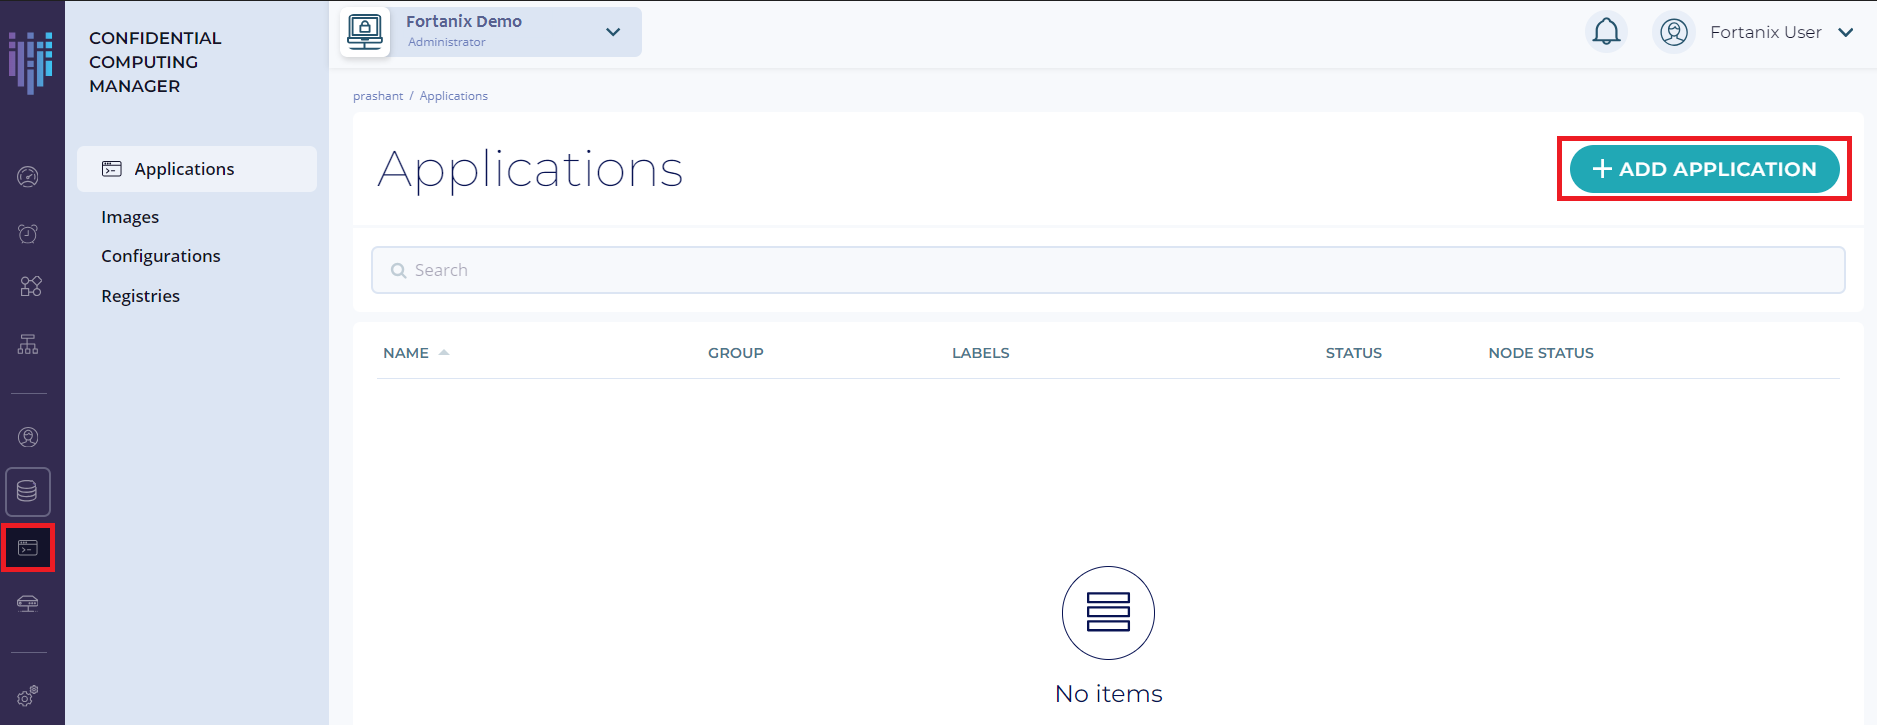
Select the ADD button for the Enclave OS Application:
Note
This tutorial covers adding Enclave OS Applications only.
- Learn more about bringing EDP Rust Applications to Fortanix Confidential Computing Manager.
- Learn more about adding an ACI Application to Fortanix Confidential Computing Manager.
In this tutorial, we'll use the Fortanix Docker registry for the sample application. Fill in the details from the following information. Use your private docker registry to keep the output image.
Application name: Python Application Server
Description: Python Flask Server
Input image name: docker.io/fortanix/python-flask
Output image name: docker.io/fortanx/python-flask-sgx
ISVPRODID: 1
ISVSVM: 1
Memory size: 1 GB
Thread count: 128
Optional: Run the application.
Docker Hub: https://hub.docker.com/u/fortanix
App: fortanix/python-flask
Run the following command:
sudo docker run fortanix/python-flask
Add a certificate. Enter the following values, and then select NEXT:
- Type: Certificate Issued by Confidential Computing Manager
- Key path: /appkey.pem
- Key type: RSA
- Certificate path: /appcert.pem
- RSA Key Size: 2048 Bits
Create an image
A Fortanix CCM Image is a software release or version of an application. Each image is associated with one enclave hash (MRENCLAVE).
After you create an Enclave OS application, on the Add Image page, enter the REGISTRY CREDENTIALS for Output image name. These credentials are used to access the private docker registry where the image will be pushed. Since the input image is stored in a public registry, there is no need to provide credentials for the input image.
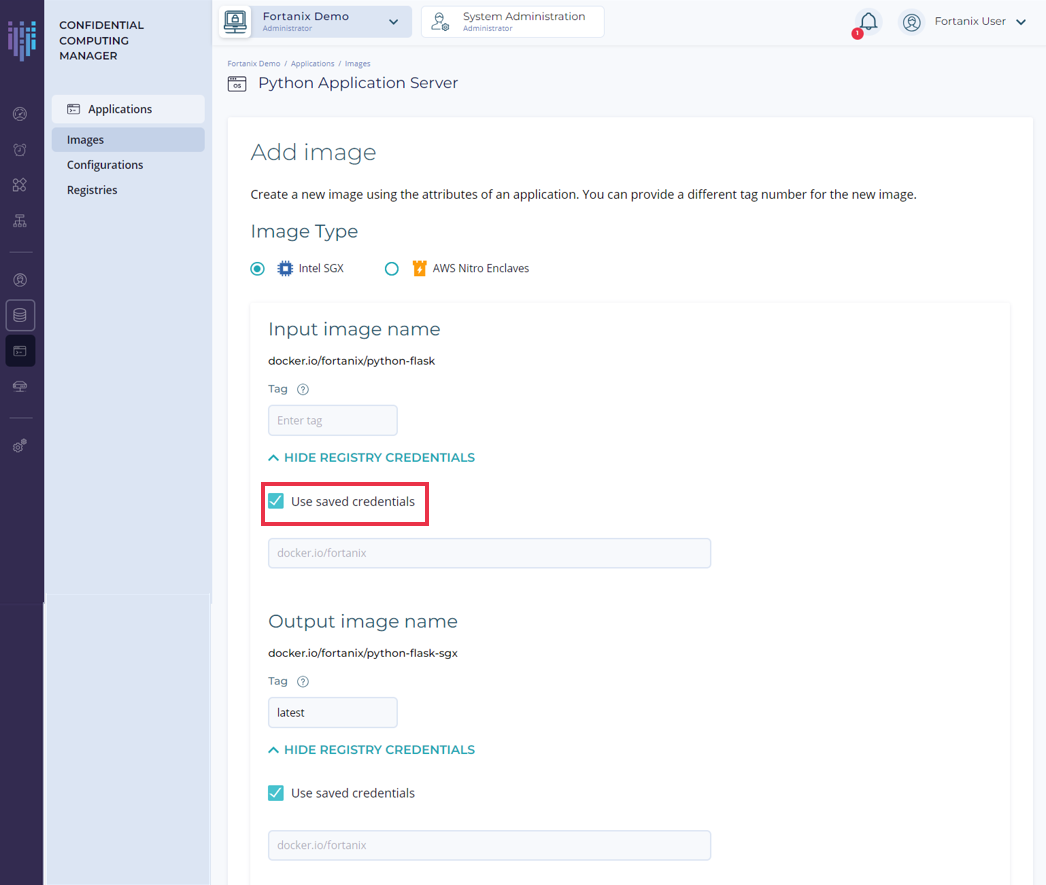
Provide the image tag. Use “latest” if you want to use the latest image builds.
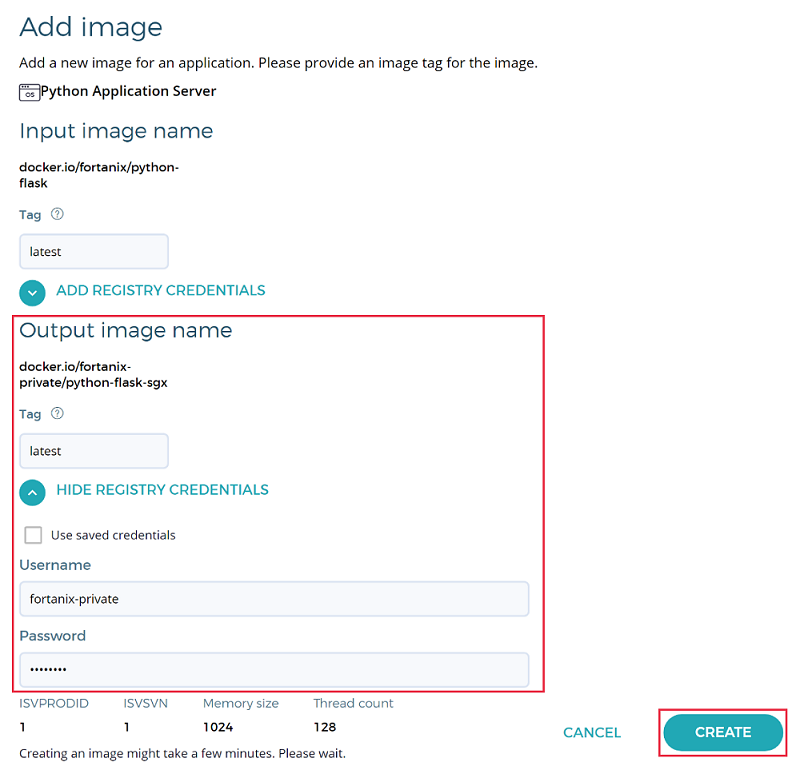
If you selected the Image Type as Intel SGX, enter the following details:
- ISVPRODID is a numeric product identifier. A user must choose a unique value in the range of 0-65535 for their applications.
- ISVSVN is a numeric security version to be assigned to the Enclave. This number should be incremented if security relevant change is made to the application.
- Memory size – Choose the memory size from the drop-down to change the memory size of the enclave.
- Thread count – Change the thread count to support the application.
Select Create to proceed.
Upon completing the image creation, you will see a notification that the image was successfully created and your application will be listed in the Applications screen.
Domain and image approval
An application whose domain is approved, will get a TLS Certificate from Fortanix Confidential Computing Manager. This certificate will have the domain as a subject name which will allow all requests from this domain to be served by the application. If this domain is not approved, the image will run but it will not be issued any TLS certificate from Fortanix Confidential Computing Manager.
Switch to the Tasks menu on the left and select Approve to approve the pending requests to allow the domain and image.
Enroll the compute node agent in Azure
Create and copy join token
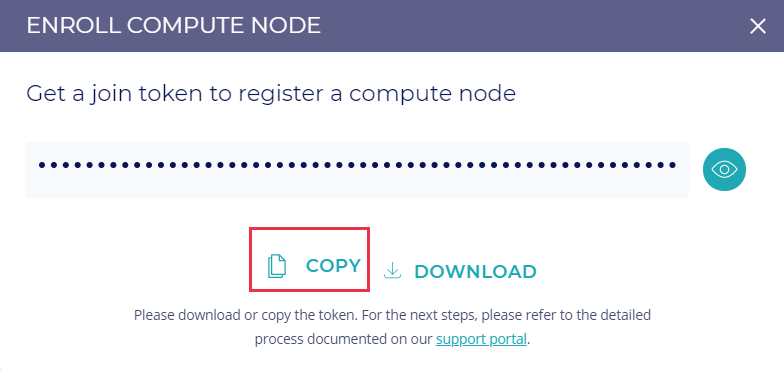
In Fortanix Confidential Computing Manager, you'll create a token. This token allows a compute node in Azure to authenticate itself. You'll need to give this token to your Azure virtual machine.
Select the Infrastructure → Compute Nodes menu item from the CCM left navigation bar and click the + ENROLL NODE button.
Click COPY to copy the Join Token. This Join Token is used by the compute node to authenticate itself.
Enroll nodes into Fortanix Node Agent in Azure Marketplace
Creating a Fortanix Node Agent will deploy a virtual machine, network interface, virtual network, network security group, and a public IP address into your Azure resource group. Your Azure subscription will be billed hourly for the virtual machine. Before you create a Fortanix Node Agent, review the Azure virtual machine pricing page for DCsv2-Series. Delete Azure resources when not in use.
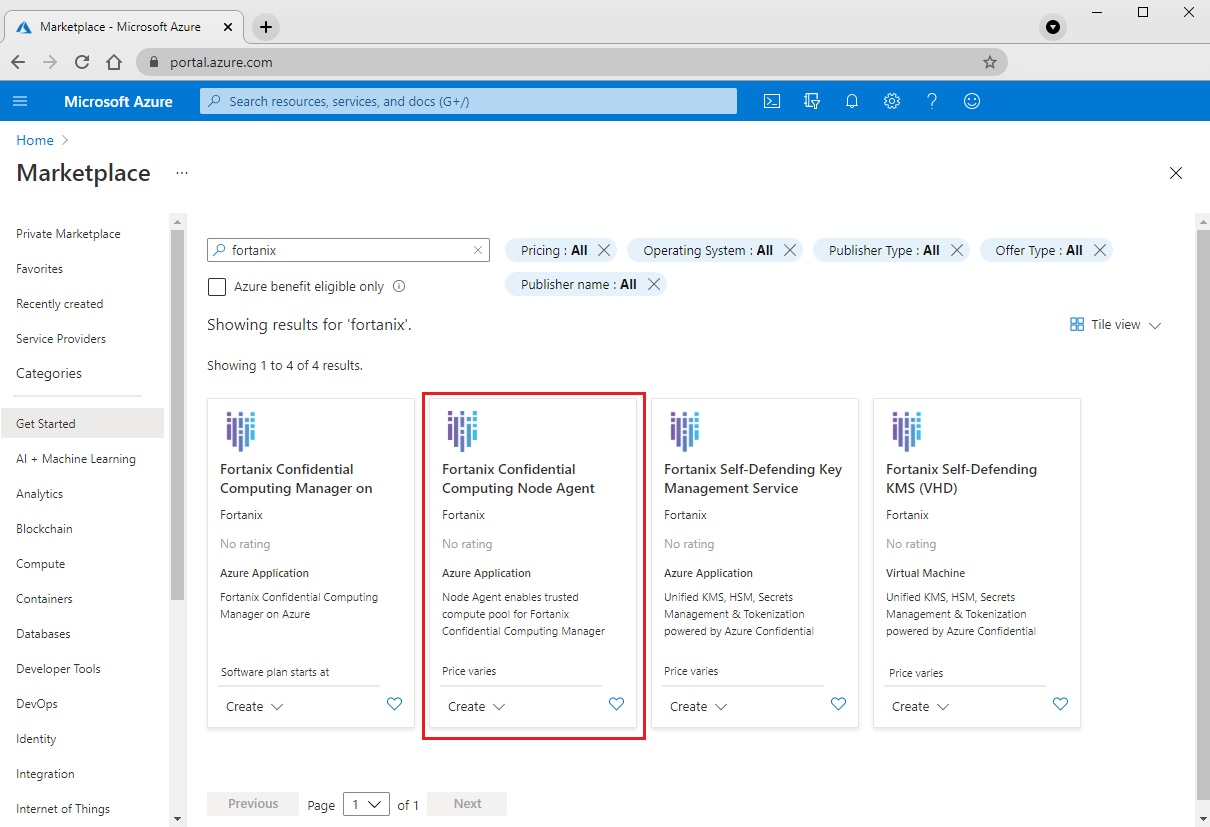
Go to the Azure Marketplace and sign in with your Azure credentials.
In the search bar, type Fortanix Confidential Computing Node Agent. Select the App that shows up in the search box called Fortanix Confidential Computing Node Agent to go to the offering's home page.
Select Get It Now, fill in your information if necessary, and select Continue. You'll be redirected to the Azure portal.
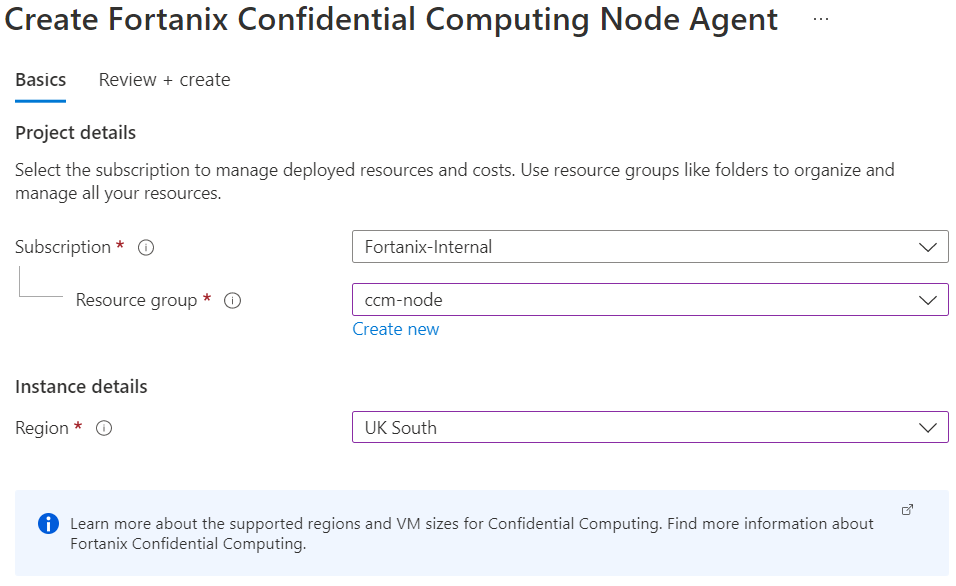
Select Create to go to the Fortanix Confidential Computing Node Agent deployment page.
On this page, you'll be entering information to deploy a virtual machine. Specifically, this VM is a DCsv2-Series Intel SGX-enabled virtual machine from Azure with Fortanix Node Agent software installed. The Node Agent will allow your converted image to run securely on Intel SGX nodes in Azure. Select the subscription and resource group where you want to deploy the virtual machine and associated resources.
Note
There are constraints when deploying DCsv2-Series virtual machines in Azure. You may need to request quota for additional cores. Read about confidential computing solutions on Azure VMs for more information.
Select an available region.
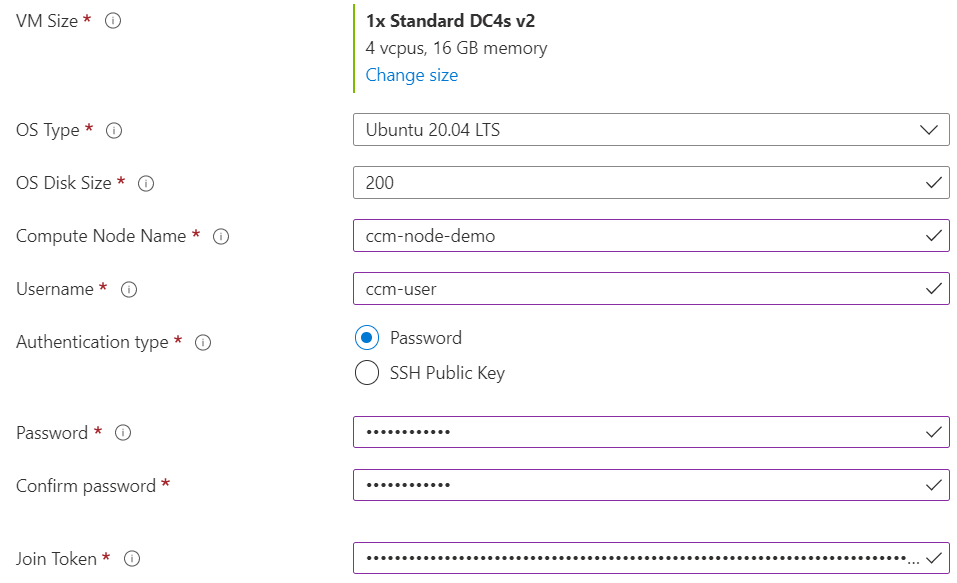
Select the OS Type.
Leave the default OS Disk Size as 200 and select a VM size (Standard_DC4s_v2 will suffice for this tutorial).
Enter a name for your virtual machine in Compute Node Name.
Enter a username and password (or SSH Key) for authenticating into the virtual machine.
Paste the token generated earlier in Join Token.
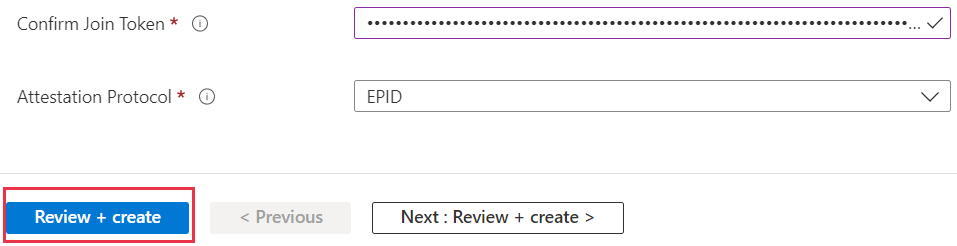
Select Review + create. Ensure the validation passes and then select Create. When all the resources deploy, the compute node is now enrolled in Fortanix Confidential Computing Manager.
Run the application image on the enrolled compute node
Run the application by executing the following command. Ensure you change the Node Agent Host IP, Port, and Converted Image Name as inputs for your specific application.
Install docker on the enrolled compute node. To install docker, use the command:
sudo apt install docker.ioRun the application image on the node by using the following command:
    sudo docker run `
        --privileged --volume /dev:/dev `
        -v /var/run/aesmd/aesm.socket:/var/run/aesmd/aesm.socket `
        -e NODE_AGENT_BASE_URL=http://52.152.206.164:9092/v1/ fortanix-private/python-flask-sgx
Where:
52.152.206.164is the Node Agent Host IP.9092is the default port on which the Node Agent listens to.fortanix/python-flask-sgxis the converted app that can be found in the Images menu under the Image Name column in the Images table in the Fortanix Confidential Computing Manager Web Portal.
Verify and monitor the running application
- Return to Fortanix Confidential Computing Manager.
- Ensure you're working inside the Account where you enrolled the node.
- Select the Applications menu on the left navigation pane.
- Verify that there's a running application with an associated compute node.
Clean up resources
When they are no longer needed, you can delete the resource group, virtual machine, and associated resources. Deleting the resource group will unenroll the nodes associated with your converted image.
Select the resource group for the virtual machine, then select Delete. Confirm the name of the resource group to finish deleting the resources.
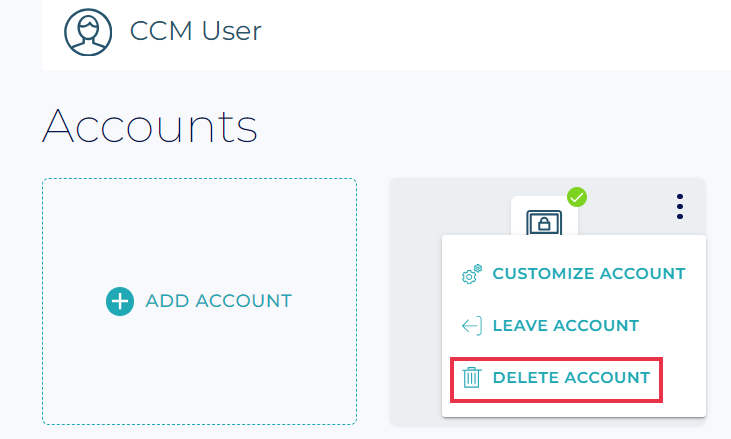
To delete the Fortanix Confidential Computing Manager account you created, go the Accounts Page in the Fortanix Confidential Computing Manager. Hover over the account you want to delete. Select the vertical black dots in the upper right-hand corner and select Delete Account.
Next steps
In this quickstart, you used Fortanix tooling to convert your application image to run on top of a confidential computing virtual machine. For more information about confidential computing virtual machines on Azure, see Solutions on Virtual Machines.
To learn more about Azure's confidential computing offerings, see Azure confidential computing overview.
Learn how to complete similar tasks using other third-party offerings on Azure, like Anjuna and Scone.