Configure Ingress for your app in Azure Container Apps
This article shows you how to enable ingress features for your container app. Ingress is an application-wide setting. Changes to ingress settings apply to all revisions simultaneously, and don't generate new revisions.
Ingress settings
You can set the following ingress template properties:
| Property | Description | Values | Required |
|---|---|---|---|
allowInsecure |
Allows insecure traffic to your container app. When set to true HTTP requests to port 80 aren't automatically redirected to port 443 using HTTPS, allowing insecure connections. |
false (default), true enables insecure connections |
No |
clientCertificateMode |
Client certificate mode for mTLS authentication. Ignore indicates server drops client certificate on forwarding. Accept indicates server forwards client certificate but doesn't require a client certificate. Require indicates server requires a client certificate. | Required, Accept, Ignore (default) |
No |
customDomains |
Custom domain bindings for Container Apps' hostnames. See Custom domains and certificates | An array of bindings | No |
exposedPort |
(TCP ingress only) The port TCP listens on. If external is true, the value must be unique in the Container Apps environment. |
A port number from 1 to 65535. (can't be 80 or 443) |
No |
external |
Allow ingress to your app from outside its Container Apps environment. | true or false(default) |
Yes |
ipSecurityRestrictions |
IP ingress restrictions. See Set up IP ingress restrictions | An array of rules | No |
stickySessions.affinity |
Enables session affinity. | none (default), sticky |
No |
targetPort |
The port your container listens to for incoming requests. | Set this value to the port number that your container uses. For HTTP ingress, your application ingress endpoint is always exposed on port 443. |
Yes |
traffic |
Traffic splitting weights split between revisions. | An array of rules | No |
transport |
The transport protocol type. | auto (default) detects HTTP/1 or HTTP/2, http for HTTP/1, http2 for HTTP/2, tcp for TCP. |
No |
Enable ingress
You can configure ingress for your container app using the Azure CLI, an ARM template, or the Azure portal.
This az containerapp ingress enable command enables ingress for your container app. You must specify the target port, and you can optionally set the exposed port if your transport type is tcp.
az containerapp ingress enable \
    --name <app-name> \
    --resource-group <resource-group> \
    --target-port <target-port> \
    --exposed-port <tcp-exposed-port> \
    --transport <transport> \
    --type <external>
    --allow-insecure
az containerapp ingress enable ingress arguments:
| Option | Property | Description | Values | Required |
|---|---|---|---|---|
--type |
external | Allow ingress to your app from anywhere, or limit ingress to its internal Container Apps environment. | external or internal |
Yes |
--allow-insecure |
allowInsecure | Allow HTTP connections to your app. | No | |
--target-port |
targetPort | The port your container listens to for incoming requests. | Set this value to the port number that your container uses. Your application ingress endpoint is always exposed on port 443. |
Yes |
--exposed-port |
exposedPort | (TCP ingress only) An port for TCP ingress. If external is true, the value must be unique in the Container Apps environment if ingress is external. |
A port number from 1 to 65535. (can't be 80 or 443) |
No |
--transport |
transport | The transport protocol type. | auto (default) detects HTTP/1 or HTTP/2, http for HTTP/1, http2 for HTTP/2, tcp for TCP. |
No |
Enable ingress for your container app by using the portal.
You can enable ingress when you create your container app, or you can enable ingress for an existing container app.
- To configure ingress when you create your container app, select Ingress from the App Configuration tab of the container app creation wizard.
- To configure ingress for an existing container app, select Ingress from the Settings menu of the container app resource page.
Enabling ingress for your container app:
You can configure ingress when you create your container app by using the Azure portal.
- Set Ingress to Enabled.
- Configure the ingress settings for your container app.
- Select Limited to Container Apps Environment for internal ingress or Accepting traffic from anywhere for external ingress.
- Select the Ingress Type: HTTP or TCP (TCP ingress is only available in environments configured with a custom virtual network).
- If HTTP is selected for the Ingress Type, select the Transport: Auto, HTTP/1 or HTTP/2.
- Select Insecure connections if you want to allow HTTP connections to your app.
- Enter the Target port for your container app.
- If you selected TCP for the Transport option, enter the Exposed port for your container app. The exposed port number can be
1to65535. (can't be80or443)
The Ingress settings page for your container app also allows you to configure IP Restrictions. For information to configure IP restriction, see IP Restrictions.
Enable ingress for your container app by using the ingress configuration property. Set the external property to true, and set your transport and targetPort properties.
-external property can be set to true for external or false for internal ingress.
- Set the
transporttoautoto detect HTTP/1 or HTTP/2,httpfor HTTP/1,http2for HTTP/2, ortcpfor TCP. - Set the
targetPortto the port number that your container uses. Your application ingress endpoint is always exposed on port443. - Set the
exposedPortproperty if transport type istcpto a port for TCP ingress. The value must be unique in the Container Apps environment if ingress is external. A port number from1to65535. (can't be80or443)
{
  ...
  "configuration": {
    "ingress": {
        "external": true,
        "transport": "tcp",
        "targetPort": 80,
        "exposedPort": 8080,
    },
  }
}
Disable ingress
Disable ingress for your container app by using the az containerapp ingress command.
az containerapp ingress disable \
    --name <app-name> \
    --resource-group <resource-group> \
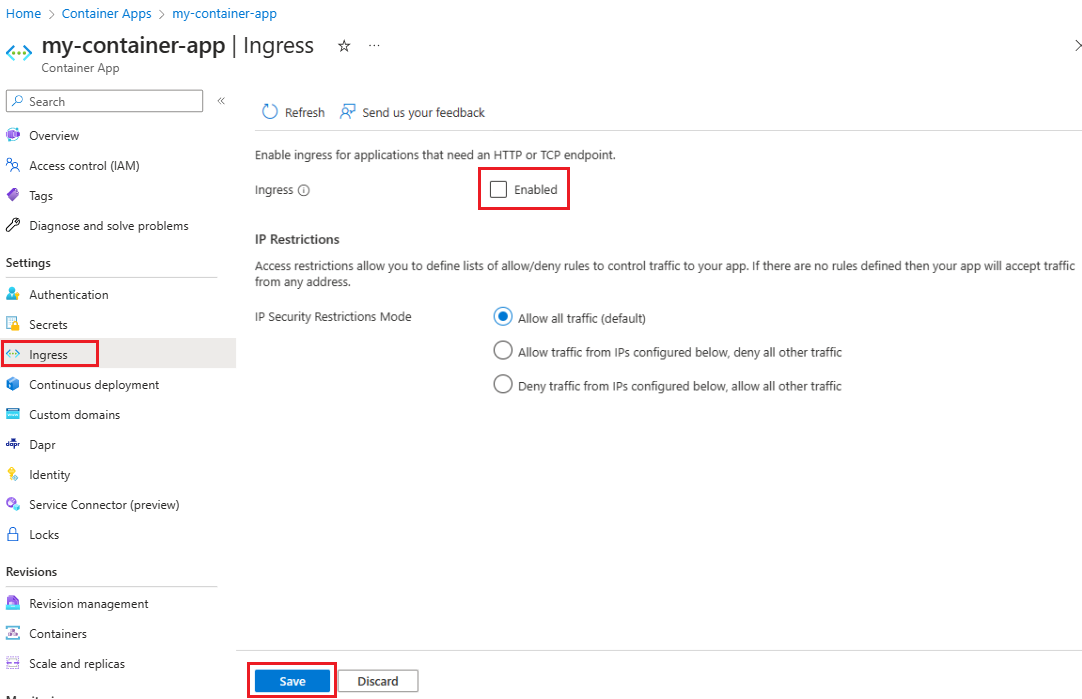
You can disable ingress for your container app using the portal.
- Select Ingress from the Settings menu of the container app page.
- Deselect the Ingress Enabled setting.
- Select Save.
Disable ingress for your container app by omitting the ingress configuration property from properties.configuration entirely.
Use other TCP ports
You can expose additional TCP ports from your application. To learn more, see the ingress concept article.
Note
To use this feature, you must have the container apps CLI extension. Run az extension add -n containerapp in order to install the latest version of the container apps CLI extension.
Adding other TCP ports can be done through the CLI by referencing a YAML file with your TCP port configurations.
az containerapp create \
    --name <app-name> \
    --resource-group <resource-group> \
    --yaml <your-yaml-file>
The following is an example YAML file you can reference in the above CLI command. The configuration for the additional TCP ports is under additionalPortMappings.
location: northcentralus
name: multiport-example
properties:
  configuration:
    activeRevisionsMode: Single
    ingress:
      additionalPortMappings:
      - exposedPort: 21025
        external: false
        targetPort: 1025
      allowInsecure: false
      external: true
      targetPort: 1080
      traffic:
      - latestRevision: true
        weight: 100
      transport: http
  managedEnvironmentId: <env id>
  template:
    containers:
    - image: maildev/maildev
      name: maildev
      resources:
        cpu: 0.25
        memory: 0.5Gi
    scale:
      maxReplicas: 1
      minReplicas: 1
  workloadProfileName: Consumption
type: Microsoft.App/containerApps
This feature isn't supported in the Azure portal.
The following ARM template provides an example of how you can add additional ports to your container apps. Each additional port should be added under additionalPortMappings within the ingress section for configuration within properties for the container app. The following is an example:
{
  ...
  "properties": {
    ...
    "configuration": {
      "ingress": {
        ...
        "additionalPortMappings": [
          {
            "external": false
            "targetPort": 80
            "exposedPort": 12000
          }
        ]
      }
    }
  ...
}
Next steps
Feedback
Coming soon: Throughout 2024 we will be phasing out GitHub Issues as the feedback mechanism for content and replacing it with a new feedback system. For more information see: https://aka.ms/ContentUserFeedback.
Submit and view feedback for