Note
Access to this page requires authorization. You can try signing in or changing directories.
Access to this page requires authorization. You can try changing directories.
Azure Container Apps manages automatic horizontal scaling through a set of declarative scaling rules. As a container app scales out, new instances of the container app are created on-demand. These instances are known as replicas.
In this tutorial, you add an HTTP scale rule to your container app and observe how your application scales.
Prerequisites
| Requirement | Instructions |
|---|---|
| Azure account | If you don't have an Azure account, you can create one for free. You need the Contributor permission on the Azure subscription to proceed. Refer to Assign Azure roles using the Azure portal for details. |
| GitHub Account | Get one for free. |
| Azure CLI | Install the Azure CLI. |
Setup
To sign in to Azure from the CLI, run the following command and follow the prompts to complete the authentication process.
az login
To ensure you're running the latest version of the CLI, run the upgrade command.
az upgrade
Next, install or update the Azure Container Apps extension for the CLI.
If you receive errors about missing parameters when you run az containerapp commands in Azure CLI or cmdlets from the Az.App module in PowerShell, be sure you have the latest version of the Azure Container Apps extension installed.
az extension add --name containerapp --upgrade
Note
Starting in May 2024, Azure CLI extensions no longer enable preview features by default. To access Container Apps preview features, install the Container Apps extension with --allow-preview true.
az extension add --name containerapp --upgrade --allow-preview true
Now that the current extension or module is installed, register the Microsoft.App and Microsoft.OperationalInsights namespaces.
az provider register --namespace Microsoft.App
az provider register --namespace Microsoft.OperationalInsights
Create and deploy the container app
Create and deploy your container app with the containerapp up command. This command creates a:
- Resource group
- Container Apps environment
- Log Analytics workspace
If any of these resources already exist, the command uses the existing resources rather than creating new ones.
Lastly, the command creates and deploys the container app using a public container image, mcr.microsoft.com/dotnet/samples:aspnetapp. This image is used to trigger the scale rules you create in this article. You don't need to know or use .NET to complete this procedure.
az containerapp up \
  --name my-container-app \
  --resource-group my-container-apps \
  --location centralus \
  --environment 'my-container-apps' \
  --image mcr.microsoft.com/dotnet/samples:aspnetapp \
  --target-port 8080 \
  --ingress external \
  --query properties.configuration.ingress.fqdn \
Note
Make sure the value for the --image parameter is in lower case.
By setting --ingress to external, you make the container app available to public requests.
The up command returns the fully qualified domain name (FQDN) for the container app. Copy this FQDN to a text file. You use it in the Send requests section. Your FQDN looks like the following example:
https://my-container-app.icydune-96848328.centralus.azurecontainerapps.io
Add scale rule
Add an HTTP scale rule to your container app by running the az containerapp update command.
az containerapp update \
    --name my-container-app \
    --resource-group my-container-apps \
    --min-replicas 1 \
    --max-replicas 10 \
    --scale-rule-name my-http-scale-rule \
    --scale-rule-http-concurrency 1
This command adds an HTTP scale rule to your container app with the name my-http-scale-rule and a concurrency setting of 1. If your app receives more than one concurrent HTTP request, the runtime creates replicas of your app to handle the requests.
The update command returns the new configuration as a JSON response to verify your request was a success.
Start log output
You can observe the effects of your application scaling by viewing the logs generated by the Container Apps runtime. Use the az containerapp logs show command to start listening for log entries.
az containerapp logs show \
    --name my-container-app \
    --resource-group my-container-apps \
    --type=system \
    --follow=true
The show command returns entries from the system logs for your container app in real time. You can expect a response like the following example:
{
    "TimeStamp":"2023-08-01T16:49:03.02752",
    "Log":"Connecting to the container 'my-container-app'..."
}
{
    "TimeStamp":"2023-08-01T16:49:03.04437",
    "Log":"Successfully Connected to container:
    'my-container-app' [Revision: 'my-container-app--9uj51l6',
    Replica: 'my-container-app--9uj51l6-5f96557ffb-5khg9']"
}
{
    "TimeStamp":"2023-08-01T16:47:31.9480811+00:00",
    "Log":"Microsoft.Hosting.Lifetime[14]"
}
{
    "TimeStamp":"2023-08-01T16:47:31.9481264+00:00",
    "Log":"Now listening on: http://[::]:80"
}
{
    "TimeStamp":"2023-08-01T16:47:31.9490917+00:00",
    "Log":"Microsoft.Hosting.Lifetime[0]"
}
{
    "TimeStamp":"2023-08-01T16:47:31.9491036+00:00",
    "Log":"Application started. Press Ctrl+C to shut down."
}
{
    "TimeStamp":"2023-08-01T16:47:31.949723+00:00",
    "Log":"Microsoft.Hosting.Lifetime[0]"
}
{
    "TimeStamp":"2023-08-01T16:47:31.9497292+00:00",
    "Log":"Hosting environment: Production"
}
{
    "TimeStamp":"2023-08-01T16:47:31.9497325+00:00",
    "Log":"Microsoft.Hosting.Lifetime[0]"
}
{
    "TimeStamp":"2023-08-01T16:47:31.9497367+00:00",
    "Log":"Content root path: /app/"
}
For more information, see az containerapp logs.
Send requests
Open a new bash shell. Run the following command, replacing <YOUR_CONTAINER_APP_FQDN> with the fully qualified domain name for your container app that you saved from the Create and deploy the container app section.
seq 1 50 | xargs -Iname -P10 curl "<YOUR_CONTAINER_APP_FQDN>"
These commands send 50 requests to your container app in concurrent batches of 10 requests each.
| Command or argument | Description |
|---|---|
seq 1 50 |
Generates a sequence of numbers from 1 to 50. |
| |
The pipe operator sends the sequence to the xargs command. |
xargs |
Runs curl with the specified URL |
-Iname |
Acts as a placeholder for the output of seq. This argument prevents the return value from being sent to the curl command. |
curl |
Calls the given URL. |
-P10 |
Instructs xargs to run up to 10 processes at a time. |
For more information, see the documentation for:
In the first shell, where you ran the az containerapp logs show command, the output now contains one or more log entries like the following.
{
    "TimeStamp":"2023-08-01 18:09:52 +0000 UTC",
    "Type":"Normal",
    "ContainerAppName":"my-container-app",
    "RevisionName":"my-container-app--00001111",
    "ReplicaName":"my-container-app--00001111-aaaaa22222-bbbb",
    "Msg":"Replica 'my-container-app--00001111-aaaaa22222-bbbb' has been scheduled to run on a node.",
    "Reason":"AssigningReplica",
    "EventSource":"ContainerAppController",
    "Count":0
}
View scaling in Azure portal (optional)
Sign in to the Azure portal.
In the Search bar at the top, enter my-container-app.
In the search results, under Resources, select my-container-app.
In the navigation bar at the left, expand Application and select Scale and replicas.
In the Scale and Replicas page, select Replicas.
Your container app now has more than one replica running.
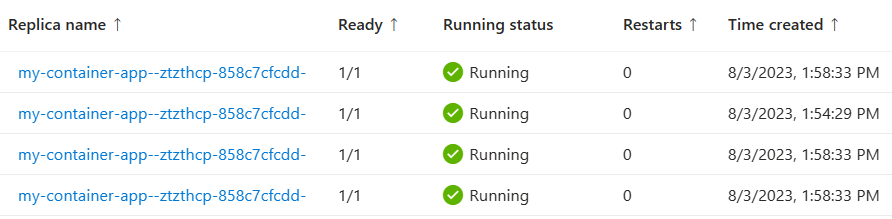
You might need to select Refresh to see the new replicas.
In the navigation bar at the left, expand Monitoring and select Metrics.
In the Metrics page, set Metric to Requests.
Select Apply splitting.
Expand the Values drop-down and check Replica.
Select the blue checkmark icon to finish editing the splitting.
The graph shows the requests received by your container app, split by replica.
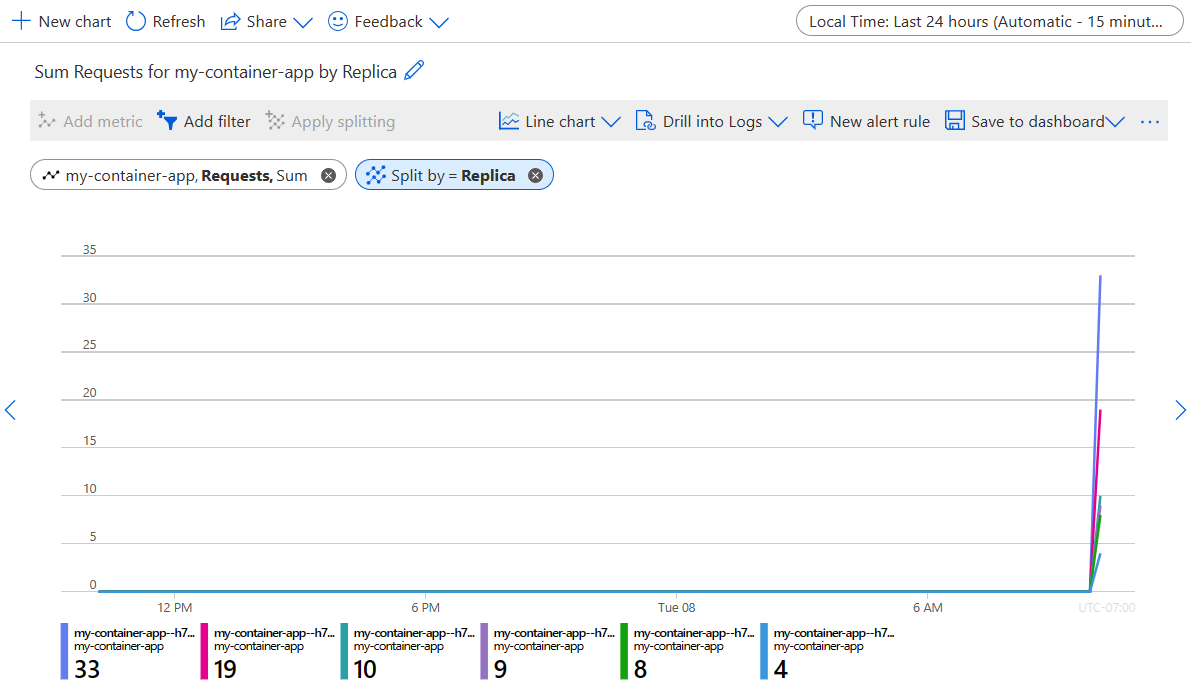
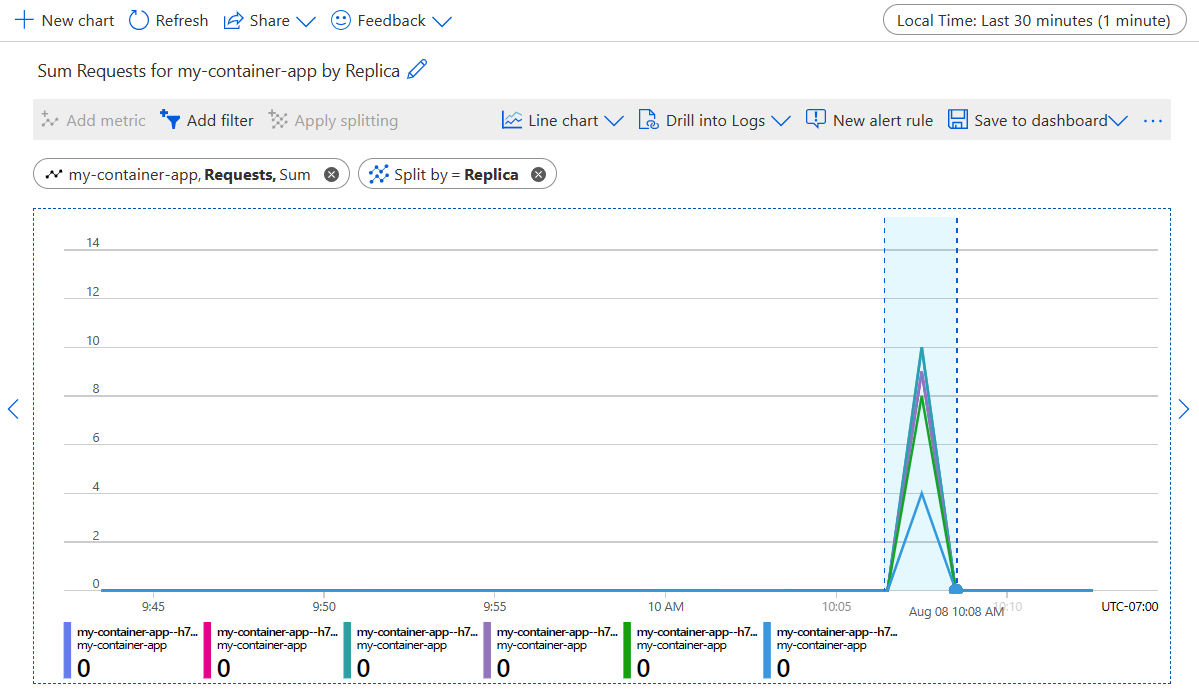
By default, the graph scale is set to last 24 hours, with a time granularity of 15 minutes. Select the scale and change it to the last 30 minutes, with a time granularity of one minute. Select the Apply button.
Select on the graph and drag to highlight the recent increase in requests received by your container app.
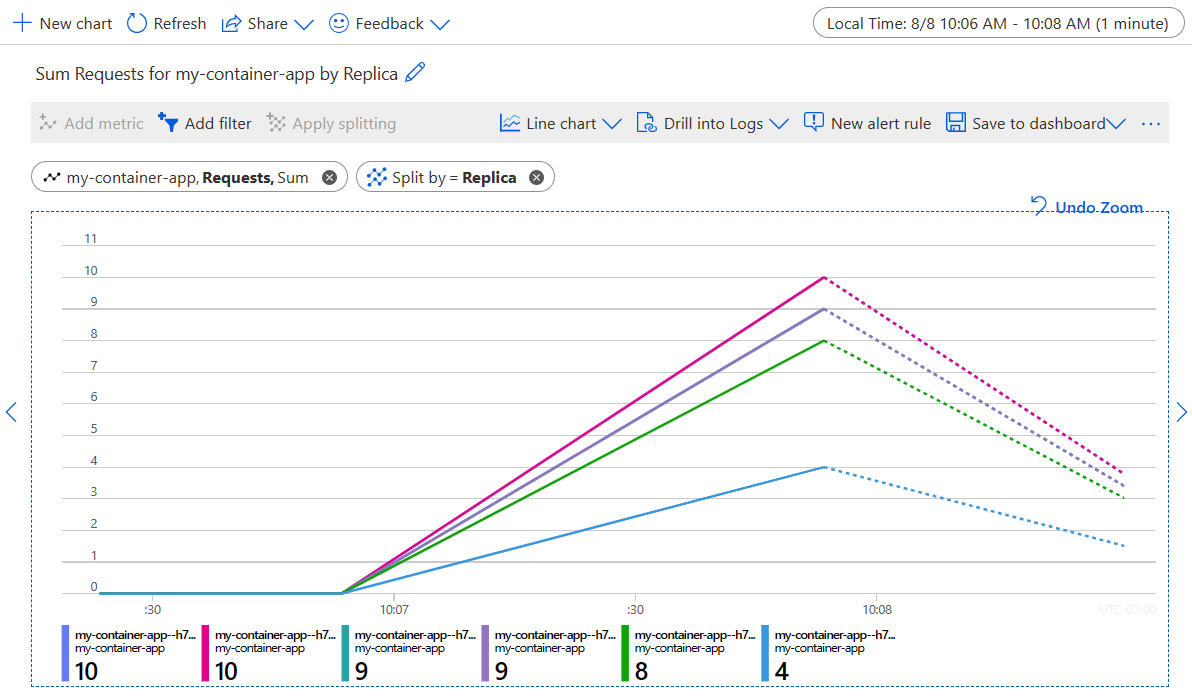
The following screenshot shows a zoomed view of how the requests received by your container app are divided among replicas.
CPU and memory scaling
You should prefer HTTP scale rules to CPU or memory scale rules when possible. CPU and memory scaling don't allow your container app to scale to zero.
After you add a CPU or memory scale rule, you can test it by sending requests to your container app and viewing the scaling in Azure portal.
After you send requests to your scale app, it might take a minute before the scale rule is triggered and the new replicas are created.
CPU scaling
CPU scaling allows your app to scale in or out depending on how much the CPU is being used.
For example, if you create a CPU scale rule with a utilization value of 50, Azure Container Apps creates more replicas of your container app when the average CPU utilization for all replicas reaches 50%.
CPU scaling doesn't allow your container app to scale to zero. For more information about this trigger, see KEDA CPU scale trigger.
Add a CPU scale rule to your container app by running the az containerapp update command.
Note
When you use the Azure CLI to add a scale rule to a container app that already has a scale rule, the new scale rule replaces the old scale rule. To see how to add multiple scale rules, see Multiple scale rules.
Before running the following command, replace the <PLACEHOLDERS> with your values. For this tutorial, replace <UTILIZATION> with 1. This causes your container app to scale when the average CPU utilization for all replicas reaches 1%. This value is for demonstration only. The number of replicas is limited to 10 by the --max-replicas 10 you specified when running az containerapp update.
az containerapp update \
    --name my-container-app \
    --resource-group my-container-apps \
    --min-replicas 1 \
    --max-replicas 10 \
    --scale-rule-name my-cpu-scale-rule \
    --scale-rule-type cpu \
    --scale-rule-metadata type=Utilization value=<UTILIZATION>
Memory scaling
Memory scaling allows your app to scale in or out depending on how much memory is being used.
For example, if you create a memory scale rule with a utilization value of 50, Azure Container Apps creates more replicas of your container app when the average memory utilization for all replicas reaches 50%.
Memory scaling doesn't allow your container app to scale to zero. For more information about this trigger, see KEDA memory scale trigger.
Add a memory scale rule to your container app by running the az containerapp update command.
Note
When you use the Azure CLI to add a scale rule to a container app that already has a scale rule, the new scale rule replaces the old scale rule. To see how to add multiple scale rules, see Multiple scale rules.
Before running the following command, replace the <PLACEHOLDERS> with your values. For this tutorial, replace <UTILIZATION> with 1. This causes your container app to scale when the average memory utilization for all replicas reaches 1%. This value is for demonstration only. The number of replicas is limited to 10 by the --max-replicas 10 you specified when running az containerapp update.
az containerapp update \
    --name my-container-app \
    --resource-group my-container-apps \
    --min-replicas 1 \
    --max-replicas 10 \
    --scale-rule-name my-memory-scale-rule \
    --scale-rule-type memory \
    --scale-rule-metadata type=Utilization value=<UTILIZATION>
Multiple scale rules
To add multiple scale rules to your container app using the Azure CLI, you must use YAML.
Export your container app configuration to YAML with the
az containerapp showcommand.az containerapp show \ --name my-container-app \ --resource-group my-container-apps \ --output yaml > app.yamlIn the
properties>template>scale>rulessection ofapp.yaml, add the following properties. Replace the<PLACEHOLDERS>with your values.... properties: ... template: ... scale: ... rules: - name: cpu-scaling-rule custom: type: cpu metadata: type: "Utilization" value: "<CPU_UTILIZATION>" - name: memory-scaling-rule custom: type: memory metadata: type: "Utilization" value: "<MEMORY_UTILIZATION>" ...Import your container app configuration from
app.yamlwith theaz containerapp updatecommand.az containerapp update \ --name my-container-app \ --resource-group my-container-apps \ --yaml app.yaml
Clean up resources
If you're not going to continue to use this application, run the following command to delete the resource group along with all the resources created in this tutorial.
Caution
The following command deletes the specified resource group and all resources contained within it. If resources outside the scope of this tutorial exist in the specified resource group, they'll also be deleted.
az group delete --name my-container-apps
Tip
Having issues? Let us know on GitHub by opening an issue in the Azure Container Apps repo.