Note
Access to this page requires authorization. You can try signing in or changing directories.
Access to this page requires authorization. You can try changing directories.
An Azure container registry is a private Docker registry deployed in Azure that you can keep network-close to your deployments. In this set of three tutorial articles, you learn how to use geo-replication to deploy an ASP.NET Core web application running in a Linux container to two Web Apps for Containers instances. You'll see how Azure automatically deploys the image to each Web App instance from the closest geo-replicated repository.
In this tutorial, part one in a three-part series:
- Create a geo-replicated Azure container registry
- Clone application source code from GitHub
- Build a Docker container image from application source
- Push the container image to your registry
In subsequent tutorials, you deploy the container from your private registry to a web app running in two Azure regions. You then update the code in the application, and update both Web App instances with a single docker push to your registry.
Before you begin
This tutorial requires a local installation of the Azure CLI (version 2.0.31 or later). Run az --version to find the version. If you need to install or upgrade, see Install Azure CLI.
You should be familiar with core Docker concepts such as containers, container images, and basic Docker CLI commands. For a primer on container basics, see Get started with Docker.
To complete this tutorial, you need a local Docker installation. Docker provides installation instructions for macOS, Windows, and Linux systems.
Azure Cloud Shell does not include the Docker components required to complete every step this tutorial. Therefore, we recommend a local installation of the Azure CLI and Docker development environment.
Create a container registry
For this tutorial, you need an Azure container registry in the Premium service tier. To create a new Azure container registry, follow the steps in this section.
Tip
If you previously created a registry and need to upgrade, see Changing tiers.
Sign in to the Azure portal.
Select Create a resource > Containers > Azure Container Registry.
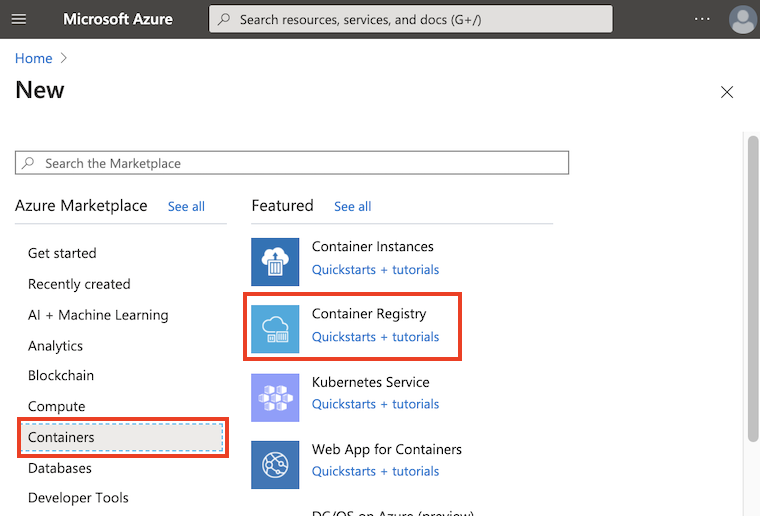
Configure your new registry with the following settings. In the Basics tab:
- Registry name: Create a registry name that's globally unique within Azure, and contains 5-50 alphanumeric characters
- Resource Group: Create new >
myResourceGroup - Location:
West US - SKU:
Premium(required for geo-replication)
Select Review + create and then Create to create the registry instance.

Throughout the rest of this tutorial, we use <acrName> as a placeholder for the container Registry name that you chose.
Tip
Because Azure container registries are typically long-lived resources that are used across multiple container hosts, we recommend that you create your registry in its own resource group. As you configure geo-replicated registries and webhooks, these additional resources are placed in the same resource group.
Configure geo-replication
Now that you have a Premium registry, you can configure geo-replication. Your web app, which you configure in the next tutorial to run in two regions, can then pull its container images from the nearest registry.
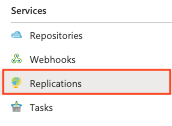
Navigate to your new container registry in the Azure portal and select Replications under Services:
A map is displayed showing green hexagons representing Azure regions available for geo-replication:
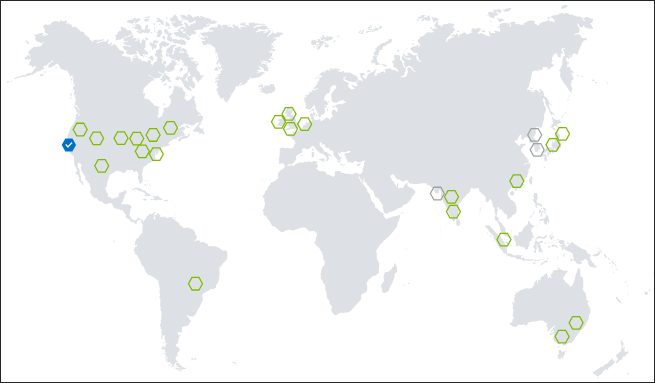
Replicate your registry to the East US region by selecting its green hexagon, then select Create under Create replication:
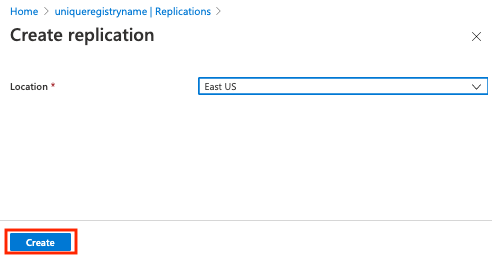
When the replication is complete, the portal reflects Ready for both regions. Use the Refresh button to refresh the status of the replication; it can take a minute or so for the replicas to be created and synchronized.

Enable admin account
In subsequent tutorials, you deploy a container image from the registry directly to Web App for Containers. To enable this capability, you must also enable the registry's admin account.
Navigate to your new container registry in the Azure portal and select Access keys under Settings. Under Admin user, select Enable.

Container registry login
Now that you've configured geo-replication, build a container image and push it to your registry. You must first log in to your registry before pushing images to it.
Use the az acr login command to authenticate and cache the credentials for your registry. Replace <acrName> with the name of the registry you created earlier.
az acr login --name <acrName>
The command returns Login Succeeded when complete.
Get application code
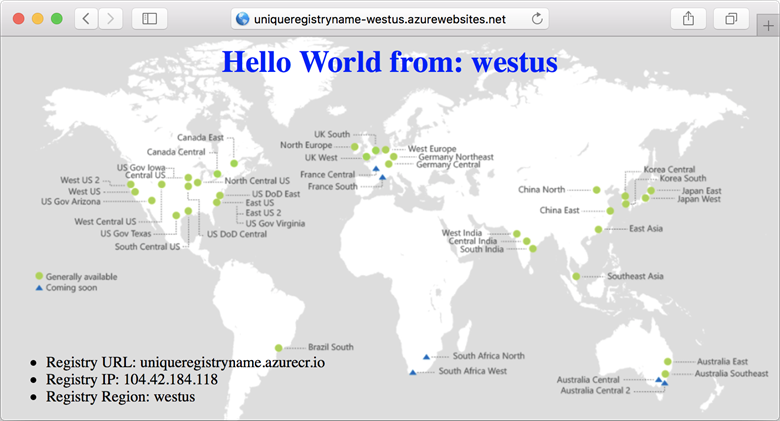
The sample in this tutorial includes a small web application built with ASP.NET Core. The app serves an HTML page that displays the region from which the image was deployed by Azure Container Registry.
Use git to download the sample into a local directory, and cd into the directory:
git clone https://github.com/Azure-Samples/acr-helloworld.git
cd acr-helloworld
If you don't have git installed, you can download the ZIP archive directly from GitHub.
Update Dockerfile
The Dockerfile included in the sample shows how the container is built. It starts from an official ASP.NET Core runtime image, copies the application files into the container, installs dependencies, compiles the output using the official .NET Core SDK image, and finally, builds an optimized aspnetcore image.
The Dockerfile is located at ./AcrHelloworld/Dockerfile in the cloned source.
FROM mcr.microsoft.com/dotnet/core/aspnet:2.2 AS base
# Update <acrName> with the name of your registry
# Example: uniqueregistryname.azurecr.io
ENV DOCKER_REGISTRY <acrName>.azurecr.io
WORKDIR /app
EXPOSE 80

FROM mcr.microsoft.com/dotnet/core/sdk:2.2 AS build
WORKDIR /src
COPY *.sln ./
COPY AcrHelloworld/AcrHelloworld.csproj AcrHelloworld/
RUN dotnet restore
COPY . .
WORKDIR /src/AcrHelloworld
RUN dotnet build -c Release -o /app

FROM build AS publish
RUN dotnet publish -c Release -o /app

FROM base AS production
WORKDIR /app
COPY --from=publish /app .
ENTRYPOINT ["dotnet", "AcrHelloworld.dll"]
The application in the acr-helloworld image tries to determine the region from which its container was deployed by querying DNS for information about the registry's login server. You must specify your registry login server's fully qualified domain name (FQDN) in the DOCKER_REGISTRY environment variable in the Dockerfile.
First, get the registry's login server with the az acr show command. Replace <acrName> with the name of the registry you created in previous steps.
az acr show --name <acrName> --query "{acrLoginServer:loginServer}" --output table
Output:
AcrLoginServer
-----------------------------
uniqueregistryname.azurecr.io
Next, update the ENV DOCKER_REGISTRY line with the FQDN of your registry's login server. This example reflects the example registry name, uniqueregistryname:
ENV DOCKER_REGISTRY uniqueregistryname.azurecr.io
Build container image
Now that you've updated the Dockerfile with the FQDN of your registry login server, you can use docker build to create the container image. Run the following command to build the image and tag it with the URL of your private registry, again replacing <acrName> with the name of your registry:
docker build . -f ./AcrHelloworld/Dockerfile -t <acrName>.azurecr.io/acr-helloworld:v1
Several lines of output are displayed as the Docker image is built (shown here truncated):
Sending build context to Docker daemon  523.8kB
Step 1/18 : FROM mcr.microsoft.com/dotnet/core/aspnet:2.2 AS base
2.2: Pulling from mcr.microsoft.com/dotnet/core/aspnet
3e17c6eae66c: Pulling fs layer

[...]

Step 18/18 : ENTRYPOINT dotnet AcrHelloworld.dll
 ---> Running in 6906d98c47a1
 ---> c9ca1763cfb1
Removing intermediate container 6906d98c47a1
Successfully built c9ca1763cfb1
Successfully tagged uniqueregistryname.azurecr.io/acr-helloworld:v1
Use docker images to see the built and tagged image:
$ docker images
REPOSITORY                                      TAG    IMAGE ID        CREATED               SIZE
uniqueregistryname.azurecr.io/acr-helloworld    v1     01ac48d5c8cf    About a minute ago    284MB
[...]
Push image to Azure Container Registry
Next, use the docker push command to push the acr-helloworld image to your registry. Replace <acrName> with the name of your registry.
docker push <acrName>.azurecr.io/acr-helloworld:v1
Because you've configured your registry for geo-replication, your image is automatically replicated to both the West US and East US regions with this single docker push command.
$ docker push uniqueregistryname.azurecr.io/acr-helloworld:v1
The push refers to a repository [uniqueregistryname.azurecr.io/acr-helloworld]
cd54739c444b: Pushed
d6803756744a: Pushed
b7b1f3a15779: Pushed
a89567dff12d: Pushed
59c7b561ff56: Pushed
9a2f9413d9e4: Pushed
a75caa09eb1f: Pushed
v1: digest: sha256:0799014f91384bda5b87591170b1242bcd719f07a03d1f9a1ddbae72b3543970 size: 1792
Next steps
In this tutorial, you created a private, geo-replicated container registry, built a container image, and then pushed that image to your registry.
Advance to the next tutorial to deploy your container to multiple Web Apps for Containers instances, using geo-replication to serve the images locally.