Note
Access to this page requires authorization. You can try signing in or changing directories.
Access to this page requires authorization. You can try changing directories.
Azure Cosmos DB Migration Assistant simplifies and accelerates RDBMS-to-Azure Cosmos DB migrations with an AI-driven, guided workflow and built-in best-practice skills. It replaces manual analysis with structured recommendations and helps you navigate key design choices such as denormalization, partitioning, and NoSQL data modeling patterns. Available in the Azure Cosmos DB extension for Visual Studio Code, it guides you through an AI-assisted migration from relational databases (for example, Oracle, Db2, SQL Server, PostgreSQL, or MySQL) to Azure Cosmos DB for NoSQL.
Relational databases work well for normalized, transactional workloads, but modern applications often require flexible schemas, elastic scale, and global distribution. Azure Cosmos DB is a managed, globally distributed NoSQL database with JSON data models, horizontal scaling, low latency, tunable consistency, RU-based throughput, automatic indexing, and built-in vector search to support AI-driven similarity queries. Manually modernizing a relational application to NoSQL is difficult and time-consuming, requiring high-impact choices—such as denormalization, partition key selection, and data modeling patterns—that demand deep knowledge of both RDBMS and NoSQL technologies.
Migration Assistant in Visual Studio Code provides a guided, phase-based workflow that assesses your schema, application code, and access patterns; generates a Cosmos DB container design (including partition key and indexing recommendations); provisions the target database and containers; loads sample data; and helps refactor application code—all within a single, end-to-end flow. Migration artifacts are written to the .cosmosdb-migration/ folder in your workspace so you can pause, resume, inspect outputs, commit them to source control, or rerun steps as needed.
Prerequisites
- Visual Studio Code installed
- Azure Cosmos DB extension installed (extension ID: ms-azuretools.vscode-cosmosdb)
- GitHub Copilot available in Visual Studio Code
- A workspace containing the application you want to migrate
- Database schema files
- Volumetrics information and access patterns (optional)
- An Azure subscription and permissions to sign in and provision Azure Cosmos DB resources, or a local Azure Cosmos DB Emulator
Open Migration Assistant
You can launch and manage migrations using the following commands from the Command Palette:
- Azure Cosmos DB: New Migration… — Opens Migration Assistant and creates a
.cosmosdb-migration/project in the selected workspace folder. - Azure Cosmos DB: Open Existing Migration… — Reopens an existing migration from a
.cosmosdb-migration/folder orproject.json. - Azure Cosmos DB: Remove Migration — Removes the migration from the workspace view without deleting the on-disk project.
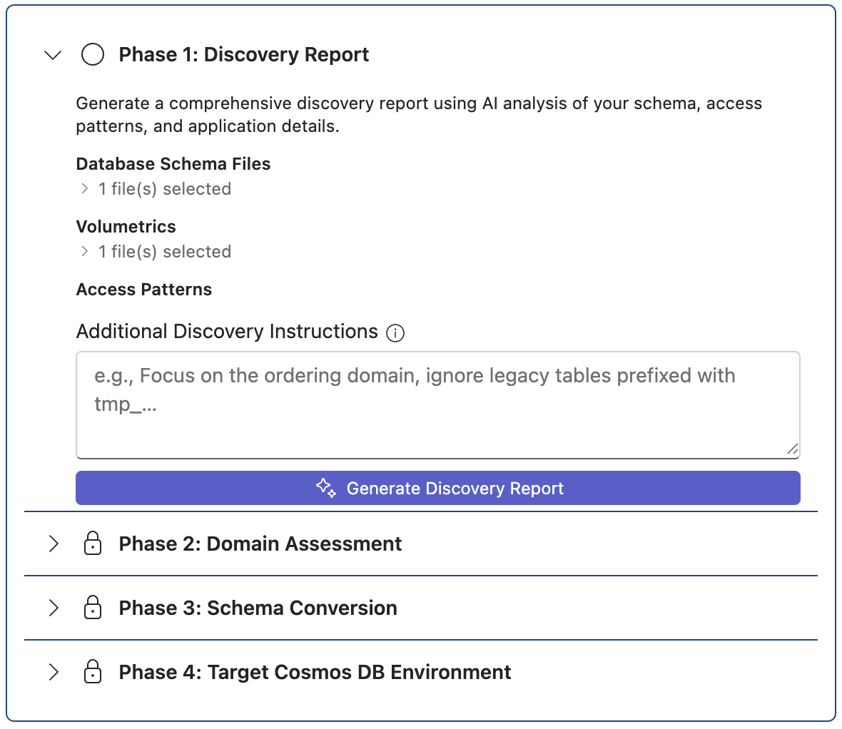
Run Phase 1: Discovery
Discovery analyzes your workspace and collects core migration inputs: schema DDL, volumetrics, and access patterns. It also produces a discovery report that describes the source application and target environment.
Open the workspace that contains the application you want to migrate.
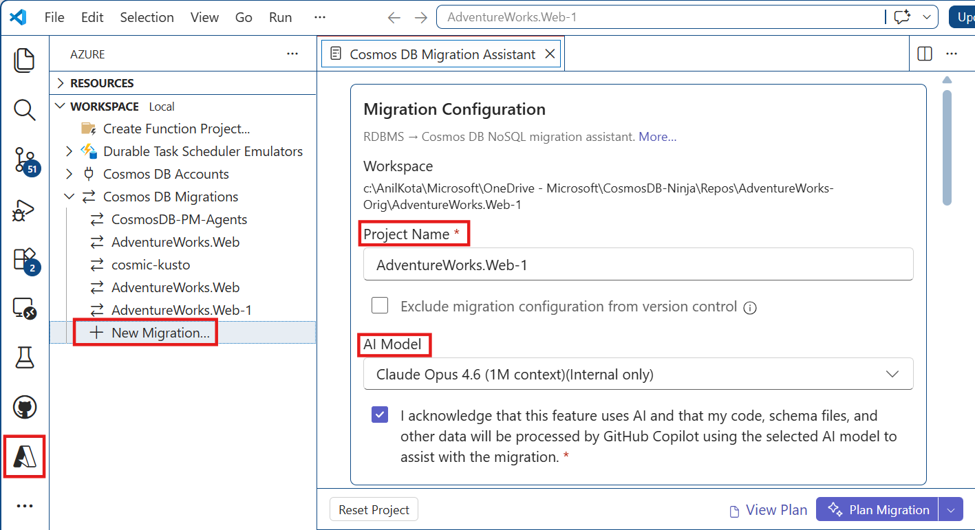
Run Azure Cosmos DB: New Migration… from the Command Palette, or navigate through the Azure logo in VS Code.
In the Migration Assistant panel, allow the assistant to scan the workspace to infer language, framework, ORM, and deployment context.
Provide Database Schema Files for the source database containing the DDLs, and optionally Volumetrics and Access patterns information.
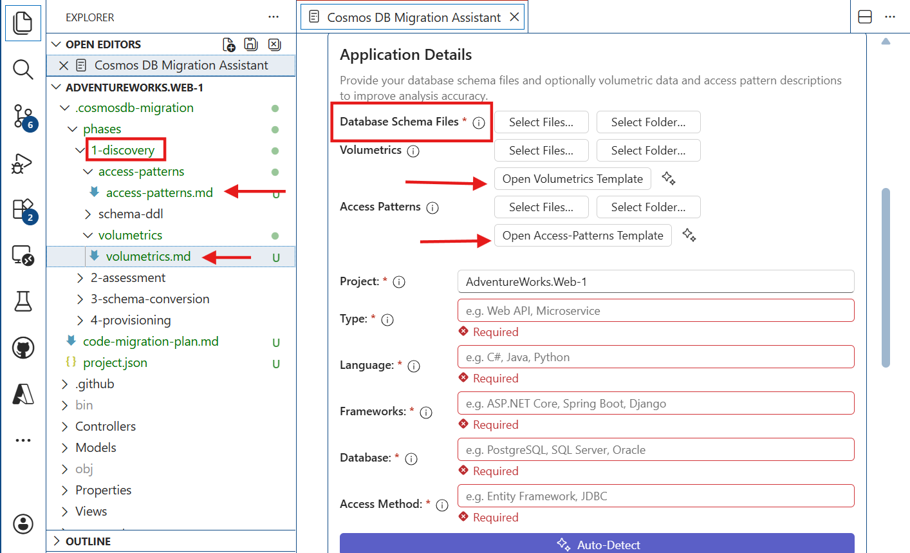
- Volumetrics information helps estimate RU/s and choose an optimal partition key. A sample template is provided in volumetrics.md (select Open Volumetrics Template) and includes estimated rows, average row size, read transactions per second, and write transactions per second. You can provide data in this format or use AI to read your input data and generate it using the template.
- Access patterns information helps design containers and partitioning strategies. A sample template is in access-patterns.md (select Open Access Patterns Template) and includes read and write patterns such as order by, list by, create, update, and delete, along with latency requirements. You can use an AI model to format the data in the required template.
- To remove or re-upload these files after they've been added to the migration project, in Project Explorer, delete them from phases/1-discovery/schema-ddl/, phases/1-discovery/volumetrics/, or phases/1-discovery/access-patterns/.
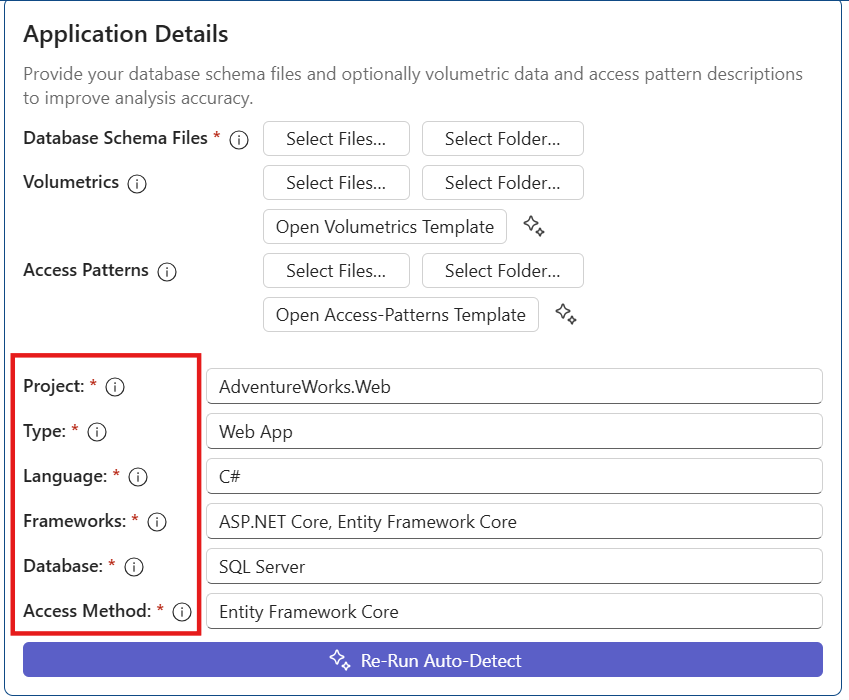
Fill in other repository details (for example, Type, Language, and Database) manually or select Auto-Detect to auto-populate them.
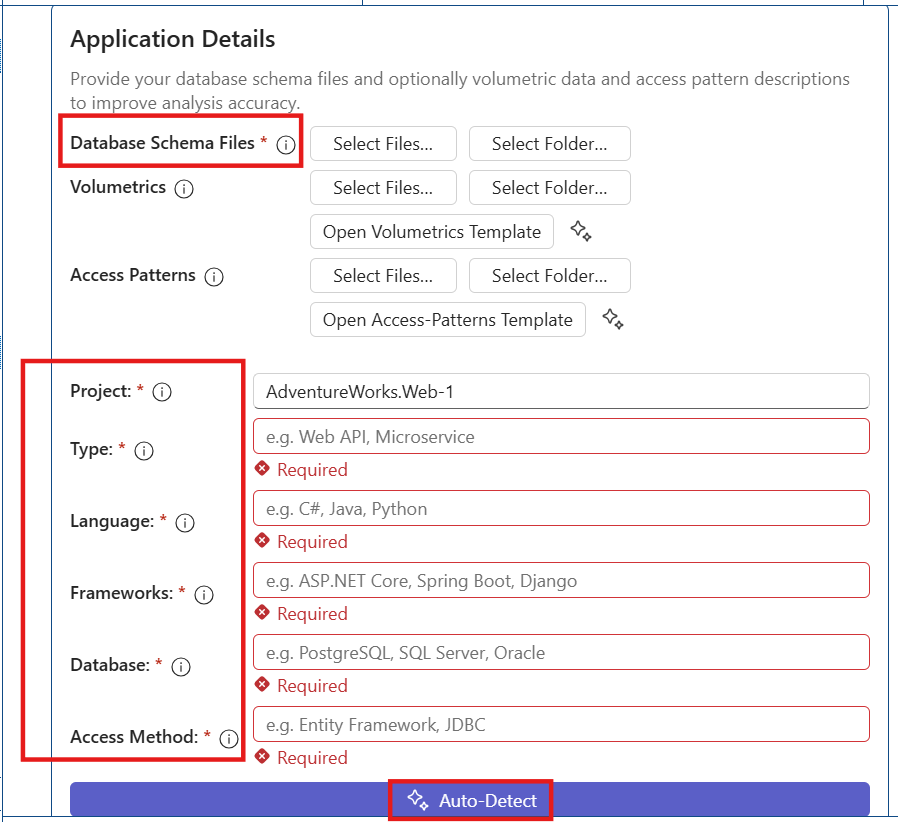
Auto-Detect traverses the project repository and fills in the information. The fields are editable, so you can update them if required.
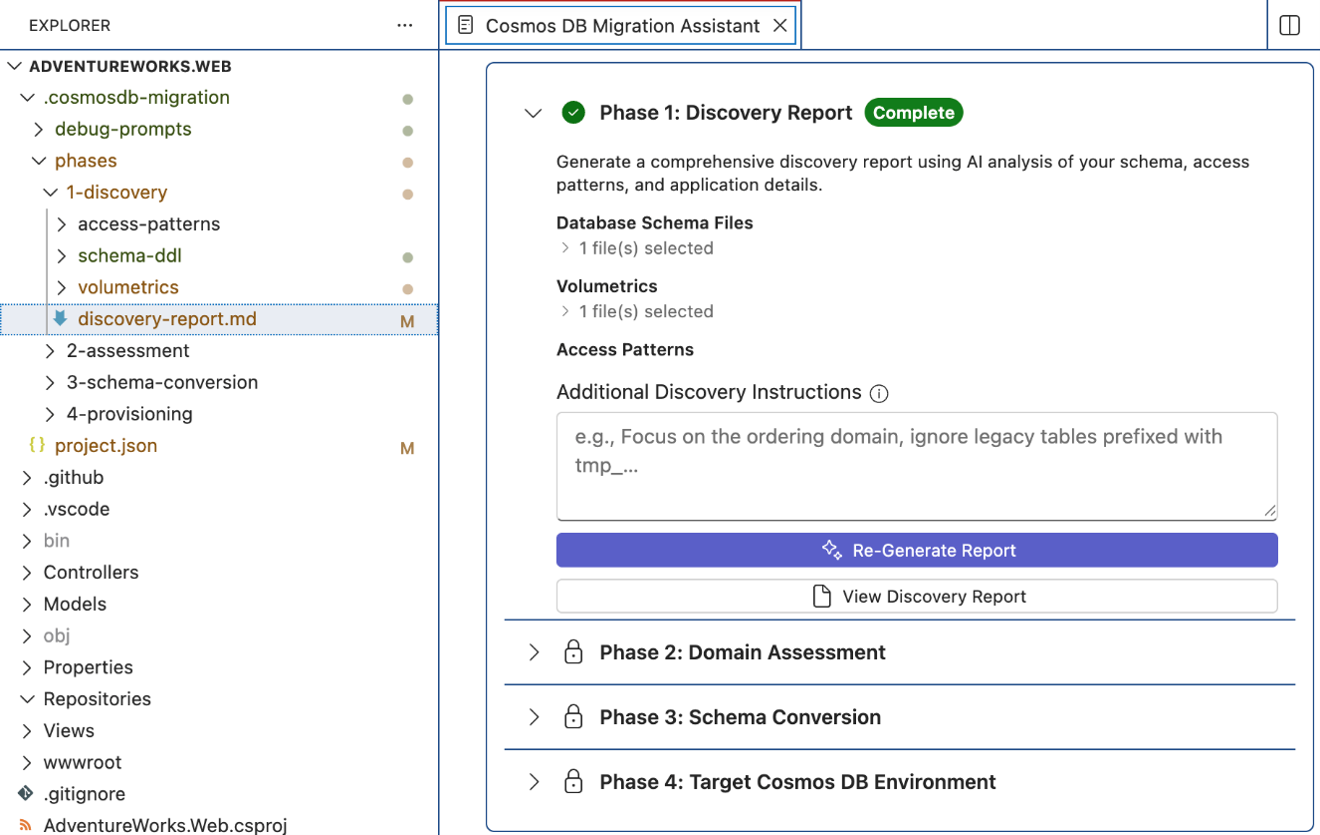
Start Discovery by selecting Generate Discovery Report.
Review the generated discovery-report.md in the migration artifacts folder.
Artifacts you can expect:
phases/1-discovery/schema-ddl/phases/1-discovery/volumetrics/phases/1-discovery/access-patterns/phases/1-discovery/discovery-report.md
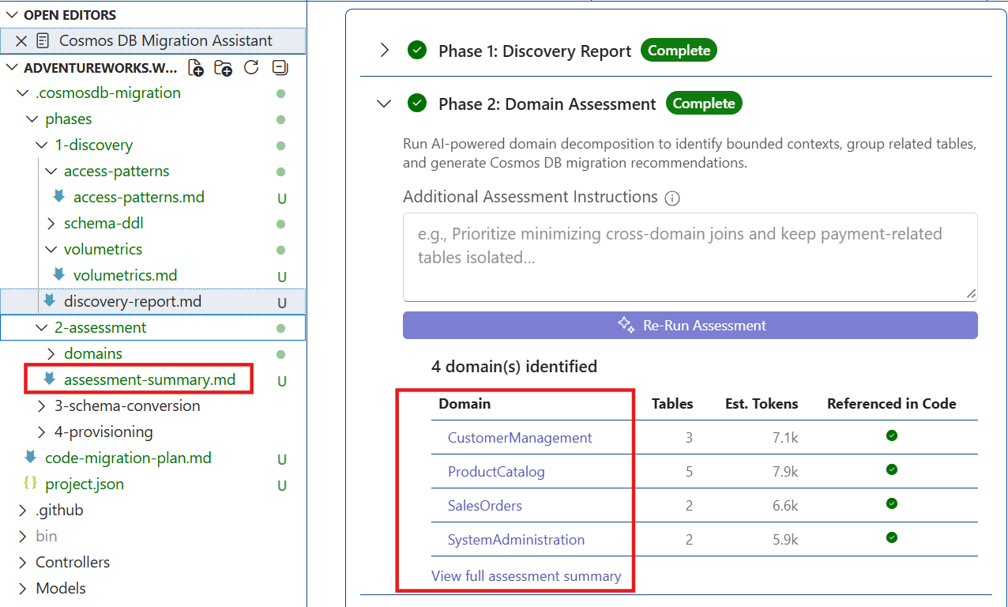
Run Phase 2: Assessment
Assessment normalizes the collected access patterns and groups tables into domains. Large domains can be split and cross-domain relationships reconciled.
Start Assessment by selecting Run Assessment.

Review the extracted and normalized access patterns.
Review the domain grouping output and any domain splitting decisions.
Review the assessment summary.
Artifacts you can expect:
phases/2-assessment/domains/phases/2-assessment/assessment-summary.md
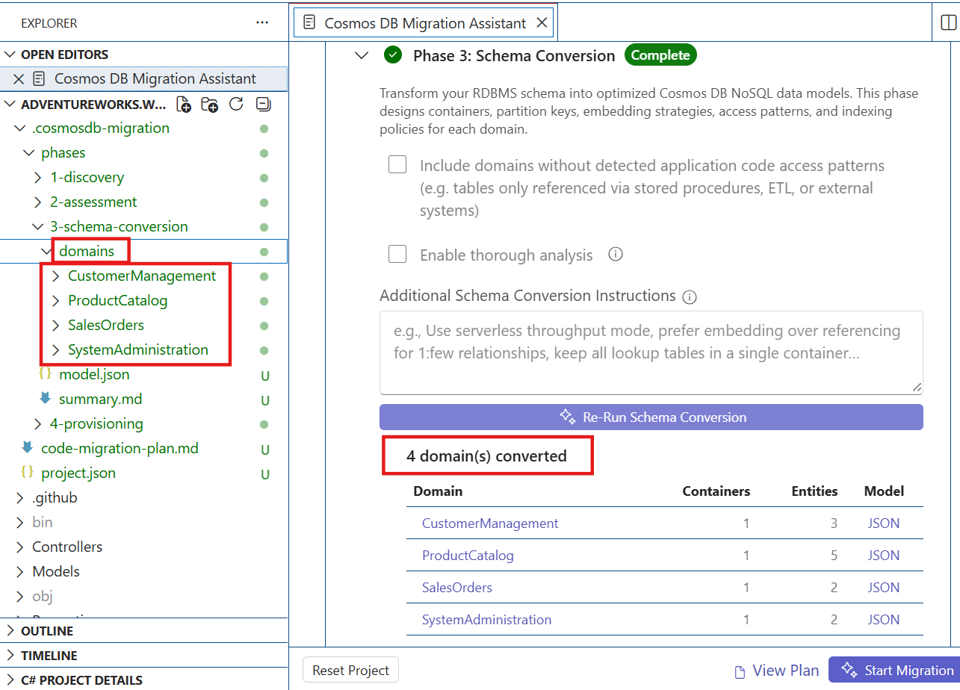
Run Phase 3: Schema Conversion
Schema Conversion designs the target Cosmos DB container model for each domain. The design loop can cover container shape, partition key choice, embedding decisions, access-pattern validation, cross-partition analysis, indexing, and summaries. A fast conversion path may be available for smaller or simpler schemas.
- Start Schema Conversion by selecting Run Schema Conversion.
- Review each domain's proposed container design and related modeling guidance.
- Review partition key recommendations and access-pattern validation outcomes.
- Review indexing guidance and cross-domain summary outputs.
- Review the merged
model.jsonbefore provisioning.
Artifacts you can expect:
phases/3-schema-conversion/domains/phases/3-schema-conversion/model.jsonphases/3-schema-conversion/summary.md
Run Phase 4: Provisioning
Provisioning signs you into Azure, lets you select or create the target account and database, provisions containers based on the schema conversion output, and optionally generates and loads sample data. The assistant may also automate data-plane RBAC role assignment so you can immediately read and write to the new containers.
Start Provisioning by selecting Target Cosmos DB Environment.
Sign in to Azure when prompted, then select or create an Azure Cosmos DB account and database. Use the table below as a guide to select the right target environment.
Target environment Best for Access requirements / prerequisites Local Cosmos DB Emulator Local dev, early validation, no Azure subscription Install Cosmos DB emulator on local Windows or Docker (Linux/Windows container); import cert if required Azure Cosmos DB account (existing) Existing workloads on Cosmos DB Access to subscription/resource group; permission for creating database/containers; RBAC role if Entra ID is used (link) Provision new Cosmos DB account Early validation in Azure, dedicated environment Active Azure subscription; Control plane RBAC and Data plane RBAC 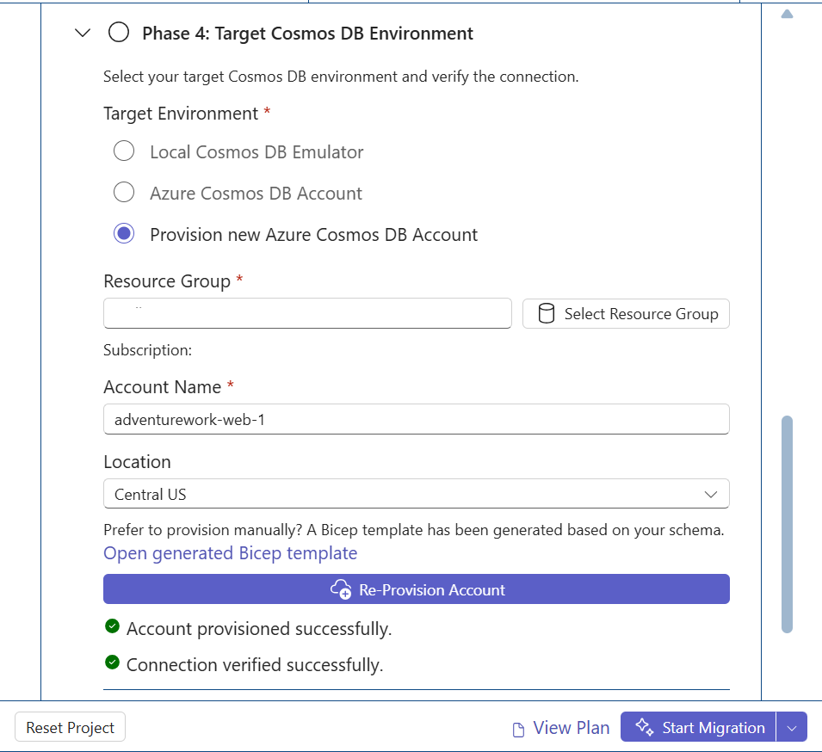
Provision containers based on the generated model.
Optionally generate and load sample data.
Test the connection to validate access to the provisioned containers.
Artifacts you can expect:
phases/4-provisioning/phases/4-provisioning/sample-data.json(if generated)

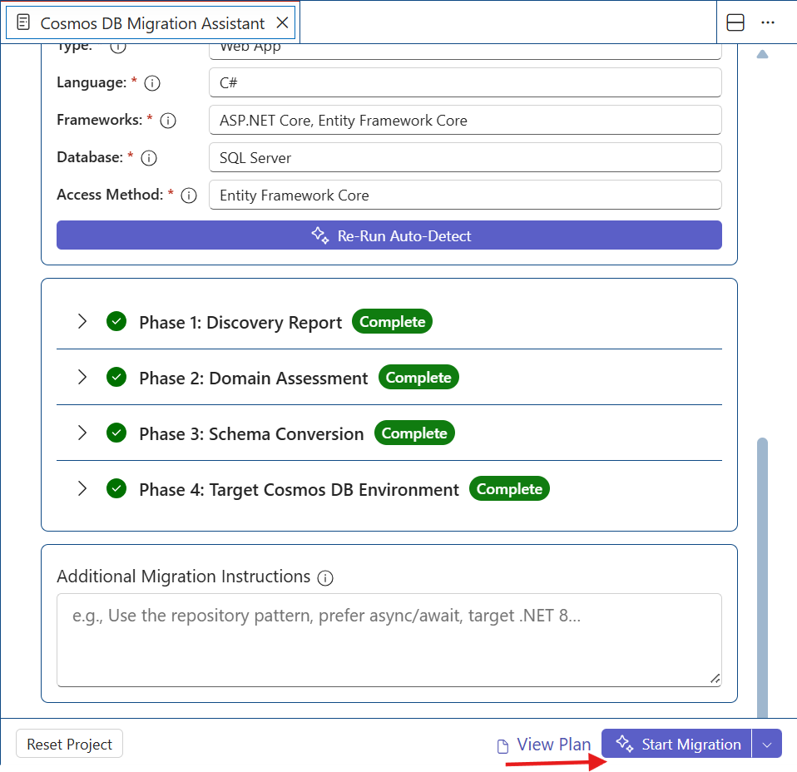
Run Phase 5: Plan or Start Migration
After Phases 1–4 are complete, Migration Assistant can build a context-rich prompt from your generated artifacts and open it in VS Code Copilot Chat. Copilot then generates the migration plan (and can optionally execute it).
- Confirm Phases 1–4 are complete in the Migration Assistant panel.
- Choose one of the following options:
- Plan Migration
- Start Migration
- Optionally enter additional migration instructions in the provided text field.
- Review the generated
code-migration-plan.mdin.cosmosdb-migration/. - If you select Start Migration, review the changes applied to your workspace and use source control to manage or revert edits if needed.
Plan Migration
Plan Migration generates code-migration-plan.md and stops without applying code changes. The file is present in 4-provisioning/ as shown below.
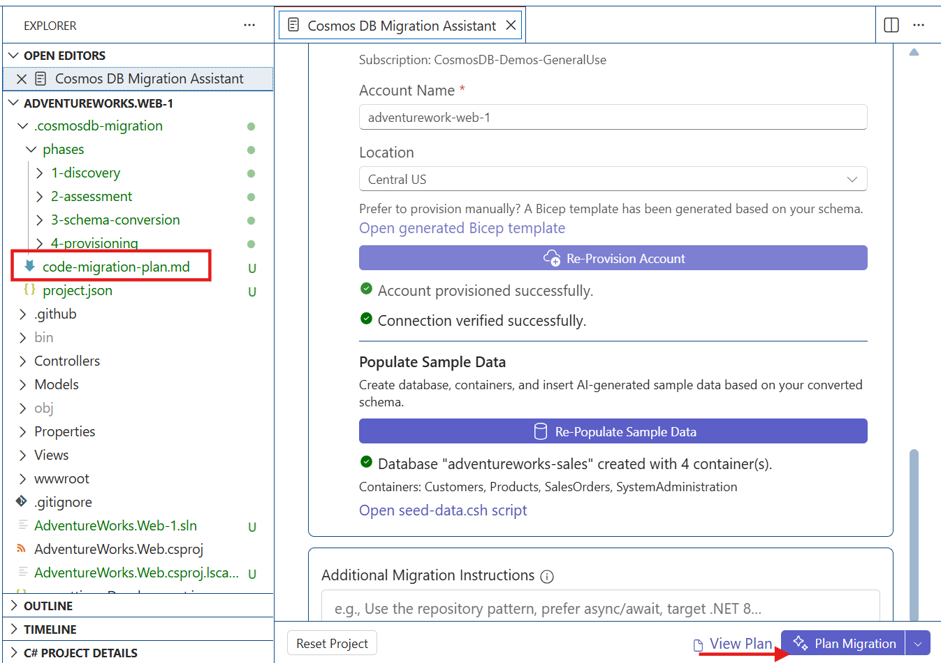
Once code-migration-plan.md is reviewed and validated, you can move on to Start Migration. If changes are required, provide special instructions in Additional Migration Instructions and rerun the process.
Start Migration
Start Migration generates the plan and immediately begins applying the described code changes.
Understand the migration artifacts on disk
Migration Assistant persists the project and phase artifacts under .cosmosdb-migration/:
| Project Artifact | Content |
|---|---|
project.json |
Central state file that tracks migration progress, phase completion status, and user-selected configuration, enabling pause/resume and reproducibility of the migration workflow. |
phases/1-discovery/ |
Captures source application context including schema DDL, access patterns, and workload characteristics, producing a discovery report that defines the migration baseline. |
phases/2-assessment/ |
Analyzes and groups relational entities into logical domains, normalizes access patterns, and generates domain-level insights to guide scalable NoSQL data modeling decisions. |
phases/3-schema-conversion/ |
Translates relational domains into optimized Cosmos DB container designs, including partitioning, indexing, and embedding strategies aligned with best practices. |
phases/4-provisioning/ |
Automates creation of Cosmos DB resources (account, database, containers), applies RBAC, and optionally generates sample data for validation and testing. |
code-migration-plan.md |
AI-generated step-by-step plan that outlines how to refactor application code (data access layer, queries, SDK usage) to align with the new Cosmos DB data model. |
Scope of the assistant
- The assistant currently supports Azure Cosmos DB for NoSQL only.
- Sources include Oracle, Db2, SQL Server, PostgreSQL and MySQL.
- The assistant focuses on discovery, schema conversion, data modeling, provisioning, converting representative sample data, and application code migration to Azure Cosmos DB for NoSQL. It currently does not support migrating the actual production data.
Next steps
- Explore the Azure Cosmos DB extension in Visual Studio Code by trying migrations from different RDBMS platforms to Azure Cosmos DB for NoSQL.
- To share feedback or report issues, use GitHub: https://aka.ms/cosmosdb-migration-assistant-report-issue.
Related content
- Relational vs. NoSQL data - .NET — Compares relational (SQL) and non-relational (NoSQL) databases, focusing on their architecture, data storage methods, and access patterns.
- Data Modeling - Azure Cosmos DB — Best practices in data modeling to optimize performance, scalability, and cost in schema-free databases.
- Migrate one-to-few relational data - Azure Cosmos DB — How to migrate relational data into Azure Cosmos DB for NoSQL.
- Azure Cosmos DB Agent Kit - Azure Cosmos DB for NoSQL — Enhances AI coding assistants with expert-level best practices for Azure Cosmos DB and integrates with tools like GitHub Copilot.
- Use Visual Studio Code to Connect and Manage Resources - Azure Cosmos DB — Quickstart for connecting to Azure Cosmos DB for NoSQL using Visual Studio Code, including querying, inserting, updating, and deleting data.
- Azure Cosmos DB Shell Visual Studio Code Extension — Provides a seamless, integrated experience for managing and querying Cosmos DB databases directly from the code editor.