Note
Access to this page requires authorization. You can try signing in or changing directories.
Access to this page requires authorization. You can try changing directories.
The Azure pricing calculator helps you turn anticipated usage into an estimated cost, which makes it easier to plan and budget for your Azure usage. Whether you're a small business owner or an enterprise-level organization, the web-based tool helps you make informed decisions about your cloud spending. When you log in, the calculator also provides a cost estimate for your Azure consumption with your negotiated or discounted prices. This article explains how to use the Azure pricing calculator.
Note
- You can also use Azure Total Cost of Ownership (TCO) Calculator to estimate the cost savings you can achieve by migrating your application workloads to Microsoft Azure.
- Prices shown in this article are examples to help you understand how the calculator works. They aren't actual prices.
Access the Azure pricing calculator
There are two ways to navigate to the calculator:
-Or-
- Go to the Azure website and select the pricing calculator link under Pricing in the navigation menu.
Understand the Azure pricing calculator
Let's look at the three main sections of the pricing calculator page:
The product picker - It shows all Azure services that the calculator can estimate costs for. In this section, there's a search box, Azure service categories, and product cards.

There are other tabs next to the Products tab that we cover later. There's also a Log in link to authenticate for various functions and features that we cover later.
Estimate and product configuration - The pricing calculator helps you build estimates, which are collections of Azure products, similar to a shopping cart.
Until you add products to your estimate, it appears blank. Here's an example.

When you add a product to your estimate, the following sections get added to your estimate:
- The estimation tools are at the top of the estimate.
- The product configuration is under the estimation tools.
Estimation summary - The estimation summary is shown below the product configuration.

As you continue to add more services to your estimate, more product configuration sections get added, one per service.
Below your estimate are some links for next steps. There's also a feedback link to help improve the Azure pricing calculator experience.

Build an estimate
Since it's your first time, you start with an empty estimate.
- Use the product picker to find a product. You can browse the catalog or search for the Azure service name.
- Select product tile to add it to the estimate. It adds the product with a default configuration.
- The pop of the configuration shows high-level filters like region, product type, tiers, and so on. Use the filters to narrow your product selection. The configurations offered change to reflect the features offered by the selected subproduct.
- Update the default configurations to show your expected monthly consumption. Estimates automatically update for the new configuration. For example, a virtual machine configuration defaults to run for one month (730 hours). Changing the configuration to 200 hours automatically updates the estimate.
- Some products offer special pricing plans, like reserved instances or savings plans. You can choose these options, if available, to lower your costs.
- Depending on the selected product or pricing plan, the estimate is split into upfront and monthly costs.
- Upfront costs are incurred before the product is consumed.
- Monthly costs are incurred after the product is consumed.
- Although optional, we recommend that you give the configuration a unique name. Finding a particular configuration in a large estimate is easier when it has a unique name.
- Repeat the steps to add more products to an estimate.
- Finally, don't forget to add a support plan. Choose from Basic, Developer, Standard, or Professional Direct. For more information, see Compare support plans.
Here's an example of a virtual machine configuration:

Use advanced calculator features
Here's an example with detailed descriptions of all the elements and options in an estimate.

| Item number | Name | Description |
|---|---|---|
| 1 | Your estimate | Creates multiple estimates and build multiple what-if scenarios. Or, segregate an estimate for different teams or applications. |
| 2 | Expand all | Expands all configurations to view the details of each product configuration. |
| 3 | Collapse all | Collapses all configurations to view a high-level view of the products in the estimate. |
| 4 | Rearrange the services | Rearranges products in the estimate to form a group. For example, group by product type or application. |
| 5 | Delete all | Deletes all products in the estimate to start with an empty estimate. The action can't be undone. |
| 6 | More info | Select to learn more about the product, pricing, or browse product documentation. |
| 7 | Clone | Clones the current product with its configuration to quickly create a similar product. |
| 8 | Delete | Deletes the selected product and its configuration. The action can't be undone. |
| 9 | Export | Exports the current estimate to an Excel file. You can share the file with others. |
| 10 | Save | Saves your progress with the estimate. |
| 11 | Save as | Renames a saved estimate. |
| 12 | Share | Creates a unique link for the estimate. You can share the link with others. However, only you can make changes to the estimate. |
| 13 | Currency | Changes the estimated costs to another currency. |
Understand calculator data
This section provides more information about where the pricing comes from, how calculations work, and alternative sources for the prices in the calculator.
The per-unit pricing information displayed in the Azure Pricing Calculator originates from data provided by the Azure Retail Prices API.
The Azure Pricing Calculator considers various factors to provide a cost estimate. Here's how it works:
- Product Configuration - The calculator pulls the per-unit pricing for each product from the Azure Retail Pricing API based on the different product parameters selected by the user such as: region, size, operating system, tier, and other specific features.
- Consumption Estimation - The calculator then goes further and uses the usage quantities that you input, such as hours, units, and others to estimate consumption and calculate estimated costs.
- Pricing plans - You can select from different pricing plans and savings options for each product. They include pay-as-you-go, one or three-year reserved instances, and savings plans for discounted rates. Selecting a different pricing plan results in different pricing.
If you need to access pricing information programmatically or require more detailed pricing data, you can use the Azure Retail Pricing API. The API provides comprehensive retail price information for all Azure services across different regions and currencies. For more information, see Azure Retail Prices API.
View an estimate with your agreement prices
The calculator helps you understand the retail costs of your Azure services, but it can also show any negotiated rates specific to your Azure Billing Account. Showing your negotiated prices helps you to get a more accurate representation of your expected costs.
At the bottom of your calculator estimate, notice the list item titled Licensing Program.

After you log in (not sign-in at the top of the page that takes you to the Azure portal), select the Licensing Program list item for the following options:
- Microsoft Customer Agreement (MCA)
- Enterprise Agreement (EA)
- New Commerce Cloud Solution Provider (CSP)
- Microsoft Online Service Agreement (MOSA)
To view negotiated pricing associated with an MCA Billing Account:
- Select the Microsoft Customer Agreement (MCA) option in the licensing program.
- Select None selected (change).

- Select a billing account and select Apply.

- Next, select a billing profile and select Apply.
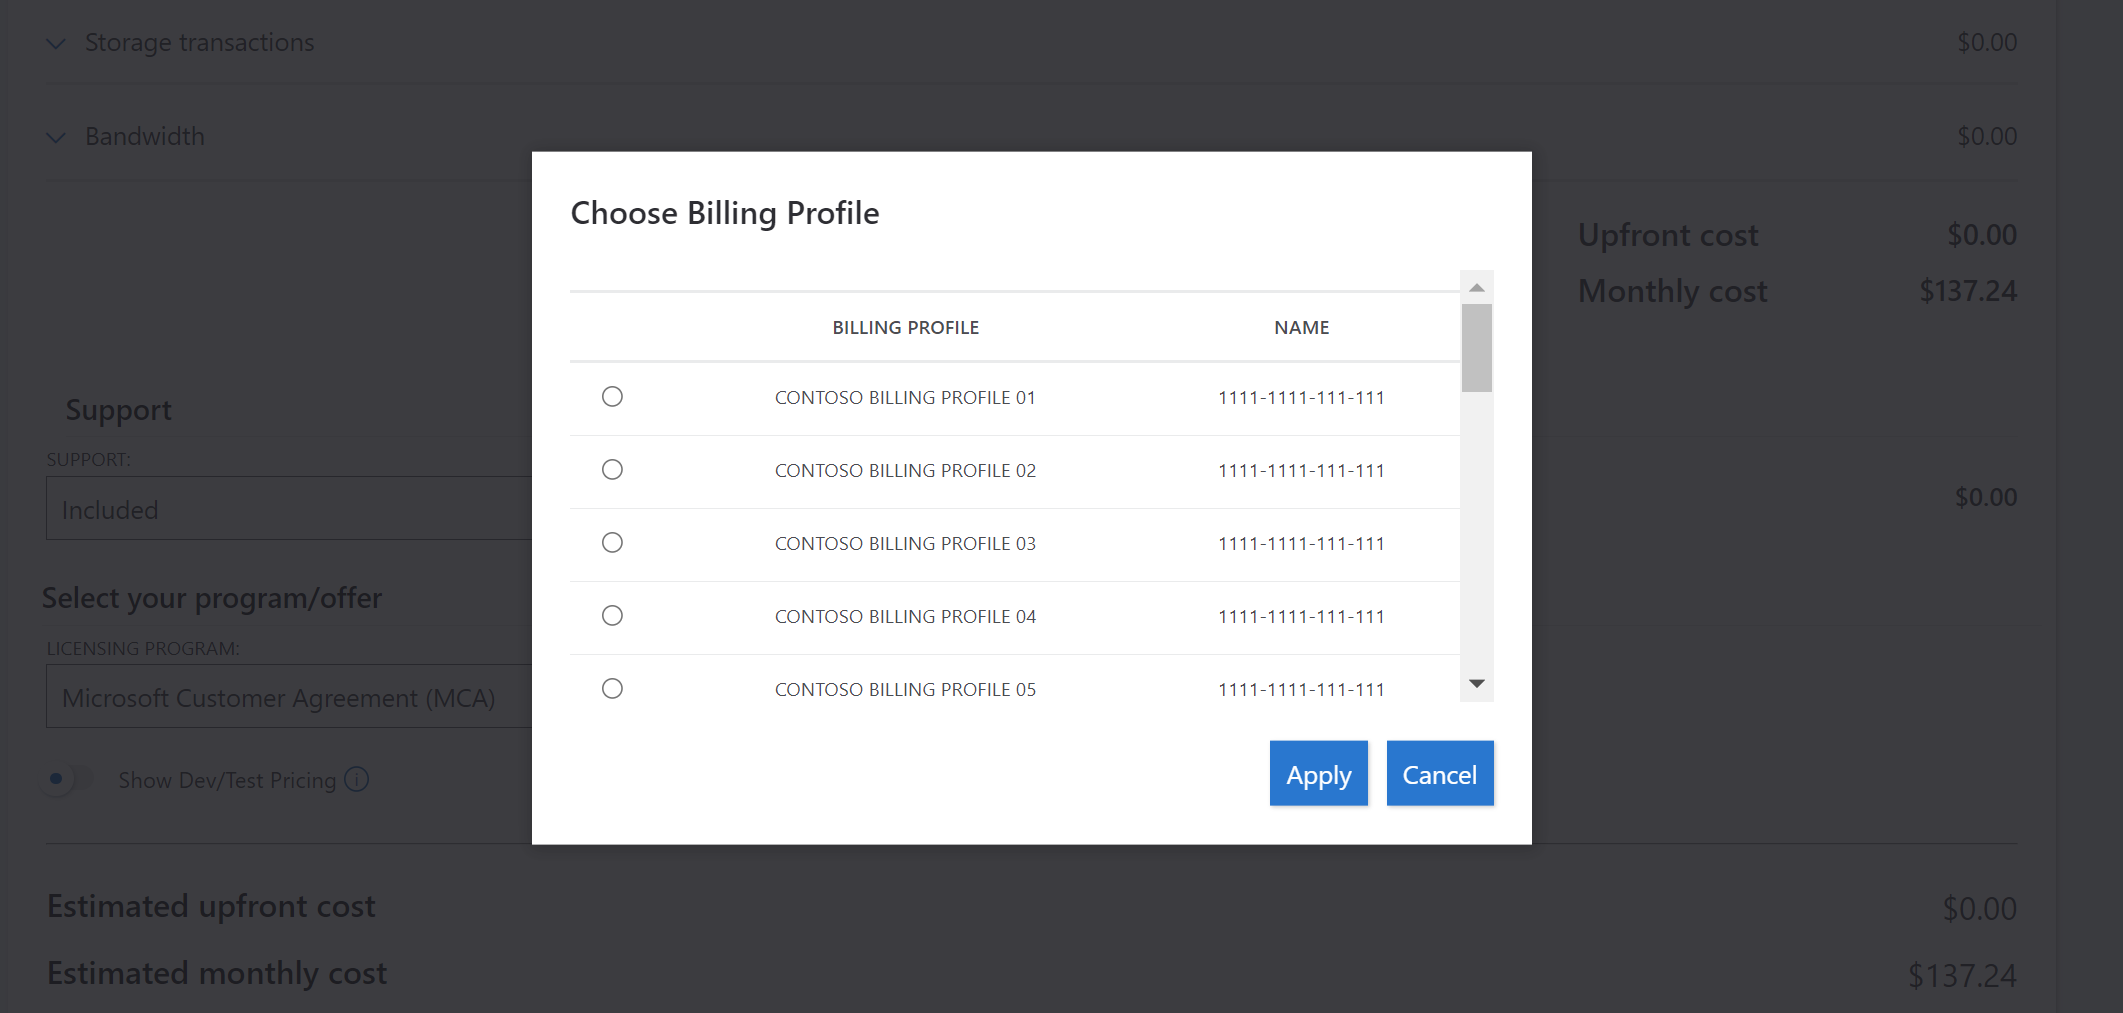


Your calculator estimate updates with your MCA price sheet information.
To view negotiated pricing associated with an EA billing account:
Your EA administrator must have both Department admins can view charges (DA view charges) and Account owners can view charges (AO view charges) enabled. For more information about enabling access, see Enable EA access to costs. After the settings are updated, it can up to 48 hours for the changes to take effect.
- Select the Enterprise Agreement (EA) option in the licensing program list.

- In the Choose Agreement area, select your enrollment or your billing account ID and then select Apply.
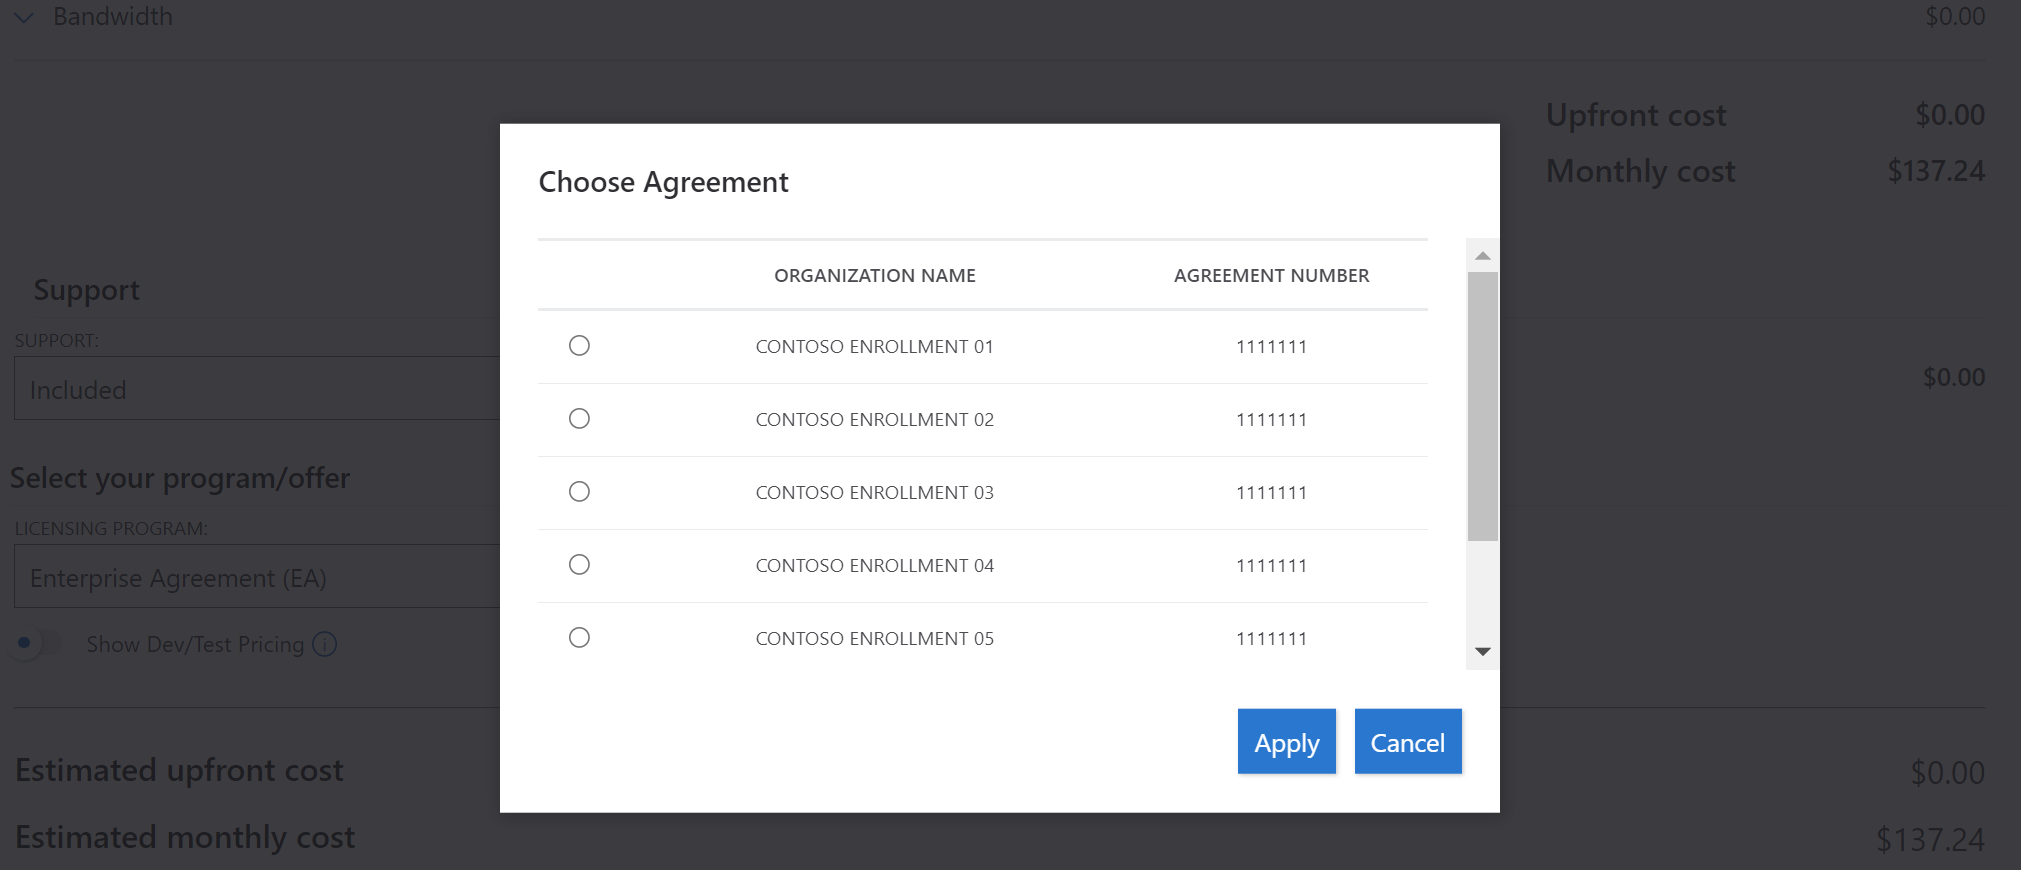


Your calculator estimate refreshes with your EA price sheet information.
If you want to change your selected enrollment, select the Selected agreement link to the right of the licensing program list item. Here's an example.

If you're a Cloud Solution Provider (CSP) partner that transitioned to the new commerce experience, you can view your estimate by selecting the Microsoft Customer Agreement (MCA) option in the licensing program.
Note
Partner Earned Credit (PEC) estimation isn't available in the calculator, so you need to manually apply your anticipated PEC to the monthly estimate.
If you don't have access to log in to the calculator to see negotiated prices, contact your administrator or Azure Account Manager.
Help us improve the calculator
If you want to provide feedback about the Pricing Calculator, there's a link at the bottom of the page. We welcome your feedback.

Next steps
- Estimate prices with the Azure Pricing Calculator.
- Learn more about the Azure Retail Prices API.