Identify anomalies and unexpected changes in cost
The article helps you identify anomalies and unexpected changes in your cloud costs using Cost Management and Billing. There's no charge to use Cost Management and Billing features for your Azure subscriptions. You start with anomaly detection for subscriptions in cost analysis to identify any atypical usage patterns based on your cost and usage trends. Then, you learn how to drill into cost information to find and investigate cost spikes and dips.
You can also create an anomaly alert to automatically get notified when an anomaly is detected.
In general, there are three types of changes that you might want to investigate:
- New costs—For example, a resource that was started or added such as a virtual machine. New costs often appear as a cost starting from zero.
- Removed costs—For example, a resource that was stopped or deleted. Removed costs often appear as costs ending in zero.
- Changed costs (increased or decreased)—For example, a resource was changed in some way that caused a cost increase or decrease. Some changes, like resizing a virtual machine, might be surfaced as a new meter that replaces a removed meter, both under the same resource.
Identify cost anomalies
The cloud comes with the promise of significant cost savings compared to on-premises costs. However, savings require diligence to proactively plan, govern, and monitor your cloud solutions. Even with proactive processes, cost surprises can still happen. For example, you might notice that something changed, but you're not sure what. Using Cost Management anomaly detection for your subscriptions can help minimize surprises.
Whether you know if you have any existing cost anomalies or not, Cost analysis informs you if it finds anything unusual as part of Insights. If not, Cost analysis shows No anomalies detected.
View anomalies in Cost analysis
Anomaly detection is available in Cost analysis smart views when you select a subscription scope. You can view your anomaly status as part of Insights.
Note
Cost anomaly alerts are not available for Azure Government customers.
In the Azure portal, navigate to Cost Management from Azure Home. Select a subscription scope and then in the left menu, select Cost analysis. In the view list, select any view under Smart views. In the following example, the Resources smart view is selected. If you have a cost anomaly, you see an insight.

If you don't have any anomalies, you see a No anomalies detected insight, confirming the dates that were evaluated.

Drill into anomaly details
To drill into the underlying data for something that changed, select the insight link. It opens a view in classic cost analysis where you can review your daily usage by resource group for the time range that was evaluated.
Continuing from the previous example of the anomaly labeled Daily run rate down 748% on Sep 28, let's examine its details after the link is selected. The following example image shows details about the anomaly. Notice the large increase in costs, a cost spike, and eventual drop in from a temporary, short-lived resource.

Cost anomalies are evaluated for subscriptions daily and compare the day's total usage to a forecasted total based on the last 60 days to account for common patterns in your recent usage. For example, spikes every Monday. Anomaly detection runs 36 hours after the end of the day (UTC) to ensure a complete data set is available.
The anomaly detection model is a univariate time-series, unsupervised prediction, and reconstruction-based model that uses 60 days of historical usage for training, then forecasts expected usage for the day. Anomaly detection forecasting uses a deep learning algorithm called WaveNet. It's different than the Cost Management forecast. The total normalized usage is determined to be anomalous if it falls outside the expected range based on a predetermined confidence interval.
Anomaly detection is available to every subscription monitored using the cost analysis. To enable anomaly detection for your subscriptions, open a cost analysis smart view and select your subscription from the scope selector at the top of the page. You see a notification informing you that your subscription is onboarded and you start to see your anomaly detection status within 24 hours.
Create an anomaly alert
You can create an alert to automatically get notified when an anomaly is detected. Creating an anomaly alert requires the Cost Management Contributor or greater role or the Microsoft.CostManagement/scheduledActions/write permission for custom roles. For more information, see Feature behavior for each role.
Note
Anomaly alerts are sent based on the current access of the rule creator at the time that the email is sent. If your organization has a policy that prohibits permanently assigning higher privileges to users, you can use a service principal and create the alert directly using the Scheduled Actions API.
An anomaly alert email includes a summary of changes in resource group count and cost. It also includes the top resource group changes for the day compared to the previous 60 days. And, it has a direct link to the Azure portal so that you can review the cost and investigate further.
An anomaly alert email is sent only once - at the time of detection.
- From Azure Home, select Cost Management under Tools.
- Verify the correct subscription is selected in the scope at the top of the page.
- In the left menu, select Cost alerts.
- On the toolbar, select + Add.
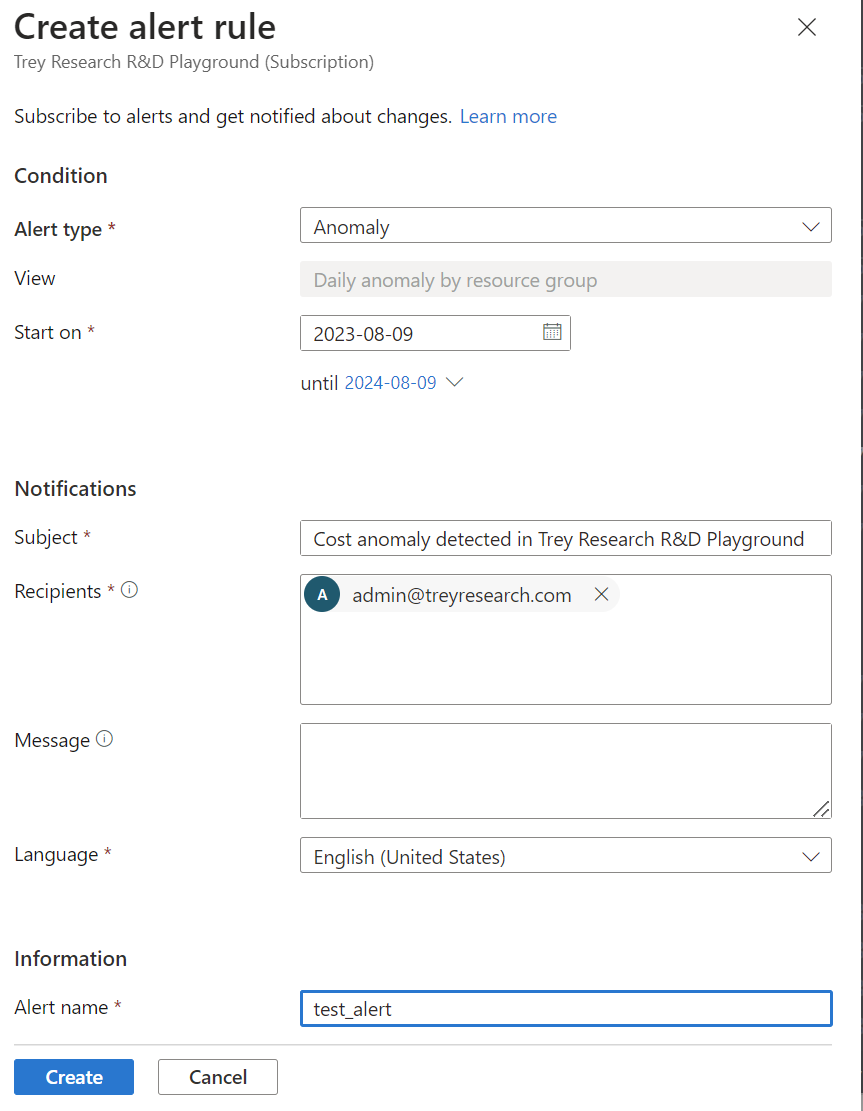
- On the Create alert rule page, select Anomaly as the Alert type.
- Enter all the required information, then select Create.
 You can view and manage the anomaly alert rule by navigating to Alert rules in the left navigation menu.

Here's an example email generated for an anomaly alert.

Manually find unexpected cost changes
Let's look at a more detailed example of finding a change in cost. When you navigate to Cost analysis and then select a subscription scope, you start with the Accumulated costs view. The following screenshot shows an example of what you might see.

With the default view and current month (March 2022), the example image doesn't show any dips or spikes.
Change the view to Daily costs and then expand the date range to Last year (2021). Then, set the granularity to Monthly. In the following image, notice that there's a significant increase in costs for the arcticmustang resource group starting in July.

Let's examine the increase in cost for the resource group more fully. To drill into the time frame of the change, change the date range. In the following example, we set a custom date range from June to July 2021 and then set the Granularity to Daily. In the example, the daily cost for the resource group was about $4.56. On June 30, the cost increased to $20.68. Later on July 1 and after, the daily cost went to $30.22.

So far, we found an increase in cost for the articmustang resource group at the end of June and the beginning of July. You might notice that the cost increase spanned over two days. The change took two days because a change in the middle of a day doesn't show the full effect of that change until the following full day.
Let's continue drilling into the data to find out more about the cost increase. Select the item that increased in cost (articmustang) to automatically set a filter for the resource group name. Then, change the Group by list to Resource. Then set the date range to a smaller period. For example, June 28 to July 4. In the following example image, the increase in cost is clearly shown. The type of resource is shown as microsoft.network/virtualnetworkgateways.

Next, select the resource in the chart that increased in cost articring to set another filter for the resource. Now, costs are shown for just that resource. Then, set the Group by list to Meter.

In the previous example, you see that the virtual private network resource named VpnGw1 stopped getting used on June 30. On June 30, a more expensive virtual private network resource named VpnGw3 started getting used.
At this point, you know what changed and the value that costs changed. However, you might not know why the change happened. At this point, you should contact the people that created or used the resource. Continue to the next section to learn more.
Find people responsible for changed resource use
Using Cost analysis, you might find resources that had sudden changes in usage. However, it might not be obvious who is responsible for the resource or why the change was made. Often, the team responsible for a given resource knows about changes that were made to a resource. Engaging them is useful as you identify why charges might appear. For example, the owning team created the resource, updated its SKU (which changed the resource rate), or increased the load on the resource due to code changes.
The Get resource changes article for Azure Resource Graph might help you to find additional information about configuration changes to resources.
Continue reading the following sections for more techniques to determine who owns a resource.
Analyze the audit logs for the resource
If you have permission to view a resource, you should be able to access its audit logs. Review the logs to find the user who was responsible for the most recent changes to a resource. To learn more, see View and retrieve Azure Activity log events.
Analyze user permissions to the resource's parent scope
People that have write access to a subscription or resource group typically have information about the resources that were created or updated. They should be able to explain the purpose of a resource or point you to the person who knows. To identify the people with permissions for a subscription scope, see Check access for a user to Azure resources. You can use a similar process for billing scopes, resource groups, and management groups.
Examine tagged resources
If you have an existing policy of tagging resources, the resource might be tagged with identifying information. For example, resources might be tagged with owner, cost center, or development environment information. If you don't already have a resource tagging policy in place, consider adopting one to help identify resources in the future.
Other strategies to identify unexpected charges
If you used the preceding strategies and you still don't understand why you received a charge or if you need other help with billing issues, review the following sections.
Why am I not receiving emails from anomaly alerts?
There are several reasons why you're not receiving alert emails. Try the following actions:
- Confirm that the creator of the schedule continues to have Reader role assigned or
Microsoft.CostManagement/scheduledActions/readpermission, if it's a custom role. - Confirm that your email address is shown as a recipient and that it's correct.
- Make sure that there are no email rules that block
microsoft-noreply@microsoft.com. - Check your spam or junk mail folder for emails from
microsoft-noreply@microsoft.com. - Check to see if the alert is expired or deleted. You can extend or create a new anomaly alert rule to fix the problem.
- Work with your admin to reenable the view charges policy in the Azure portal. The policy applies to indirect Enterprise Agreements and to Microsoft Customer Agreements with a Microsoft partner.
Note
Azure checks the permissions of the alert rule creator before sending the alert email. If your organization has a policy that prohibits permanently assigning higher privileges to users, you can use a service principal and create the alert directly using the Scheduled Actions API.
Why am I not able to create an anomaly alert rule?
Try the following steps:
Anomaly alert rules can only be created at the subscription scope. Ensure that the correct scope is selected.
Verify that you have the Owner, Contributor, or Cost Management Contributor role on the subscription.
If you got an error message indicating that you reached the limit of five alerts per subscription, consider editing an existing anomaly alert rule. Add yourself as a recipient instead of creating a new rule in case you exhausted the limit.
Anomaly alerts are currently available only in the Azure public cloud. If you are using a government cloud or any of the sovereign clouds, this service is not yet available.
How can I automate the creation of an anomaly alert rule?
You can automate the creation of anomaly alert rules using the Scheduled Action API, specifying the scheduled action kind as InsightAlert.
Get help to identify charges
If used the preceding strategies and you still don't understand why you received a charge or if you need other help with billing issues, create a support request.
Related content
- Learn about how to Optimize your cloud investment with Cost Management.