Note
Access to this page requires authorization. You can try signing in or changing directories.
Access to this page requires authorization. You can try changing directories.
Diagram of the sequence of the deployment guide including these locations, in order: Overview, Plan, Prepare, Publish, Monitor, and Optimization. The 'Publish' location is currently highlighted.
Host Data API builder quickly in Azure Static Web Apps using just a configuration file. This guide includes steps to integrate Data API builder with a static web app.
In this guide, walk through the steps to build a DAB configuration file, host the file as part of your application, and then use a database connection in Azure Static Web Apps.
Prerequisites
Important
Support for Data API builder (DAB) in Azure Static Web Apps using database connections is in preview. Azure Static Web Apps uses a fixed version of the DAB engine that can vary from the latest stable version of DAB. To access the latest DAB features, consider an alternative host for DAB using the latest version of the engine from GitHub, Microsoft Container Registry (Docker Hub), or NuGet.
- An Azure account with an active subscription. Create an account for free.
- Azure Static Web Apps CLI. Install the Static Web Apps (SWA) CLI.
- Data API builder CLI. Install the Data API builder (DAB) CLI.
- Existing supported database addressable from Azure.
- Existing web application in a GitHub repository that can be deployed to Azure Static Web Apps.
- If you don't have a web application, generate a repository with a basic web application.
Create a static web app
To start, use the Azure portal to create a new Azure Static Web App using the web application in GitHub.
Sign into the Azure portal (https://portal.azure.com).
Create a new resource group. You will use this resource group to for all new resources in this guide.
Tip
We recommend naming the resource group msdocs-dab-swa. All screenshots in this guide use this name.
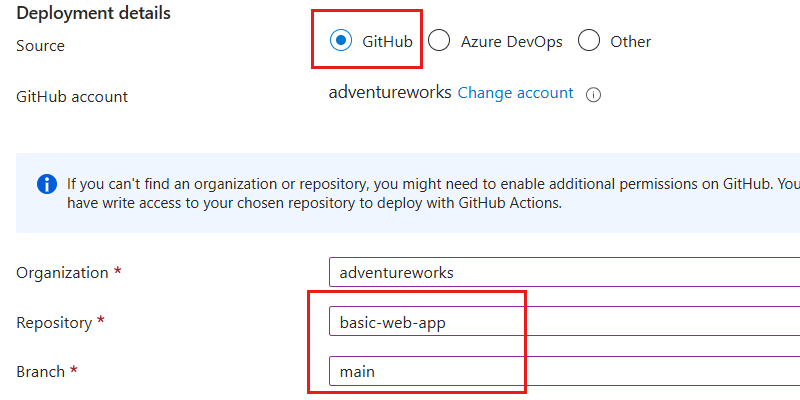
Create an Azure Static Web App. Use these settings to configure the static web app.
Setting Value Resource group Select the resource group you created earlier Name Enter a globally unique name Plan type Select the best option for your workload Source Select GitHub GitHub account Configure a GitHub account that has access to the web application repository Organization Select the parent organization or user for the repository Repository Select the repository name Branch Select the primary branch 
Wait for the static web application deployment to complete. A GitHub Actions workflow is automatically added to your repository that will deploy the application to Azure Static Web Apps every time you push to the primary branch.
Note
This initial deployment can take a few minutes. You can always check the status of the deployment in either the Azure portal or the GitHub Actions tab in your repository.
Navigate to the new static web app in the Azure portal.
In the Essentials section, use the URL hyperlink to navigate to the running web application. Verify that the application is running as expected.
Add the DAB configuration file
Now, use the DAB and SWA command-line interfaces to create a new DAB configuration file and add it to the web application repository.
Open the GitHub repository for your web application in the integrated developer environment (IDE) of your choice.
Tip
You can use any IDE you'd like. If you want to work on the application locally, you can clone the repository to your local machine. If you prefer to work in the browser, you can use GitHub Codespaces. Ensure that the SWA and DAB CLIs is installed in your development environment.
Open a terminal in the root of the repository.
Use the
swa dbcommand from the SWA CLI to initialize a new DAB configuration file using the specified database type. The command will create a new file named staticwebapp.database.config.json in the swa-db-connections folder.swa db init --database-type "<database-type>"Important
Some database types will require additional configuration settings on initialization.
Use the
dab addcommand to add at least one database entity to the configuration. Configure each entity to allow all permissions for anonymous users. Repeatdab addas many times as you like for your entities.dab add "<entity-name>" --source "<schema>.<table>" --permissions "anonymous:*" --config "swa-db-connections/staticwebapp.database.config.json"Open and review the contents of the swa-db-connections/staticwebapp.database.config.json file.
Commit your changes to the repository and push them to the primary branch. This will automatically trigger a new deployment of the web application. Wait for this latest deployment to finish before continuing with this guide.
Configure the database connection
Next, configure the database connection in the Azure portal to allow the static web app to access the database.
Navigate to the static web app again in the Azure portal.
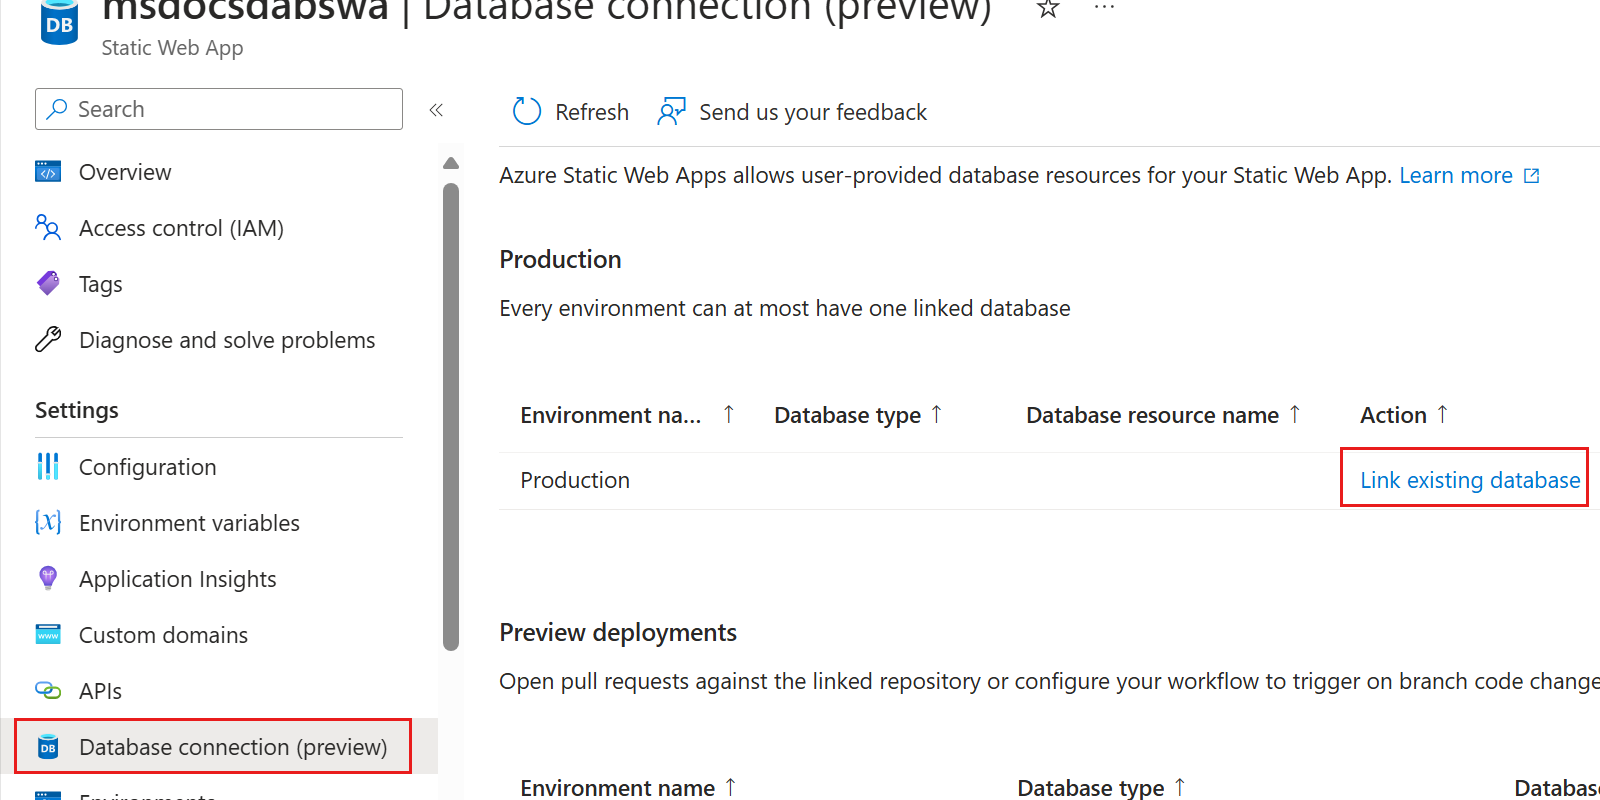
Select the Database connection option in the Settings section of the resource menu. Then, select Link existing database for the production environment.

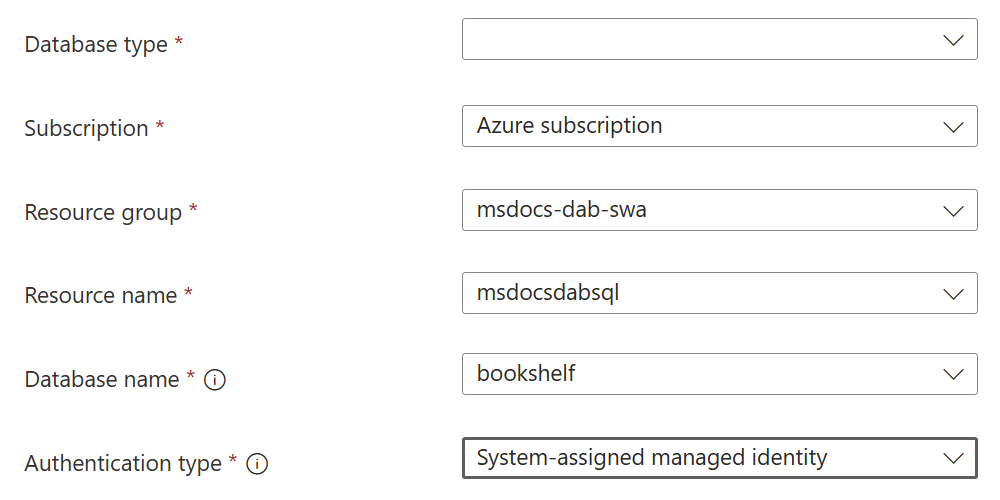
In the Link database dialog, use these settings to configure the database connection.
Setting Value Database type Select the same database type you used when creating the DAB configuration file Resource group Select the resource group you created earlier in this guide Resource name Select the database resource you want to link to the static web app Database name Enter the name of the database Authentication type Select the type of authentication you intend to use 
Tip
We recommend using a connection string that does not include authorization keys. Instead, use managed identities and role-based access control to manage access between your database and host. For more information, see Azure services that use managed identities.
Test the data API endpoint
Finally, validate that the data API endpoint is available on the static web app.
Navigate to the static web app again in the Azure portal.
Use the URL field in the Essentials section to browse to the static web app's website again.
Navigate to the
/data-apipath for the current running application. Observe that the response still indicates that the DAB container is healthy.{ Healthy }Note
Static Web Apps automatically set the runtime host mode to
Production, overwriting any value in the configuration file. As a result, developer features like Swagger and Banana Cake Pop are unavailable in Static Web Apps.Navigate to the
https://<your-static-web-app-url>/data-api/<your-rest-path>/<your-entity-name>path for the current running application. This issues an HTTP GET request for that set of entities. Observe the JSON response.
Clean up resources
When you no longer need the sample application or resources, remove the corresponding deployment and all resources.
Navigate to the resource group using the Azure portal.
In the command bar, select Delete.
