Note
Access to this page requires authorization. You can try signing in or changing directories.
Access to this page requires authorization. You can try changing directories.
Important
Azure Data Catalog was retired on May 15, 2024.
For data catalog features, use the Microsoft Purview service, which offers unified data governance for your entire data estate.
In this tutorial, you use the registration tool to register data assets from the database sample with the catalog. Registration is the process of extracting key structural metadata such as names, types, and locations from the data source and the assets it contains, and copying that metadata to the catalog. The data source and data assets remain where they are, but the metadata is used by the catalog to make them more easily discoverable and understandable.
In this tutorial, you learn how to:
- Register data assets
- Search data assets
- Annotate data assets
- Connect to data assets
- Manage data assets
- Delete data assets
Prerequisites
- A Microsoft Azure subscription.
- You need to have your own Microsoft Entra tenant.
- An Azure Data Catalog
To set up Data Catalog, you must be the owner or co-owner of an Azure subscription.
Register data assets
Register a data source
In this example, we'll register data assets (tables) from a database sample for Azure SQL Database, but you can use any supported data source if you prefer to work with data that is familiar and relevant to your role. For a list of supported data sources, see: Supported data sources.
The database name we're using in this tutorial is RLSTest.
You can now register data assets from the database sample by using Azure Data Catalog.
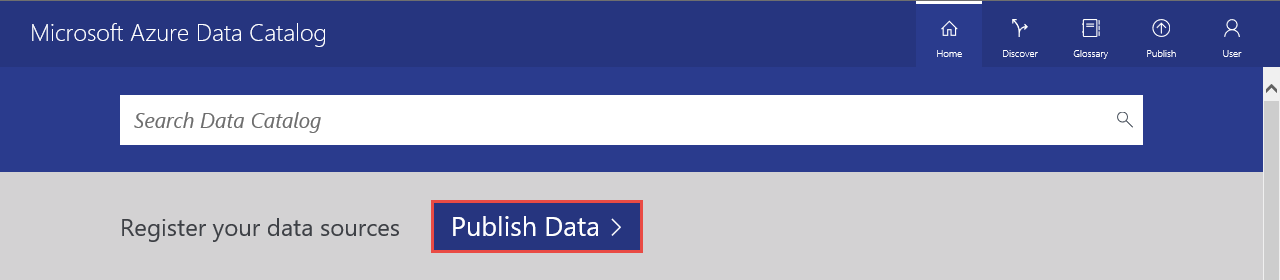
Go to the Azure Data Catalog home page and select Publish Data.
Select Launch Application to download, install, and run the registration tool on your computer.

On the Welcome page, select Sign in and enter your credentials.

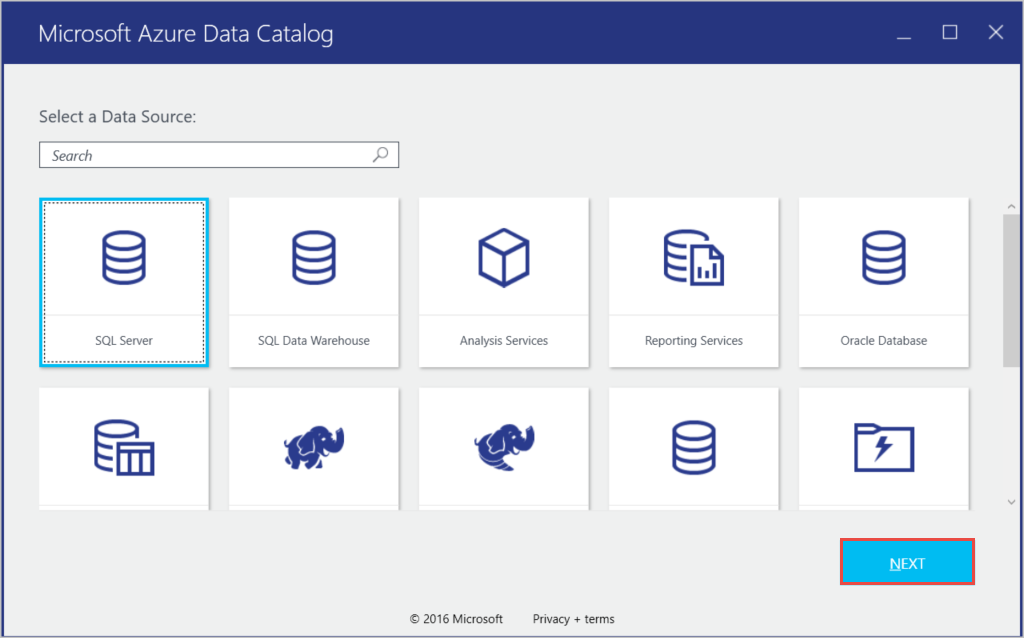
On the Microsoft Azure Data Catalog page, select SQL Server and Next.
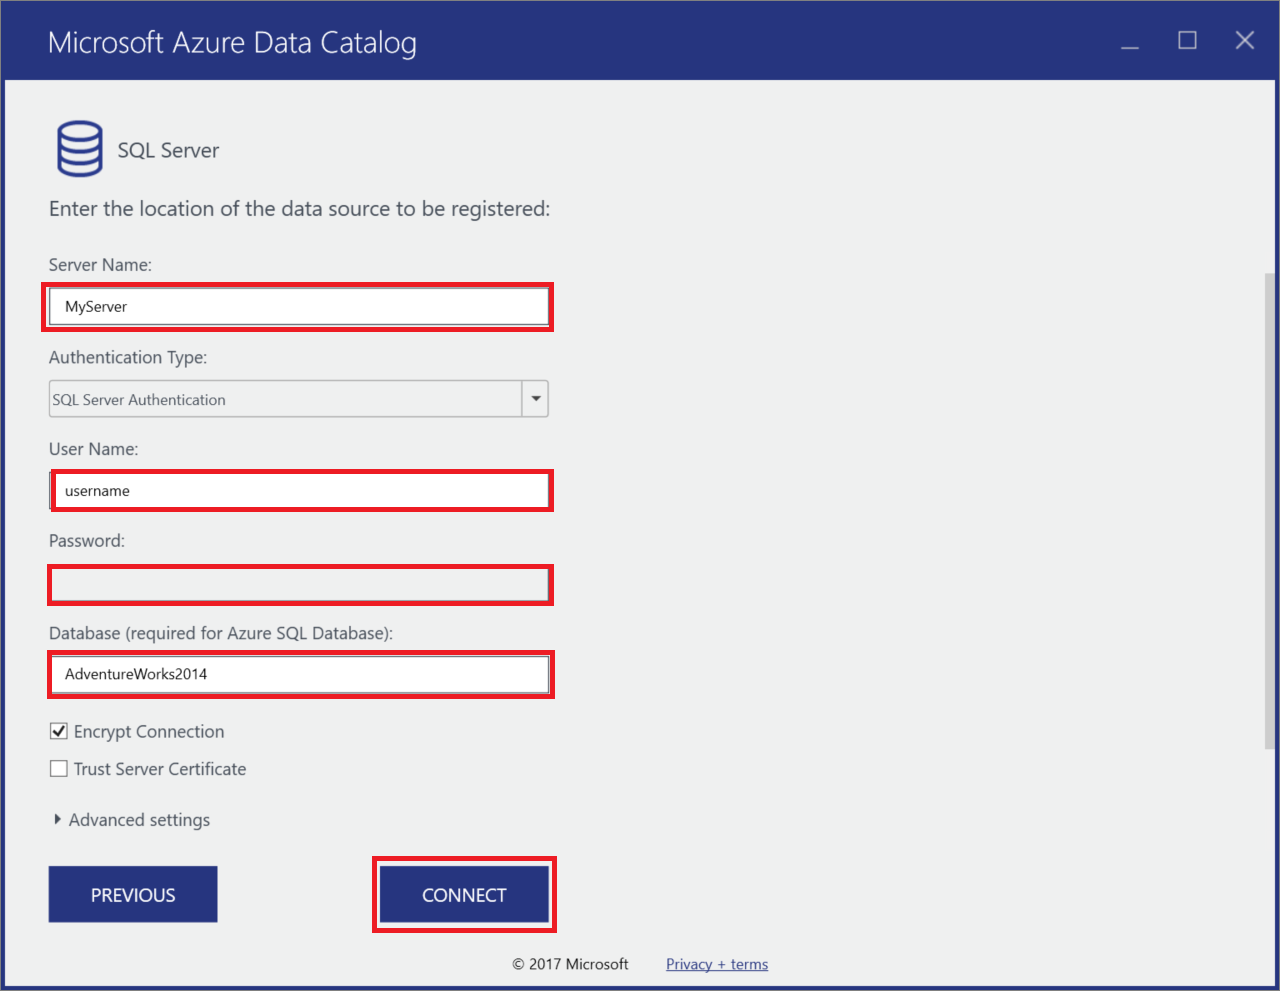
Enter the SQL Server connection properties for your database sample in Azure SQL Database and select CONNECT.
Register the metadata of your data asset. In this example, you register Product objects from the sample namespace:
In the Server Hierarchy tree, expand your database sample and select SalesLT.
Select Product, ProductCategory, ProductDescription, and ProductModel by using Ctrl+select.
Select the move-selected arrow (>). This action moves all selected objects into the Objects to be registered list.
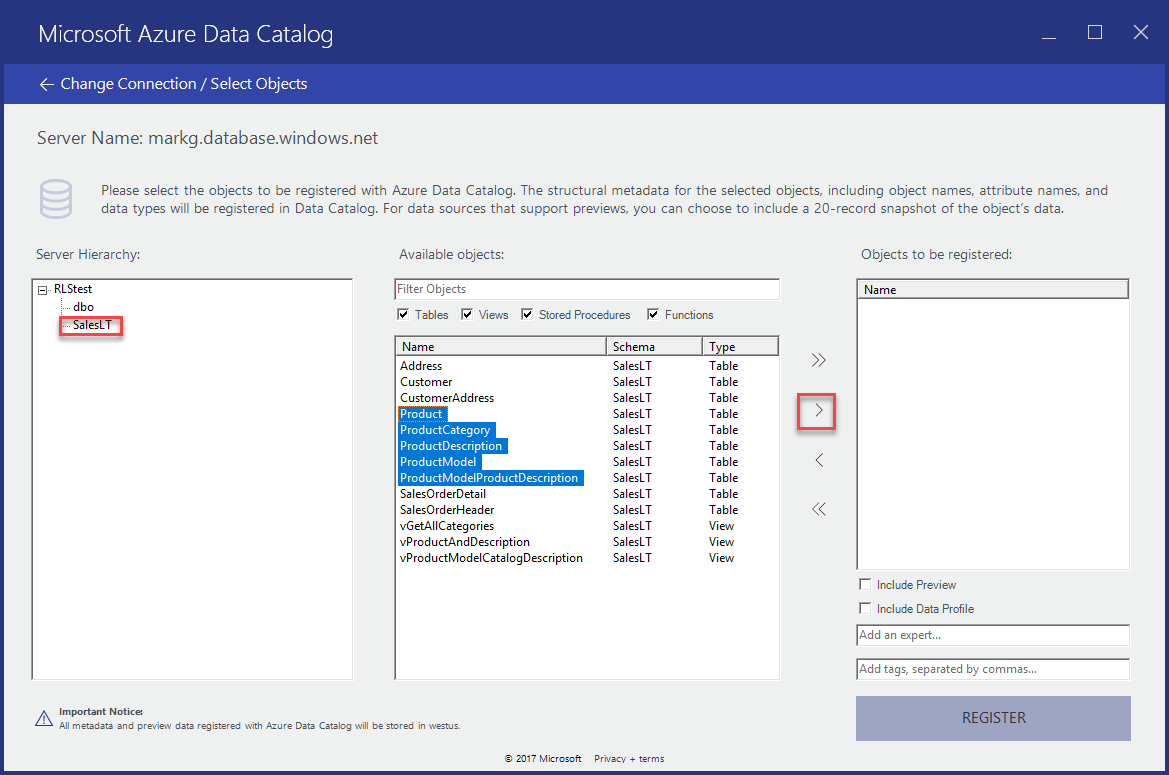
Select Include a Preview to include a snapshot preview of the data. The snapshot includes up to 20 records from each table, and it's copied into the catalog.
Select Include Data Profile to include a snapshot of the object statistics for the data profile (for example: minimum, maximum, and average values for a column, number of rows).
In the Add tags field, enter sales, product, azure sql. This action adds search tags for these data assets. Tags are a great way to help users find a registered data source.
Specify the name of an expert on this data (optional).
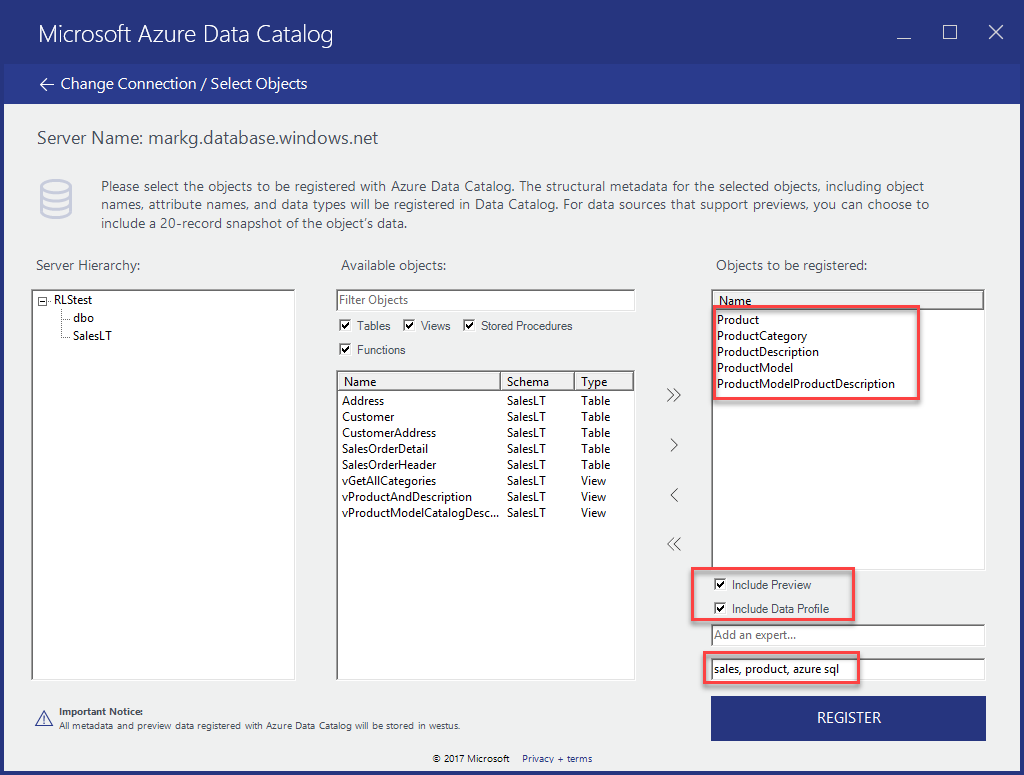
Select REGISTER. Azure Data Catalog registers your selected objects. In this exercise, the selected objects from your database sample are registered. The registration tool extracts metadata from the data asset and copies that data into the Azure Data Catalog service. The data remains where it currently stays. Data remains under the control of the administrators and policies of the origin system.
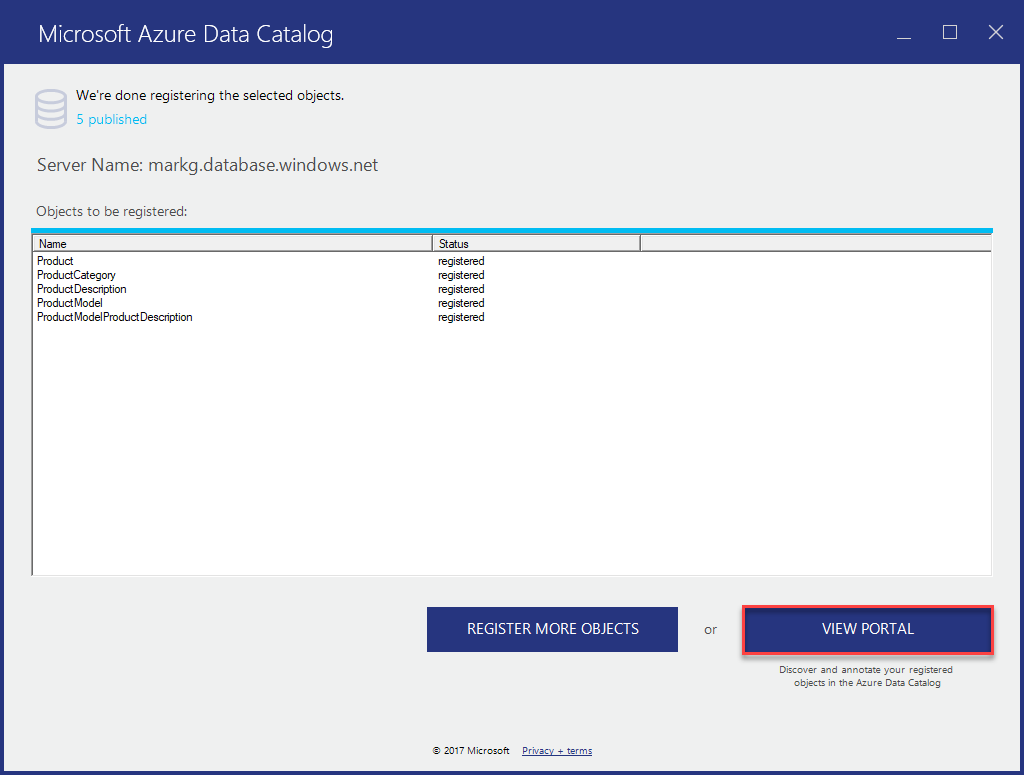
To see your registered data source objects, select View Portal. In the Azure Data Catalog portal, confirm that you see all four tables and the database in the grid view (verify that the search bar is clear).
In this exercise, you registered objects from the database sample for Azure SQL Database so that they can be easily discovered by users across your organization.
In the next exercise, you learn how to discover registered data assets.
Discover data assets
Discovery in Azure Data Catalog uses two primary mechanisms: searching and filtering.
Searching is designed to be both intuitive and powerful. By default, search terms are matched against any property in the catalog, including user-provided annotations.
Filtering is designed to complement searching. You can select specific characteristics such as experts, data source type, object type, and tags to view matching data assets and to constrain search results to matching assets.
By using a combination of searching and filtering, you can quickly navigate the data sources that are registered with Azure Data Catalog.
In this exercise, you use the Azure Data Catalog portal to discover data assets you registered in the previous exercise. See Data Catalog Search syntax reference for details about search syntax.
Following are a few examples for discovering data assets in the catalog.
Discover data assets with basic search
Basic search helps you search a catalog by using one or more search terms. Results are any assets that match on any property with one or more of the terms specified.
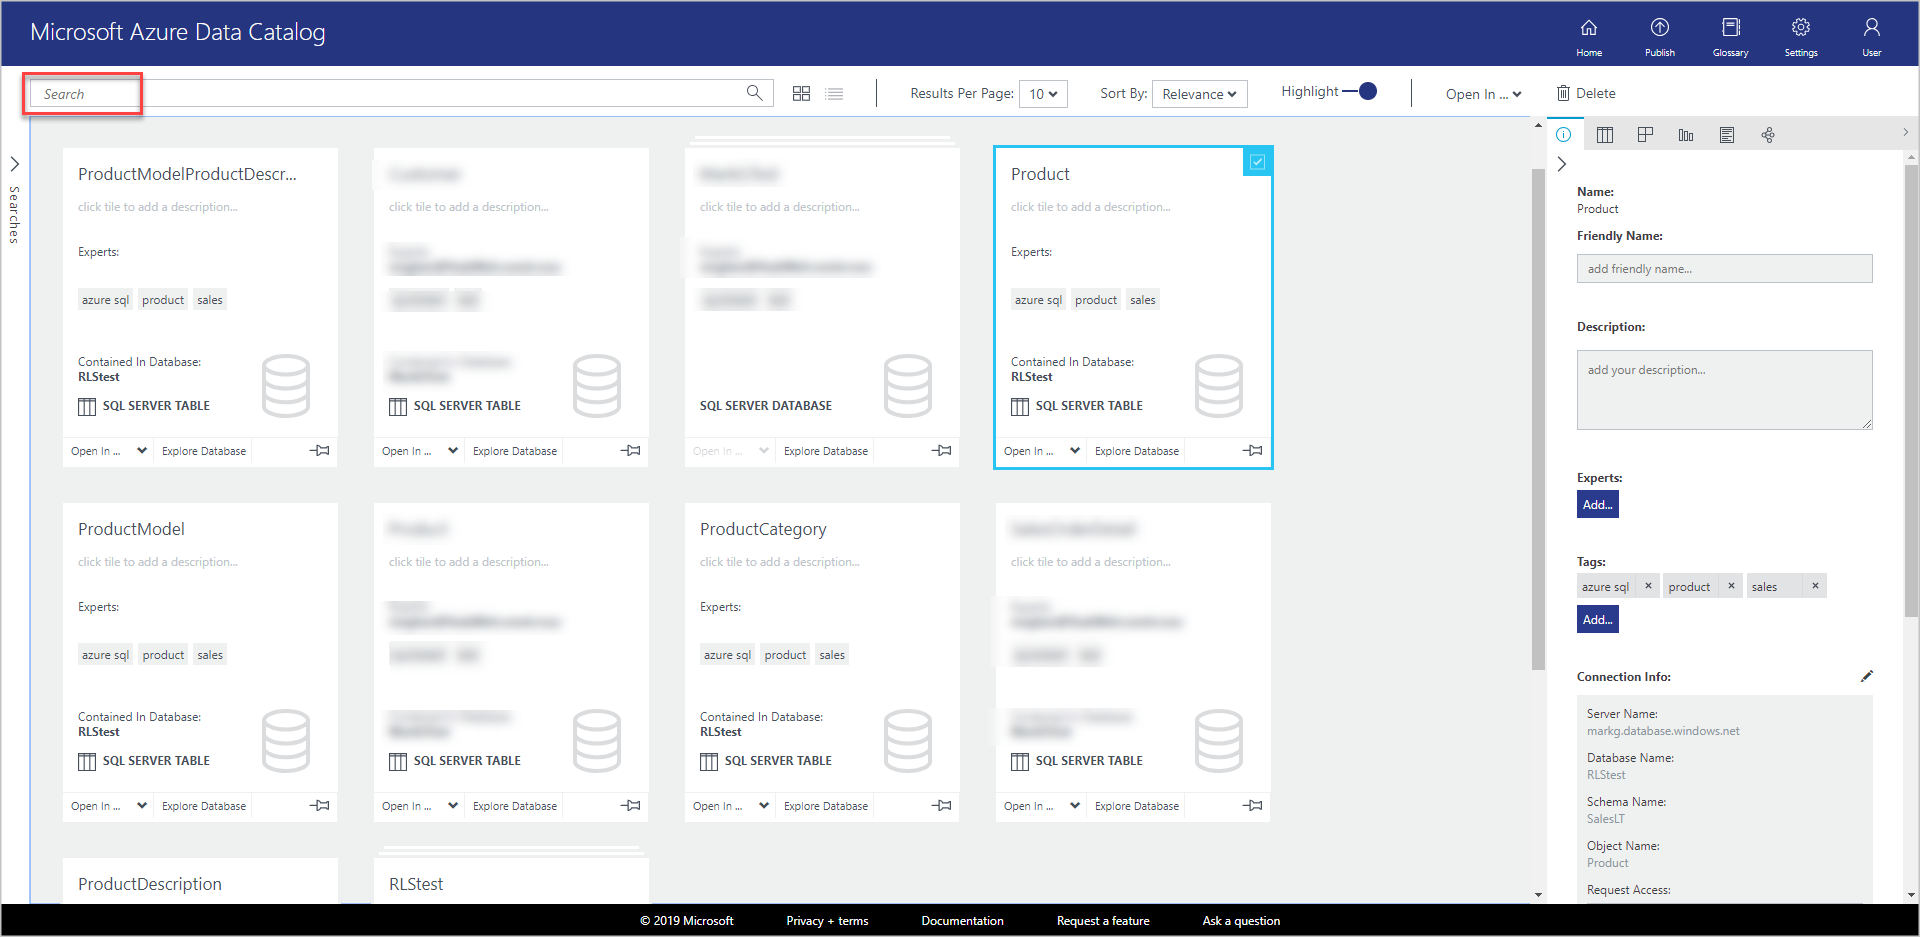
Select Home in the Azure Data Catalog portal. If you've closed the web browser, go to the Azure Data Catalog home page.
In the search box, enter
productand press ENTER.
Confirm that you see all four tables and the database in the results. You can switch between grid view and list view by selecting buttons on the toolbar, as shown in the following image. Notice that the search keyword is highlighted in the search results because the Highlight option is ON. You can also specify the number of results per page in search results.
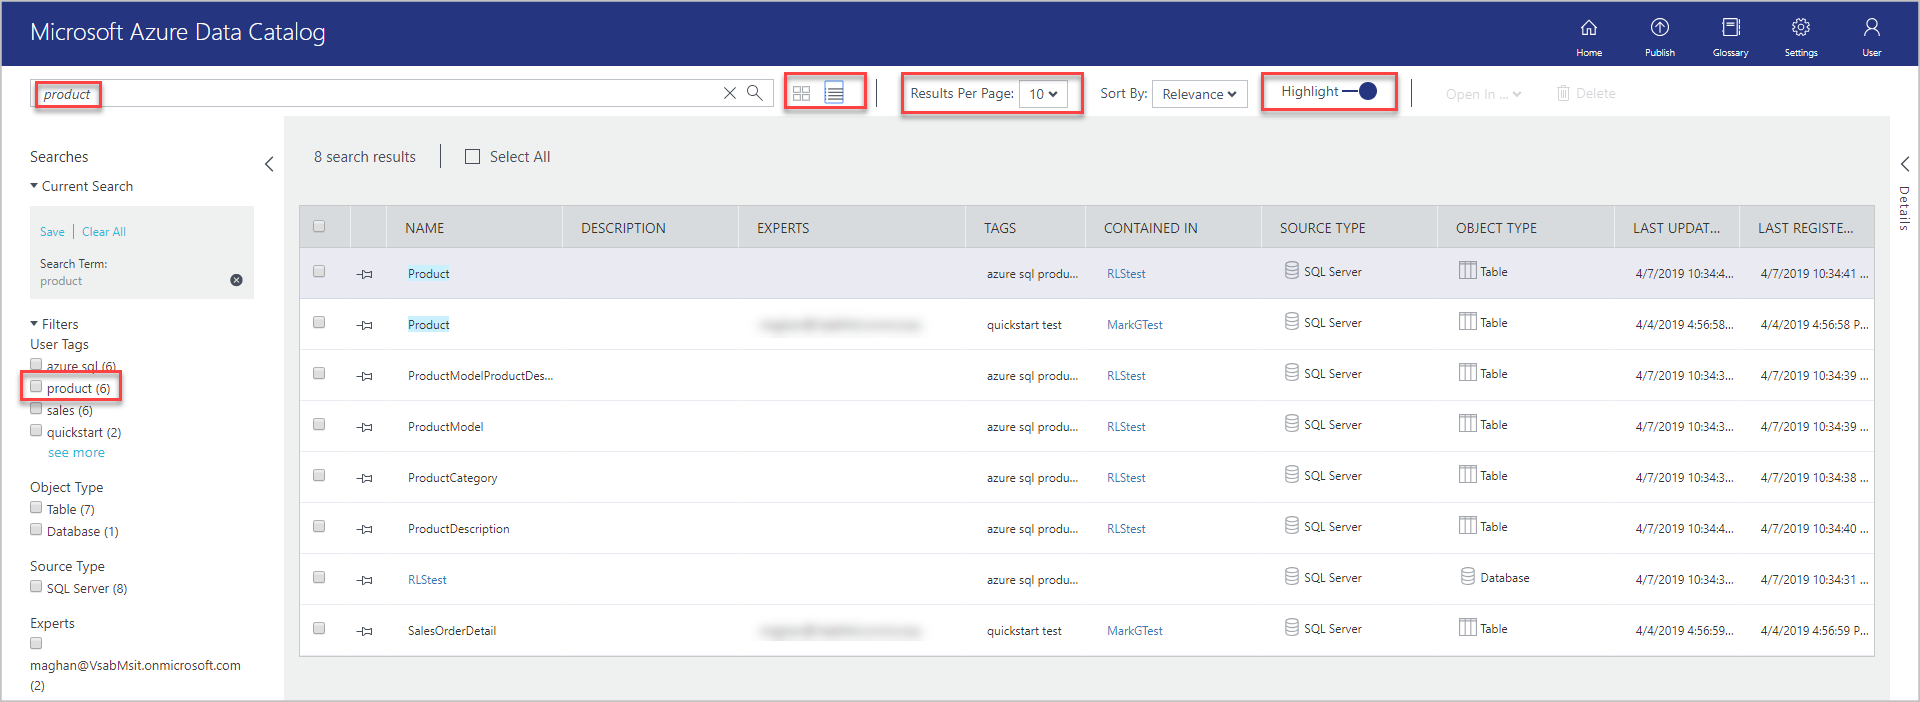
The Searches panel is on the left and the Properties panel is on the right. On the Searches panel, you can change search criteria and filter results. The Properties panel displays properties of a selected object in the grid or list.
Select Product in the search results. select the Preview, Columns, Data Profile, and Documentation tabs, or select the arrow to expand the bottom pane.
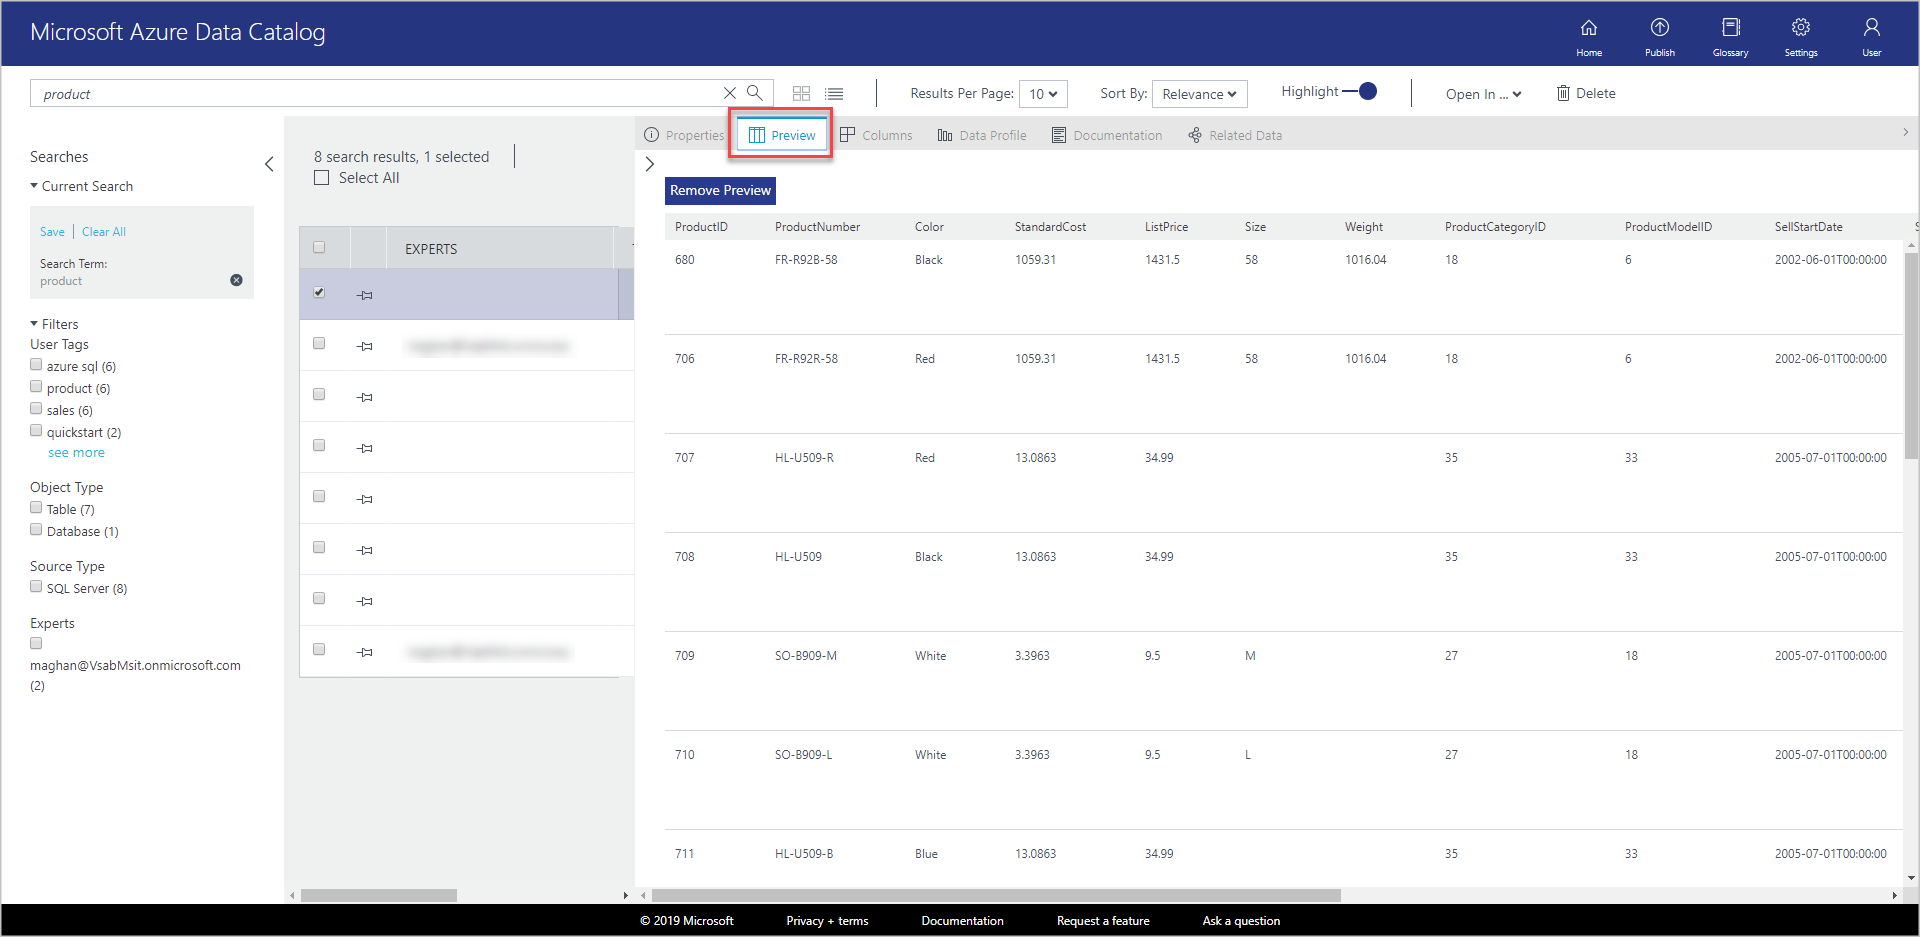
On the Preview tab, you see a preview of the data in the Product table.
Select the Columns tab to find details about columns (such as name and data type) in the data asset.
Select the Data Profile tab to see the profiling of data (for example: number of rows, size of data, or minimum value in a column) in the data asset.
Discover data assets with property scoping
Property scoping helps you discover data assets where the search term is matched with the specified property.
Clear the Table filter under Object Type in Filters.
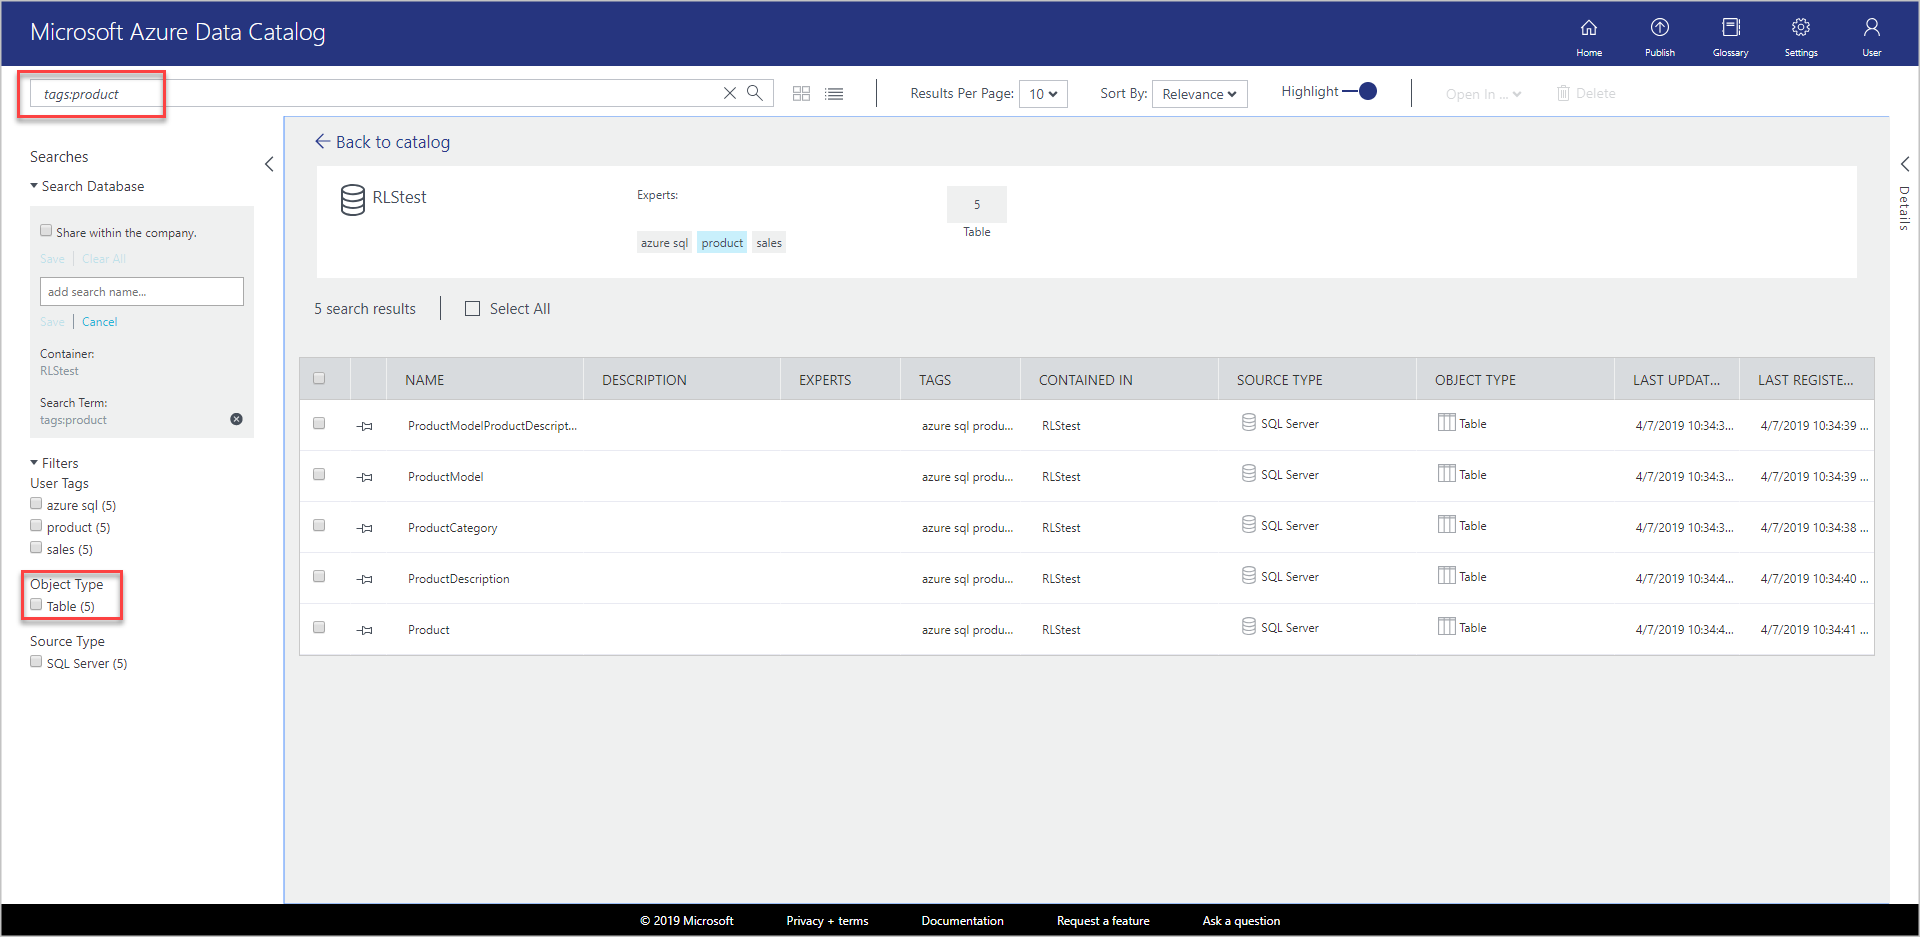
In the search box, enter
tags:productand press ENTER. See Data Catalog Search syntax reference for all the properties you can use for searching the data catalog.Confirm that you see the tables and the database in the results.
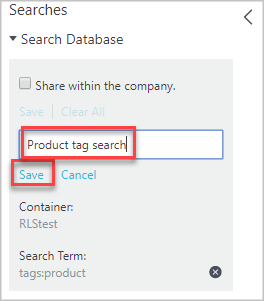
Save the search
In the Searches pane in the Current Search section, enter a name for the search and select Save.
Confirm that the saved search shows up under Saved Searches.
Select one of the actions you can take on the saved search (Rename, Delete, Save As Default search).
Grouping with parentheses
By grouping with parentheses, you can group parts of the query to achieve logical isolation, especially along with Boolean operators.
In the search box, enter
name:product AND (tags:product AND objectType:table)and press ENTER.Confirm that you see only the Product table in the search results.
Comparison operators
With comparison operators, you can use comparisons other than equality for properties that have numeric and date data types.
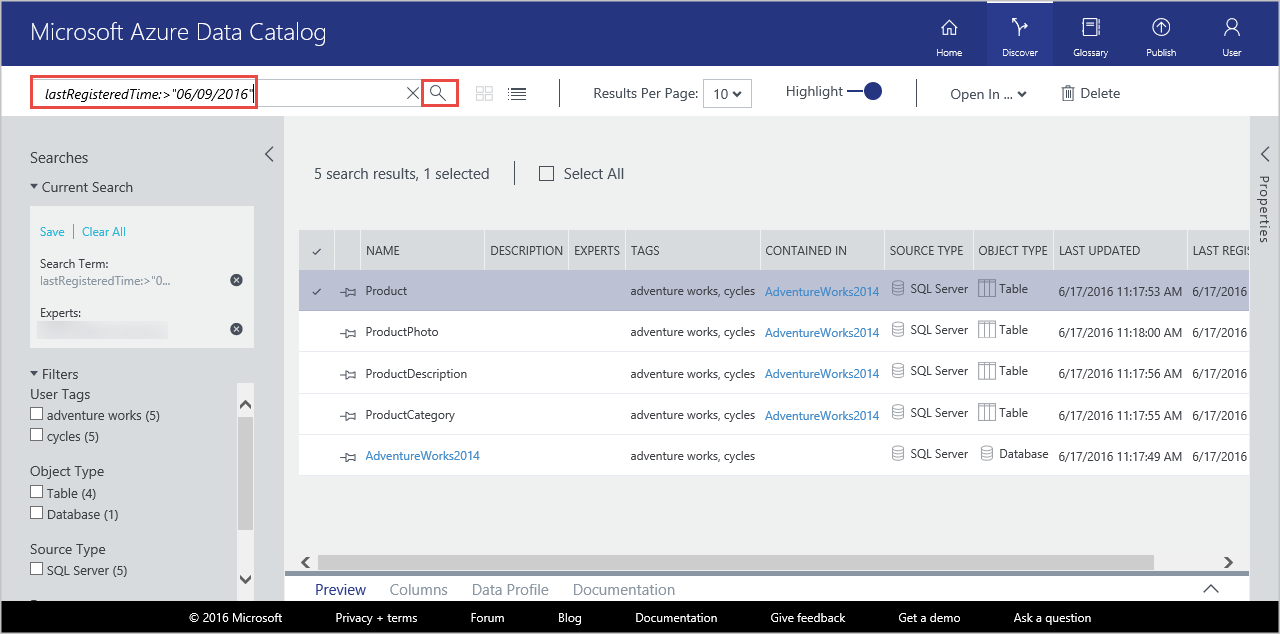
In the search box, enter
lastRegisteredTime:>"06/09/2016".Clear the Table filter under Object Type.
Press ENTER.
Confirm that you see the Product, ProductCategory, and ProductDescription tables and the SQL database you registered in search results.
See How to discover data assets for detailed information about discovering data assets. For more information on search syntax, see Data Catalog Search syntax reference.
Annotate data assets
In this exercise, you use the Azure Data Catalog portal to annotate (add information such as descriptions, tags, or experts) existing data assets in the catalog. The annotations supplement the structural metadata extracted from the data source during registration. Annotation makes the data assets much easier to discover and understand.
In this exercise, you annotate a single data asset (ProductPhoto). You add a friendly name and description to the ProductPhoto data asset.
Go to the Azure Data Catalog home page and search with
tags:productto find the data assets you've registered.Select ProductModel in search results.
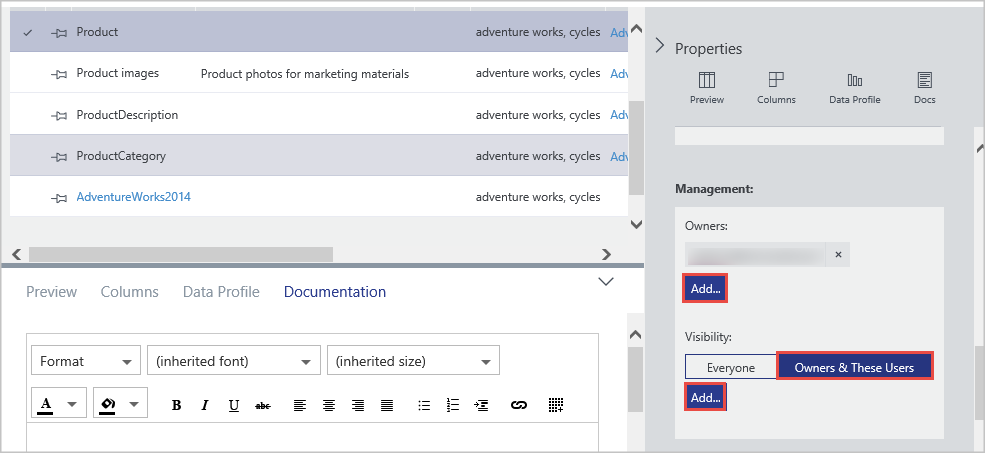
Enter Product images for Friendly Name and Product photos for marketing materials for the Description.
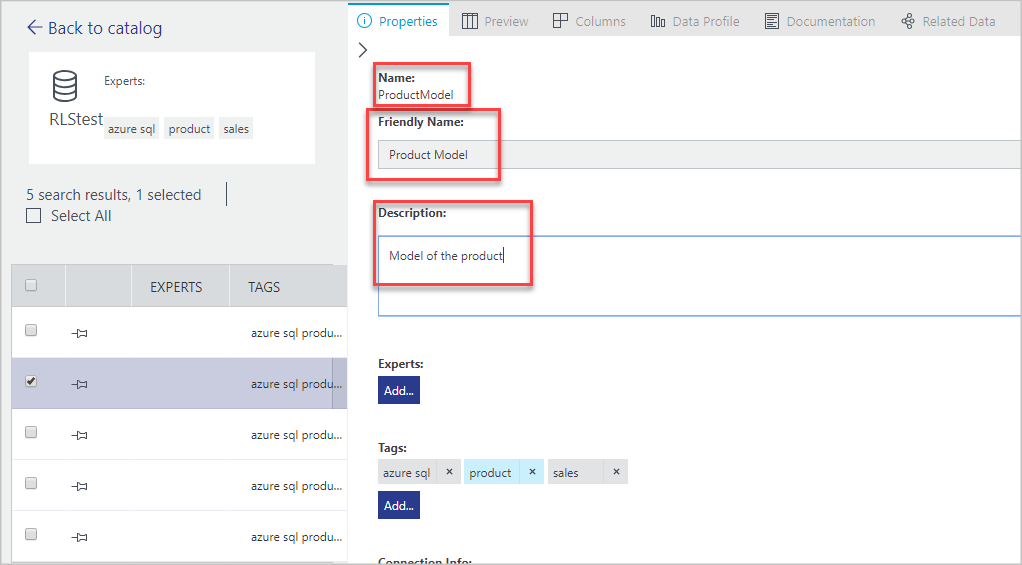
The Description helps others discover and understand why and how to use the selected data asset. You can also add more tags and view columns. You can search and filter data sources by using the descriptive metadata you’ve added to the catalog.
You can also do the following steps on this page:
Add experts for the data asset. select Add in the Experts area.
Add tags at the dataset level. select Add in the Tags area. A tag can be a user tag or a glossary tag. The Standard Edition of Data Catalog includes a business glossary that helps catalog administrators define a central business taxonomy. Catalog users can then annotate data assets with glossary terms. For more information, see How to set up the Business Glossary for Governed Tagging
Add tags at the column level. select Add under Tags for the column you want to annotate.
Add description at the column level. Enter Description for a column. You can also view the description metadata extracted from the data source.
Add Request access information that shows users how to request access to the data asset.
Choose the Documentation tab and provide documentation for the data asset. With Azure Data Catalog documentation, you can use your data catalog as a content repository to create a complete narrative of your data assets.
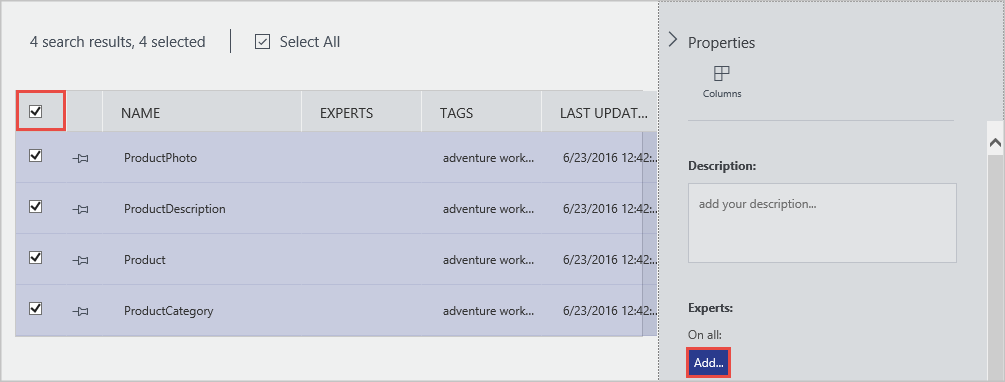
You can also add an annotation to multiple data assets. For example, you can select all the data assets you registered and specify an expert for them.
Azure Data Catalog supports a crowd-sourcing approach to annotations. Any Data Catalog user can add tags (user or glossary), descriptions, and other metadata. By doing so, users add perspective on a data asset and its use, and share that perspective with other users.
See How to annotate data assets for detailed information about annotating data assets.
Connect to data assets
In this exercise, you open data assets in an integrated client tool (Excel) and a non-integrated tool (SQL Server Management Studio) by using connection information.
Note
It’s important to remember that Azure Data Catalog doesn’t give you access to the actual data source—it simply makes it easier for you to discover and understand it. When you connect to a data source, the client application you choose uses your Windows credentials or prompts you for credentials as necessary. If you have not previously been granted access to the data source, you need to be granted access before you can connect.
Connect to a data asset from Excel
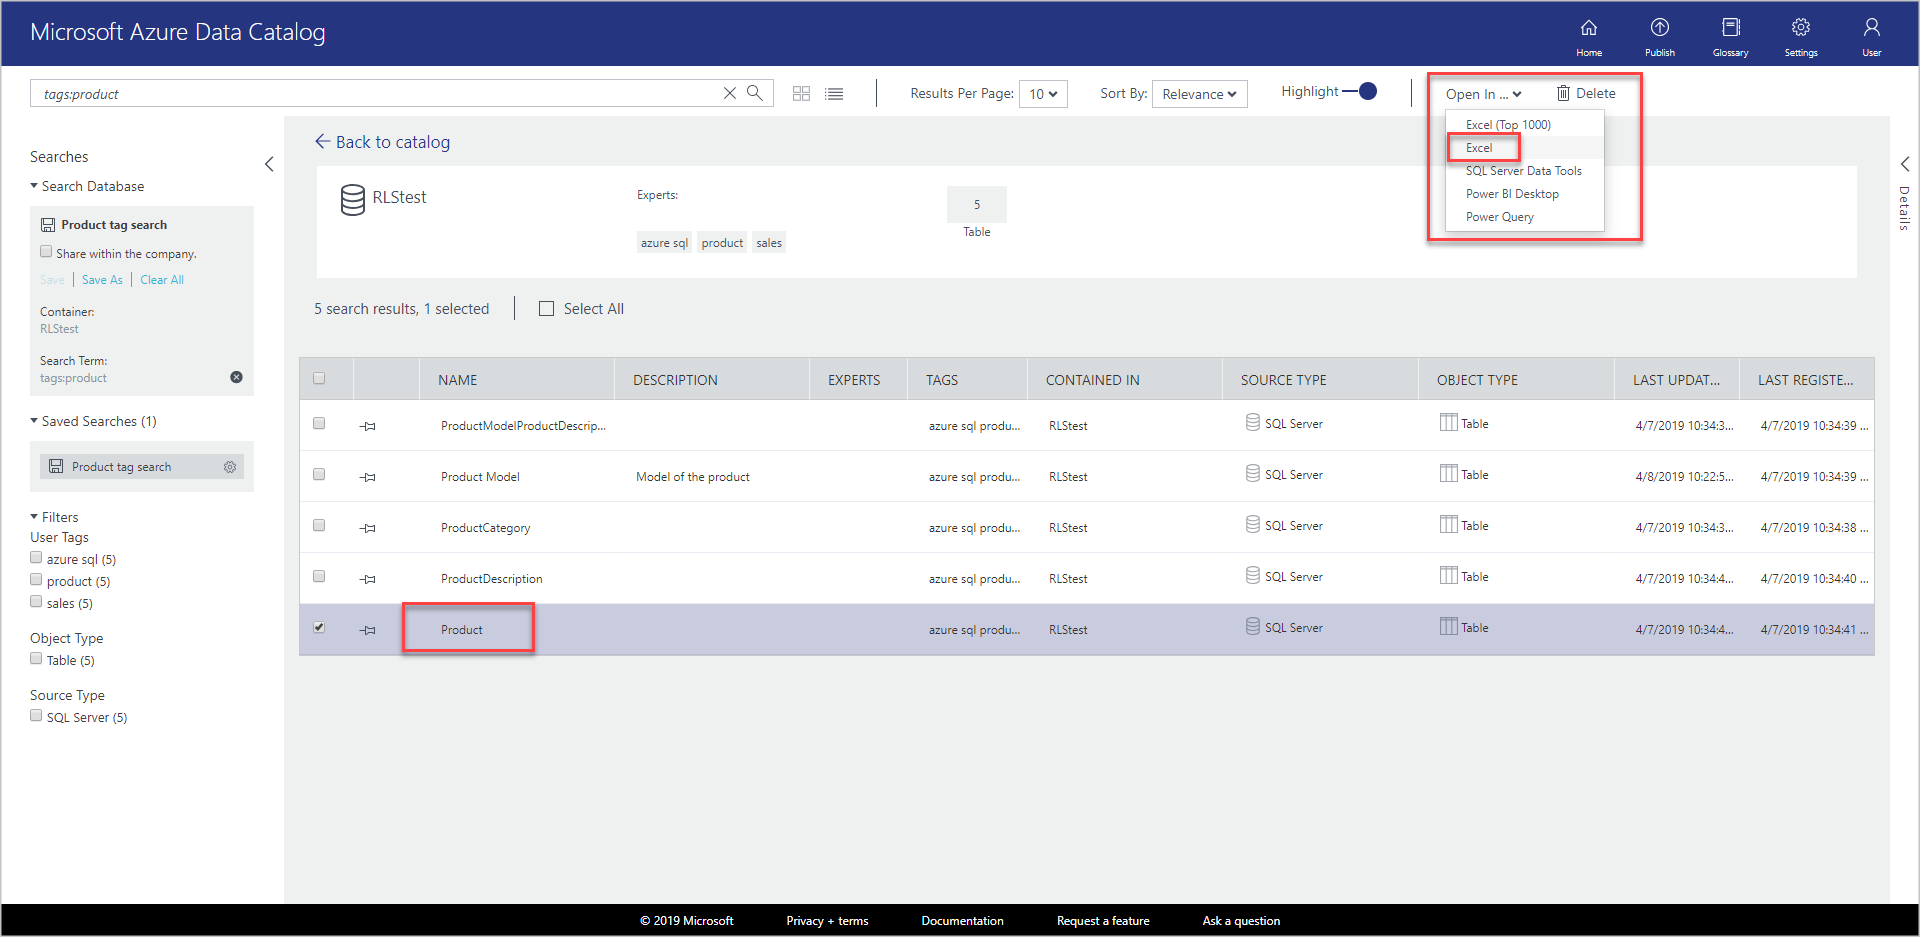
Select Product from search results. select Open In on the toolbar and select Excel.
Select Open in the download pop-up window. This experience might vary depending on the browser.
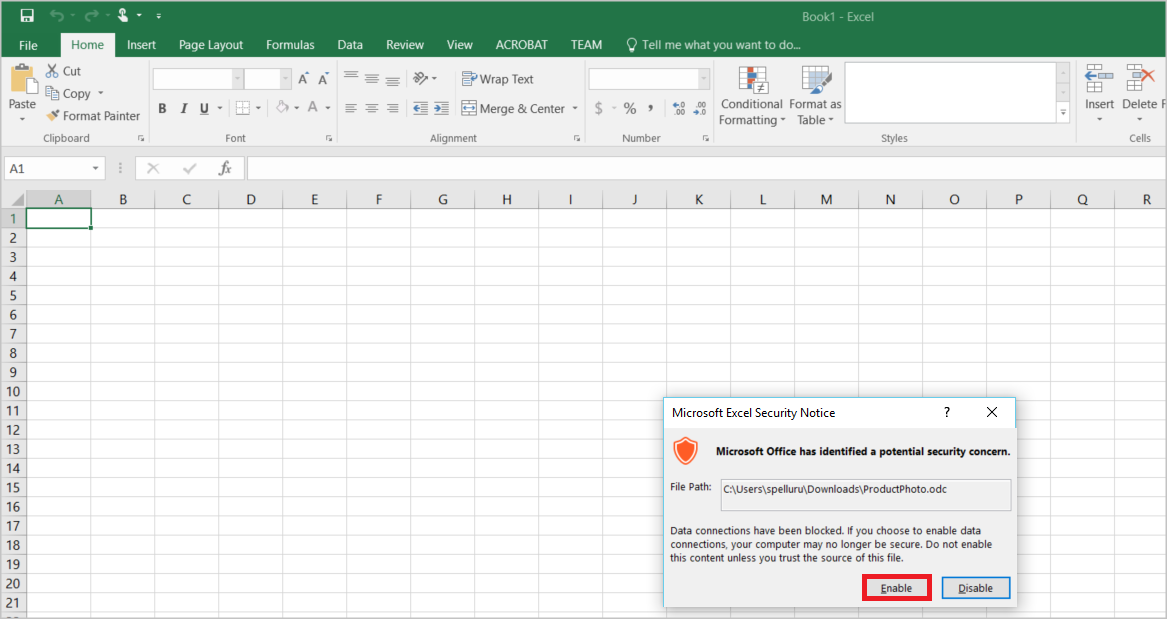
In the Microsoft Excel Security Notice window, select Enable.
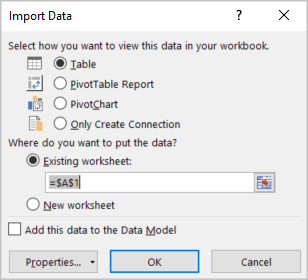
Keep the defaults in the Import Data dialog box and select OK.
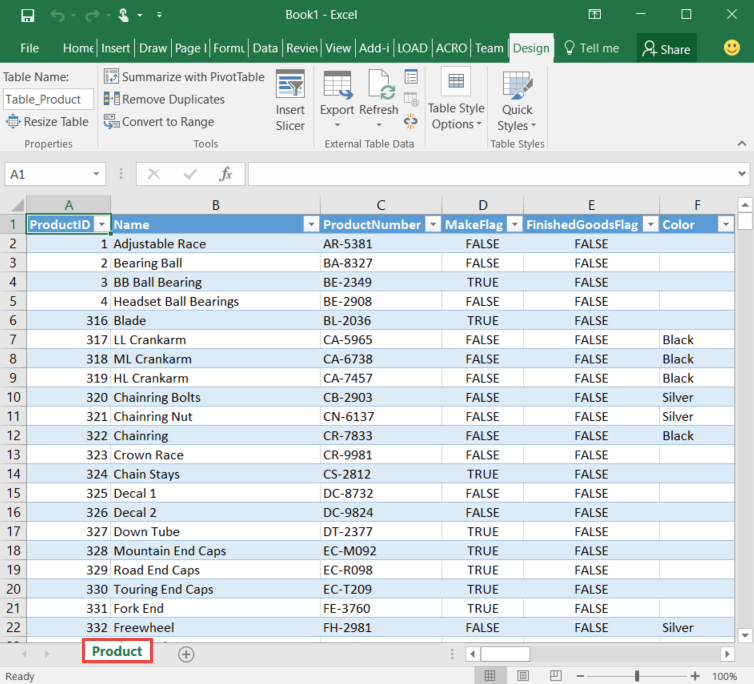
View the data source in Excel.
SQL Server Management Studio
In this exercise, you connected to data assets discovered by using Azure Data Catalog. With the Azure Data Catalog portal, you can connect directly by using the client applications integrated into the Open in menu. You can also connect with any application you choose by using the connection location information included in the asset metadata. For example, you can use SQL Server Management Studio to connect to Azure SQL Database to access the data in the data assets registered in this tutorial.
Open SQL Server Management Studio.
In the Connect to Server dialog box, enter the server name from the Properties pane in the Azure Data Catalog portal.
Use appropriate authentication and credentials to access the data asset. If you don't have access, use information in the Request Access field to get it.
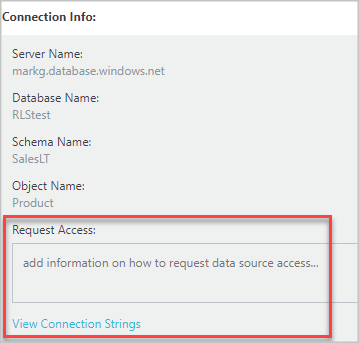
Select View Connection Strings to view and copy ADO.NET, ODBC, and OLEDB connection strings to the clipboard for use in your application.
Manage data assets
In this step, you see how to set up security for your data assets. Data Catalog doesn't give users access to the data itself. The owner of the data source controls data access.
You can use Data Catalog to discover data sources and to view the metadata related to the sources registered in the catalog. There could be situations, however, where data sources should only be visible to specific users or to members of specific groups. For these scenarios, you can use Data Catalog to take ownership of registered data assets, and control the visibility of the assets you own.
Note
The management capabilities described in this exercise are available only in the Standard Edition of Azure Data Catalog, not in the Free Edition. In Azure Data Catalog, you can take ownership of data assets, add co-owners to data assets, and set the visibility of data assets.
Take ownership of data assets and restrict visibility
Go to the Azure Data Catalog home page. In the Search text box, enter
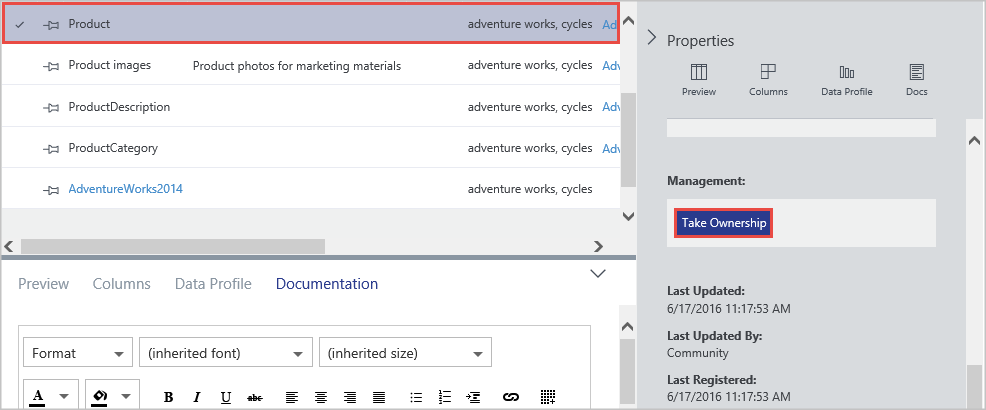
tags:cyclesand press ENTER.Select an item in the result list and select Take Ownership on the toolbar.
In the Management section of the Properties panel, select Take Ownership.
To restrict visibility, choose Owners & These Users in the Visibility section and select Add. Enter user email addresses in the text box and press ENTER.
Remove data assets
In this exercise, you use the Azure Data Catalog portal to remove preview data from registered data assets and delete data assets from the catalog.
In Azure Data Catalog, you can delete an individual asset or delete multiple assets.
Go to the Azure Data Catalog home page.
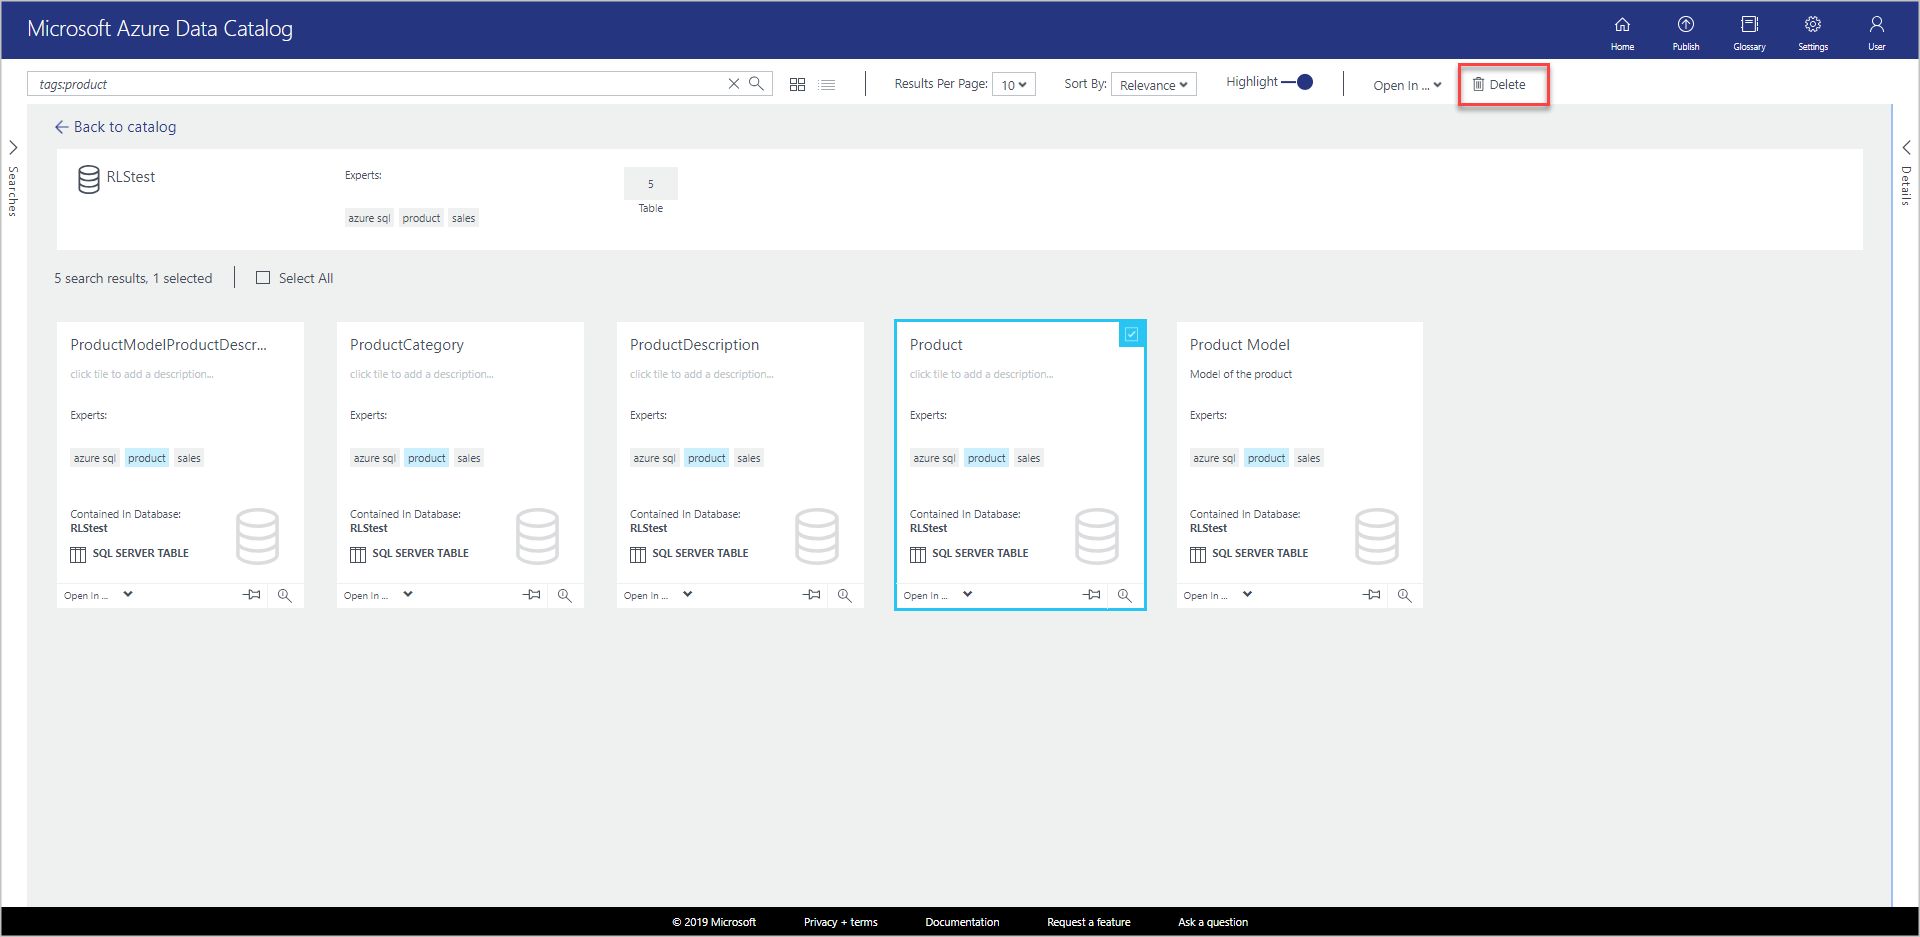
In the Search text box, enter
tags:cyclesand select ENTER.Select an item in the result list and select Delete on the toolbar as shown in the following image:
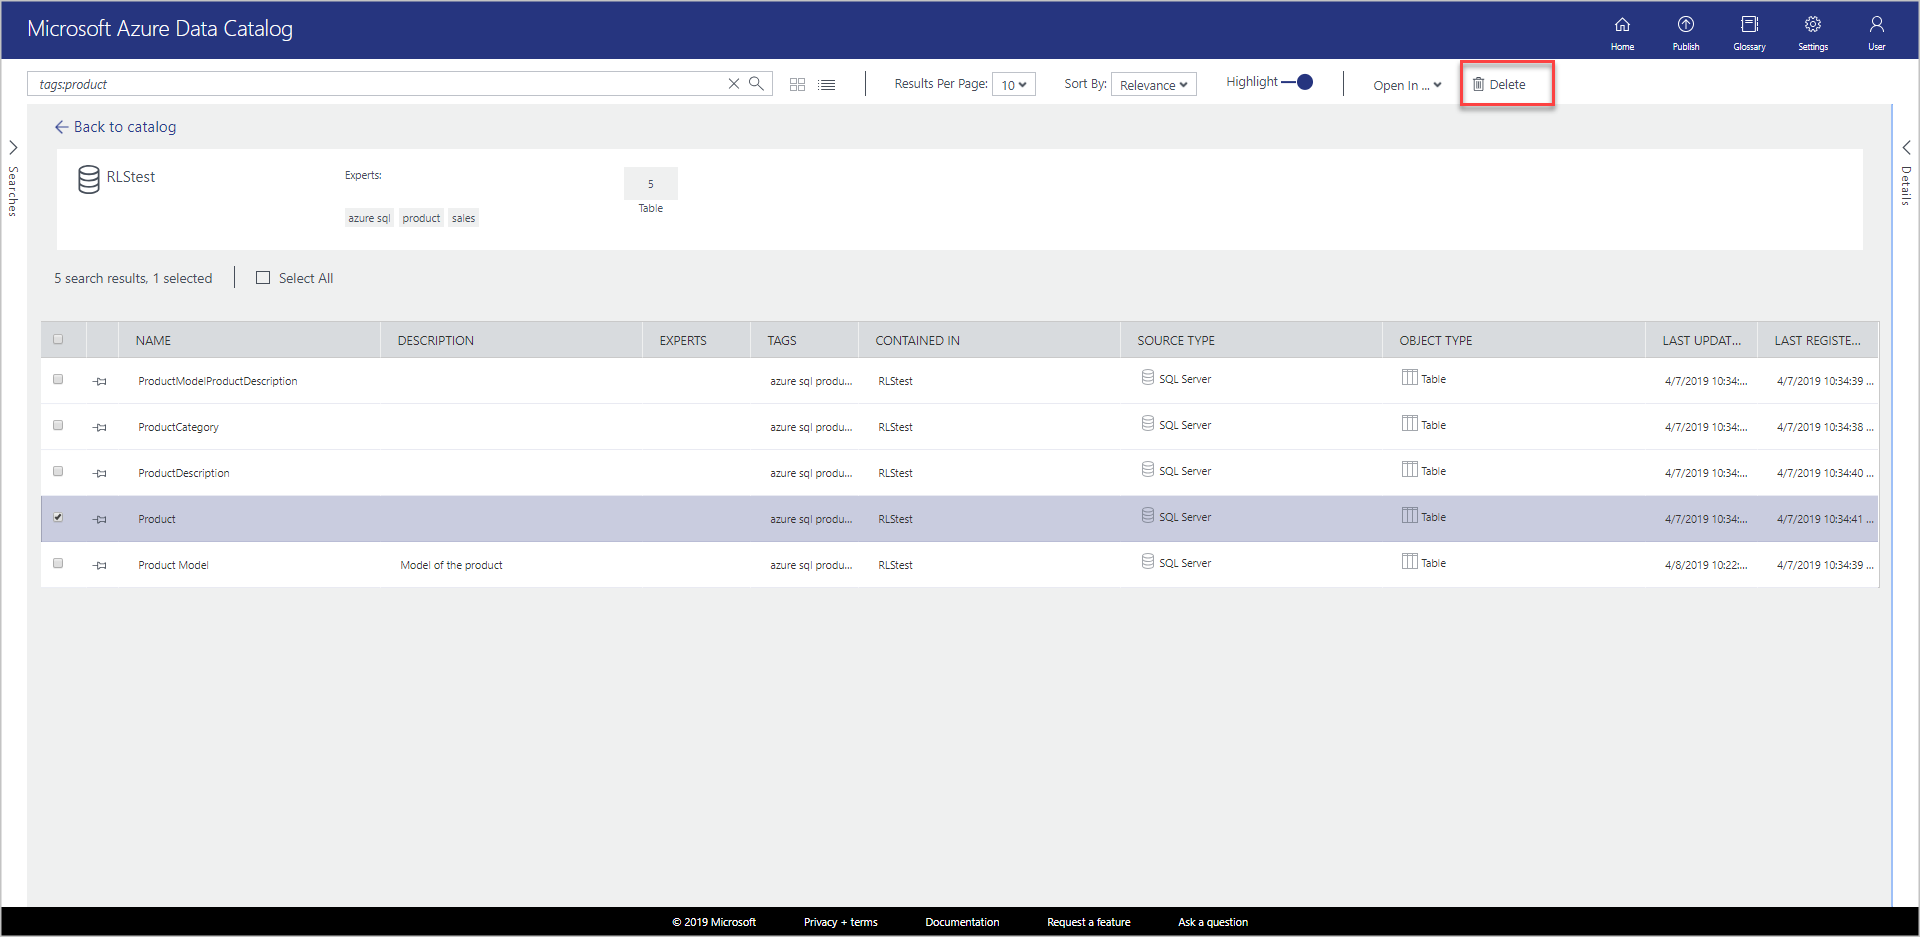
If you're using the list view, the check box is to the left of the item as shown in the following image:
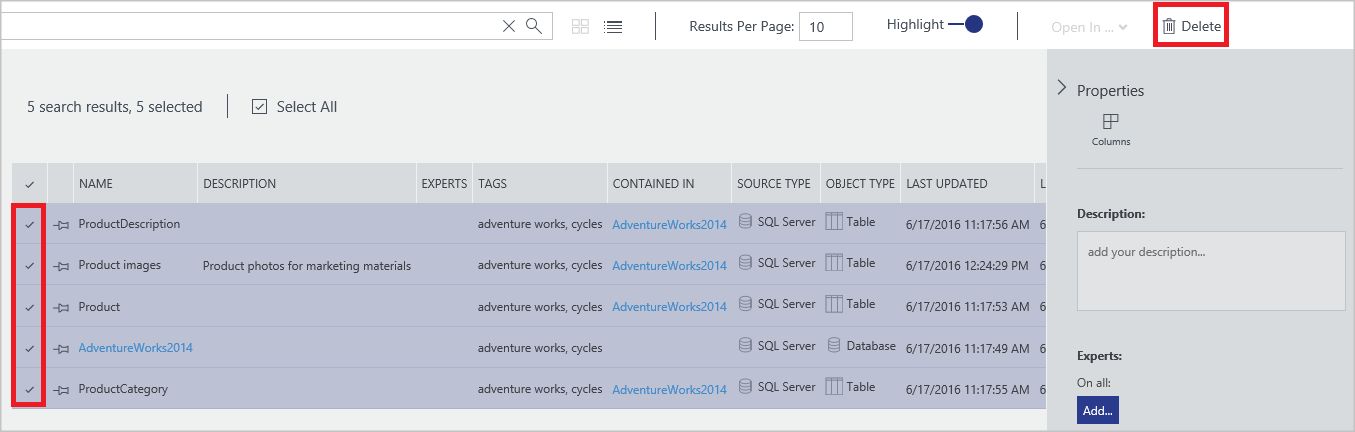
You can also select multiple data assets and delete them as shown in the following image:
Note
The default behavior of the catalog is to allow any user to register any data source, and to allow any user to delete any data asset that has been registered. The management capabilities included in the Standard Edition of Azure Data Catalog provide additional options for taking ownership of assets, restricting who can discover assets, and restricting who can delete assets.
Clean up resources
Follow the Remove data assets steps to clean up any assets you have used while following this tutorial.
Summary
In this tutorial, you explored essential capabilities of Azure Data Catalog, including registering, annotating, discovering, and managing enterprise data assets. Now that you’ve completed the tutorial, it’s time to get started. You can begin today by registering the data sources you and your team rely on, and by inviting colleagues to use the catalog.