Note
Access to this page requires authorization. You can try signing in or changing directories.
Access to this page requires authorization. You can try changing directories.
A dashboard is a collection of tiles, optionally organized in pages, where each tile has an underlying query and a visual representation. For more information on creating dashboards, see Visualize data with Azure Data Explorer dashboards.
In this document, you'll learn how to grant permissions and manage permissions to share a dashboard with other users.
Important
To access the dashboard, a dashboard viewer needs the following:
- Dashboard link for access
- Dashboard permissions
- Access to the underlying database in the Azure Data Explorer cluster
In general, dashboards are shared in two steps: Grant permissions, and share the dashboard link. When granting permissions to a user in a different tenant, the user must additionally accept the invitation to access the dashboard.
Manage permissions
Browse to your Azure Data Explorer dashboards and toggle mode from Viewing to Editing.
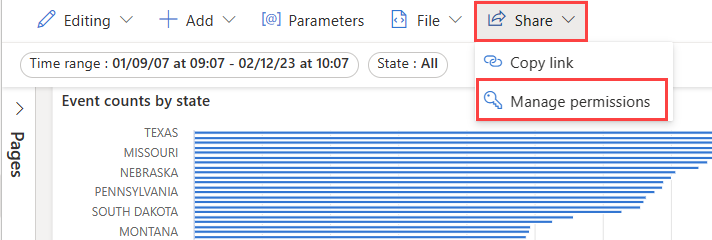
Select the Share menu item in the top bar of the dashboard.
Select Manage permissions from the dropdown.

Grant permissions
Permissions can be granted to users within your tenant or to users in a different tenant.
Grant permissions to users within your tenant
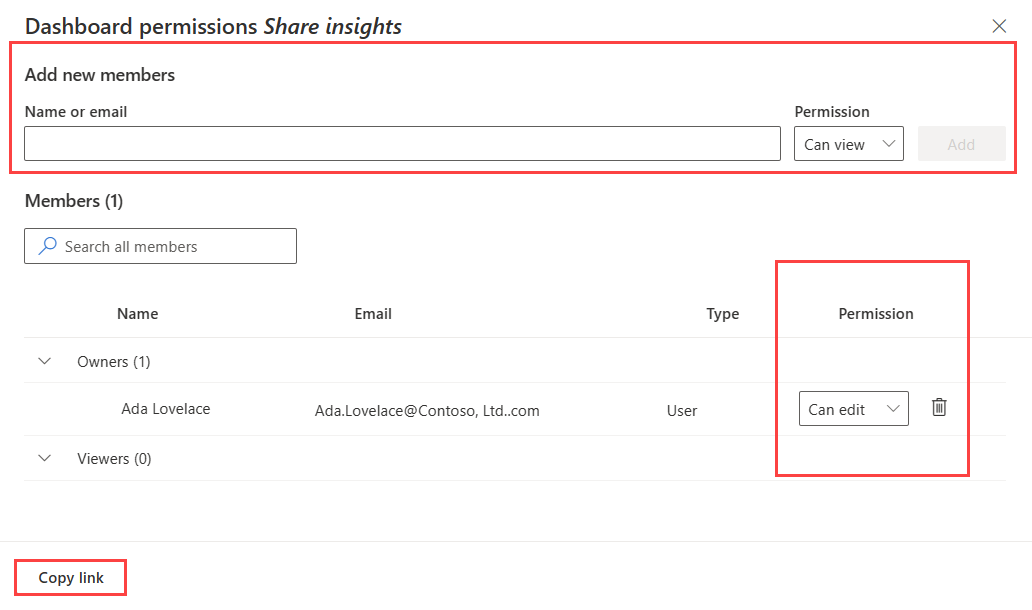
In the Dashboard permissions pane:
- Enter the Microsoft Entra user or Microsoft Entra group in Add new members.
- In the Permission level, select one of the following values: Can view or Can edit.
- Select Add.

Grant permissions to users in a different tenant
Important
Cross-tenant sharing is disabled by default. To enable cross-tenant sharing, a tenant admin must enable it in the Azure Data Explorer WebUI settings.
If a tenant admin enables cross-tenant sharing and later disables cross-tenant sharing, all dashboards shared while the feature was active will remain accessible.
In the Dashboard permissions pane:
Select the Share menu item in the top bar of the dashboard.
Under Share with external user, enter the user's email address.
Note
- You can share with individual Microsoft Entra ID users, security groups, or Microsoft accounts (MSA).
- You can't share with distribution groups.
Choose if you want to allow the user to edit the dashboard. If so, check the Allow edit permission box.
Note
An invitee with edit permissions can share the dashboard with users from their own tenant, or use this invitation flow to to invite users from other tenants.
Select Create invitation.

Send the invitation link to the user. The user must accept the invitation to access the dashboard.
Important
- Once an invitation is sent, it can't be revoked. You can wait until the invitation expires, or you can revoke access once the invitee has accepted the invitation.
- The lifetime of an invitation is three days. After that, the invitation expires and a user who didn't accept the invitation can't access the dashboard.
After sharing the dashboard, you can see who you've shared with in the Dashboard permissions pane.
Accept an invitation
When the user clicks on the invitation link, they see a page with the following information:
- The dashboard name
- What to expect when they accept the invitation

The user can then accept the invitation and sign in to access the dashboard.
Important
The user must accept the invitation while signed in to their home tenant.
Note
If you're accepting on behalf of a security group, you must be a member of the group to accept the invitation. Once the first member of the group accepts the invitation, all members of the group can use the shared link to access the dashboard.
Change a user permission level
To change a user permission level in the Dashboard permissions pane:
- Either use the search box or scroll the user list to find the user.
- Change the Permission level as needed.
- To remove a user, select the trash icon next to the user.

Share the dashboard link
To share the dashboard link, do one of the following:
- Select Share and then select Copy link.
- In the Dashboard permissions window, select Copy link.