Note
Access to this page requires authorization. You can try signing in or changing directories.
Access to this page requires authorization. You can try changing directories.
You can install the Azure Data Explorer Kusto emulator in the following ways:
- On your own device: Consider using this option if you need to provision a local development environment
- On a CI/CD agent virtual machine (VM): Use this option if you require a CI/CD pipeline for running automated tests
The emulator is available as a Linux Docker container image.
In this article, you learn how to:
This article focuses on how to install the Linux Docker container on a Windows client.
Prerequisites
- The host operating system must be one of:
- Windows Server 2022
- Windows Server 2019 Version 10.0.17763.2928 or newer
- Windows 11
- Any Linux distribution that supports Docker Client for Linux
- A processor that supports SSE4.2/AVX2 instruction sets
- At least 2 GB of RAM (4 GB or more recommended)
- Docker Client for Linux or Docker Client for Windows
Important
Linux distros only support Linux container images. ARM processors are not supported.
Install the Kusto emulator
The following steps are for using a shell to start the emulator using the Kusto emulator container image. For other options, see Run emulator options.
Run the following command to start the emulator.
Important
The Kusto emulator container image is a free offering under the Microsoft Software License Terms. Since the emulator runs in a container, you must accept the license terms by passing the
ACCEPT_EULAenvironment variable to the container with its value set toY.Note
- The first time this command is run, Docker pulls the container image which is several GBs in size and might take several minutes to download. Once downloaded, the image is cached and available for subsequent runs without having to download it again.
To start the Linux container, make sure you use the
latestorstabletag:docker run -e ACCEPT_EULA=Y -m 4G -d -p 8080:8080 -t mcr.microsoft.com/azuredataexplorer/kustainer-linux:latestRun the following command to verify that the container is running.
docker psThe command returns a list of running container instances. Verify that the emulator image mcr.microsoft.com/azuredataexplorer/kustainer-linux:latest appears in the list.
CONTAINER ID   IMAGE                                                  COMMAND                  CREATED          STATUS          PORTS                    NAMES
a8b51bce21ad   mcr.microsoft.com/azuredataexplorer/kustainer-linux:latest   "powershell -Command¦"   11 minutes ago   Up 10 minutes   0.0.0.0:8080->8080/tcp   contoso
Run the following command to verify that Kusto emulator is running. This command is for PowerShell, you could do something similar using
curlin a Linux environment. The command runs the.show clusterquery against the management API and it should return a StatusCode with value 200.Invoke-WebRequest -Method post -ContentType 'application/json' -Body '{"csl":".show cluster"}' http://localhost:8080/v1/rest/mgmtThe command should return something like:
StatusCode        : 200
StatusDescription : OK
Content           : {"Tables":[{"TableName":"Table_0","Columns":[{"ColumnName":"NodeId","DataType":"String","ColumnType":"string"},{"ColumnName":"Address","DataType":"St
                    ring","ColumnType":"string"},{"ColumnName":"Name","...
RawContent        : HTTP/1.1 200 OK
                    Transfer-Encoding: chunked
                    x-ms-client-request-id: unspecified;d239f3aa-7df0-4e46-af0a-edd7139d0511
                    x-ms-activity-id: a0ac8941-7e4c-4176-98fa-b7ebe14fae90
                    Content-Type: application...
Forms             : {}
Headers           : {[Transfer-Encoding, chunked], [x-ms-client-request-id, unspecified;d239f3aa-7df0-4e46-af0a-edd7139d0511], [x-ms-activity-id,
                    a0ac8941-7e4c-4176-98fa-b7ebe14fae90], [Content-Type, application/json]...}
Images            : {}
InputFields       : {}
Links             : {}
ParsedHtml        : System.__ComObject
RawContentLength  : 988
Run emulator options
You can use any of the following options when running the emulator:
Mount a local folder to the container: Use this option to mount a folder in the host environment into the container. Mounting a host folder enables your queries to interact with local files, which is useful for creating a database persistent between container runs and ingesting data.
For example, to mount the folder "D:\host\local" on the host to the folder "/kustodatadata" in the container, use the following command on Windows Server:
docker run -v d:\host\local:/kustodata -e ACCEPT_EULA=Y -m 4G -d -p 8080:8080 -t mcr.microsoft.com/azuredataexplorer/kustainer-linux:latestRun on a different port: The Kusto emulator exposes access to the Kusto Query Engine on port 8080; hence in other examples you mapped the host port 8080 to the emulator port 8080. You can use this option to map a different host to the engine.
For example, to map port 9000 on the host to the engine, use the following command on Windows Server:
docker run -e ACCEPT_EULA=Y -m 4G -d -p 9000:8080 -t mcr.microsoft.com/azuredataexplorer/kustainer-linux:latest
Connect to the emulator
You can use any of the following tools to connect to and interact with the emulator:
In the following sections, you use Kusto.Explorer to create a database, ingest data, and query it. To learn more, see Using Kusto.Explorer.
Important
The Kusto Emulator doesn't support HTTPS or Microsoft Entra authentication.
You must first allow unsafe connections in Tools > Options > Connections > Allow unsafe connections.
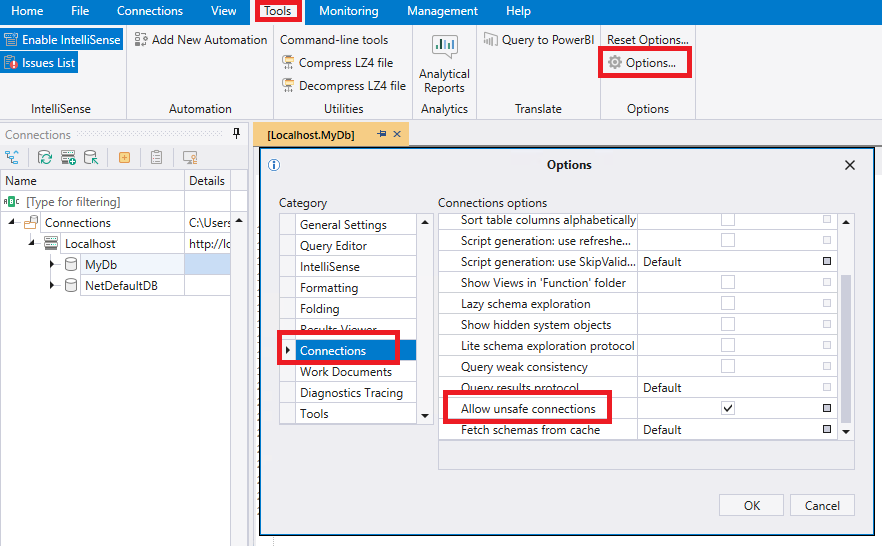
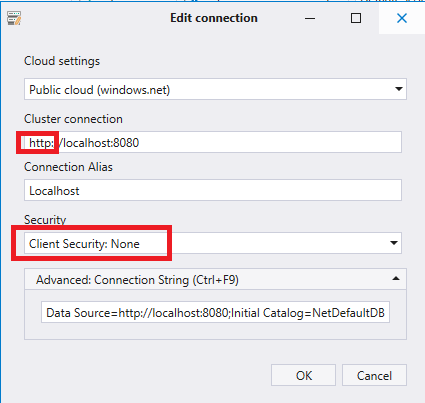
The following image highlights the affected fields in the Add connection properties.
- The Cluster connection must begin with
http://and nothttps://. - In Security > Advanced: Connection String, you need to remove the
AAD Federated Security=Trueportion of the connection string to disable Microsoft Entra authentication.
Create a database
To store data and run queries, create a database or attach the emulator to an existing database.
A database can be persisted in a container folder or on a mounted folder. The former's lifetime is bound to the container, so restarting the container loses any changes. Also, the container virtual storage is less efficient than native one. Mounted folder enables you to keep the data between container runs.
In this example, we keep the data on the container.
In the Kusto.Explorer Query mode, run the following command to create a persistent database:
.create database <YourDatabaseName> persist (
  @"/kustodata/dbs/<YourDatabaseName>/md",
  @"/kustodata/dbs/<YourDatabaseName>/data"
  )
This command requires that the folders don't already exist, to prevent over-writing existing information. To attach to an existing database, use the following command instead, specifying the path that ends with md:
.attach database <YourDatabaseName> from @"<PathToMdFolder>"
It's also possible to detach the database from the emulator, which will keep all the database metadata and data intact so you can reattach to it in the future:
.detach database <YourDatabaseName>
Ingest data
To ingest data, you must first create an external table linked to a file and then ingest the data into a table in the database.
Use the steps in the following example to create an external table and ingest data into it. As part of the example, create a file called sample.csv in the local folder d:\host\local, with the following data:
Alice, 1
Bob, 2
Carl, 3
Run the following command to create a table to receive the data:
.create table MyIngestedSample(Name:string, Id:int)Run the following command to ingest the file into the table:
.ingest into table MyIngestedSample(@"/kustodata/sample.csv")
Query data
You can view the data in the table using the following query:
MyIngestedSample
| summarize sum(Id), avg(Id)
Stopping the container
You can stop the container by running the following command to obtain the container ID:
docker psRun the following command with the container ID:
docker stop <containerID>