Ingest data with the NLog sink into Azure Data Explorer
Important
This connector can be used in Real-Time Intelligence in Microsoft Fabric. Use the instructions in this article with the following exceptions:
- If required, create databases using the instructions in Create a KQL database.
- If required, create tables using the instructions in Create an empty table.
- Get query or ingestion URIs using the instructions in Copy URI.
- Run queries in a KQL queryset.
NLog is a flexible and free logging platform for various .NET platforms, including .NET standard. NLog allows you to write to several targets, such as a database, file, or console. With NLog, you can change the logging configuration on-the-fly. The NLog sink is a target for NLog that allows you to send your log messages to an Azure Data Explorer cluster. The plugin is built on top of the Azure-Kusto-Data library and provides an efficient way to sink your logs to your cluster.
In this article, you'll learn how to:
For a complete list of data connectors, see Data connectors overview.
Prerequisites
- .NET SDK 6.0 or later
- An Azure Data Explorer cluster and database
Set up your environment
In this section, you'll prepare your environment to use the NLog connector.
Install the package
Add the NLog.Azure.Kusto NuGet package. Use the Install-Package command specifying the name of the NuGet package.
Install-Package NLog.Azure.Kusto
Create a Microsoft Entra app registration
Microsoft Entra application authentication is used for applications that need to access Azure Data Explorer without a user present. To ingest data using the NLog connector, you need to create and register a Microsoft Entra service principal, and then authorize this principal to ingest data an Azure Data Explorer database.
- Using your Azure Data Explorer cluster, follow steps 1-7 in Create a Microsoft Entra application registration in Azure Data Explorer.
- Save the following values to be used in later steps:
- Application (client) ID
- Directory (tenant) ID
- Client secret key value
Grant the Microsoft Entra app permissions
In the query tab of the web UI, connect to your cluster. For more information on how to connect, see Add clusters.
Browse to the database in which you want to ingest data.
Run the following management command, replacing the placeholders. Replace DatabaseName with the name of the target database and ApplicationID with the previously saved value. This command grants the app the database ingestor role. For more information, see Manage database security roles.
.add database <DatabaseName> ingestors ('aadapp=<ApplicationID>') 'Azure Data Explorer App Registration'Note
The last parameter is a string that shows up as notes when you query the roles associated with a database. For more information, see View existing security roles.
Create a table and ingestion mapping
Create a target table for the incoming data.
In your query editor, run the following table creation command, replacing the placeholder TableName with the name of the target table:
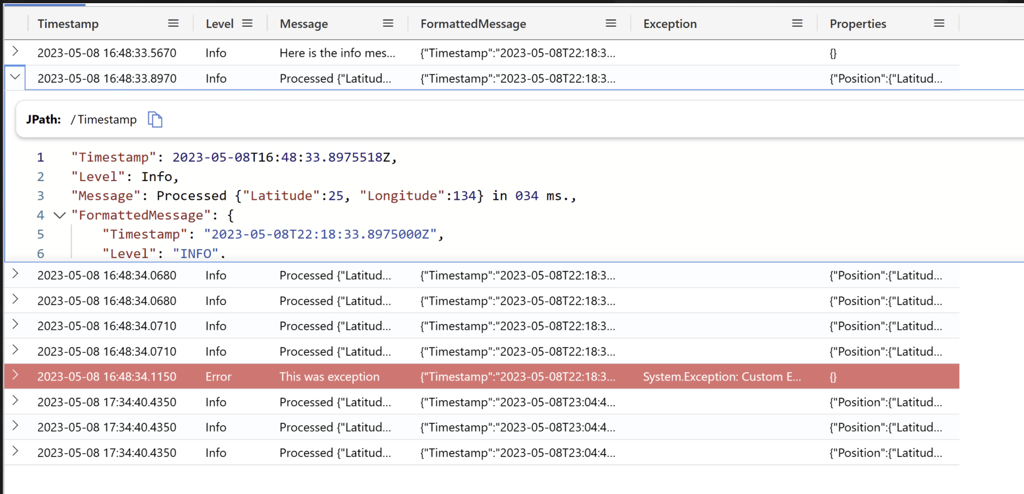
.create table <TableName> (Timestamp:datetime, Level:string, Message:string, FormattedMessage:dynamic, Exception:string, Properties:dynamic)
Add the Azure Data Explorer target configuration to your app
Use the following steps to:
- Add the Azure Data Explorer target configuration
- Build and run the app
Add the Azure Data Explorer target in your NLog configuration file.
<targets>
    <target name="adxtarget" xsi:type="ADXTarget"
    IngestionEndpointUri="<ADX connection string>"
    Database="<ADX database name>"
    TableName="<ADX table name>"
    ApplicationClientId="<AAD App clientId>"
    ApplicationKey="<AAD App key>"
    Authority="<AAD tenant id>"
    />
</targets>

##Rules
<rules>
    <logger name="*" minlevel="Info" writeTo="adxtarget" />
</rules>
For more options, see Azure Data Explorer Nlog connector.
Send data to Azure Data Explorer using the NLog sink. For example:
logger.Info("Processed {@Position} in {Elapsed:000} ms.", position, elapsedMs);
logger.Error(exceptionObj, "This was exception");
logger.Debug("Processed {@Position} in {Elapsed:000} ms. ", position, elapsedMs);
logger.Warn("Processed {@Position} in {Elapsed:000} ms. ", position, elapsedMs);
Build and run the app. For example, if you're using Visual Studio, press F5.
Verify that the data is in your cluster. In the web UI, run the following query replacing the placeholder with the name of the table that used earlier:
<TableName>
| take 10
Run the sample app
Use the sample log generator app as an example showing how to configure and use the NLog sink.
Clone the NLog sink's git repo using the following git command:
git clone https://github.com/Azure/azure-kusto-nlog-sink.gitSet the following environmental variables, so that NLog config file can read them right away from environment:
Variable Description INGEST_ENDPOINT The ingest URI for your cluster in the format https://ingest-<cluster>.<region>.kusto.windows.net. DATABASE The case-sensitive name of the target database. APP_ID Application client ID required for authentication. You saved this value in Create a Microsoft Entra App registration. APP_KEY Application key required for authentication. You saved this value in Create a Microsoft Entra App registration. AZURE_TENANT_ID The ID of the tenant in which the application is registered. You saved this value in Create a Microsoft Entra App registration. You can set the environment variables manually or using the following commands:
Within your terminal, navigate to the root folder of the cloned repo and run the following
dotnetcommand to build the app:cd .\NLog.Azure.Kusto.Samples\ dotnet buildWithin your terminal, navigate to the samples folder and run the following
dotnetcommand to run the app:dotnet runIn the web UI, select the target database, and run the following query to explore the ingested data.
ADXNLogSample
| take 10
Your output should look similar to the following image:

Related content
Feedback
Coming soon: Throughout 2024 we will be phasing out GitHub Issues as the feedback mechanism for content and replacing it with a new feedback system. For more information see: https://aka.ms/ContentUserFeedback.
Submit and view feedback for