Note
Access to this page requires authorization. You can try signing in or changing directories.
Access to this page requires authorization. You can try changing directories.
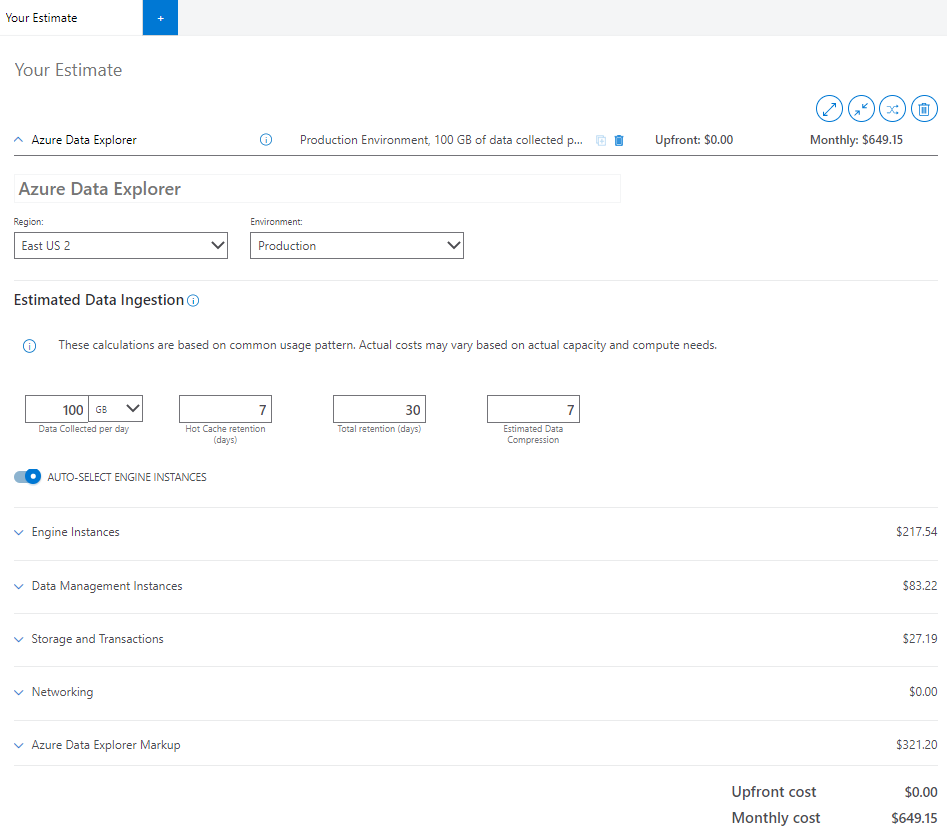
Azure Data Explorer provides a pricing calculator to estimate the cost of your cluster. The estimate is based on specifications such as estimated data ingestion and engine workload. As you make changes to the configuration, the price estimate also changes so you can understand the cost implications of your configuration choices.
This article explains each of the components of the calculator and gives tips along the way to help you make better decisions about how to configure your cluster.
How it works
You set the region, environment, and estimated data ingestion of your cluster. Then, the calculator estimates a monthly cost based on auto-selected or manually selected specifications in each of the following components:
- Engine instances
- Data management instances
- Storage and transactions
- Networking
- Azure Data Explorer markup
At the bottom of the form, the individual component estimates are added together to create a total monthly estimate. The component estimates and total update as you make configuration changes.
Get started
- Go to the pricing calculator.
- Scroll down the page until you see a tab titled Your Estimate.
- Verify that Azure Data Explorer appears in the tab. If it doesn't, do the following:
- Scroll back to the top of the page.
- In the search box, type Azure Data Explorer.
- Select the Azure Data Explorer widget.
- Start the configuration.
The sections of this article correspond to the components in the calculator and highlight what you need to know.
Region and environment
The region and environment you choose for your cluster will affect the cost of each component. This is because the different regions and environments don't provide exactly the same services or capacity.
Choose the Environment for your cluster.
Production clusters contain two or more nodes for engine and data management and operate under the Azure Data Explorer SLA.
Dev/test clusters are the lowest cost option, which makes them great for service evaluation, conducting PoCs, and scenario validations. They're limited in size and can't grow beyond a single node. There's no Azure Data Explorer markup charge or product SLA for these clusters.
Select the desired Region for your cluster.
Use the regions decision guide to find the right region for you. Your choice might depend on requirements such as:
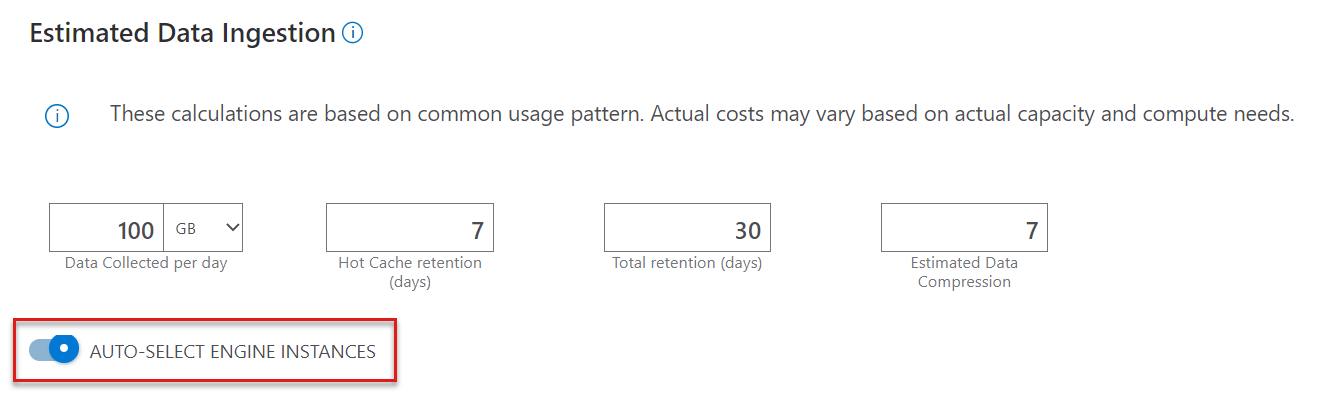
Estimated data ingestion
The information provided in the Estimated Data Ingestion section of the calculator influences the price of all the components of your cluster.
In the calculator, enter estimates for the following fields:
Data Collected per day (GB/TB): Data that you plan to ingest without compression into Azure Data Explorer cluster every day. Calculate this estimate based on the number of files and the average size of a file being ingested. If you're streaming the data using messages, review the average size of a single message and how many messages you're ingesting.
Hot cache retention (days): Period for which your data is stored in cache for fast query access. Ingested data that's cached according to our cache policy on the local SSD of the Engine service. Your query performance requirement determines the amount of compute nodes and local SSD storage needed.
Total retention (days): Period for which your data is stored and available for query. Following the retention window, your data will be automatically removed. Choose the data retention window based on compliance or other regulatory requirements. Apply the hot window capability to warm the data based on the time window for faster queries.
Estimated data compression: Ratio between the uncompressed data size and compressed size. Data compression varies based on the cardinality of the values and its structure. For example, logs data ingested in structured columns has higher compression compared to dynamic columns or GUID. All ingested data is compressed by default.
Auto-select engine instances
If you want to individually configure the remaining components, turn off AUTO-SELECT ENGINE INSTANCES. When turned on, the calculator selects the most optimal Stock Keeping Unit (SKU) based on the ingestion inputs.
Engine instances
Engine instances are responsible for indexing, caching data on local SSDs, premium storage as managed disks, and serving queries. The engine service requires a minimum of two compute instances.
Workload options
The following are the engine Workload options:
- All: Automatically selects the optimal SKU based on the input you provide
- Compute Optimized SKUs:
- Provides high cores to hot cache ratio
- Suited for high query rates
- Local SSD for low latency I/O
- Storage optimized SKUs:
- Provides larger storage options of 1 TB to 4 TB per Engine node
- Suited for workloads that require caching large data sizes
- In some SKUs, premium managed disk storage is attached to the engine node instead of Local SSD for hot data storage
To get an estimate for Engine instances:
- Choose between the workload options. The engine Instance will adjust accordingly. If you turned off AUTO-SELECT ENGINE INSTANCES, then choose the specific engine Instance and the VM Series.
- Specify the number of hours, days, or months you’d like to run the engine.
- (Optional) Select a Savings Options plan.
The Premium Managed Disk component is based on the SKU selected.
Note
Not all VM Series are offered in each region. If you're looking for a SKU that isn't listed in the selected region, choose a different region.
Data management instances
The data management (DM) service is responsible for data ingestion from managed data pipelines like Azure Blob storage, Event Hubs, IoT Hub, and other services like Azure Data Factory, Azure Stream Analytics, and Kafka. The service requires a minimum of two compute instances that are automatically configured and managed based on the engine instance size.
To get an estimate for Data Management Instances:
- Specify the number of hours, days, or months you’d like to run the instance.
- (Optional) Select a Savings Options plan.
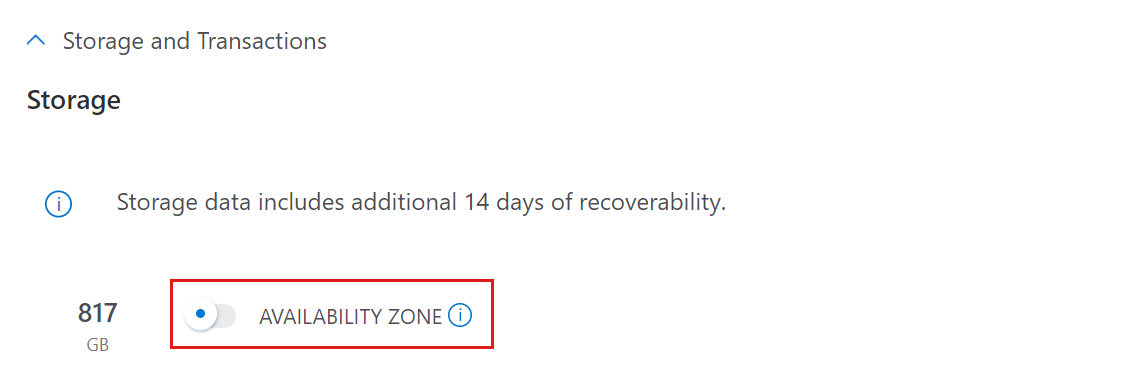
Storage and transactions
The storage component is the persistent layer where all the data is stored compressed and is billed as Standard LRS or as Standard ZRS. The storage is calculated based on the amount of data collected, the total retention days, and the estimated data compression.
To get an estimate for Storage and transactions:
- If you need availability zone support, turn on AVAILABILITY ZONE. When turned on, storage will be deployed as ZRS. Otherwise, storage will be deployed as LRS.
Networking
This component is configured using the bandwidth service.
To get a bandwidth service estimate:
- Scroll to the top of the page
- In the search box, type in “bandwidth”
- Select the Bandwidth product widget
- Scroll down to the Bandwidth component of the estimate
- Select a data transfer type
- Select a source region
- Select a destination region
- Enter the estimated amount of outbound data in GB
Note
Select the same region where logs are generated to avoid cross region cost and reduce latency. There’s no data transfer cost between Azure services deployed in the same region.
Azure Data Explorer markup
The Azure Data Explorer markup is charged for the premium support option provided with your data ingestion and engine clusters. It's billed based on the number of engine vCPUs in the cluster and isn't charged for dev clusters. Your costs change based on the number of hours, days, or months configured in the engine instances component. Optionally select a Savings Options plan. For more information, see Azure Data Explorer pricing - FAQ.
Support
Choose a support plan:
Developer: Select this option when configuring Azure Data Explorer in a non-production environment or for trial and evaluation. For more information, see the Azure Support: Developer page.
Standard: Select this option when configuring Azure Data Explorer when you need minimal business critical dependence. For more information, see the Azure Support: Standard page.
Professional Direct: Select this option when you need substantial business critical utilization of Azure Data Explorer. For more information, see the Azure Support: Professional Direct page.
What to do with your estimate
- Export the estimate to Excel
- Save the estimate for future reference
- Share the estimate – sign-in is required