Note
Access to this page requires authorization. You can try signing in or changing directories.
Access to this page requires authorization. You can try changing directories.
Serilog is a popular logging framework for .NET applications. Serilog allows developers to control which log statements are output with arbitrary granularity based on the logger's name, logger level, and message pattern. The Serilog sink, also known as an appender, streams your log data to your table, where you can analyze and visualize your logs in real time.
This article shows how to ingest data with Serilog.
For a complete list of data connectors, see Data integrations overview.
Prerequisites
- .NET SDK 6.0 or later
- An Azure Data Explorer cluster and database with the default cache and retention policies
- Azure Data Explorer query environment
- Your Kusto cluster URI for the TargetURI value in the format https://ingest-<cluster>.<region>.kusto.windows.net For more information, see Add a cluster connection.
Authentication
Microsoft Entra authentication is used for applications that need to access your KQL database table without a user present. To ingest data using the Serilog connector, you can use one of the following authentication methods:
A Microsoft Entra service principal is a security identity used by applications to access specific Azure resources. This identity is used to authenticate the connector to your KQL database using a client ID and password, and can be used for applications that are running outside of Azure.
A Managed identity is used to authenticate the connector to your KQL database using a client ID. Managed identities are used for applications that are running within Azure.
Create a Microsoft Entra service principal
Create a Microsoft Entra service principal and then authorize this principal as the identity used by the connector to ingest data to your KQL database.
The Microsoft Entra service principal can be created through the Azure portal or programmatically, as in the following example.
You'll later grant permissions for this service principal to access Kusto resources.
Sign in to your Azure subscription via Azure CLI. Then authenticate in the browser.
az loginChoose the subscription to host the principal. This step is needed when you have multiple subscriptions.
az account set --subscription YOUR_SUBSCRIPTION_GUIDCreate the service principal. In this example, the service principal is called
my-service-principal.az ad sp create-for-rbac -n "my-service-principal" --role Contributor --scopes /subscriptions/{SubID}From the returned JSON data, copy the
appId,password, andtenantfor future use.{ "appId": "00001111-aaaa-2222-bbbb-3333cccc4444", "displayName": "my-service-principal", "name": "my-service-principal", "password": "00001111-aaaa-2222-bbbb-3333cccc4444", "tenant": "00001111-aaaa-2222-bbbb-3333cccc4444" }
You've created your Microsoft Entra application and service principal.
Create a target table and ingestion mapping
Create a target table for the incoming data and an ingestion mapping to map the ingested data columns to the columns in the target table. In the following steps, the table schema and mapping correspond to the data sent from the sample app.
Run the following table creation command in your query editor, replacing the placeholder TableName with the name of the target table:
.create table <TableName> (Timestamp: datetime, Level: string, Message: string, Exception: string, Properties: dynamic, Position: dynamic, Elapsed: int)Run the following .create ingestion mapping command, replacing the placeholders TableName with the target table name and TableNameMapping with the name of the ingestion mapping:
.create table <TableName> ingestion csv mapping '<TableNameMapping>' '[{"Name":"Timestamp","DataType":"","Ordinal":"0","ConstValue":null},{"Name":"Level","DataType":"","Ordinal":"1","ConstValue":null},{"Name":"Message","DataType":"","Ordinal":"2","ConstValue":null},{"Name":"Exception","DataType":"","Ordinal":"3","ConstValue":null},{"Name":"Properties","DataType":"","Ordinal":"4","ConstValue":null},{"Name":"Position","DataType":"","Ordinal":"5","ConstValue":null},{"Name":"Elapsed","DataType":"","Ordinal":"6","ConstValue":null}]'Grant the service principal from Create a Microsoft Entra service principal database ingestor role permissions to work with the database. For more information, see Examples. Replace the placeholder DatabaseName with the name of the target database and ApplicationID with the
AppIdvalue you saved when creating a Microsoft Entra service principal..add database <DatabaseName> ingestors ('aadapp=<ApplicationID>') 'App Registration'
Use Serilog in your ASP.NET Core application
This section explains how to integrate Serilog into your ASP.NET Core application to log data and send it to your KQL table.
Install the package
Add the Serilog.Sinks.AzureDataExplorer NuGet library package. Use the Install-Package command specifying the name of the NuGet package.
Install-Package Serilog.Sinks.AzureDataExplorer
Add the Serilog sink to your app
Use the following steps to:
- Add the Serilog sink to your app.
- Configure the variables used by the sink.
- Build and run the app.
Add the following code to your app:
using Serilog.Sinks.AzureDataExplorer;Configure the Serilog sink, replacing placeholders using the information in the table that follows:
For Microsoft Entra service principal authentication use the following code:
var log = new LoggerConfiguration() .WriteTo.AzureDataExplorerSink(new AzureDataExplorerSinkOptions { IngestionEndpointUri = "<TargetURI>", DatabaseName = "<MyDatabase>", TableName = "<MyTable>", BufferBaseFileName = "<BufferBaseFileName>" }) .CreateLogger();Use the table below to set the values for the sink options:
Variable Description IngestionEndPointUriThe ingest URI. DatabaseNameThe case-sensitive name of the target database. TableNameThe case-sensitive name of an existing target table. For example, SerilogTest is the name of the table created in Create a target table and ingestion mapping. AppIdThe Application client ID required for Microsoft Entra service principal authentication. You saved this value in Create a Microsoft Entra service principal. AppKeyThe application key required for Microsoft Entra service principal authentication. You saved this value as passwordin Create a Microsoft Entra service principal.TenantThe ID of the tenant in which the application is registered when using Microsoft Entra service principal authentication. You saved this value in Create a Microsoft Entra service principal. BufferBaseFileNameOptional base file name for the buffer file. Set this value if you require your logs to be durable against loss resulting connection failures to your cluster. For example, C:/Temp/Serilog.ManagedIdentityClientIdThe client ID of the user-assigned managed identity, when using Managed Identity authentication. For more options, see Sink Options.
Send data to your database using the Serilog sink. For example:
log.Verbose("Processed {@Position} in {Elapsed:000} ms.", position, elapsedMs);
log.Information("Processed {@Position} in {Elapsed:000} ms.", position, elapsedMs);
log.Warning("Processed {@Position} in {Elapsed:000} ms.", position, elapsedMs);
log.Error(new Exception(), "Processed {@Position} in {Elapsed:000} ms.", position, elapsedMs);
log.Debug("Processed {@Position} in {Elapsed:000} ms. ", position, elapsedMs);
Build and run the app. For example, if you're using Visual Studio, press F5.
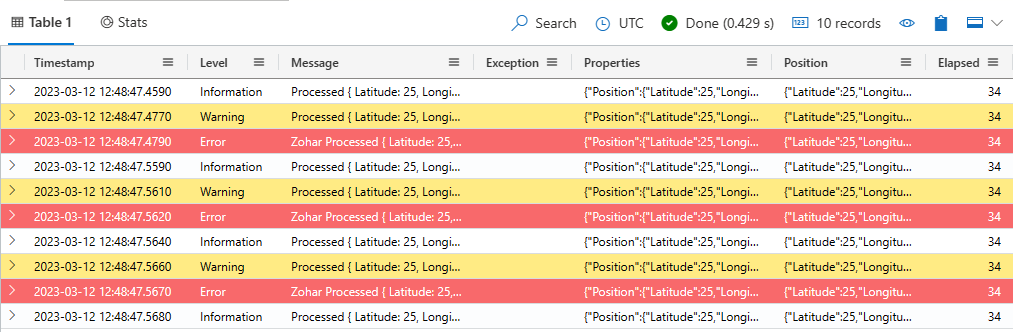
Verify that the data is in your table. Run the following query replacing the placeholder with the name of the table that was created in a previous step:
<TableName>
| take 10
Run the sample app
If you don't have your own data to test, you can use the sample log generator app with sample data to test configuration and use of the Serilog sink.
Clone the Serilog sink's git repo using the following git command:
git clone https://github.com/Azure/serilog-sinks-azuredataexplorerSet the following environmental variables to configure the Serilog sink:
Variable Description IngestionEndPointUriThe ingest URI. DatabaseNameThe case-sensitive name of the target database. TableNameThe case-sensitive name of an existing target table. For example, SerilogTest is the name of the table created in Create a target table and ingestion mapping. AppIdApplication client ID required for Microsoft Entra service principal authentication. You saved this value in Create a Microsoft Entra service principal. AppKeyApplication key required for Microsoft Entra service principal authentication. You saved this value in Create a Microsoft Entra service principal. TenantThe ID of the tenant in which the application is registered when using Microsoft Entra service principal authentication. You saved this value in Create a Microsoft Entra service principal. BufferBaseFileNameThe base file name for the buffer file. Set this value if you require your logs to be durable against loss resulting connection failures to your cluster. For example, C:/Temp/SerilogManagedIdentityClientIdThe client ID of the user-assigned managed identity, when using Managed Identity authentication. You can set the environment variables manually or using the following commands:
In your terminal, browse to the root folder of the cloned repo and run the following .NET command to build the app:
dotnet build srcIn your terminal, browse to the samples folder and run the following .NET command to run the app:
dotnet build run
In the query environment, select the target database, and run the following query to explore the ingested data, replacing the placeholder TableName with the name of the target table:
<TableName>
| take 10
Your output should look similar to the following image: