Note
Access to this page requires authorization. You can try signing in or changing directories.
Access to this page requires authorization. You can try changing directories.
It's often necessary to send notifications during or after execution of a pipeline. Notification provides proactive alerting and reduces the need for reactive monitoring to discover issues. You can learn about how to send email notifications using logic apps that a data factory or Synapse pipeline can invoke. Many enterprises are also increasingly using Microsoft Teams for collaboration. This article shows how to configure notifications from pipeline alerts into Microsoft Teams.
Prerequisites
Before you can send notifications to Teams from your pipelines, you must create an Incoming Webhook for your Teams channel. If you need to create a new Teams channel for this purpose, refer to the Teams documentation.
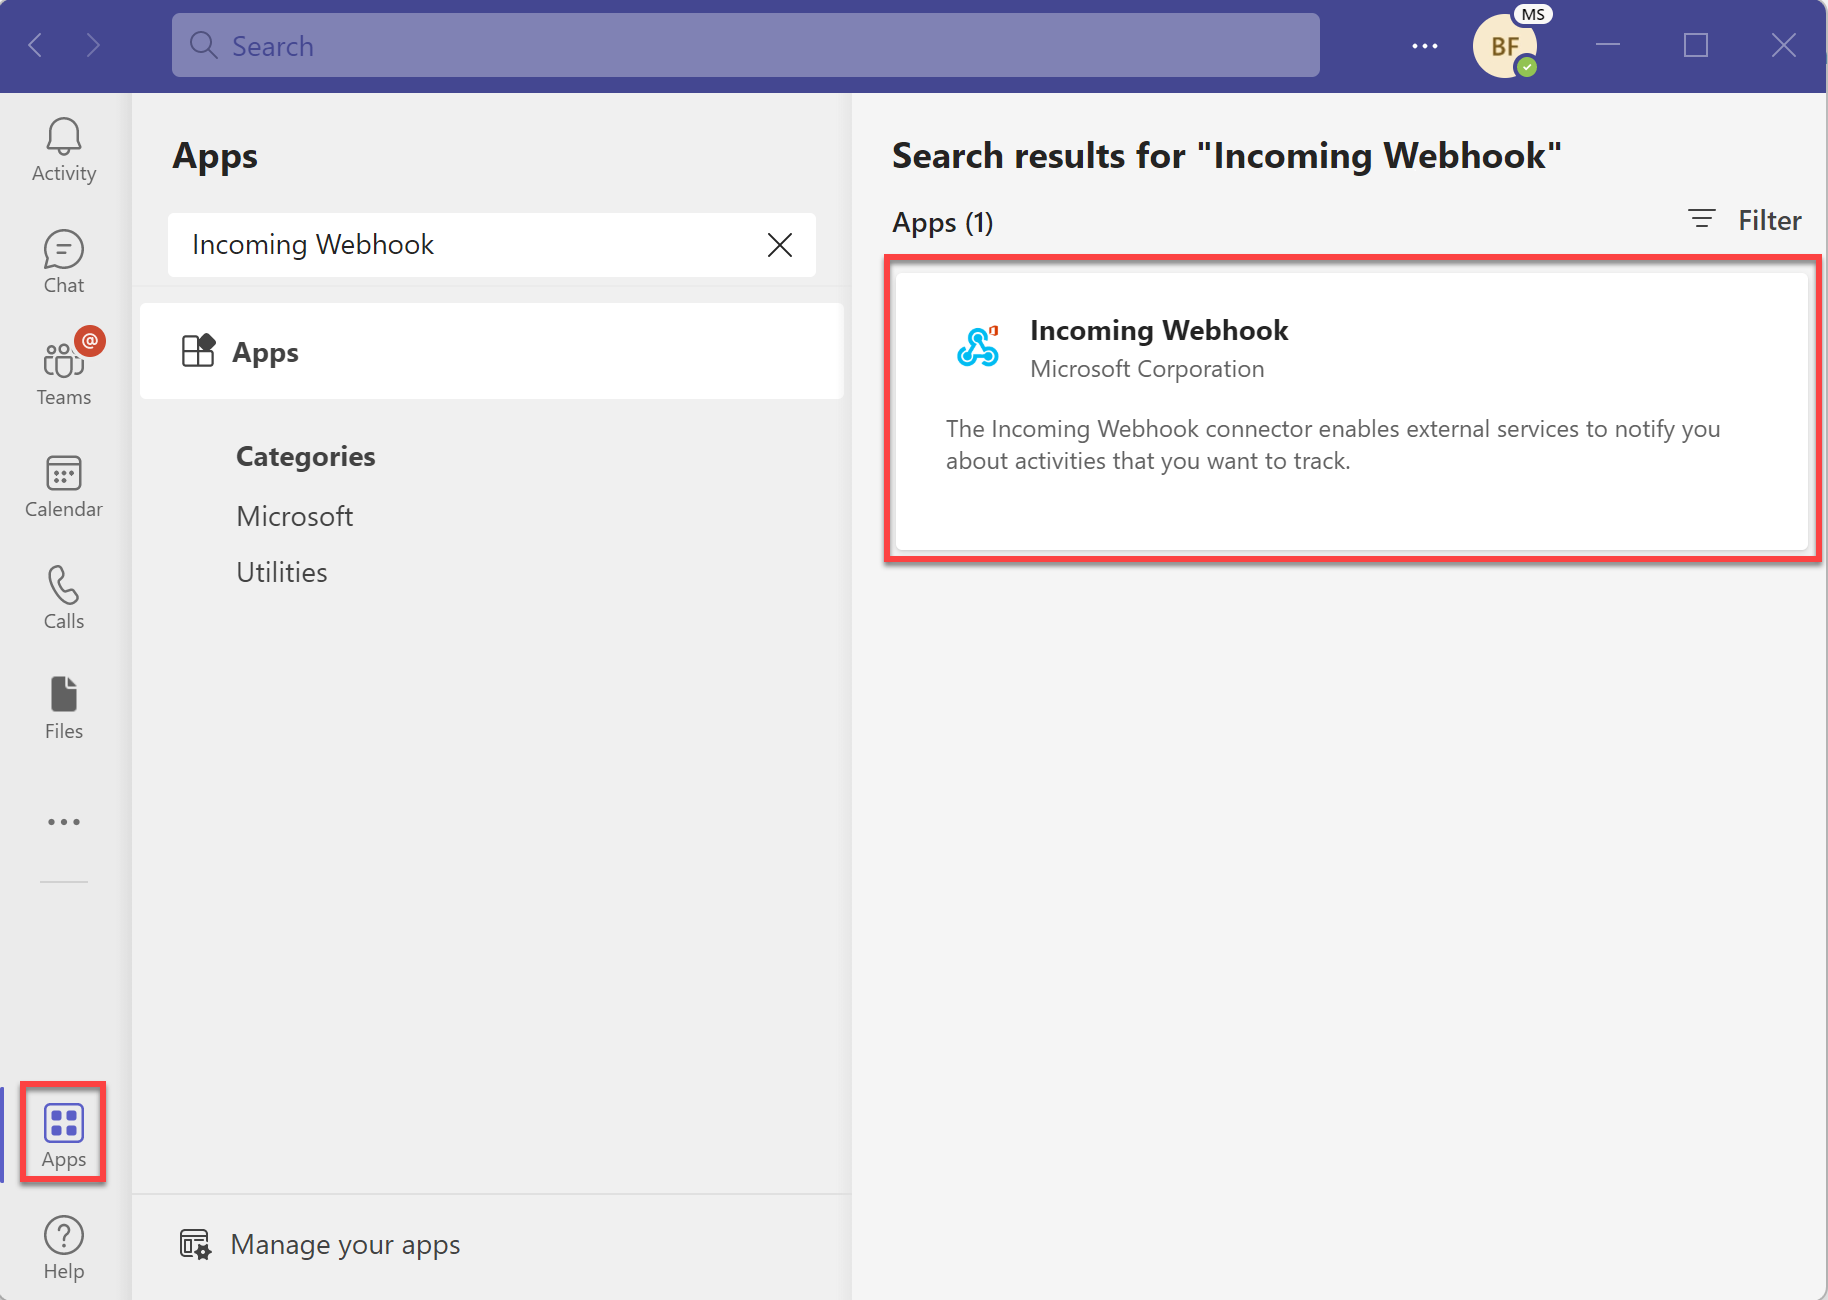
Open Microsoft Teams and go to the Apps tab. Search for "Incoming Webhook" and select the Incoming Webhook connector.
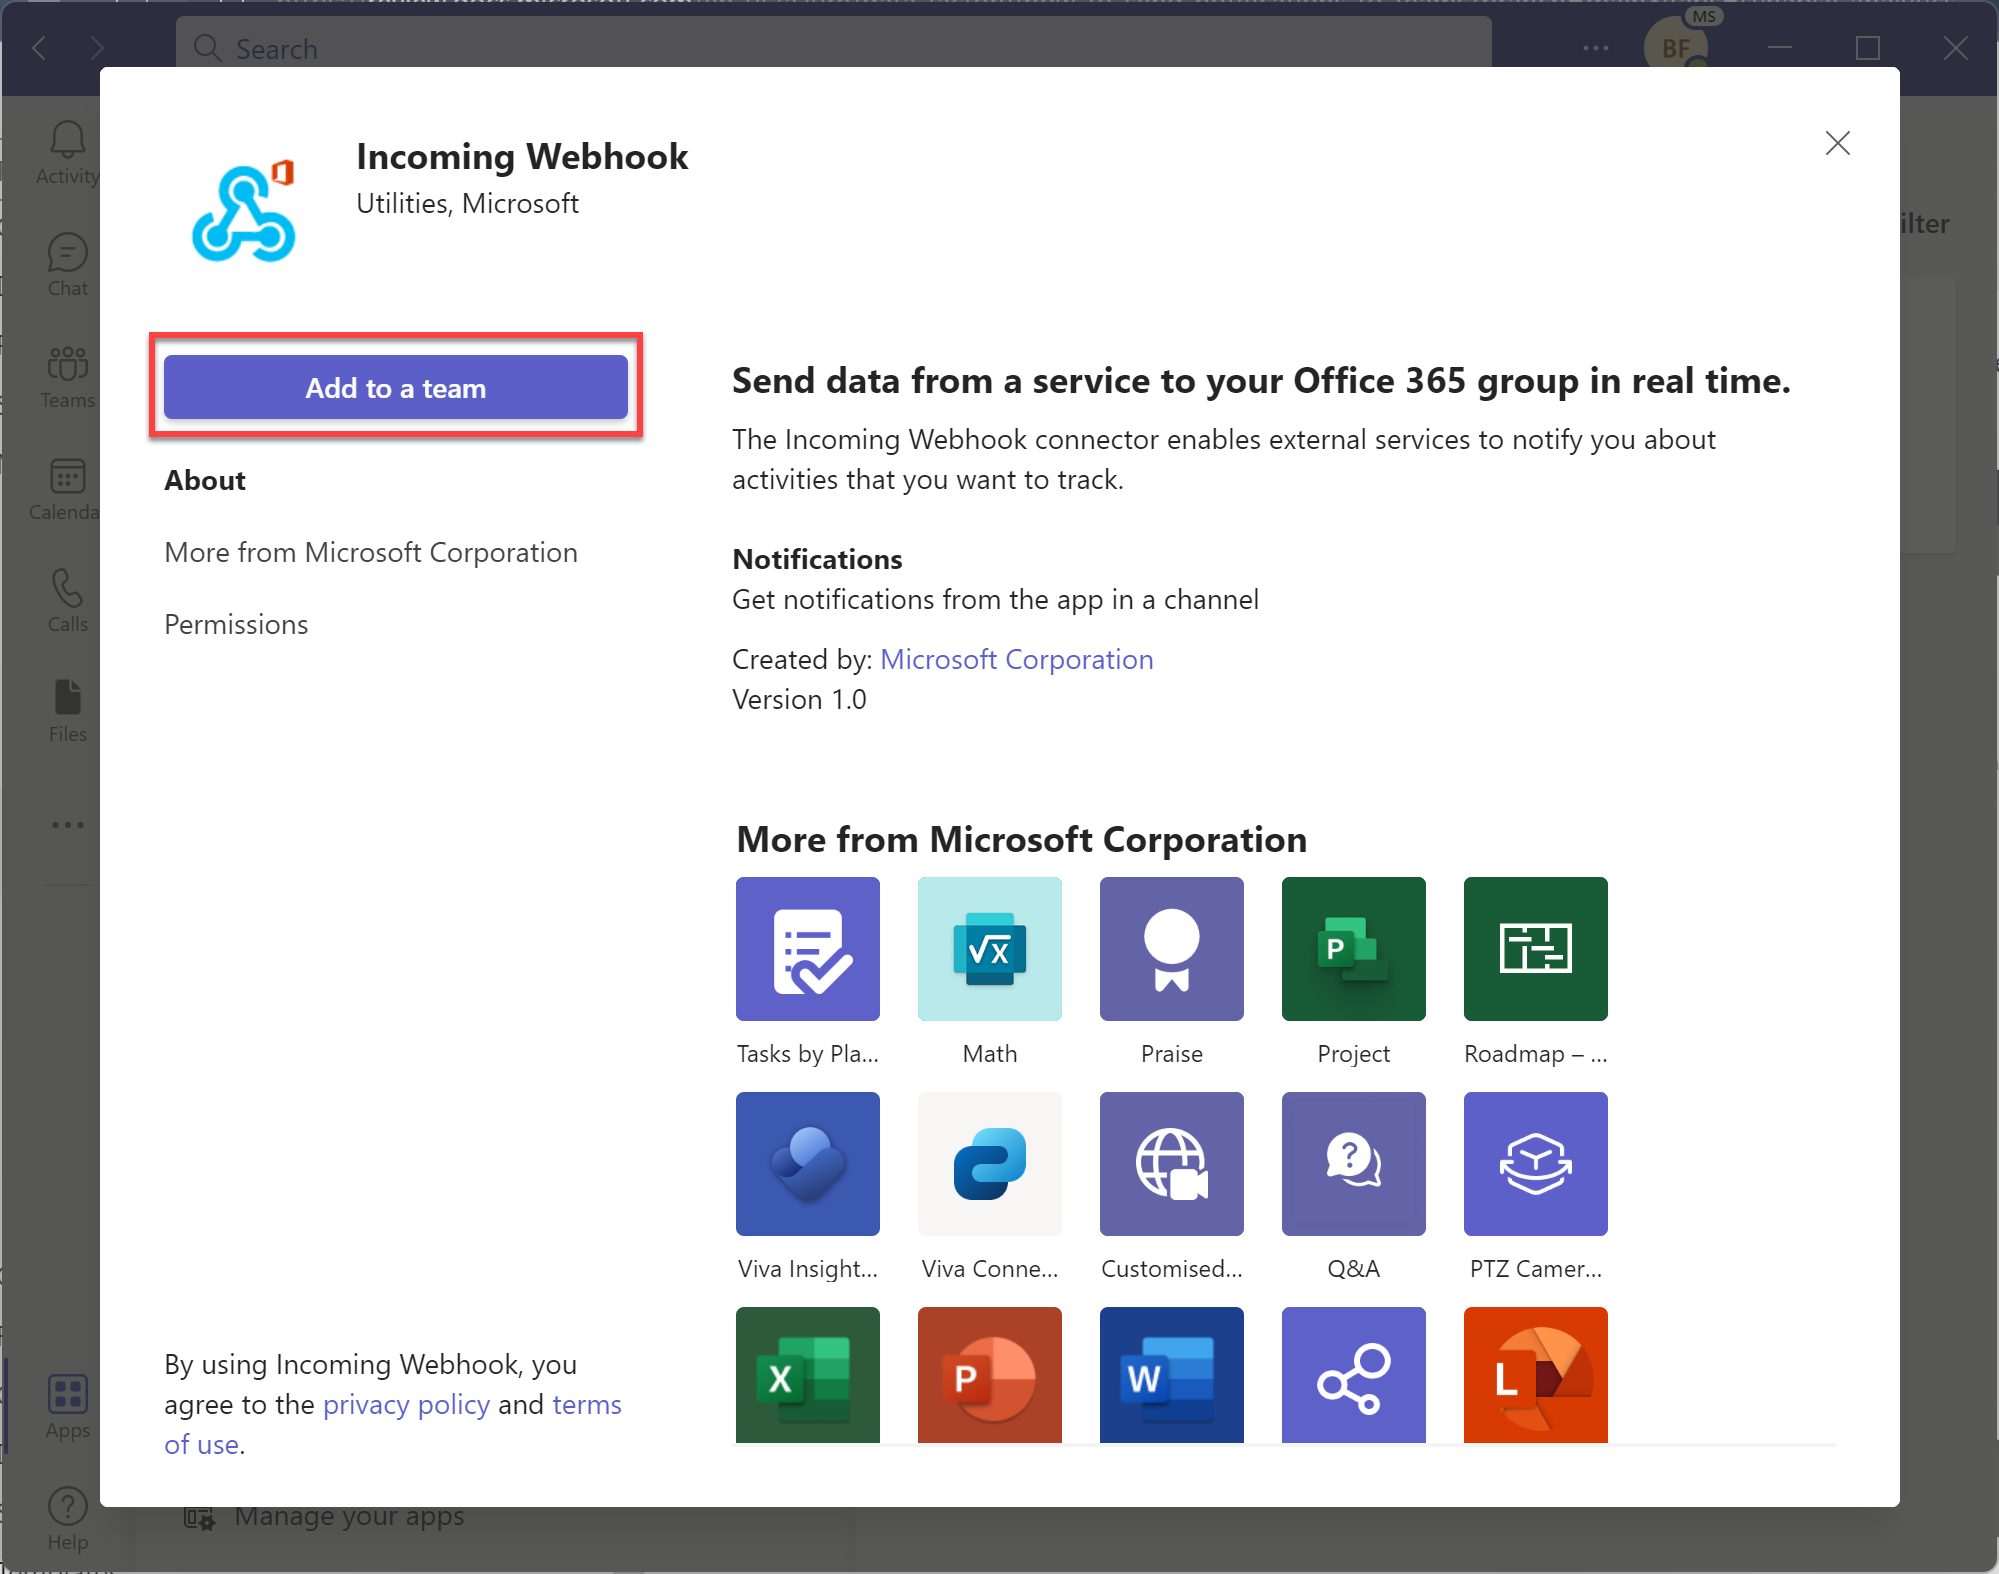
Select the "Add to a team" button to add the connector to the Team or Team channel name site where you want to send notifications.
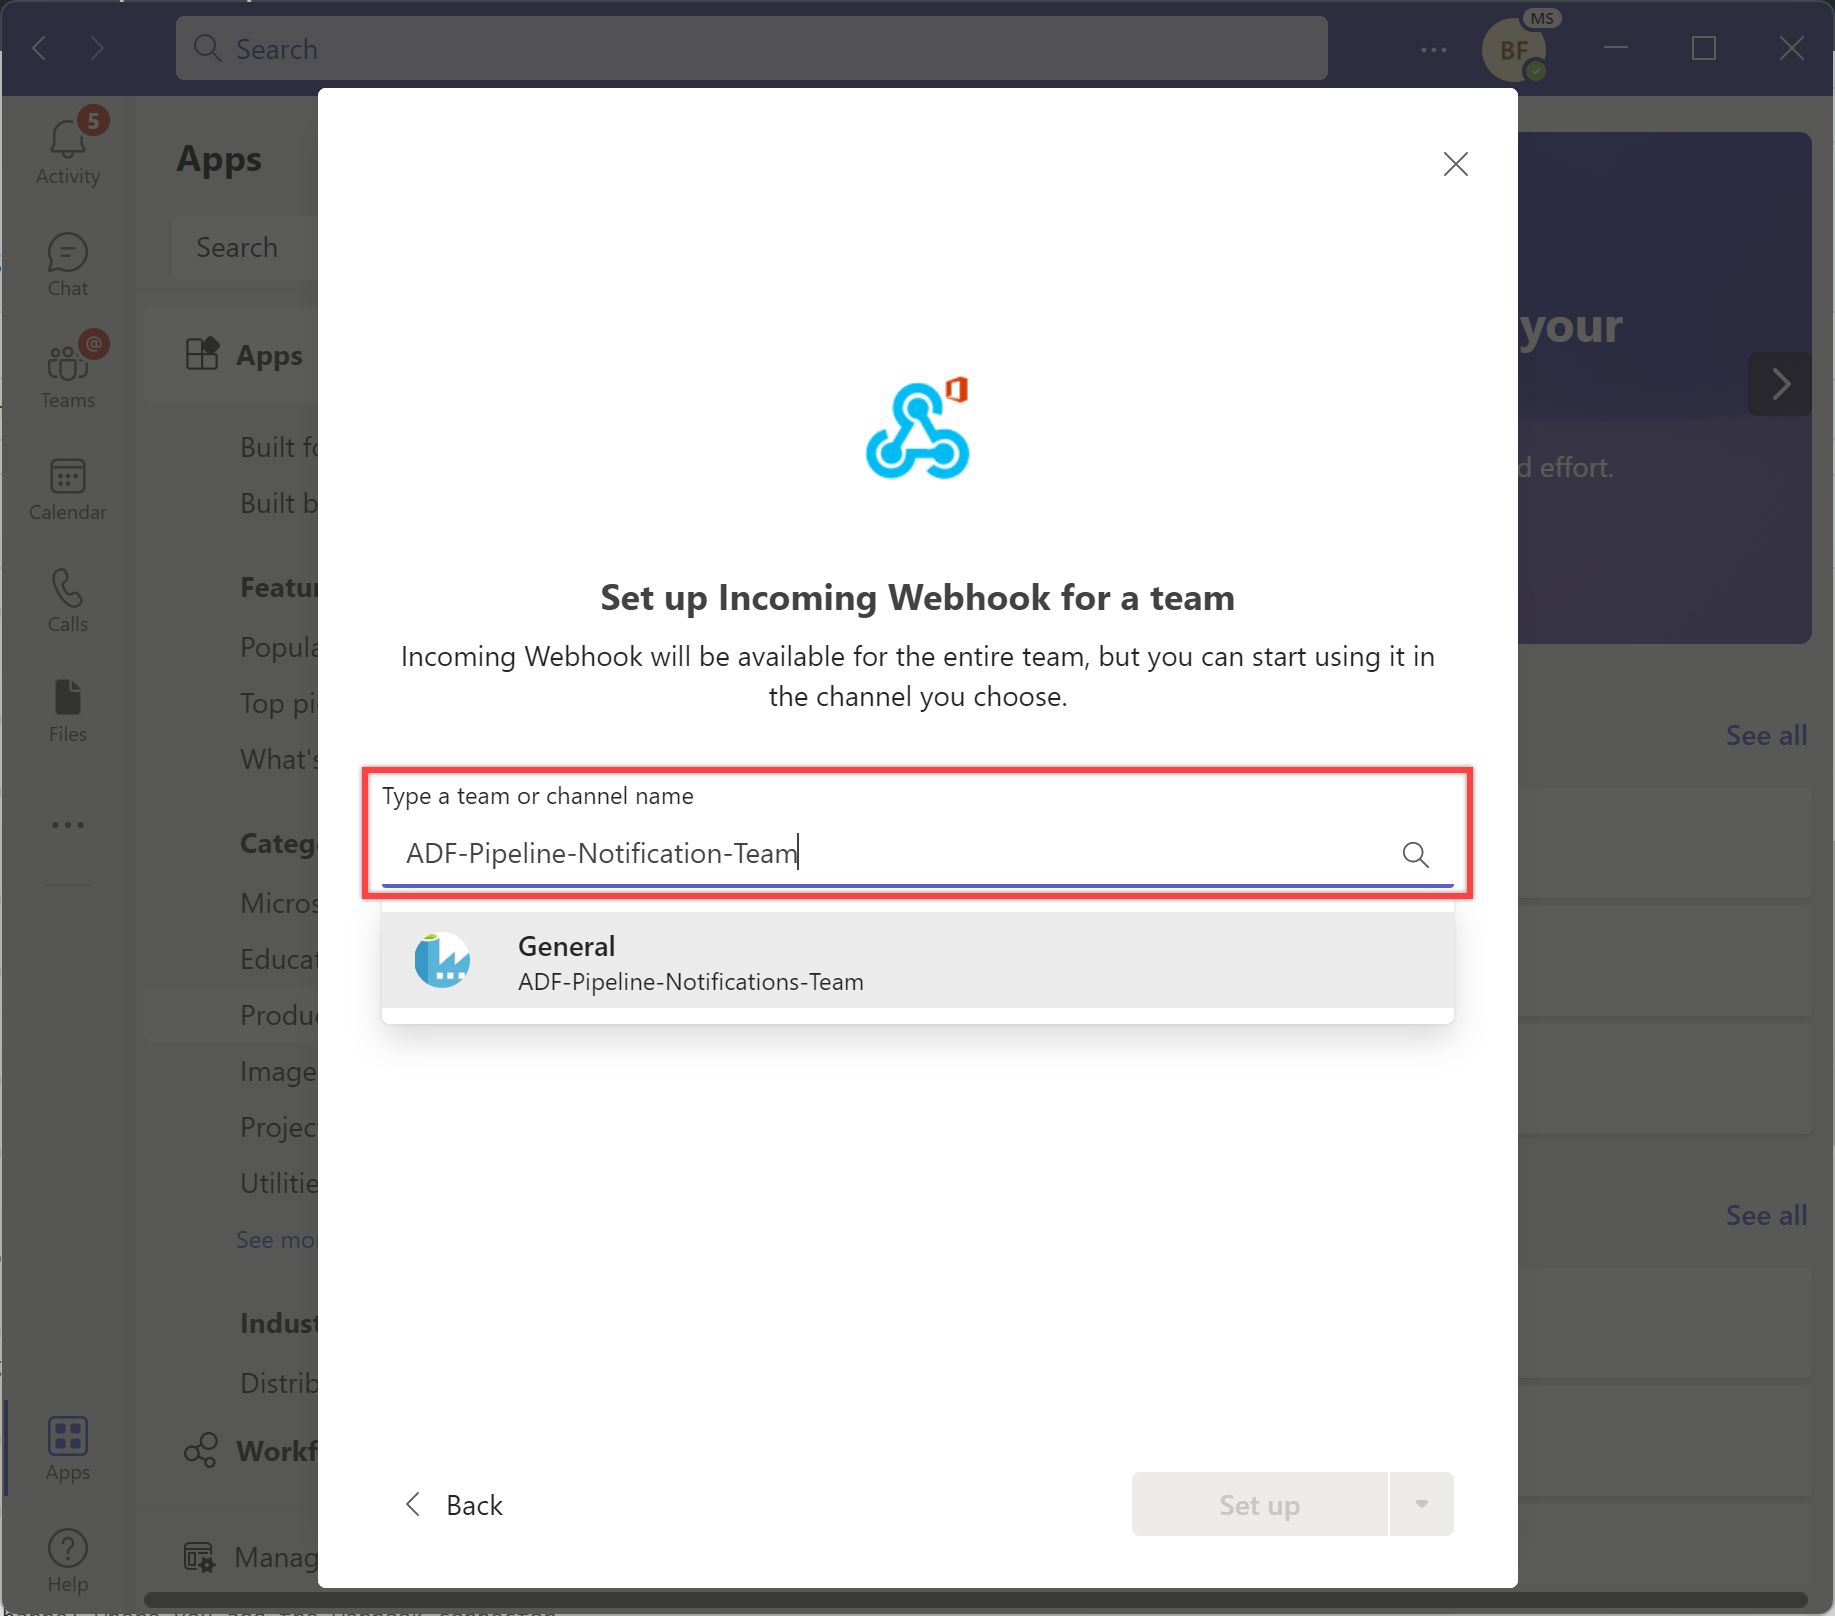
Type or select Team or Team channel name where you want to send the notifications.
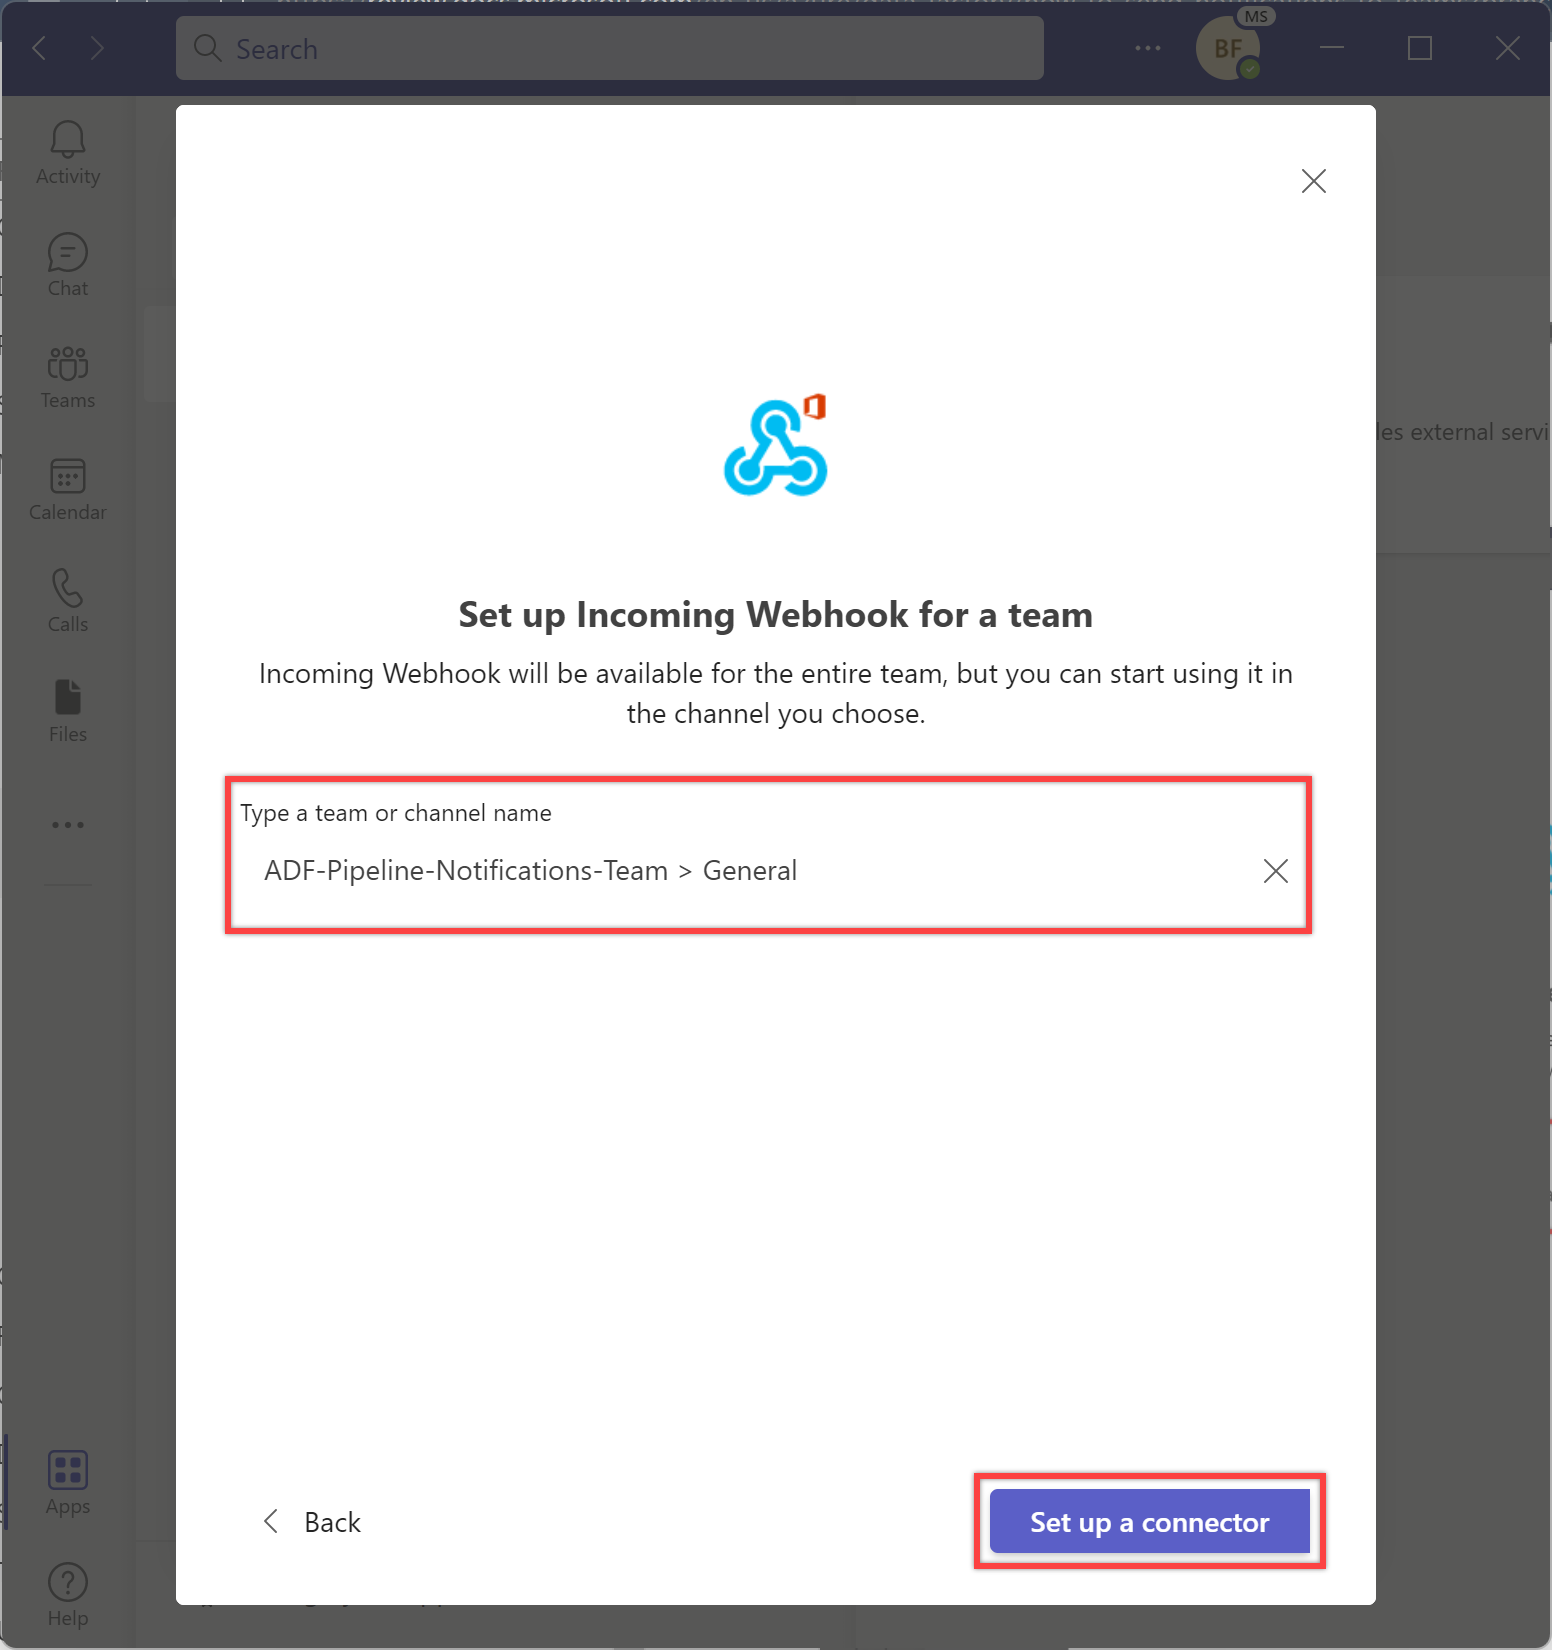
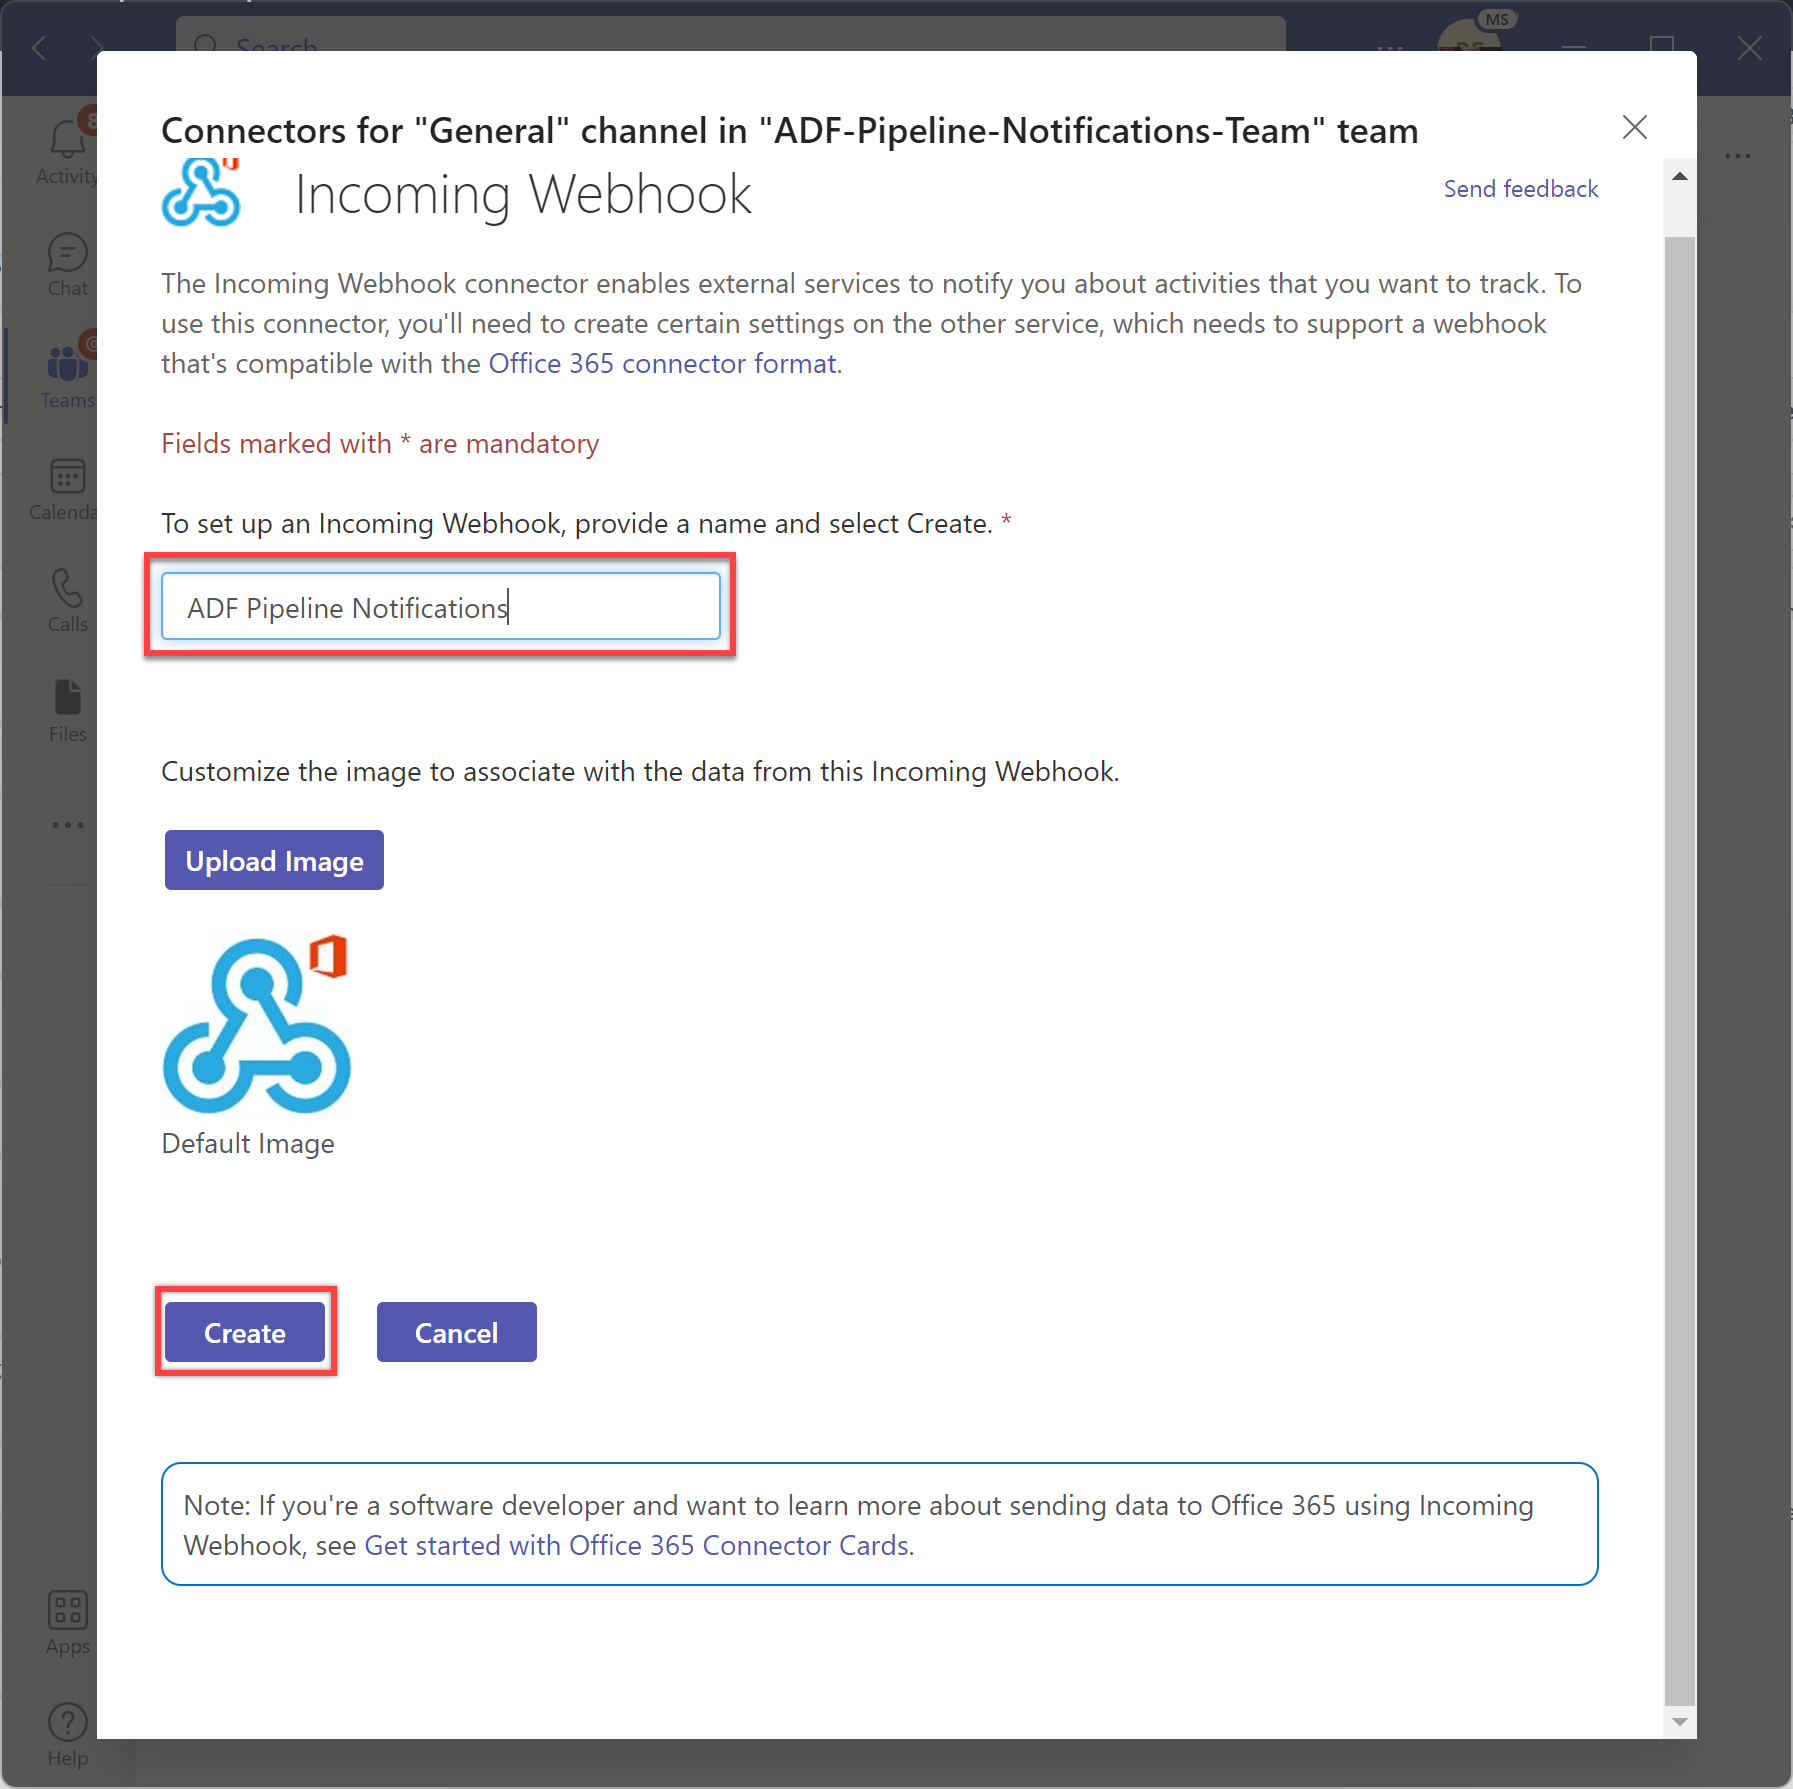
Select the "Set up a connector" button to set up the Incoming Webhook for the Team or Team channel name you selected in the previous step.
Name the Webhook as appropriate and optionally upload an icon to identify your messages. After that, select the "Create" button to create the Incoming Webhook.
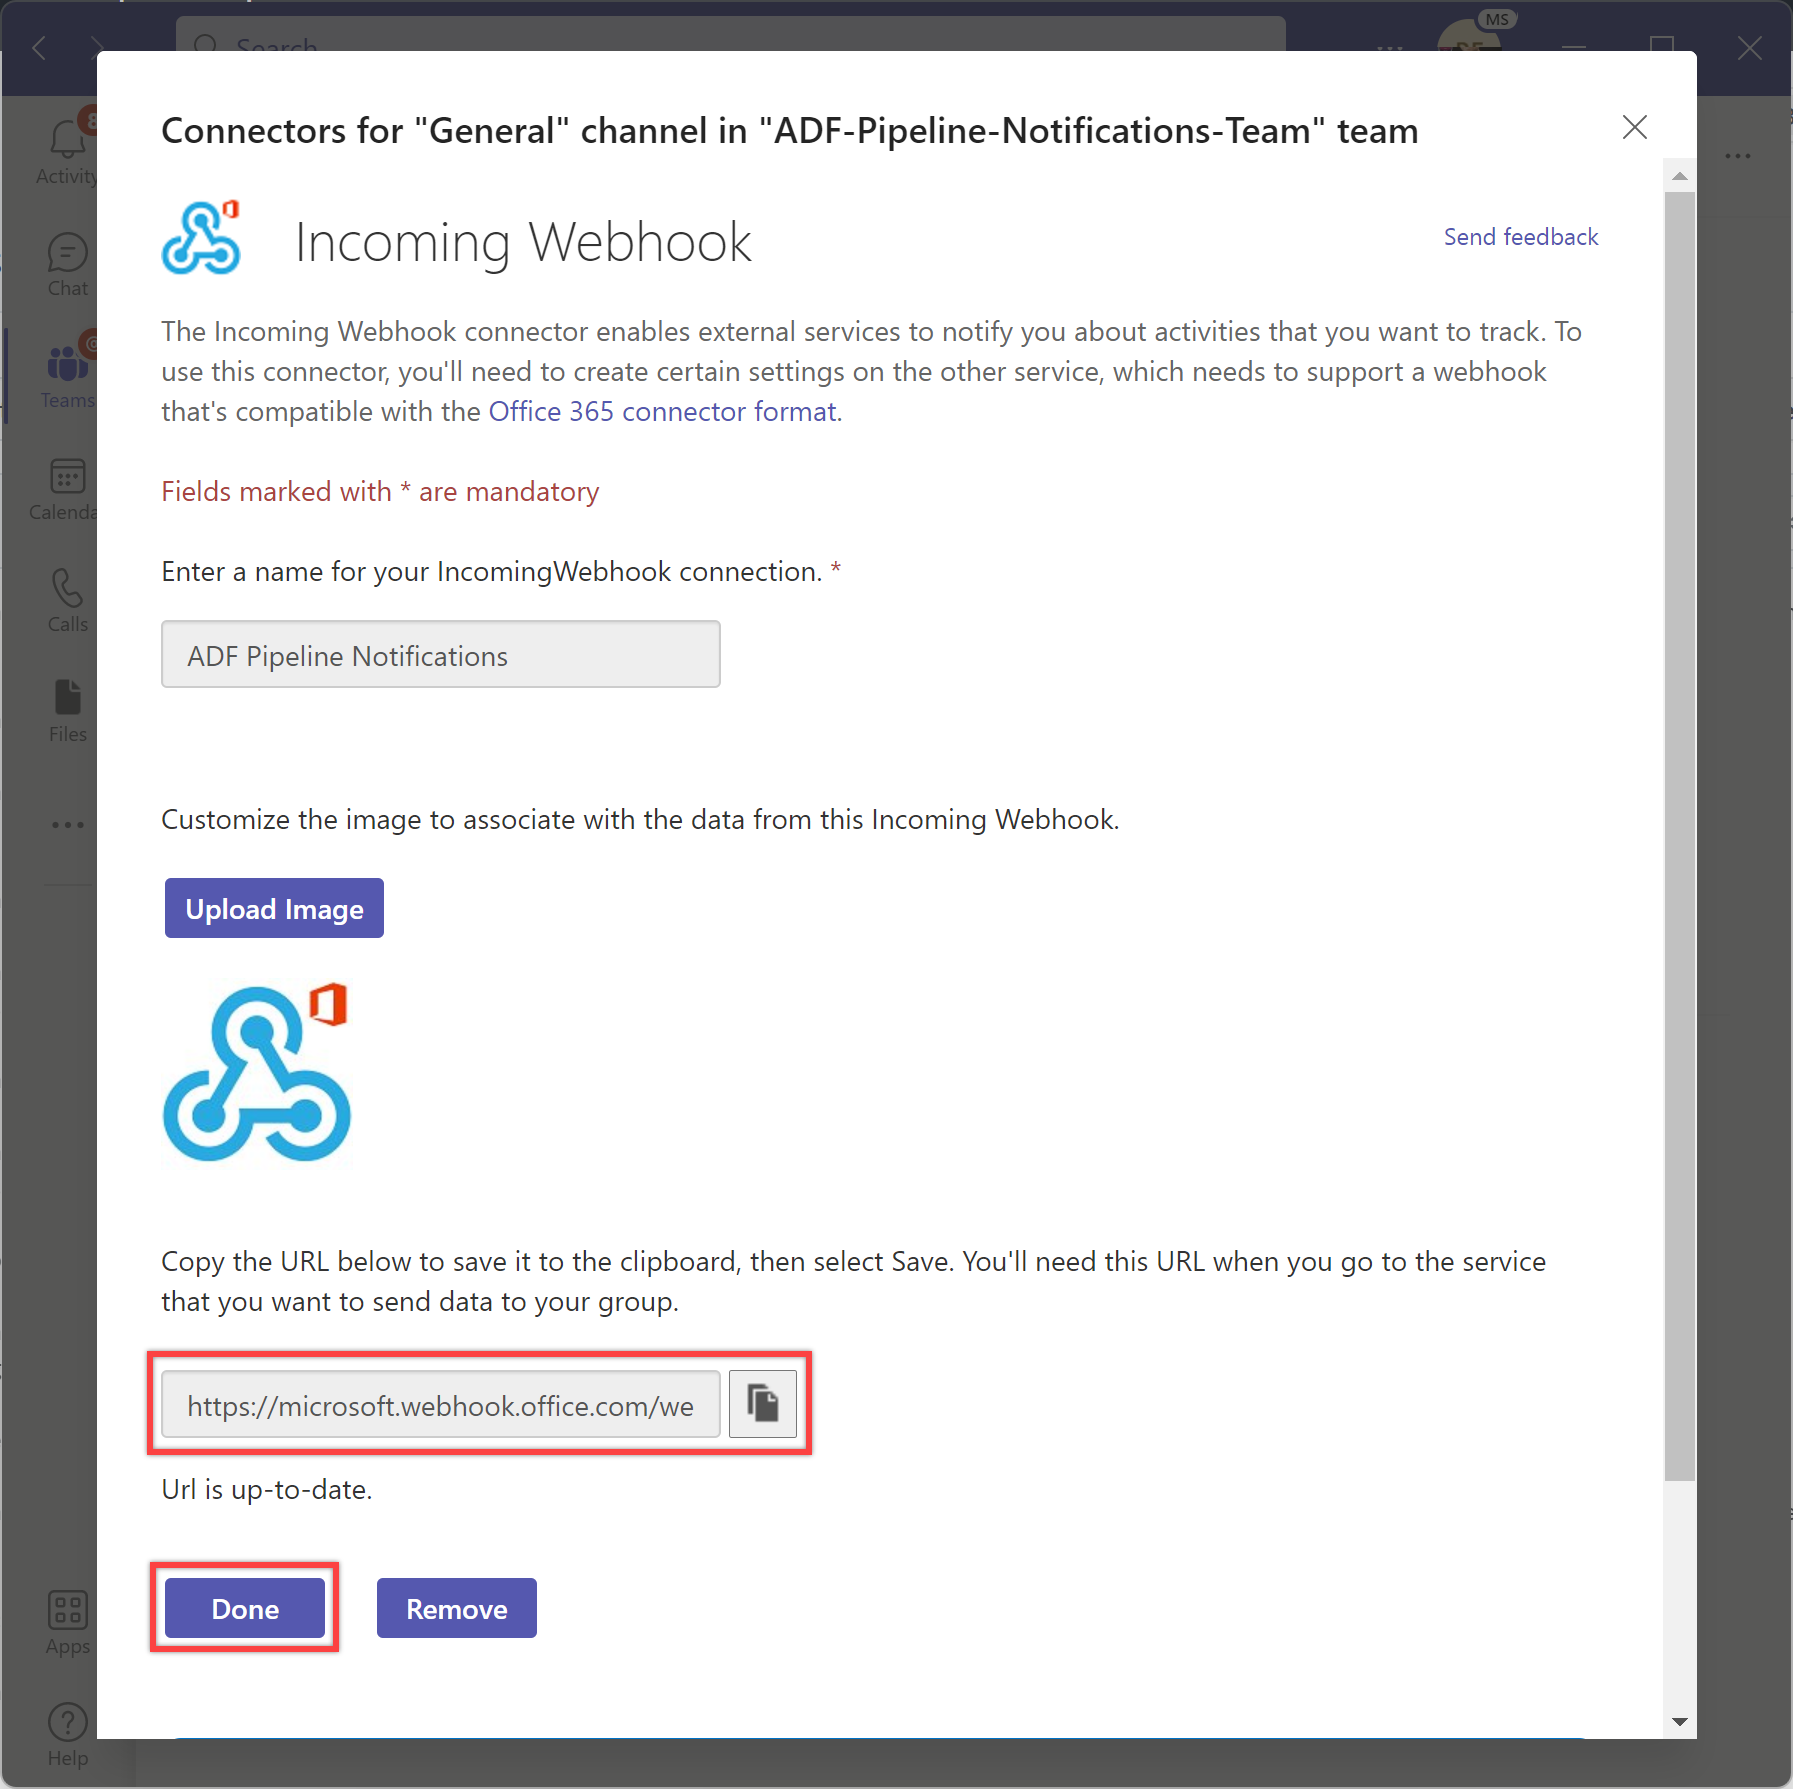
Copy the Webhook URL that is generated on creation and save it for later use in pipeline. After that, select the "Done" button to complete the setup.
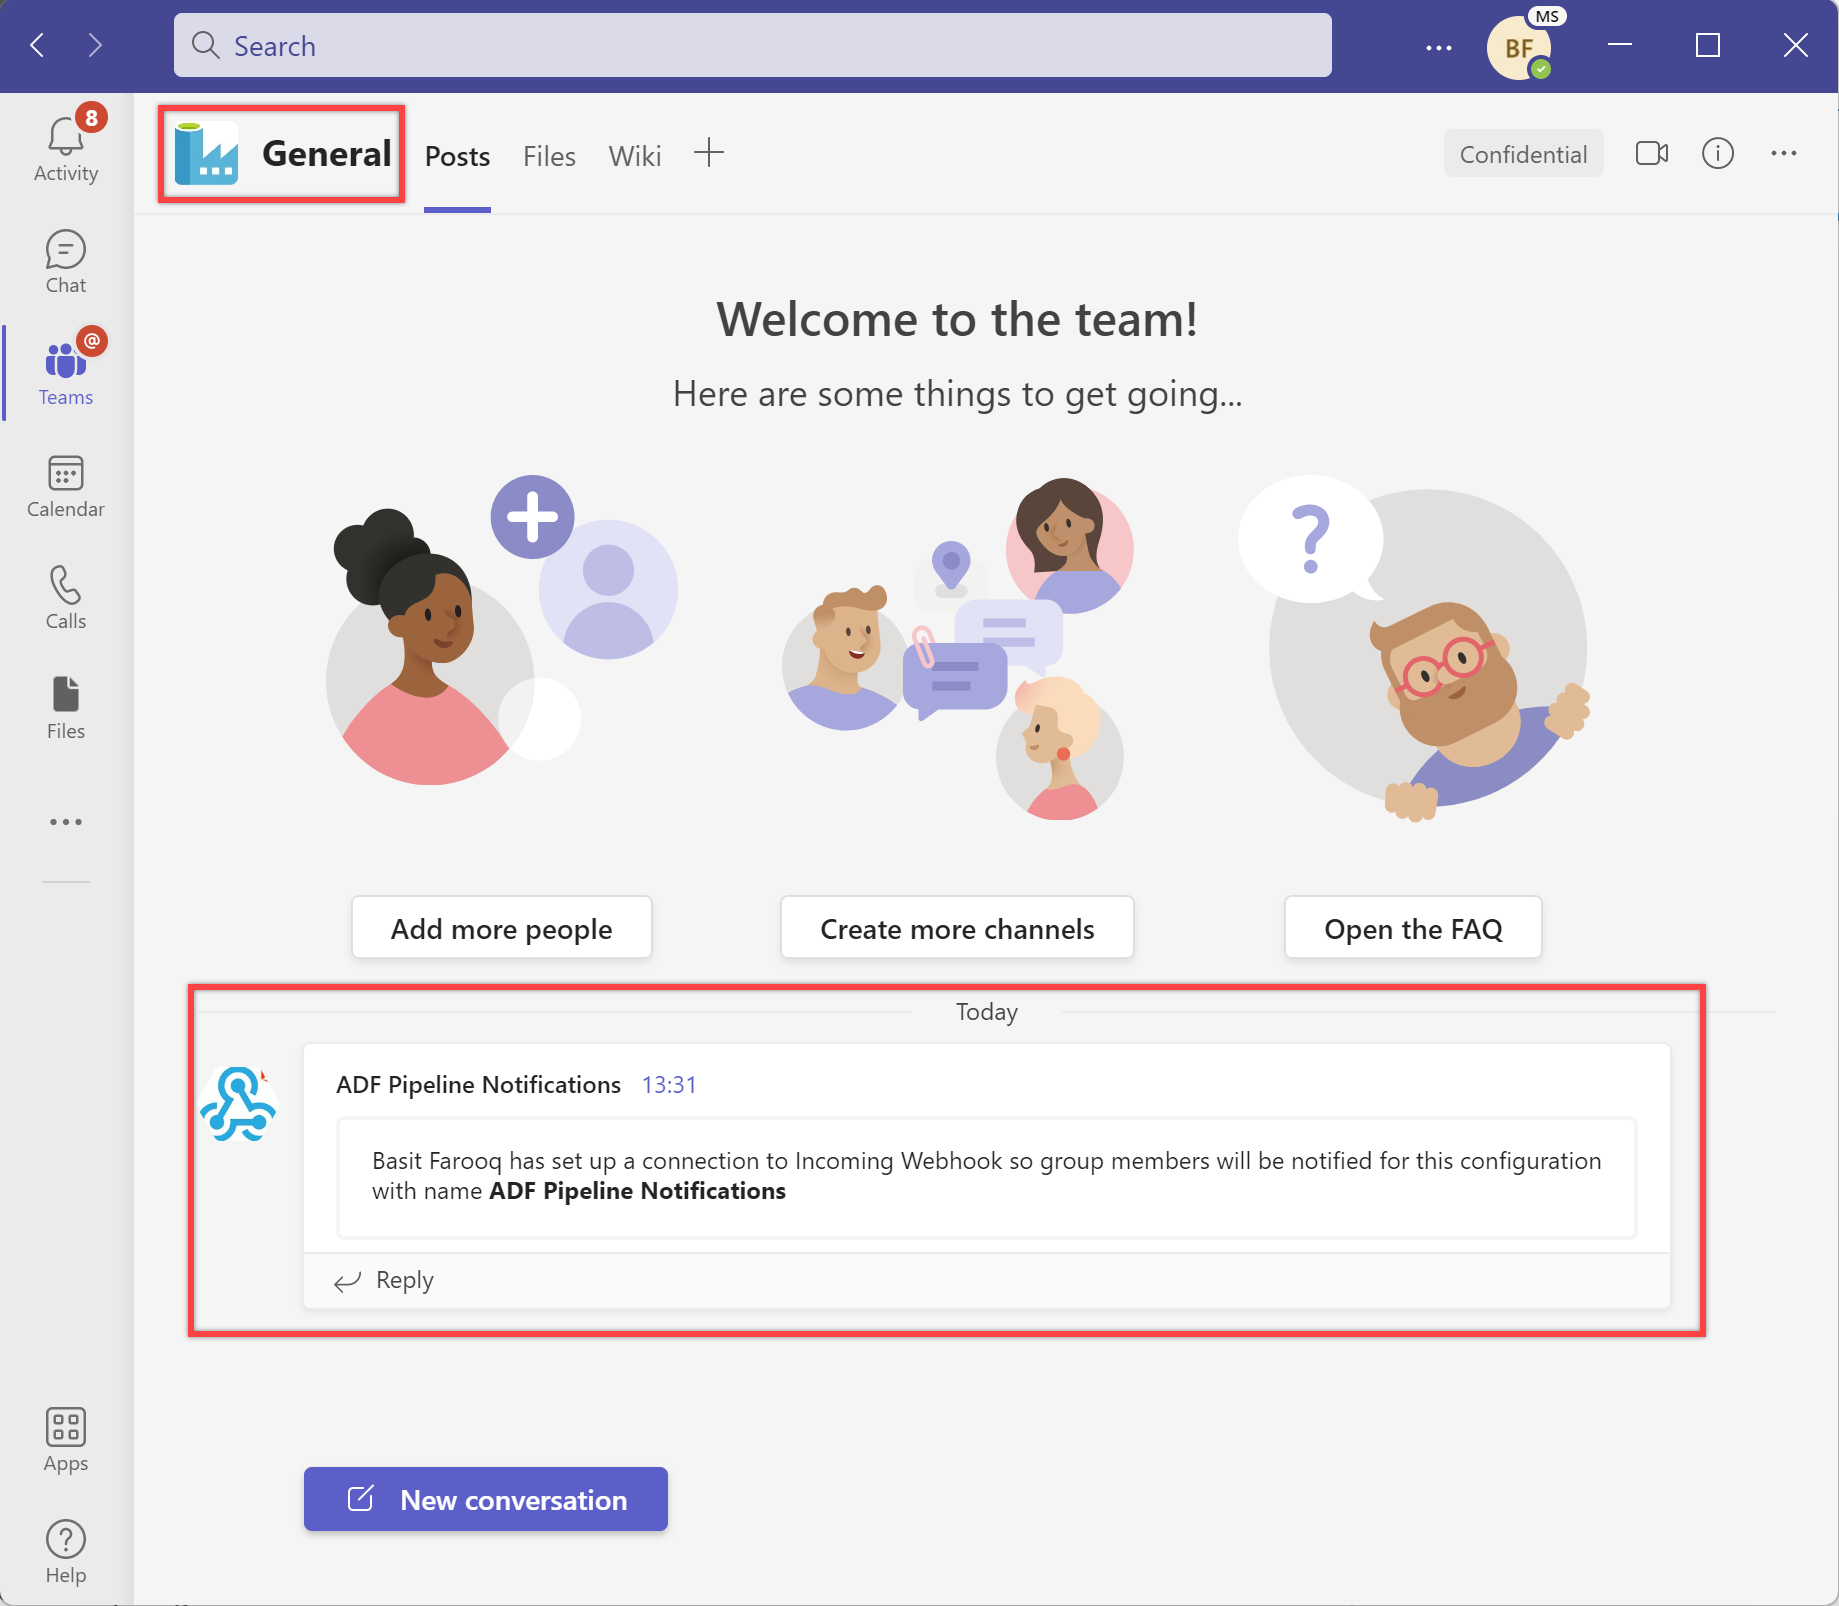
You can see the notification in the channel where you add the webhook connector.
Steps to send notifications on Teams channel from a pipeline:
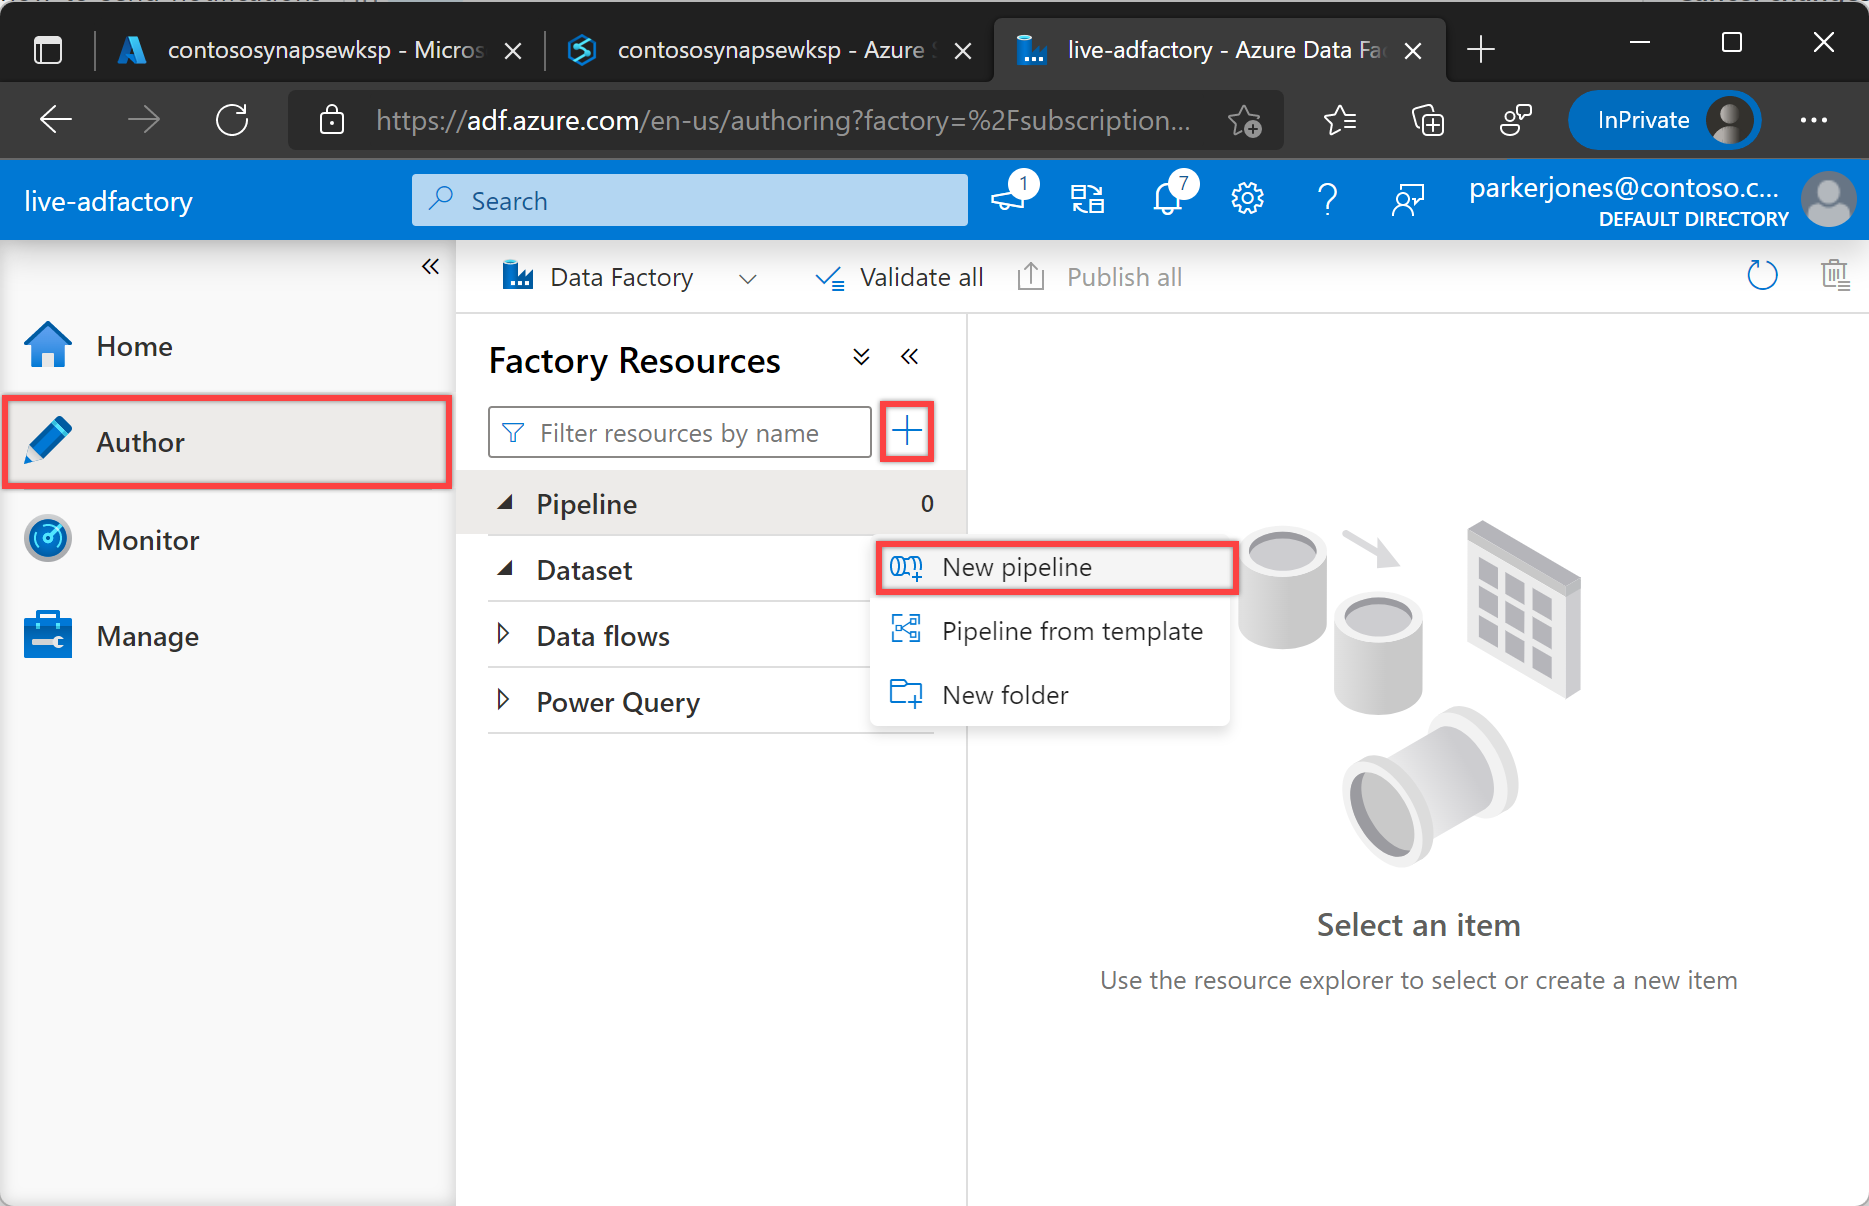
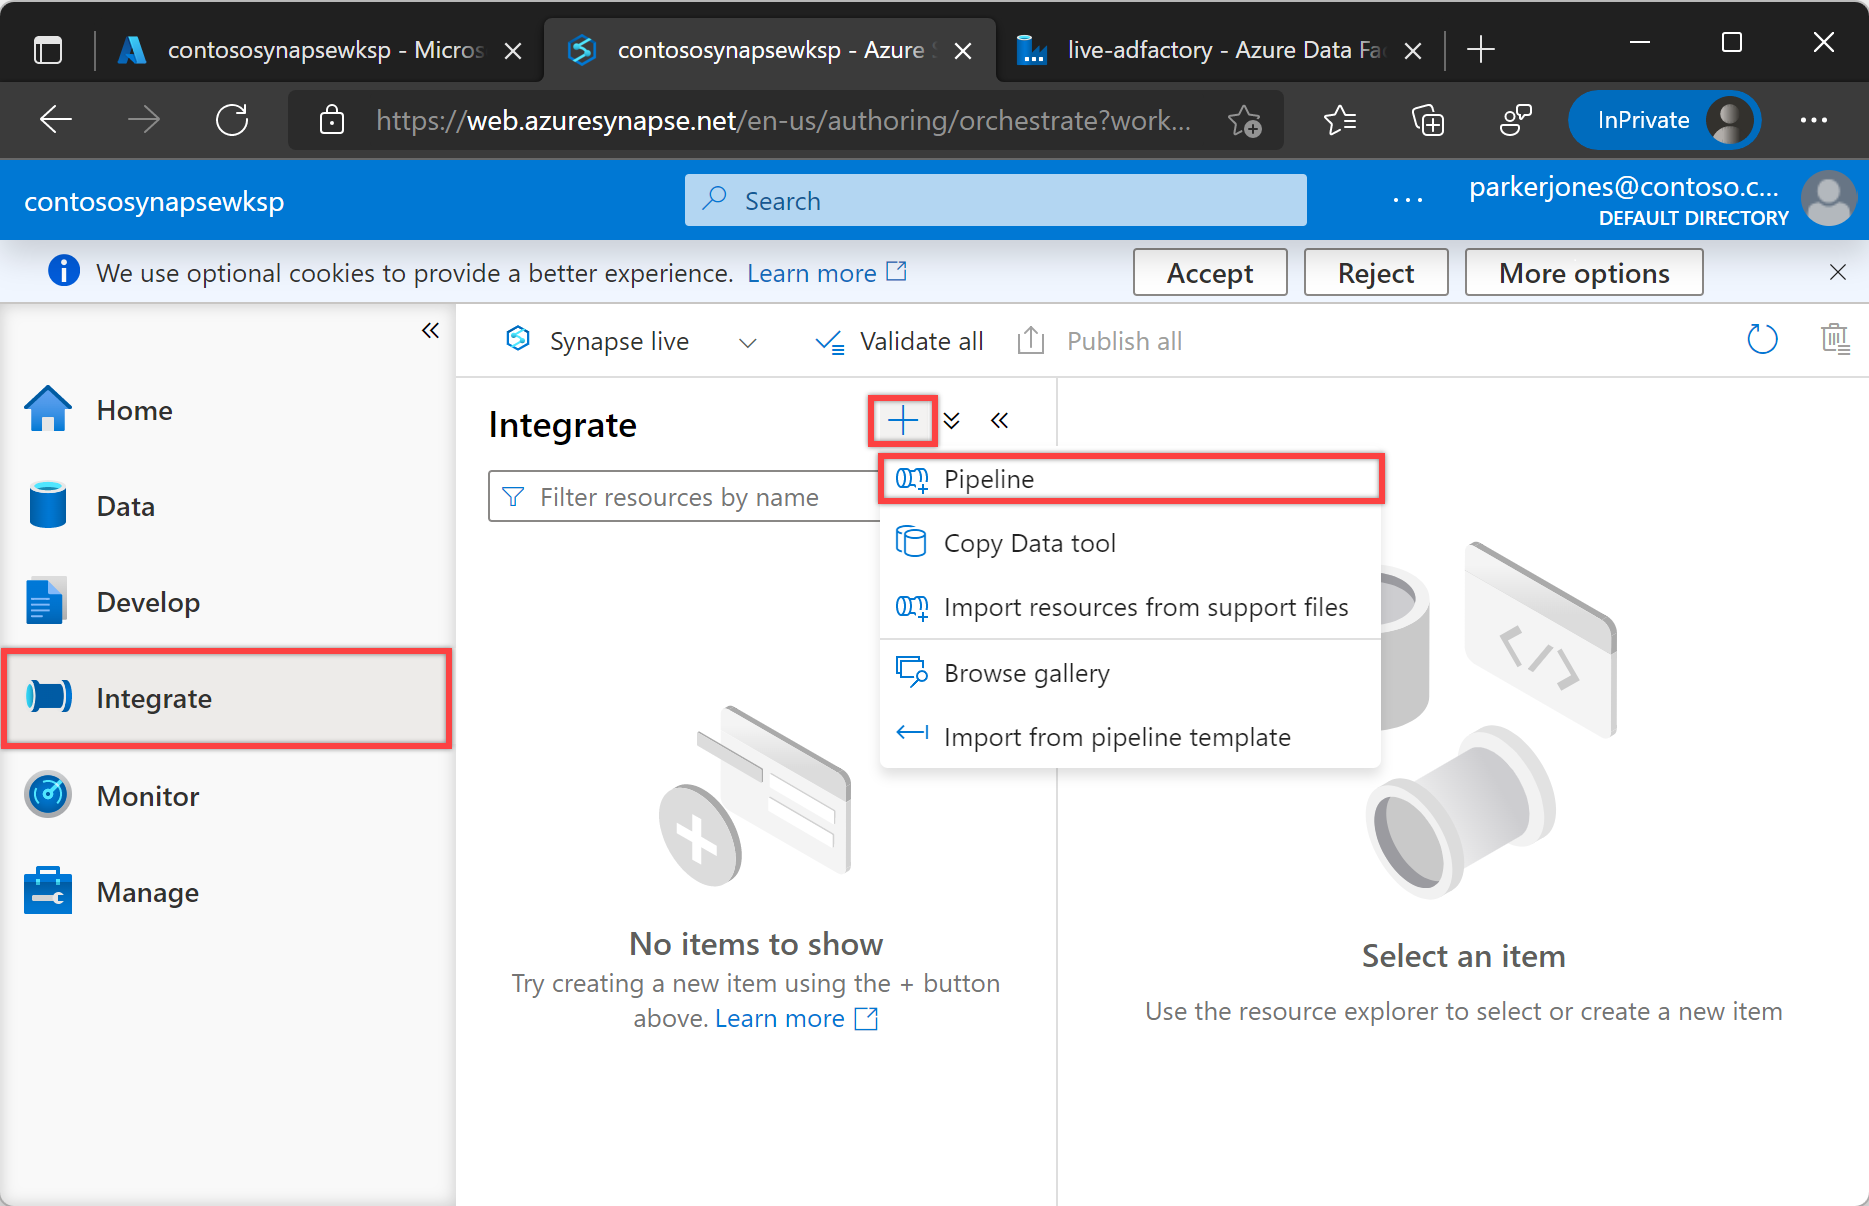
Select Author tab from the left pane.
Select the + (plus) button, and then select New pipeline.
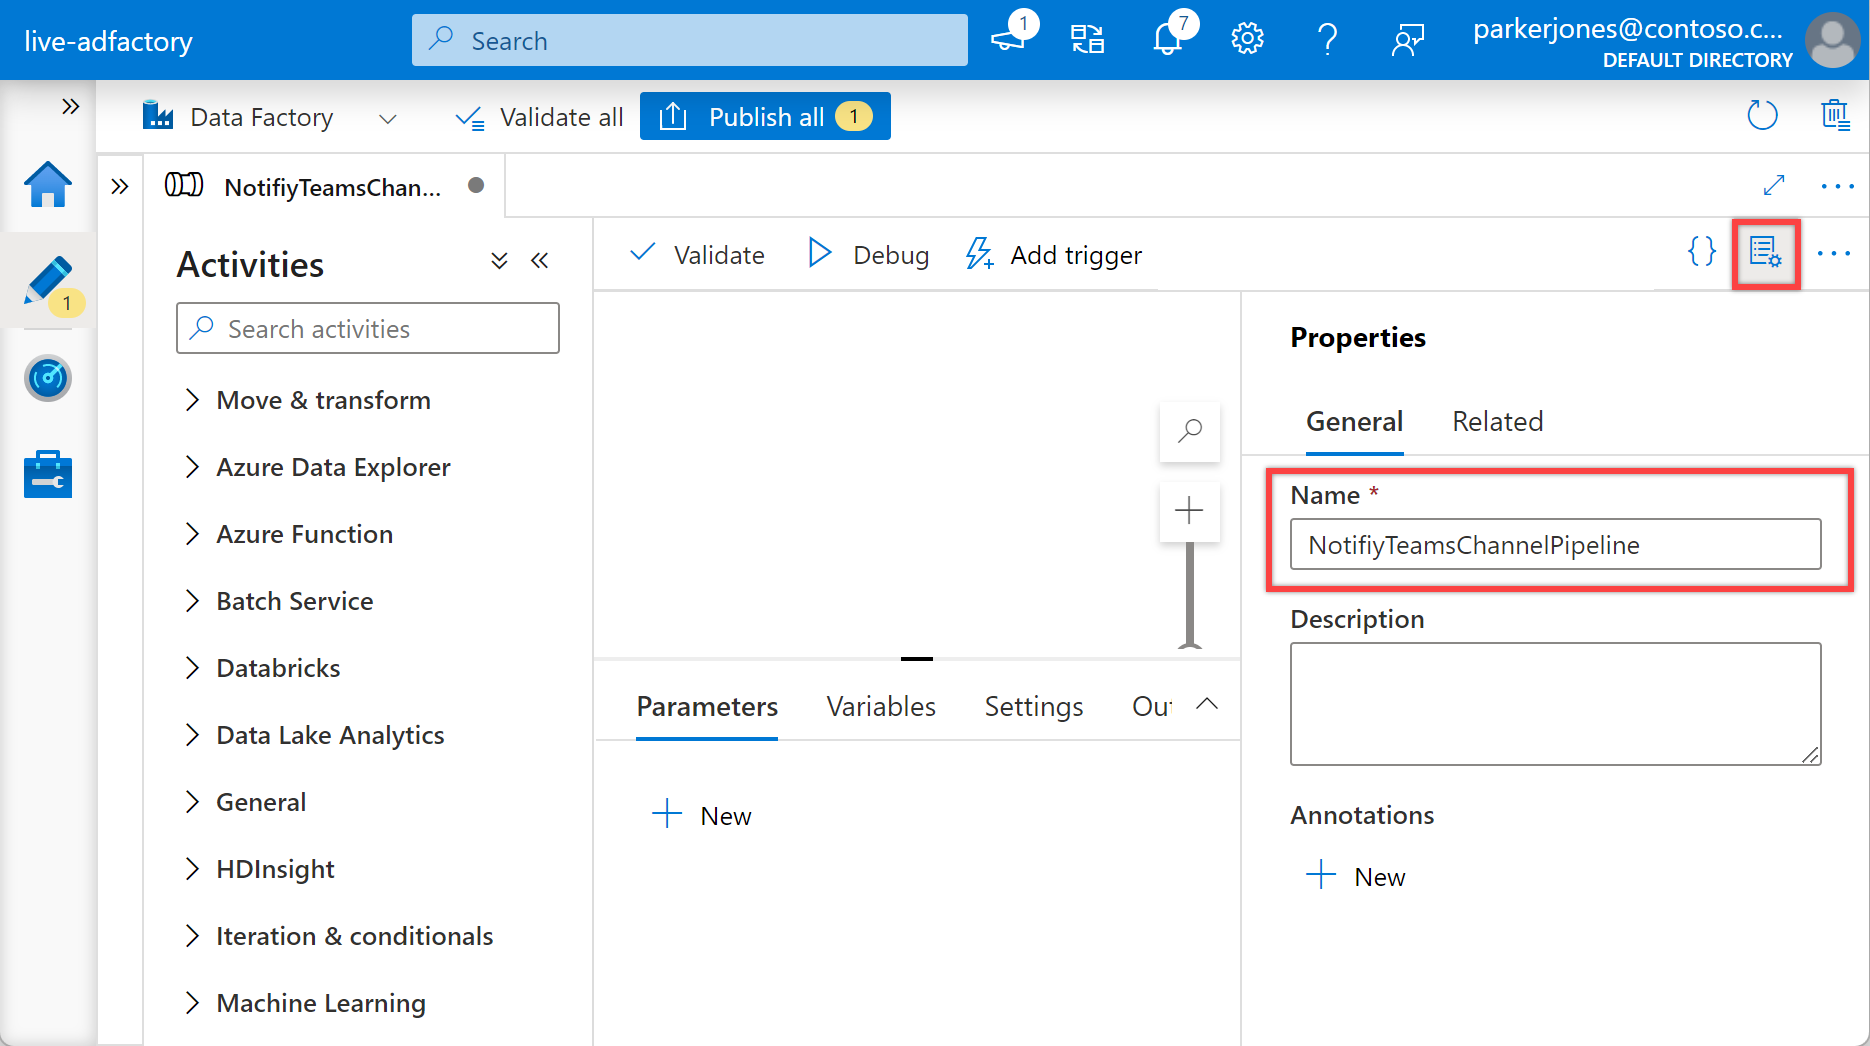
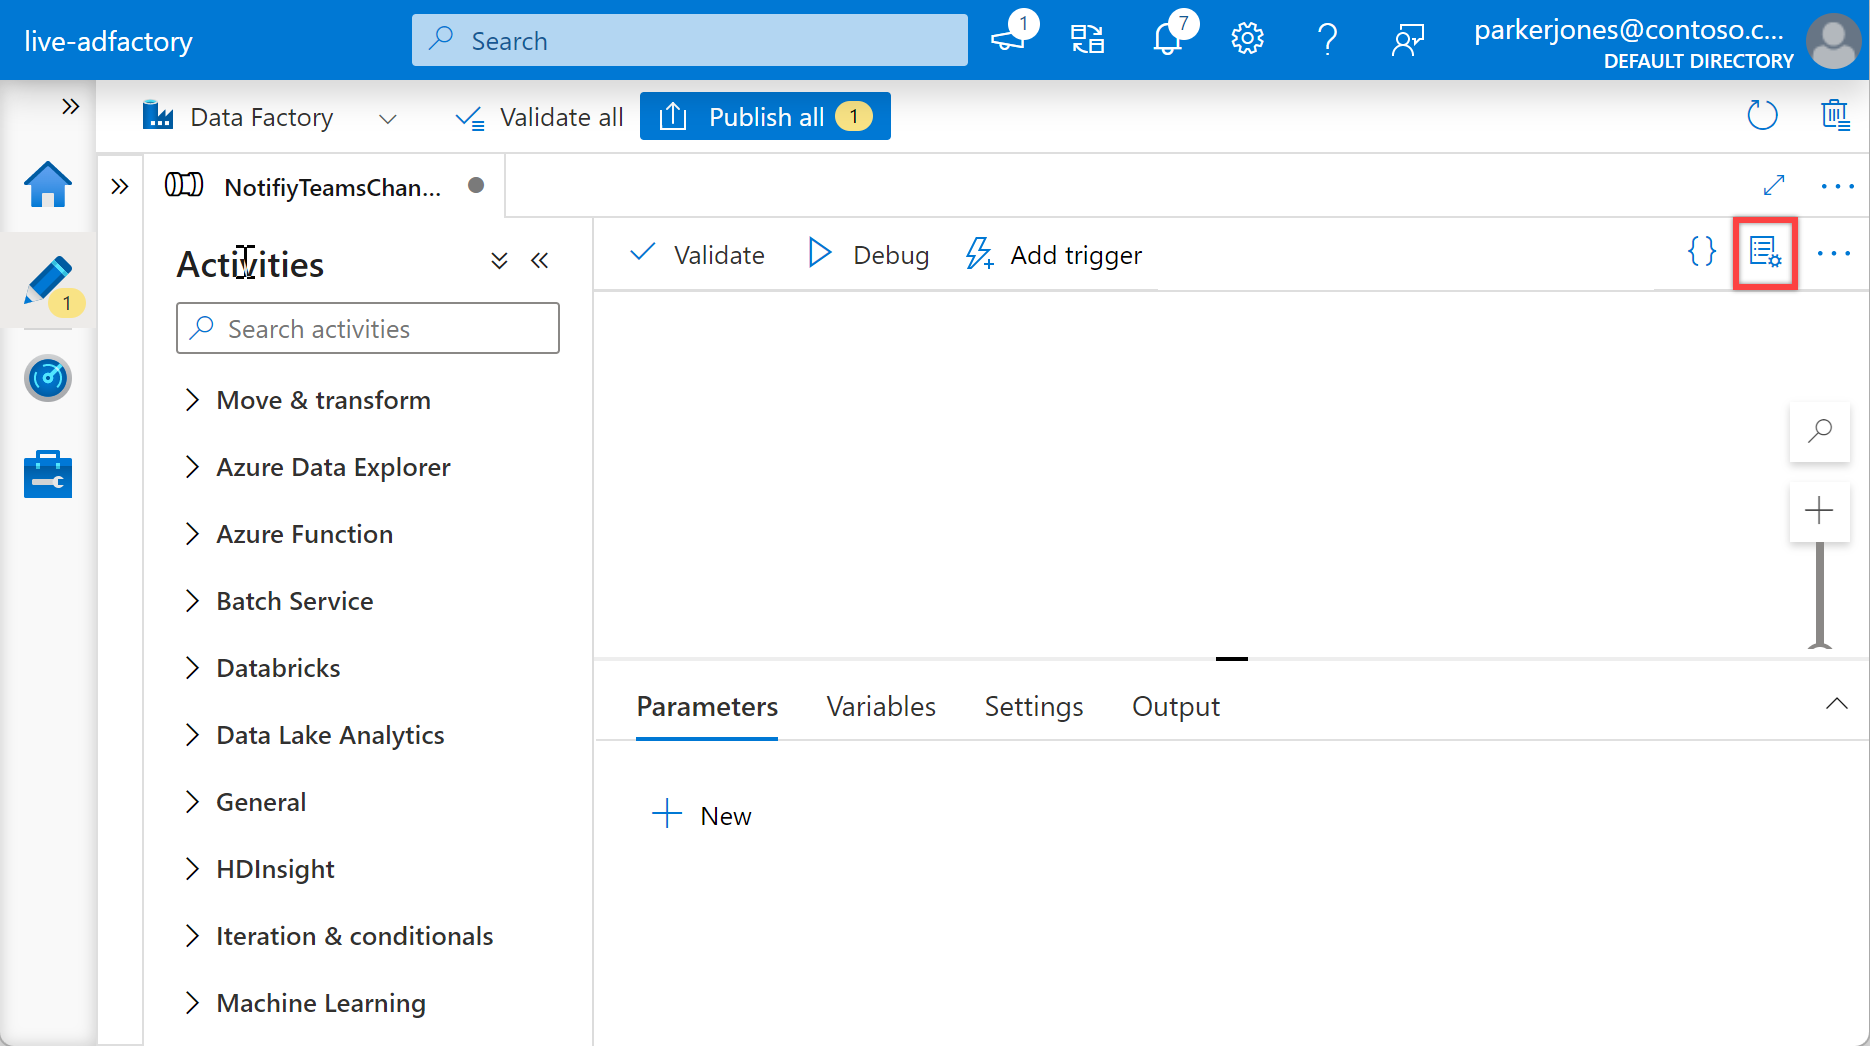
In the "Properties" pane under "General", specify NotifyTeamsChannelPipeline for Name. Then collapse the panel by clicking the Properties icon in the top-right corner.
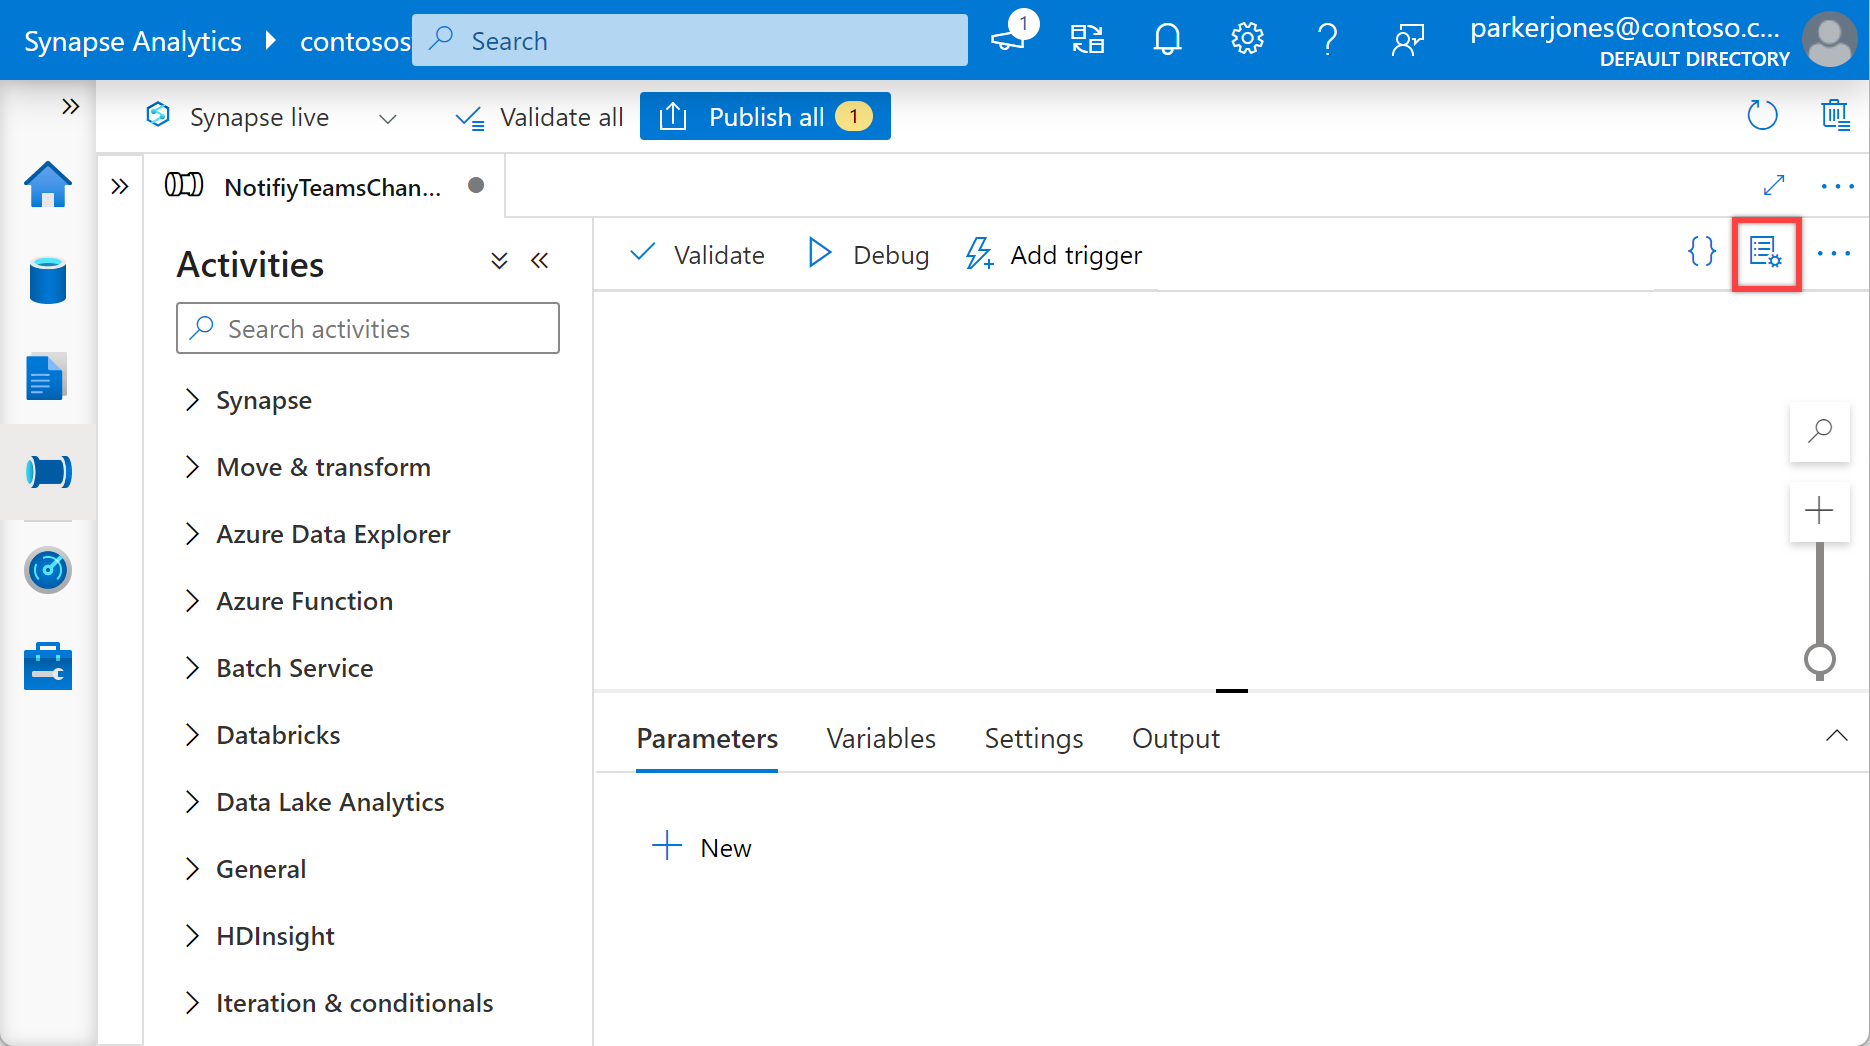
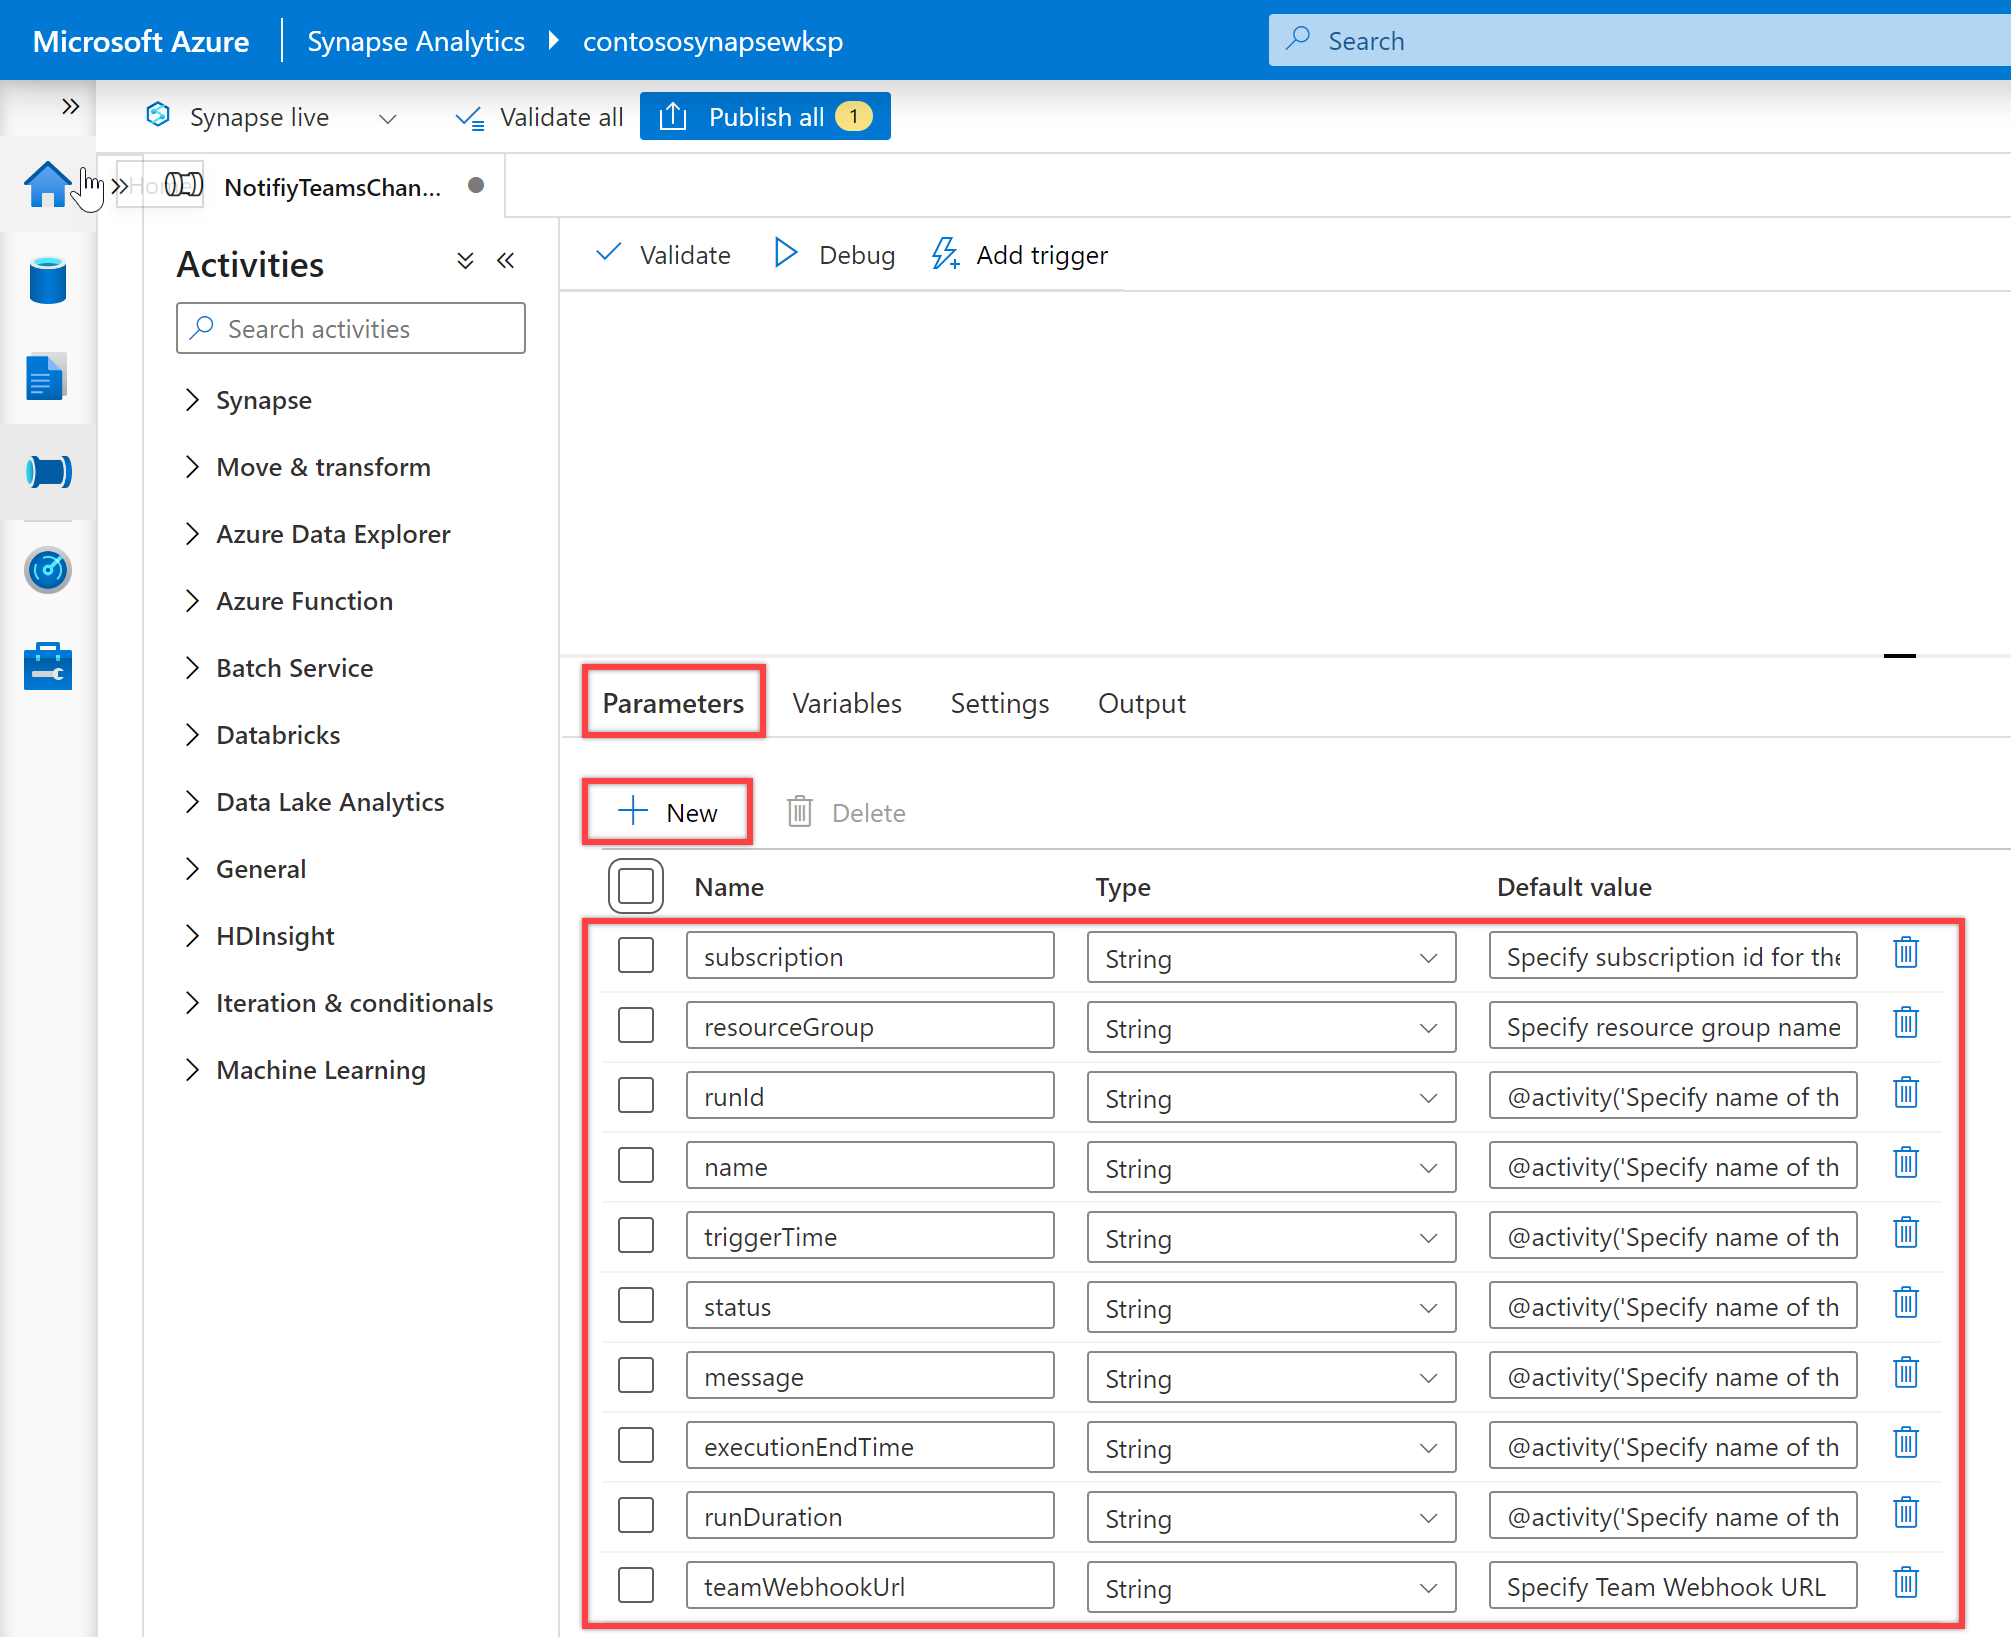
In the "Configurations" pane, select Parameters, and then select the + New button define following parameters for your pipeline.
Name Type Default Value subscription StringSpecify subscription id for the pipelineresourceGroup StringSpecify resource group name for the pipelinerunId String@activity('Specify name of the calling pipeline').output['pipelineRunId']name String@activity('Specify name of the calling pipeline').output['pipelineName']triggerTime String@activity('Specify name of the calling pipeline').ExecutionStartTimestatus String@activity('Specify name of the calling pipeline').Statusmessage String@activity('Specify name of the calling pipeline').Error['message']executionEndTime String@activity('Specify name of the calling pipeline').ExecutionEndTimerunDuration String@activity('Specify name of the calling pipeline').DurationteamWebhookUrl StringSpecify Team Webhook URL
Note
These parameters are used to construct the monitoring URL. Suppose you do not provide a valid subscription and resource group (of the same data factory where the pipelines belong). In that case, the notification will not contain a valid pipeline monitoring URL, but the messages will still work. Additionally, adding these parameters helps prevent the need to always pass those values from another pipeline. If you intend to control those values through a metadata-driven approach, then you should modify them accordingly.
Tip
We recommend adding the current Data Factory Subscription ID, Resource Group, and the Teams webhook URL (refer to prerequisites) for the default value of the relevant parameters.
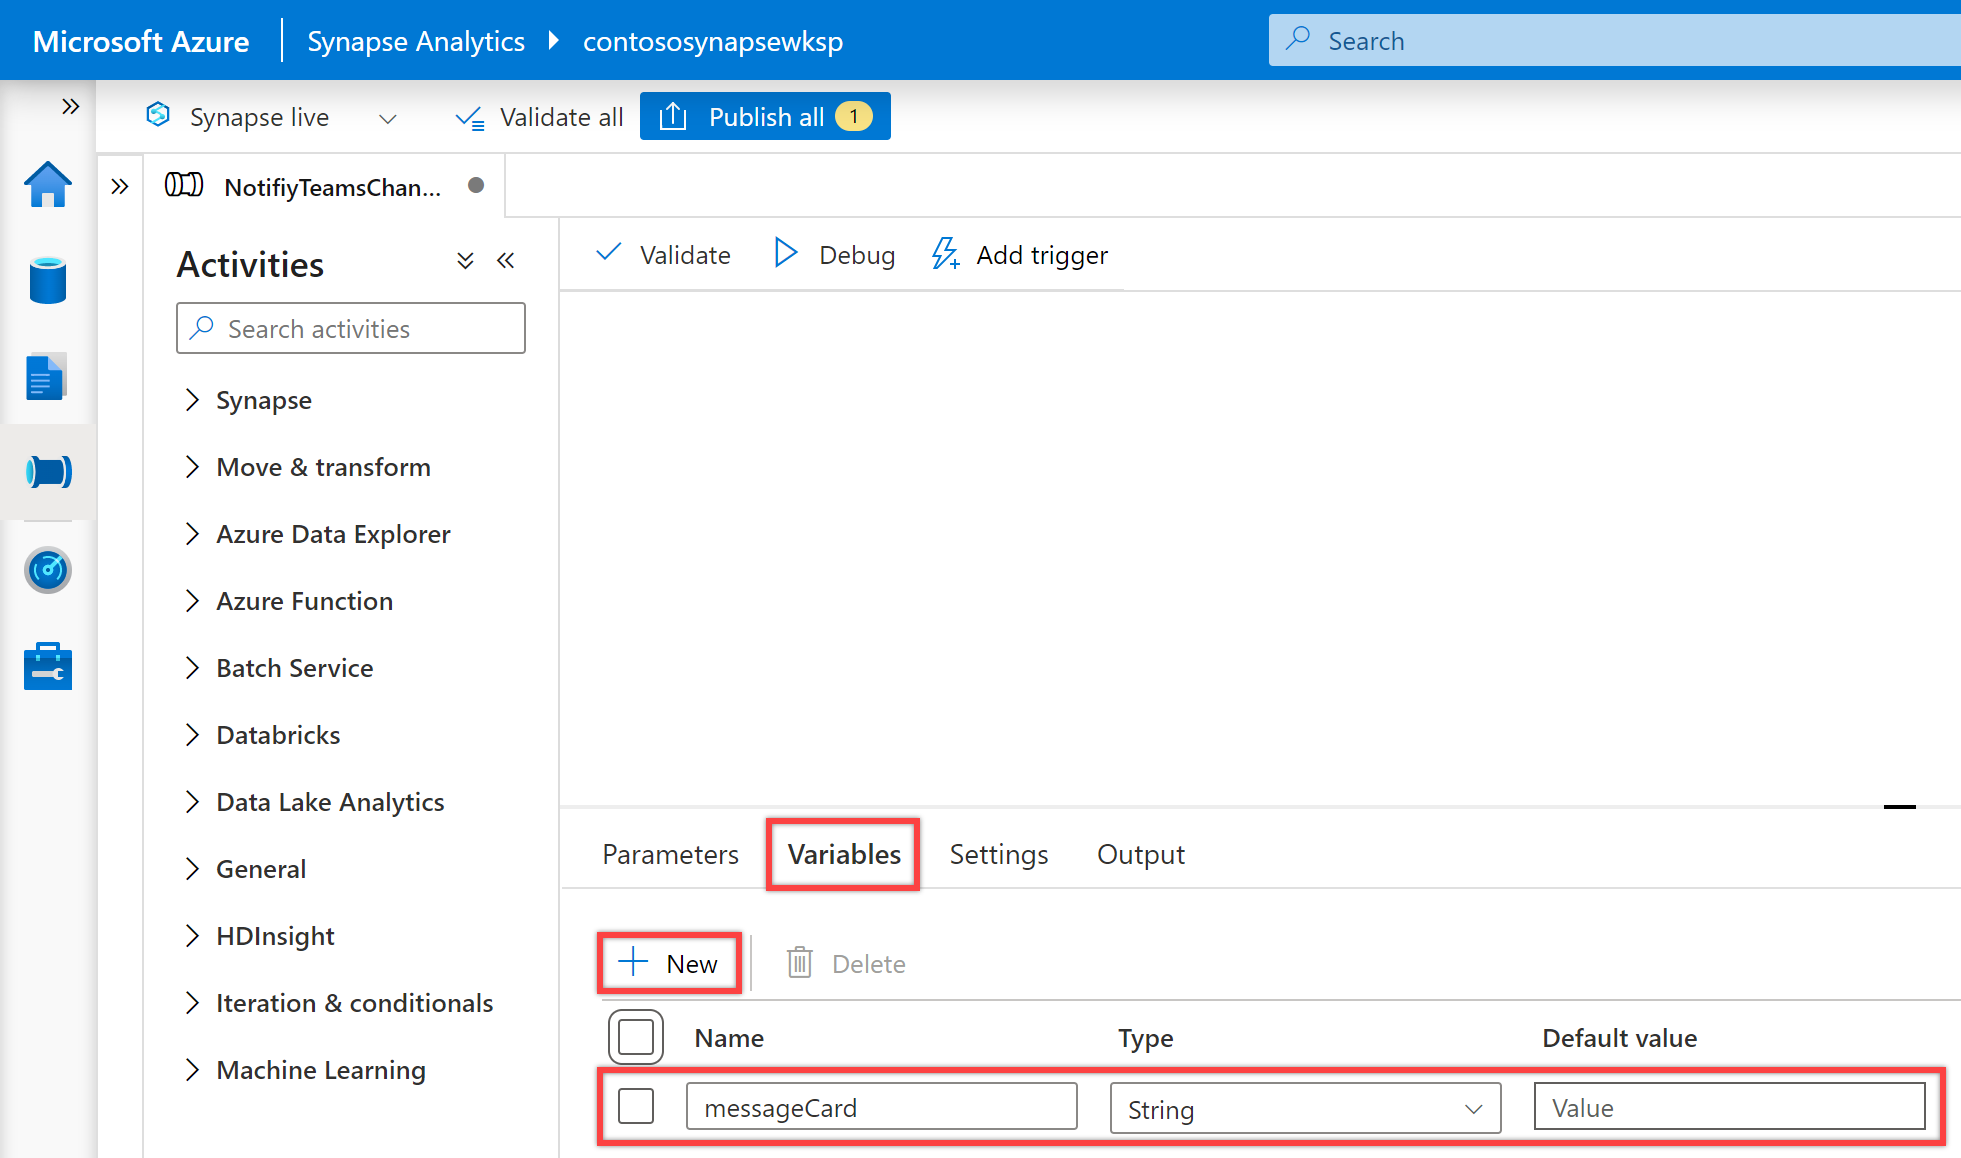
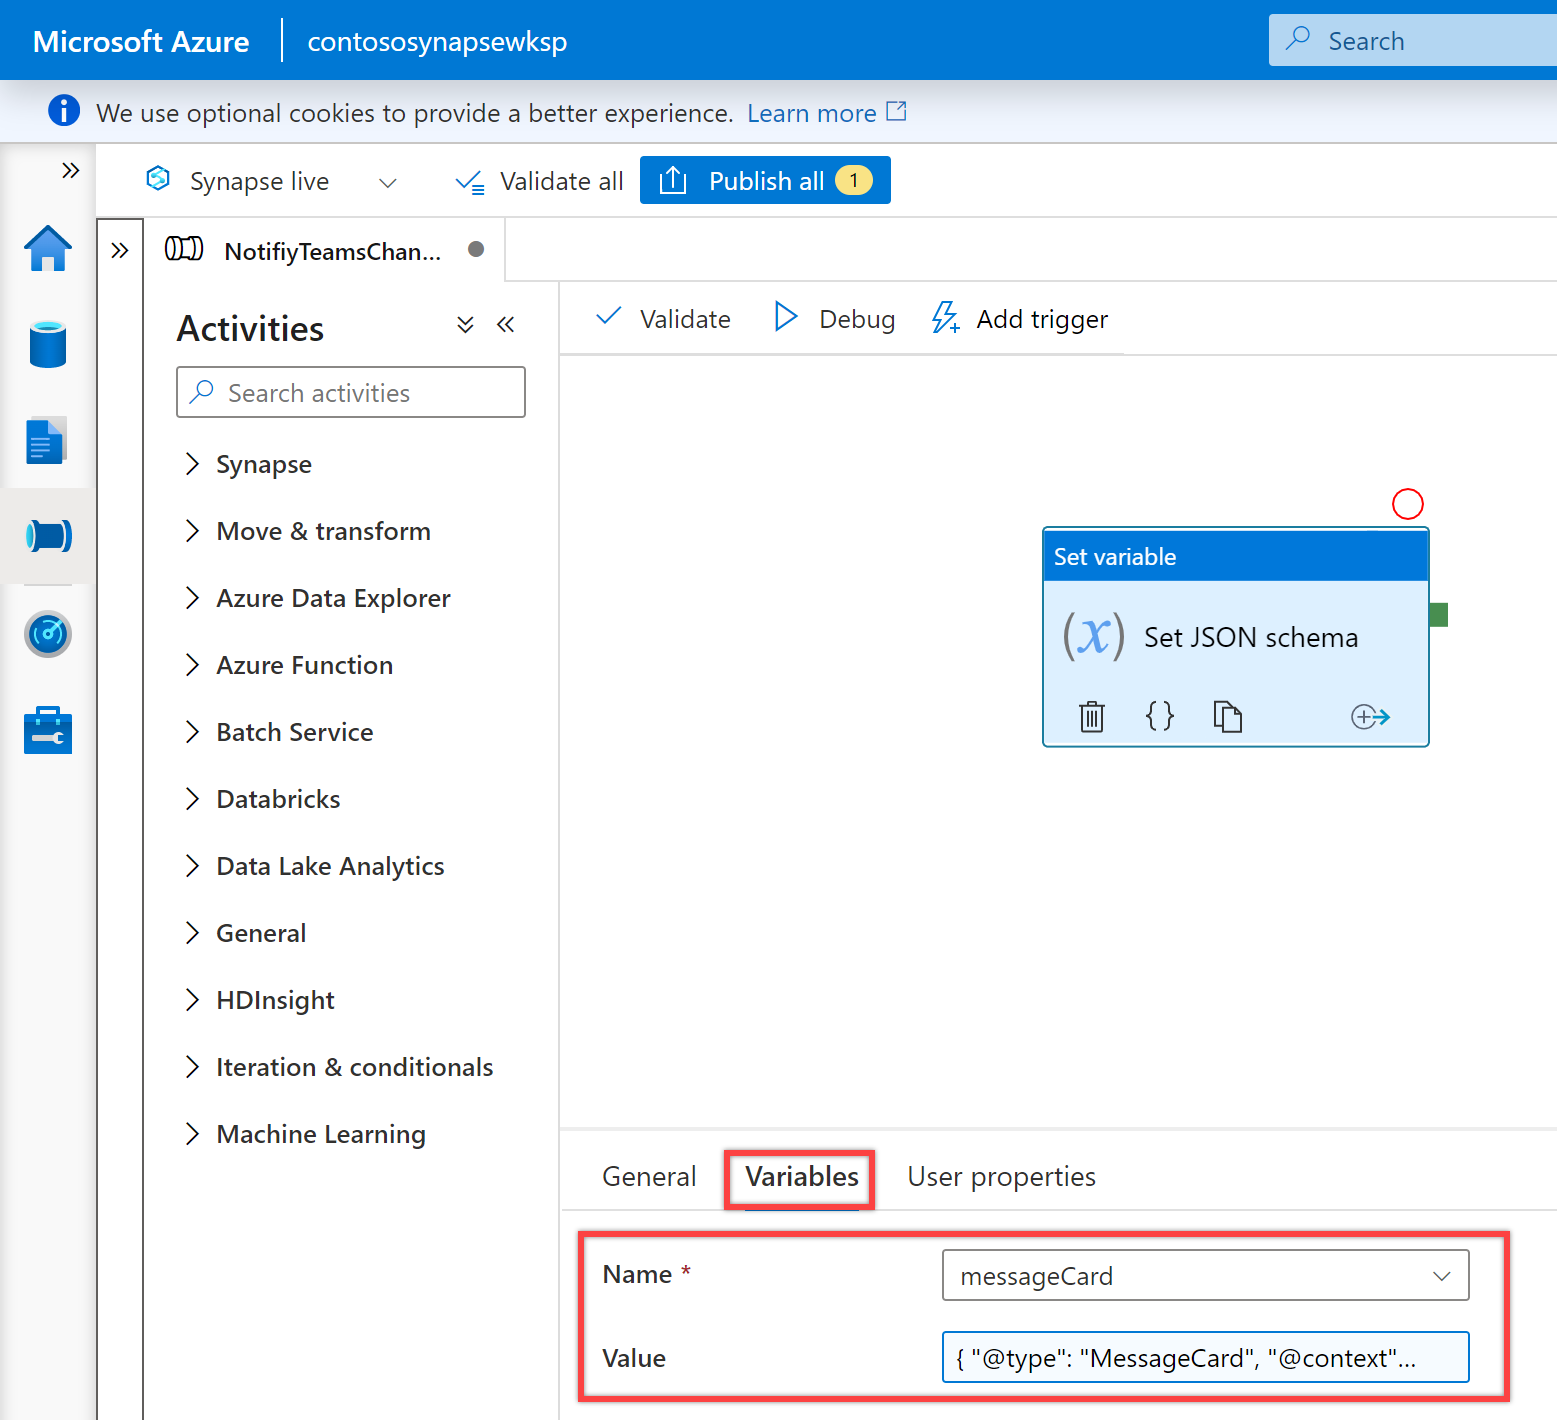
In the "Configurations" pane, select Variables, and then select the + New button define following variables for your pipeline.
Name Type Default Value messageCard String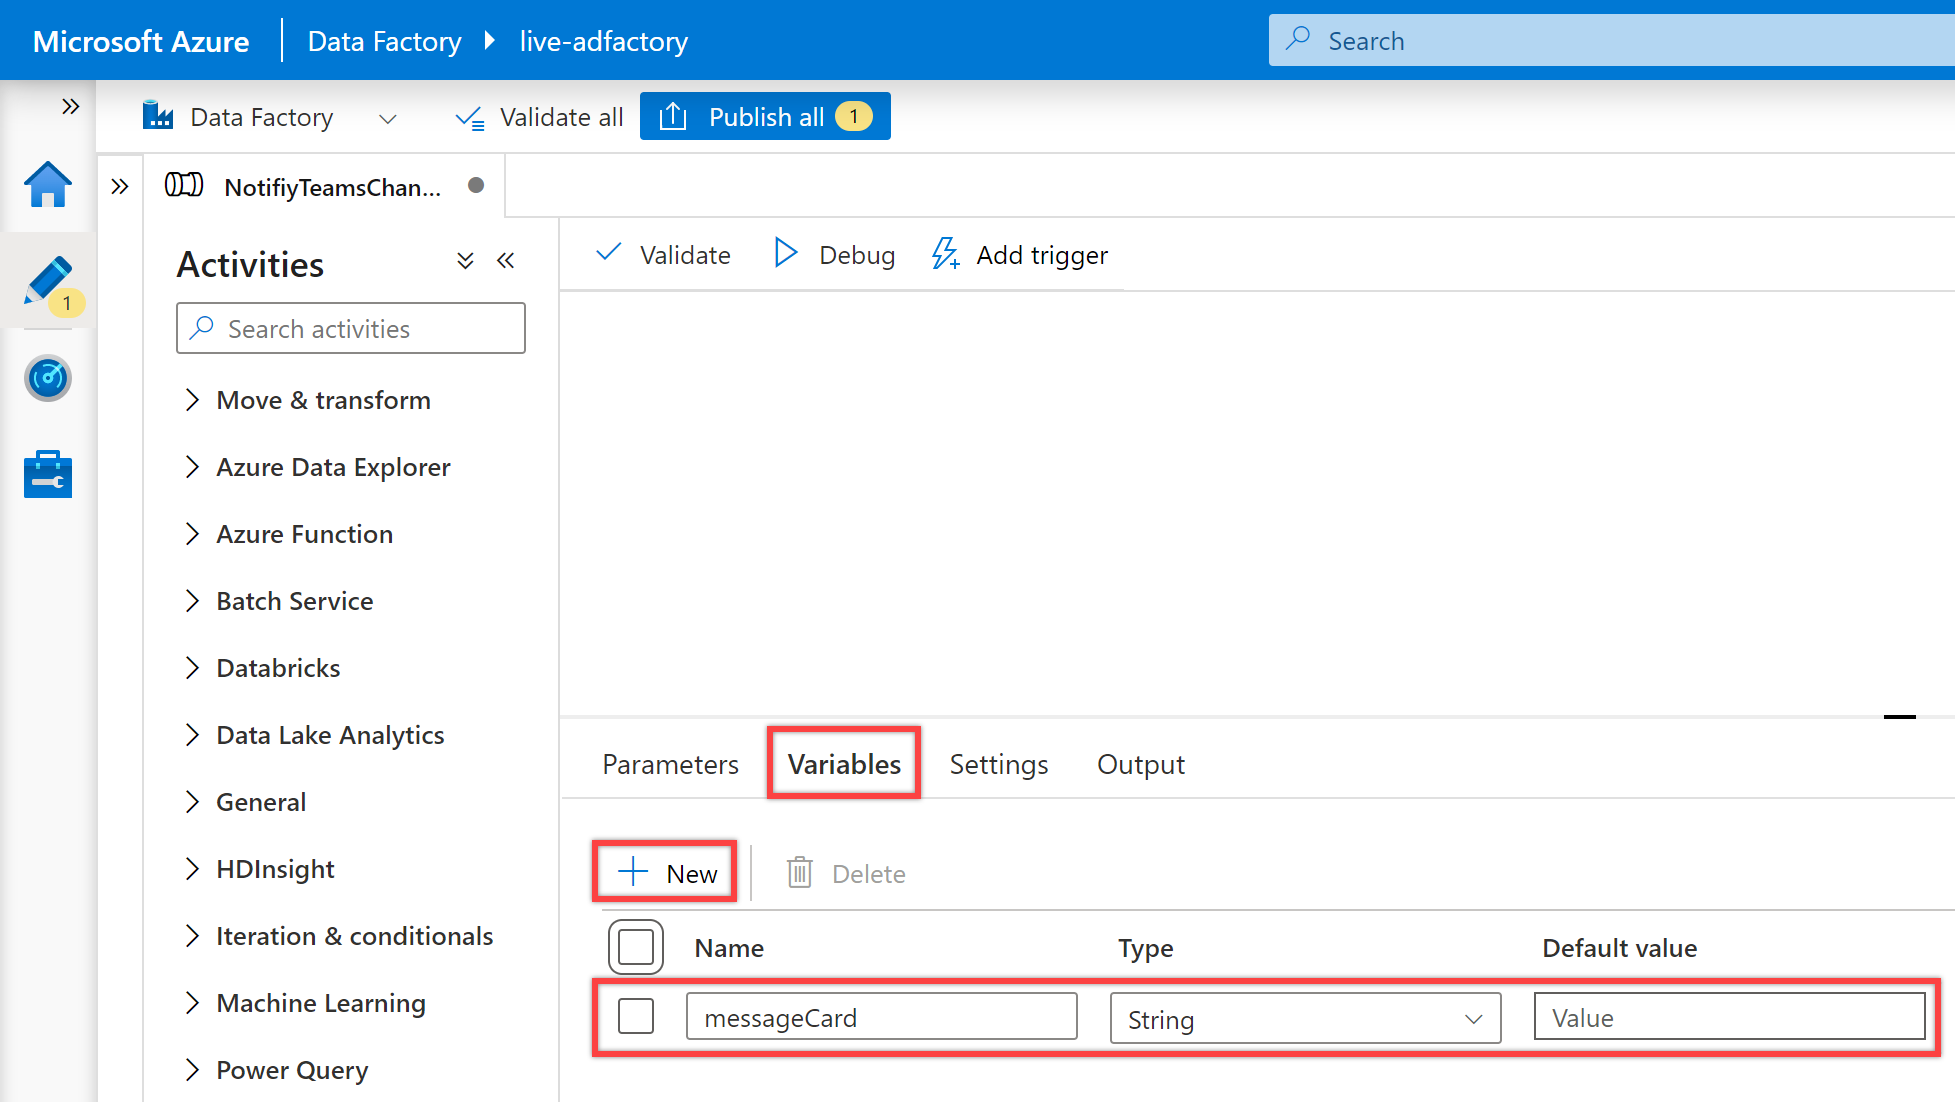
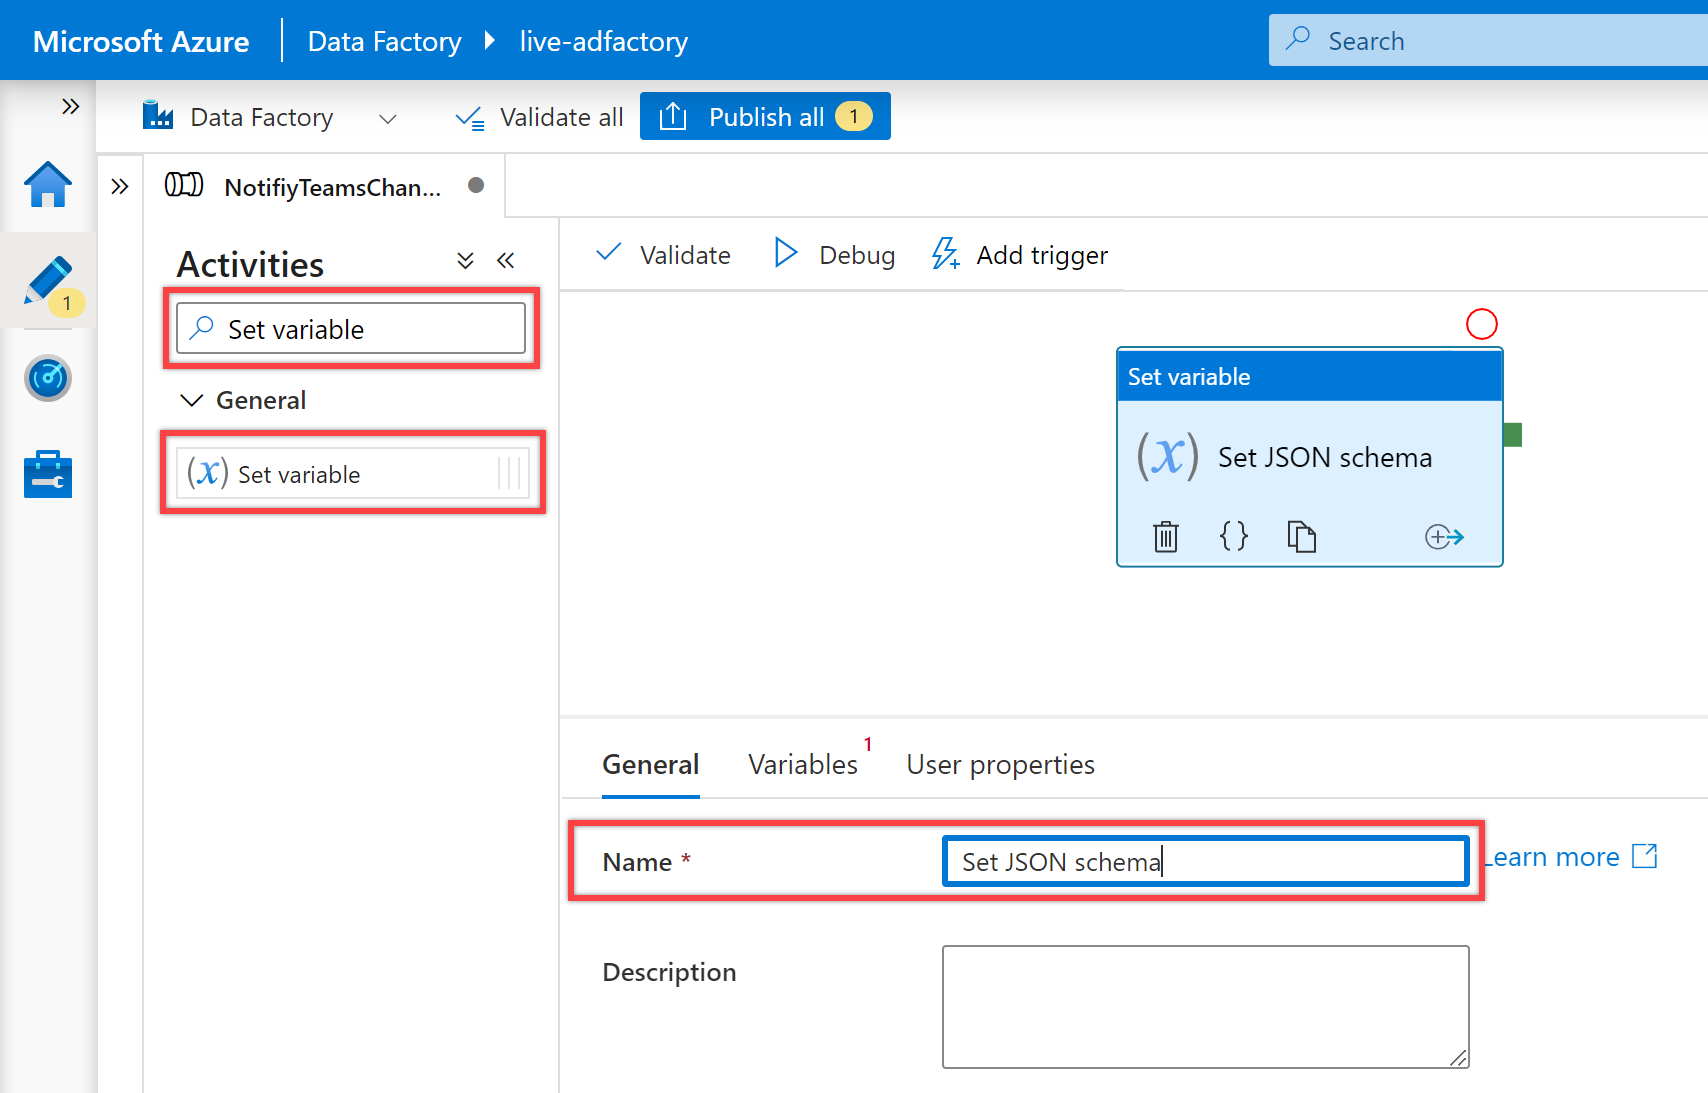
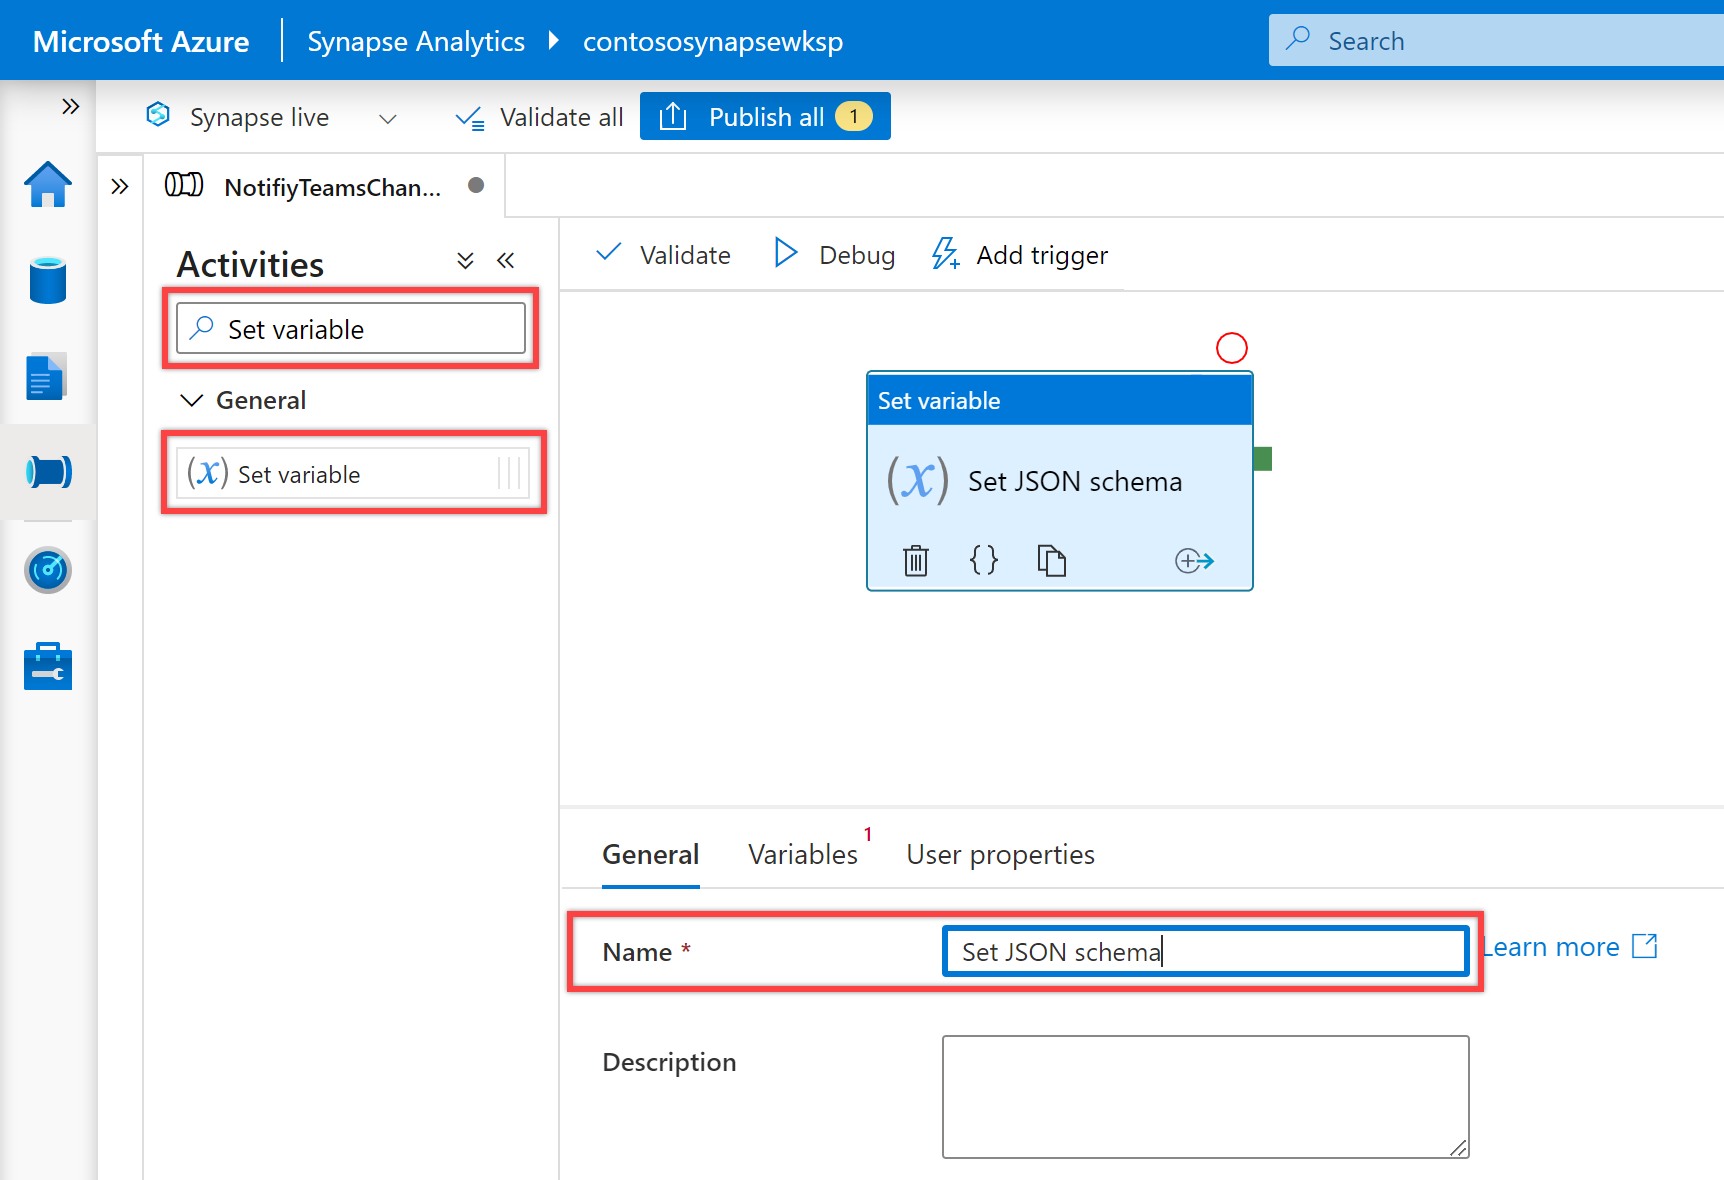
Search for "Set variable" in the pipeline "Activities" pane, and drag a Set Variable activity to the pipeline canvas.
Select the Set Variable activity on the canvas if it isn't already selected, and its "General" tab, to edit its details.
In the "General" tab, specify Set JSON schema for Name of the Set Variable activity.
In the "Variables" tab, select messageCard variable for the Name property and enter the following JSON for its Value property:
{ "@type": "MessageCard", "@context": "http://schema.org/extensions", "themeColor": "0076D7", "summary": "Pipeline status alert message", "sections": [ { "activityTitle": "Pipeline execution alert", "facts": [ { "name": "Subscription Id:", "value": "@{pipeline().parameters.subscription}" }, { "name": "Resource Group:", "value": "@{pipeline().parameters.resourceGroup}" }, { "name": "Data Factory Name:", "value": "@{pipeline().DataFactory}" }, { "name": "Pipeline RunId:", "value": "@{pipeline().parameters.runId}" }, { "name": "Pipeline Name:", "value": "@{pipeline().Pipeline}" }, { "name": "Pipeline Status:", "value": "@{pipeline().parameters.status}" }, { "name": "Execution Start Time (UTC):", "value": "@{pipeline().parameters.triggerTime}" }, { "name": "Execution Finish Time (UTC):", "value": "@{pipeline().parameters.executionEndTime}" }, { "name": "Execution Duration (s):", "value": "@{pipeline().parameters.runDuration}" }, { "name": "Message:", "value": "@{pipeline().parameters.message}" }, { "name": "Notification Time (UTC):", "value": "@{utcnow()}" } ], "markdown": true } ], "potentialAction": [ { "@type": "OpenUri", "name": "View pipeline run", "targets": [ { "os": "default", "uri": "@{concat('https://synapse.azure.com/monitoring/pipelineruns/',pipeline().parameters.runId,'?factory=/subscriptions/',pipeline().parameters.subscription,'/resourceGroups/',pipeline().parameters.resourceGroup,'/providers/Microsoft.DataFactory/factories/',pipeline().DataFactory)}" } ] } ] }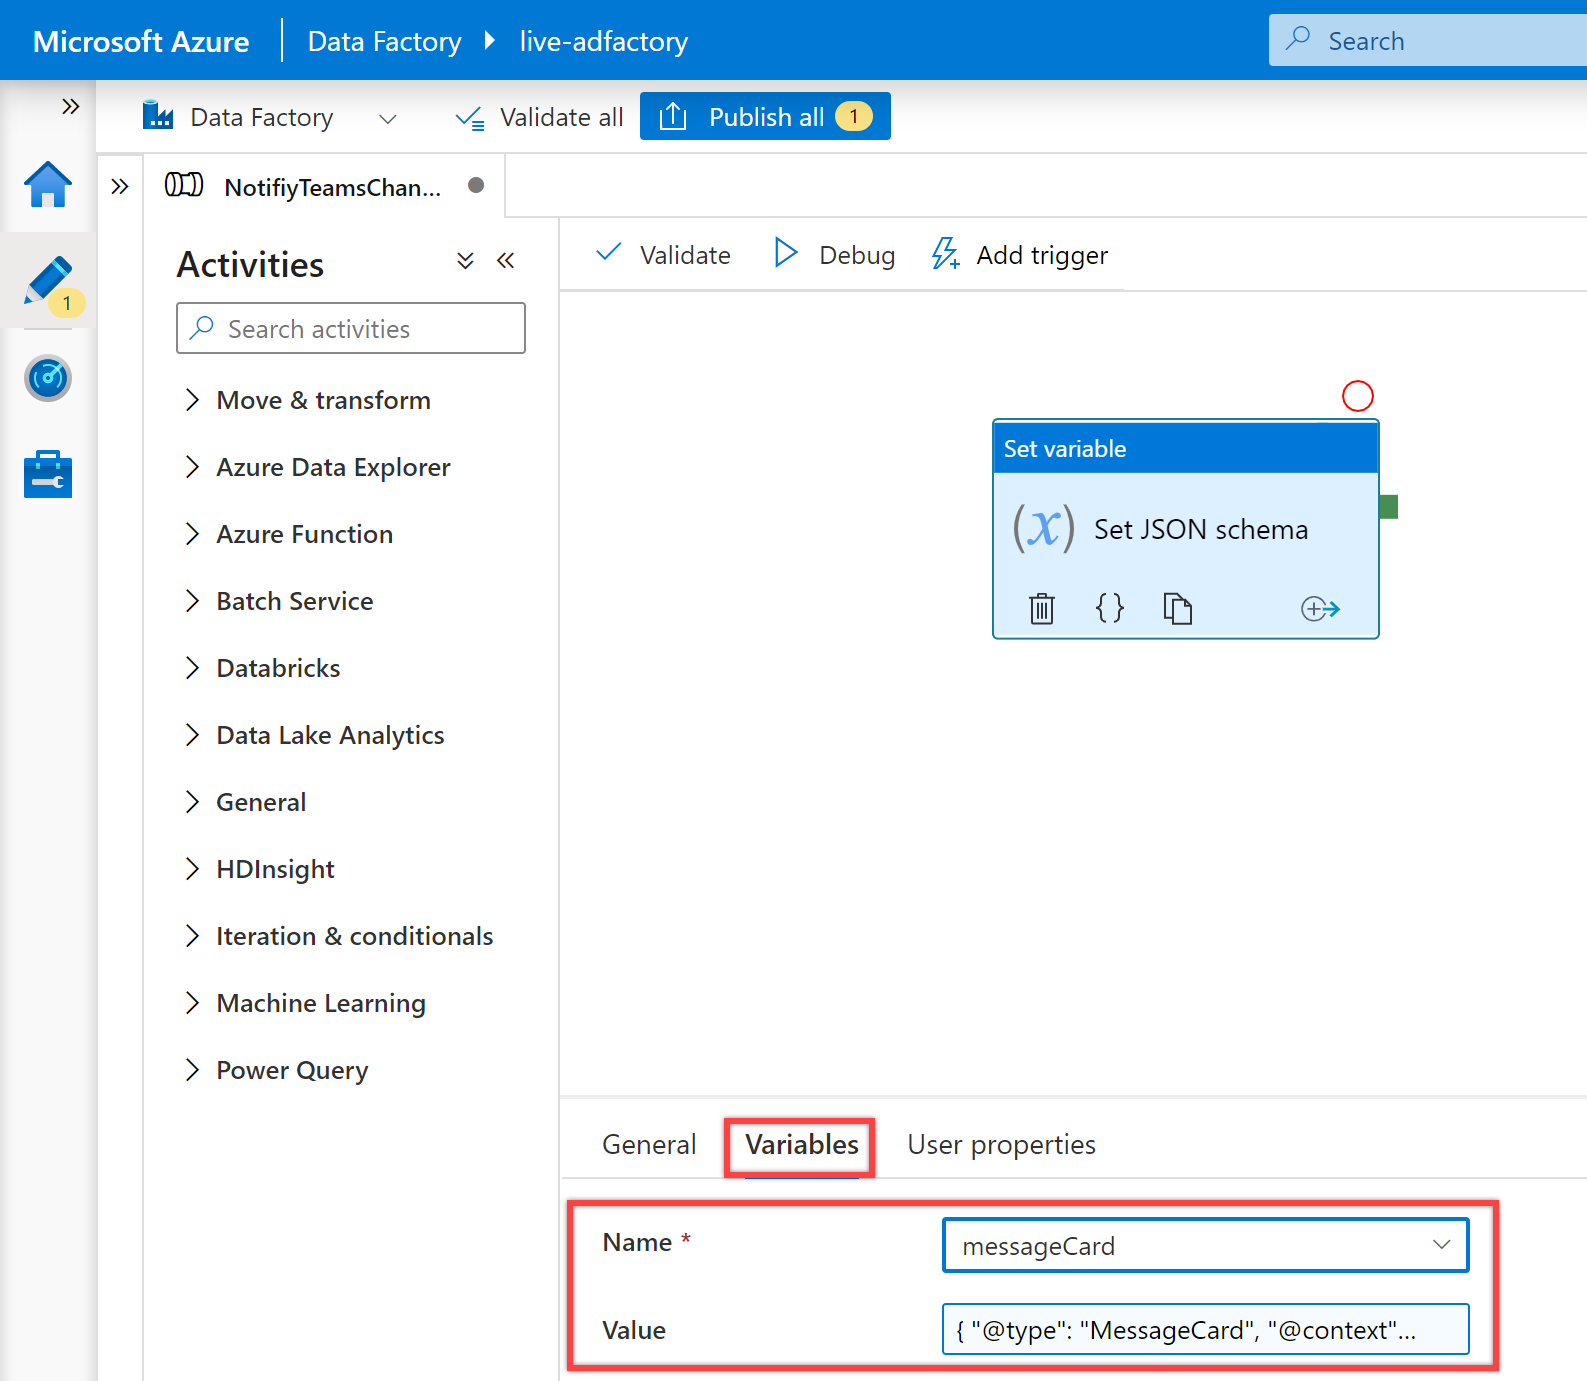
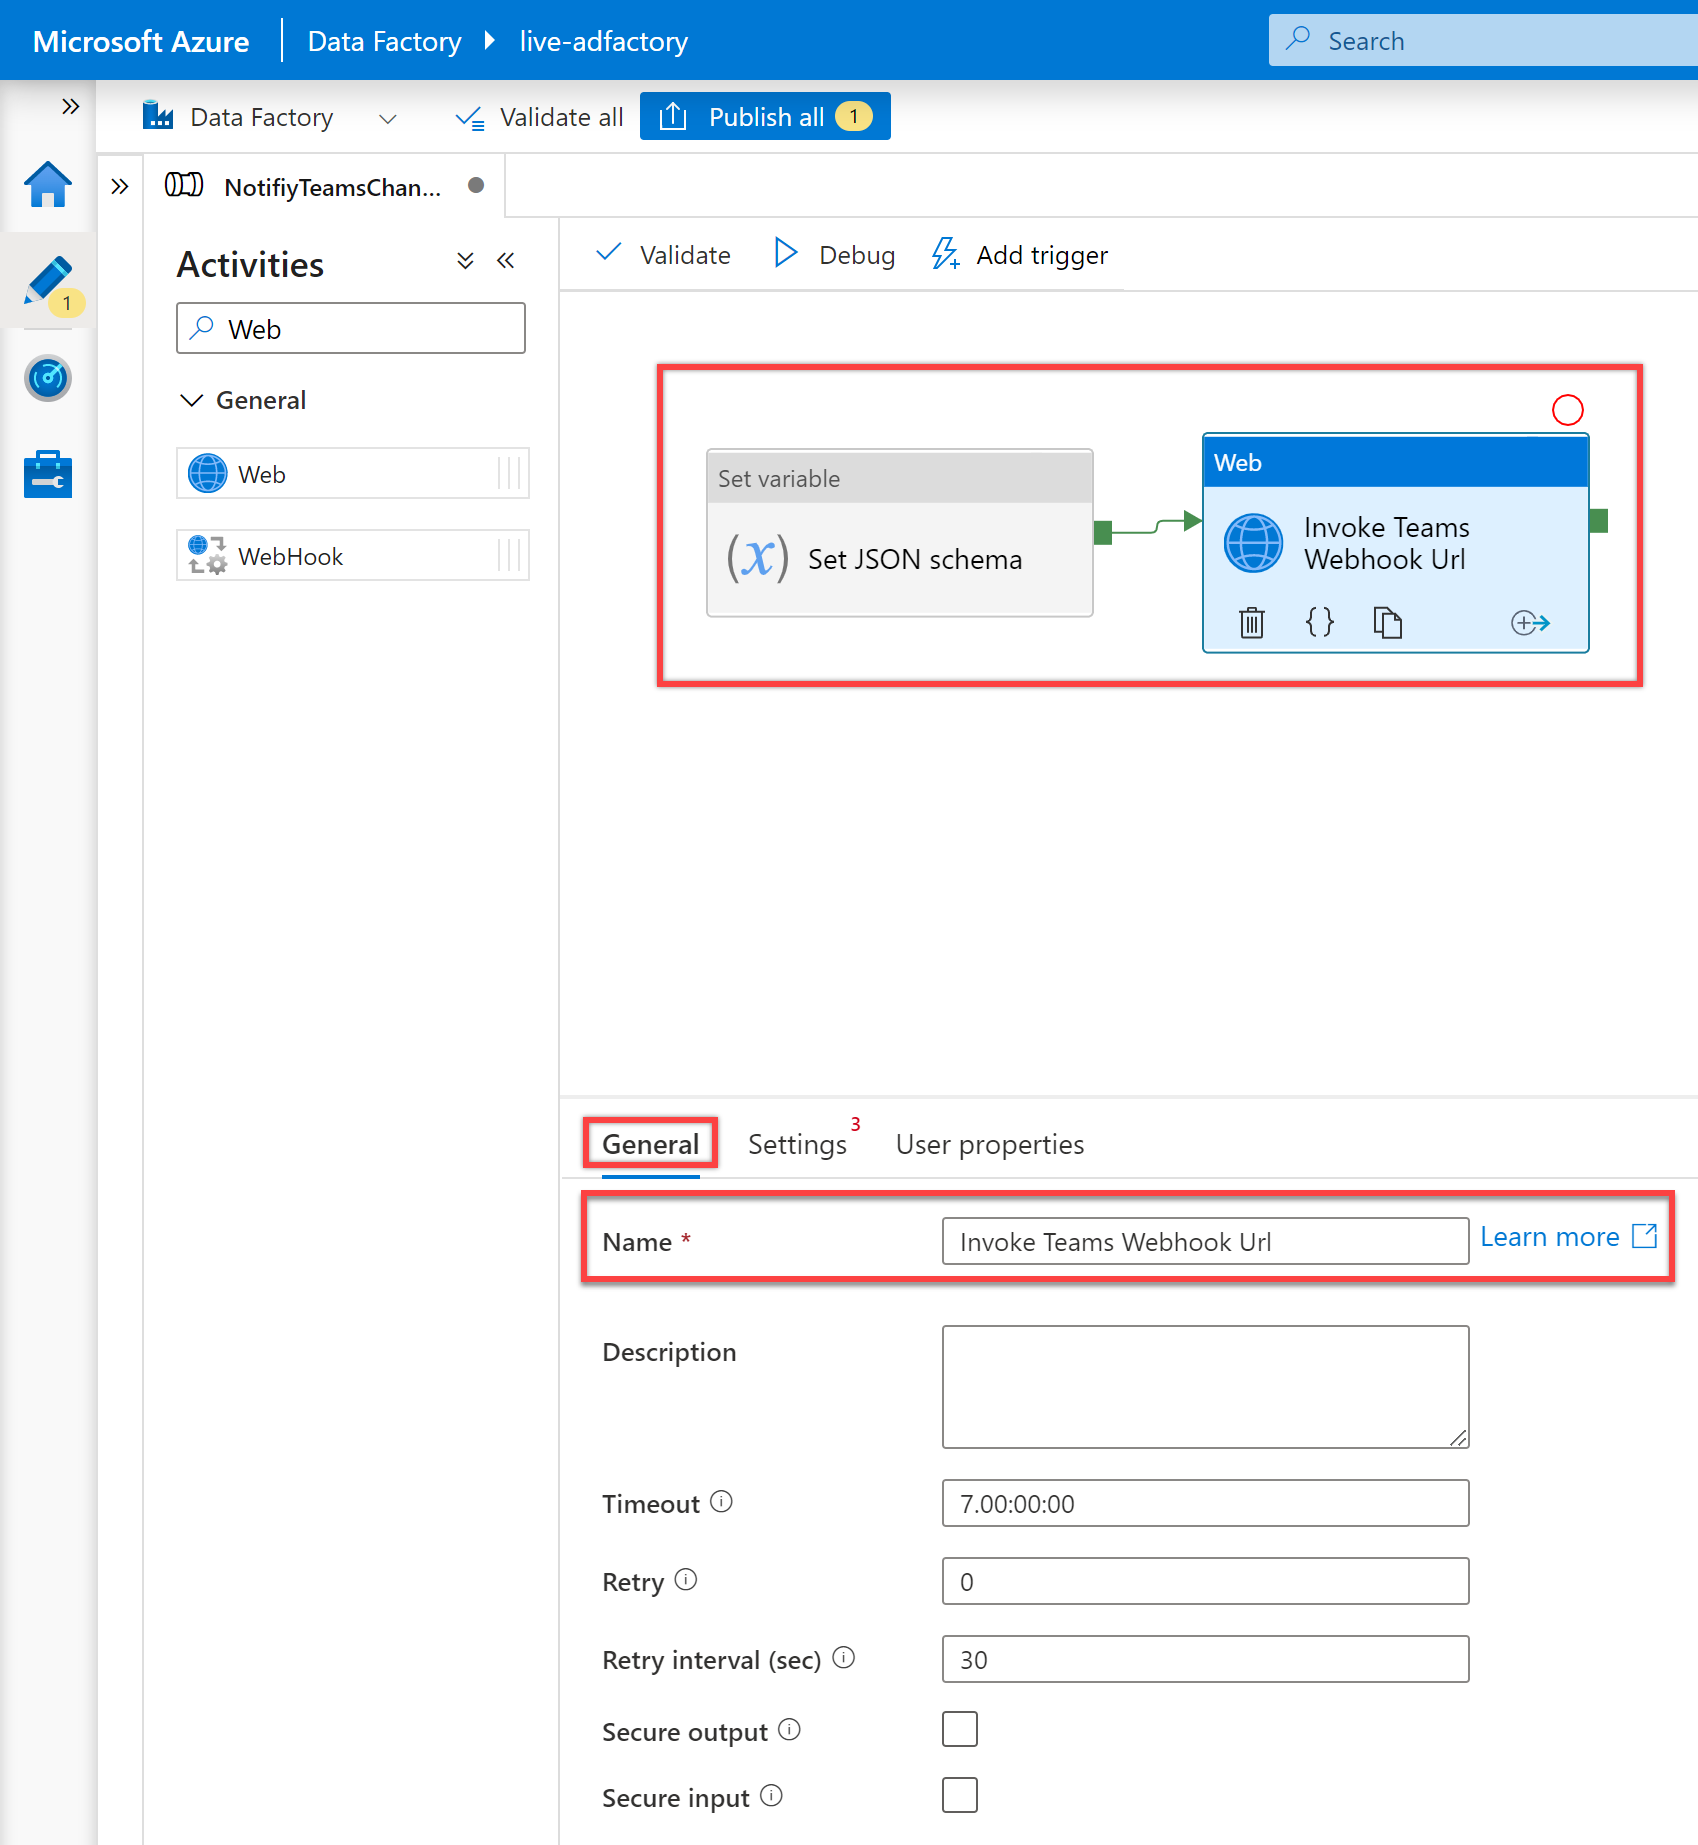
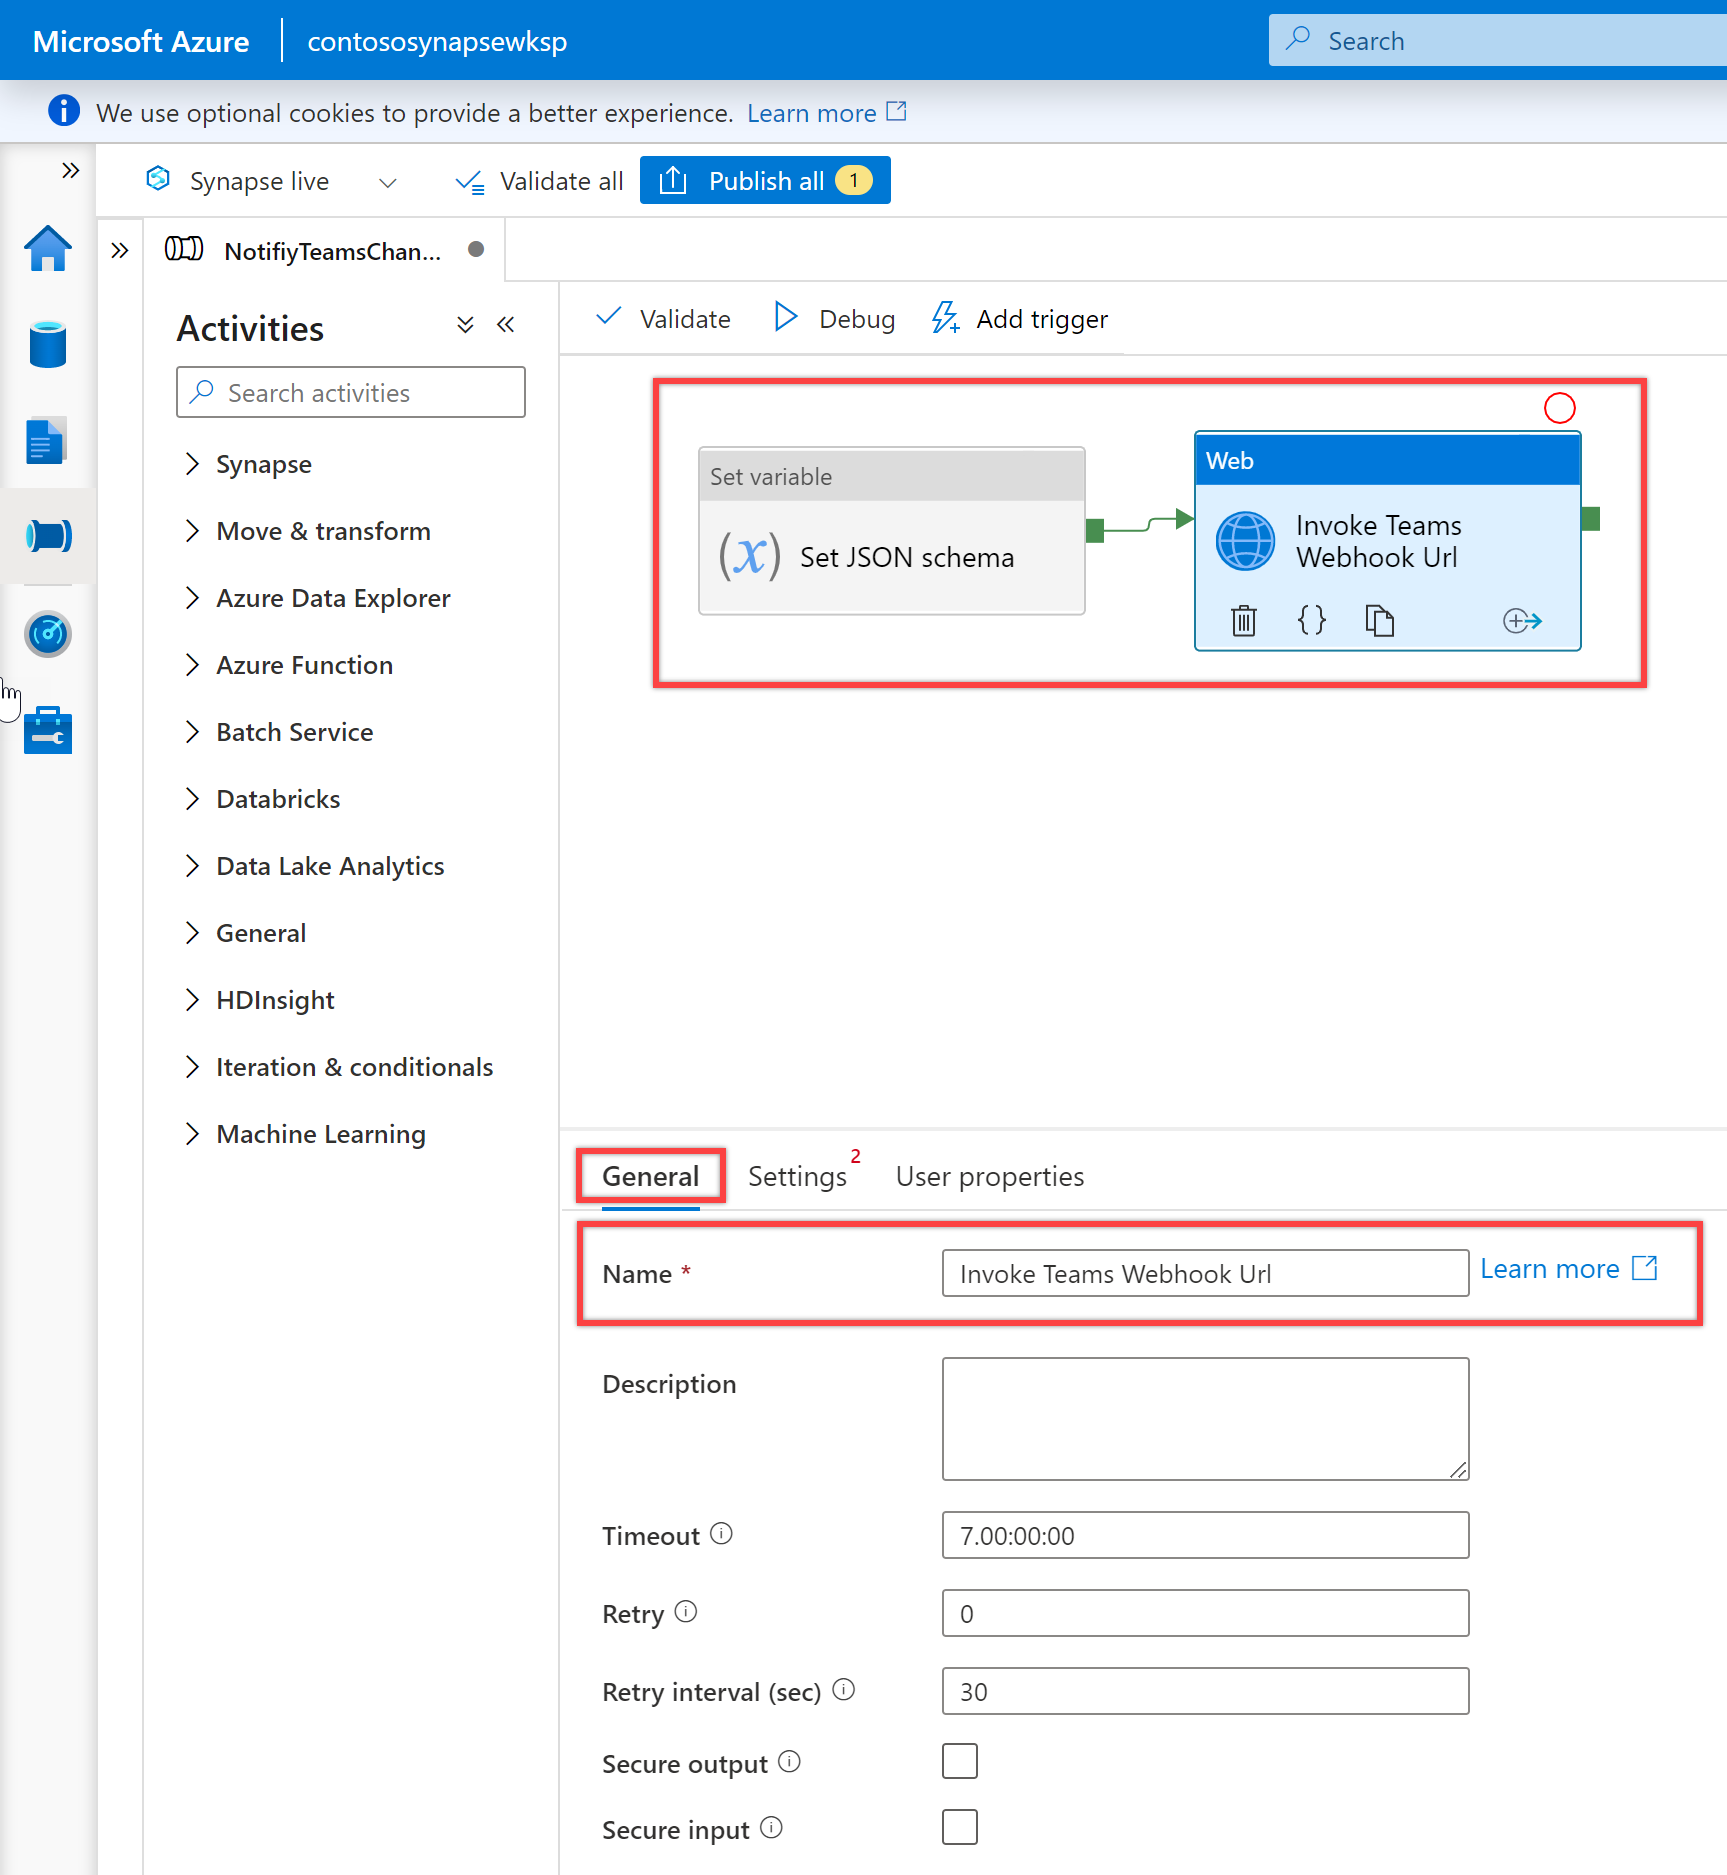
Search for "Web" in the pipeline "Activities" pane, and drag a Web activity to the pipeline canvas.
Create a dependency condition for the Web activity so that it only runs if the Set Variable activity succeeds. To create this dependency, select the green handle on the right side of the Set Variable activity, drag it, and connect it to the Web activity.
Select the new Web activity on the canvas if it isn't already selected, and its "General" tab, to edit its details.
In the "General" pane, specify Invoke Teams Webhook Url for Name of the Web activity.
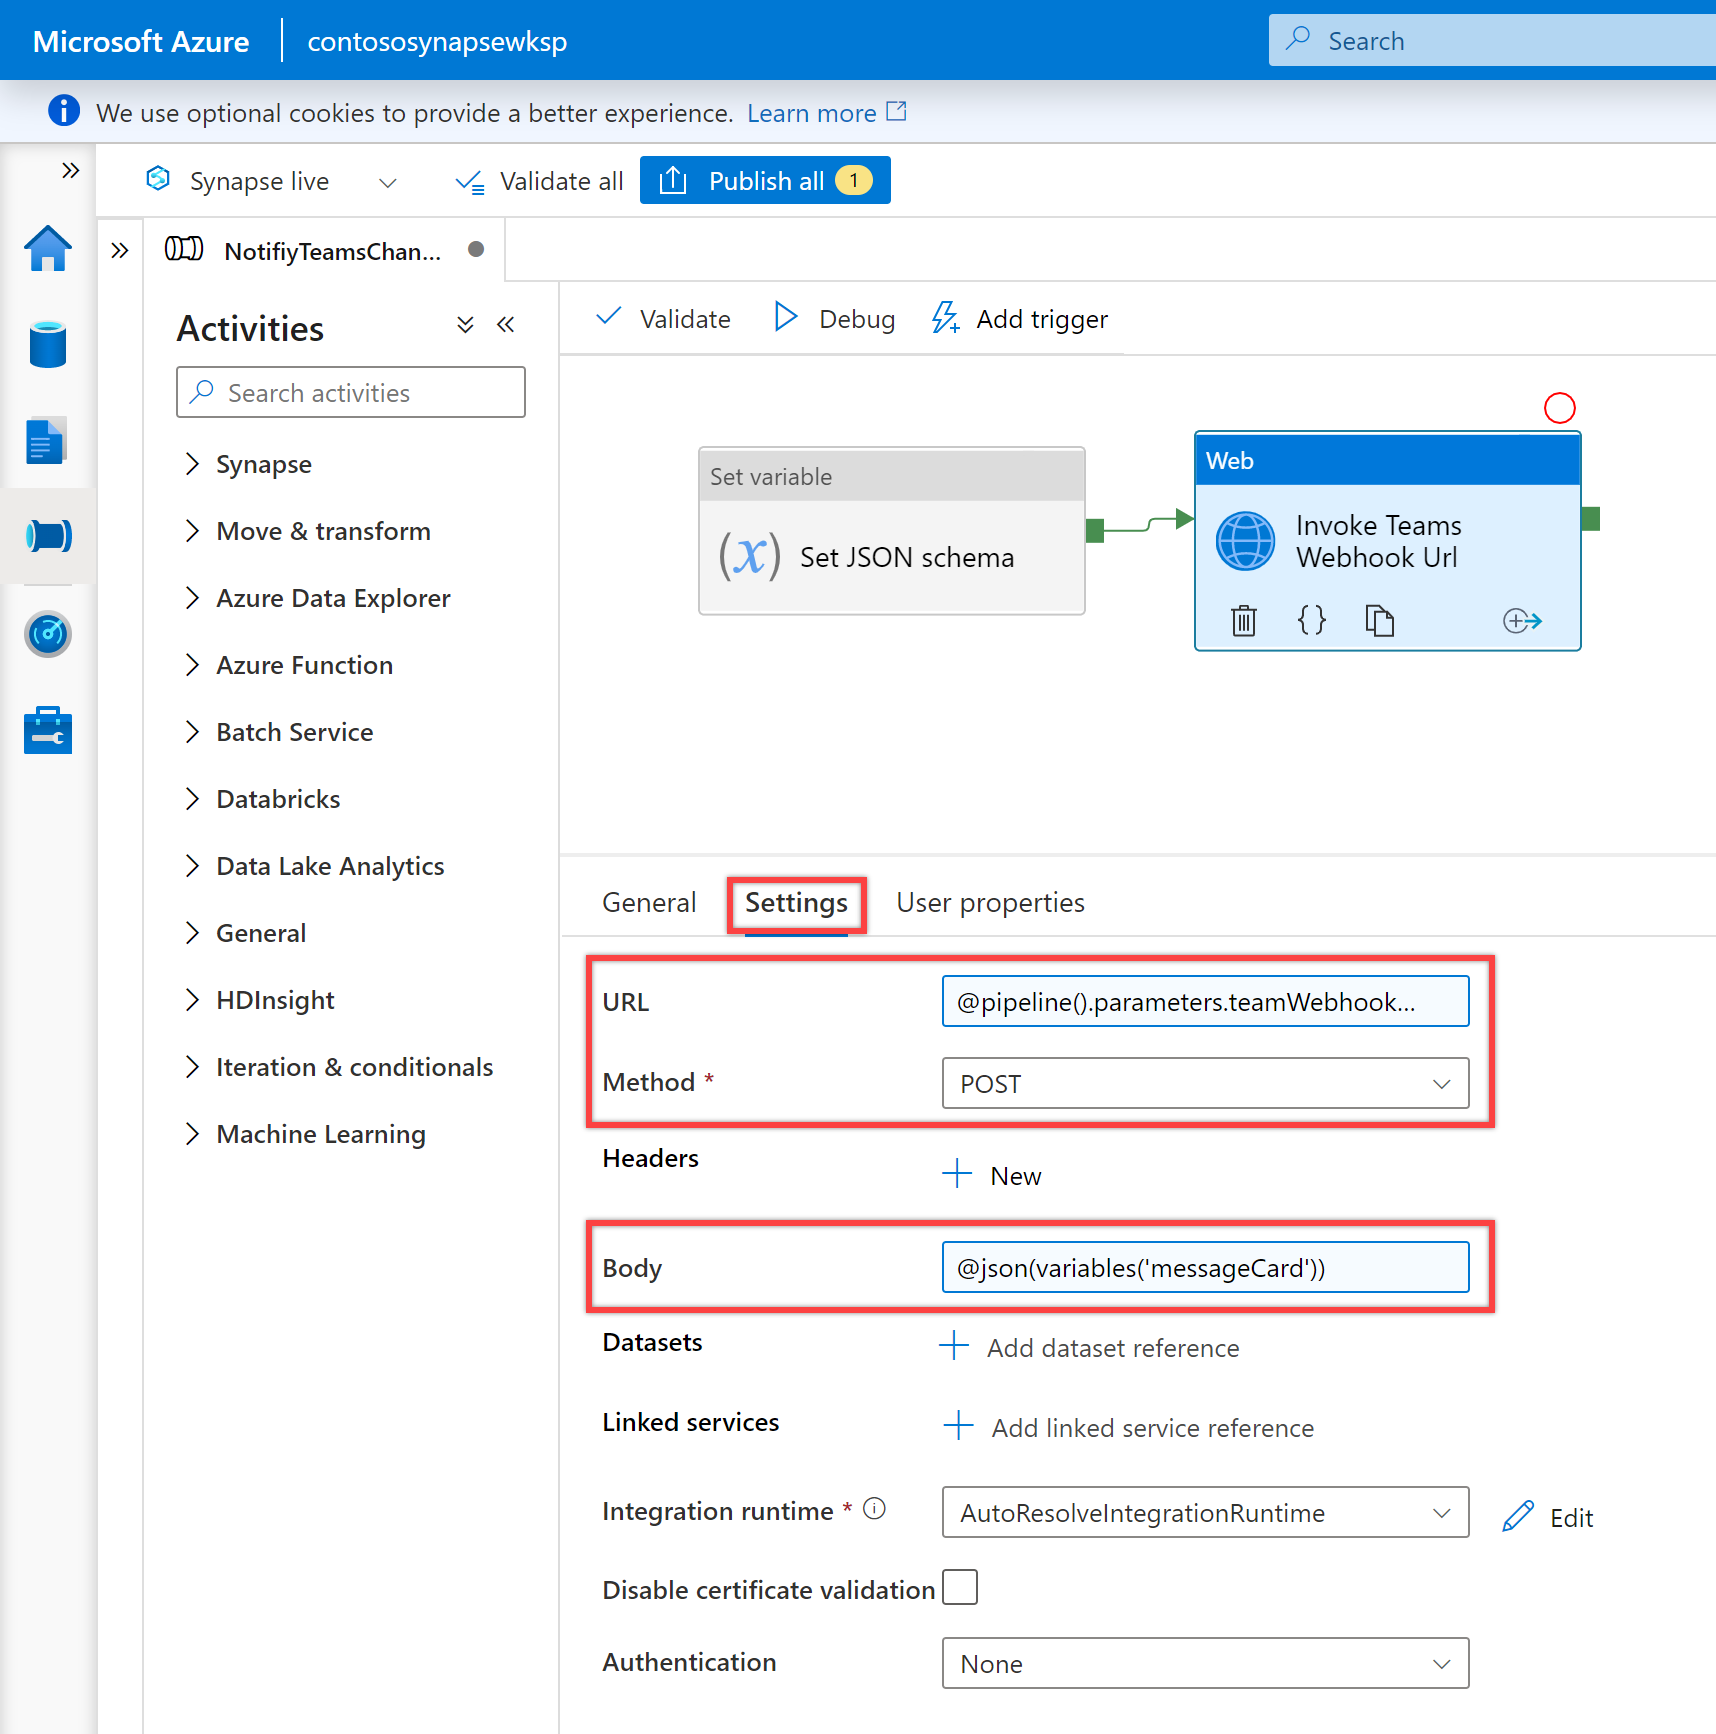
In the "Settings" pane, set following properties as follows:
Property value URL @pipeline().parameters.teamWebhookUrlMethod POSTBody @json(variables('messageCard'))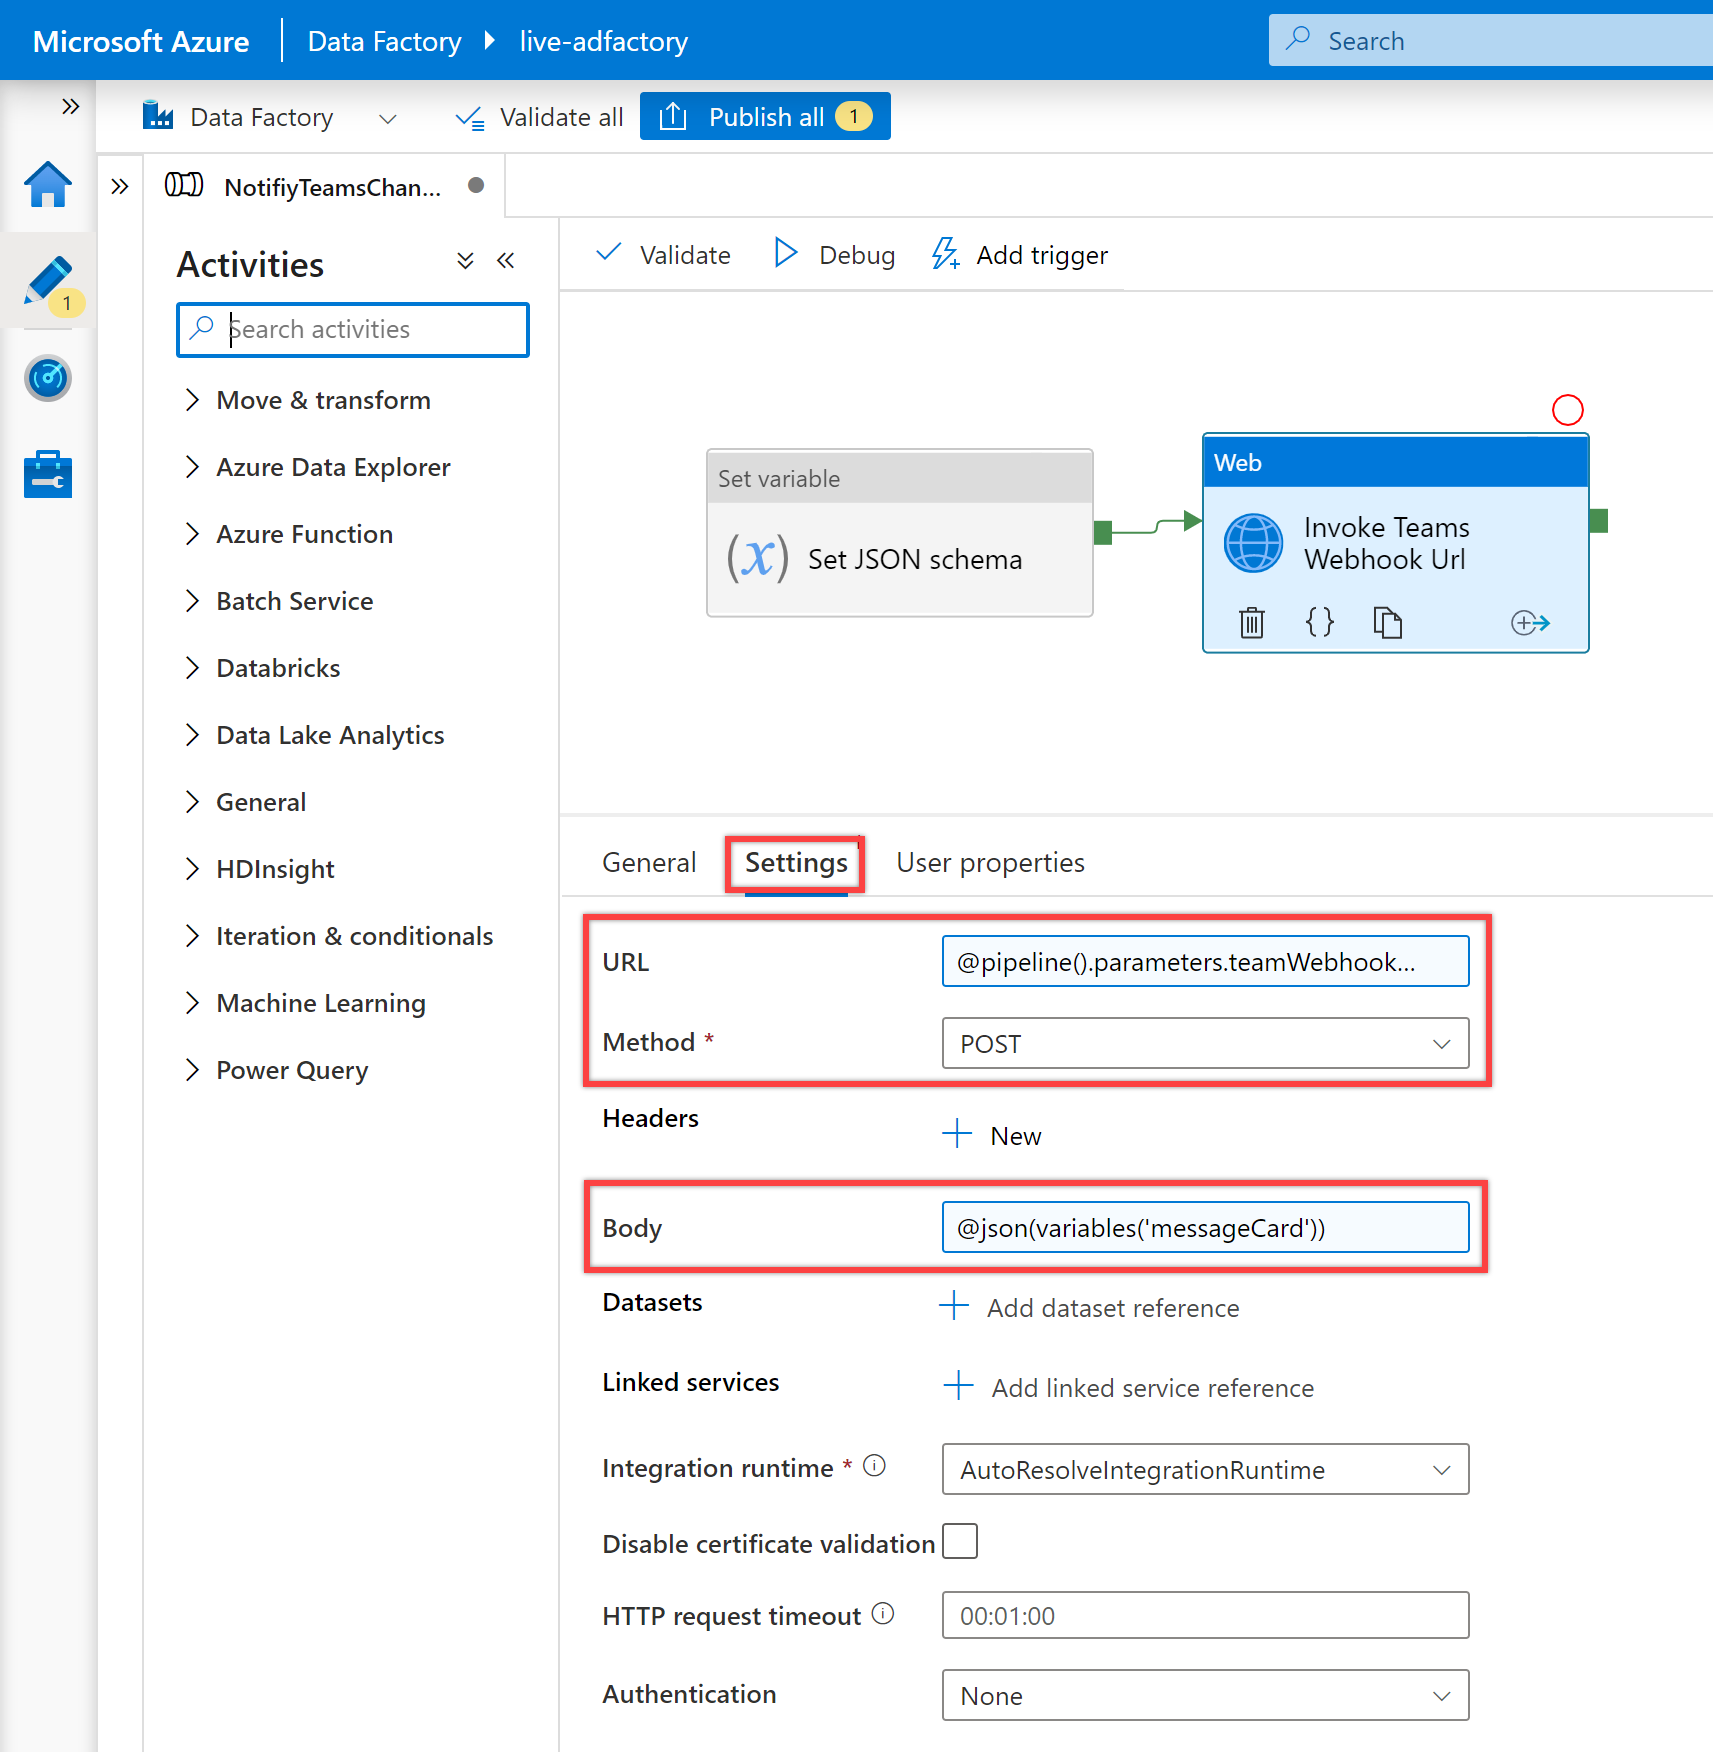
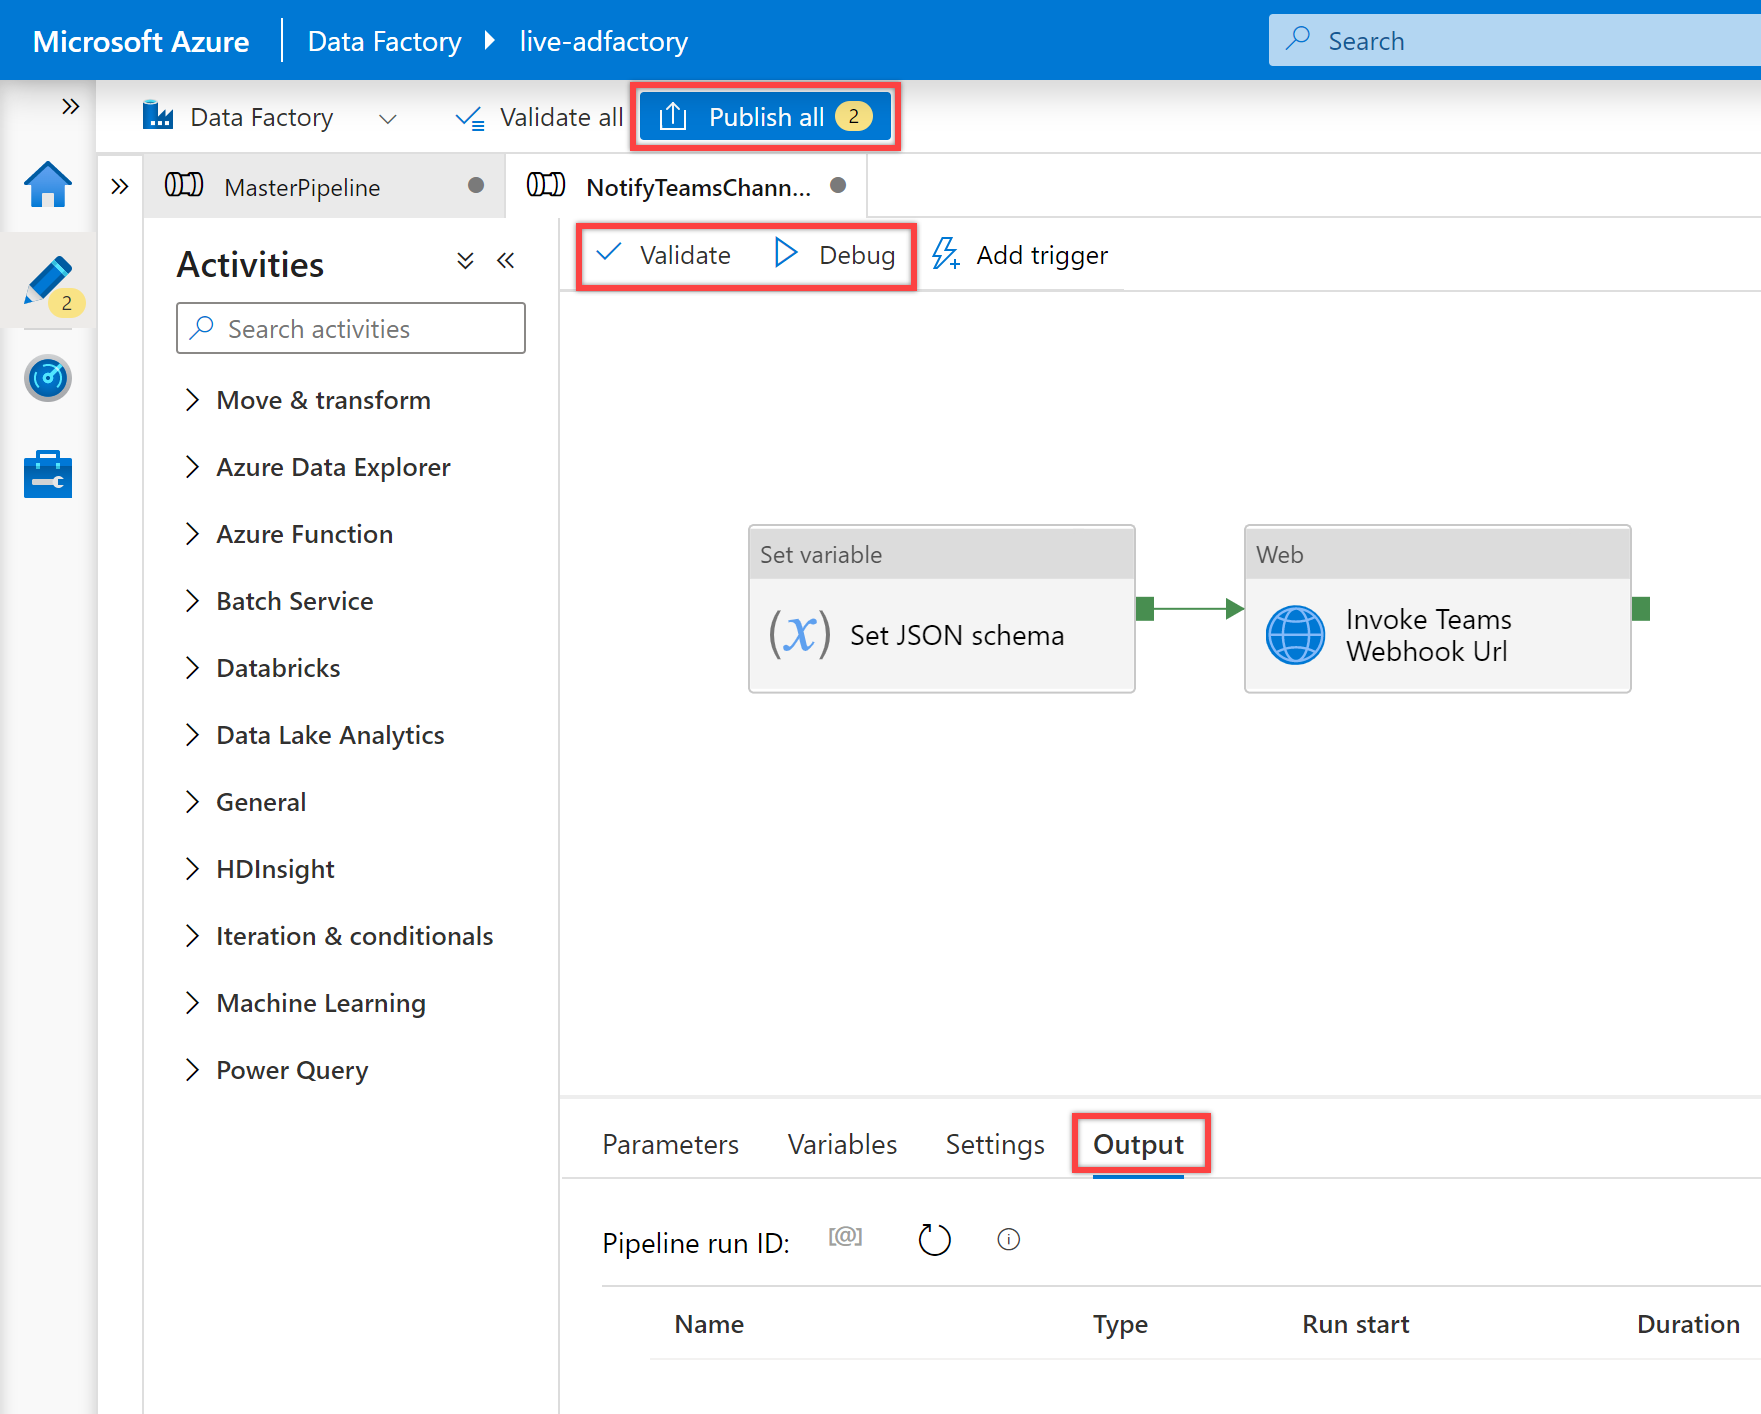
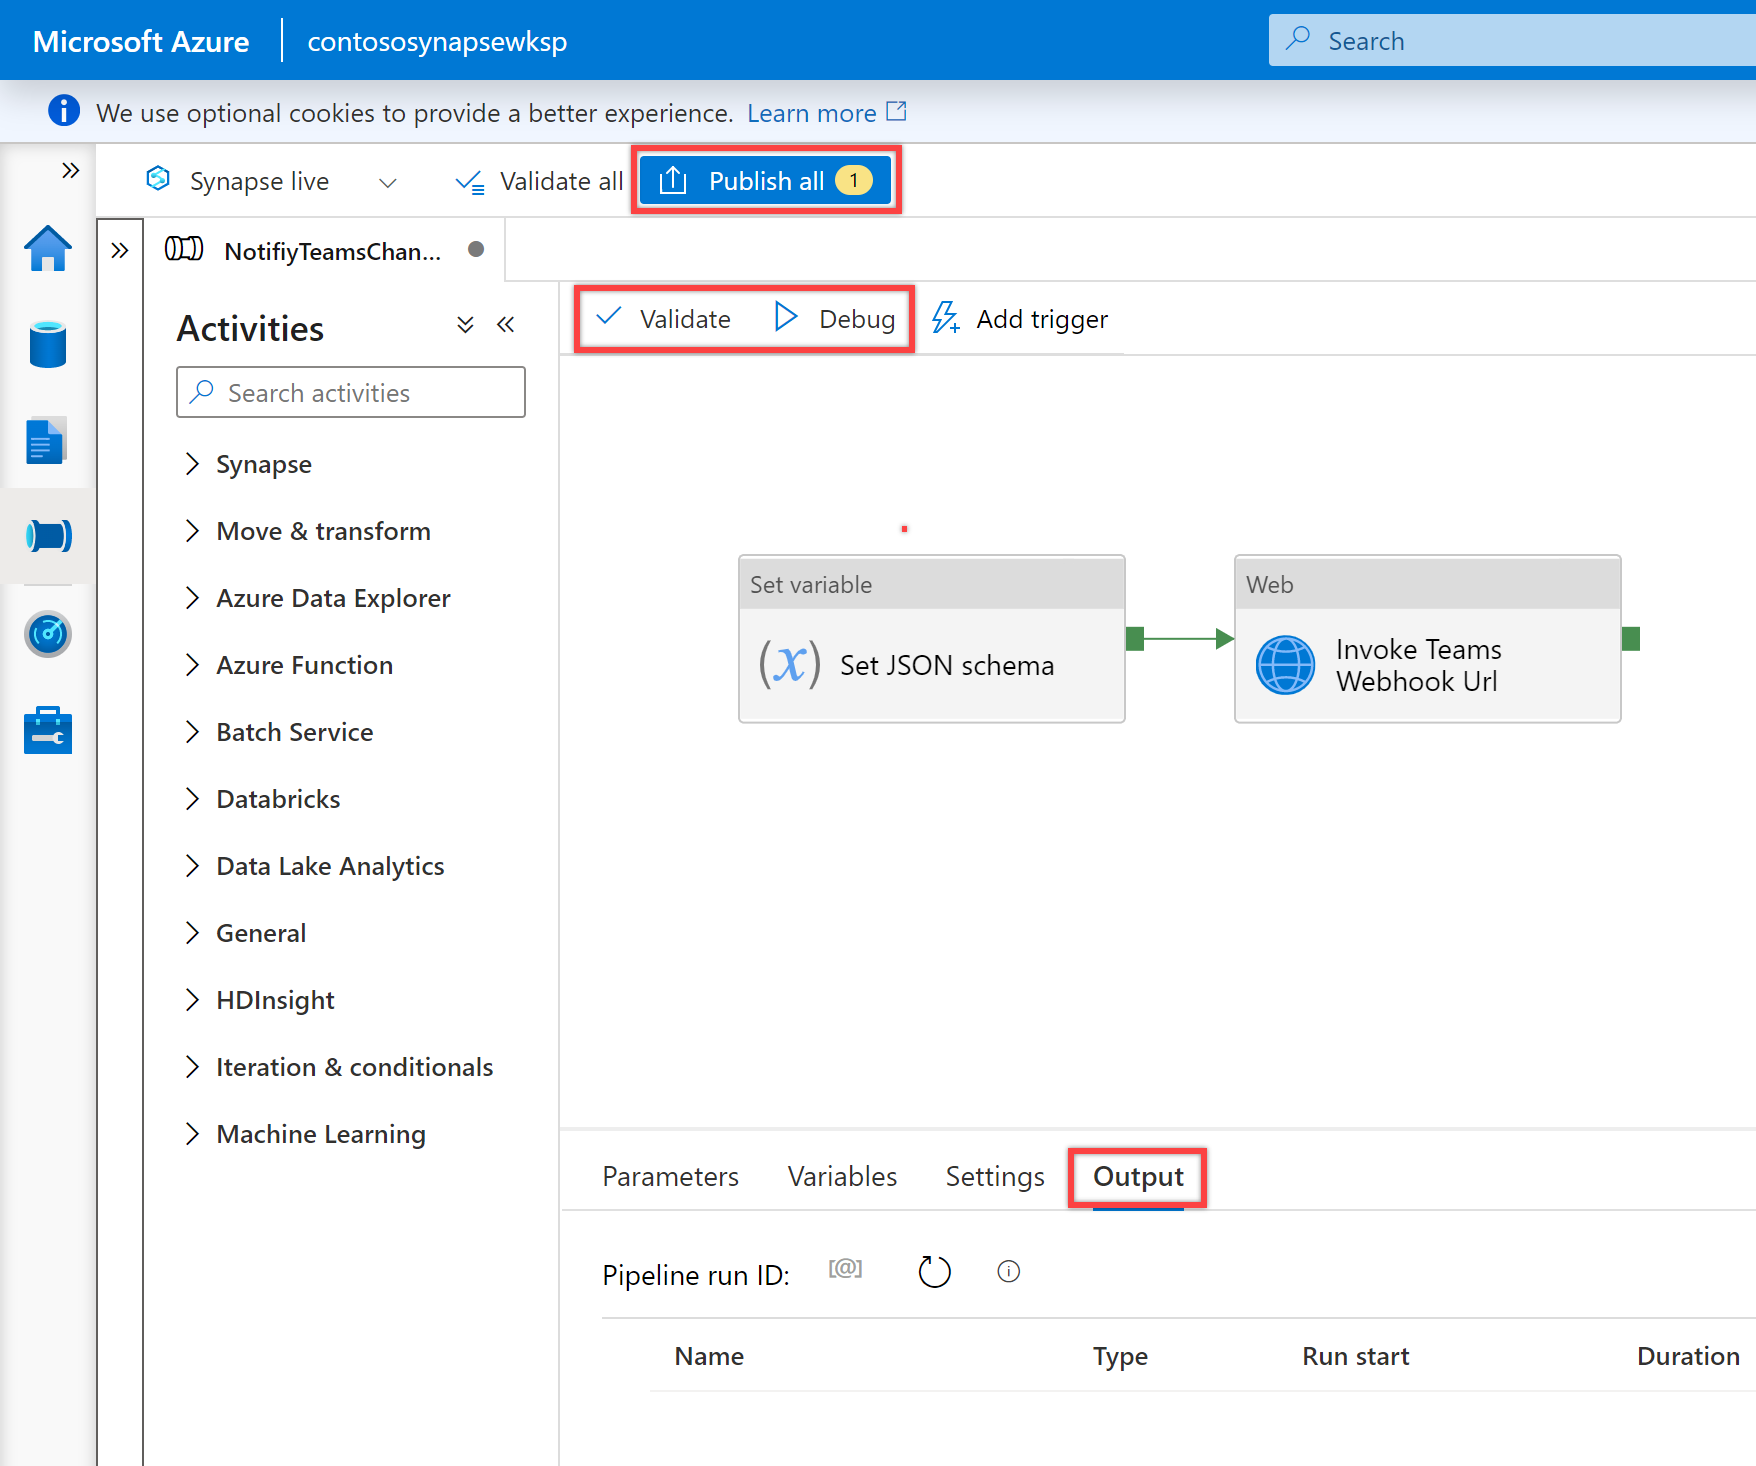
All set and now you're ready to validate, debug, and then publish your NotifyTeamsChannelPipeline pipeline.
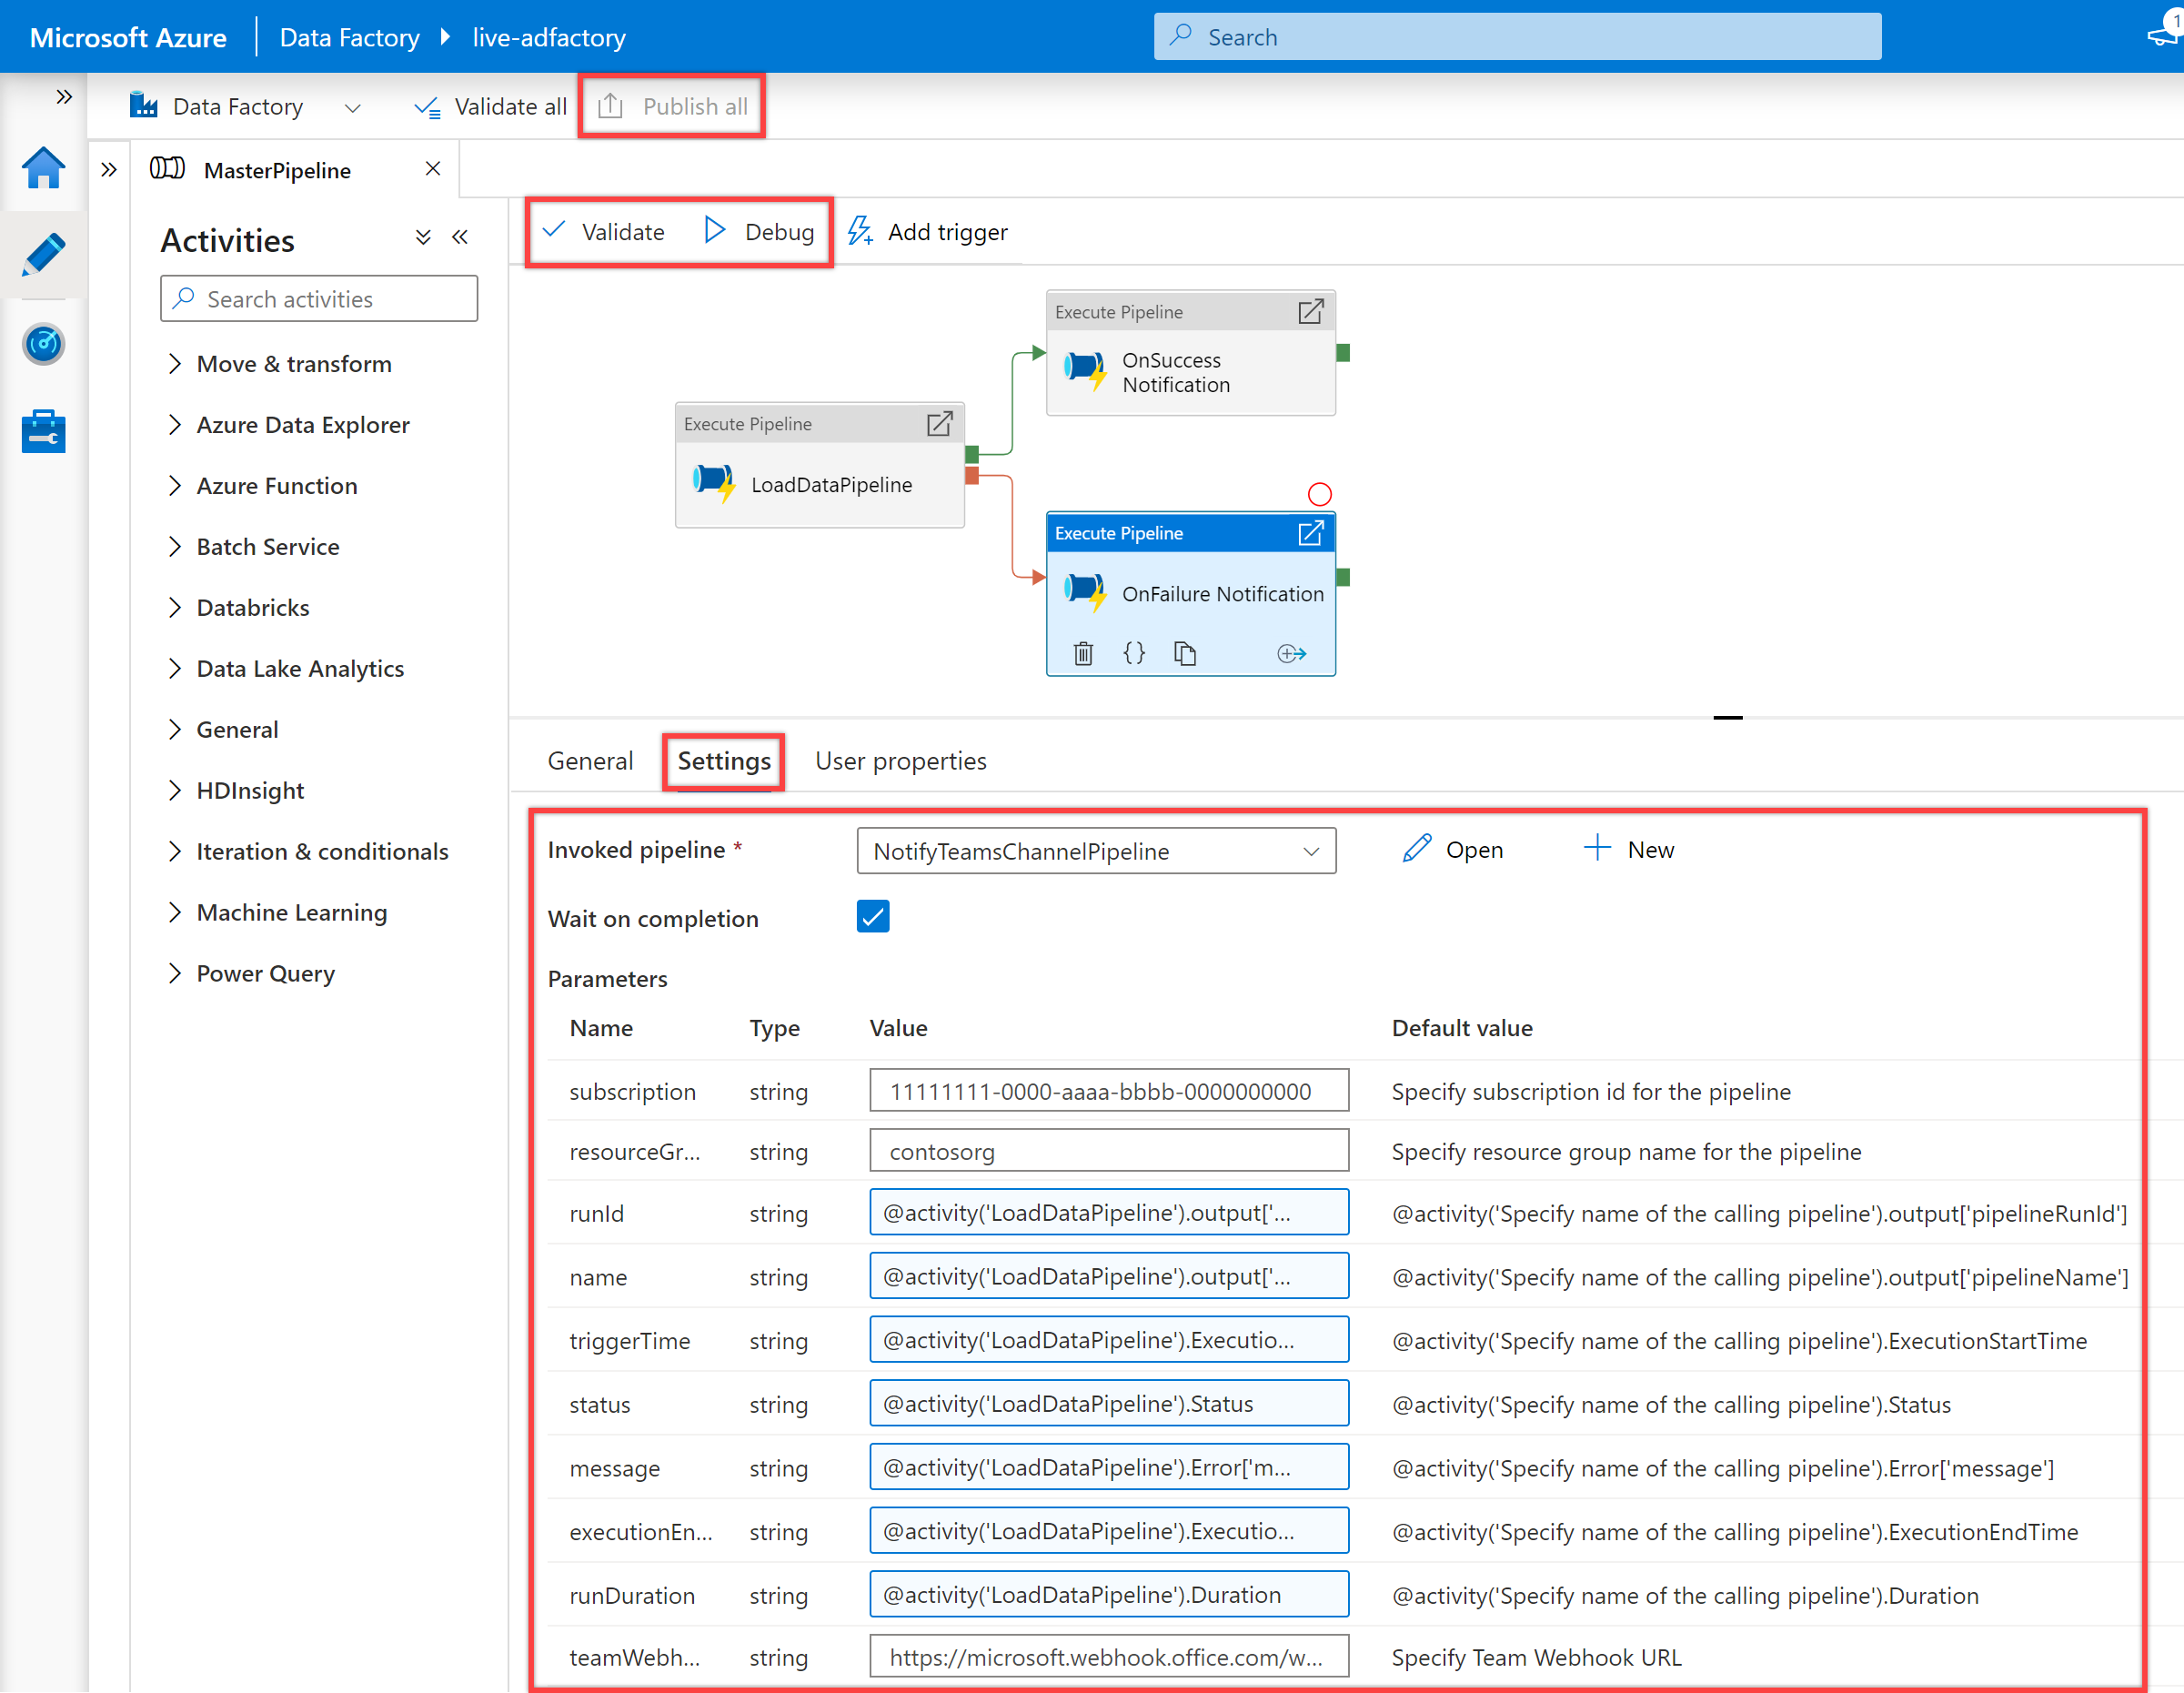
- To validate the pipeline, select Validate from the tool bar.
- To debug the pipeline, select Debug on the toolbar. You can see the status of the pipeline run in the "Output" tab at the bottom of the window.
- Once the pipeline can run successfully, in the top toolbar, select Publish all. This action publishes entities you created to Data Factory. Wait until you see the Successfully published message.

Sample usage
In this sample usage scenario, we'll create a master pipeline with three Execute Pipeline activities. The first Execute Pipeline activity will invoke our ETL pipeline and the remaining two Execute Pipeline activities will invoke the "NotifyTeamsChannelPipeline" pipeline to send relevant success or failure notifications to the Teams channel depending on the execution state of our ETL pipeline.
Select Author tab from the left pane in Data Factory or Integrate tab from the left pane in Synapse Studio. Next, select the + (plus) button, and then select Pipeline to create a new pipeline.
In the "General" panel under Properties, specify MasterPipeline for Name. Then collapse the panel by clicking the Properties icon in the top-right corner.
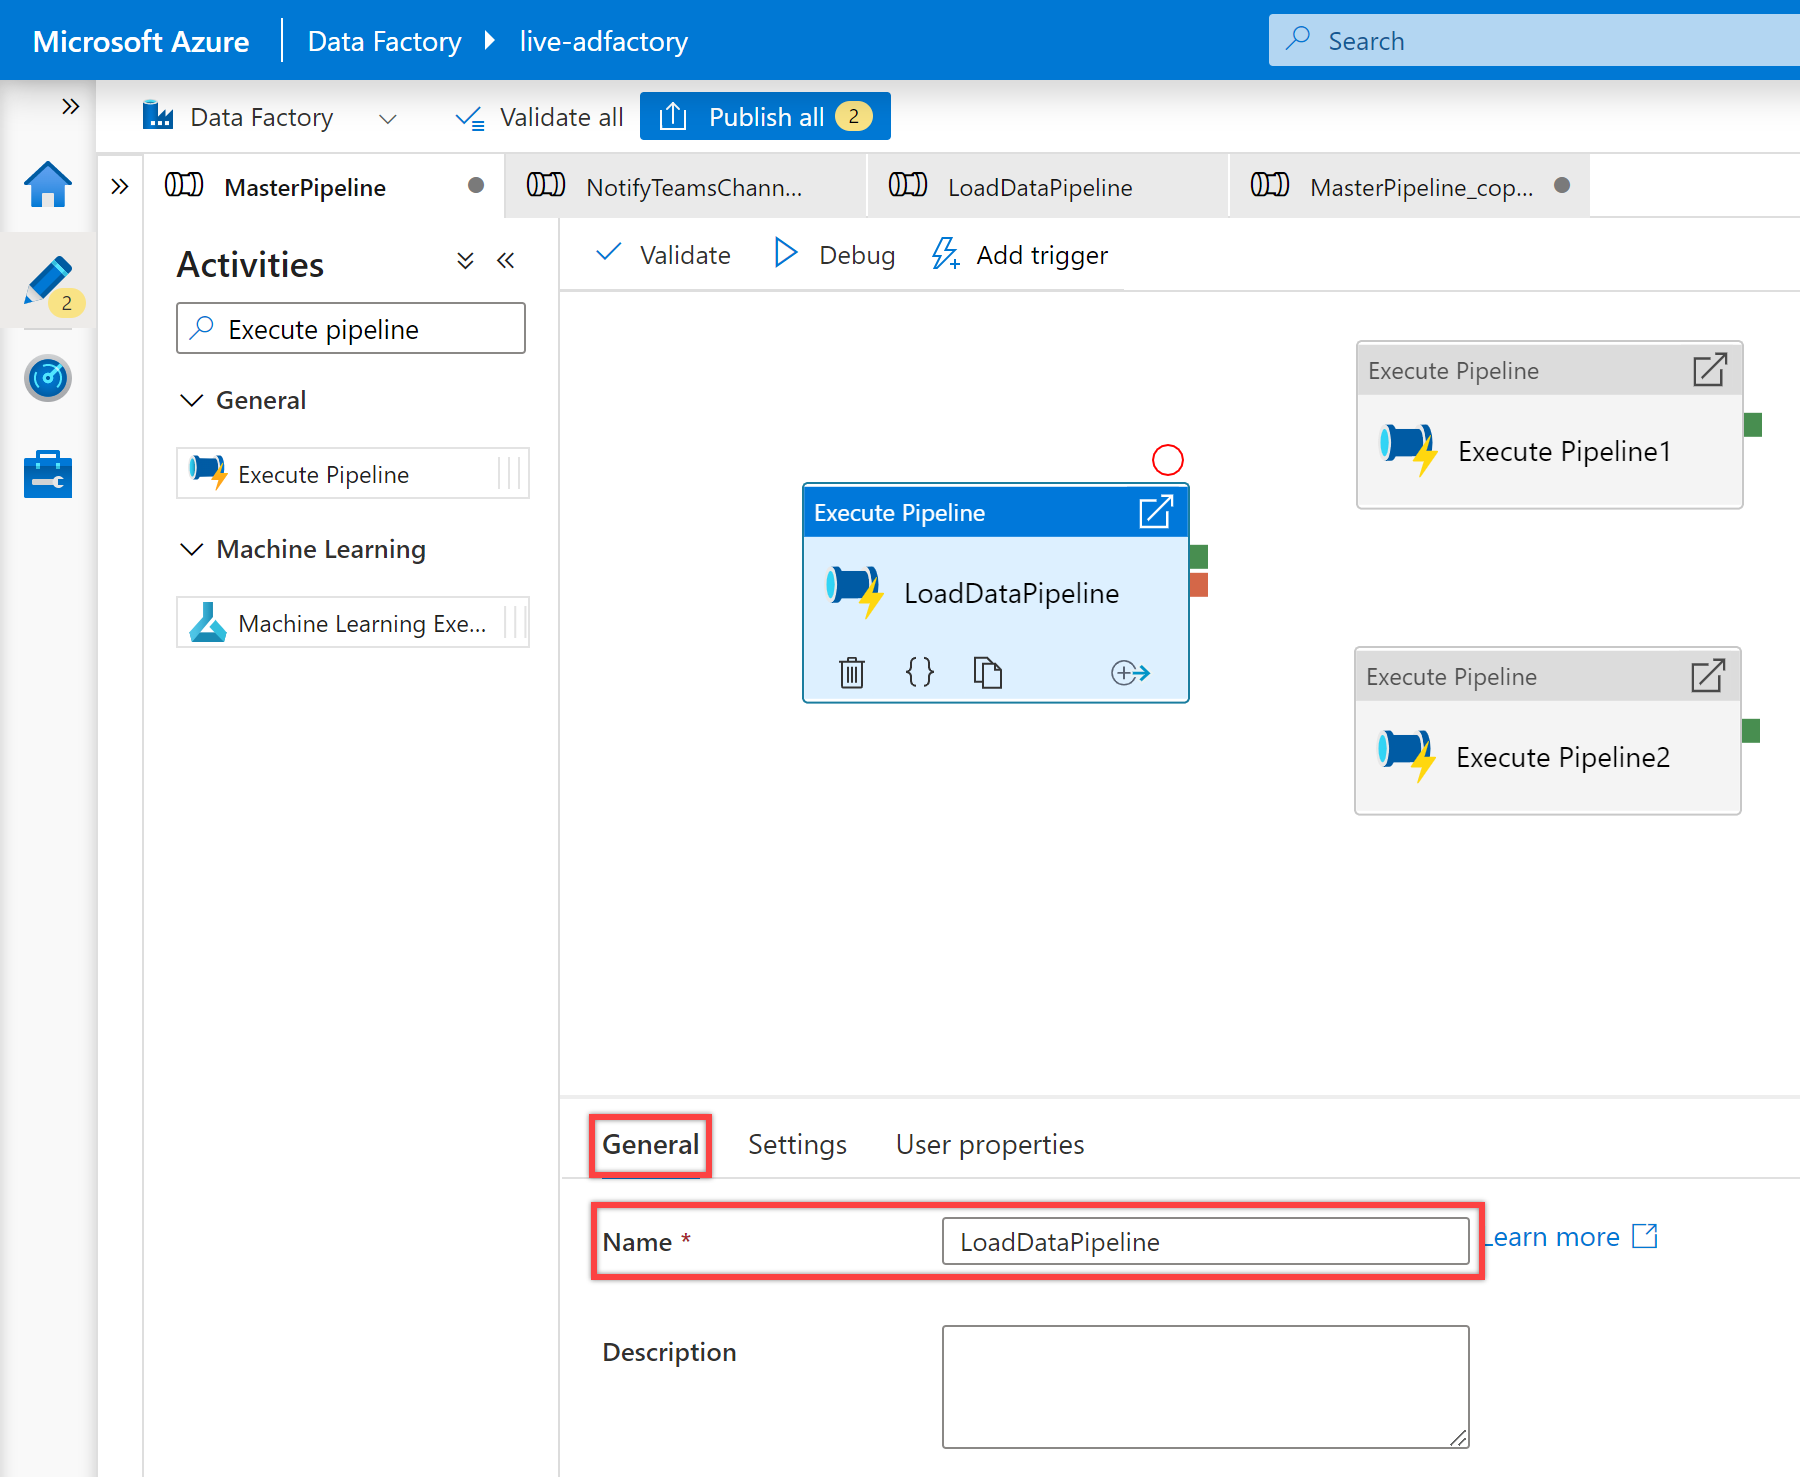
Search for pipeline in the pipeline "Activities" pane, and drag three Execute Pipeline activities to the pipeline canvas.
Select first Execute Pipeline activity on the canvas if it isn't already selected, and its "General" pane, to edit its details.
- For Name property of the Execute Pipeline activity, we recommend using the name of your invoked ETL pipeline for which you want to send notifications. For example, we used LoadDataPipeline for the Name of our Execute Pipeline activity because it's the name of our invoked pipeline.
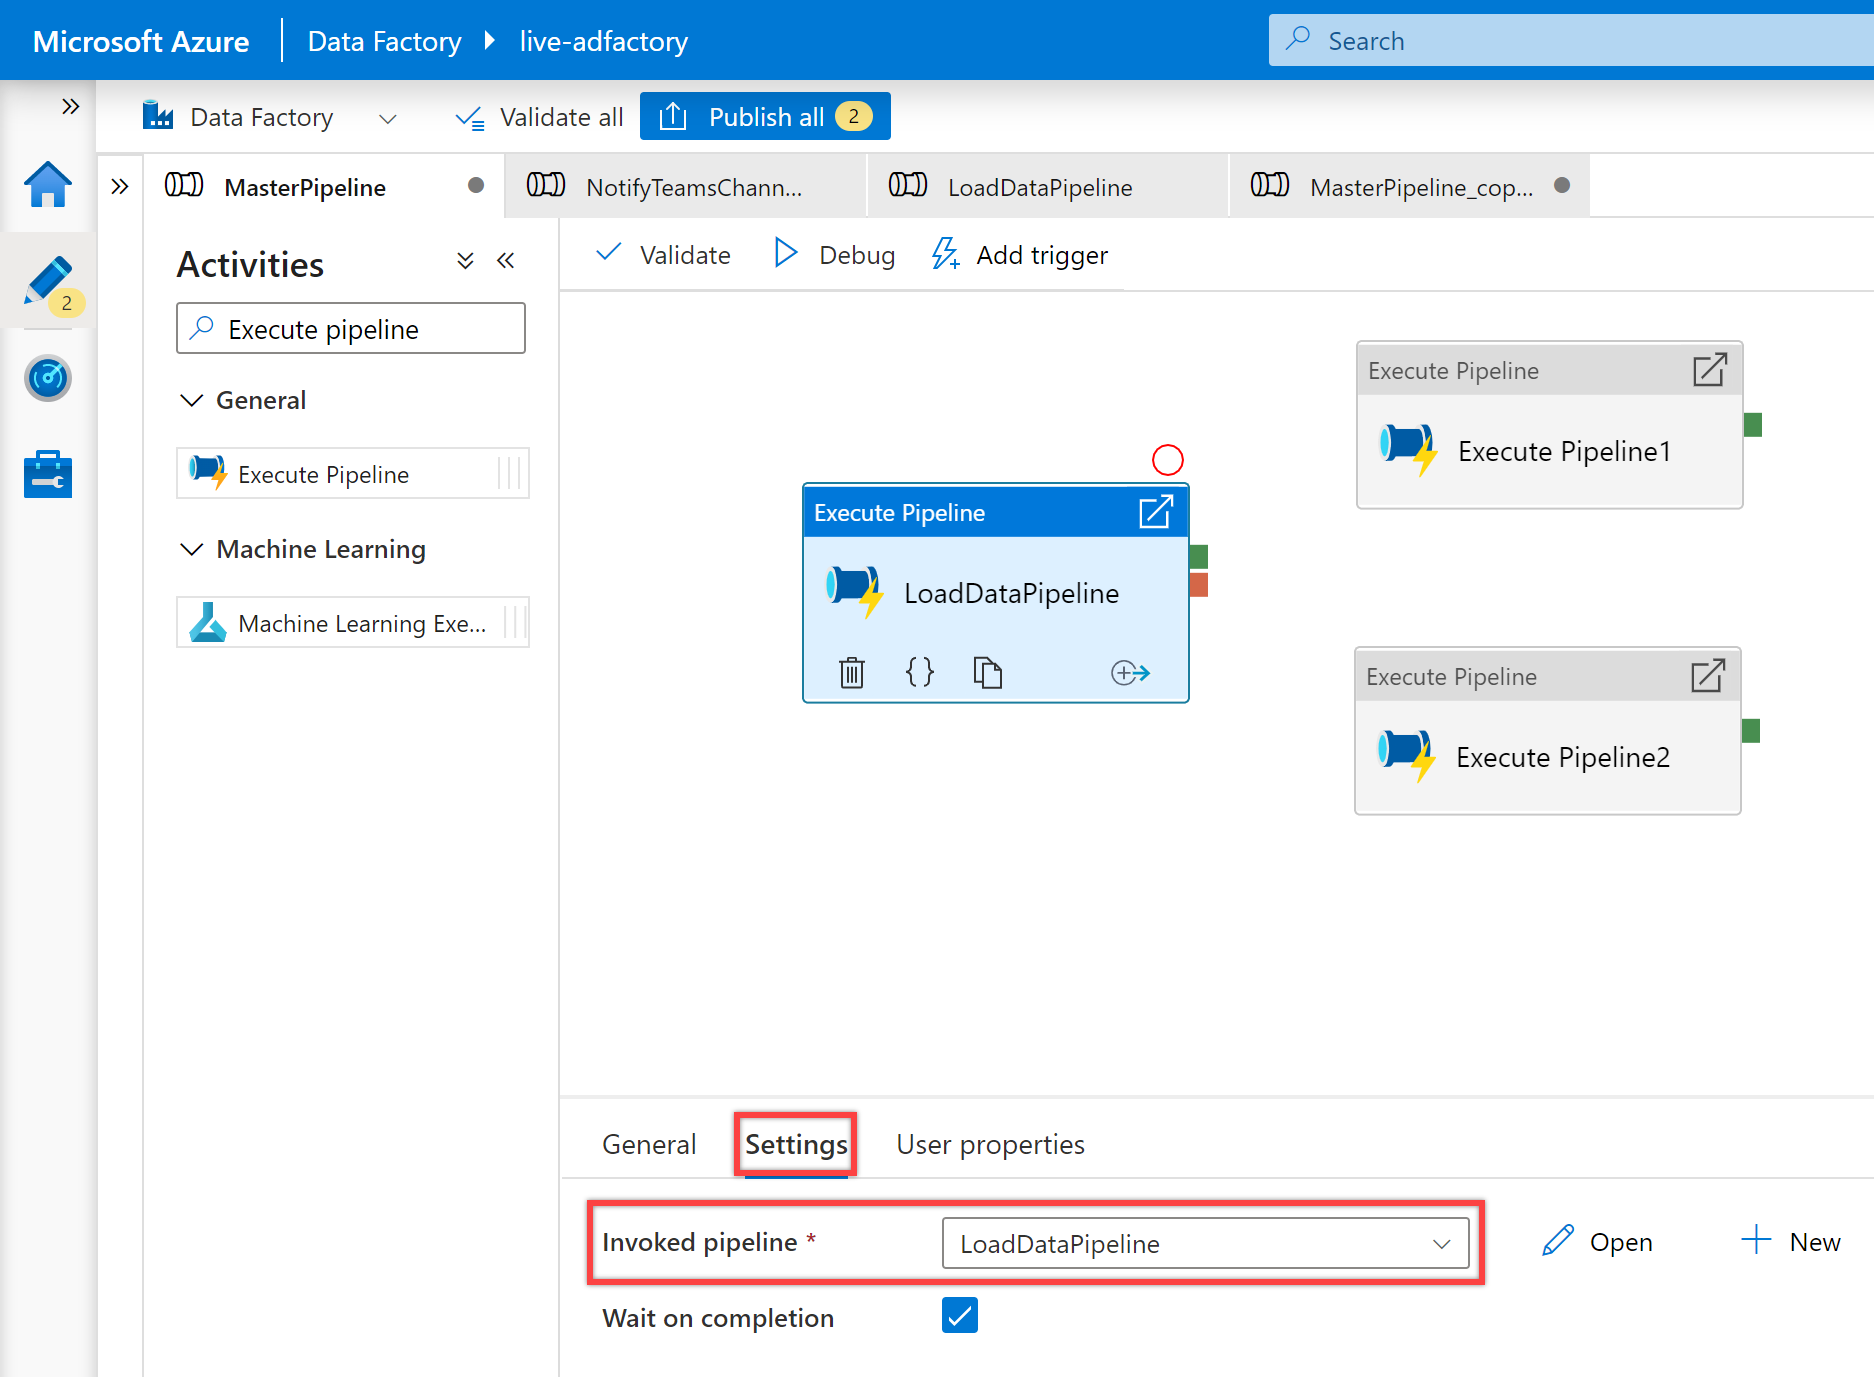
- In the "Settings" pane, select an existing pipeline or create a new one using the + New button for the Invoked pipeline property. For example, in our case, we selected LoadDataPipeline pipeline for the "Invoked pipeline" property. Select other options and configure any parameters for the pipeline as required to complete your configuration.
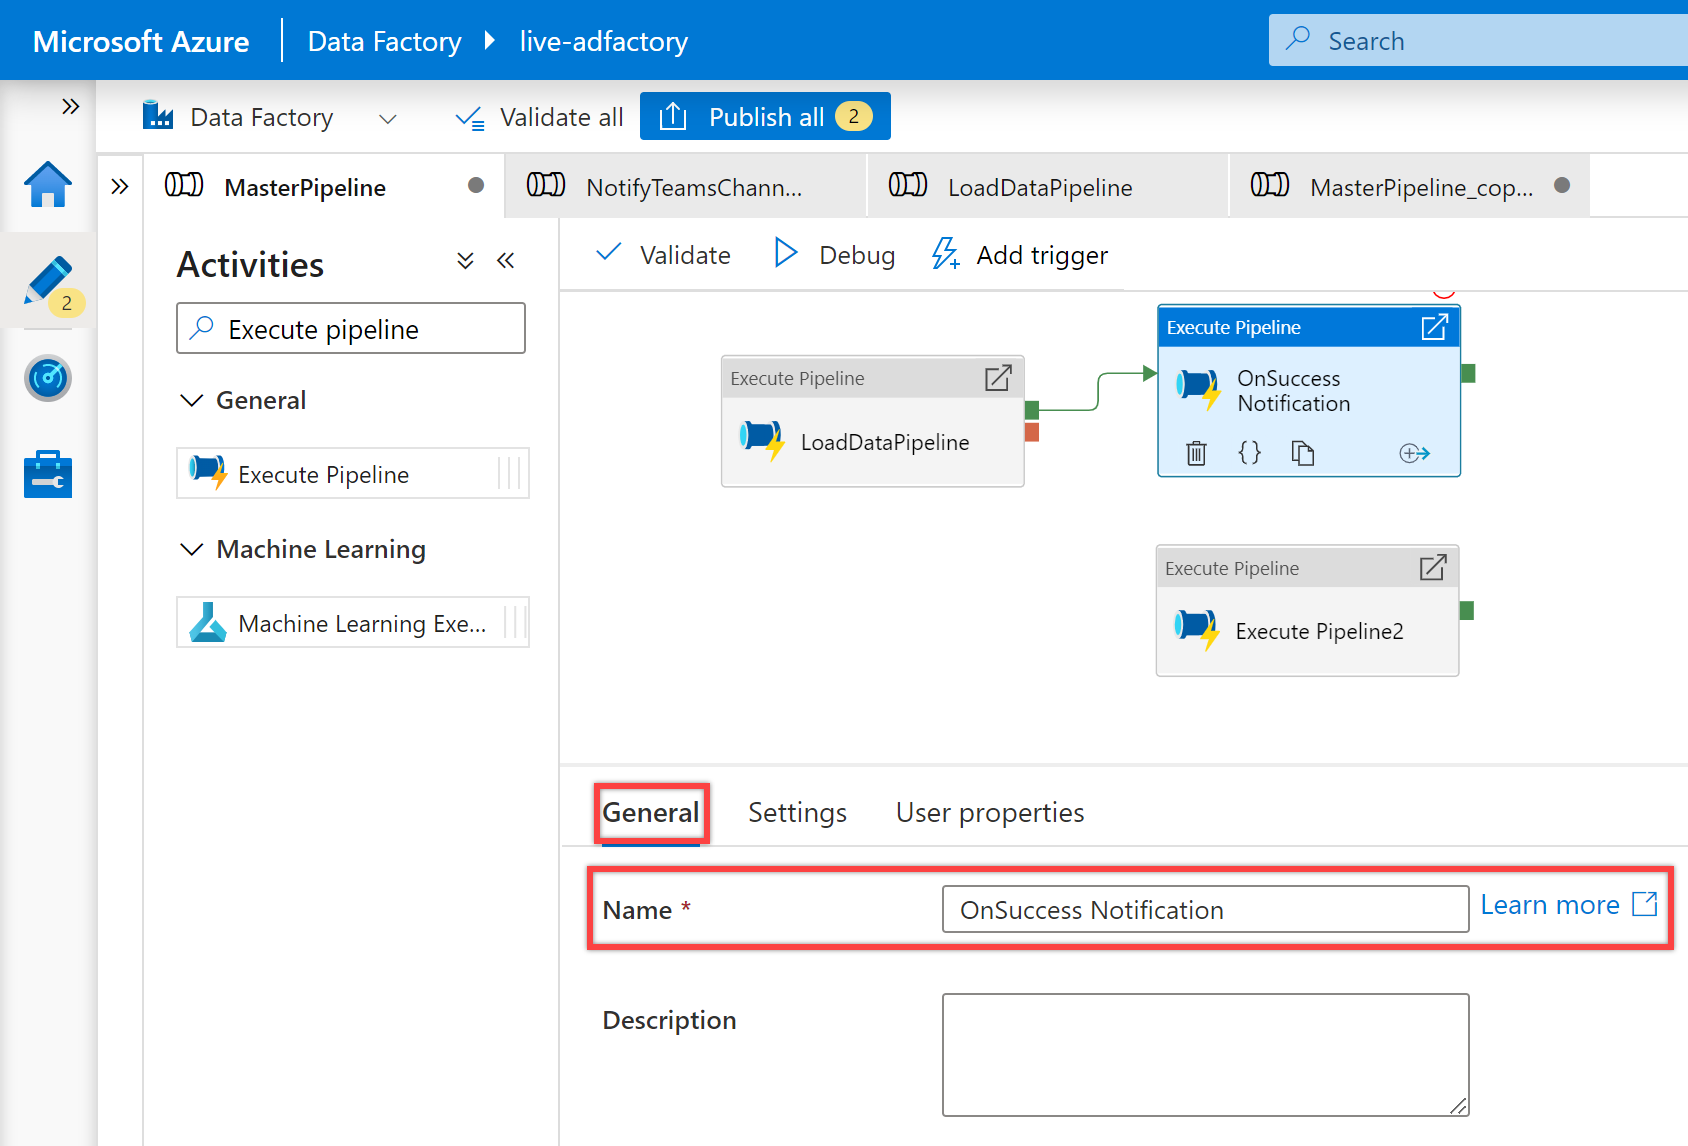
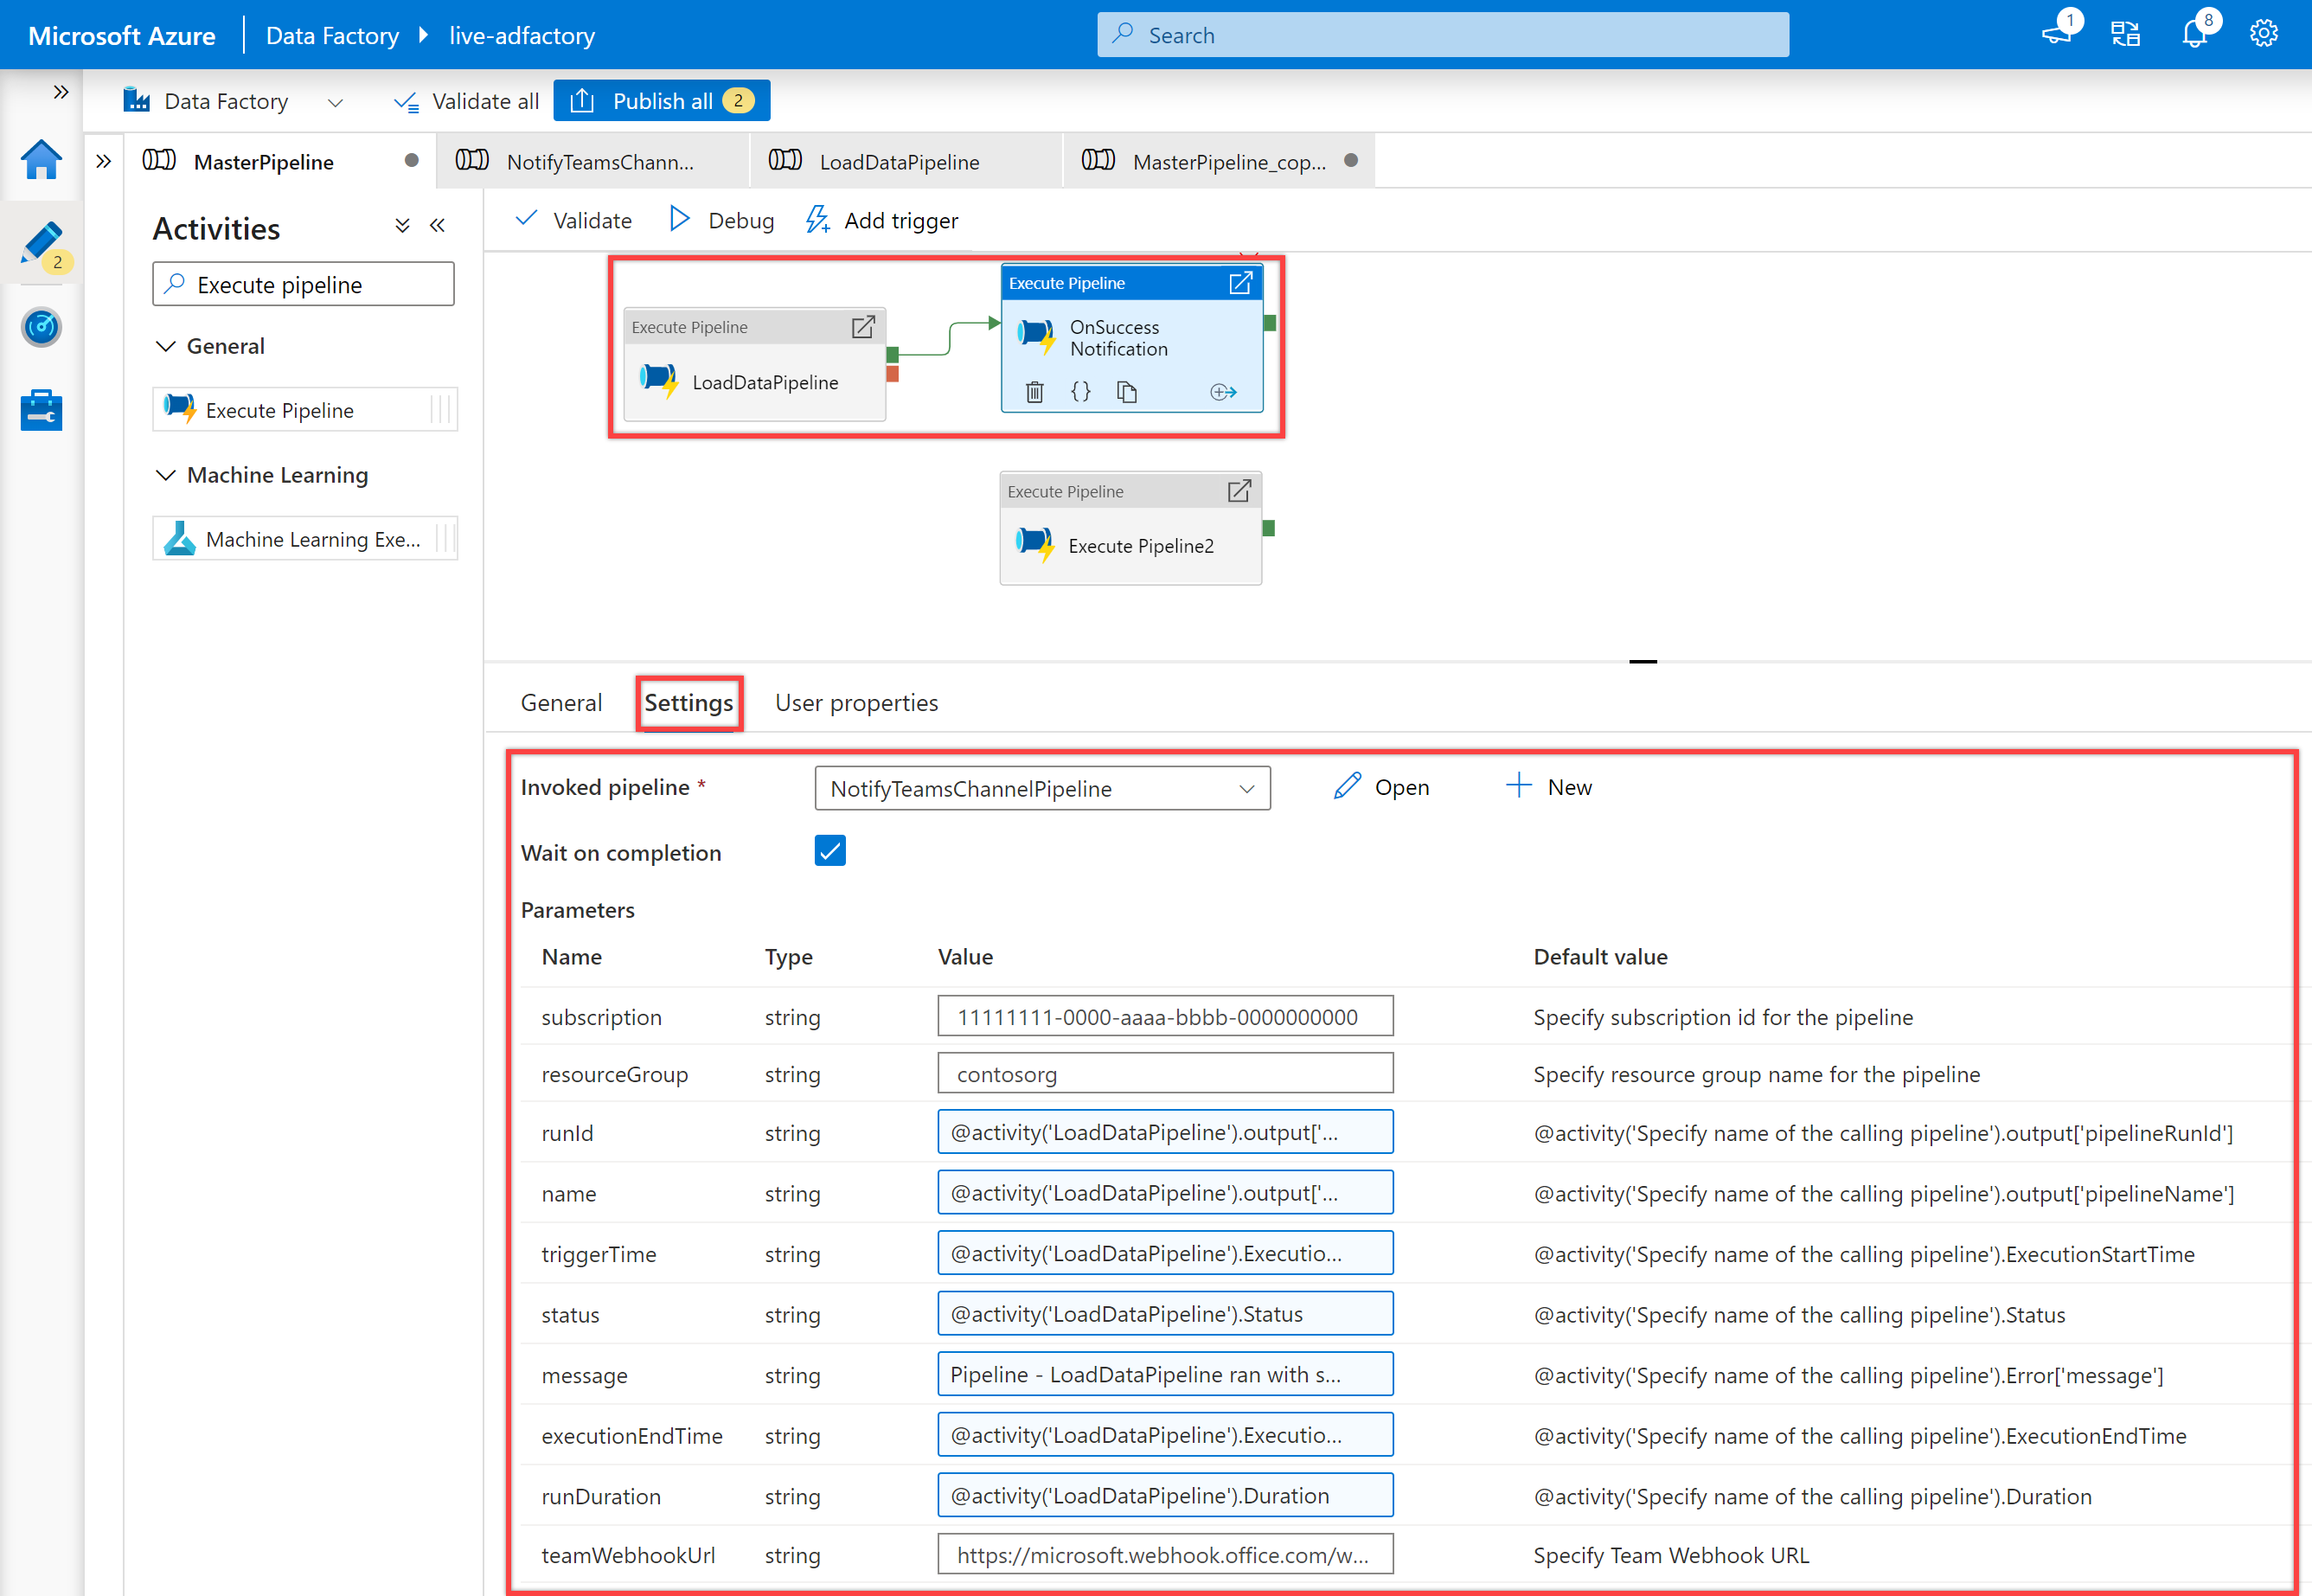
Select second Execute Pipeline activity on the canvas, and it's "General" pane, to edit its details.
Specify OnSuccess Notification for Name of the Execute Pipeline activity.
In the "Settings" pane, select NotifyTeamsChannelPipeline pipeline, which we created earlier, for the Invoked pipeline property. Customize the parameters as required based on activity type. For example, I've customized the parameters as follows:
Name Value subscription 11111111-0000-aaaa-bbbb-0000000000resourceGroup contosorgrunId @activity('LoadDataPipeline').output['pipelineRunId']name @activity('LoadDataPipeline').output['pipelineName']triggerTime @activity('LoadDataPipeline').ExecutionStartTimestatus @activity('LoadDataPipeline').Statusmessage Pipeline - LoadDataPipeline ran with success.executionEndTime @activity('LoadDataPipeline').ExecutionEndTimerunDuration @activity('LoadDataPipeline').DurationteamWebhookUrl https://microsoft.webhook.office.com/webhookb2/1234abcd-1x11-2ff1-ab2c-1234d0699a9e@72f988bf-32b1-41af-91ab-2d7cd011db47/IncomingWebhook/8212f66ad80040ab83cf68b554d9232a/17d524d0-ed5c-44ed-98a0-35c12dd89a6dCreate a dependency condition for the second Execute Pipeline activity so that it only runs if the first Execute Pipeline activity succeeds. To create this dependency, select the green handle on the right side of the first Execute Pipeline activity, drag it, and connect it to the second Execute Pipeline activity.
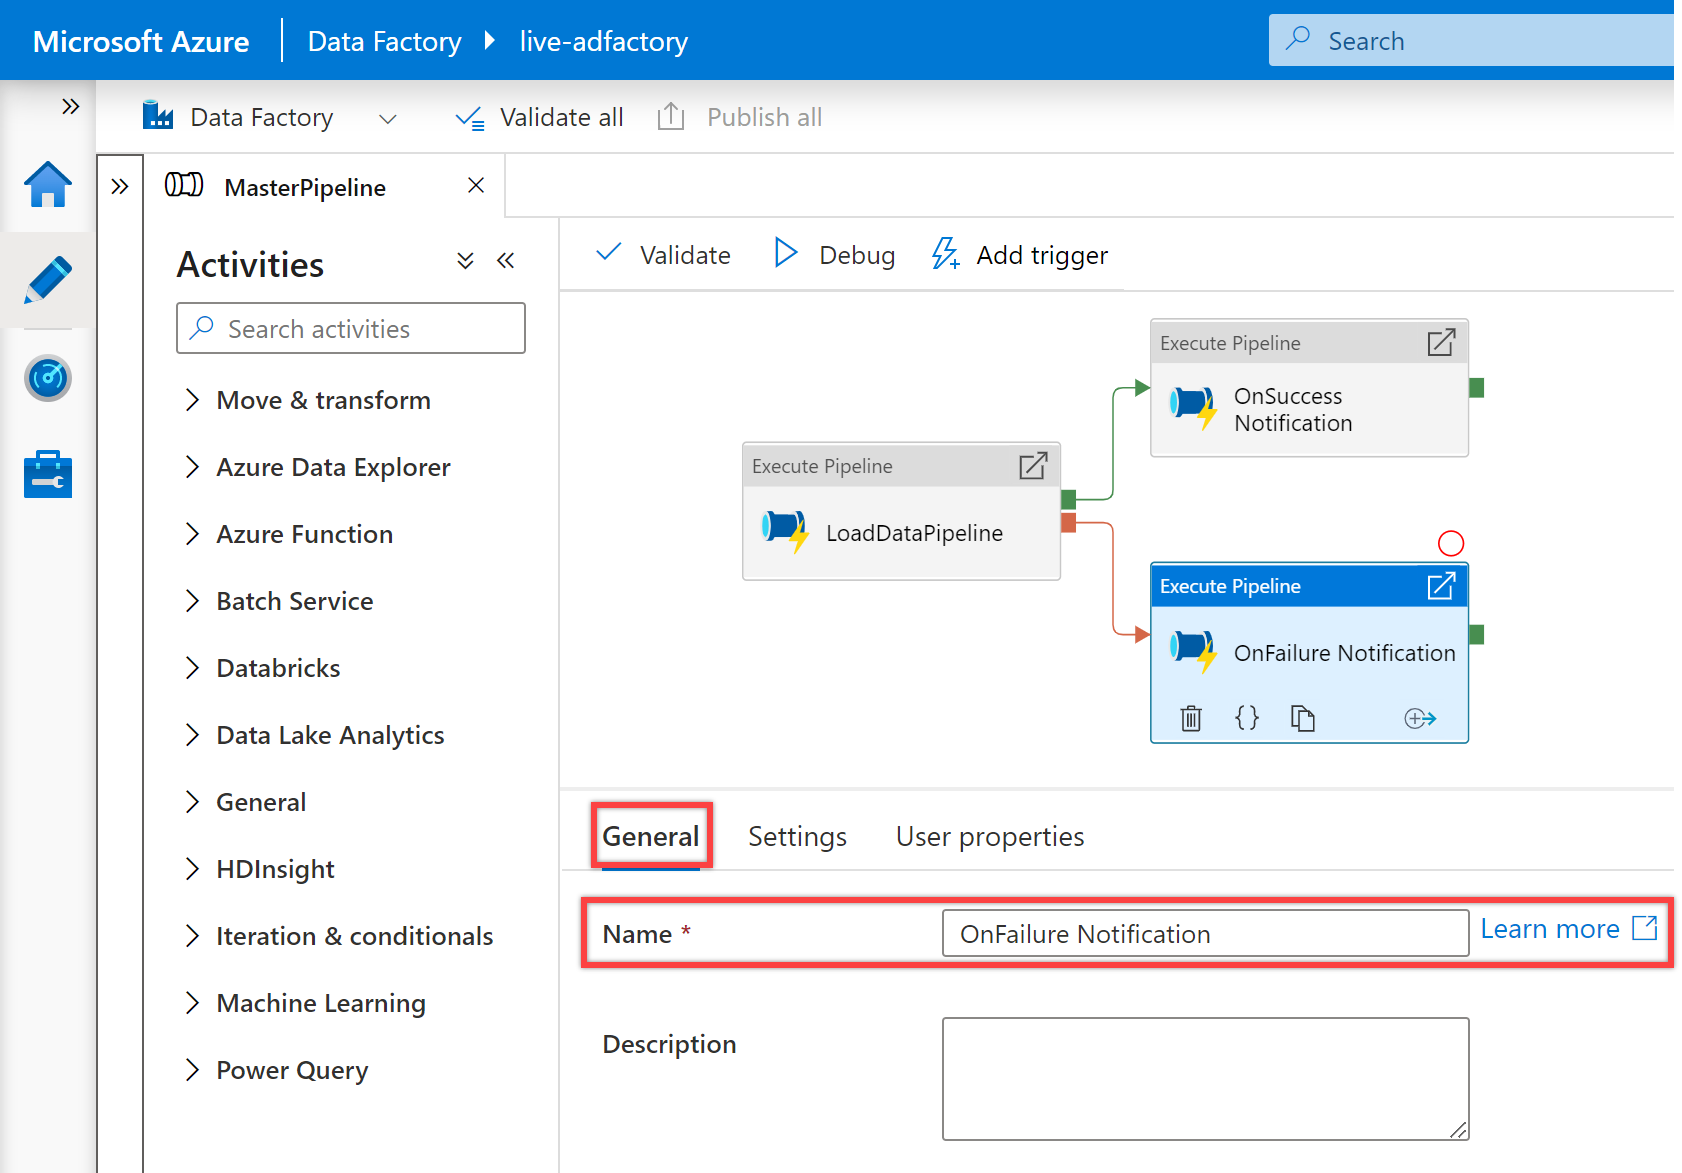
Select third Execute Pipeline activity on the canvas, and it's "General" pane, to edit its details.
Specify OnFailure Notification for Name of the Execute Pipeline activity.
In the "Settings" pane, select NotifyTeamsChannelPipeline pipeline for the Invoked pipeline property. Customize the parameters as required based on activity type. For example, I've customized the parameters this time as follows:
Name Value subscription 11111111-0000-aaaa-bbbb-0000000000resourceGroup contosorgrunId @activity('LoadDataPipeline').output['pipelineRunId']name @activity('LoadDataPipeline').output['pipelineName']triggerTime @activity('LoadDataPipeline').ExecutionStartTimestatus @activity('LoadDataPipeline').Statusmessage @activity('LoadDataPipeline').Error['message']executionEndTime @activity('LoadDataPipeline').ExecutionEndTimerunDuration @activity('LoadDataPipeline').DurationteamWebhookUrl https://microsoft.webhook.office.com/webhookb2/1234abcd-1x11-2ff1-ab2c-1234d0699a9e@72f988bf-32b1-41af-91ab-2d7cd011db47/IncomingWebhook/8212f66ad80040ab83cf68b554d9232a/17d524d0-ed5c-44ed-98a0-35c12dd89a6dCreate a dependency condition for the third Execute Pipeline activity so that it only runs if the first Execute Pipeline activity fails. To create this dependency, select the red handle on the right side of the first Execute Pipeline activity, drag it, and connect it to the third Execute Pipeline activity.
Validate, debug, and then publish your MasterPipeline pipeline.
Run pipeline to receive notifications in Teams. For example, below are sample notifications, when my pipeline ran successfully and when it failed.
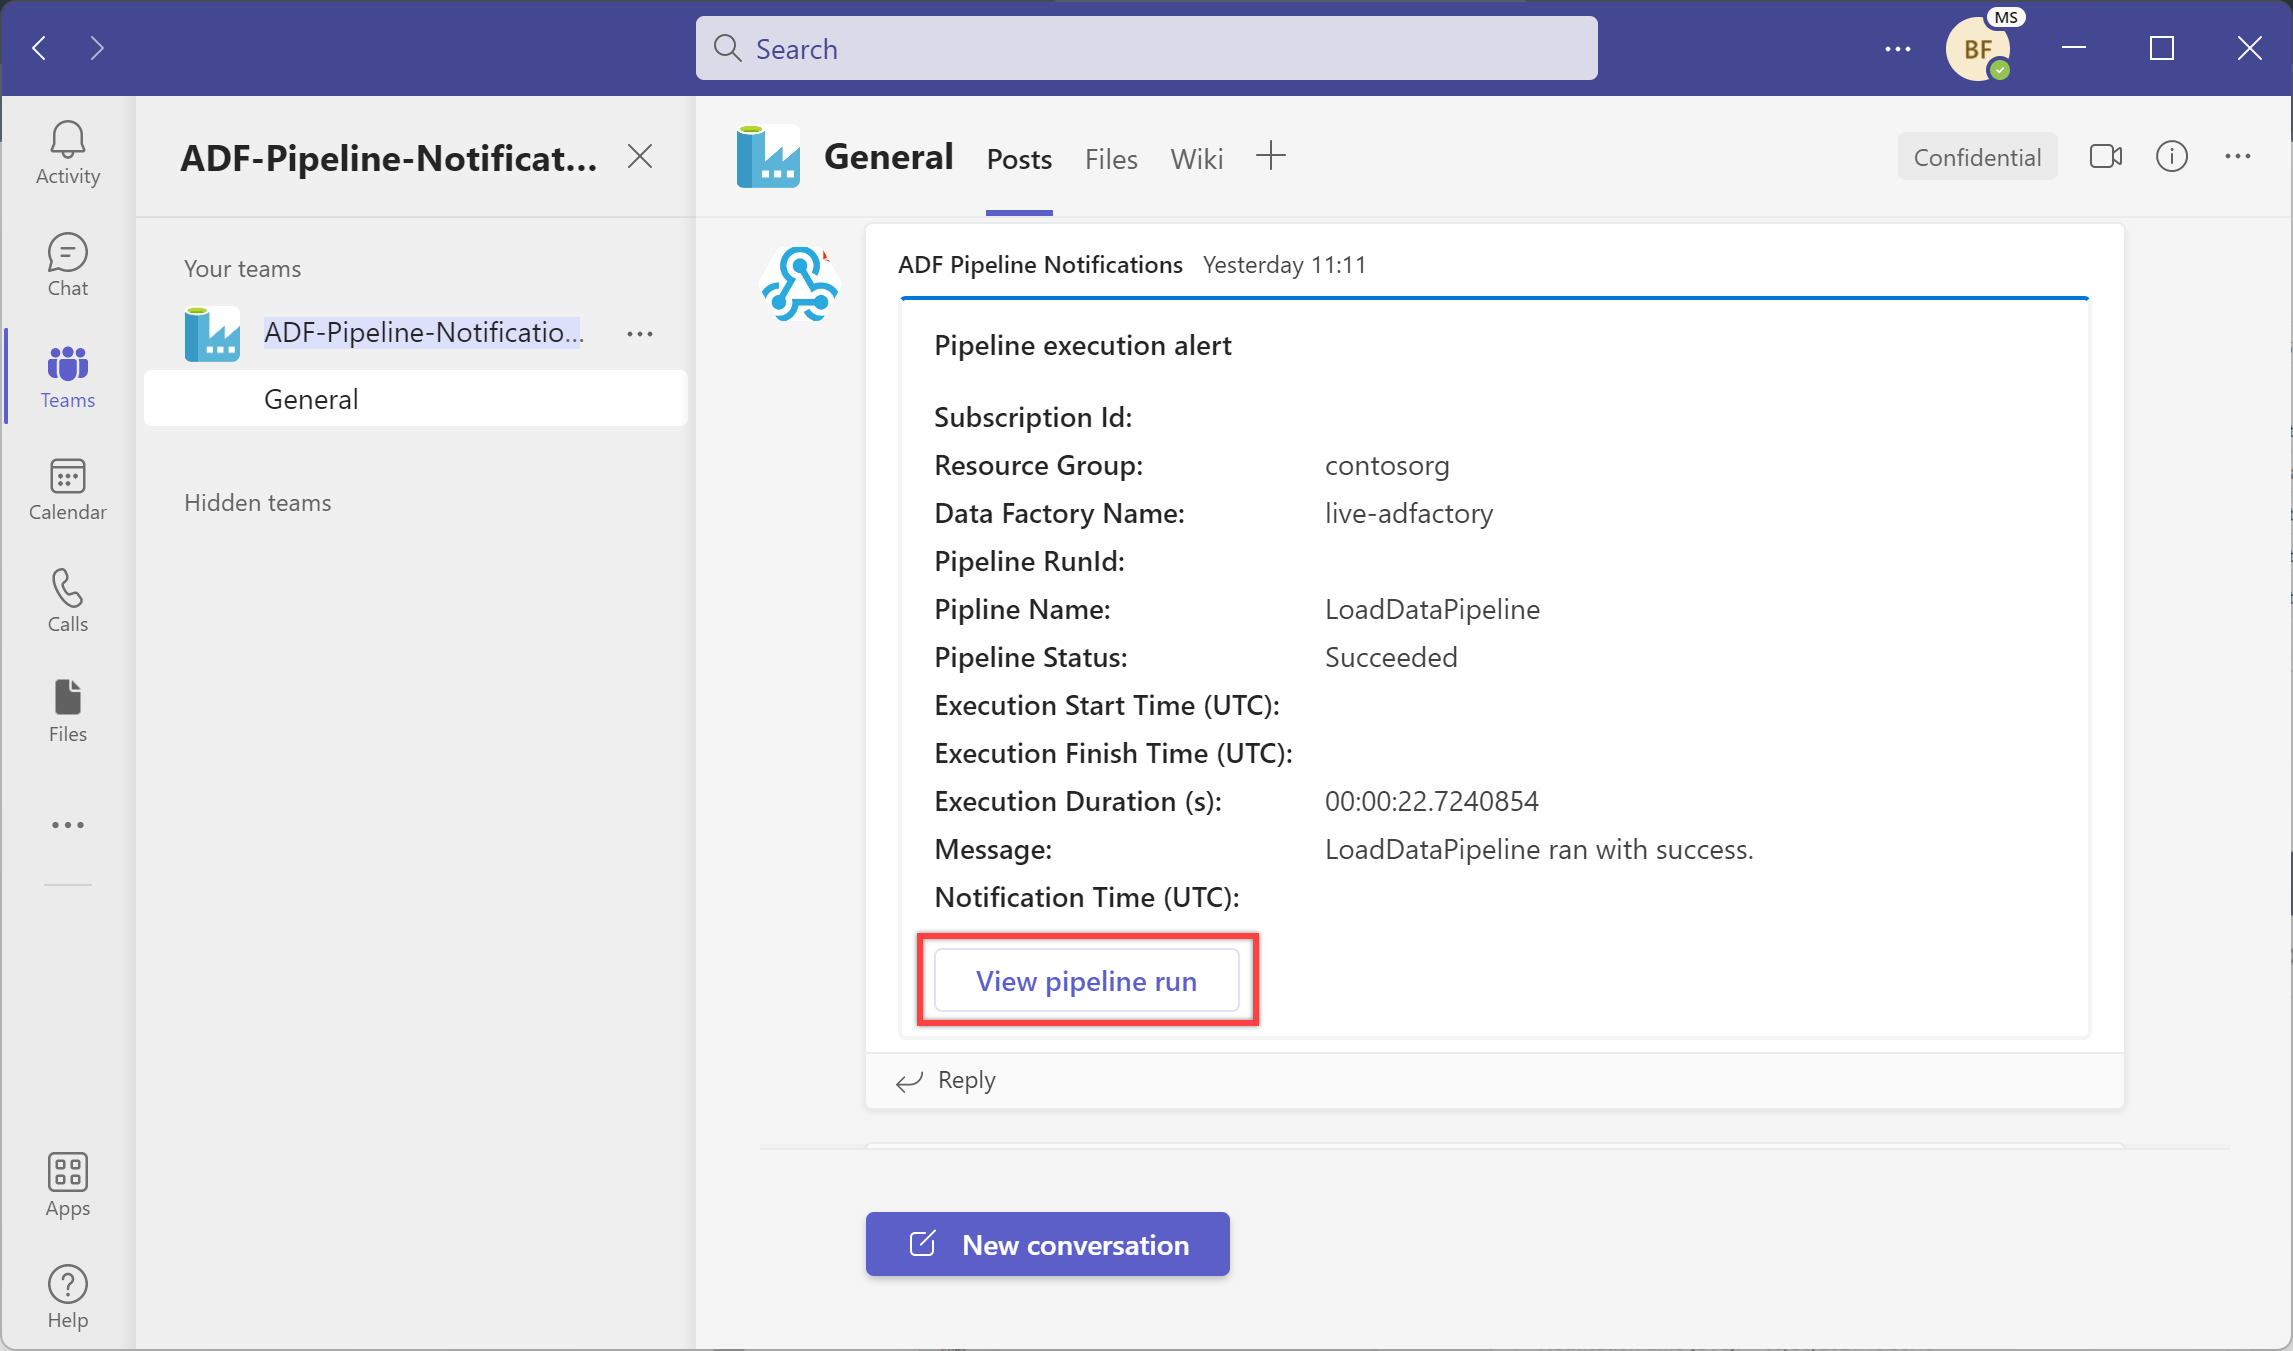
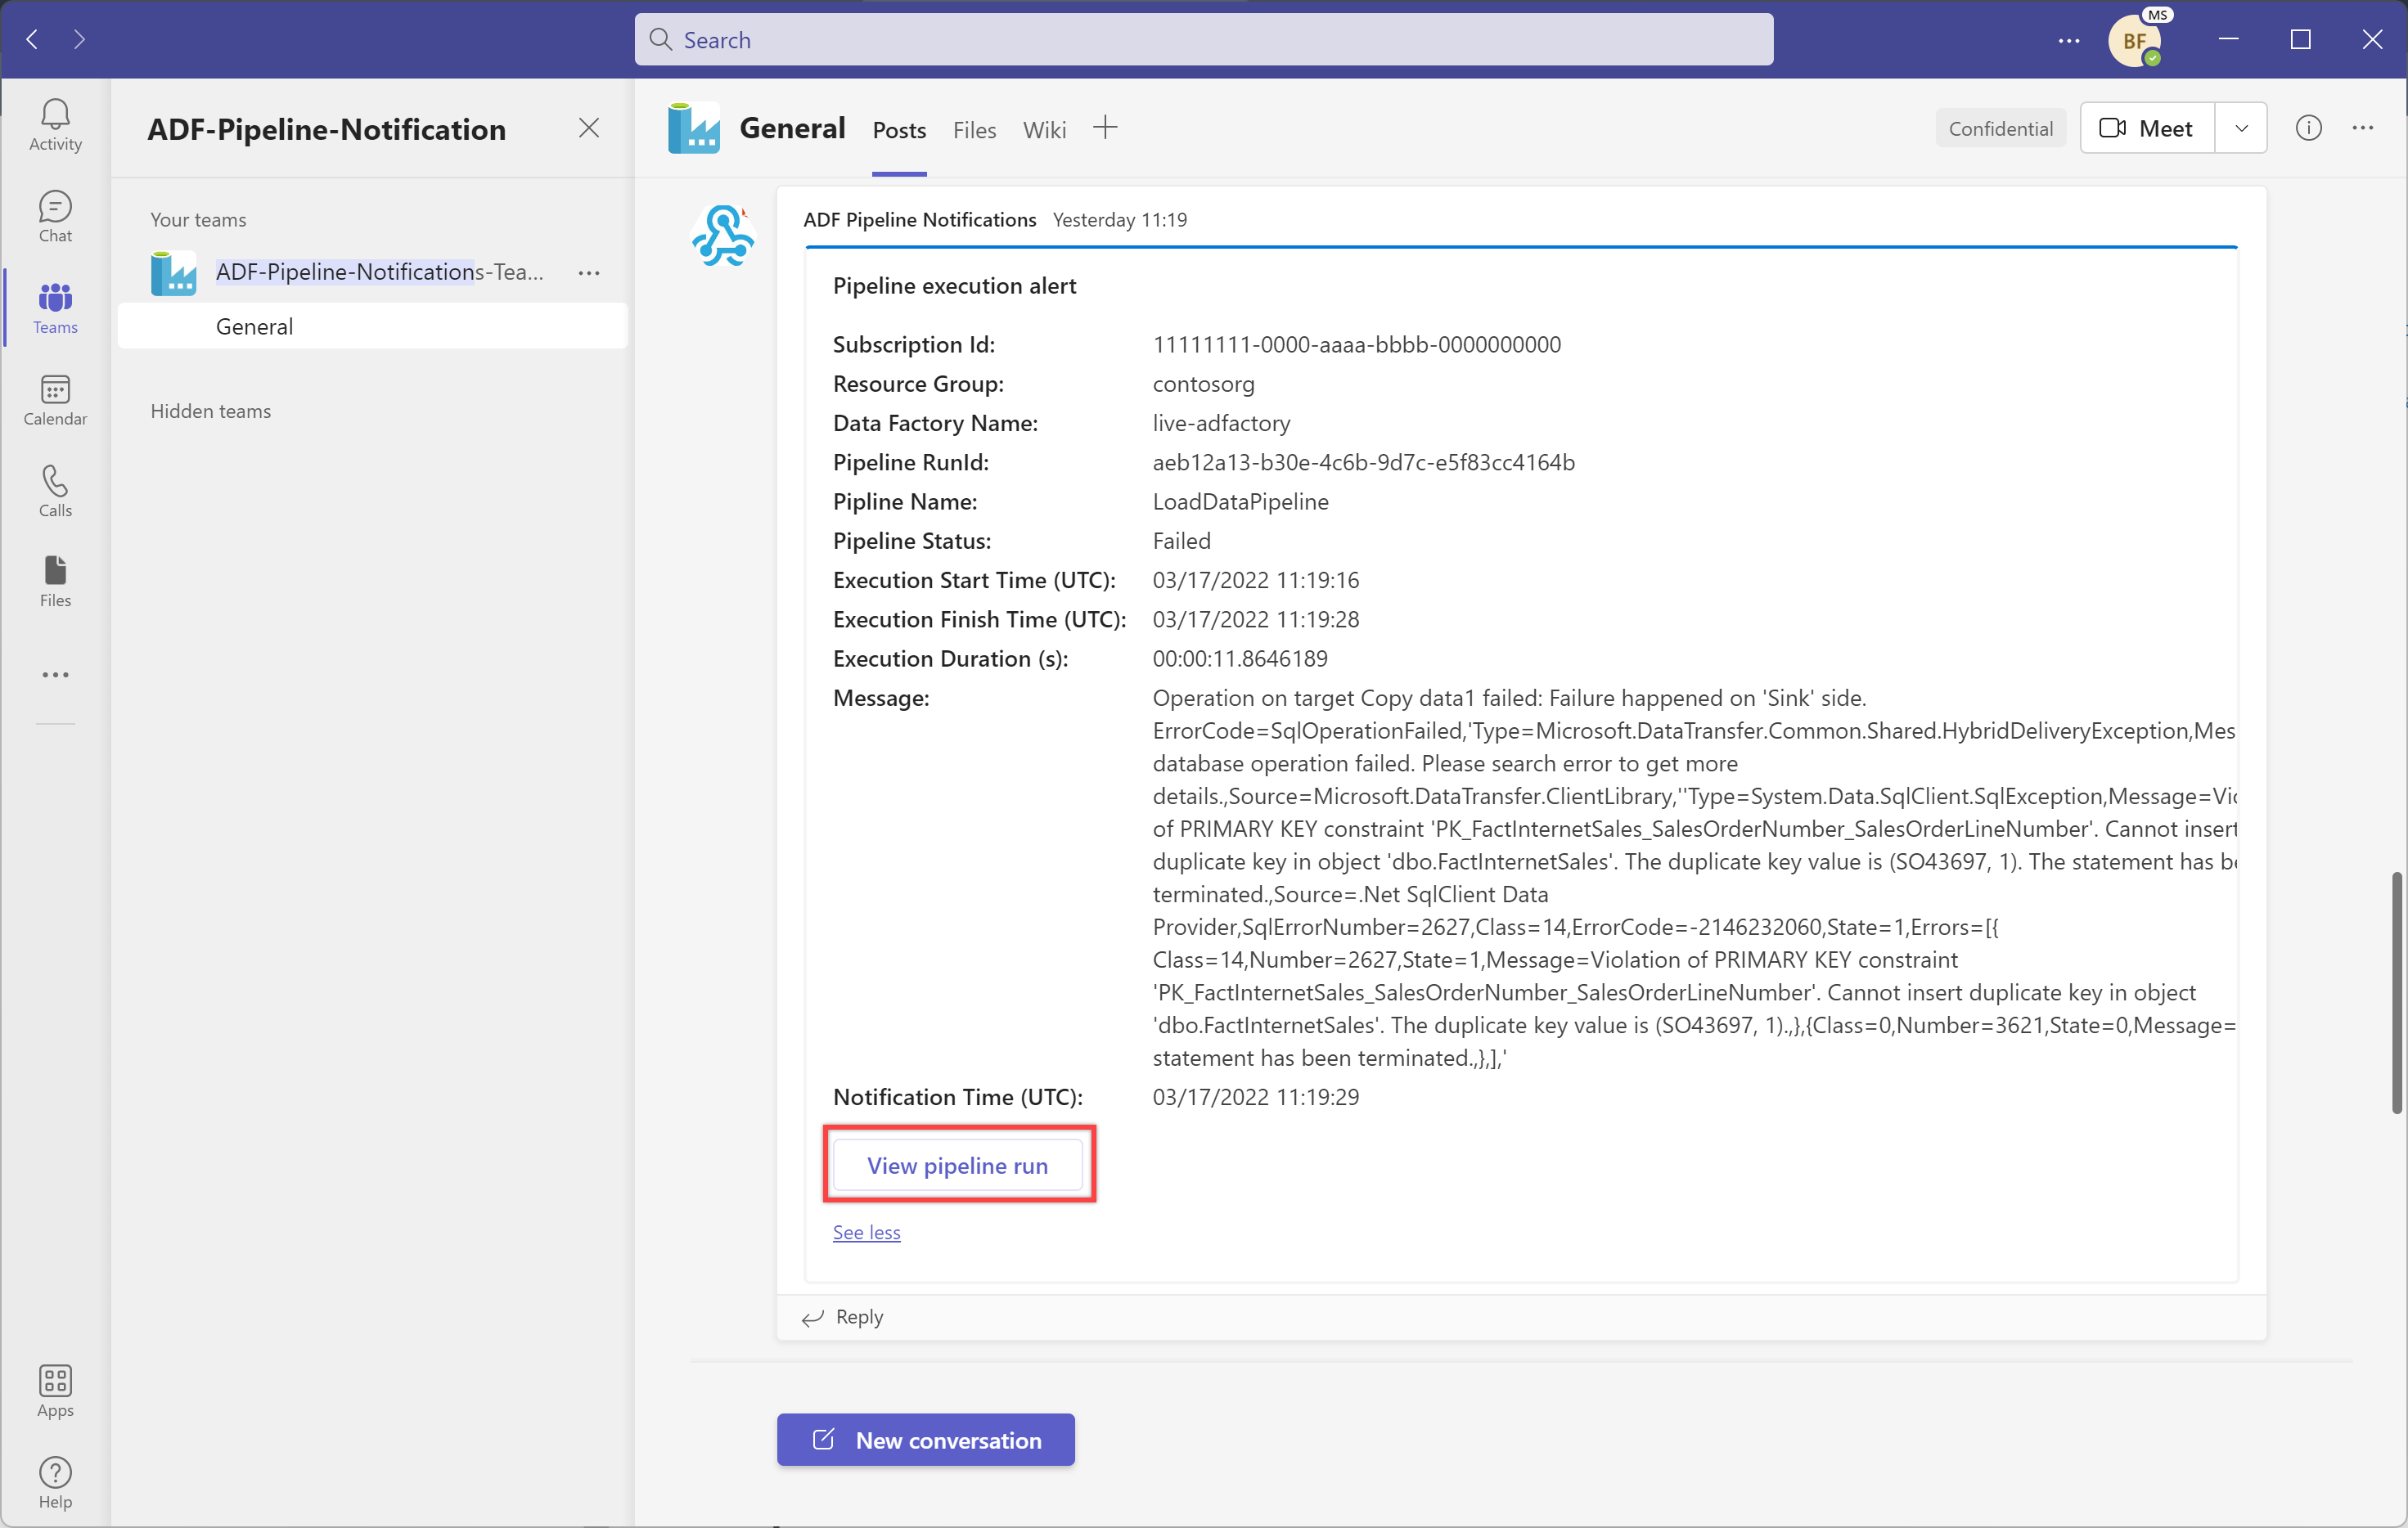
Select the "View pipeline run" button to view pipeline run.
Add dynamic messages with system variables and expressions
You can use system variables and expressions to make your messages dynamic. For example:
@activity("CopyData").output.errors[0].Message@activity("DataFlow").error.Message
The above expressions will return the relevant error messages from a failure, which can be sent out as notification on a Teams channel. For more information about this topic, see the Copy activity output properties article.
We also encourage you to review the Microsoft Teams supported notification payload schema and further customize the above template to your needs.