Note
Access to this page requires authorization. You can try signing in or changing directories.
Access to this page requires authorization. You can try changing directories.
APPLIES TO:  Azure Data Factory
Azure Synapse Analytics
Azure Data Factory
Azure Synapse Analytics
Tip
Looking for an easy way to move data? Copy job in Microsoft Fabric provides a simple, scalable way to load data without building a pipeline. Learn how to create one.
This tutorial demonstrates copying a number of tables from Azure SQL Database to Azure Synapse Analytics. You can apply the same pattern in other copy scenarios as well. For example, copying tables from SQL Server/Oracle to Azure SQL Database/Azure Synapse Analytics /Azure Blob, copying different paths from Blob to Azure SQL Database tables.
Note
If you are new to Azure Data Factory, see Introduction to Azure Data Factory.
At a high level, this tutorial involves following steps:
- Create a data factory.
- Create Azure SQL Database, Azure Synapse Analytics, and Azure Storage linked services.
- Create Azure SQL Database and Azure Synapse Analytics datasets.
- Create a pipeline to look up the tables to be copied and another pipeline to perform the actual copy operation.
- Start a pipeline run.
- Monitor the pipeline and activity runs.
This tutorial uses Azure portal. To learn about using other tools/SDKs to create a data factory, see Quickstarts.
End-to-end workflow
In this scenario, you have a number of tables in Azure SQL Database that you want to copy to Azure Synapse Analytics. Here is the logical sequence of steps in the workflow that happens in pipelines:

- The first pipeline looks up the list of tables that needs to be copied over to the sink data stores. Alternatively you can maintain a metadata table that lists all the tables to be copied to the sink data store. Then, the pipeline triggers another pipeline, which iterates over each table in the database and performs the data copy operation.
- The second pipeline performs the actual copy. It takes the list of tables as a parameter. For each table in the list, copy the specific table in Azure SQL Database to the corresponding table in Azure Synapse Analytics using staged copy via Blob storage and PolyBase for best performance. In this example, the first pipeline passes the list of tables as a value for the parameter.
If you don't have an Azure subscription, create a free account before you begin.
Prerequisites
- Azure Storage account. The Azure Storage account is used as staging blob storage in the bulk copy operation.
- Azure SQL Database. This database contains the source data. Create a database in SQL Database with Adventure Works LT sample data following Create a database in Azure SQL Database article. This tutorial copies all the tables from this sample database to an Azure Synapse Analytics.
- Azure Synapse Analytics. This data warehouse holds the data copied over from the SQL Database. If you don't have an Azure Synapse Analytics workspace, see the Get started with Azure Synapse Analytics article for steps to create one.
Azure services to access SQL server
For both SQL Database and Azure Synapse Analytics, allow Azure services to access SQL server. Ensure that Allow Azure services and resources to access this server setting is turned ON for your server. This setting allows the Data Factory service to read data from your Azure SQL Database and write data to your Azure Synapse Analytics.
To verify and turn on this setting, go to your server > Security > Firewalls and virtual networks > set the Allow Azure services and resources to access this server to ON.
Create a data factory
Launch Microsoft Edge or Google Chrome web browser. Currently, Data Factory UI is supported only in Microsoft Edge and Google Chrome web browsers.
Go to the Azure portal.
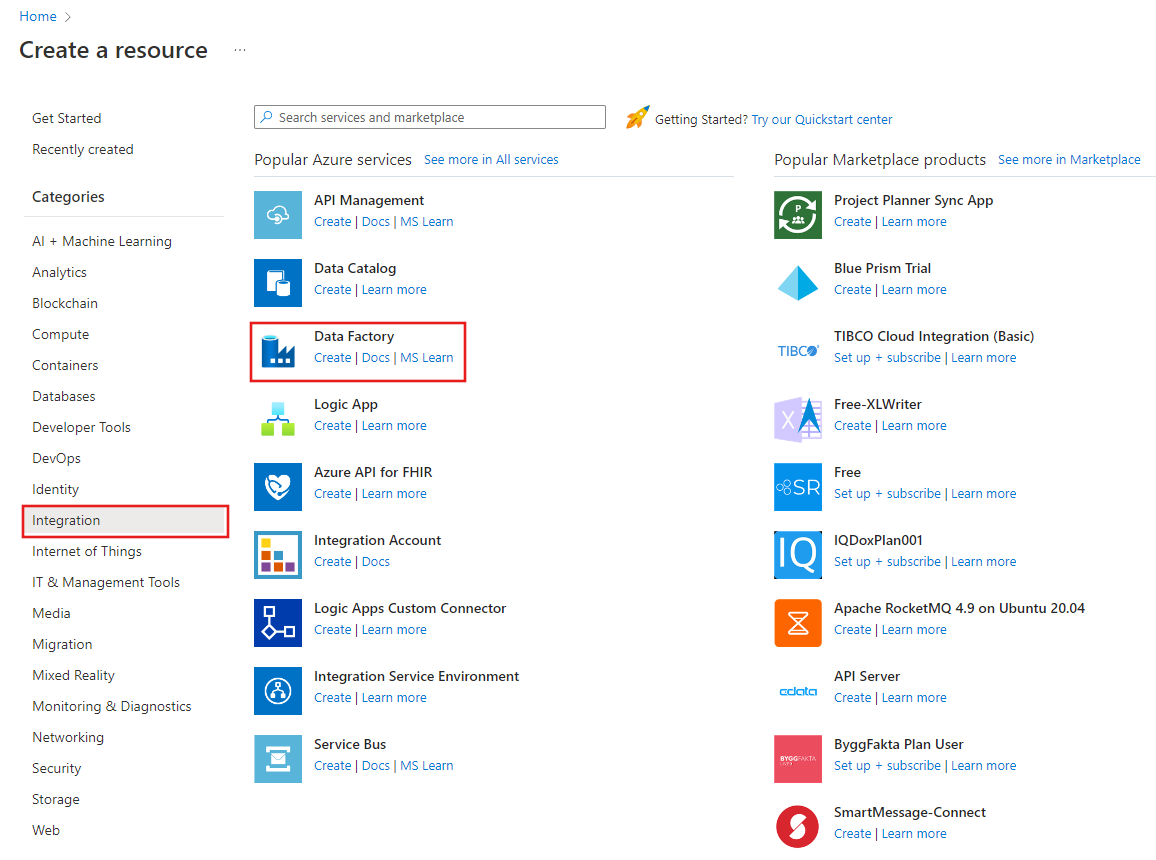
On the top menu, select Create a resource > Analytics > Data Factory :
On the New data factory page, enter ADFTutorialBulkCopyDF for name.
The name of the Azure data factory must be globally unique. If you see the following error for the name field, change the name of the data factory (for example, yournameADFTutorialBulkCopyDF). See Data Factory - Naming Rules article for naming rules for Data Factory artifacts.
Data factory name "ADFTutorialBulkCopyDF" is not availableSelect your Azure subscription in which you want to create the data factory.
For the Resource Group, do one of the following steps:
Select Use existing, and select an existing resource group from the drop-down list.
Select Create new, and enter the name of a resource group.
To learn about resource groups, see Using resource groups to manage your Azure resources.
Select V2 for the version.
Select the location for the data factory. For a list of Azure regions in which Data Factory is currently available, select the regions that interest you on the following page, and then expand Analytics to locate Data Factory: Products available by region. The data stores (Azure Storage, Azure SQL Database, etc.) and computes (HDInsight, etc.) used by data factory can be in other regions.
Click Create.
After the creation is complete, select Go to resource to navigate to the Data Factory page.
Select Open on the Open Azure Data Factory Studio tile to launch the Data Factory UI application in a separate tab.
Create linked services
You create linked services to link your data stores and computes to a data factory. A linked service has the connection information that the Data Factory service uses to connect to the data store at runtime.
In this tutorial, you link your Azure SQL Database, Azure Synapse Analytics, and Azure Blob Storage data stores to your data factory. The Azure SQL Database is the source data store. The Azure Synapse Analytics is the sink/destination data store. The Azure Blob Storage is to stage the data before the data is loaded into Azure Synapse Analytics by using PolyBase.
Create the source Azure SQL Database linked service
In this step, you create a linked service to link your database in Azure SQL Database to the data factory.
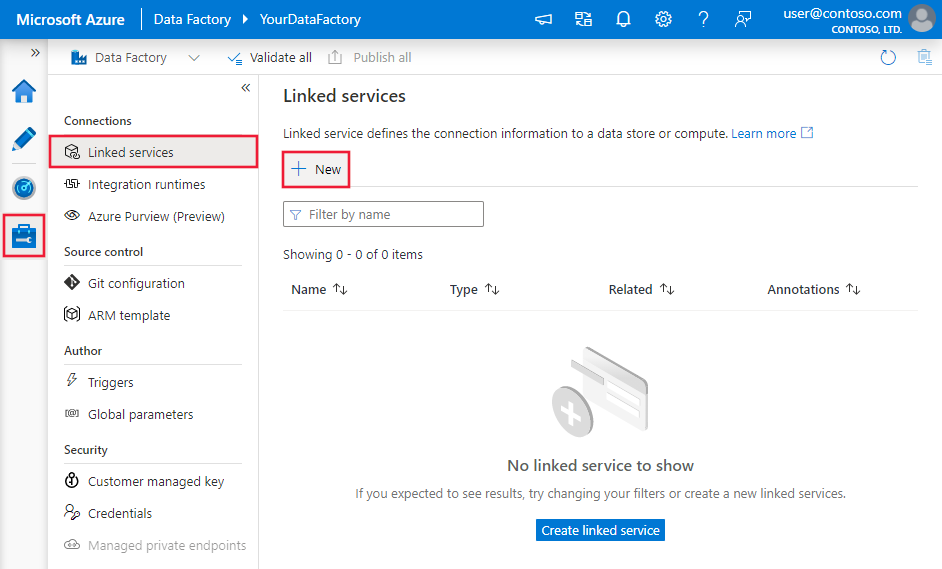
Open Manage tab from the left pane.
On the Linked services page, select +New to create a new linked service.
In the New Linked Service window, select Azure SQL Database, and click Continue.
In the New Linked Service (Azure SQL Database) window, do the following steps:
a. Enter AzureSqlDatabaseLinkedService for Name.
b. Select your server for Server name
c. Select your database for Database name.
d. Enter name of the user to connect to your database.
e. Enter password for the user.
f. To test the connection to your database using the specified information, click Test connection.
g. Click Create to save the linked service.
Create the sink Azure Synapse Analytics linked service
In the Connections tab, click + New on the toolbar again.
In the New Linked Service window, select Azure Synapse Analytics, and click Continue.
In the New Linked Service (Azure Synapse Analytics) window, do the following steps:
a. Enter AzureSqlDWLinkedService for Name.
b. Select your server for Server name
c. Select your database for Database name.
d. Enter User name to connect to your database.
e. Enter Password for the user.
f. To test the connection to your database using the specified information, click Test connection.
g. Click Create.
Create the staging Azure Storage linked service
In this tutorial, you use Azure Blob storage as an interim staging area to enable PolyBase for a better copy performance.
In the Connections tab, click + New on the toolbar again.
In the New Linked Service window, select Azure Blob Storage, and click Continue.
In the New Linked Service (Azure Blob Storage) window, do the following steps:
a. Enter AzureStorageLinkedService for Name.
b. Select your Azure Storage account for Storage account name.c. Click Create.
Create datasets
In this tutorial, you create source and sink datasets, which specify the location where the data is stored.
The input dataset AzureSqlDatabaseDataset refers to the AzureSqlDatabaseLinkedService. The linked service specifies the connection string to connect to the database. The dataset specifies the name of the database and the table that contains the source data.
The output dataset AzureSqlDWDataset refers to the AzureSqlDWLinkedService. The linked service specifies the connection string to connect to the Azure Synapse Analytics. The dataset specifies the database and the table to which the data is copied.
In this tutorial, the source and destination SQL tables are not hard-coded in the dataset definitions. Instead, the ForEach activity passes the name of the table at runtime to the Copy activity.
Create a dataset for source SQL Database
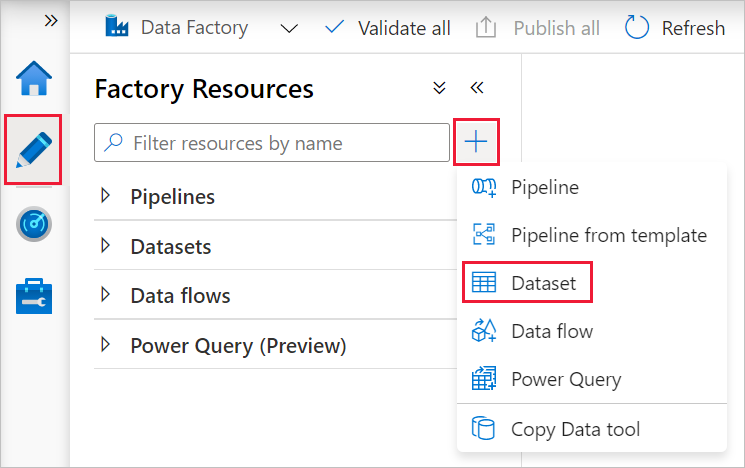
Select Author tab from the left pane.
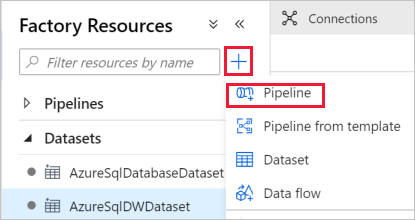
Select the + (plus) in the left pane, and then select Dataset.
In the New Dataset window, select Azure SQL Database, and then click Continue.
In the Set properties window, under Name, enter AzureSqlDatabaseDataset. Under Linked service, select AzureSqlDatabaseLinkedService. Then click OK.
Switch to the Connection tab, select any table for Table. This table is a dummy table. You specify a query on the source dataset when creating a pipeline. The query is used to extract data from your database. Alternatively, you can click Edit check box, and enter dbo.dummyName as the table name.
Create a dataset for sink Azure Synapse Analytics
Click + (plus) in the left pane, and click Dataset.
In the New Dataset window, select Azure Synapse Analytics, and then click Continue.
In the Set properties window, under Name, enter AzureSqlDWDataset. Under Linked service, select AzureSqlDWLinkedService. Then click OK.
Switch to the Parameters tab, click + New, and enter DWTableName for the parameter name. Click + New again, and enter DWSchema for the parameter name. If you copy/paste this name from the page, ensure that there's no trailing space character at the end of DWTableName and DWSchema.
Switch to the Connection tab,
For Table, check the Edit option. Select into the first input box and click the Add dynamic content link below. In the Add Dynamic Content page, click the DWSchema under Parameters, which will automatically populate the top expression text box
@dataset().DWSchema, and then click Finish.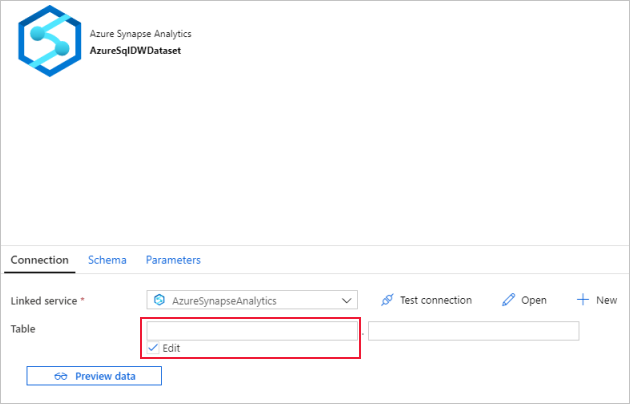
Select into the second input box and click the Add dynamic content link below. In the Add Dynamic Content page, click the DWTAbleName under Parameters, which will automatically populate the top expression text box
@dataset().DWTableName, and then click Finish.The tableName property of the dataset is set to the values that are passed as arguments for the DWSchema and DWTableName parameters. The ForEach activity iterates through a list of tables, and passes one by one to the Copy activity.
Create pipelines
In this tutorial, you create two pipelines: IterateAndCopySQLTables and GetTableListAndTriggerCopyData.
The GetTableListAndTriggerCopyData pipeline performs two actions:
- Looks up the Azure SQL Database system table to get the list of tables to be copied.
- Triggers the pipeline IterateAndCopySQLTables to do the actual data copy.
The IterateAndCopySQLTables pipeline takes a list of tables as a parameter. For each table in the list, it copies data from the table in Azure SQL Database to Azure Synapse Analytics using staged copy and PolyBase.
Create the pipeline IterateAndCopySQLTables
In the left pane, click + (plus), and click Pipeline.
In the General panel under Properties, specify IterateAndCopySQLTables for Name. Then collapse the panel by clicking the Properties icon in the top-right corner.
Switch to the Parameters tab, and do the following actions:
a. Click + New.
b. Enter tableList for the parameter Name.
c. Select Array for Type.
In the Activities toolbox, expand Iteration & Conditions, and drag-drop the ForEach activity to the pipeline design surface. You can also search for activities in the Activities toolbox.
a. In the General tab at the bottom, enter IterateSQLTables for Name.
b. Switch to the Settings tab, click the input box for Items, then click the Add dynamic content link below.
c. In the Add Dynamic Content page, collapse the System Variables and Functions sections, click the tableList under Parameters, which will automatically populate the top expression text box as
@pipeline().parameter.tableList. Then click Finish.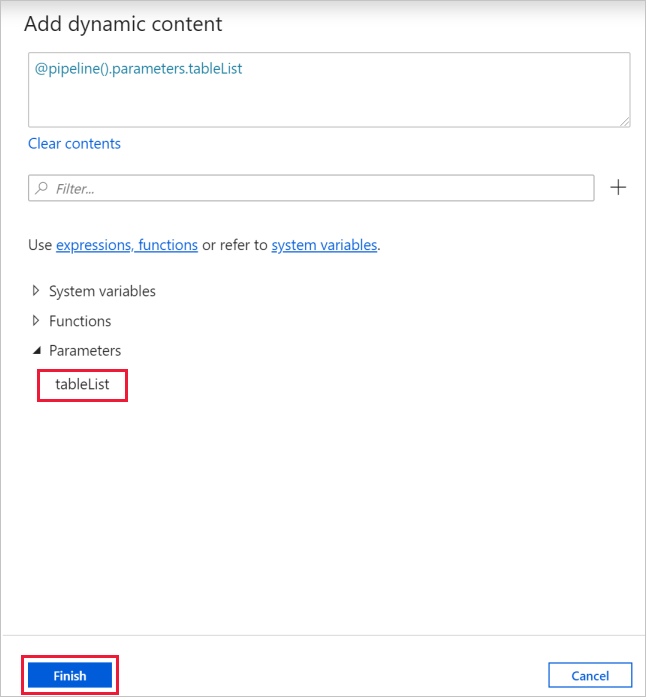
d. Switch to Activities tab, click the pencil icon to add a child activity to the ForEach activity.

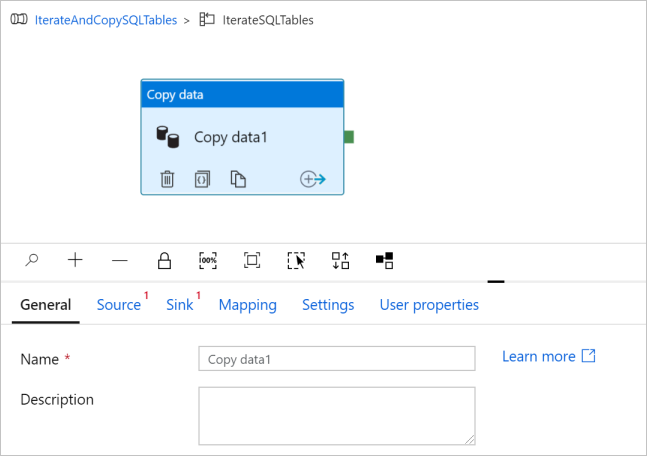
In the Activities toolbox, expand Move & Transfer, and drag-drop Copy data activity into the pipeline designer surface. Notice the breadcrumb menu at the top. The IterateAndCopySQLTable is the pipeline name and IterateSQLTables is the ForEach activity name. The designer is in the activity scope. To switch back to the pipeline editor from the ForEach editor, you can click the link in the breadcrumb menu.
Switch to the Source tab, and do the following steps:
Select AzureSqlDatabaseDataset for Source Dataset.
Select Query option for Use query.
Click the Query input box -> select the Add dynamic content below -> enter the following expression for Query -> select Finish.
SELECT * FROM [@{item().TABLE_SCHEMA}].[@{item().TABLE_NAME}]
Switch to the Sink tab, and do the following steps:
Select AzureSqlDWDataset for Sink Dataset.
Click the input box for the VALUE of DWTableName parameter -> select the Add dynamic content below, enter
@item().TABLE_NAMEexpression as script, -> select Finish.Click the input box for the VALUE of DWSchema parameter -> select the Add dynamic content below, enter
@item().TABLE_SCHEMAexpression as script, -> select Finish.For Copy method, select PolyBase.
Clear the Use type default option.
For Table option, the default setting is "None". If you don’t have tables pre-created in the sink Azure Synapse Analytics, enable Auto create table option, copy activity will then automatically create tables for you based on the source data. For details, refer to Auto create sink tables.
Click the Pre-copy Script input box -> select the Add dynamic content below -> enter the following expression as script -> select Finish.
IF EXISTS (SELECT * FROM [@{item().TABLE_SCHEMA}].[@{item().TABLE_NAME}]) TRUNCATE TABLE [@{item().TABLE_SCHEMA}].[@{item().TABLE_NAME}]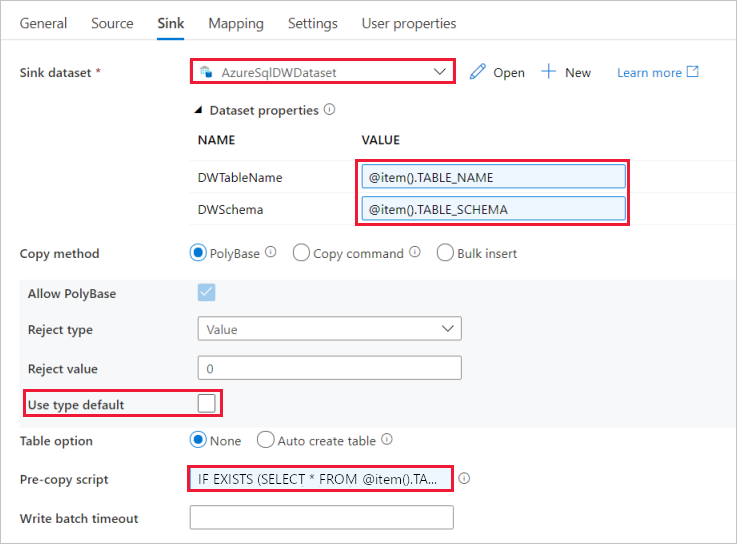
Switch to the Settings tab, and do the following steps:
- Select the checkbox for Enable Staging.
- Select AzureStorageLinkedService for Store Account Linked Service.
To validate the pipeline settings, click Validate on the top pipeline tool bar. Make sure that there's no validation error. To close the Pipeline Validation Report, click the double angle brackets >>.
Create the pipeline GetTableListAndTriggerCopyData
This pipeline does two actions:
- Looks up the Azure SQL Database system table to get the list of tables to be copied.
- Triggers the pipeline "IterateAndCopySQLTables" to do the actual data copy.
Here are the steps to create the pipeline:
In the left pane, click + (plus), and click Pipeline.
In the General panel under Properties, change the name of the pipeline to GetTableListAndTriggerCopyData.
In the Activities toolbox, expand General, and drag-drop Lookup activity to the pipeline designer surface, and do the following steps:
- Enter LookupTableList for Name.
- Enter Retrieve the table list from my database for Description.
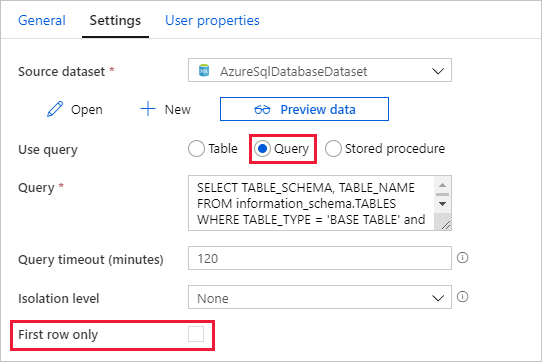
Switch to the Settings tab, and do the following steps:
Select AzureSqlDatabaseDataset for Source Dataset.
Select Query for Use query.
Enter the following SQL query for Query.
SELECT TABLE_SCHEMA, TABLE_NAME FROM information_schema.TABLES WHERE TABLE_TYPE = 'BASE TABLE' and TABLE_SCHEMA = 'SalesLT' and TABLE_NAME <> 'ProductModel'Clear the checkbox for the First row only field.
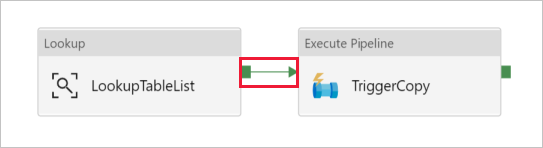
Drag-drop Execute Pipeline activity from the Activities toolbox to the pipeline designer surface, and set the name to TriggerCopy.
To Connect the Lookup activity to the Execute Pipeline activity, drag the green box attached to the Lookup activity to the left of Execute Pipeline activity.
Switch to the Settings tab of Execute Pipeline activity, and do the following steps:
Select IterateAndCopySQLTables for Invoked pipeline.
Clear the checkbox for Wait on completion.
In the Parameters section, click the input box under VALUE -> select the Add dynamic content below -> enter
@activity('LookupTableList').output.valueas table name value -> select Finish. You're setting the result list from the Lookup activity as an input to the second pipeline. The result list contains the list of tables whose data needs to be copied to the destination.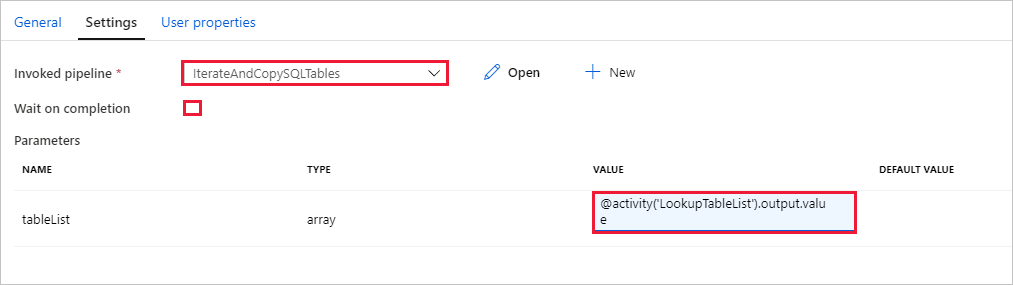
To validate the pipeline, click Validate on the toolbar. Confirm that there are no validation errors. To close the Pipeline Validation Report, click >>.
To publish entities (datasets, pipelines, etc.) to the Data Factory service, click Publish all on top of the window. Wait until the publishing succeeds.
Trigger a pipeline run
Go to pipeline GetTableListAndTriggerCopyData, click Add Trigger on the top pipeline tool bar, and then click Trigger now.
Confirm the run on the Pipeline run page, and then select Finish.
Monitor the pipeline run
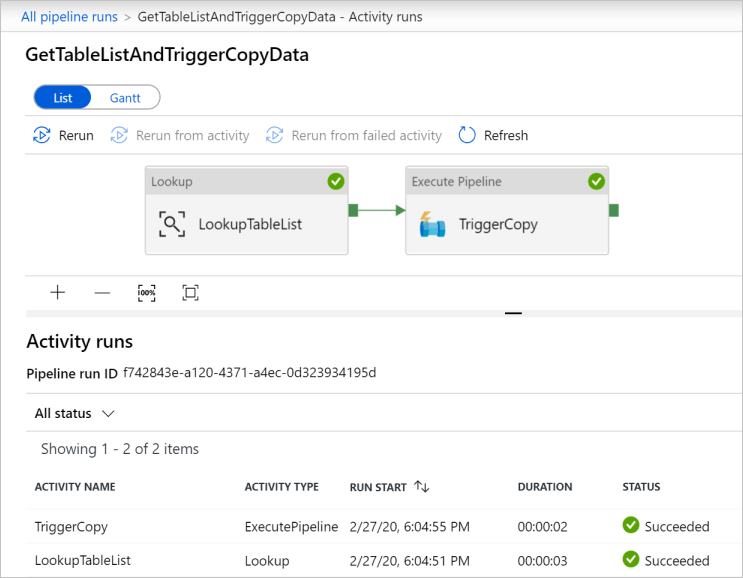
Switch to the Monitor tab. Click Refresh until you see runs for both the pipelines in your solution. Continue refreshing the list until you see the Succeeded status.
To view activity runs associated with the GetTableListAndTriggerCopyData pipeline, click the pipeline name link for the pipeline. You should see two activity runs for this pipeline run.
To view the output of the Lookup activity, click the Output link next to the activity under the ACTIVITY NAME column. You can maximize and restore the Output window. After reviewing, click X to close the Output window.
{
    "count": 9,
    "value": [
        {
            "TABLE_SCHEMA": "SalesLT",
            "TABLE_NAME": "Customer"
        },
        {
            "TABLE_SCHEMA": "SalesLT",
            "TABLE_NAME": "ProductDescription"
        },
        {
            "TABLE_SCHEMA": "SalesLT",
            "TABLE_NAME": "Product"
        },
        {
            "TABLE_SCHEMA": "SalesLT",
            "TABLE_NAME": "ProductModelProductDescription"
        },
        {
            "TABLE_SCHEMA": "SalesLT",
            "TABLE_NAME": "ProductCategory"
        },
        {
            "TABLE_SCHEMA": "SalesLT",
            "TABLE_NAME": "Address"
        },
        {
            "TABLE_SCHEMA": "SalesLT",
            "TABLE_NAME": "CustomerAddress"
        },
        {
            "TABLE_SCHEMA": "SalesLT",
            "TABLE_NAME": "SalesOrderDetail"
        },
        {
            "TABLE_SCHEMA": "SalesLT",
            "TABLE_NAME": "SalesOrderHeader"
        }
    ],
    "effectiveIntegrationRuntime": "DefaultIntegrationRuntime (East US)",
    "effectiveIntegrationRuntimes": [
        {
            "name": "DefaultIntegrationRuntime",
            "type": "Managed",
            "location": "East US",
            "billedDuration": 0,
            "nodes": null
        }
    ]
}
To switch back to the Pipeline Runs view, click All Pipeline runs link at the top of the breadcrumb menu. Click IterateAndCopySQLTables link (under PIPELINE NAME column) to view activity runs of the pipeline. Notice that there's one Copy activity run for each table in the Lookup activity output.
Confirm that the data was copied to the target Azure Synapse Analytics you used in this tutorial.
Related content
You performed the following steps in this tutorial:
- Create a data factory.
- Create Azure SQL Database, Azure Synapse Analytics, and Azure Storage linked services.
- Create Azure SQL Database and Azure Synapse Analytics datasets.
- Create a pipeline to look up the tables to be copied and another pipeline to perform the actual copy operation.
- Start a pipeline run.
- Monitor the pipeline and activity runs.
Advance to the following tutorial to learn about copy data incrementally from a source to a destination: