Note
Access to this page requires authorization. You can try signing in or changing directories.
Access to this page requires authorization. You can try changing directories.
APPLIES TO:  Azure Data Factory
Azure Synapse Analytics
Azure Data Factory
Azure Synapse Analytics
Tip
Data Factory in Microsoft Fabric is the next generation of Azure Data Factory, with a simpler architecture, built-in AI, and new features. If you're new to data integration, start with Fabric Data Factory. Existing ADF workloads can upgrade to Fabric to access new capabilities across data science, real-time analytics, and reporting.
In this tutorial, you create a data factory by using the Azure Data Factory user interface (UI). The pipeline in this data factory copies data securely from Azure Blob storage to an Azure SQL database (both allowing access to only selected networks) by using private endpoints in Azure Data Factory Managed Virtual Network. The configuration pattern in this tutorial applies to copying from a file-based data store to a relational data store. For a list of data stores supported as sources and sinks, see the Supported data stores and formats table. The private endpoints feature is available across all tiers of Azure Data Factory, so no specific tier is required to utilize them. For more details on pricing and tiers, please refer to the Azure Data Factory pricing page.
Note
If you're new to Data Factory, see Introduction to Azure Data Factory.
In this tutorial, you do the following steps:
- Create a data factory.
- Create a pipeline with a copy activity.
Prerequisites
- Azure subscription. If you don't have an Azure subscription, create a free Azure account before you begin.
- Azure storage account. You use Blob storage as a source data store. If you don't have a storage account, see Create an Azure storage account for steps to create one. Ensure the storage account allows access only from selected networks.
- Azure SQL Database. You use the database as a sink data store. If you don't have an Azure SQL database, see Create a SQL database for steps to create one. Ensure the SQL Database account allows access only from selected networks.
Create a blob and a SQL table
Now, prepare your blob storage and SQL database for the tutorial by performing the following steps.
Create a source blob
Open Notepad. Copy the following text, and save it as an emp.txt file on your disk:
FirstName,LastName
John,Doe
Jane,Doe
Create a container named adftutorial in your blob storage. Create a folder named input in this container. Then, upload the emp.txt file to the input folder. Use the Azure portal or tools such as Azure Storage Explorer to do these tasks.
Create a sink SQL table
Use the following SQL script to create the dbo.emp table in your SQL database:
CREATE TABLE dbo.emp
(
    ID int IDENTITY(1,1) NOT NULL,
    FirstName varchar(50),
    LastName varchar(50)
)
GO

CREATE CLUSTERED INDEX IX_emp_ID ON dbo.emp (ID);
Create a data factory
In this step, you create a data factory and start the Data Factory UI to create a pipeline in the data factory.
Open Microsoft Edge or Google Chrome. Currently, only Microsoft Edge and Google Chrome web browsers support the Data Factory UI.
On the left menu, select Create a resource > Analytics > Data Factory.
On the New data factory page, under Name, enter ADFTutorialDataFactory.
The name of the Azure data factory must be globally unique. If you receive an error message about the name value, enter a different name for the data factory (for example, yournameADFTutorialDataFactory). For naming rules for Data Factory artifacts, see Data Factory naming rules.
Select the Azure subscription in which you want to create the data factory.
For Resource Group, take one of the following steps:
- Select Use existing, and select an existing resource group from the drop-down list.
- Select Create new, and enter the name of a resource group.
To learn about resource groups, see Use resource groups to manage your Azure resources.
Under Version, select V2.
Under Location, select a location for the data factory. Only locations that are supported appear in the drop-down list. The data stores (for example, Azure Storage and SQL Database) and computes (for example, Azure HDInsight) used by the data factory can be in other regions.
Select Create.
After the creation is finished, you see the notice in the Notifications center. Select Go to resource to go to the Data Factory page.
Select Open on the Open Azure Data Factory Studio tile to launch the Data Factory UI in a separate tab.
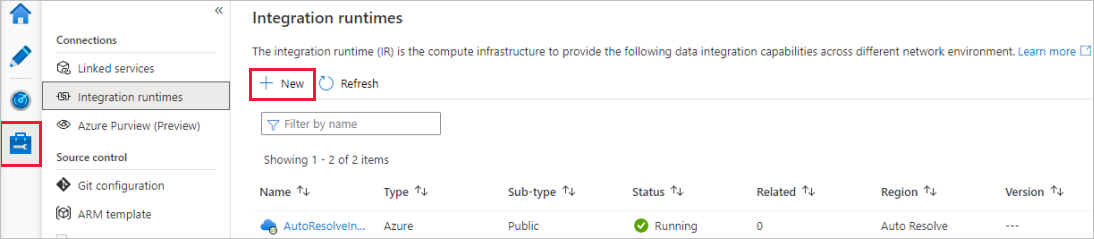
Create an Azure integration runtime in Data Factory Managed Virtual Network
In this step, you create an Azure integration runtime and enable Data Factory Managed Virtual Network.
In the Data Factory portal, go to Manage and select New to create a new Azure integration runtime.
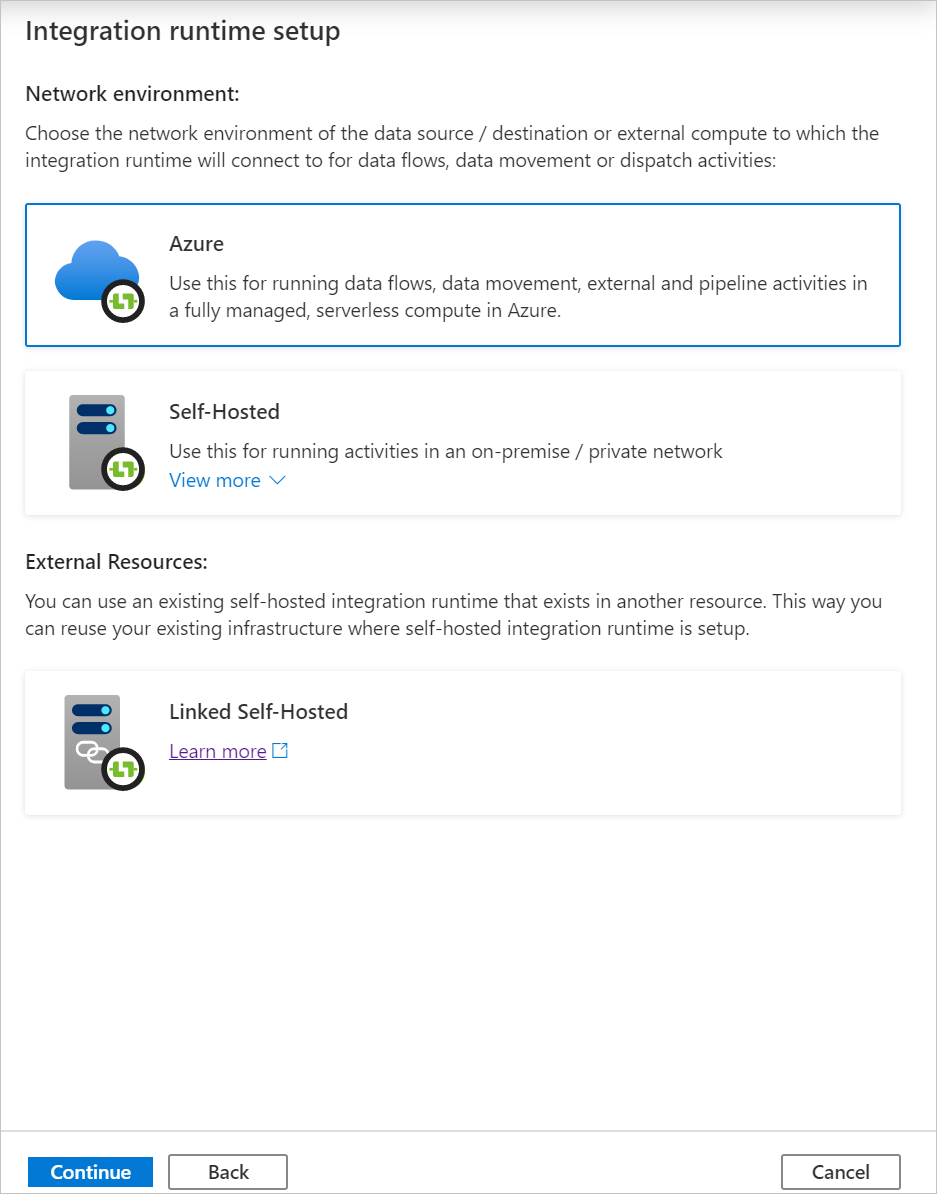
On the Integration runtime setup page, choose what integration runtime to create based on required capabilities. In this tutorial, select Azure, Self-Hosted and then click Continue.
Select Azure and then click Continue to create an Azure Integration runtime.
Under Virtual network configuration (Preview), select Enable.
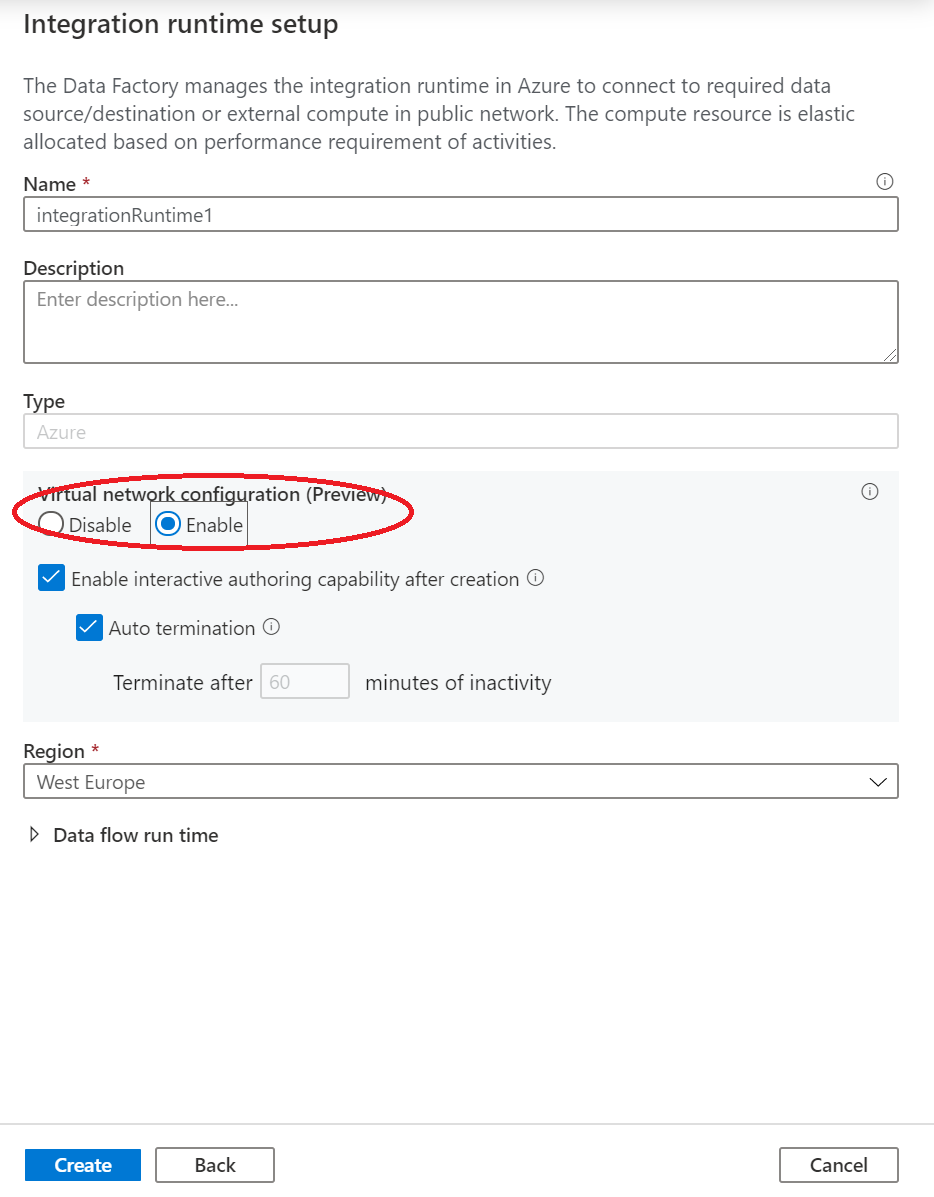
Select Create.
Create a pipeline
In this step, you create a pipeline with a copy activity in the data factory. The copy activity copies data from Blob storage to SQL Database. In the Quickstart tutorial, you created a pipeline by following these steps:
- Create the linked service.
- Create input and output datasets.
- Create a pipeline.
In this tutorial, you start by creating a pipeline. Then you create linked services and datasets when you need them to configure the pipeline.
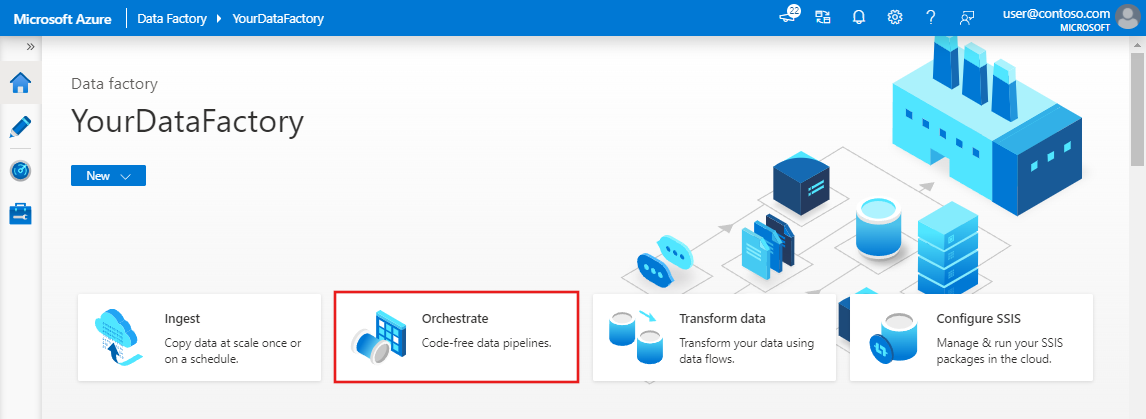
On the home page, select Orchestrate.
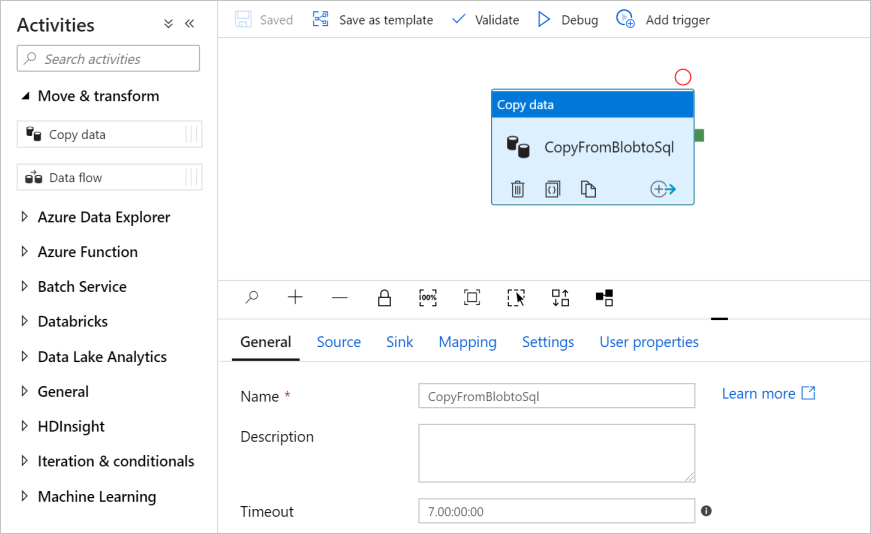
In the properties pane for the pipeline, enter CopyPipeline for the pipeline name.
In the Activities tool box, expand the Move and Transform category, and drag the Copy data activity from the tool box to the pipeline designer surface. Enter CopyFromBlobToSql for the name.
Configure a source
Tip
In this tutorial, you use Account key as the authentication type for your source data store. You can also choose other supported authentication methods, such as SAS URI,Service Principal, and Managed Identity if needed. For more information, see the corresponding sections in Copy and transform data in Azure Blob storage by using Azure Data Factory.
To store secrets for data stores securely, we also recommend that you use Azure Key Vault. For more information and illustrations, see Store credentials in Azure Key Vault.
Create a source dataset and linked service
Go to the Source tab. Select + New to create a source dataset.
In the New Dataset dialog box, select Azure Blob Storage, and then select Continue. The source data is in Blob storage, so you select Azure Blob Storage for the source dataset.
In the Select Format dialog box, select the format type of your data, and then select Continue.
In the Set Properties dialog box, enter SourceBlobDataset for Name. Select the check box for First row as header. Under the Linked service text box, select + New.
In the New linked service (Azure Blob Storage) dialog box, enter AzureStorageLinkedService as Name, and select your storage account from the Storage account name list.
Make sure you enable Interactive authoring. It might take around one minute to be enabled.
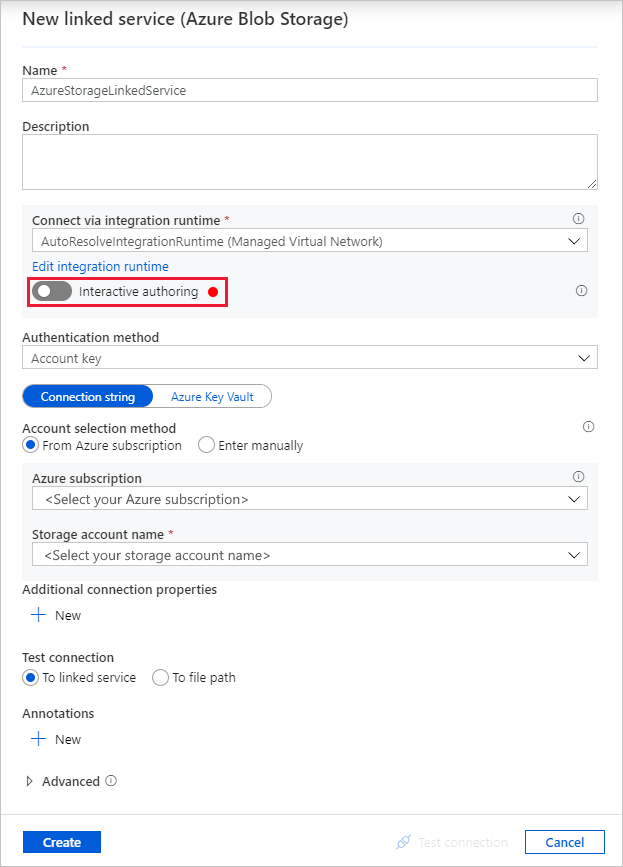
Select Test connection. It should fail when the storage account allows access only from Selected networks and requires Data Factory to create a private endpoint to it that should be approved prior to using it. In the error message, you should see a link to create a private endpoint that you can follow to create a managed private endpoint. An alternative is to go directly to the Manage tab and follow instructions in the next section to create a managed private endpoint.
Note
The Manage tab might not be available for all data factory instances. If you don't see it, you can access private endpoints by selecting Author > Connections > Private Endpoint.
Keep the dialog box open, and then go to your storage account.
Follow instructions in this section to approve the private link.
Go back to the dialog box. Select Test connection again, and select Create to deploy the linked service.
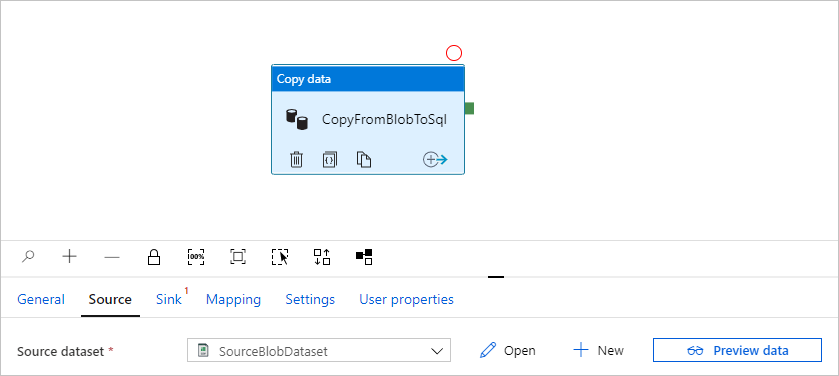
After the linked service is created, it goes back to the Set properties page. Next to File path, select Browse.
Go to the adftutorial/input folder, select the emp.txt file, and then select OK.
Select OK. It automatically goes to the pipeline page. On the Source tab, confirm that SourceBlobDataset is selected. To preview data on this page, select Preview data.
Create a managed private endpoint
If you didn't select the hyperlink when you tested the connection, follow the path. Now you need to create a managed private endpoint that you'll connect to the linked service you created.
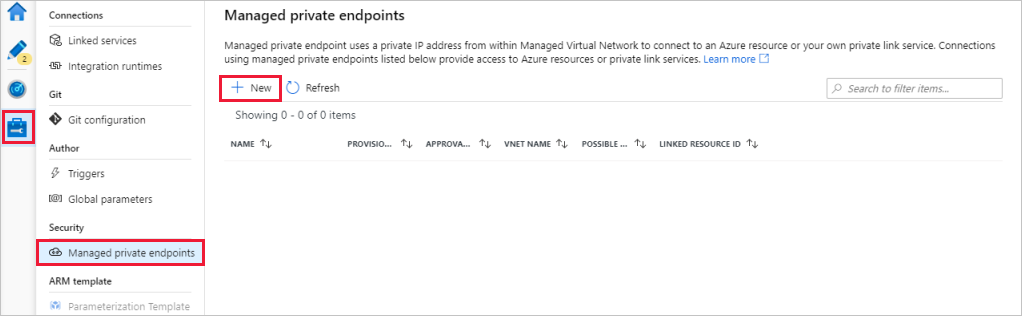
Go to the Manage tab.
Note
The Manage tab might not be available for all Data Factory instances. If you don't see it, you can access private endpoints by selecting Author > Connections > Private Endpoint.
Go to the Managed private endpoints section.
Select + New under Managed private endpoints.
Select the Azure Blob Storage tile from the list, and select Continue.
Enter the name of the storage account you created.
Select Create.
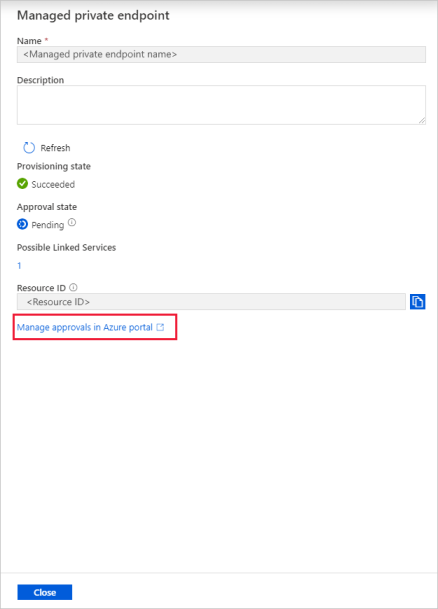
After a few seconds, you should see that the private link created needs an approval.
Select the private endpoint that you created. You can see a hyperlink that will lead you to approve the private endpoint at the storage account level.
Approval of a private link in a storage account
In the storage account, go to Private endpoint connections under the Settings section.
Select the check box for the private endpoint you created, and select Approve.
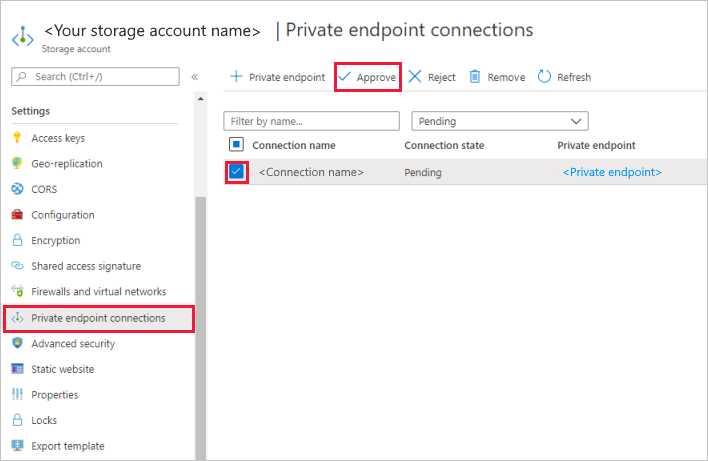
Add a description, and select yes.
Go back to the Managed private endpoints section of the Manage tab in Data Factory.
After about one or two minutes, you should see the approval of your private endpoint appear in the Data Factory UI.
Configure a sink
Tip
In this tutorial, you use SQL authentication as the authentication type for your sink data store. You can also choose other supported authentication methods, such as Service Principal and Managed Identity if needed. For more information, see corresponding sections in Copy and transform data in Azure SQL Database by using Azure Data Factory.
To store secrets for data stores securely, we also recommend that you use Azure Key Vault. For more information and illustrations, see Store credentials in Azure Key Vault.
Create a sink dataset and linked service
Go to the Sink tab, and select + New to create a sink dataset.
In the New Dataset dialog box, enter SQL in the search box to filter the connectors. Select Azure SQL Database, and then select Continue. In this tutorial, you copy data to a SQL database.
In the Set Properties dialog box, enter OutputSqlDataset for Name. From the Linked service drop-down list, select + New. A dataset must be associated with a linked service. The linked service has the connection string that Data Factory uses to connect to the SQL database at runtime. The dataset specifies the container, folder, and the file (optional) to which the data is copied.
In the New linked service (Azure SQL Database) dialog box, take the following steps:
- Under Name, enter AzureSqlDatabaseLinkedService.
- Under Server name, select your SQL Server instance.
- Make sure you enable Interactive authoring.
- Under Database name, select your SQL database.
- Under User name, enter the name of the user.
- Under Password, enter the password for the user.
- Select Test connection. It should fail because the SQL server allows access only from Selected networks and requires Data Factory to create a private endpoint to it, which should be approved prior to using it. In the error message, you should see a link to create a private endpoint that you can follow to create a managed private endpoint. An alternative is to go directly to the Manage tab and follow instructions in the next section to create a managed private endpoint.
- Keep the dialog box open, and then go to your selected SQL server.
- Follow instructions in this section to approve the private link.
- Go back to the dialog box. Select Test connection again, and select Create to deploy the linked service.
It automatically goes to the Set Properties dialog box. In Table, select [dbo].[emp]. Then select OK.
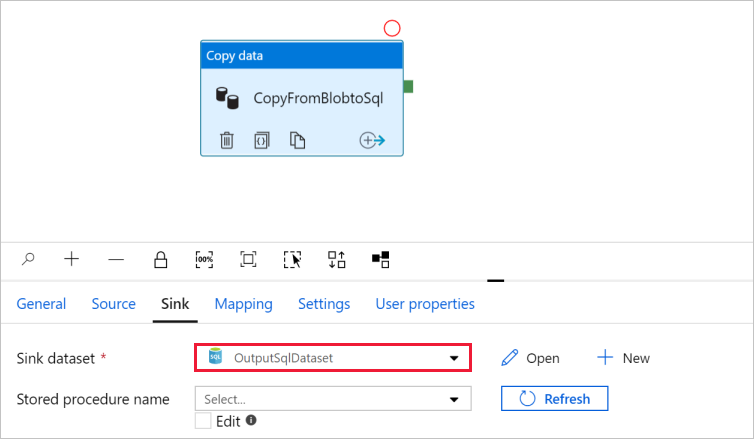
Go to the tab with the pipeline, and in Sink dataset, confirm that OutputSqlDataset is selected.
You can optionally map the schema of the source to the corresponding schema of the destination by following Schema mapping in copy activity.
Create a managed private endpoint
If you didn't select the hyperlink when you tested the connection, follow the path. Now you need to create a managed private endpoint that you'll connect to the linked service you created.
Go to the Manage tab.
Go to the Managed private endpoints section.
Select + New under Managed private endpoints.
Select the Azure SQL Database tile from the list, and select Continue.
Enter the name of the SQL server you selected.
Select Create.
After a few seconds, you should see that the private link created needs an approval.
Select the private endpoint that you created. You can see a hyperlink that will lead you to approve the private endpoint at the SQL server level.
Approval of a private link in SQL Server
- In the SQL server, go to Private endpoint connections under the Settings section.
- Select the check box for the private endpoint you created, and select Approve.
- Add a description, and select yes.
- Go back to the Managed private endpoints section of the Manage tab in Data Factory.
- It should take one or two minutes for the approval to appear for your private endpoint.
Debug and publish the pipeline
You can debug a pipeline before you publish artifacts (linked services, datasets, and pipeline) to Data Factory or your own Azure Repos Git repository.
- To debug the pipeline, select Debug on the toolbar. You see the status of the pipeline run in the Output tab at the bottom of the window.
- After the pipeline can run successfully, in the top toolbar, select Publish all. This action publishes entities (datasets and pipelines) you created to Data Factory.
- Wait until you see the Successfully published message. To see notification messages, select Show Notifications in the upper-right corner (bell button).
Summary
The pipeline in this sample copies data from Blob storage to SQL Database by using private endpoints in Data Factory Managed Virtual Network. You learned how to:
- Create a data factory.
- Create a pipeline with a copy activity.