Note
Access to this page requires authorization. You can try signing in or changing directories.
Access to this page requires authorization. You can try changing directories.
APPLIES TO:  Azure Data Factory
Azure Synapse Analytics
Azure Data Factory
Azure Synapse Analytics
Tip
Data Factory in Microsoft Fabric is the next generation of Azure Data Factory, with a simpler architecture, built-in AI, and new features. If you're new to data integration, start with Fabric Data Factory. Existing ADF workloads can upgrade to Fabric to access new capabilities across data science, real-time analytics, and reporting.
Many times, when processing data for ETL jobs, you'll need to change the column names before writing the results. Sometimes this is needed to align column names to a well-known target schema. Other times, you may need to set column names at runtime based on evolving schemas. In this tutorial, you'll learn how to use data flows to set column names for your destination files and database tables dynamically using external configuration files and parameters.
If you're new to Azure Data Factory, see Introduction to Azure Data Factory.
Prerequisites
- Azure subscription. If you don't have an Azure subscription, create a free Azure account before you begin.
- Azure storage account. You use ADLS storage as a source and sink data stores. If you don't have a storage account, see Create an Azure storage account for steps to create one.
Create a data factory
In this step, you create a data factory and open the Data Factory UX to create a pipeline in the data factory.
- Open Microsoft Edge or Google Chrome. Currently, Data Factory UI is supported only in the Microsoft Edge and Google Chrome web browsers.
- On the left menu, select Create a resource > Integration > Data Factory
- On the New data factory page, under Name, enter ADFTutorialDataFactory
- Select the Azure subscription in which you want to create the data factory.
- For Resource Group, take one of the following steps:
- Select Use existing, and select an existing resource group from the drop-down list.
- Select Create new, and enter the name of a resource group.To learn about resource groups, see Use resource groups to manage your Azure resources.
- Under Version, select V2.
- Under Location, select a location for the data factory. Only locations that are supported are displayed in the drop-down list. Data stores (for example, Azure Storage and SQL Database) and computes (for example, Azure HDInsight) used by the data factory can be in other regions.
- Select Create.
- After the creation is finished, you see the notice in Notifications center. Select Go to resource to navigate to the Data factory page.
- Select Author & Monitor to launch the Data Factory UI in a separate tab.
Create a pipeline with a data flow activity
In this step, you'll create a pipeline that contains a data flow activity.
From the ADF home page, select Create pipeline.
In the General tab for the pipeline, enter DeltaLake for Name of the pipeline.
In the factory top bar, slide the Data Flow debug slider on. Debug mode allows for interactive testing of transformation logic against a live Spark cluster. Data Flow clusters take 5-7 minutes to warm up and users are recommended to turn on debug first if they plan to do Data Flow development. For more information, see Debug Mode.
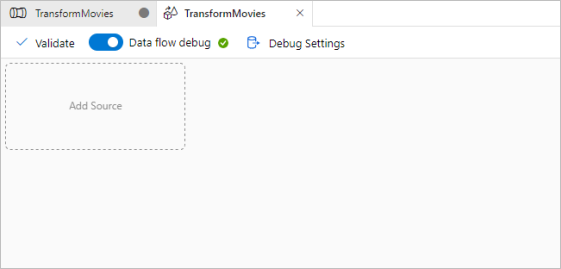
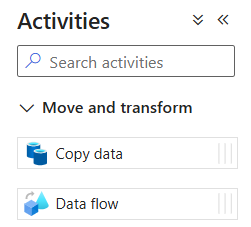
In the Activities pane, expand the Move and Transform accordion. Drag and drop the Data Flow activity from the pane to the pipeline canvas.
In the Adding Data Flow pop-up, select Create new Data Flow and then name your data flow DynaCols. Select Finish when done.
Build dynamic column mapping in data flows
For this tutorial, we're going to use a sample movies rating file and renaming a few of the fields in the source to a new set of target columns that can change over time. The datasets you'll create below should point to this movies CSV file in your Blob Storage or ADLS Gen2 storage account. Download the movies file here and store the file in your Azure storage account.
Tutorial objectives
You'll learn how to dynamically set column names using a data flow
- Create a source dataset for the movies CSV file.
- Create a lookup dataset for a field mapping JSON configuration file.
- Convert the columns from the source to your target column names.
Start from a blank data flow canvas
First, let's set up the data flow environment for each of the mechanisms described below for landing data in ADLS Gen2.
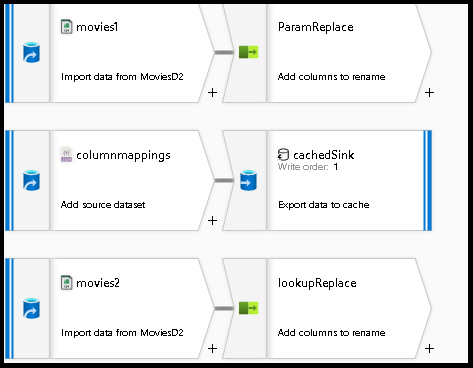
Select on the source transformation and call it
movies1.Select the new button next to dataset in the bottom panel.
Choose either Blob or ADLS Gen2 depending on where you stored the moviesDB.csv file from above.
Add a second source, which we'll use to source the configuration JSON file to look up field mappings.
Call this as
columnmappings.For the dataset, point to a new JSON file that will store a configuration for column mapping. You can paste the into the JSON file for this tutorial example:
[
{"prevcolumn":"title","newcolumn":"movietitle"},
{"prevcolumn":"year","newcolumn":"releaseyear"}
]
Set this source setting to
array of documents.Add a third source and call it
movies2. Configure this exactly the same asmovies1.
Parameterized column mapping
In this first scenario, you'll set output column names in your data flow by setting the column mapping based on matching incoming fields with a parameter that is a string array of columns and match each array index with the incoming column ordinal position. When executing this data flow from a pipeline, you'll be able to set different column names on each pipeline execution by sending in this string array parameter to the data flow activity.

Go back to the data flow designer and edit the data flow created above.
Select on the parameters tab
Create a new parameter and choose string array data type
For the default value, enter
['a','b','c']Use the top
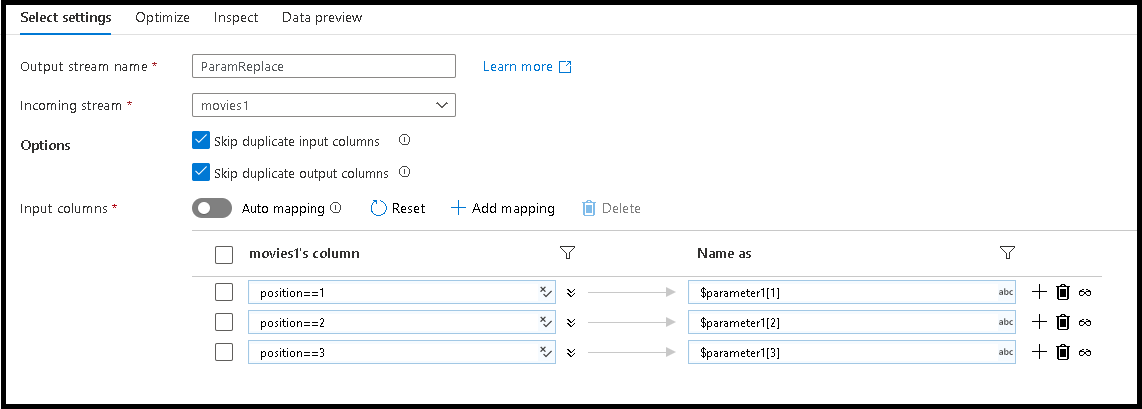
movies1source to modify the column names to map to these array valuesAdd a Select transformation. The Select transformation will be used to map incoming columns to new column names for output.
We're going to change the first three column names to the new names defined in the parameter
To do this, add three rule-based mapping entries in the bottom pane
For the first column, the matching rule will be
position==1and the name will be$parameter1[1]Follow the same pattern for column 2 and 3
Select on the Inspect and Data Preview tabs of the Select transformation to view the new column name values
(a,b,c)replace the original movie, title, genres column names
Create a cached lookup of external column mappings
Next, we'll create a cached sink for a later lookup. The cache will read an external JSON configuration file that can be used to rename columns dynamically on each pipeline execution of your data flow.
- Go back to the data flow designer and edit the data flow created above. Add a Sink transformation to the
columnmappingssource. - Set sink type to
Cache. - Under Settings, choose
prevcolumnas the key column.
Look up columns names from cached sink
Now that you've stored the configuration file contents in memory, you can dynamically map incoming column names to new outgoing column names.
- Go back to the data flow designer and edit the data flow create above. Select on the
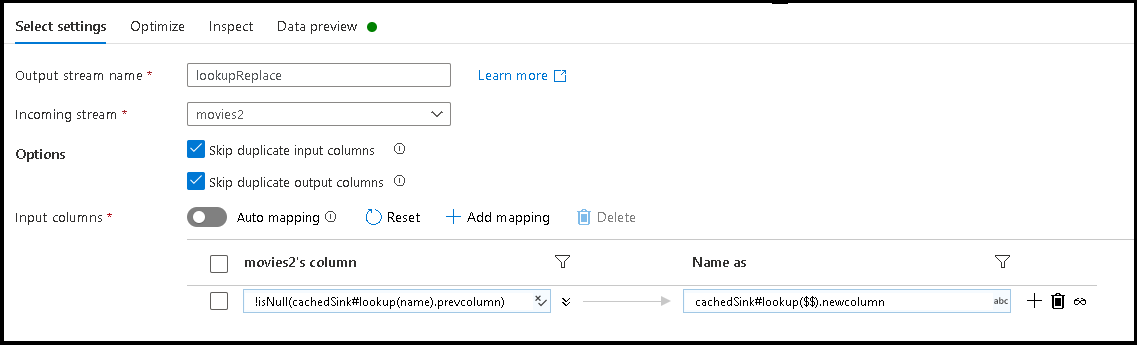
movies2source transformation. - Add a Select transformation. This time, we'll use the Select transformation to rename column names based on the target name in the JSON configuration file that is being stored in the cached sink.
- Add a rule-based mapping. For the Matching Condition, use this formula:
!isNull(cachedSink#lookup(name).prevcolumn). - For the output column name, use this formula:
cachedSink#lookup($$).newcolumn. - What we've done is to find all column names that match the
prevcolumnproperty from the external JSON configuration file and renamed each match to the newnewcolumnname. - Select on the Data Preview and Inspect tabs in the Select transformation and you should now see the new column names from the external mapping file.
Related content
- The completed pipeline from this tutorial can be downloaded from here
- Learn more about data flow sinks.