Note
Access to this page requires authorization. You can try signing in or changing directories.
Access to this page requires authorization. You can try changing directories.
APPLIES TO:  Azure Data Factory
Azure Synapse Analytics
Azure Data Factory
Azure Synapse Analytics
Tip
Data Factory in Microsoft Fabric is the next generation of Azure Data Factory, with a simpler architecture, built-in AI, and new features. If you're new to data integration, start with Fabric Data Factory. Existing ADF workloads can upgrade to Fabric to access new capabilities across data science, real-time analytics, and reporting.
In this tutorial, you create an Azure Data Factory with a pipeline that loads delta data from multiple tables in a SQL Server database to Azure SQL Database.
You perform the following steps in this tutorial:
- Prepare source and destination data stores.
- Create a data factory.
- Create a self-hosted integration runtime.
- Install the integration runtime.
- Create linked services.
- Create source, sink, and watermark datasets.
- Create, run, and monitor a pipeline.
- Review the results.
- Add or update data in source tables.
- Rerun and monitor the pipeline.
- Review the final results.
Overview
Here are the important steps to create this solution:
Select the watermark column.
Select one column for each table in the source data store, which you can identify the new or updated records for every run. Normally, the data in this selected column (for example, last_modify_time or ID) keeps increasing when rows are created or updated. The maximum value in this column is used as a watermark.
Prepare a data store to store the watermark value.
In this tutorial, you store the watermark value in a SQL database.
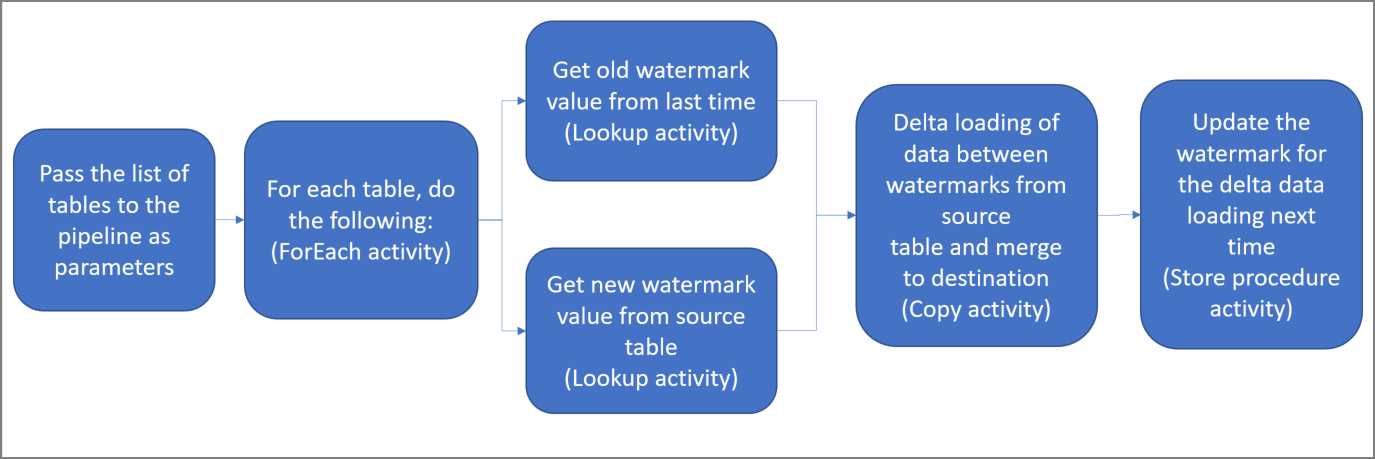
Create a pipeline with the following activities:
Create a ForEach activity that iterates through a list of source table names that is passed as a parameter to the pipeline. For each source table, it invokes the following activities to perform delta loading for that table.
Create two lookup activities. Use the first Lookup activity to retrieve the last watermark value. Use the second Lookup activity to retrieve the new watermark value. These watermark values are passed to the Copy activity.
Create a Copy activity that copies rows from the source data store with the value of the watermark column greater than the old watermark value and less than or equal to the new watermark value. Then, it copies the delta data from the source data store to Azure Blob storage as a new file.
Create a StoredProcedure activity that updates the watermark value for the pipeline that runs next time.
Here is the high-level solution diagram:
If you don't have an Azure subscription, create a free account before you begin.
Prerequisites
- SQL Server. You use a SQL Server database as the source data store in this tutorial.
- Azure SQL Database. You use a database in Azure SQL Database as the sink data store. If you don't have a SQL database, see Create a database in Azure SQL Database for steps to create one.
Create source tables in your SQL Server database
Open SQL Server Management Studio (SSMS) or Visual Studio Code, and connect to your SQL Server database.
In Server Explorer (SSMS) or in the Connections pane (Visual Studio Code), right-click the database and choose New Query.
Run the following SQL command against your database to create tables named
customer_tableandproject_table:create table customer_table ( PersonID int, Name varchar(255), LastModifytime datetime ); create table project_table ( Project varchar(255), Creationtime datetime ); INSERT INTO customer_table (PersonID, Name, LastModifytime) VALUES (1, 'John','9/1/2017 12:56:00 AM'), (2, 'Mike','9/2/2017 5:23:00 AM'), (3, 'Alice','9/3/2017 2:36:00 AM'), (4, 'Andy','9/4/2017 3:21:00 AM'), (5, 'Anny','9/5/2017 8:06:00 AM'); INSERT INTO project_table (Project, Creationtime) VALUES ('project1','1/1/2015 0:00:00 AM'), ('project2','2/2/2016 1:23:00 AM'), ('project3','3/4/2017 5:16:00 AM');
Create destination tables in your Azure SQL Database
Open SQL Server Management Studio (SSMS) or Visual Studio Code, and connect to your SQL Server database.
In Server Explorer (SSMS) or in the Connections pane (Visual Studio Code), right-click the database and choose New Query.
Run the following SQL command against your database to create tables named
customer_tableandproject_table:create table customer_table ( PersonID int, Name varchar(255), LastModifytime datetime ); create table project_table ( Project varchar(255), Creationtime datetime );
Create another table in Azure SQL Database to store the high watermark value
Run the following SQL command against your database to create a table named
watermarktableto store the watermark value:create table watermarktable ( TableName varchar(255), WatermarkValue datetime, );Insert initial watermark values for both source tables into the watermark table.
 INSERT INTO watermarktable
 VALUES
 ('customer_table','1/1/2010 12:00:00 AM'),
 ('project_table','1/1/2010 12:00:00 AM');
Create a stored procedure in the Azure SQL Database
Run the following command to create a stored procedure in your database. This stored procedure updates the watermark value after every pipeline run.
CREATE PROCEDURE usp_write_watermark @LastModifiedtime datetime, @TableName varchar(50)
AS

BEGIN

UPDATE watermarktable
SET [WatermarkValue] = @LastModifiedtime
WHERE [TableName] = @TableName

END
Create data types and additional stored procedures in Azure SQL Database
Run the following query to create two stored procedures and two data types in your database. They're used to merge the data from source tables into destination tables.
In order to make the journey easy to start with, we directly use these Stored Procedures passing the delta data in via a table variable and then merge the them into destination store. Be cautious it is not expecting a "large" number of delta rows (more than 100) to be stored in the table variable.
If you do need to merge a large number of delta rows into the destination store, we suggest you to use copy activity to copy all the delta data into a temporary "staging" table in the destination store first, and then built your own stored procedure without using table variable to merge them from the “staging” table to the “final” table.
CREATE TYPE DataTypeforCustomerTable AS TABLE(
    PersonID int,
    Name varchar(255),
    LastModifytime datetime
);

GO

CREATE PROCEDURE usp_upsert_customer_table @customer_table DataTypeforCustomerTable READONLY
AS

BEGIN
  MERGE customer_table AS target
  USING @customer_table AS source
  ON (target.PersonID = source.PersonID)
  WHEN MATCHED THEN
      UPDATE SET Name = source.Name,LastModifytime = source.LastModifytime
  WHEN NOT MATCHED THEN
      INSERT (PersonID, Name, LastModifytime)
      VALUES (source.PersonID, source.Name, source.LastModifytime);
END

GO

CREATE TYPE DataTypeforProjectTable AS TABLE(
    Project varchar(255),
    Creationtime datetime
);

GO

CREATE PROCEDURE usp_upsert_project_table @project_table DataTypeforProjectTable READONLY
AS

BEGIN
  MERGE project_table AS target
  USING @project_table AS source
  ON (target.Project = source.Project)
  WHEN MATCHED THEN
      UPDATE SET Creationtime = source.Creationtime
  WHEN NOT MATCHED THEN
      INSERT (Project, Creationtime)
      VALUES (source.Project, source.Creationtime);
END
Azure PowerShell
Install the latest Azure PowerShell modules by following the instructions in Install and configure Azure PowerShell.
Create a data factory
Define a variable for the resource group name that you use in PowerShell commands later. Copy the following command text to PowerShell, specify a name for the Azure resource group in double quotation marks, and then run the command. An example is
"adfrg".$resourceGroupName = "ADFTutorialResourceGroup";If the resource group already exists, you might not want to overwrite it. Assign a different value to the
$resourceGroupNamevariable, and run the command again.Define a variable for the location of the data factory.
$location = "East US"To create the Azure resource group, run the following command:
New-AzResourceGroup $resourceGroupName $locationIf the resource group already exists, you might not want to overwrite it. Assign a different value to the
$resourceGroupNamevariable, and run the command again.Define a variable for the data factory name.
Important
Update the data factory name to make it globally unique. An example is ADFIncMultiCopyTutorialFactorySP1127.
$dataFactoryName = "ADFIncMultiCopyTutorialFactory";To create the data factory, run the following Set-AzDataFactoryV2 cmdlet:
Set-AzDataFactoryV2 -ResourceGroupName $resourceGroupName -Location $location -Name $dataFactoryName
Note the following points:
The name of the data factory must be globally unique. If you receive the following error, change the name and try again:
Set-AzDataFactoryV2 : HTTP Status Code: Conflict
Error Code: DataFactoryNameInUse
Error Message: The specified resource name 'ADFIncMultiCopyTutorialFactory' is already in use. Resource names must be globally unique.
To create Data Factory instances, the user account you use to sign in to Azure must be a member of contributor or owner roles, or an administrator of the Azure subscription.
For a list of Azure regions in which Data Factory is currently available, select the regions that interest you on the following page, and then expand Analytics to locate Data Factory: Products available by region. The data stores (Azure Storage, SQL Database, SQL Managed Instance, and so on) and computes (Azure HDInsight, etc.) used by the data factory can be in other regions.
Create a self-hosted integration runtime
In this section, you create a self-hosted integration runtime and associate it with an on-premises machine with the SQL Server database. The self-hosted integration runtime is the component that copies data from SQL Server on your machine to Azure SQL Database.
Create a variable for the name of the integration runtime. Use a unique name, and make a note of it. You use it later in this tutorial.
$integrationRuntimeName = "ADFTutorialIR"Create a self-hosted integration runtime.
Set-AzDataFactoryV2IntegrationRuntime -Name $integrationRuntimeName -Type SelfHosted -DataFactoryName $dataFactoryName -ResourceGroupName $resourceGroupNameHere is the sample output:
 Name              : <Integration Runtime name>
 Type              : SelfHosted
 ResourceGroupName : <ResourceGroupName>
 DataFactoryName   : <DataFactoryName>
 Description       :
 Id                : /subscriptions/<subscription ID>/resourceGroups/<ResourceGroupName>/providers/Microsoft.DataFactory/factories/<DataFactoryName>/integrationruntimes/ADFTutorialIR
To retrieve the status of the created integration runtime, run the following command. Confirm that the value of the State property is set to NeedRegistration.
Get-AzDataFactoryV2IntegrationRuntime -name $integrationRuntimeName -ResourceGroupName $resourceGroupName -DataFactoryName $dataFactoryName -StatusHere is the sample output:
State                     : NeedRegistration
Version                   :
CreateTime                : 9/24/2019 6:00:00 AM
AutoUpdate                : On
ScheduledUpdateDate       :
UpdateDelayOffset         :
LocalTimeZoneOffset       :
InternalChannelEncryption :
Capabilities              : {}
ServiceUrls               : {eu.frontend.clouddatahub.net}
Nodes                     : {}
Links                     : {}
Name                      : ADFTutorialIR
Type                      : SelfHosted
ResourceGroupName         : <ResourceGroup name>
DataFactoryName           : <DataFactory name>
Description               :
Id                        : /subscriptions/<subscription ID>/resourceGroups/<ResourceGroup name>/providers/Microsoft.DataFactory/factories/<DataFactory name>/integrationruntimes/<Integration Runtime name>
To retrieve the authentication keys used to register the self-hosted integration runtime with Azure Data Factory service in the cloud, run the following command:
Get-AzDataFactoryV2IntegrationRuntimeKey -Name $integrationRuntimeName -DataFactoryName $dataFactoryName -ResourceGroupName $resourceGroupName | ConvertTo-JsonHere is the sample output:
{
 "AuthKey1": "IR@0000000000-0000-0000-0000-000000000000@xy0@xy@xxxxxxxxxxxxxxxxxxxxxxxxxxxxxxxxxxxxxxxx=",
 "AuthKey2":  "IR@0000000000-0000-0000-0000-000000000000@xy0@xy@yyyyyyyyyyyyyyyyyyyyyyyyyyyyyyyyyyyyyyyy="
}
Copy one of the keys (exclude the double quotation marks) used to register the self-hosted integration runtime that you install on your machine in the following steps.
Install the integration runtime tool
If you already have the integration runtime on your machine, uninstall it by using Add or Remove Programs.
Download the self-hosted integration runtime on a local Windows machine. Run the installation.
On the Welcome to Microsoft Integration Runtime Setup page, select Next.
On the End-User License Agreement page, accept the terms and license agreement, and select Next.
On the Destination Folder page, select Next.
On the Ready to install Microsoft Integration Runtime page, select Install.
On the Completed the Microsoft Integration Runtime Setup page, select Finish.
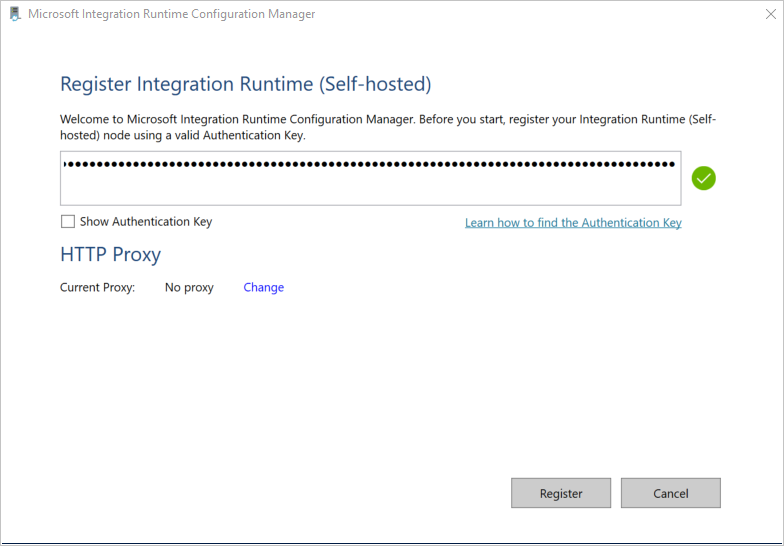
On the Register Integration Runtime (Self-hosted) page, paste the key you saved in the previous section, and select Register.
On the New Integration Runtime (Self-hosted) Node page, select Finish.
When the self-hosted integration runtime is registered successfully, you see the following message:
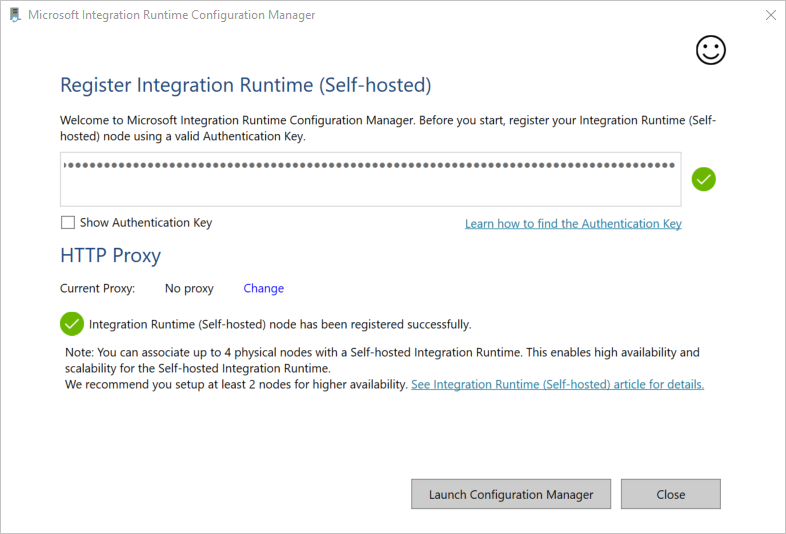
On the Register Integration Runtime (Self-hosted) page, select Launch Configuration Manager.
When the node is connected to the cloud service, you see the following page:
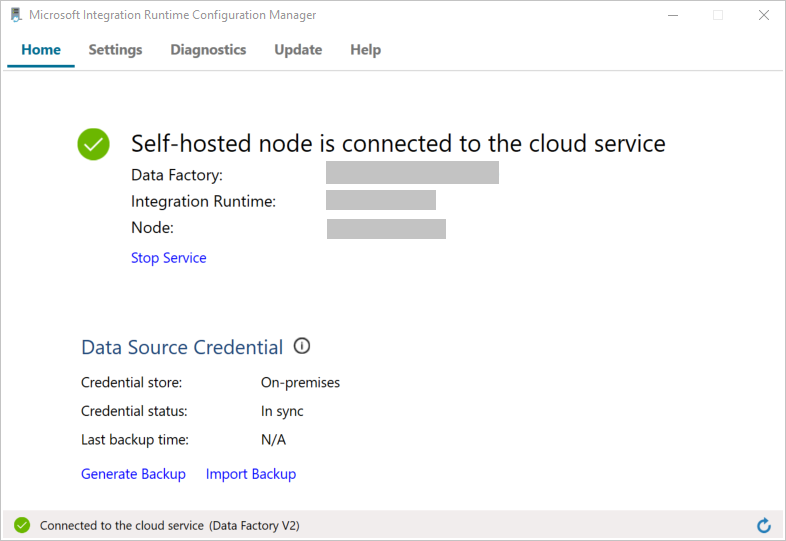
Now, test the connectivity to your SQL Server database.

a. On the Configuration Manager page, go to the Diagnostics tab.
b. Select SqlServer for the data source type.
c. Enter the server name.
d. Enter the database name.
e. Select the authentication mode.
f. Enter the user name.
g. Enter the password that's associated with for the user name.
h. Select Test to confirm that the integration runtime can connect to SQL Server. If the connection is successful, you see a green check mark. If the connection is not successful, you see an error message. Fix any issues, and ensure that the integration runtime can connect to SQL Server.
Note
Make a note of the values for authentication type, server, database, user, and password. You use them later in this tutorial.
Create linked services
You create linked services in a data factory to link your data stores and compute services to the data factory. In this section, you create linked services to your SQL Server database and your database in Azure SQL Database.
Create the SQL Server linked service
In this step, you link your SQL Server database to the data factory.
Create a JSON file named SqlServerLinkedService.json in the C:\ADFTutorials\IncCopyMultiTableTutorial folder (create the local folders if they don't already exist) with the following content. Select the right section based on the authentication you use to connect to SQL Server.
Important
Select the right section based on the authentication you use to connect to SQL Server.
If you use SQL authentication, copy the following JSON definition:
 {
     "name":"SqlServerLinkedService",
     "properties":{
         "annotations":[

         ],
         "type":"SqlServer",
         "typeProperties":{
             "connectionString":"integrated security=False;data source=<servername>;initial catalog=<database name>;user id=<username>;Password=<password>"
         },
         "connectVia":{
             "referenceName":"<integration runtime name>",
             "type":"IntegrationRuntimeReference"
         }
     }
 }
If you use Windows authentication, copy the following JSON definition:
 {
     "name":"SqlServerLinkedService",
     "properties":{
         "annotations":[

         ],
         "type":"SqlServer",
         "typeProperties":{
             "connectionString":"integrated security=True;data source=<servername>;initial catalog=<database name>",
             "userName":"<username> or <domain>\\<username>",
             "password":{
                 "type":"SecureString",
                 "value":"<password>"
             }
         },
         "connectVia":{
             "referenceName":"<integration runtime name>",
             "type":"IntegrationRuntimeReference"
         }
     }
 }
Important
- Select the right section based on the authentication you use to connect to SQL Server.
- Replace <integration runtime name> with the name of your integration runtime.
- Replace <servername>, <databasename>, <username>, and <password> with values of your SQL Server database before you save the file.
- If you need to use a slash character (
\) in your user account or server name, use the escape character (\). An example ismydomain\\myuser.
In PowerShell, run the following cmdlet to switch to the C:\ADFTutorials\IncCopyMultiTableTutorial folder.
Set-Location 'C:\ADFTutorials\IncCopyMultiTableTutorial'Run the Set-AzDataFactoryV2LinkedService cmdlet to create the linked service AzureStorageLinkedService. In the following example, you pass values for the ResourceGroupName and DataFactoryName parameters:
Set-AzDataFactoryV2LinkedService -DataFactoryName $dataFactoryName -ResourceGroupName $resourceGroupName -Name "SqlServerLinkedService" -File ".\SqlServerLinkedService.json"Here is the sample output:
LinkedServiceName : SqlServerLinkedService
ResourceGroupName : <ResourceGroupName>
DataFactoryName   : <DataFactoryName>
Properties        : Microsoft.Azure.Management.DataFactory.Models.SqlServerLinkedService
Create the SQL Database linked service
Create a JSON file named AzureSQLDatabaseLinkedService.json in C:\ADFTutorials\IncCopyMultiTableTutorial folder with the following content. (Create the folder ADF if it doesn't already exist.) Replace <servername>, <database name>, <user name>, and <password> with the name of your SQL Server database, name of your database, user name, and password before you save the file.
 {
     "name":"AzureSQLDatabaseLinkedService",
     "properties":{
         "annotations":[

         ],
         "type":"AzureSqlDatabase",
         "typeProperties":{
             "connectionString":"integrated security=False;encrypt=True;connection timeout=30;data source=<servername>.database.windows.net;initial catalog=<database name>;user id=<user name>;Password=<password>;"
         }
     }
 }
In PowerShell, run the Set-AzDataFactoryV2LinkedService cmdlet to create the linked service AzureSQLDatabaseLinkedService.
Set-AzDataFactoryV2LinkedService -DataFactoryName $dataFactoryName -ResourceGroupName $resourceGroupName -Name "AzureSQLDatabaseLinkedService" -File ".\AzureSQLDatabaseLinkedService.json"Here is the sample output:
LinkedServiceName : AzureSQLDatabaseLinkedService
ResourceGroupName : <ResourceGroupName>
DataFactoryName   : <DataFactoryName>
Properties        : Microsoft.Azure.Management.DataFactory.Models.AzureSqlDatabaseLinkedService
Create datasets
In this step, you create datasets to represent the data source, the data destination, and the place to store the watermark.
Create a source dataset
Create a JSON file named SourceDataset.json in the same folder with the following content:
{
     "name":"SourceDataset",
     "properties":{
         "linkedServiceName":{
             "referenceName":"SqlServerLinkedService",
             "type":"LinkedServiceReference"
         },
         "annotations":[

         ],
         "type":"SqlServerTable",
         "schema":[

         ]
     }
}
The Copy activity in the pipeline uses a SQL query to load the data rather than load the entire table.
Run the Set-AzDataFactoryV2Dataset cmdlet to create the dataset SourceDataset.
Set-AzDataFactoryV2Dataset -DataFactoryName $dataFactoryName -ResourceGroupName $resourceGroupName -Name "SourceDataset" -File ".\SourceDataset.json"Here is the sample output of the cmdlet:
DatasetName       : SourceDataset
ResourceGroupName : <ResourceGroupName>
DataFactoryName   : <DataFactoryName>
Structure         :
Properties        : Microsoft.Azure.Management.DataFactory.Models.SqlServerTableDataset
Create a sink dataset
Create a JSON file named SinkDataset.json in the same folder with the following content. The tableName element is set by the pipeline dynamically at runtime. The ForEach activity in the pipeline iterates through a list of table names and passes the table name to this dataset in each iteration.
 {
     "name":"SinkDataset",
     "properties":{
         "linkedServiceName":{
             "referenceName":"AzureSQLDatabaseLinkedService",
             "type":"LinkedServiceReference"
         },
         "parameters":{
             "SinkTableName":{
                 "type":"String"
             }
         },
         "annotations":[

         ],
         "type":"AzureSqlTable",
         "typeProperties":{
             "tableName":{
                 "value":"@dataset().SinkTableName",
                 "type":"Expression"
             }
         }
     }
 }
Run the Set-AzDataFactoryV2Dataset cmdlet to create the dataset SinkDataset.
Set-AzDataFactoryV2Dataset -DataFactoryName $dataFactoryName -ResourceGroupName $resourceGroupName -Name "SinkDataset" -File ".\SinkDataset.json"Here is the sample output of the cmdlet:
DatasetName       : SinkDataset
ResourceGroupName : <ResourceGroupName>
DataFactoryName   : <DataFactoryName>
Structure         :
Properties        : Microsoft.Azure.Management.DataFactory.Models.AzureSqlTableDataset
Create a dataset for a watermark
In this step, you create a dataset for storing a high watermark value.
Create a JSON file named WatermarkDataset.json in the same folder with the following content:
 {
     "name": " WatermarkDataset ",
     "properties": {
         "type": "AzureSqlTable",
         "typeProperties": {
             "tableName": "watermarktable"
         },
         "linkedServiceName": {
             "referenceName": "AzureSQLDatabaseLinkedService",
             "type": "LinkedServiceReference"
         }
     }
 }
Run the Set-AzDataFactoryV2Dataset cmdlet to create the dataset WatermarkDataset.
Set-AzDataFactoryV2Dataset -DataFactoryName $dataFactoryName -ResourceGroupName $resourceGroupName -Name "WatermarkDataset" -File ".\WatermarkDataset.json"Here is the sample output of the cmdlet:
DatasetName       : WatermarkDataset
ResourceGroupName : <ResourceGroupName>
DataFactoryName   : <DataFactoryName>
Structure         :
Properties        : Microsoft.Azure.Management.DataFactory.Models.AzureSqlTableDataset
Create a pipeline
The pipeline takes a list of table names as a parameter. The ForEach activity iterates through the list of table names and performs the following operations:
Use the Lookup activity to retrieve the old watermark value (the initial value or the one that was used in the last iteration).
Use the Lookup activity to retrieve the new watermark value (the maximum value of the watermark column in the source table).
Use the Copy activity to copy data between these two watermark values from the source database to the destination database.
Use the StoredProcedure activity to update the old watermark value to be used in the first step of the next iteration.
Create the pipeline
Create a JSON file named IncrementalCopyPipeline.json in the same folder with the following content:
{ "name":"IncrementalCopyPipeline", "properties":{ "activities":[ { "name":"IterateSQLTables", "type":"ForEach", "dependsOn":[ ], "userProperties":[ ], "typeProperties":{ "items":{ "value":"@pipeline().parameters.tableList", "type":"Expression" }, "isSequential":false, "activities":[ { "name":"LookupOldWaterMarkActivity", "type":"Lookup", "dependsOn":[ ], "policy":{ "timeout":"7.00:00:00", "retry":0, "retryIntervalInSeconds":30, "secureOutput":false, "secureInput":false }, "userProperties":[ ], "typeProperties":{ "source":{ "type":"AzureSqlSource", "sqlReaderQuery":{ "value":"select * from watermarktable where TableName = '@{item().TABLE_NAME}'", "type":"Expression" } }, "dataset":{ "referenceName":"WatermarkDataset", "type":"DatasetReference" } } }, { "name":"LookupNewWaterMarkActivity", "type":"Lookup", "dependsOn":[ ], "policy":{ "timeout":"7.00:00:00", "retry":0, "retryIntervalInSeconds":30, "secureOutput":false, "secureInput":false }, "userProperties":[ ], "typeProperties":{ "source":{ "type":"SqlServerSource", "sqlReaderQuery":{ "value":"select MAX(@{item().WaterMark_Column}) as NewWatermarkvalue from @{item().TABLE_NAME}", "type":"Expression" } }, "dataset":{ "referenceName":"SourceDataset", "type":"DatasetReference" }, "firstRowOnly":true } }, { "name":"IncrementalCopyActivity", "type":"Copy", "dependsOn":[ { "activity":"LookupOldWaterMarkActivity", "dependencyConditions":[ "Succeeded" ] }, { "activity":"LookupNewWaterMarkActivity", "dependencyConditions":[ "Succeeded" ] } ], "policy":{ "timeout":"7.00:00:00", "retry":0, "retryIntervalInSeconds":30, "secureOutput":false, "secureInput":false }, "userProperties":[ ], "typeProperties":{ "source":{ "type":"SqlServerSource", "sqlReaderQuery":{ "value":"select * from @{item().TABLE_NAME} where @{item().WaterMark_Column} > '@{activity('LookupOldWaterMarkActivity').output.firstRow.WatermarkValue}' and @{item().WaterMark_Column} <= '@{activity('LookupNewWaterMarkActivity').output.firstRow.NewWatermarkvalue}'", "type":"Expression" } }, "sink":{ "type":"AzureSqlSink", "sqlWriterStoredProcedureName":{ "value":"@{item().StoredProcedureNameForMergeOperation}", "type":"Expression" }, "sqlWriterTableType":{ "value":"@{item().TableType}", "type":"Expression" }, "storedProcedureTableTypeParameterName":{ "value":"@{item().TABLE_NAME}", "type":"Expression" }, "disableMetricsCollection":false }, "enableStaging":false }, "inputs":[ { "referenceName":"SourceDataset", "type":"DatasetReference" } ], "outputs":[ { "referenceName":"SinkDataset", "type":"DatasetReference", "parameters":{ "SinkTableName":{ "value":"@{item().TABLE_NAME}", "type":"Expression" } } } ] }, { "name":"StoredProceduretoWriteWatermarkActivity", "type":"SqlServerStoredProcedure", "dependsOn":[ { "activity":"IncrementalCopyActivity", "dependencyConditions":[ "Succeeded" ] } ], "policy":{ "timeout":"7.00:00:00", "retry":0, "retryIntervalInSeconds":30, "secureOutput":false, "secureInput":false }, "userProperties":[ ], "typeProperties":{ "storedProcedureName":"[dbo].[usp_write_watermark]", "storedProcedureParameters":{ "LastModifiedtime":{ "value":{ "value":"@{activity('LookupNewWaterMarkActivity').output.firstRow.NewWatermarkvalue}", "type":"Expression" }, "type":"DateTime" }, "TableName":{ "value":{ "value":"@{activity('LookupOldWaterMarkActivity').output.firstRow.TableName}", "type":"Expression" }, "type":"String" } } }, "linkedServiceName":{ "referenceName":"AzureSQLDatabaseLinkedService", "type":"LinkedServiceReference" } } ] } } ], "parameters":{ "tableList":{ "type":"array" } }, "annotations":[ ] } }Run the Set-AzDataFactoryV2Pipeline cmdlet to create the pipeline IncrementalCopyPipeline.
Set-AzDataFactoryV2Pipeline -DataFactoryName $dataFactoryName -ResourceGroupName $resourceGroupName -Name "IncrementalCopyPipeline" -File ".\IncrementalCopyPipeline.json"Here is the sample output:
 PipelineName      : IncrementalCopyPipeline
 ResourceGroupName : <ResourceGroupName>
 DataFactoryName   : <DataFactoryName>
 Activities        : {IterateSQLTables}
 Parameters        : {[tableList, Microsoft.Azure.Management.DataFactory.Models.ParameterSpecification]}
Run the pipeline
Create a parameter file named Parameters.json in the same folder with the following content:
 {
     "tableList":
     [
         {
             "TABLE_NAME": "customer_table",
             "WaterMark_Column": "LastModifytime",
             "TableType": "DataTypeforCustomerTable",
             "StoredProcedureNameForMergeOperation": "usp_upsert_customer_table"
         },
         {
             "TABLE_NAME": "project_table",
             "WaterMark_Column": "Creationtime",
             "TableType": "DataTypeforProjectTable",
             "StoredProcedureNameForMergeOperation": "usp_upsert_project_table"
         }
     ]
 }
Run the pipeline IncrementalCopyPipeline by using the Invoke-AzDataFactoryV2Pipeline cmdlet. Replace placeholders with your own resource group and data factory name.
$RunId = Invoke-AzDataFactoryV2Pipeline -PipelineName "IncrementalCopyPipeline" -ResourceGroup $resourceGroupName -dataFactoryName $dataFactoryName -ParameterFile ".\Parameters.json"
Monitor the pipeline
Sign in to the Azure portal.
Select All services, search with the keyword Data factories, and select Data factories.
Search for your data factory in the list of data factories, and select it to open the Data factory page.
On the Data factory page, select Open on the Open Azure Data Factory Studio tile to launch Azure Data Factory in a separate tab.
On the Azure Data Factory home page, select Monitor on the left side.

You can see all the pipeline runs and their status. Notice that in the following example, the status of the pipeline run is Succeeded. To check parameters passed to the pipeline, select the link in the Parameters column. If an error occurred, you see a link in the Error column.

When you select the link in the Actions column, you see all the activity runs for the pipeline.
To go back to the Pipeline Runs view, select All Pipeline Runs.
Review the results
In SQL Server Management Studio, run the following queries against the target SQL database to verify that the data was copied from source tables to destination tables:
Query
select * from customer_table
Output
===========================================
PersonID    Name    LastModifytime
===========================================
1            John    2017-09-01 00:56:00.000
2            Mike    2017-09-02 05:23:00.000
3            Alice    2017-09-03 02:36:00.000
4            Andy    2017-09-04 03:21:00.000
5            Anny    2017-09-05 08:06:00.000
Query
select * from project_table
Output
===================================
Project        Creationtime
===================================
project1    2015-01-01 00:00:00.000
project2    2016-02-02 01:23:00.000
project3    2017-03-04 05:16:00.000
Query
select * from watermarktable
Output
======================================
TableName        WatermarkValue
======================================
customer_table    2017-09-05 08:06:00.000
project_table    2017-03-04 05:16:00.000
Notice that the watermark values for both tables were updated.
Add more data to the source tables
Run the following query against the source SQL Server database to update an existing row in customer_table. Insert a new row into project_table.
UPDATE customer_table
SET [LastModifytime] = '2017-09-08T00:00:00Z', [name]='NewName' where [PersonID] = 3

INSERT INTO project_table
(Project, Creationtime)
VALUES
('NewProject','10/1/2017 0:00:00 AM');
Rerun the pipeline
Now, rerun the pipeline by executing the following PowerShell command:
$RunId = Invoke-AzDataFactoryV2Pipeline -PipelineName "IncrementalCopyPipeline" -ResourceGroup $resourceGroupname -dataFactoryName $dataFactoryName -ParameterFile ".\Parameters.json"Monitor the pipeline runs by following the instructions in the Monitor the pipeline section. When the pipeline status is In Progress, you see another action link under Actions to cancel the pipeline run.
Select Refresh to refresh the list until the pipeline run succeeds.
Optionally, select the View Activity Runs link under Actions to see all the activity runs associated with this pipeline run.
Review the final results
In SQL Server Management Studio, run the following queries against the target database to verify that the updated/new data was copied from source tables to destination tables.
Query
select * from customer_table
Output
===========================================
PersonID    Name    LastModifytime
===========================================
1            John    2017-09-01 00:56:00.000
2            Mike    2017-09-02 05:23:00.000
3            NewName    2017-09-08 00:00:00.000
4            Andy    2017-09-04 03:21:00.000
5            Anny    2017-09-05 08:06:00.000
Notice the new values of Name and LastModifytime for the PersonID for number 3.
Query
select * from project_table
Output
===================================
Project        Creationtime
===================================
project1    2015-01-01 00:00:00.000
project2    2016-02-02 01:23:00.000
project3    2017-03-04 05:16:00.000
NewProject    2017-10-01 00:00:00.000
Notice that the NewProject entry was added to project_table.
Query
select * from watermarktable
Output
======================================
TableName        WatermarkValue
======================================
customer_table    2017-09-08 00:00:00.000
project_table    2017-10-01 00:00:00.000
Notice that the watermark values for both tables were updated.
Related content
You performed the following steps in this tutorial:
- Prepare source and destination data stores.
- Create a data factory.
- Create a self-hosted integration runtime (IR).
- Install the integration runtime.
- Create linked services.
- Create source, sink, and watermark datasets.
- Create, run, and monitor a pipeline.
- Review the results.
- Add or update data in source tables.
- Rerun and monitor the pipeline.
- Review the final results.
Advance to the following tutorial to learn about transforming data by using a Spark cluster on Azure: