Note
Access to this page requires authorization. You can try signing in or changing directories.
Access to this page requires authorization. You can try changing directories.
APPLIES TO:  Azure Stack Edge Pro - GPUAzure Stack Edge Pro 2Azure Stack Edge Pro RAzure Stack Edge Mini R
This article describes how to create and manage a virtual machine (VM) on your Azure Stack Edge device by using Azure PowerShell.
VM deployment workflow
The high-level deployment workflow of the VM deployment is as follows:
- Connect to the local Azure Resource Manager of your device.
- Identify the built-in subscription on the device.
- Bring your VM image.
- Create a resource group in the built-in subscription. The resource group contains the VM and all the related resources.
- Create a local storage account on the device to store the VHD that is used to create a VM image.
- Upload a Windows/Linux source image into the storage account to create a managed disk.
- Use the managed disk to create a VM image.
- Enable compute on a device port to create a virtual switch.
- This creates a virtual network using the virtual switch attached to the port on which you enabled compute.
- Create a VM using the previously created VM image, virtual network, and virtual network interface(s) to communicate within the virtual network and assign a public IP address to remotely access the VM. Optionally include data disks to provide more storage for your VM.
Prerequisites
Before you can deploy VMs on your Azure Stack Edge device, you must configure your client to connect to the device via Azure Resource Manager over Azure PowerShell. For detailed instructions, see Connect to Azure Resource Manager on your Azure Stack Edge device.
Make sure that you can use the following steps to access the device from your client. You've already done this configuration when you connected to Azure Resource Manager, and now you're verifying that the configuration was successful.
Verify that Azure Resource Manager communication is working by running the following command:
To call the local device APIs to authenticate, enter:
If you configured compute for Kubernetes, you can skip this step. Otherwise, ensure that you've enabled a network interface for compute by doing the following:
a. On your local user interface, go to Compute settings.
b. Select the network interface that you want to use to create a virtual switch. The VMs you create will be attached to a virtual switch that's attached to this port and the associated network. Be sure to choose a network that matches the IP address you'll use for the VM.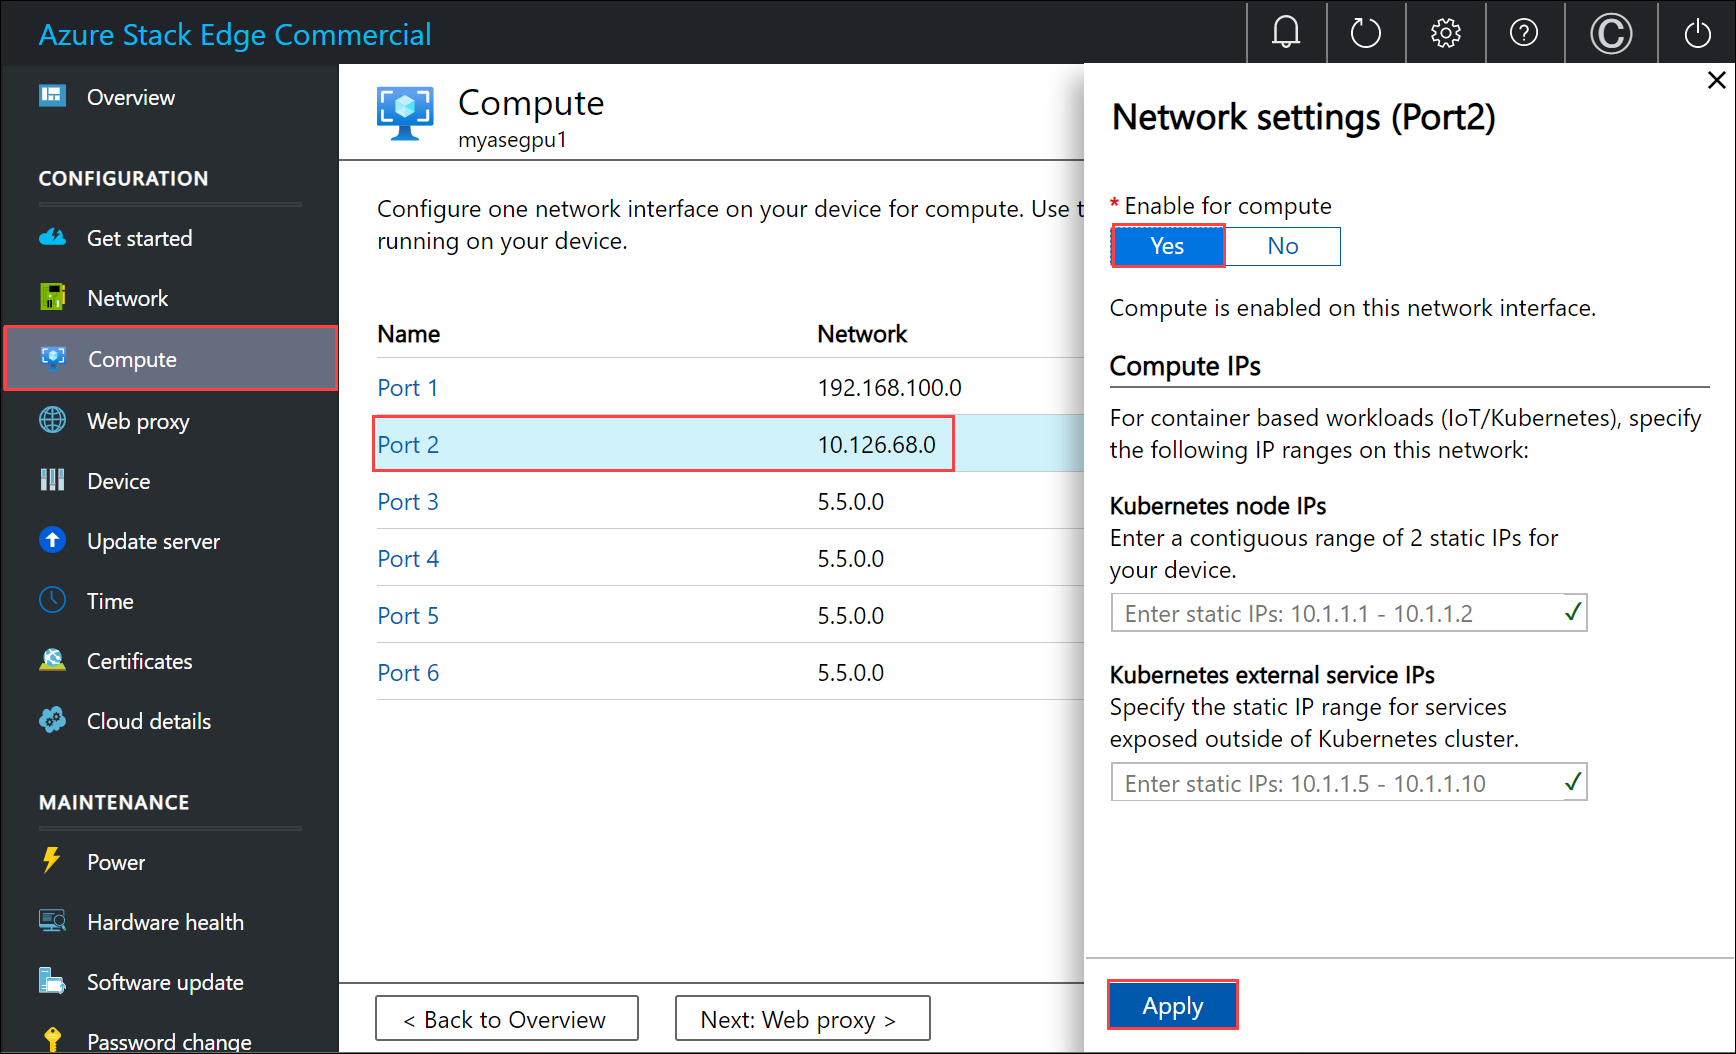
c. Under Enable for compute on the network interface, select Yes. Azure Stack Edge will create and manage a virtual switch that corresponds to that network interface. Don't enter specific IPs for Kubernetes at this time. It can take several minutes to enable compute.
Note
If you're creating GPU VMs, select a network interface that's connected to the internet. Doing so enables you to install a GPU extension on your device.
Query for a built-in subscription on the device
For Azure Resource Manager, only a single fixed subscription that's user-visible is supported. This subscription is unique per device, and the subscription name and subscription ID can't be changed.
The subscription contains all the resources that are required for VM creation.
Important
The subscription is created when you enable VMs from the Azure portal, and it lives locally on your device.
The subscription is used to deploy the VMs.
To list the subscription, run the following command:
Get-AzSubscriptionHere's some example output:
PS C:\WINDOWS\system32> Get-AzSubscription

Name                          Id                                   TenantId
----                          --                                   --------
Default Provider Subscription ...                                  ...


PS C:\WINDOWS\system32>
Get a list of the registered resource providers that are running on the device. The list ordinarily includes compute, network, and storage.
Get-AzResourceProviderNote
The resource providers are pre-registered, and they can't be modified or changed.
Here's some example output:
PS C:\WINDOWS\system32>  Get-AzResourceProvider

ProviderNamespace : Microsoft.AzureBridge
RegistrationState : Registered
ResourceTypes     : {locations, operations, locations/ingestionJobs}
Locations         : {DBELocal}

ProviderNamespace : Microsoft.Compute
RegistrationState : Registered
ResourceTypes     : {virtualMachines, virtualMachines/extensions, locations, operations...}
Locations         : {DBELocal}

ProviderNamespace : Microsoft.Network
RegistrationState : Registered
ResourceTypes     : {operations, locations, locations/operations, locations/usages...}
Locations         : {DBELocal}

ProviderNamespace : Microsoft.Resources
RegistrationState : Registered
ResourceTypes     : {tenants, locations, providers, checkresourcename...}
Locations         : {DBELocal}

ProviderNamespace : Microsoft.Storage
RegistrationState : Registered
ResourceTypes     : {storageaccounts, storageAccounts/blobServices, storageAccounts/tableServices,
                    storageAccounts/queueServices...}
Locations         : {DBELocal}

PS C:\WINDOWS\system32>
Create a resource group
Start by creating a new Azure resource group and use this as a logical container for all the VM related resources, such as storage account, disk, network interface, and managed disk.
Important
All the resources are created in the same location as that of the device, and the location is set to DBELocal.
Set some parameters.
$ResourceGroupName = "<Resource group name>"Create a resource group for the resources that you create for the VM.
New-AzResourceGroup -Name $ResourceGroupName -Location DBELocalHere's some example output:
PS C:\WINDOWS\system32> New-AzResourceGroup -Name myaseazrg -Location DBELocal

ResourceGroupName : myaseazrg
Location          : dbelocal
ProvisioningState : Succeeded
Tags              :
ResourceId        : /subscriptions/.../resourceGroups/myaseazrg

PS C:\WINDOWS\system32>
Create a local storage account
Create a new local storage account by using an existing resource group. Use this local storage account to upload the virtual disk image when creating a VM.
Before you create a local storage account, you must configure your client to connect to the device via Azure Resource Manager over Azure PowerShell. For detailed instructions, see Connect to Azure Resource Manager on your Azure Stack Edge device.
Set some parameters.
$StorageAccountName = "<Storage account name>"Create a new local storage account on your device.
New-AzStorageAccount -Name $StorageAccountName -ResourceGroupName $ResourceGroupName -Location DBELocal -SkuName Standard_LRSNote
By using Azure Resource Manager, you can create only local storage accounts, such as locally redundant storage (standard or premium). To create tiered storage accounts, see Tutorial: Transfer data via storage accounts with Azure Stack Edge Pro with GPU.
Here's an example output:
PS C:\WINDOWS\system32> New-AzStorageAccount -Name myaseazsa -ResourceGroupName myaseazrg -Location DBELocal -SkuName Standard_LRS

StorageAccountName ResourceGroupName PrimaryLocation SkuName      Kind    AccessTier CreationTime
------------------ ----------------- --------------- -------      ----    ---------- ------------
myaseazsa          myaseazrg         DBELocal        Standard_LRS Storage            6/10/2021 11:45...

PS C:\WINDOWS\system32>
To get the access keys for an existing local storage account that you have created, provide the associated resource group name and the local storage account name.
Get-AzStorageAccountKey
Here's an example output:
PS C:\WINDOWS\system32> Get-AzStorageAccountKey

cmdlet Get-AzStorageAccountKey at command pipeline position 1
Supply values for the following parameters:
(Type !? for Help.)
ResourceGroupName: myaseazrg
Name: myaseazsa

KeyName    Value                                                                                       Permissions
-------    -----                                                                                       ------
key1       gv3OF57tuPDyzBNc1M7fhil2UAiiwnhTT6zgiwE3TlF/CD217Cvw2YCPcrKF47joNKRvzp44leUe5HtVkGx8RQ==    Full
key2       kmEynIs3xnpmSxWbU41h5a7DZD7v4gGV3yXa2NbPbmhrPt10+QmE5PkOxxypeSqbqzd9si+ArNvbsqIRuLH2Lw==    Full

PS C:\WINDOWS\system32>
Add the blob URI to the host file
You already added the blob URI in the hosts file for the client that you're using to connect to Azure Blob Storage in Modify host file for endpoint name resolution of Connecting to Azure Resource Manager on your Azure Stack Edge device. This entry was used to add the blob URI:
<Device IP address> <storage name>.blob.<appliance name>.<dnsdomain>
Install certificates
If you're using HTTPS, you need to install the appropriate certificates on your device. Here, you install the blob endpoint certificate. For more information, see Use certificates with your Azure Stack Edge Pro with GPU device.
Upload a VHD
Copy any disk images to be used into page blobs in the local storage account that you created earlier. You can use a tool such as AzCopy to upload the virtual hard disk (VHD) to the storage account.
Use the following commands with AzCopy 10:
Set some parameters including the appropriate version of APIs for AzCopy. In this example, AzCopy 10 was used.
$Env:AZCOPY_DEFAULT_SERVICE_API_VERSION="2019-07-07"
$ContainerName = <Container name>
$ResourceGroupName = <Resource group name>
$StorageAccountName = <Storage account name>
$VHDPath = "Full VHD Path"
$VHDFile = <VHD file name>
Copy the VHD from the source (in this case, local system) to the storage account that you created on your device in the earlier step.
$StorageAccountKey = (Get-AzStorageAccountKey -ResourceGroupName $ResourceGroupName -Name $StorageAccountName)[0].Value
$blobendpoint = (Get-AzEnvironment -Name Environment Name).StorageEndpointSuffix
$StorageAccountContext = New-AzStorageContext -StorageAccountName $StorageAccountName -StorageAccountKey $StorageAccountKey -Endpoint $blobendpoint
<Create the container if it does not exist>
$containerName = "con1"
$container = New-AzStorageContainer -Name $containerName -Context $StorageAccountContext -Permission Container
$StorageAccountSAS = New-AzStorageAccountSASToken -Service Blob -ResourceType Container,Service,Object -Permission "acdlrw" -Context $StorageAccountContext -Protocol HttpsOnly
$endPoint = (Get-AzStorageAccount -name $StorageAccountName -ResourceGroupName $ResourceGroupName).PrimaryEndpoints.Blob
<Path to azcopy.exe> cp "$VHDPath\$VHDFile" "$endPoint$ContainerName$StorageAccountSAS"
Here's an example output:
PS C:\windows\system32> $ContainerName = "testcontainer1"
PS C:\windows\system32> $ResourceGroupName = "myaseazrg"
PS C:\windows\system32> $StorageAccountName = "myaseazsa"
PS C:\windows\system32> $VHDPath = "C:\Users\alkohli\Downloads\Ubuntu1604"
PS C:\windows\system32> $VHDFile = "ubuntu13.vhd"

PS C:\windows\system32> $StorageAccountKey = (Get-AzStorageAccountKey -ResourceGroupName $ResourceGroupName -Name $StorageAccountName)[0].Value
PS C:\windows\system32> $endPoint = (Get-AzStorageAccount -name $StorageAccountName -ResourceGroupName $ResourceGroupName).PrimaryEndpoints.Blob
PS C:\windows\system32> $StorageAccountContext = New-AzStorageContext -StorageAccountName $StorageAccountName -StorageAccountKey $StorageAccountKey -Endpoint $endpoint
PS C:\windows\system32> $StorageAccountSAS = New-AzStorageAccountSASToken -Service Blob -ResourceType Container,Service,Object -Permission "acdlrw" -Context $StorageAccountContext -Protocol HttpsOnly

PS C:\windows\system32> C:\azcopy\azcopy_windows_amd64_10.10.0\azcopy.exe cp "$VHDPath\$VHDFile" "$endPoint$ContainerName$StorageAccountSAS"
INFO: Scanning...
INFO: Any empty folders will not be processed, because source and/or destination doesn't have full folder support

Job 72a5e3dd-9210-3e43-6691-6bebd4875760 has started
Log file is located at: C:\Users\alkohli\.azcopy\72a5e3dd-9210-3e43-6691-6bebd4875760.log

INFO: azcopy.exe: A newer version 10.11.0 is available to download
Create a managed disk from the VHD
Create a managed disk from the uploaded VHD.
Set some parameters.
$DiskName = "<Managed disk name>"
$HyperVGeneration = "<Generation of the image: V1 or V2>"
Create a managed disk from uploaded VHD. To get the source URL for your VHD, go to the container in the storage account that contains the VHD in Storage Explorer. Select the VHD, and right-click and then select Properties. In the Blob properties dialog, select the URI.
$StorageAccountId = (Get-AzStorageAccount -ResourceGroupName $ResourceGroupName -Name $StorageAccountName).Id
$DiskConfig = New-AzDiskConfig -Location DBELocal -HyperVGeneration $HyperVGeneration -StorageAccountId $StorageAccountId -CreateOption Import -SourceUri "Source URL for your VHD"
New-AzDisk -ResourceGroupName $ResourceGroupName -DiskName $DiskName -Disk $DiskConfig
Here's an example output:.
PS C:\WINDOWS\system32> $DiskName = "myazmd"
PS C:\WINDOWS\system32  $HyperVGeneration = "V1"
PS C:\WINDOWS\system32> $StorageAccountId = (Get-AzStorageAccount -ResourceGroupName $ResourceGroupName -Name $StorageAccountName).Id
PS C:\WINDOWS\system32> $DiskConfig = New-AzDiskConfig -Location DBELocal -HyperVGeneration $HyperVGeneration -StorageAccountId $StorageAccountId -CreateOption Import -SourceUri "https://myaseazsa.blob.myasegpu.wdshcsso.com/testcontainer1/ubuntu13.vhd"
PS C:\WINDOWS\system32> New-AzDisk -ResourceGroupName $ResourceGroupName -DiskName $DiskName -Disk $DiskConfig

ResourceGroupName            : myaseazrg
ManagedBy                    :
Sku                          : Microsoft.Azure.Management.Compute.Models.DiskSku
Zones                        :
TimeCreated                  : 6/24/2021 12:19:56 PM
OsType                       :
HyperVGeneration             : V1
CreationData                 : Microsoft.Azure.Management.Compute.Models.CreationDat
                               a
DiskSizeGB                   : 30
DiskSizeBytes                : 32212254720
UniqueId                     : 53743801-cbf2-4d2f-acb4-971d037a9395
EncryptionSettingsCollection :
ProvisioningState            : Succeeded
DiskIOPSReadWrite            : 500
DiskMBpsReadWrite            : 60
DiskState                    : Unattached
Encryption                   : Microsoft.Azure.Management.Compute.Models.Encryption
Id                           : /subscriptions/.../r
                               esourceGroups/myaseazrg/providers/Microsoft.Compute/d
                               isks/myazmd
Name                         : myazmd
Type                         : Microsoft.Compute/disks
Location                     : DBELocal
Tags                         : {}

PS C:\WINDOWS\system32>
Create a VM image from the managed disk
You'll now create a VM image from the managed disk.
Set some parameters.
$DiskSize = "<Size greater than or equal to size of source managed disk>"
$OsType = "<linux or windows>"
$ImageName = "<Image name>"
Create a VM image. The supported OS types are Linux and Windows.
$imageConfig = New-AzImageConfig -Location DBELocal -HyperVGeneration $hyperVGeneration
$ManagedDiskId = (Get-AzDisk -Name $DiskName -ResourceGroupName $ResourceGroupName).Id
Set-AzImageOsDisk -Image $imageConfig -OsType $OsType -OsState 'Generalized' -DiskSizeGB $DiskSize -ManagedDiskId $ManagedDiskId
New-AzImage -Image $imageConfig -ImageName $ImageName -ResourceGroupName $ResourceGroupName
Here's an example output.
PS C:\WINDOWS\system32> $OsType = "linux"
PS C:\WINDOWS\system32> $ImageName = "myaseazlinuxvmimage"
PS C:\WINDOWS\system32> $DiskSize = 35
PS C:\WINDOWS\system32> $imageConfig = New-AzImageConfig -Location DBELocal
PS C:\WINDOWS\system32> $ManagedDiskId = (Get-AzDisk -Name $DiskName -ResourceGroupName $ResourceGroupName).Id
PS C:\WINDOWS\system32> Set-AzImageOsDisk -Image $imageConfig -OsType $OsType -OsState 'Generalized' -DiskSizeGB $DiskSize -ManagedDiskId $ManagedDiskId

ResourceGroupName    :
SourceVirtualMachine :
StorageProfile       : Microsoft.Azure.Management.Compute.Models.ImageStorageProfile
ProvisioningState    :
HyperVGeneration     : V1
Id                   :
Name                 :
Type                 :
Location             : DBELocal
Tags                 :

PS C:\WINDOWS\system32> New-AzImage -Image $imageConfig -ImageName $ImageName -ResourceGroupName $ResourceGroupName

ResourceGroupName    : myaseazrg
SourceVirtualMachine :
StorageProfile       : Microsoft.Azure.Management.Compute.Models.ImageStorageProfile
ProvisioningState    : Succeeded
HyperVGeneration     : V1
Id                   : /subscriptions/.../resourceG
                       roups/myaseazrg/providers/Microsoft.Compute/images/myaseazlin
                       uxvmimage
Name                 : myaseazlinuxvmimage
Type                 : Microsoft.Compute/images
Location             : dbelocal
Tags                 : {}

PS C:\WINDOWS\system32>
Create your VM with previously created resources
Before you create and deploy the VM, you must create one virtual network and associate a virtual network interface with it.
Important
The following rules apply:
- You can create only one virtual network, even across resource groups. The virtual network must have exactly the same address space as the logical network.
- The virtual network can have only one subnet. The subnet must have exactly the same address space as the virtual network.
- When you create the virtual network interface card, you can use only the static allocation method. The user needs to provide a private IP address.
Query the automatically created virtual network
When you enable compute from the local UI of your device, a virtual network called ASEVNET is created automatically, under the ASERG resource group.
Use the following command to query the existing virtual network:
$ArmVn = Get-AzVirtualNetwork -Name ASEVNET -ResourceGroupName ASERG
Create a virtual network interface card
You create a virtual network interface card by using the virtual network subnet ID.
Set some parameters.
$IpConfigName = "<IP config name>"
$NicName = "<Network interface name>"
Create a virtual network interface.
$ipConfig = New-AzNetworkInterfaceIpConfig -Name $IpConfigName -SubnetId $aRmVN.Subnets[0].Id
$Nic = New-AzNetworkInterface -Name $NicName -ResourceGroupName $ResourceGroupName -Location DBELocal -IpConfiguration $IpConfig
By default, an IP is dynamically assigned to your network interface from the network enabled for compute. Use the
-PrivateIpAddress parameterif you're allocating a static IP to your network interface.Here's an example output:
PS C:\WINDOWS\system32> $IpConfigName = "myazipconfig1"
PS C:\WINDOWS\system32> $NicName = "myaznic1"
PS C:\WINDOWS\system32> $ipConfig = New-AzNetworkInterfaceIpConfig -Name $IpConfigName -SubnetId $aRmVN.Subnets[0].Id
PS C:\WINDOWS\system32> $ipConfig = New-AzNetworkInterfaceIpConfig -Name $IpConfigName -SubnetId $aRmVN.Subnets[0].Id
PS C:\WINDOWS\system32> $Nic = New-AzNetworkInterface -Name $NicName -ResourceGroupName $ResourceGroupName -Location DBELocal -IpConfiguration $IpConfig
PS C:\WINDOWS\system32> $Nic

Name                        : myaznic1
ResourceGroupName           : myaseazrg
Location                    : dbelocal
Id                          : /subscriptions/.../re
                              sourceGroups/myaseazrg/providers/Microsoft.Network/net
                              workInterfaces/myaznic1
Etag                        : W/"0b20057b-2102-4f34-958b-656327c0fb1d"
ResourceGuid                : e7d4131f-6f01-4492-9d4c-a8ff1af7244f
ProvisioningState           : Succeeded
Tags                        :
VirtualMachine              : null
IpConfigurations            : [
                                {
                                  "Name": "myazipconfig1",
                                  "Etag":
                              "W/\"0b20057b-2102-4f34-958b-656327c0fb1d\"",
                                  "Id": "/subscriptions/.../resourceGroups/myaseazrg/providers/Microsoft.
                              Network/networkInterfaces/myaznic1/ipConfigurations/my
                              azipconfig1",
                                  "PrivateIpAddress": "10.126.76.60",
                                  "PrivateIpAllocationMethod": "Dynamic",
                                  "Subnet": {
                                    "Delegations": [],
                                    "Id": "/subscriptions/.../resourceGroups/ASERG/providers/Microsoft.Ne
                              twork/virtualNetworks/ASEVNET/subnets/ASEVNETsubNet",
                                    "ServiceAssociationLinks": []
                                  },
                                  "ProvisioningState": "Succeeded",
                                  "PrivateIpAddressVersion": "IPv4",
                                  "LoadBalancerBackendAddressPools": [],
                                  "LoadBalancerInboundNatRules": [],
                                  "Primary": true,
                                  "ApplicationGatewayBackendAddressPools": [],
                                  "ApplicationSecurityGroups": []
                                }
                              ]
DnsSettings                 : {
                                "DnsServers": [],
                                "AppliedDnsServers": [],
                                "InternalDomainNameSuffix": "auwlfcx0dhxurjgisct43fc
                              ywb.a--x.internal.cloudapp.net"
                              }
EnableIPForwarding          : False
EnableAcceleratedNetworking : False
NetworkSecurityGroup        : null
Primary                     :
MacAddress                  : 001DD84A58D1

PS C:\WINDOWS\system32>
Optionally, while you're creating a virtual network interface card for a VM, you can pass the public IP. In this instance, the public IP returns the private IP.
New-AzPublicIPAddress -Name <Public IP> -ResourceGroupName <ResourceGroupName> -AllocationMethod Static -Location DBELocal
$publicIP = (Get-AzPublicIPAddress -Name <Public IP> -ResourceGroupName <Resource group name>).Id
$ipConfig = New-AzNetworkInterfaceIpConfig -Name <ConfigName> -PublicIpAddressId $publicIP -SubnetId $subNetId
Create a VM
You can now use the VM image to create a VM and attach it to the virtual network that you created earlier.
Set the username and password to sign in to the VM that you want to create.
$pass = ConvertTo-SecureString "<Password>" -AsPlainText -Force;
$cred = New-Object System.Management.Automation.PSCredential("<Enter username>", $pass)
After you create and power up the VM, use the preceding username and password to sign in to it.
Set the parameters.
$VmName = "<VM name>"
$ComputerName = "<VM display name>"
$OsDiskName = "<OS disk name>"
Create the VM.
$VirtualMachine =  New-AzVMConfig -VmName $VmName -VMSize "Standard_D1_v2"

$VirtualMachine =  Set-AzVMOperatingSystem -VM $VirtualMachine -Linux -ComputerName $ComputerName -Credential $cred

$VirtualMachine =  Set-AzVmOsDisk -VM $VirtualMachine -Name $OsDiskName -Caching "ReadWrite" -CreateOption "FromImage" -Linux -StorageAccountType Standard_LRS

$nicID = (Get-AzNetworkInterface -Name $NicName -ResourceGroupName $ResourceGroupName).Id

$VirtualMachine =  Add-AzVMNetworkInterface -Vm $VirtualMachine -Id $nicID

$image = ( Get-AzImage -ResourceGroupName $ResourceGroupName -ImageName $ImageName).Id

$VirtualMachine =  Set-AzVMSourceImage -VM $VirtualMachine -Id $image

New-AzVM -ResourceGroupName $ResourceGroupName -Location DBELocal -VM $VirtualMachine -Verbose
Here's an example output.
PS C:\WINDOWS\system32> $pass = ConvertTo-SecureString "Password1" -AsPlainText -Force;
PS C:\WINDOWS\system32> $cred = New-Object System.Management.Automation.PSCredential("myazuser", $pass)
PS C:\WINDOWS\system32> $VmName = "myazvm"
>> $ComputerName = "myazvmfriendlyname"
>> $OsDiskName = "myazosdisk1"
PS C:\WINDOWS\system32> $VirtualMachine =  New-AzVMConfig -VmName $VmName -VMSize "Standard_D1_v2"
PS C:\WINDOWS\system32> $VirtualMachine =  Set-AzVMOperatingSystem -VM $VirtualMachine -Linux -ComputerName $ComputerName -Credential $cred
PS C:\WINDOWS\system32> $VirtualMachine =  Set-AzVmOsDisk -VM $VirtualMachine -Name $OsDiskName -Caching "ReadWrite" -CreateOption "FromImage" -Linux -StorageAccountType Standard_LRS
PS C:\WINDOWS\system32> $nicID = (Get-AzNetworkInterface -Name $NicName -ResourceGroupName $ResourceGroupName).Id
PS C:\WINDOWS\system32> $nicID/subscriptions/.../resourceGroups/myaseazrg/providers/Microsoft.Network/networkInterfaces/myaznic1
PS C:\WINDOWS\system32> $VirtualMachine =  Add-AzVMNetworkInterface -VM $VirtualMachine -Id $nicID
PS C:\WINDOWS\system32> $image = ( Get-AzImage -ResourceGroupName $ResourceGroupName -ImageName $ImageName).Id
PS C:\WINDOWS\system32> $VirtualMachine =  Set-AzVMSourceImage -VM $VirtualMachine -Id $image
PS C:\WINDOWS\system32> New-AzVM -ResourceGroupName $ResourceGroupName -Location DBELocal -VM $VirtualMachine -Verbose
WARNING: Since the VM is created using premium storage or managed disk, existing
standard storage account, myaseazsa, is used for boot diagnostics.
VERBOSE: Performing the operation "New" on target "myazvm".

RequestId IsSuccessStatusCode StatusCode ReasonPhrase
--------- ------------------- ---------- ------------
                         True         OK OK
To figure out the IP assigned to the VM that you created, query the virtual network interface that you created. Locate the
PrivateIPAddressand copy the IP for your VM. Here's an example output.PS C:\WINDOWS\system32> $Nic Name : myaznic1 ResourceGroupName : myaseazrg Location : dbelocal Id : /subscriptions/.../re sourceGroups/myaseazrg/providers/Microsoft.Network/net workInterfaces/myaznic1 Etag : W/"0b20057b-2102-4f34-958b-656327c0fb1d" ResourceGuid : e7d4131f-6f01-4492-9d4c-a8ff1af7244f ProvisioningState : Succeeded Tags : VirtualMachine : null IpConfigurations : [ { "Name": "myazipconfig1", "Etag": "W/\"0b20057b-2102-4f34-958b-656327c0fb1d\"", "Id": "/subscriptions/.../resourceGroups/myaseazrg/providers/Microsoft. Network/networkInterfaces/myaznic1/ipConfigurations/my azipconfig1", "PrivateIpAddress": "10.126.76.60", "PrivateIpAllocationMethod": "Dynamic", "Subnet": { "Delegations": [], "Id": "/subscriptions/.../resourceGroups/ASERG/providers/Microsoft.Ne twork/virtualNetworks/ASEVNET/subnets/ASEVNETsubNet", "ServiceAssociationLinks": [] }, "ProvisioningState": "Succeeded", "PrivateIpAddressVersion": "IPv4", "LoadBalancerBackendAddressPools": [], "LoadBalancerInboundNatRules": [], "Primary": true, "ApplicationGatewayBackendAddressPools": [], "ApplicationSecurityGroups": [] } ] DnsSettings : { "DnsServers": [], "AppliedDnsServers": [], "InternalDomainNameSuffix": "auwlfcx0dhxurjgisct43fc ywb.a--x.internal.cloudapp.net" } EnableIPForwarding : False EnableAcceleratedNetworking : False NetworkSecurityGroup : null Primary : MacAddress : 001DD84A58D1 PS C:\WINDOWS\system32>
Connect to the VM
Depending on whether you created a Windows VM or a Linux VM, the connection instructions can be different.
Connect to a Linux VM
To connect to a Linux VM, do the following:
Connect to the VM by using the private IP that you passed during the VM creation.
Open an SSH session to connect with the IP address.
ssh -l <username> <ip address>At the prompt, provide the password that you used when you created the VM.
If you need to provide the SSH key, use this command.
ssh -i c:/users/Administrator/.ssh/id_rsa Administrator@5.5.41.236Here's an example output when you connect to the VM:
PS C:\WINDOWS\system32> ssh -l myazuser "10.126.76.60"
The authenticity of host '10.126.76.60 (10.126.76.60)' can't be established.
ECDSA key fingerprint is SHA256:V649Zbo58zAYMKreeP7M6w7Na0Yf9QPg4SM7JZVV0E4.
Are you sure you want to continue connecting (yes/no/[fingerprint])? yes
Warning: Permanently added '10.126.76.60' (ECDSA) to the list of known hosts.
myazuser@10.126.76.60's password:
Welcome to Ubuntu 18.04.2 LTS (GNU/Linux 4.18.0-1013-azure x86_64)

 * Documentation:  https://help.ubuntu.com
 * Management:     https://landscape.canonical.com
 * Support:        https://ubuntu.com/advantage

 System information disabled due to load higher than 1.0

  Get cloud support with Ubuntu Advantage Cloud Guest:
    http://www.ubuntu.com/business/services/cloud

284 packages can be updated.
192 updates are security updates.

The programs included with the Ubuntu system are free software;
the exact distribution terms for each program are described in the
individual files in /usr/share/doc/*/copyright.

Ubuntu comes with ABSOLUTELY NO WARRANTY, to the extent permitted by
applicable law.

To run a command as administrator (user "root"), use "sudo <command>".
See "man sudo_root" for details.

myazuser@myazvmfriendlyname:~$ client_loop: send disconnect: Connection reset
PS C:\WINDOWS\system32>
If you used a public IP address during the VM creation, you can use that IP to connect to the VM. To get the public IP, run the following command:
$publicIp = Get-AzPublicIpAddress -Name $PublicIp -ResourceGroupName $ResourceGroupName
In this instance, the public IP is the same as the private IP that you passed during the creation of the virtual network interface.
Connect to a Windows VM
To connect to a Windows VM, do the following:
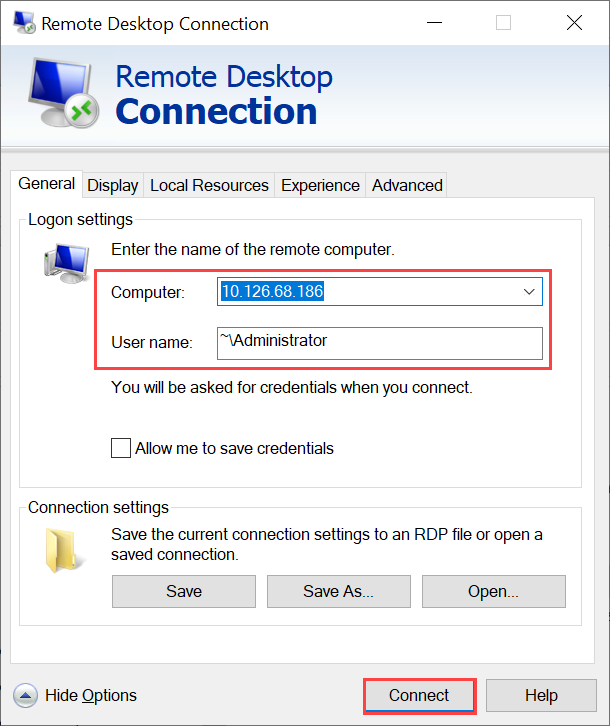
Connect to your Windows VM by using the Remote Desktop Protocol (RDP) via the IP that you passed during the VM creation.
On your client, open RDP.
Go to Start, and then enter mstsc.
On the Remote Desktop Connection pane, enter the IP address of the VM and the access credentials you used in the VM template parameters file. Then select Connect.
Note
You might need to approve connecting to an untrusted machine.
You're now signed in to your VM that runs on the appliance.
Manage the VM
The following sections describe some of the common operations that you can create on your Azure Stack Edge Pro device.
List VMs that are running on the device
To return a list of all the VMs that are running on your Azure Stack Edge device, run this command:
Get-AzVM -ResourceGroupName <String> -Name <String>
For more information about this cmdlet, see Get-AzVM.
Turn on the VM
To turn on a virtual machine that's running on your device, run the following cmdlet:
Start-AzVM [-Name] <String> [-ResourceGroupName] <String>
For more information about this cmdlet, see Start-AzVM.
Suspend or shut down the VM
To stop or shut down a virtual machine that's running on your device, run the following cmdlet:
Stop-AzVM [-Name] <String> [-StayProvisioned] [-ResourceGroupName] <String>
For more information about this cmdlet, see Stop-AzVM cmdlet.
Resize the VM
To resize an existing virtual machine, run the following cmdlets:
Important
Before you resize it, stop the VM without the -StayProvisioned flag.
$vm = Get-AzVM [-Name] <String> [-ResourceGroupName] <String>

$vm.HardwareProfile.VmSize = <new size> - Example: "Standard_D3_v2"

$vm | Update-AzVM
Add a data disk
If the workload requirements on your VM increase, you might need to add a data disk. To do so, run the following command:
Add-AzRmVMDataDisk -VM $VirtualMachine -Name "disk1" -VhdUri "https://contoso.blob.core.windows.net/vhds/diskstandard03.vhd" -LUN 0 -Caching ReadOnly -DiskSizeinGB 1 -CreateOption Empty

Update-AzVM -ResourceGroupName "<Resource Group Name string>" -VM $VirtualMachine
Delete the VM
To remove a virtual machine from your device, run the following cmdlet:
Remove-AzVM [-Name] <String> [-ResourceGroupName] <String>
For more information about this cmdlet, see Remove-AzVm cmdlet.