Note
Access to this page requires authorization. You can try signing in or changing directories.
Access to this page requires authorization. You can try changing directories.
APPLIES TO:  Azure Stack Edge Pro - GPUAzure Stack Edge Pro 2Azure Stack Edge Pro RAzure Stack Edge Mini R
This article describes how to wipe the data and then return your Azure Stack Edge device. After you've returned the device, you can also delete the resource associated with the device.
In this article, you learn how to:
- Wipe the data off the data disks on the device
- Initiate device return in Azure portal
- Pack up the device and schedule a pickup
- Delete the resource in Azure portal
Erase data from the device
To wipe the data off the data disks of your device, you need to reset your device.
Before you reset, create a copy of the local data on the device if needed. You can copy the data from the device to an Azure Storage container.
You can initiate the device return even before the device is reset.
You can reset your device in the local web UI or in PowerShell. For PowerShell instructions, see Reset your device.
To reset your device using the local web UI, take the following steps.
In the local web UI, go to Maintenance > Device reset.
Select Reset device.
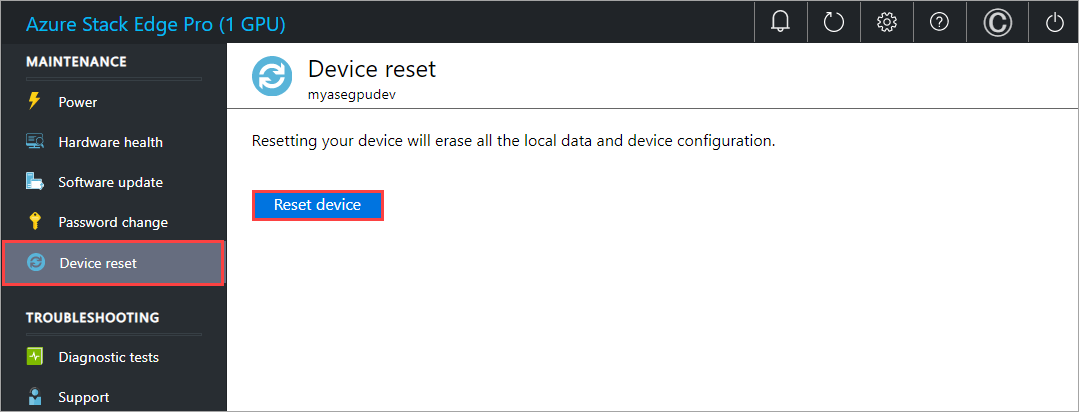
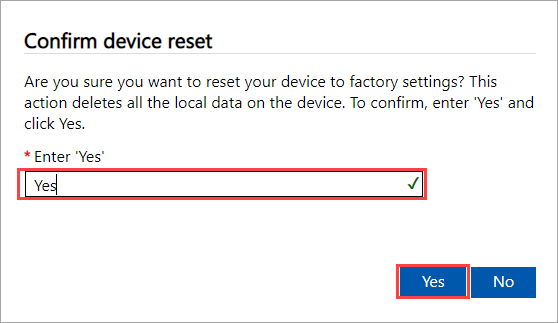
When prompted for confirmation, review the warning. Type Yes and then select Yes to continue.
The reset erases the data off the device data disks. Depending on the amount of data on your device, this process takes about 30-40 minutes.
Remove Azure resources from your Azure Stack Edge device
In addition to resetting your device, complete the following steps to remove Azure resources associated with the device.
Delete the Azure Stack Edge resource (name of the service) associated with the Azure Stack Edge device. You can also use this step to remove the associated key vault. This step also removes the managed identity associated with the Azure Stack Edge resource. Gather key vault details before you delete the Azure Stack Edge resource.
Use the following steps to delete the Azure Stack Edge resource, its managed identity, the associated key vault, and the Azure storage account:
- In Azure portal, go to your key vault, navigate to Diagnostic settings, and make note of the storage account name and the key vault name.
- Go to your Azure Stack Edge resource and then to Overview. From the command bar, select Delete.
- In the Delete device blade, specify the name of the device you want to delete and then select Delete.
- To continue, confirm the delete operation.
- When deleting the Azure Stack Edge resource, you'll also be prompted to remove the associated key vault. To get the key vault name, select Security in left navigation, and then select the key vault name to get to the key vault resource. The key vault name starts with the service name and is appended with a GUID. Select Diagnostic settings and also note the storage account name.
- Delete the Azure storage account used by the key vault. Look for a Zone redundant storage account in the same scope as the Azure Stack Edge resource; manually delete the storage account.
Note
While performing the device reset, only the data that resides locally on the device will be deleted. The data that's in the cloud won't be deleted and, if not removed, will continue to collect charges. This data must be deleted separately using a cloud storage management tool like Azure Storage Explorer.
Note
- If you're exchanging or upgrading to a new device, we recommend that you reset your device only after you've received the new device.
- The device reset only deletes all the local data off the device. The data that is in the cloud isn't deleted and collects charges. This data needs to be deleted separately using a cloud storage management tool like Azure Storage Explorer.
Initiate device return
To begin the return process, take the following steps.
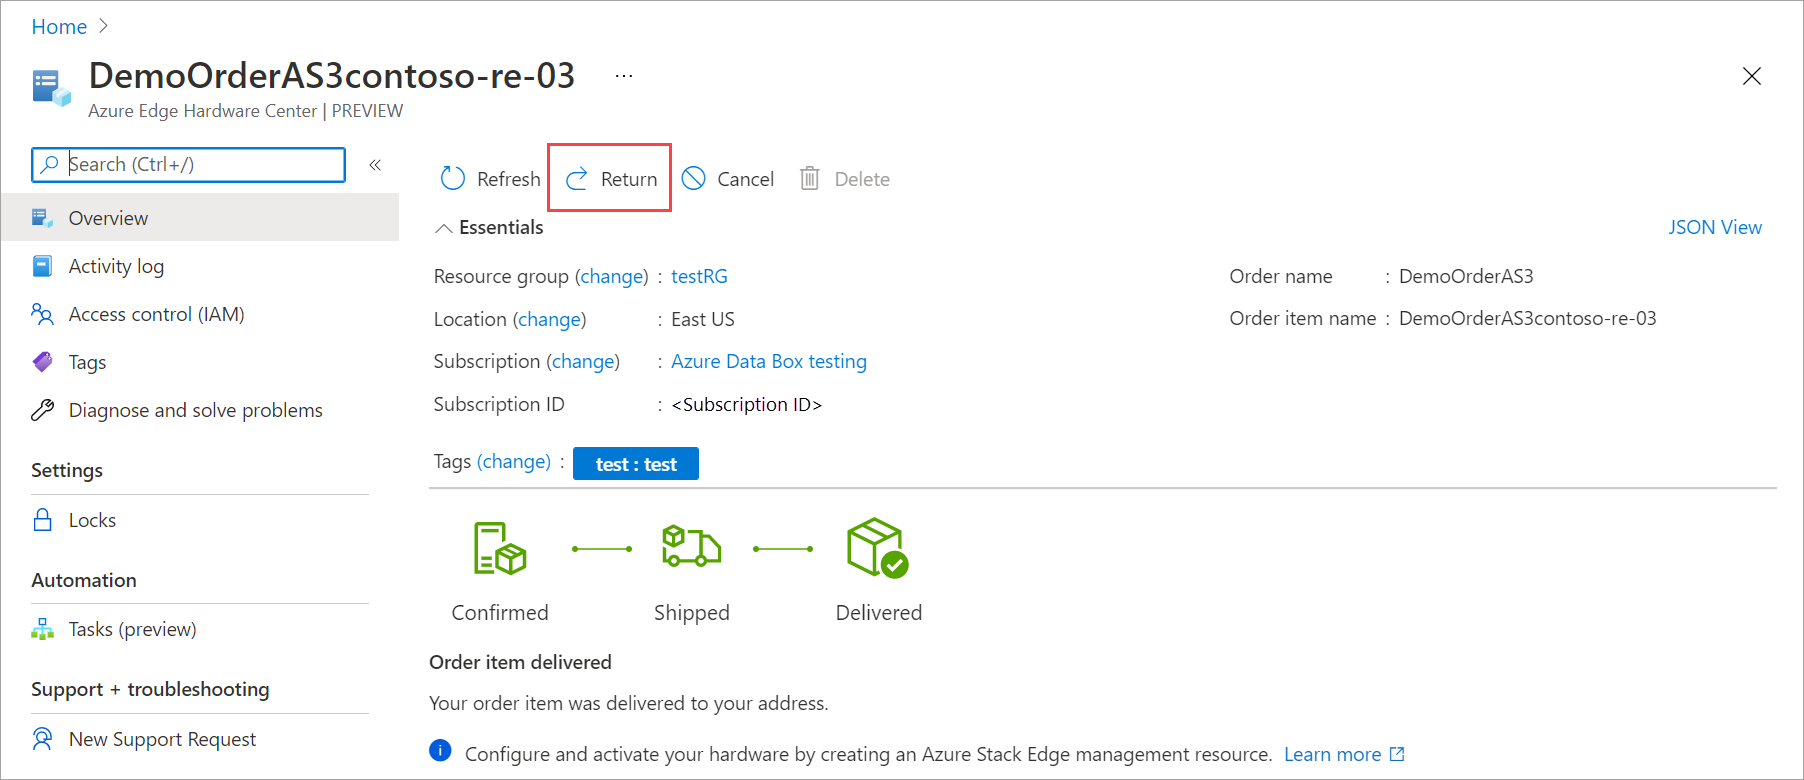
If you used the Azure Edge Hardware Center to order your device, follow these steps to return the device:
In the Azure portal, go to your Azure Edge Hardware Center order item resource. In the Overview, go to the top command bar in the right pane and select Return. The return option is only enabled after you have received a device.
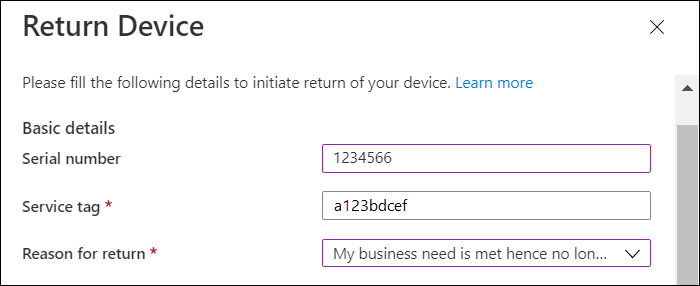
In the Return hardware blade, provide the following information:
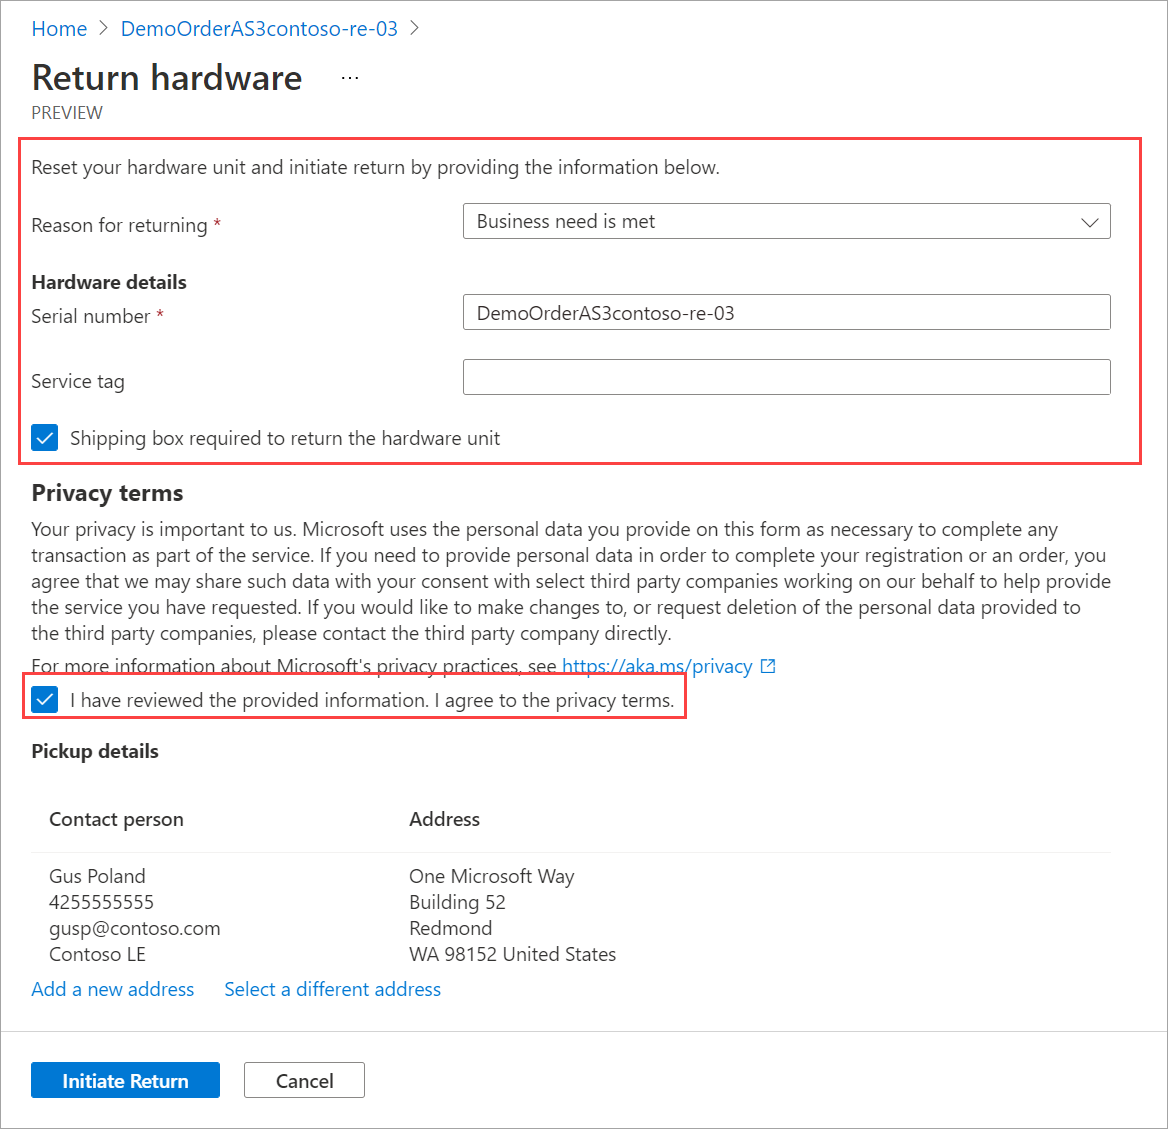
From the dropdown list, select a Reason for returning.
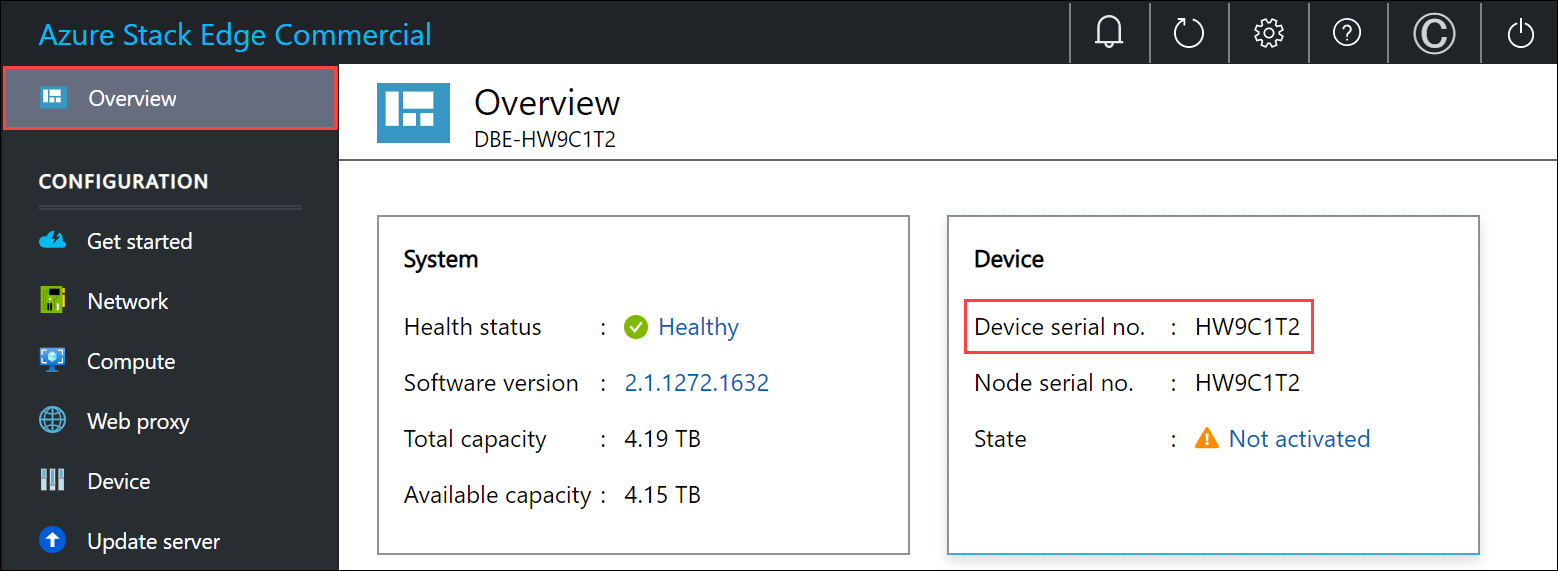
Provide the serial number of the device. To get the device serial number, go the local web UI of the device and then go to Overview.

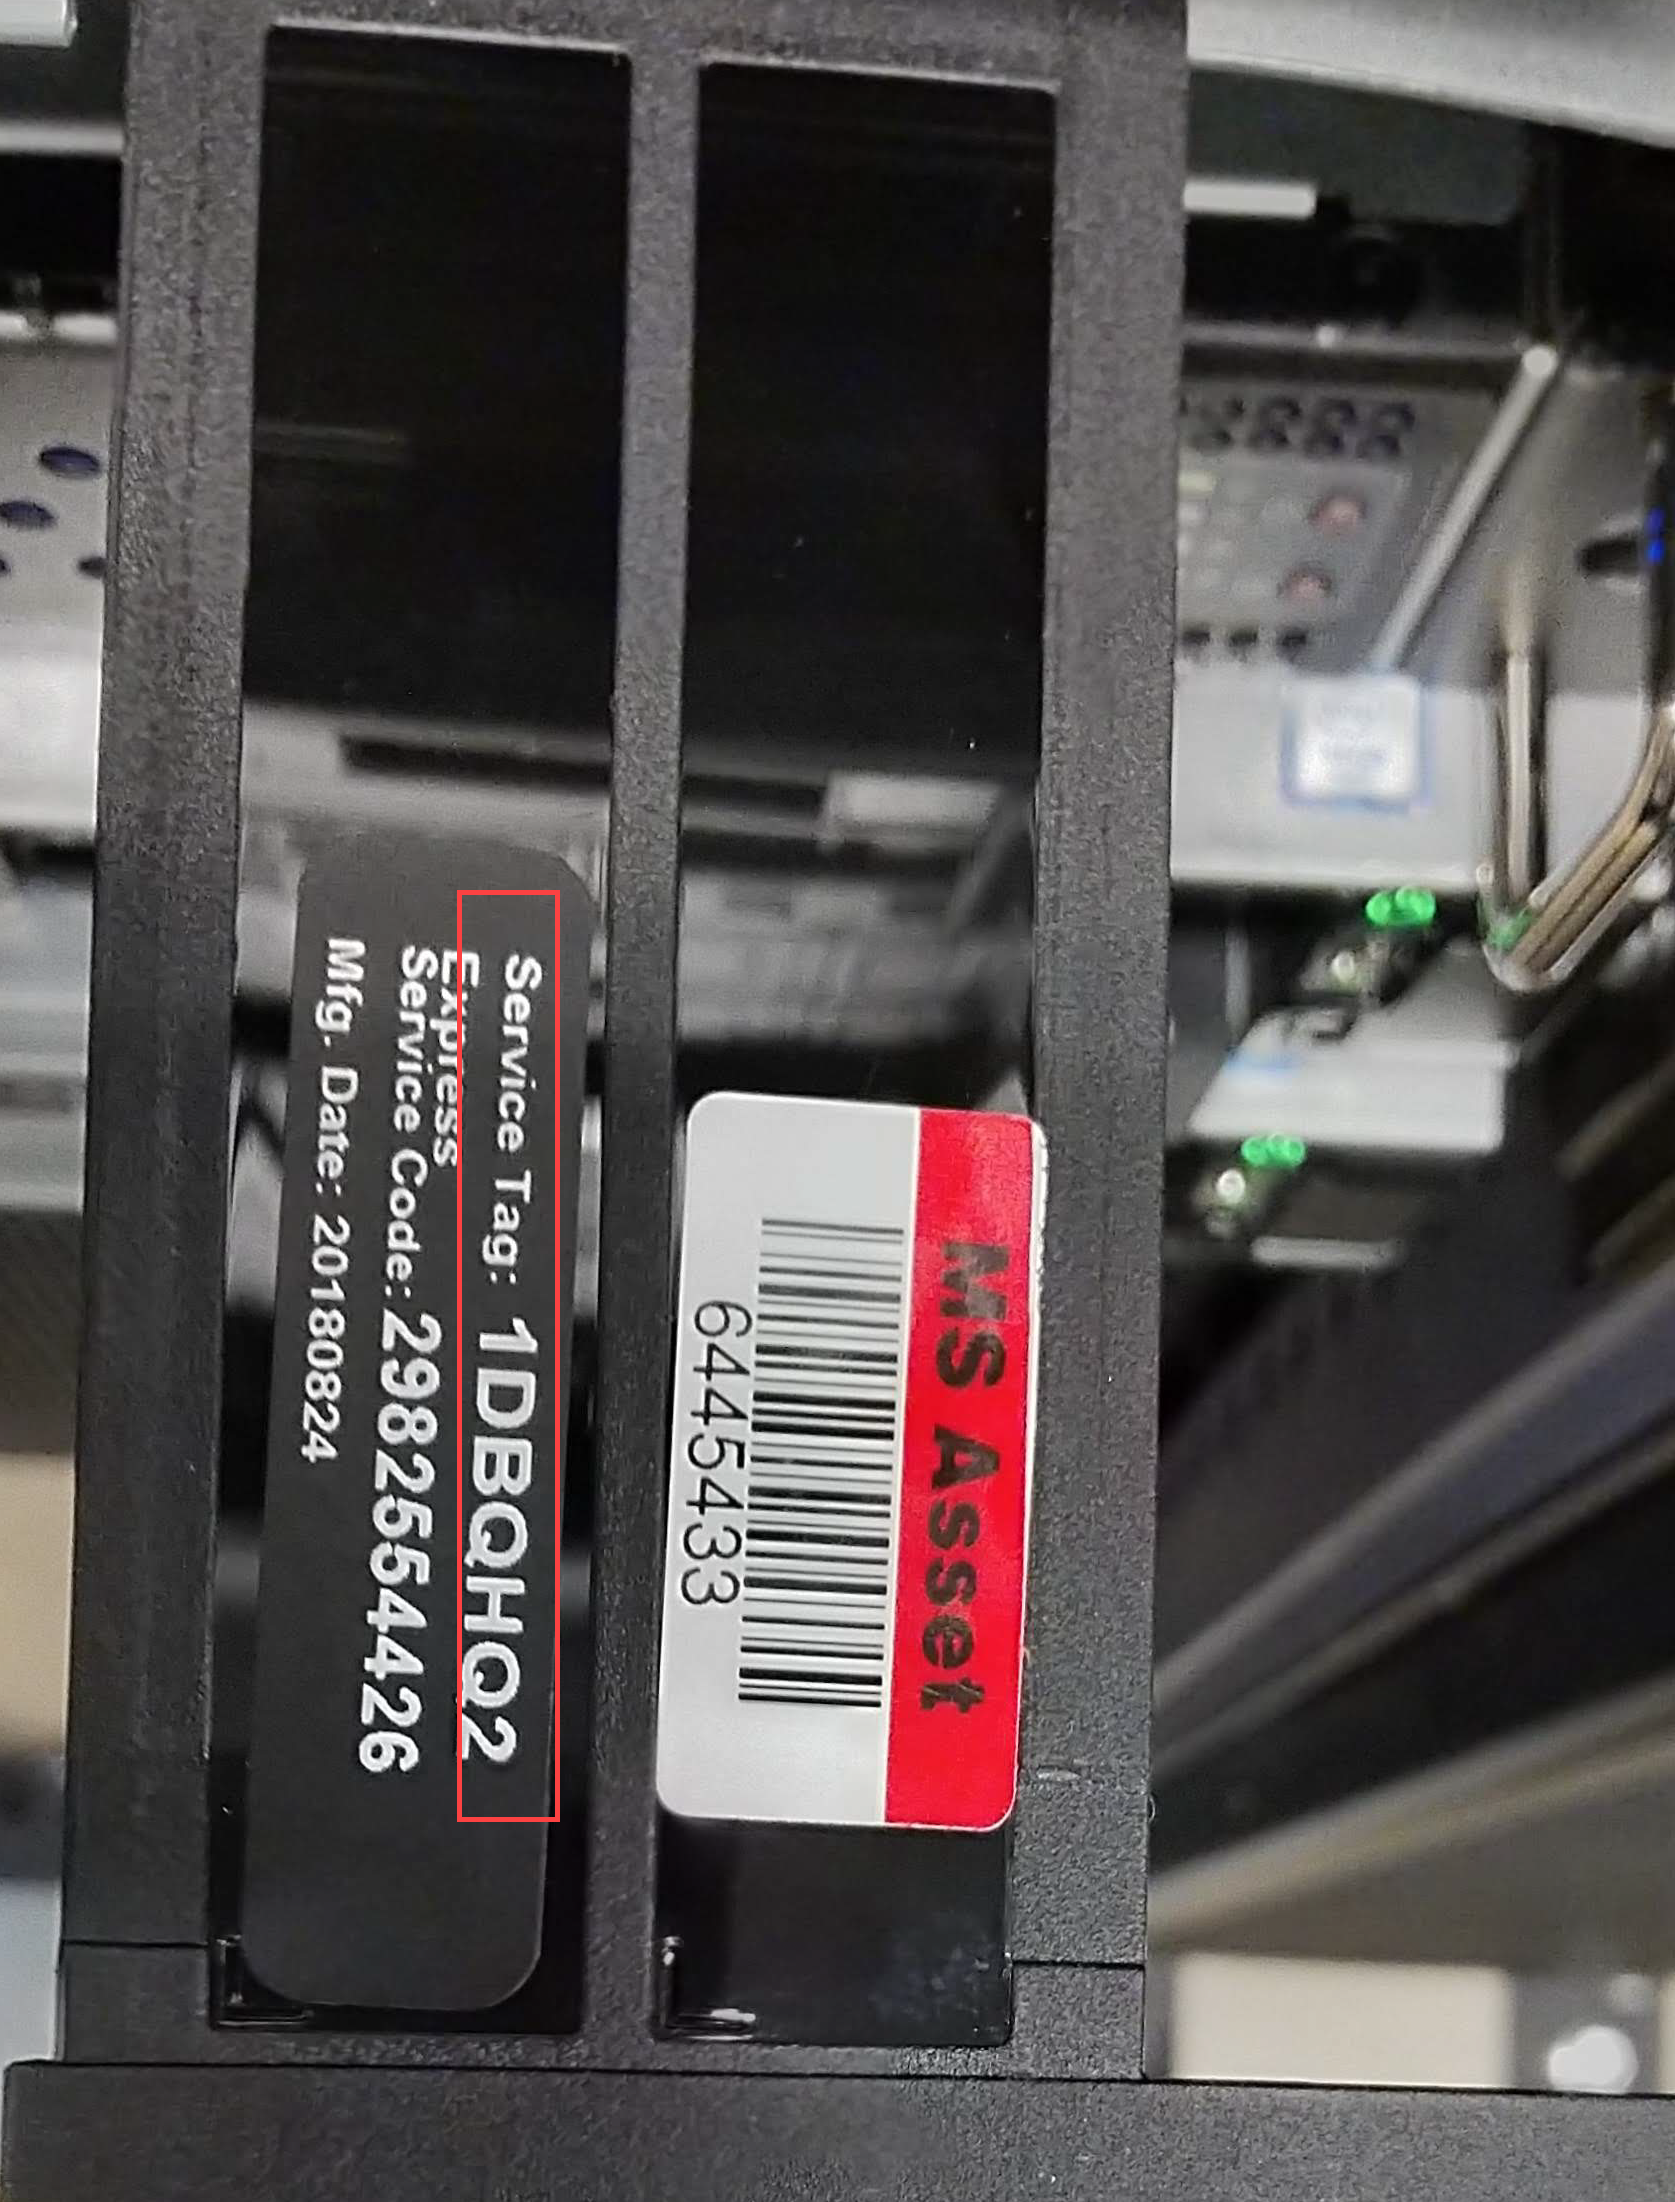
(Optionally) Enter the Service tag number. The service tag number is an identifier with five or more characters, which is unique to your device. The service tag is located on the bottom-right corner of the device (as you face the device). Pull out the information tag (it is a slide-out label panel). This panel contains system information such as service tag, NIC, MAC address, and so on.
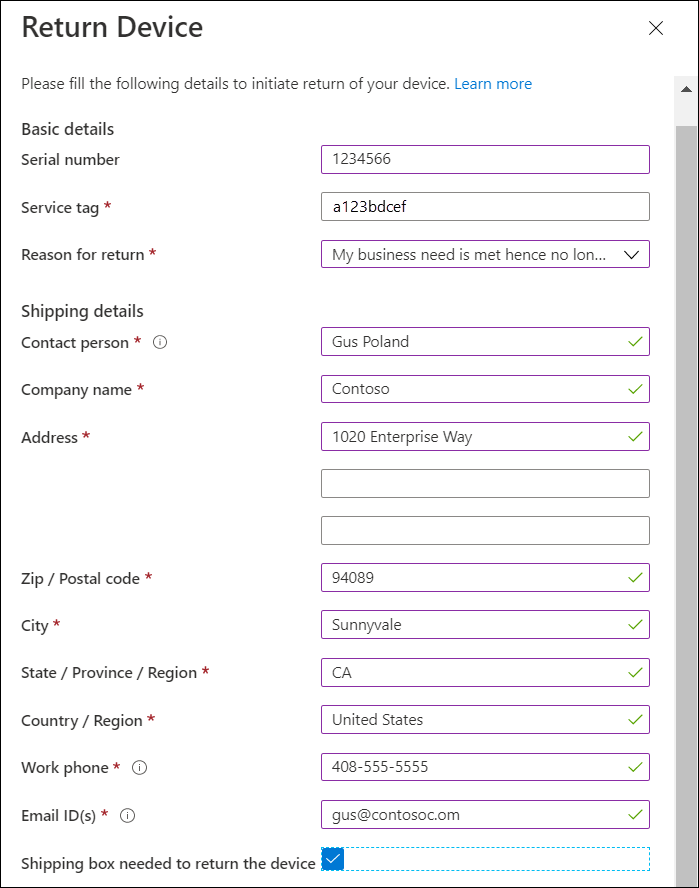
To request a return shipping box, check the Shipping box required to return the hardware unit.you can request it. Answer Yes to the question Need an empty box to return.
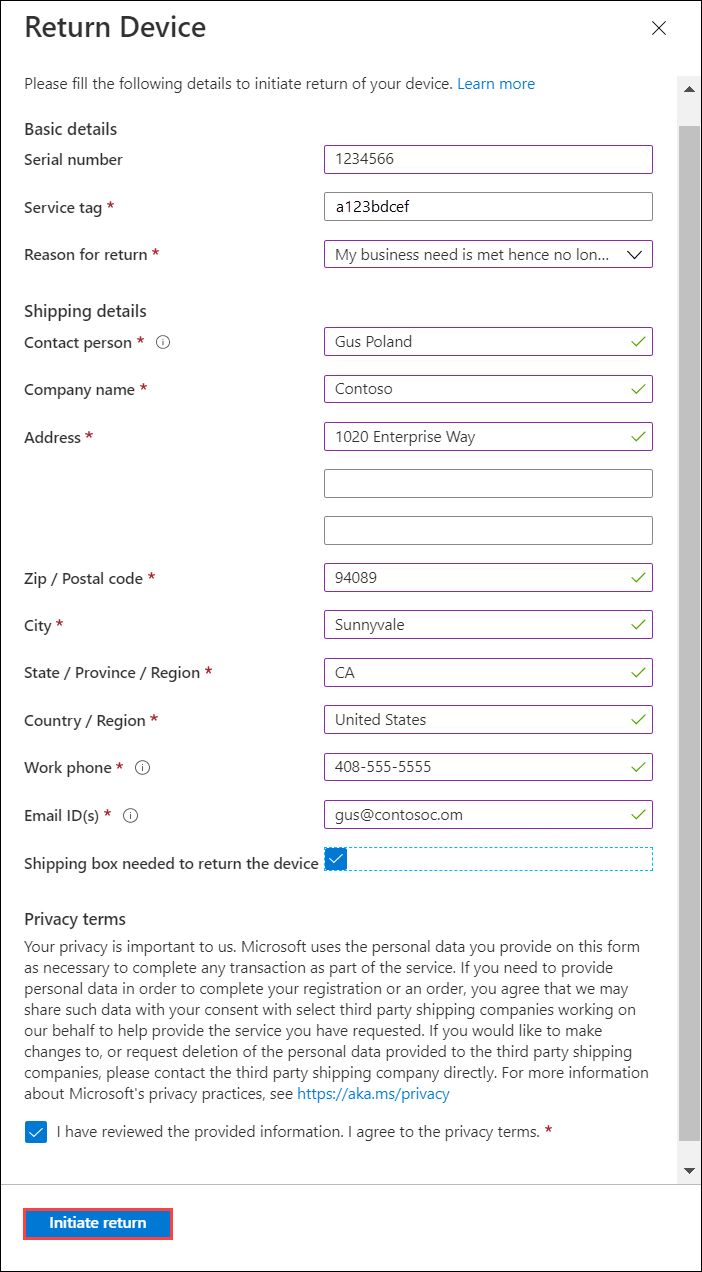
Review the Privacy terms, and select the checkbox by the note that you have reviewed and agree to the privacy terms.
Verify the Pickup details. By default, these are set to your shipping address. You can add a new address or select a different one from the saved addresses for the return pickup.
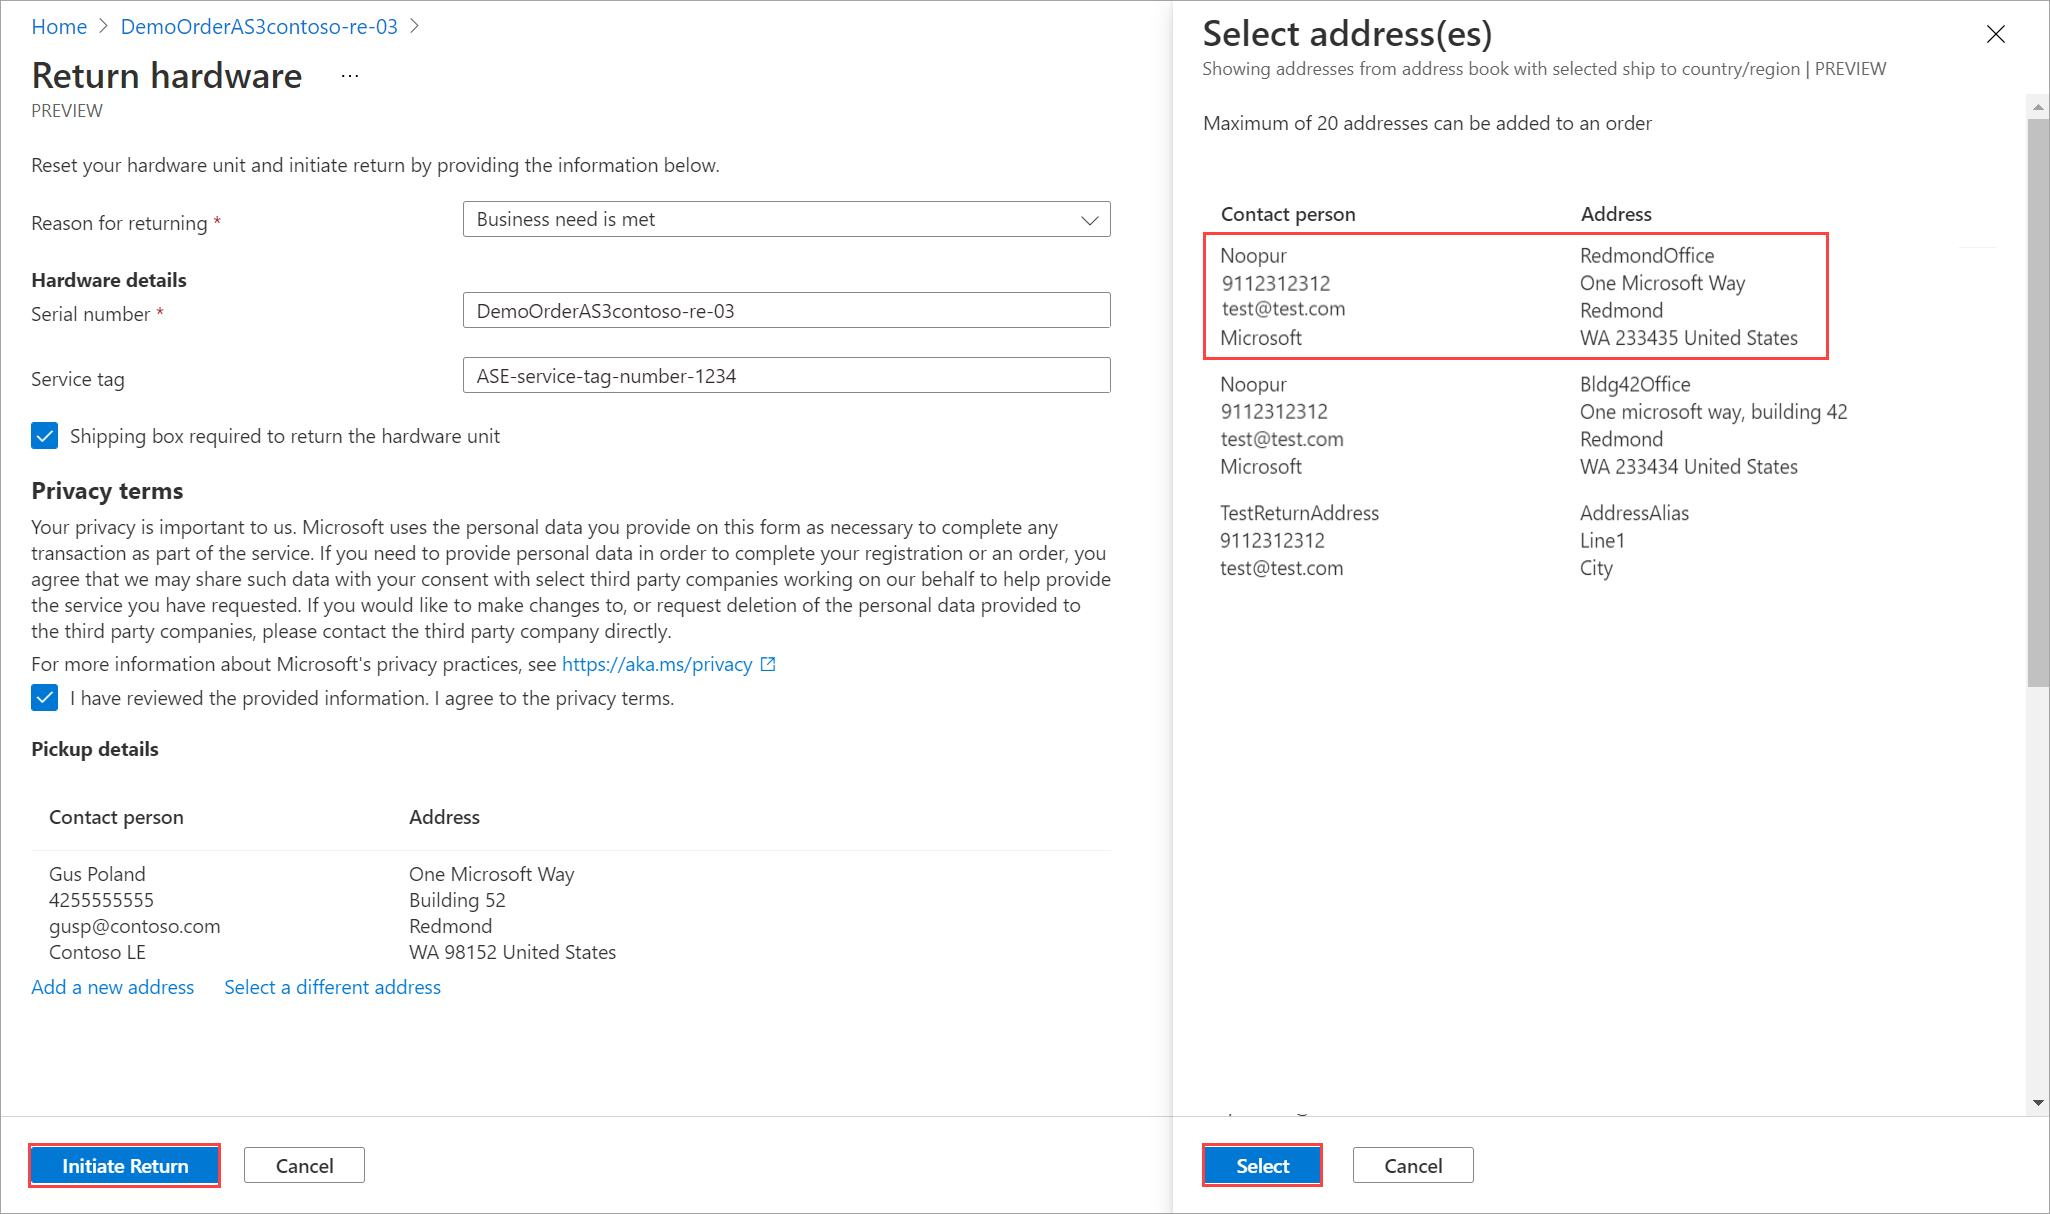
Select Initiate return.
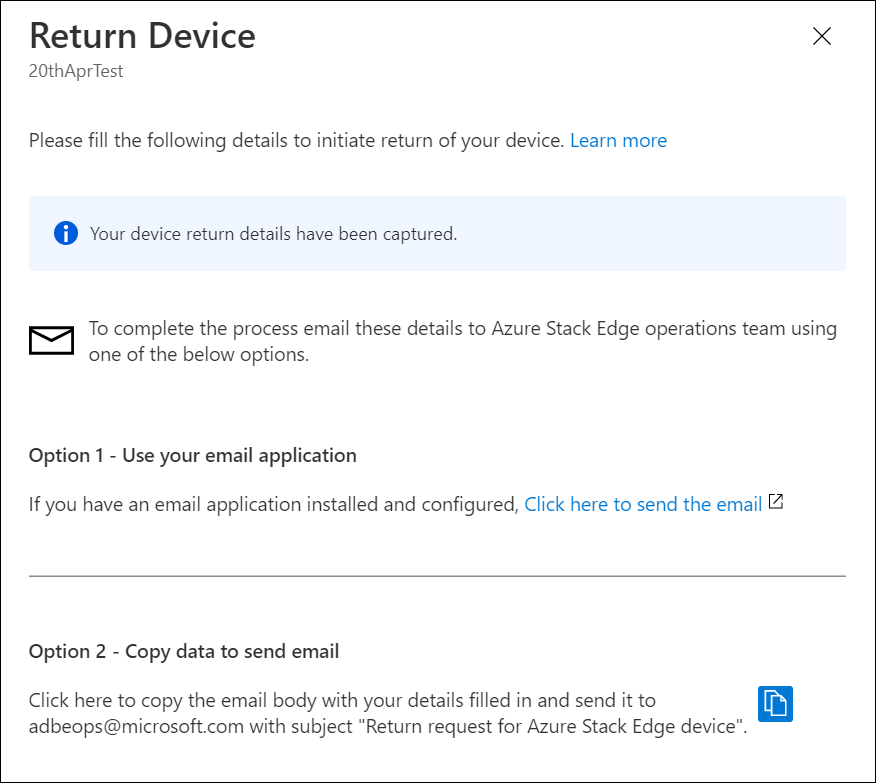
Once the return request is submitted, the order item resource starts reflecting the status of your return shipment. The status progresses from Return initiated to Picked up to Return completed. Use the portal to check the return status of your resource at any time.
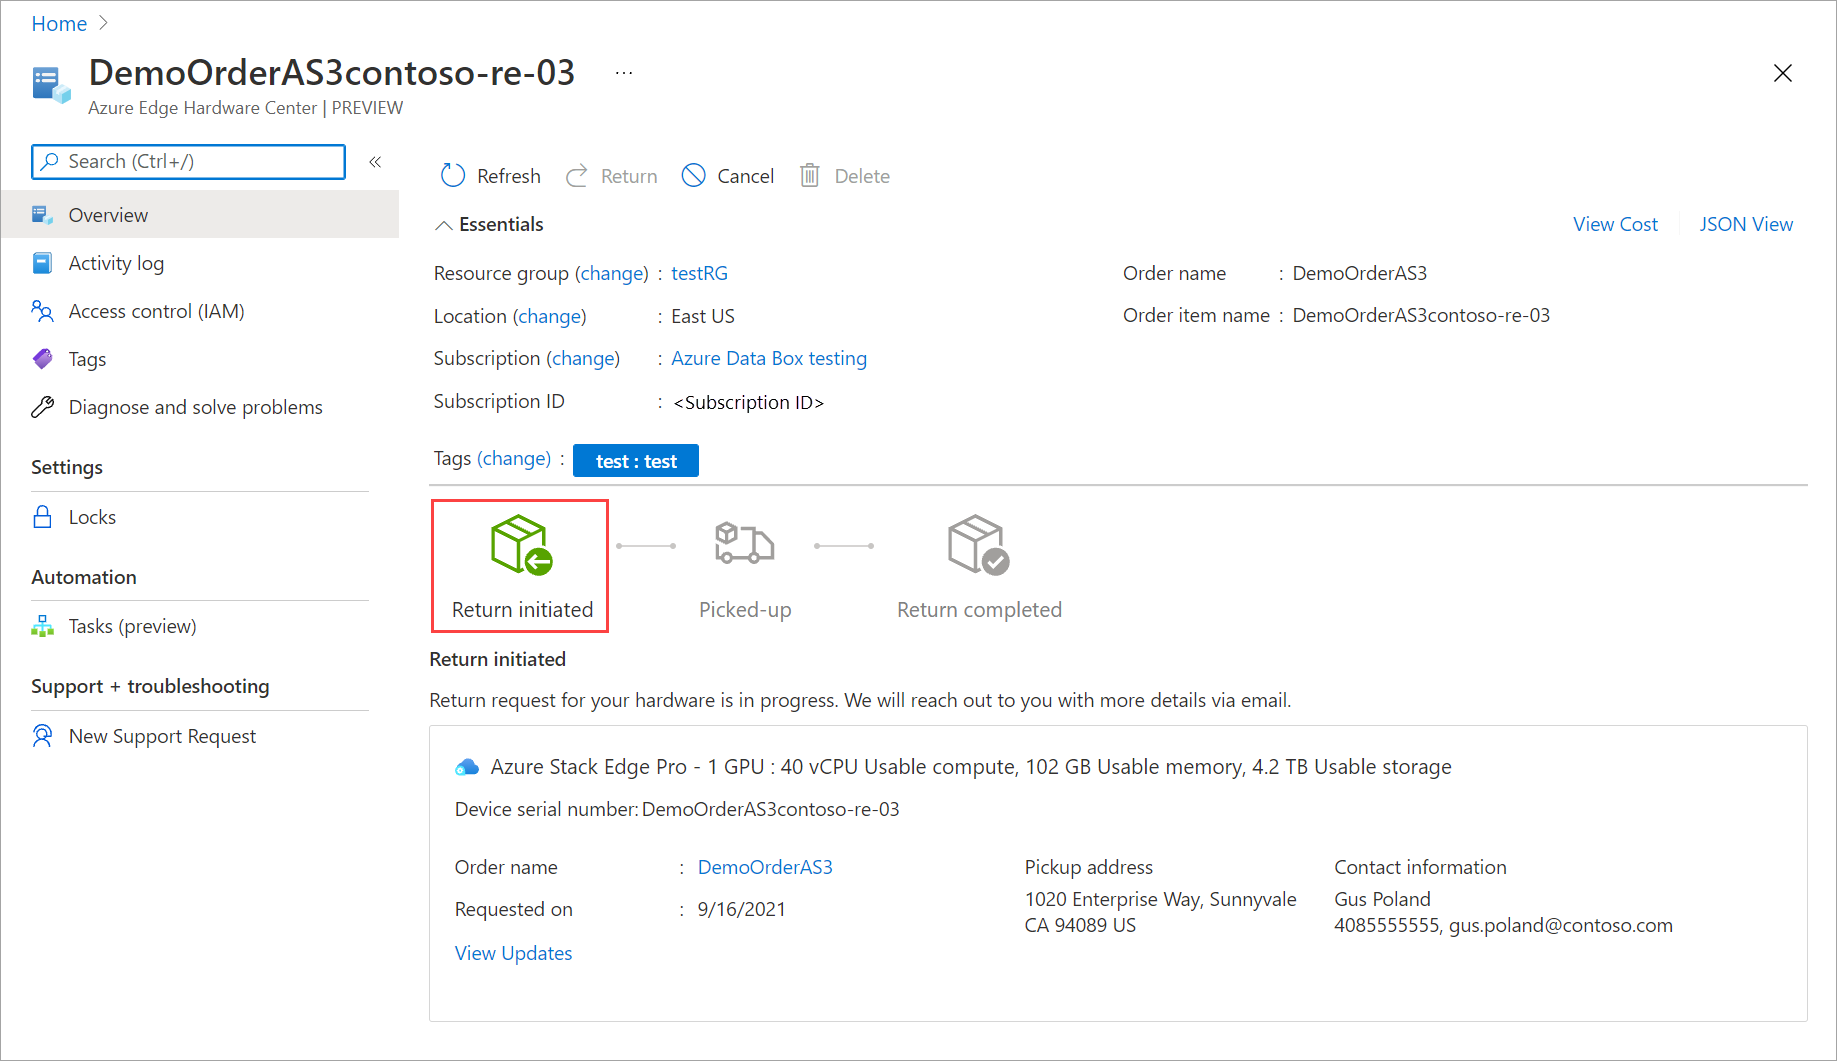
Once the request is initiated, the Azure Stack Edge operations team reaches out to you to help schedule the device pickup.
The next step is to package the device.


Pack the device
To pack the device, take the following steps.
Shut down the device. In the local web UI, go to Maintenance > Power settings.
Select Shut down. When prompted for confirmation, click Yes to continue. For more information, see Manage power.
Unplug the power cables and remove all the network cables from the device.
Carefully prepare the shipment package as per the following instructions and as shown in the following diagram:

- Use the shipping box you requested from Azure or the original shipping box with its foam packaging.
- Place the bottom foam piece in the box.
- Lay the device on top of the foam taking care that it sits snugly in the foam.
- Place the top foam piece in the package.
- Place the power cords in the accessory tray and the rails on the top foam piece.
- Seal the box and affix the shipping label that you received from Azure on the package.
Important
If proper guidelines to prepare the return shipment aren't observed, the device could be damaged and damaged device fee may apply. Review the Product Terms of service and the FAQ on lost or damaged device.
Schedule a pickup
To schedule a pickup, take the following steps.
Schedule a pickup with your regional carrier. If returning the device in US, your carrier could be UPS or FedEx. To schedule a pickup with UPS:
- Call the local UPS (country/region-specific toll free number).
- In your call, quote the reverse shipment tracking number as shown on your printed label.
- If the tracking number isn't quoted, UPS will require you to pay an extra charge during pickup.
Instead of scheduling the pickup, you can also drop off the Azure Stack Edge at the nearest drop-off location.
Complete return
In this section, you can verify when the return is complete and then choose to delete the order.
When you initiate the return, the billing is paused. After the device is received at the Azure datacenter, the device is inspected for damage or any signs of tampering.
- If the device arrives intact and is in good shape, Azure Stack Edge operations team will contact you to confirm that the device was returned. You can choose to delete the resource associated with the device in the Azure portal.
- If the device arrives significantly damaged, charges may apply. For details, see the FAQ on lost or damaged device and Product Terms of Service.


Next steps
- Learn how to Get a replacement Azure Stack Edge device.