Note
Access to this page requires authorization. You can try signing in or changing directories.
Access to this page requires authorization. You can try changing directories.
Note
The Azure Data Box Heavy device will be retired on May 31, 2025 in the US, EU, UK, Canada, and US Gov regions. After this date, new orders for this device will no longer be accepted. However, we'll continue to process and support all existing orders. The Azure Data Box service will transition to using the Next-gen Azure Data Box 120, Azure Data Box 525, Azure Data Box Disk, and Azure Import/Export service for all offline data transfer needs in these regions.
This quickstart describes how to deploy the Azure Data Box Heavy using the Azure portal. The steps include how to cable, configure, and copy data to Data Box Heavy so that it uploads to Azure. The quickstart is performed in the Azure portal and on the local web UI of the device.
For detailed step-by-step deployment and tracking instructions, go to Tutorial: Order Azure Data Box Heavy
Prerequisites
Complete the following configuration prerequisites for the installation site, Data Box service, and device before you deploy the device.
For installation site
Before you begin, make sure that:
- The device can fit through all your entryways. Device dimensions are: width: 26” length: 48” height: 28”.
- You have access for the device via an elevator or a ramp if you plan to install on a floor other than the ground floor.
- You have two people to handle the device. The device weighs approximately ~500 lbs. and comes on wheels.
- You have a flat site in the datacenter with proximity to an available network connection that can accommodate a device with this footprint.
For service
Before you begin, make sure that:
You have your Microsoft Azure storage account with access credentials, such as storage account name and access key.
The subscription you use for Data Box service is one of the following types:
- Microsoft Customer Agreement (MCA) for new subscriptions or Microsoft Enterprise Agreement (EA) for existing subscriptions. Read more about MCA for new subscriptions and EA subscriptions.
- Cloud Solution Provider (CSP). Learn more about Azure CSP program.
Note
This service is supported for the Azure CSP program in India if you are on the modern billing model. If you are on the legacy billing model as per your agreement, you will not be able to create Data Box orders.
- Microsoft Azure Sponsorship. Learn more about Azure sponsorship program.
- Microsoft Partner Network (MPN). Learn more about Microsoft Partner Network.
Ensure that you have owner or contributor access to the subscription to create a device order.
For device
Before you begin, make sure that:
- You've reviewed the safety guidelines for your Data Box Heavy.
- You have a host computer connected to the datacenter network. Data Box Heavy will copy the data from this computer. Your host computer must run a supported operating system.
- You have a laptop with RJ-45 cable to connect to the local UI and configure the device. Use the laptop to configure each node of the device once.
- Your datacenter has high-speed network and you have at least one 10 GbE connection.
- You need one 40-Gbps cable or 10-Gbps cable per device node. Choose cables that are compatible with the Mellanox MCX314A-BCCT network interface:
- For the 40-Gbps cable, device end of the cable needs to be QSFP+.
- For the 10-Gbps cable, you need an SFP+ cable that plugs into a 10-G switch on one end, with a QSFP+ to SFP+ adapter (or the QSA adapter) for the end that plugs into the device.
- The power cables are included in a tray at the back of the device.
Sign in to Azure
Sign in to the Azure portal.
Order
This step takes roughly 5 minutes.
- Create a new Azure Data Box resource in Azure portal.
- Select an existing subscription enabled for this service and choose transfer type as Import. Provide the Source country where the data resides and Azure destination region for the data transfer.
- Select Data Box Heavy. The maximum usable capacity is 770 TB and you can create multiple orders for larger data sizes.
- Enter the order details and shipping information. If the service is available in your region, provide notification email addresses, review the summary, and then create the order.
Once the order is created, the device is prepared for shipment.

Cable and connect to your device
After you have reviewed the prerequisites, you'll cable and connect to your device.
Cable for power
This step takes about 5 minutes.
When you receive the Data Box Heavy, do the following steps to cable the device for power and turn on the device.
- If there is any evidence that the device is tampered with or damaged, do not proceed. Contact Microsoft Support to ship you a replacement device.
- Move the device to installation site and lock the rear wheels.
- Connect all the four power cables to the power supplies at the back of the device.
- Use the power buttons in the front plane to turn on the device nodes.
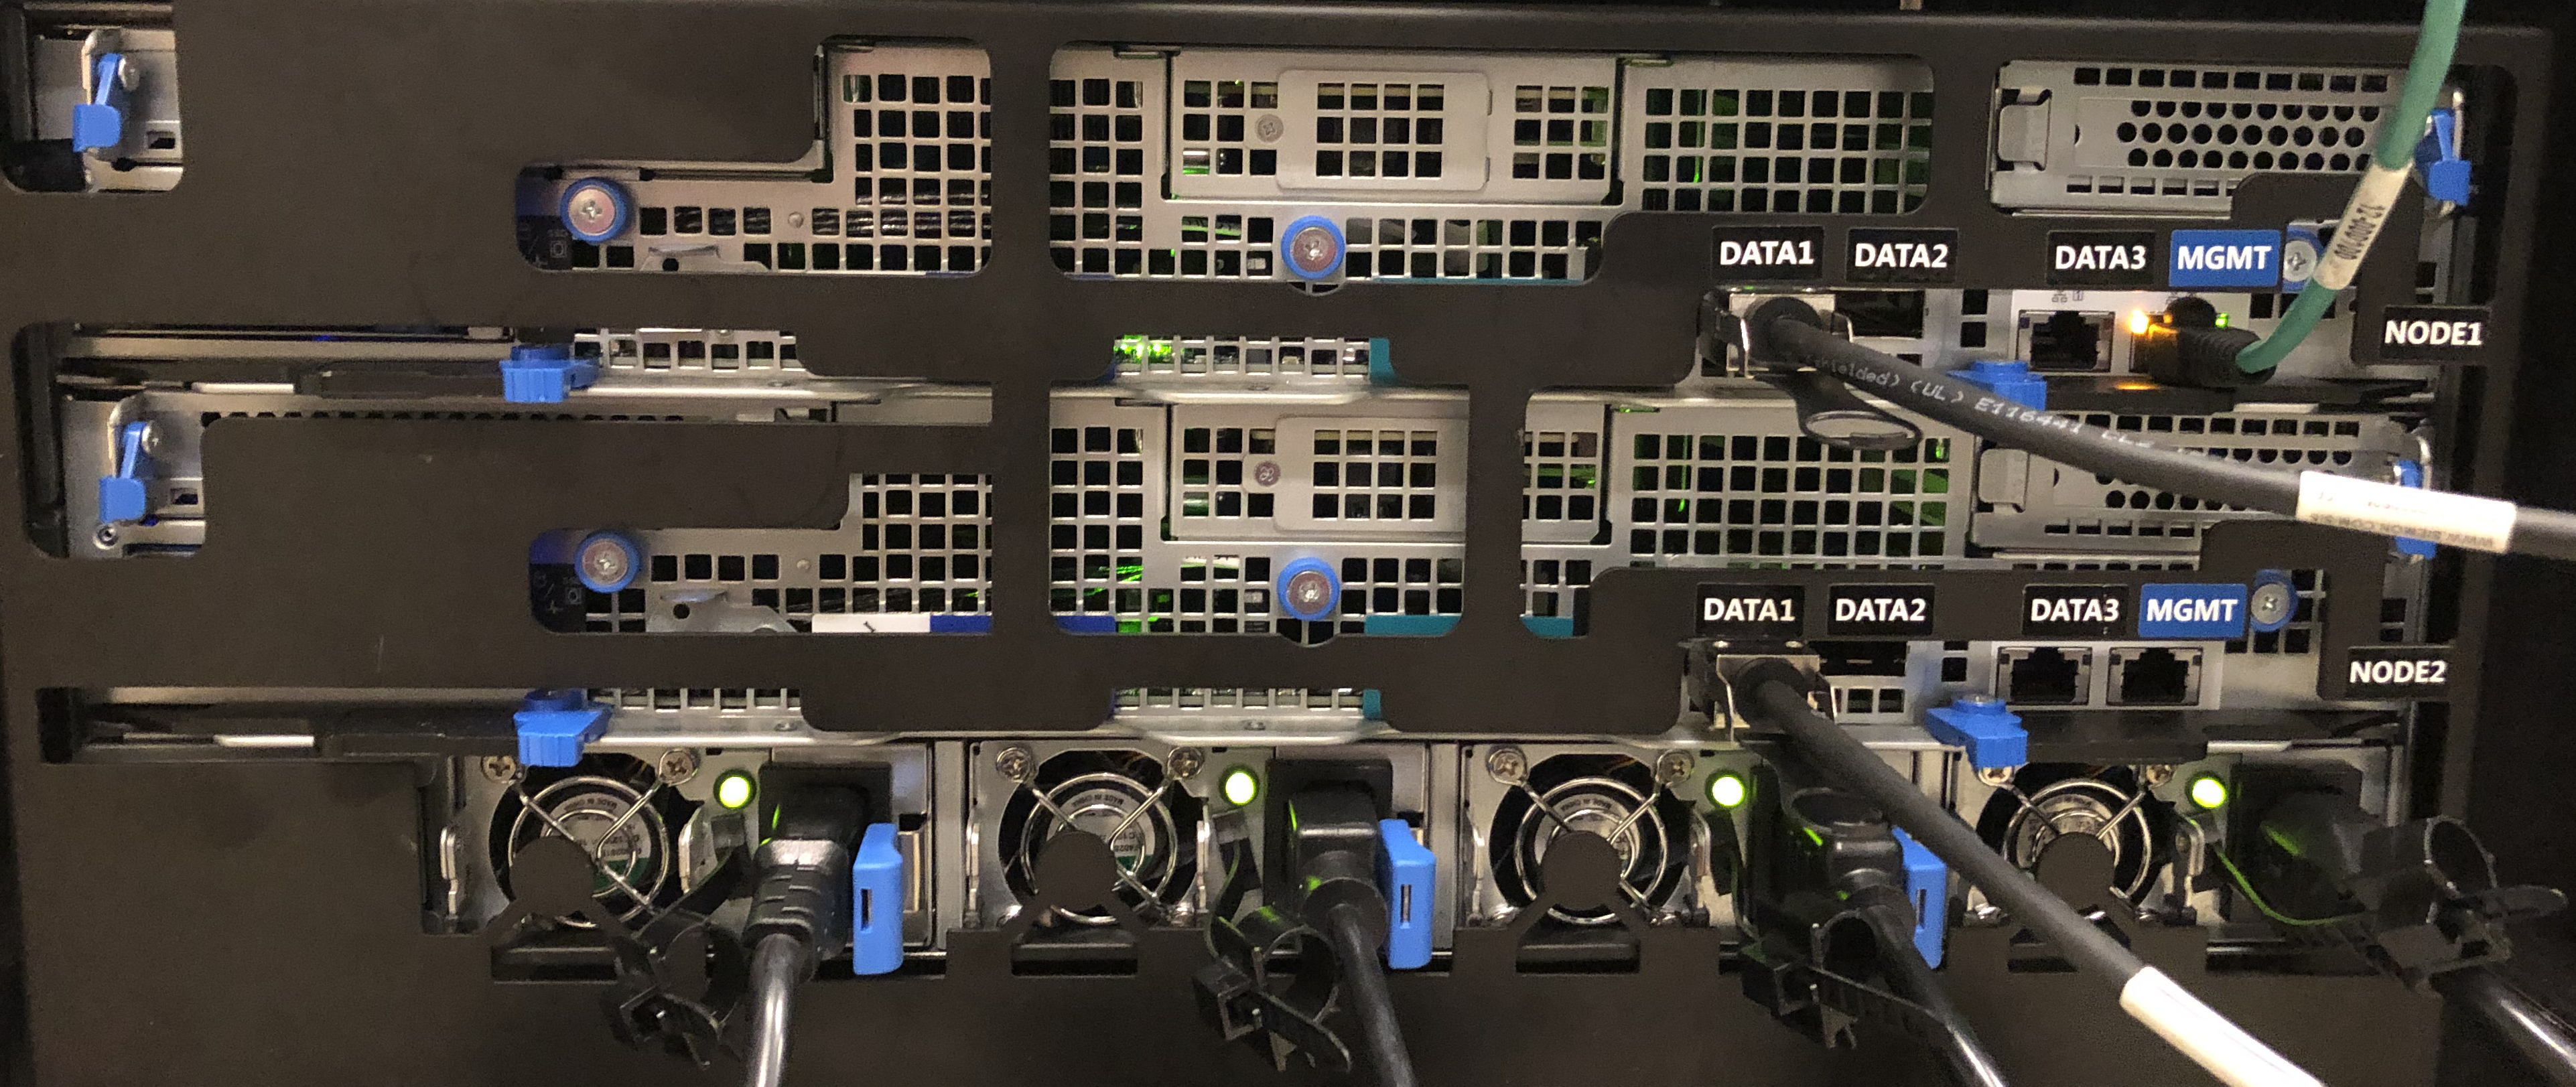
Cable first node for network
This step takes about 10-15 minutes to complete.
Use the RJ-45 CAT 6 network cable to connect your host computer to the management port (MGMT) on the device.
Use the Twinax QSFP+ copper cable to connect at least one 40 Gbps (preferred over 1 Gbps) network interface, DATA 1 or DATA 2 for data. If using a 10-Gbps switch, use a Twinax SFP+ copper cable with a QSFP+ to SFP+ adapter (the QSA adapter) to connect the 40-Gbps network interface for data.
Cable the device as shown below.
Configure first node
This step takes about 5-7 minutes to complete.
- To get the device password, go to General > Device details in the Azure portal. Same password is used for both nodes of the device.
- Assign a static IP address of 192.168.100.5 and subnet 255.255.255.0 to the Ethernet adapter on the computer you are using to connect to Data Box Heavy. Access the local web UI of the device at
https://192.168.100.10. The connection could take up to 5 minutes after you turned on the device. - Sign in using the password from the Azure portal. You see an error indicating a problem with the website’s security certificate. Follow the browser-specific instructions to proceed to the web page.
- By default, the network settings for the interfaces (excluding the MGMT) are configured as DHCP. If needed, you can configure these interfaces as static and provide an IP address.
Cable and configure the second node
This step takes about 15-20 minutes to complete.
Follow the steps used for the first node to cable and configure the second node on the device.
Copy data
The time to complete this operation depends upon your data size and the speed of the network over which the data is copied.
Copy data to both the device nodes using both the 40-Gbps data interfaces in parallel.
- If using a Windows host, use an SMB compatible file copy tool such as Robocopy.
- For NFS host, use
cpcommand orrsyncto copy the data.
Connect to the shares on the device using the path:
\\<IP address of your device>\ShareName. To get the share access credentials, go to the Connect & copy page in the local web UI of the Data Box Heavy.Make sure that the share and folder names, and the data follow guidelines described in the Azure Storage and Data Box Heavy service limits.
Prepare to ship
The time to complete this operation depends upon your data size.
- After the data copy is complete without any errors, go to Prepare to ship page in the local web UI and start the ship preparation.
- After the Prepare to ship has completed successfully on both the nodes, turn off the device from the local web UI.
Ship to Azure
This operation takes about 15-20 minutes to complete.
- Remove the cables and return them to the tray at the back of the device.
- Schedule a pickup with your regional carrier.
- Reach out to Data Box Operations to inform regarding the pickup and to get the return shipping label.
- The return shipping label should be visible on the front clear panel of the device.
Verify data
The time to complete this operation depends upon your data size.
When the Data Box Heavy device is connected to the Azure datacenter network, the data automatically uploads to Azure.
Data Box service notifies you that the data copy is complete via the Azure portal.
- Check error logs for any failures and take appropriate actions.
- Verify that your data is in the storage account(s) before you delete it from the source.
Clean up resources
This step takes 2-3 minutes to complete.
You can cancel the Data Box Heavy order in the Azure portal before the order is processed. Once the order is processed, the order cannot be canceled. The order progresses until it reaches the completed stage. To cancel the order, go to Overview and click Cancel from the command bar.
You can delete the order once the status shows as Completed or Canceled in the Azure portal. To delete the order, go to Overview and click Delete from the command bar.
Next steps
In this quickstart, you’ve deployed a Data Box Heavy to help import your data into Azure. To learn more about Azure Data Box Heavy management, advance to the following tutorial: