Enable Azure Private Link as a standard deployment
This article explains how to use Azure Private Link to enable private connectivity between users and their Databricks workspaces, and also between clusters on the classic compute plane and the core services on the control plane within the Databricks workspace infrastructure.
Note
- For requirements and an overview of Private Link, see Enable Azure Private Link back-end and front-end connections.
- There are two deployment types: standard and simplified. This article describes the standard deployment. To compare these deployment types, see Choose standard or simplified deployment.
Introduction to front-end connections in a standard deployment
To support private front-end connections to the Azure Databricks web application for clients that have no public internet connectivity, you must add a browser authentication private endpoint to support single sign-on (SSO) login callbacks to the Azure Databricks web application. Typically these user connections would come through a VNet that handles connections to on-premises network and VPN, and this is called a transit VNet.
Tip
If you are implementing only back-end Private Link connections, you do not need a transit VNet or a browser authentication private endpoint, and can skip the rest of this section.
A browser authentication private endpoint is a private connection with sub-resource type browser_authentication. It hosts a private connection from a transit VNet that allows Microsoft Entra ID (formerly Azure Active Directory) to redirect users after login to the correct Azure Databricks control plane instance.
- If you plan to allow connections from your user client transit network to the public internet, adding a browser authentication private endpoint is recommended but not required.
- If you plan to disallow connections from your client transit network to the public internet, adding a browser authentication private endpoint is required.
The browser authentication private endpoint is shared among all workspaces in the region that share the same private DNS zone. Also note that some corporate DNS solutions effectively limit you to one regional private endpoint for the browser authentication.
Important
To host the web authentication private network settings, Databricks strongly recommends creating a workspace called a private web auth workspace for each region. This solves the problem of deleting a workspace potentially affecting other workspaces in that region. For more context and details, see Step 4: Create a private endpoint to support SSO for web browser access.
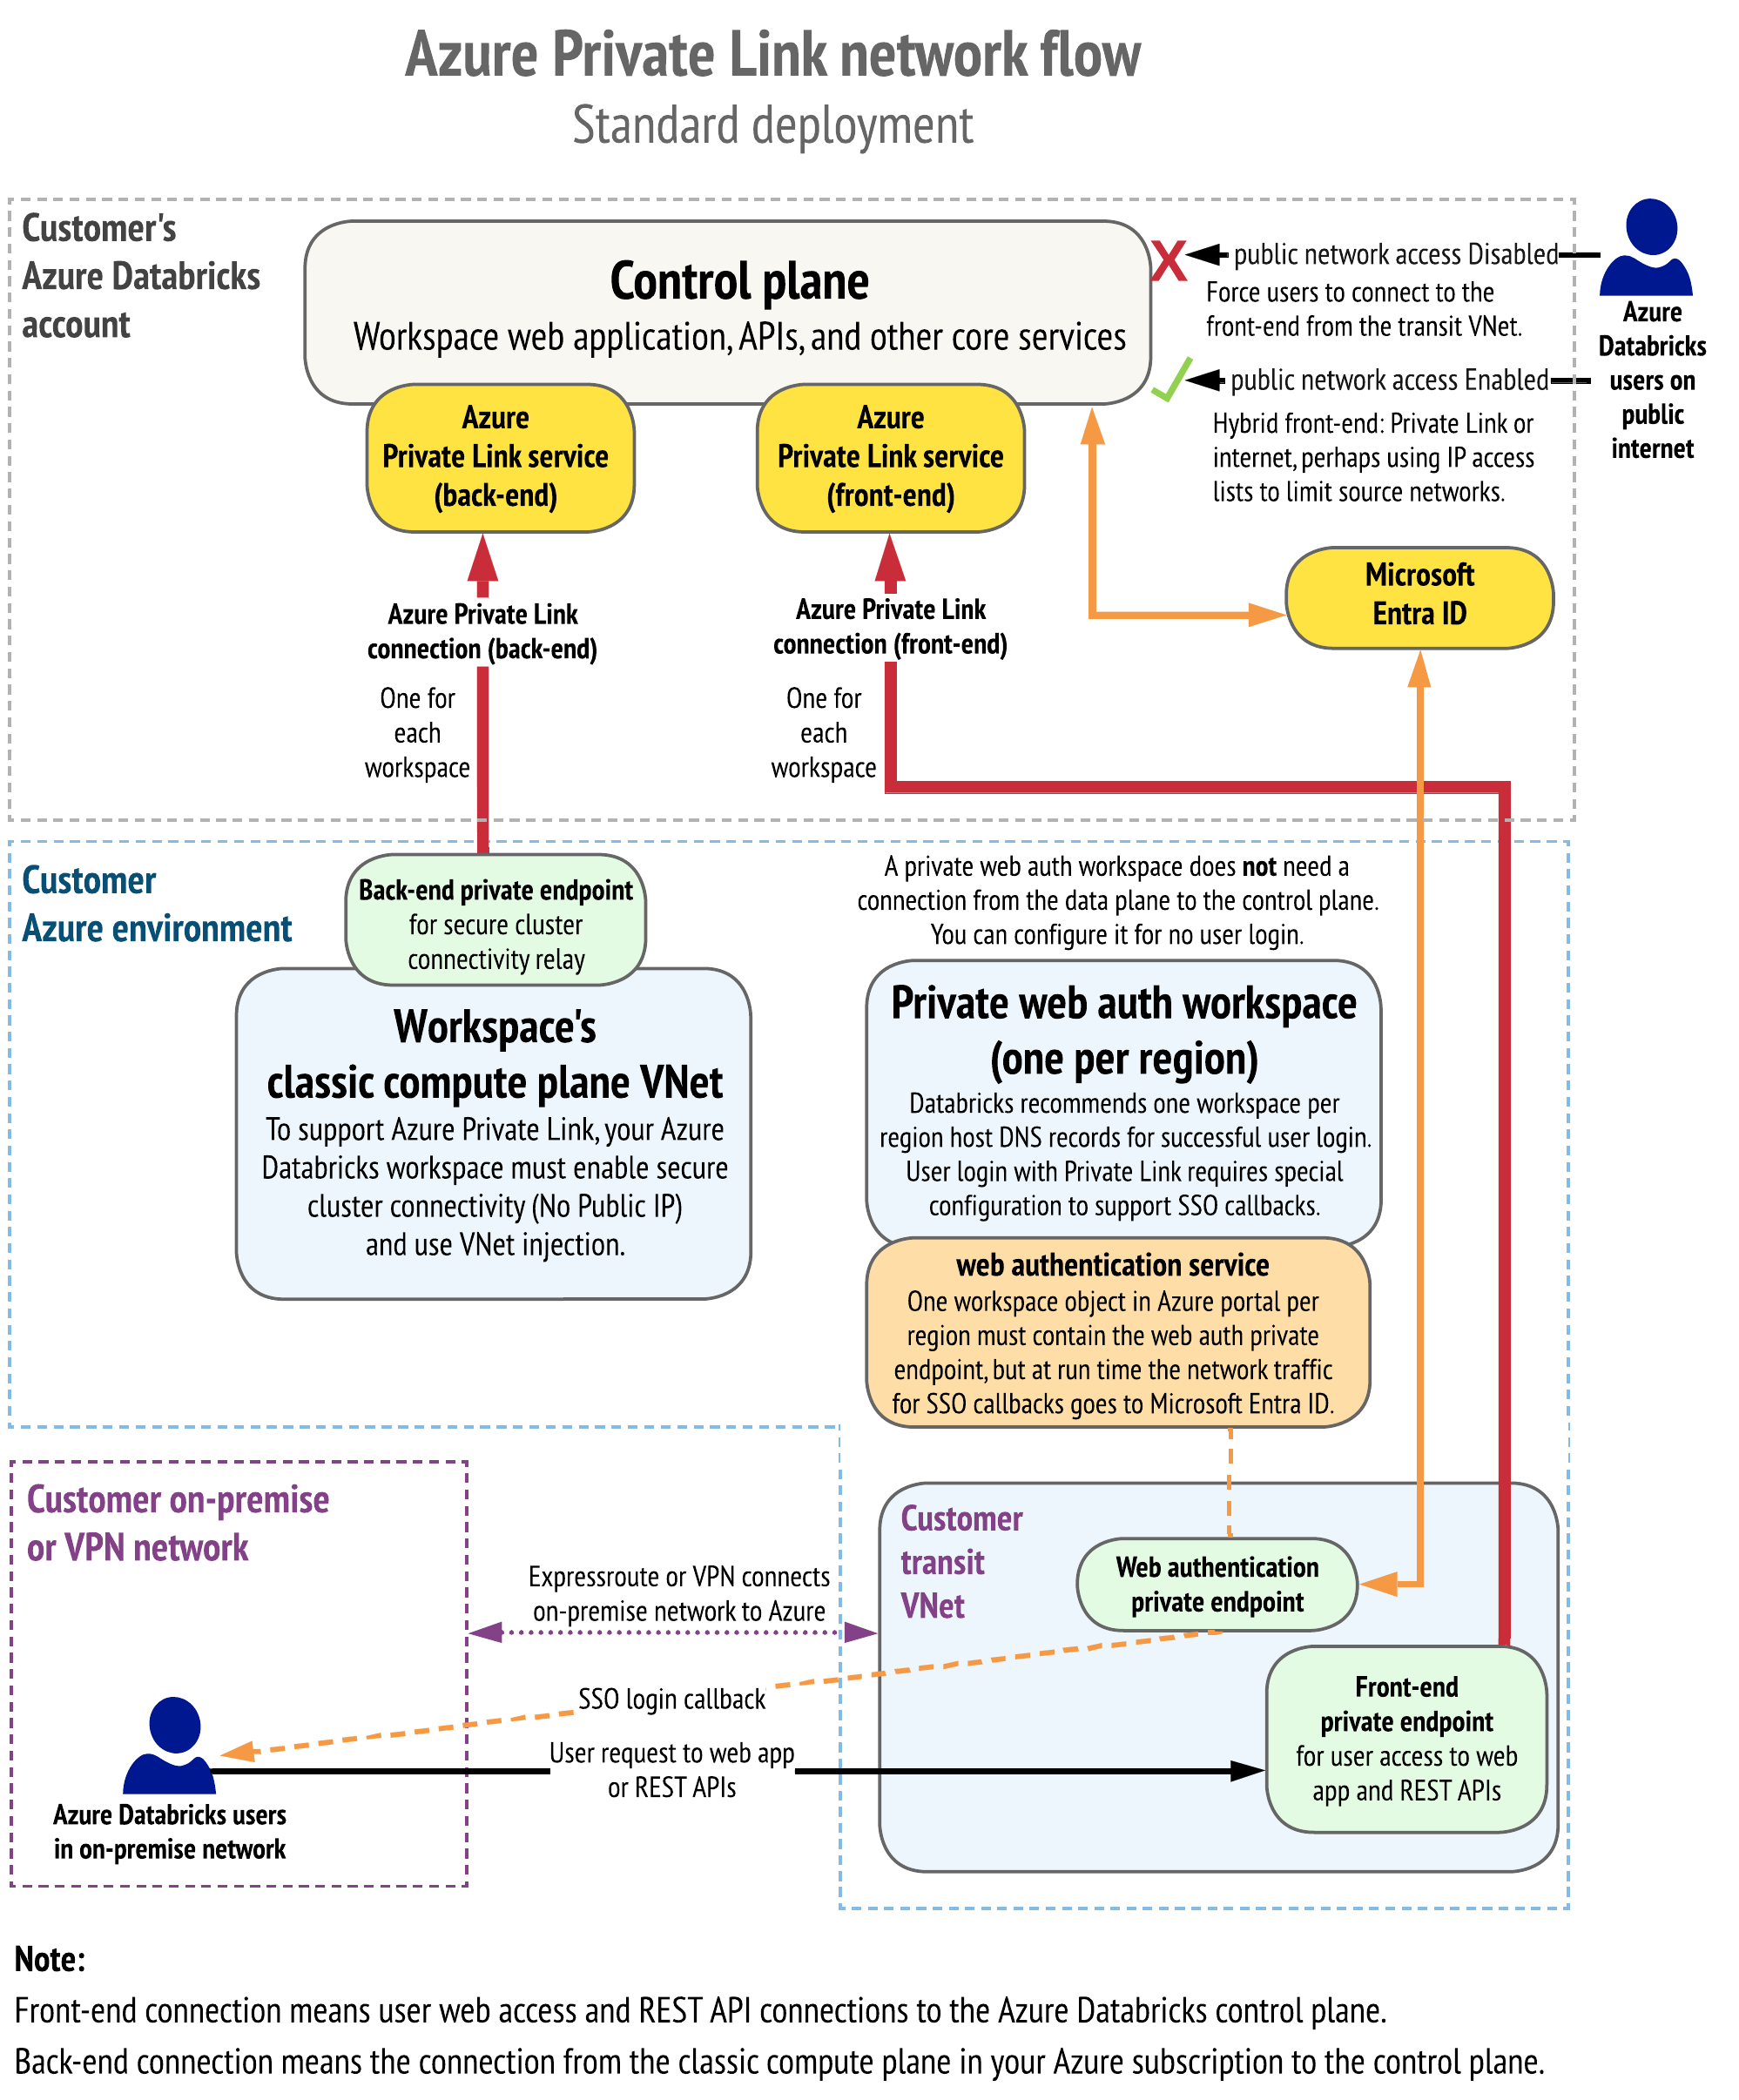
Network flow and network object diagrams
The following diagram shows the network flow in a typical implementation of the Private Link standard deployment:
The following diagram shows the network object architecture:
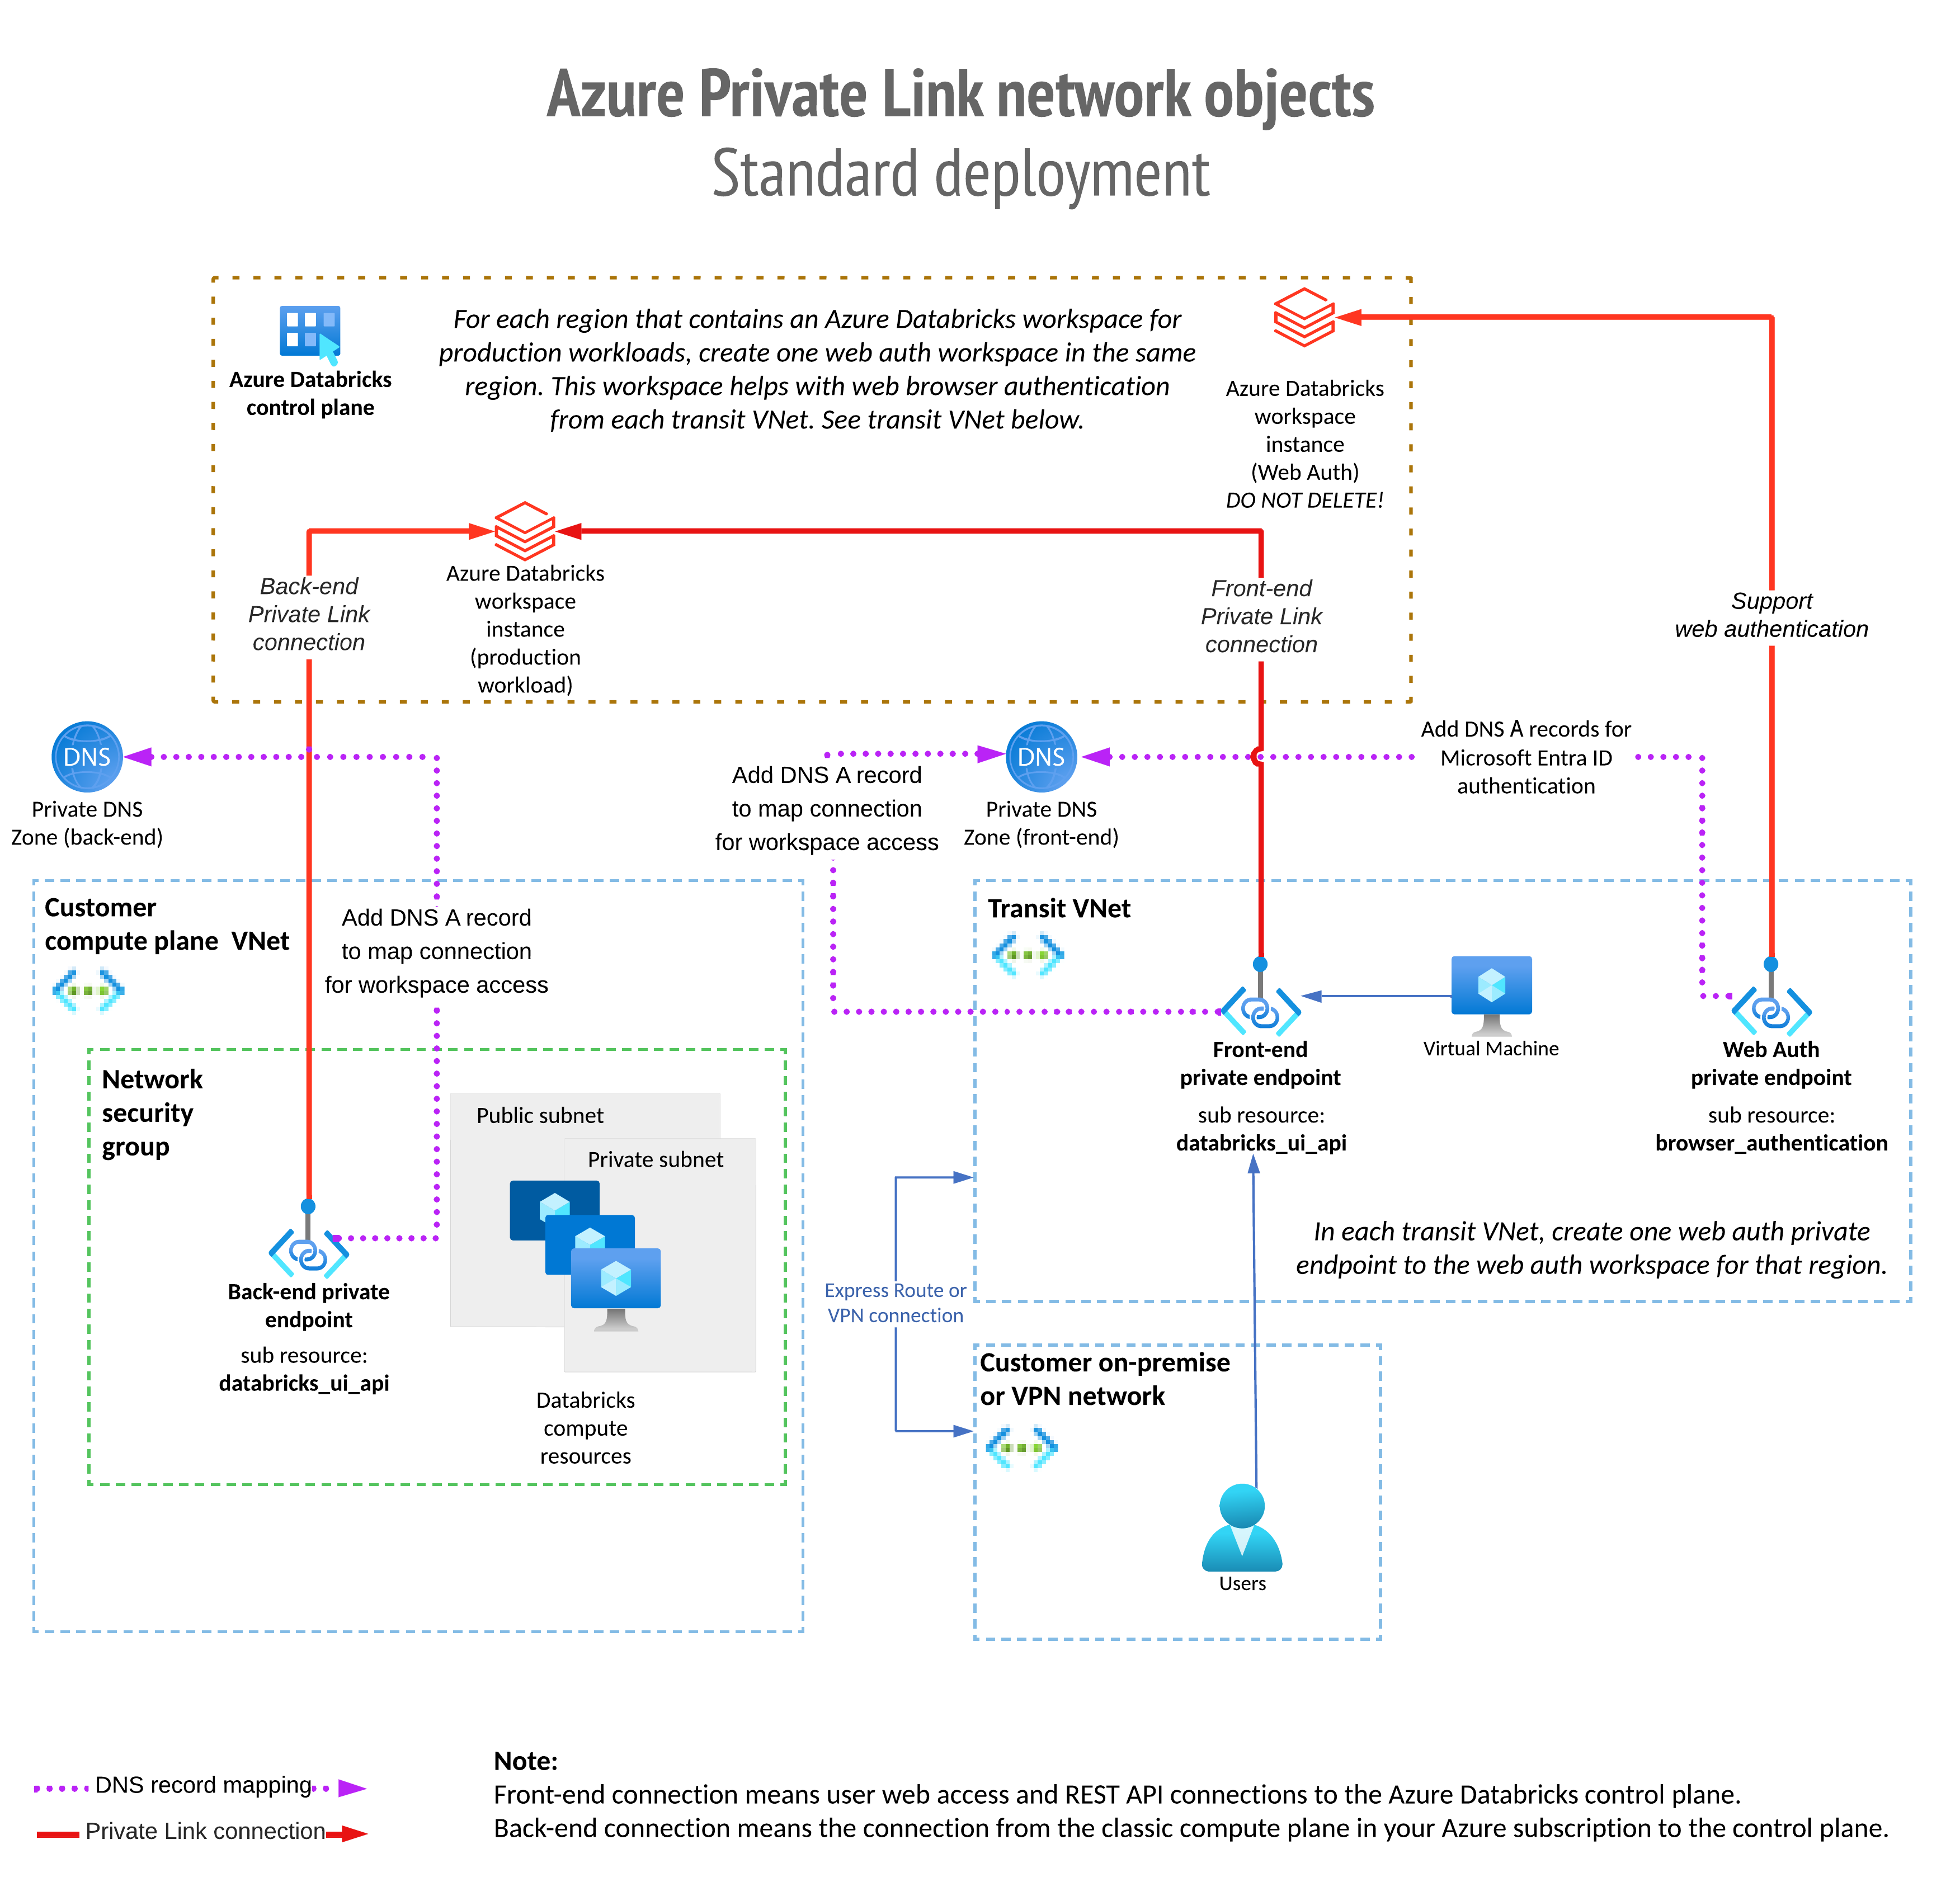
To compare this to the Private Link simplified deployment, see Network flow and network object diagrams
Step 1: Create resource groups
- In the Azure portal, go to the resource groups blade.
- Click Create resource group to create a resource group for your workspace. Set the Azure subscription, region, and the name of the resource group. Click Review and Create and then Create.
- Repeat the previous step to create a resource group for your Private Link resources such as your Private Link endpoint and zone. The region does not need to match the workspace region. Use the Azure region that matches the region that you plan to use for your transit VNet. If the workspace region and the transit VNet region do not match, there are additional costs to transfer data between regions.
Step 2: Create or prepare the workspace VNet
You may already have a VNet that you will use, or you can create a new VNet specifically for Azure Databricks.
For the requirements for IP ranges of the VNet and the two required subnets for the workspace, see the article Deploy Azure Databricks in your Azure virtual network (VNet injection).
The VNet and subnet IP ranges that you use for Azure Databricks defines the maximum number of cluster nodes that you can use at one time. Choose these values carefully to match your own organization’s network requirements and maximum cluster nodes that you expect to use at one time with Azure Databricks. See Address space and maximum cluster nodes.
For example, you could create a VNet with these values:
- IP range: First remove the default IP range, and then add IP range
10.28.0.0/23. - Create subnet
public-subnetwith range10.28.0.0/25. - Create subnet
private-subnetwith range10.28.0.128/25. - Create subnet
private-linkwith range10.28.1.0/27.
Step 3: Provision an Azure Databricks workspace and private endpoints
Deploy a new Azure Databricks workspace with the following settings:
- For the network for compute resources, deploy your Azure Databricks workspace in your own VNet. This feature is known as Deploy Azure Databricks in your Azure virtual network (VNet injection).
- Secure cluster connectivity (also known as No-Public-IP/NPIP).
- Private Link support.
To deploy a workspace with these settings, you have several options, including a user interface in the Azure portal, a custom template (which you can apply in the UI, with Azure CLI, or PowerShell), or Terraform. To use a custom template to create a Private Link enabled workspace, use this template.
No matter which approach you choose, set these values as you create your new workspace:
- Public network access (for front-end Private Link) (in the template as
publicNetworkAccess): Controls your settings for the front-end use case of Private Link.- If you set this to
Enabled(the default), users and REST API clients on the public internet can access Azure Databricks, although you can limit access to specific IP ranges from approved source networks using Configure IP access lists for workspaces. - If you set this to
Disabled, no user access is permitted from the public internet. If set to Disabled, the front-end connection can be accessed only using Private Link connectivity and not from the public internet. IP access lists are not effective on Private Link connections. - If you wish to use only back-end Private Link (no front-end Private Link), you must set public network access to
Enabled.
- If you set this to
- Required NSG rules (for back-end Private Link) (in the template as
requiredNsgRules): Possible values:- All Rules (the default): This value is in the template as
AllRules. This indicates that your workspace compute plane needs a network security group that includes Azure Databricks rules that allow connections on the public internet from the compute plane to the control plane. If you are not using back-end Private Link, use this setting. - No Azure Databricks Rules: This value is in the template as
NoAzureDatabricksRules: Use this value if you are using back-end Private Link, which means that your workspace compute plane does not need network security group rules to connect to the Azure Databricks control plane. If you are using back-end Private Link, use this setting.
- All Rules (the default): This value is in the template as
- Enable secure cluster cluster connectivity (No-Public-IP/NPIP) (in the template as
enableNoPublicIp): Always set to Yes (true), which enables secure cluster connectivity.
The combination of the settings Public network access (in the template, publicNetworkAccess) and Required NSG rules (in the template, requiredNsgRules) define what types of Private Link are supported.
The following table shows the supported scenarios for the two main Private Link use cases, which are front-end and back-end.
| Scenario | Set public network access to this value | Set Required NSG rules to this value | Create these endpoints |
|---|---|---|---|
| No Private Link for front-end or back-end | Enabled | All Rules | n/a |
| Recommended configuration: Both front-end and back-end Private Link. Front-end connectivity is locked down to require Private Link. | Disabled | NoAzureDatabricksRules | One for back-end (required). One for front-end (required). Additionally, one browser auth private endpoint per region. |
| Both front-end and back-end Private Link. Hybrid front-end connectivity allows Private Link or public internet, typically using Configure IP access lists for workspaces. Use this hybrid approach if you use Private Link for on-premises user access but need to allow specific internet CIDR ranges. The additional ranges might be used for Azure services such as SCIM or Azure Machine Learning, or to provide external access for JDBC, cloud automation, or admin tools. | Enabled | NoAzureDatabricksRules | One for back-end (required). One endpoint for front-end (optional). Additionally, one browser auth private endpoint per region. |
| Front-end only Private Link. Front-end connectivity is locked down to require Private Link (public network access is disabled). No Private Link for back-end. | This is an unsupported scenario. | This is an unsupported scenario. | This is an unsupported scenario. |
| Front-end only Private Link. Hybrid front-end connectivity allows Private Link or public internet, perhaps using Configure IP access lists for workspaces. No Private Link for back-end. | Enabled | All Rules | One endpoint for front-end (optional). Additionally, one browser auth private endpoint per region. |
| Back-end only Private Link. Front-end uses public internet, perhaps using Configure IP access lists for workspaces. No Private Link for front-end. | Enabled | NoAzureDatabricksRules | One endpoint for back-end (required). |
Set these workspace configuration settings:
- Set Pricing tier to Premium (in a template, this value is
premium) - If you are enabling any back-end connectivity, set Enable No Public Ip (secure cluster connectivity) to Yes (in a template, this value is
true). - Set Networking > Deploy Azure Databricks workspace in your own Virtual Network (VNet) to Yes (in a template, this value is
true)
Note
In general, you need to enable Private Link when you create a new workspace. However, if you have an existing workspace that never had Private Link front-end or back-end access, or if you used the default values for Public network access (Enabled) and Required NSG rules (All Rules), you can choose to add front-end Private Link later. However, Public network access will remain enabled so only some of the configuration options are available to you.
There are two ways you can create the workspace:
Create the workspace and private endpoints in the Azure portal UI
The Azure portal automatically includes the two Private Link fields (Public network access and Required NSG rules) when creating a new Azure Databricks workspace.
To create the workspace with your own VNet (VNet injection). To configure and size your subnets, follow the workspace procedure in Deploy Azure Databricks in your Azure virtual network (VNet injection) but do not yet press Create.
Set the following fields:
- Set Pricing Tier to
premiumor else you will not see the Private Link fields in the UI. - Set Networking > Deploy Azure Databricks workspace with Secure Cluster Connectivity (No Public IP) to Yes.
- Set Networking > Deploy Azure Databricks workspace in your own Virtual Network (VNet) to Yes.
- Set the subnets according to the VNet that you created in a previous step. For details, see the article for VNet injection.
- Set Private Link workspace fields Public Network Access and Required Nsg Rules according to the scenarios table in Step 3: Provision an Azure Databricks workspace and private endpoints.
The following screenshot shows the four most important fields for Private Link connectivity.
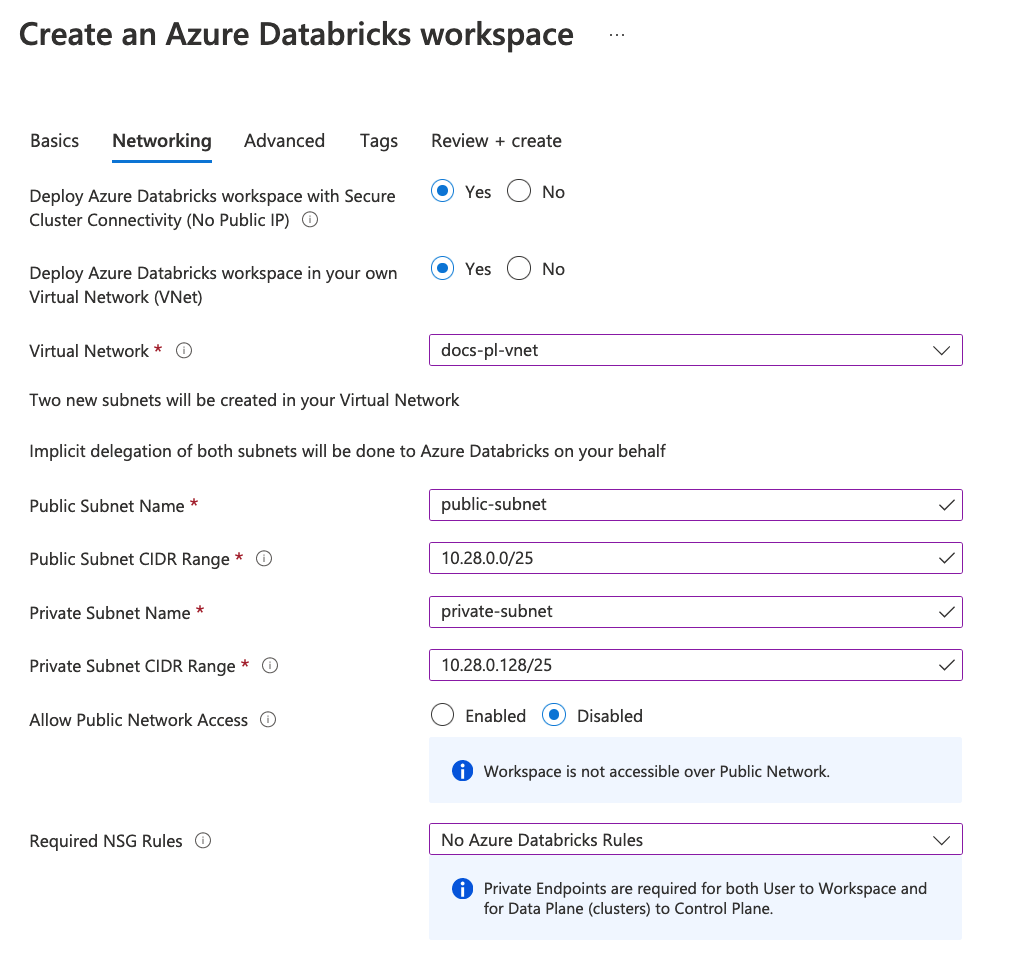
- Set Pricing Tier to
Create a private endpoint for back-end connectivity:
Look for the Private endpoints section below the fields shown in the previous screenshot. If you do not see them, you probably did not set the Pricing Tier to Premium.
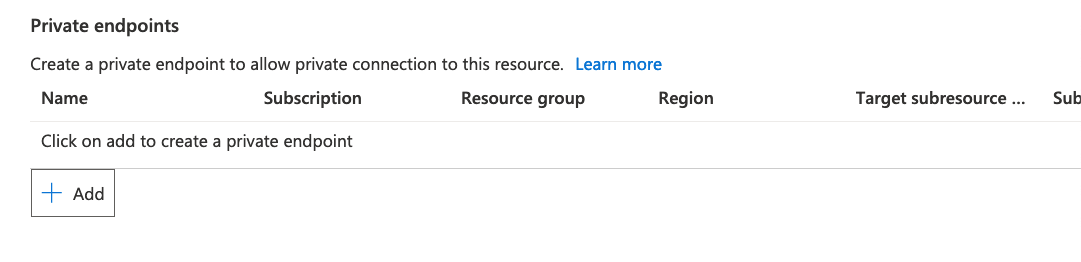
Click + Add.
Azure portal shows the Create private endpoint blade within the create workspace.
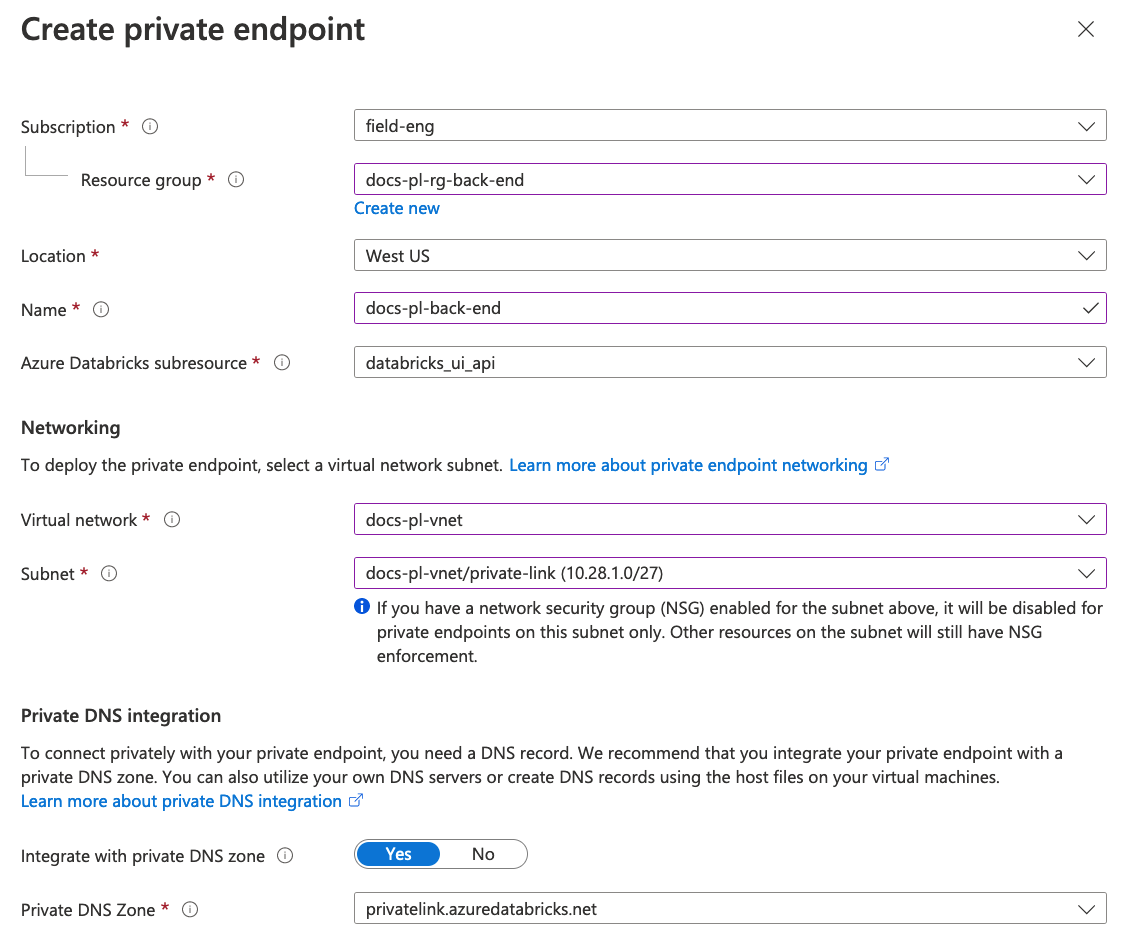
When you create the private endpoint from within the workspace some Azure fields for this object type are not shown because they are auto-populated and non-editable. Some fields are visible but do not need to be edited:
The Azure Databricks sub-resource field is visible and automatically populated with the value databricks_ui_api. That sub-resource value represents the current Azure Databricks control plane for your workspace. This sub-resource name value is used for private endpoints for both back-end and front-end connectivity.
After you set your resource group, VNet, and subnet, the Private DNS Zone is automatically populated with a value if you use the Azure-created built-in DNS rather than a custom DNS.
Important
Azure might not automatically choose the Private DNS zone that you want to use. Review the value for the Private DNS Zone field and modify it as needed.
Set the Location to match your workspace region. Note that for back-end private endpoint region and workspace region must match, even though for front-end private endpoint connections, the regions do not need to match.
Set the Virtual network to your workspace VNet.
Set the subnet to Private Link specific subnet in your workspace. For related information, see network requirements.
For typical use with the built-in Azure DNS, set Integrate with private DNS zone to Yes. The rest of these instructions assume you chose Yes.
If your organization maintains its own custom DNS, you may want to set this to No, but review this Microsoft article on DNS configuration before proceeding. Contact your Azure Databricks account team if you have questions.
Click OK to create the private endpoint and return to the workspace creation blade.
Only one private endpoint can be created directly from within the workspace creation flow. To create a separate front-end private endpoint from your transit VNet, you need to create an additional private endpoint but you need to do that after the workspace is deployed.
To finalize creation of the workspace, click Review + create and then Create.
Wait until the workspace is deployed, then click Go to resource. This is the Azure portal object for your Azure Databricks workspace. Consider pinning this resource to your Azure dashboard for easy access to it.
Create an additional front-end private endpoint to connect your transit VNet to the Azure Databricks control plane:
- From the workspace object in the Azure portal, click Networking.
- Click the Private endpoint connections tab.
- Click + Private endpoint.
- Set the resource group to your resource group for your front-end connection.
- For the Region, a front-end private endpoint must be in the same region as your transit VNet, but can be in a different region than your workspace or control plane.
Create the workspace by using a custom template and optionally add front-end private endpoints
If you do not want to use the standard Azure portal UI to create the workspace, you can use a template to deploy your workspace. You can use the template with:
The all-in-one deployment ARM template for Private Link creates the following resources:
Network security groups
Resource groups
VNet including subnets for the workspace (the standard two subnets) and Private Link (an additional subnet)
Azure Databricks workspace
The back-end Private Link endpoint with private DNS zone
Note
The template does not create a front-end endpoint from your transit VNet. After creation of the workspace, you can add that endpoint manually.
You can deploy the template directly from the main page for the template.
To deploy it directly, click Deploy on Azure. To view the source, click Browse on GitHub.
In both cases, set the following parameter values for the template:
- Set
pricingTiertopremium. If you leave this asstandard, the Azure portal hides the configuration fields that are specific to Private Link. - Set
enableNoPublicIptotrue - Set
publicNetworkAccessandrequiredNsgRulesaccording to the table in Step 3: Provision an Azure Databricks workspace and private endpoints - Set the
networkSecurityGroupto the ID for your workspace NSG.
- Set
Wait for the workspace to deploy.
Navigate to the new **Azure Databricks Service resource that represents your workspace. This is the Azure portal object for your Azure Databricks workspace. Consider pinning this resource to your Azure dashboard for easy access to it.
(Front-end Private Link only) Create the front-end connection to your transit VNet:
- In the left navigation, click Settings > Networking.
- Click the Private endpoint connections tab.
- Click + Private endpoint.
- Set the resource group to your resource group for your front-end connection.
- For the Region, your front-end private endpoint must be in the same region as your transit VNet, but can be in a different region than your workspace or control plane.
Step 4: Create a private endpoint to support SSO for web browser access
Important
Skip this step if you do not implement front-end Private Link. Also, if all your workspaces in the region support Private Link front-end connections and the client network (the transit VNet) allows public internet access, the configuration that this step describes is recommended but optional.
User authentication to the Azure Databricks web application uses OAuth as part of the Microsoft Entra ID (formerly Azure Active Directory) SSO implementation. During authentication, the user browser connects to the Azure Databricks control plane. In addition, the OAuth flow requires a network callback redirect from Microsoft Entra ID. If you configured front-end Private Link, without additional configuration the SSO network redirect fails. This means that users in the transit VNet would be unable to authenticate to Azure Databricks. Note that this issue applies to user login to the web application UI over a front-end connection but does not apply to REST API connections because REST API authentication doesn’t use SSO callbacks.
To support web browser authentication, if your client network (the transit VNet) disallows access to the public internet, you must create a browser authentication private endpoint to support single sign-on (SSO) authentication callbacks. A browser authentication private endpoint is a private endpoint with the sub-resource called browser_authentication. Creating a browser authentication private endpoint causes Azure Databricks to automatically configure the DNS records for the callback from Microsoft Entra ID during SSO login. The DNS changes are made by default in the private DNS zone that is associated with the workspace VNet.
For an organization with multiple workspaces, it is important to understand that a properly configured network configuration is exactly one browser authentication private endpoint for each Azure Databricks region for each private DNS zone. The browser authentication private endpoint configures private web authentication for all Private Link workspaces in the region that share the same private DNS zone.
For example, if you have 10 production workspaces in the West US region that share the same private DNS zone, you will have one browser authentication private endpoint to support these workspaces.
Important
- If someone deletes the workspace that hosts the browser authentication private endpoint for that region, it disrupts user web authentication for any other workspaces in that region that relied on that browser authentication private endpoint and related DNS configuration for SSO callbacks.
- To reduce risks from workspace deletion and encourage standard workspace configuration for your production workspaces, Databricks strongly recommends that you create a private web auth workspace for each region.
- For non-production deployments, you can simplify the implementation by omitting the additional private web auth workspace. In that case, your web auth endpoint would connect to one of your other workspaces in that region.
A private web auth workspace is a workspace that you create in the same region as your Azure Databricks workspaces, and its only purpose is hosting the browser authentication private endpoint connection from a specific transit VNet to your actual production Azure Databricks workspaces in that region. In all other ways, the private web auth workspace is not used for anything, for example do not use it for running jobs or other workloads. It does not need any actual user data or incoming network connectivity other than the browser authentication private endpoint. You can configure it to have no user access. By setting the workspace setting Public network access to Disabled and do not create any front-end private endpoints to the workspace, users do not have access to user login to the workspace.
To visualize how the private web auth workspace works with other objects for Private Link connectivity, see the diagram earlier in this article.
The private web auth workspace acts as a callback service for all workspaces in the region for user SSO during login. After login to your regular workspaces completes, the private web auth workspace is unused until the next login.
Whether or not you choose to create a private web auth workspace, you must choose one workspace in the region that will host the browser authentication private endpoint destination. In the Azure portal, choose one Azure Databricks workspace object that contains the browser authentication private endpoint. At run time, the actual network access is from your transit VNet to Microsoft Entra ID. After successful login using Microsoft Entra ID, the user’s web browser is redirected to the correct control plane instance.
Tip
Databricks strongly recommends the private web auth workspace configuration if you have multiple workspaces that share a private DNS configuration. You can choose to omit the private web auth workspace for any of the following conditions:
- You have only one workspace in the region and you are confident that you won’t add more later.
- You’re confident that you won’t need to delete any workspace.
- Non-production deployments.
In any of these cases, omit the private web auth workspace and instead choose one of your production workspaces to host the browser authentication private endpoint. However, be aware of the risks that eventual deletion of that workspace will immediately prevent user authentication for other workspaces in the region with front-end Private Link support.
To create a private endpoint to support SSO:
Recommended but optional step: create a private web auth workspace to host the web authentication service.
Create a resource group to host the private web auth workspace. Create one for each region into which you have deployed Azure Databricks workspaces.
Create one private web auth workspace for each region into which you have deployed Azure Databricks workspaces.
- You can use the Azure portal, Azure CLI, Powershell, or Terraform to create a new Azure Databricks workspace.
- Set the tier to Premium.
- Set the workspace name to
WEB_AUTH_DO_NOT_DELETE_<region>to ensure it is not deleted. - Set Required NSG Rules (
requiredNsgRules) to the valueNoAzureDatabricksRules. - Set Secure cluster connectivity (NPIP) (
disablePublicIp) to Enabled. - Create the workspace in the same region as your other production workspaces.
- Use VNet injection. Create or use a VNet separate from the VNet that you use for your main workspace VNet.
- Set Public network access (
publicNetworkAccess) to Disabled. - Do not put any Azure Databricks workload on this workspace.
- Do not add any private endpoints other than the browser authentication private endpoint. For example, do not create any private endpoint with the
databricks_ui_apisub-resource, which would enable front-end or back-end connections to the workspace, which is not necessary.
For details on deploying a workspace using VNet injection, see Deploy Azure Databricks in your Azure virtual network (VNet injection).
To create the workspace you can use the standard all-in-one ARM template and follow the requirements listed above for the workspace configuration.
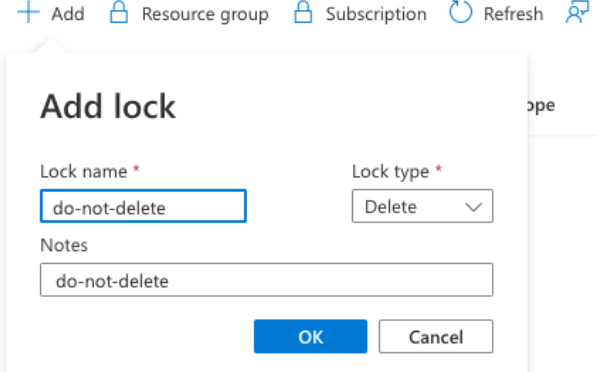
After creating the private web auth workspace, set a lock on it to prevent the workspace from being deleted. Navigate to the Azure Databricks service instance in Azure portal. In the left navigation, click Locks. Click +Add. Set Lock type to Delete. Give the lock a name. Click OK.
In Azure portal, navigate to the Azure Databricks Service instance that represents your workspace.
- If you are using a private web auth workspace, go to the Azure Databricks Service instance object for the private web auth workspace.
- If you are not using a private web auth workspace, choose one workspace that will host the web auth private endpoint. Remember that deletion of that workspace will delete DNS records that are required for all your other workspaces in that region that use Private Link front-end connections. in Azure portal, open this workspace’s Azure Databricks Service instance blade.
Go to Settings > Networking > Private endpoint connections.
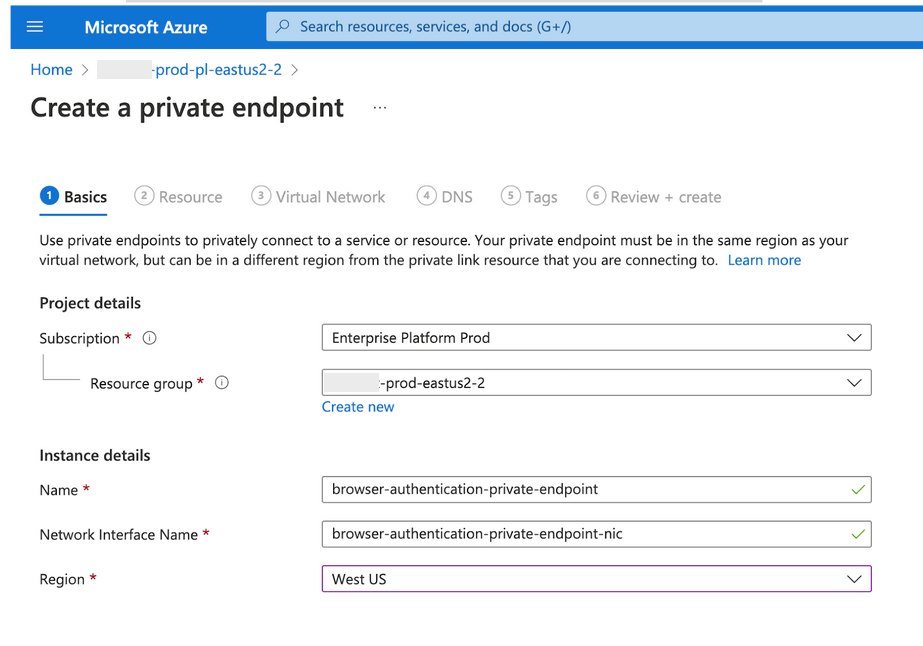
Click the + Add button to create a private endpoint for this workspace.
The Azure portal shows the Create private endpoint blade within the create workspace flow.
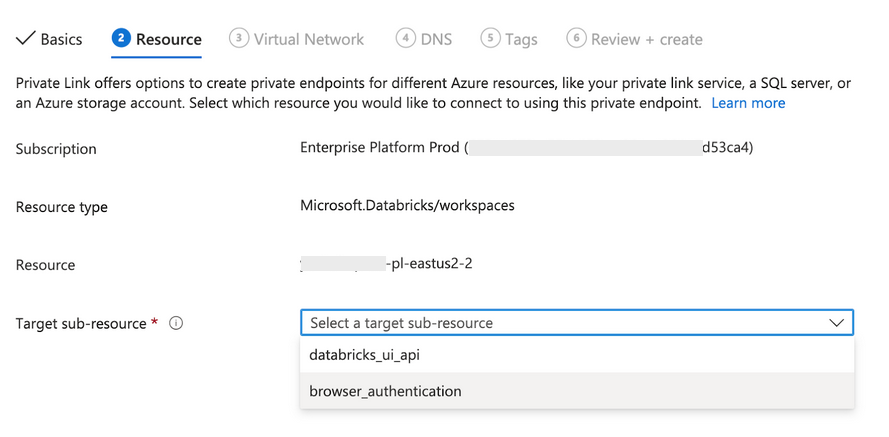
In the Resource step, set the Target sub-resource field to browser_authentication.
Note that the Resource type and Resource fields automatically reference the Azure Databricks Service workspace instance that you are editing.
In the Virtual Network step:
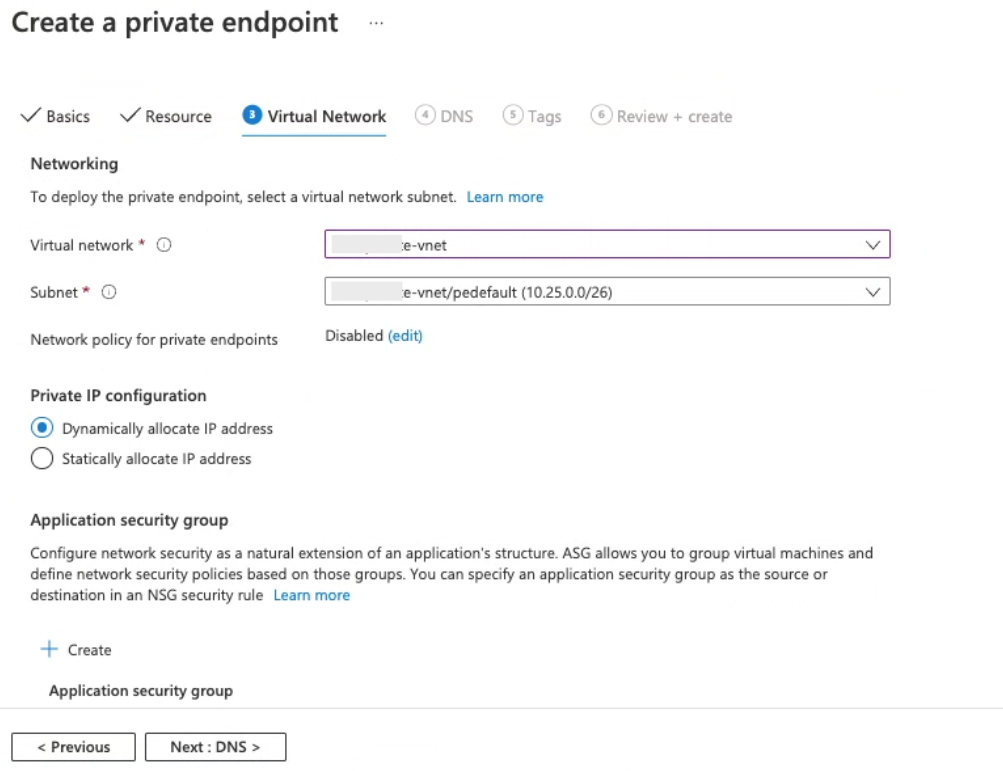
- Set the virtual network to your transit VNet.
- Set the subnet to the Private Link specific subnet in your transit VNet. This subnet must not be either of the standard subnets used for VNet injection. If you have not created that subnet yet, do that now in another browser window. For related information, see the network requirements.
In the DNS step:
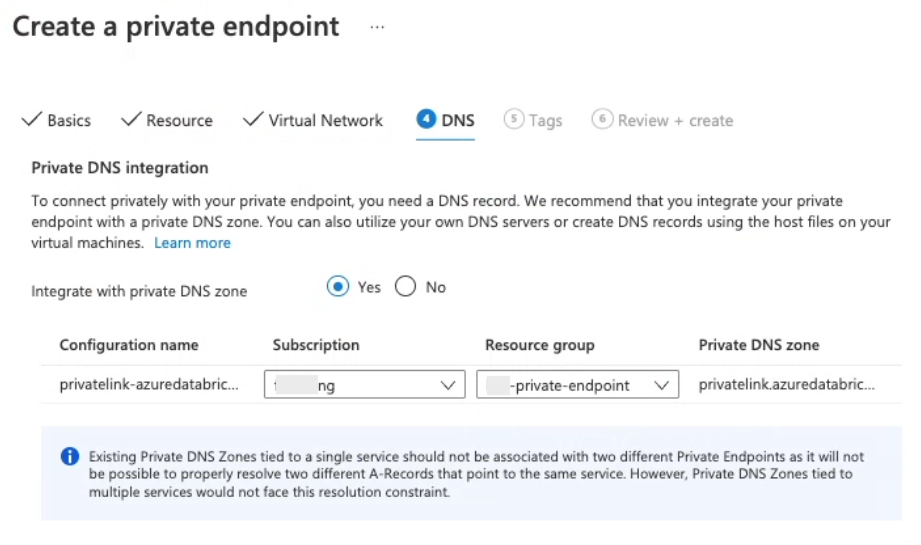
For typical use with the built-in Azure DNS, set Integrate with private DNS zone to Yes.
If your organization maintains its own custom DNS, you could set Integrate with private DNS zone to No, but read this Microsoft article on DNS configuration before proceeding. Contact your Azure Databricks account team if you have questions.
The rest of the instructions in this article assume you chose Yes.
Verify that the Resource group field is set to the right resource group. It may have been pre-populated to the correct resource group, but it is not guaranteed to do so. Set it to the same VNet as the front-end private endpoint.
Important
This is a common step for misconfiguration, so do this step carefully.
Click OK to create the private endpoint.
If you integrate with built-in Azure DNS, you can now confirm that your DNS was automatically configured by the browser authentication private endpoint that you created. For example, if you look inside your private DNS zone, you will see one or more new
Arecords with names that end in.pl-auth. These are records that represent the SSO callbacks for each control plane instance in the region. If there is more than one Azure Databricks control plane instance in that region, there will be more than oneArecord.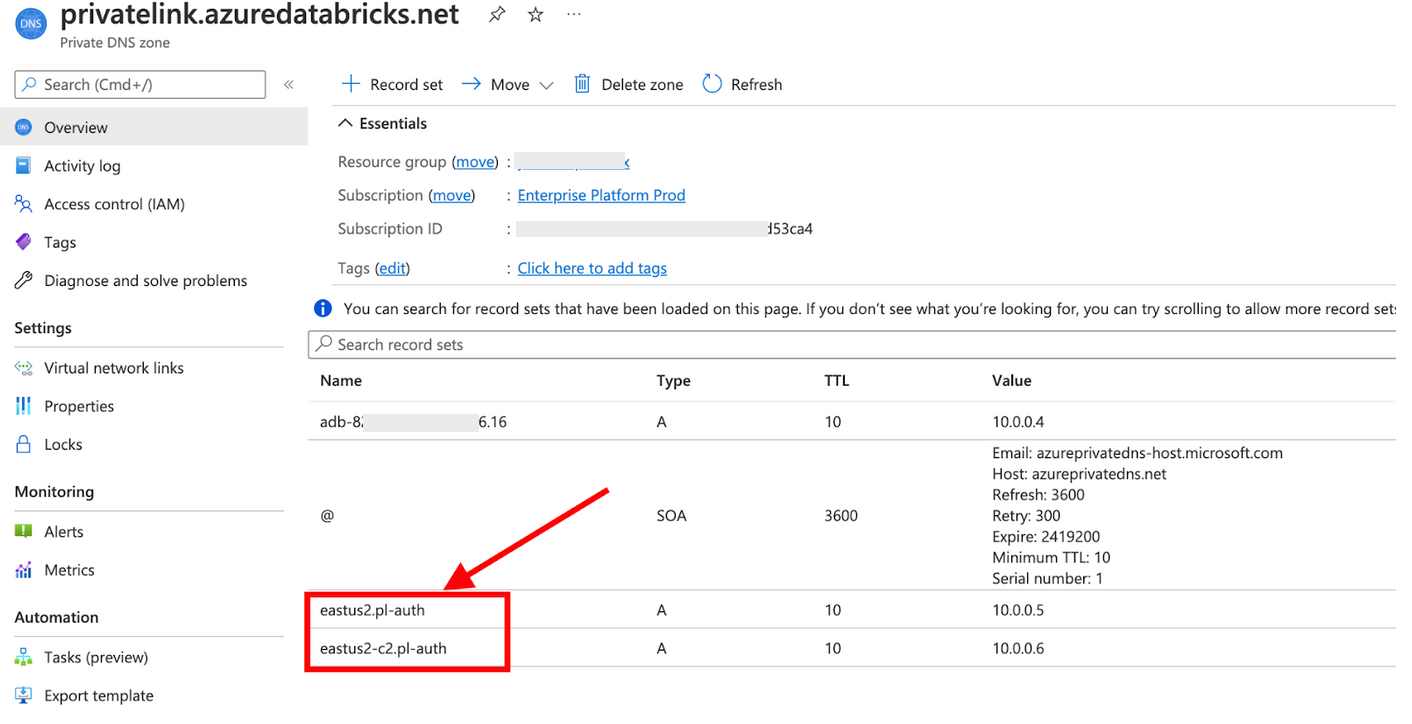
Custom DNS
If you use custom DNS, you must ensure that appropriate DNS configuration is configured to support SSO authentication callbacks. For guidance, contact your Azure Databricks account team.
If you are using a front-end private endpoint and users access the Azure Databricks workspace from a transit VNet for which you have enabled custom DNS, you must enable the private endpoint IP address for the workspace to be accessible using the workspace URL.
You may need to configure conditional forwarding to Azure or create a DNS A record for the workspace URL in custom DNS (on-premises or internal DNS). For detailed instructions about how to enable access to Private Link enabled services, see Azure Private Endpoint DNS configuration.
For example, if you directly map the resource URLs to the front-end private endpoint IP addresses in your internal DNS, you need two entries:
One DNS
Arecord maps the per-workspace URL (adb-1111111111111.15.azuredatabricks.net) to the front-end private endpoint IP address.One or more DNS
Arecords map the Microsoft Entra ID OAuth flow reply URL to the front-end private endpoint IP address, for examplewestus.pl-auth.azuredatabricks.net. Because one region might have more than one control plane instance, you may need to add multipleArecords, one for each control plane instance.Note
If you are using custom DNS, to get the set of control plane instance domains that you must use for regions that you want to use, contact your Azure Databricks account team. Some regions have more than one control plane instance.
In addition to individual A records needed for workspace private endpoint access, you must configure at least one set of OAuth (browser_authentication) DNS records per region. This provides private client access across OAuth access to all workspaces in the region because the browser_authentication private endpoint to the control plane is shared among workspaces in that region.
Alternatively, you could allow OAuth traffic to egress over the public network if access to the public internet is allowed, and sharing a single user-to-workspace private endpoint IP address for all business units would be a problem due to common DNS.
After these configurations are prepared, you should be able to access the Azure Databricks workspace and start clusters for your workloads.
Step 5: Test user SSO authentication to your workspace
You must test authentication to your new workspace. For the initial authentication attempt, launch the workspace from within the Azure portal. On the workspace object, there is a button Launch Workspace, which is important. When you click it, Azure Databricks attempts to log in to the workspace and provision your initial workspace admin user account. It is important to test authentication to ensure that your workspace is working correctly.
Click the button Launch Workspace.
Test network access from your transit VNet or a network location that peers to it. For example, if your on-premises network has access to the transit VNet, you can check user SSO from your on-premises network. Confirm network access from your test network to your transit subnet.
- If you enabled front-end Private Link, you need to test that authentication happens successfully from your transit VNet. If you’ve already used ExpressRoute or VPN to connect your on-premises network to your transit VNet, and if as a user you are at a routable location that can connect to the transit VNet, then you can test Azure Databricks authentication by logging in from your current network.
If you are not at a network location that can access your transit subnet, you can test connectivity by creating a virtual machine in your transit subnet or a network location that that can reach it. For example, use a Windows 10 virtual machine:
- Go to the Virtual Machine blade in the Azure portal.
- Create a Windows 10 virtual machine in the test VNet and subnet.
- Connect to it with an RDP client such as Microsoft Remote Desktop.
From within the VM or other test computer, use a web browser to connect to the Azure portal and launch the workspace.
- In the Azure portal, find the Azure Databricks workspace object.
- Click Launch Workspace to launch a window tab that logs you into Azure Databricks using your user ID that you used to log in to the Azure portal.
- Confirm that login is successful.
Authentication troubleshooting
Error: If you see a message “Configured privacy settings disallow access for workspace <your-workspace-id> over your current network. Please contact your administrator for more information.”
This error probably means:
- You are connecting to the workspace over the public internet (not from a Private Link connection).
- You have configured the workspace to not support public network access.
Review the earlier steps in this section.
Error: “Browser failure with error code DNS_PROBE_FINISHED_NXDOMAIN
This error means that a user’s login to the Azure Databricks web application failed because it could not find the appropriate DNS configuration for the Azure Databricks control plane instance in the target region. The DNS record that points to the <control-plane-instance-short-name>.pl-auth name was not found. You might have misconfigured the browser authentication private endpoint. Carefully review the section again at Step 4: Create a private endpoint to support SSO for web browser access. If you have questions, contact your Azure Databricks account team.
Step 6: Test back-end Private Link connection (required for a back-end connection)
If you added a back-end Private Link connection, it’s important to test that it is working correctly. Simply logging into the Azure Databricks web application does not test the back-end connection.
If you are not already logged into your Azure Databricks workspace, log in again using your workspace URL or from the Launch Workspace button in the Azure Databricks Service instance in the Azure portal.
In the left nav, click Compute
Click Create Cluster, type a cluster name, and click Create Cluster. For more information about creating clusters, see Compute configuration reference.
Wait until the cluster appears to be started successfully. It may take several minutes. Refresh the page to get the latest status.
If it fails to start, on the cluster page, click Event Log and review the latest entries. For typical Private Link misconfiguration, the Event Log includes an error similar to the following after a 10-15 minute wait:
Cluster terminated. Reason: Control Plane Request FailureIf you get this error, carefully re-review the instructions in this article. If you have questions, contact your Azure Databricks account team.
How to delete an Azure Databricks workspace that has private endpoints
Important
If you are using the recommended but optional deployment style that uses a private web auth workspace, it’s important that you never delete the workspace or the browser auth private endpoint that is associated with the workspace. See Step 4: Create a private endpoint to support SSO for web browser access.
Azure blocks the deletion of an Azure Databricks workspace if it has any private endpoints.
Important
You must delete the private endpoints before attempting to delete the Azure Databricks workspace.
- In the Azure portal, open the Azure Databricks Service instance that represents your workspace.
- In the left nav, click Settings > Networking.
- Click the Private endpoint connections tab.
- If you are not using a private web auth workspace, check if your organization may be using this workspace as an OAuth CNAME link and it may be shared with other workspaces that use the same control plane instance. If so, before you delete any private endpoints that may rely on the CNAME from this workspace, configure the other workspace’s network objects to ensure that the CNAME still points to a valid zone
Arecord from another workspace. See Step 4: Create a private endpoint to support SSO for web browser access. - For each private endpoint, select the row and click the Remove icon. Click Yes to confirm removal.
When you are done, you can delete the workspace from Azure portal.
Check for pending approval or approve pending private endpoints
If the Azure user who created the private endpoint for the transit VNet does not have owner/contributor permissions for the workspace, a separate user with owner/contributor permissions for the workspace must manually approve the private endpoint creation request before it is enabled.
Connection states include:
- Approved: Endpoint is approved and no further action is necessary.
- Pending: Endpoint requires approval from a user with owner/contributor permissions for the workspace.
- Disconnected: The endpoint because a related object for this connection was deleted.
- Rejected: The endpoint was rejected.
To check connection state:
In the Azure portal, navigate to your workspace that contains one or more private endpoints that you have recently created.
Click Networking.
Click the Private endpoint connections tab.
In the list of endpoints, look at the Connection state column.
- If they all have the value connection state value Approved, there is no action necessary to approve the private endpoint.
- If the value of any are Pending, they require approval from someone with owner/contributor permissions for the workspace.
If you have owner/contributor permissions for the workspace:
Select one or more endpoint rows that are pending.
If you approve of the connection, click the Approve button.
If you disapprove of the connection, click the Reject button.
If you do not have owner/contributor permissions for the workspace, contact your workspace administrator to approve the connection.
Feedback
Coming soon: Throughout 2024 we will be phasing out GitHub Issues as the feedback mechanism for content and replacing it with a new feedback system. For more information see: https://aka.ms/ContentUserFeedback.
Submit and view feedback for