Continuous integration and delivery on Azure Databricks using Azure DevOps
Note
This article covers Azure DevOps, which is developed by a third party. To contact the provider, see Azure DevOps Services support.
This article guides you through configuring Azure DevOps automation for your code and artifacts that work with Azure Databricks. Specifically, you will configure a continuous integration and delivery (CI/CD) workflow to connect to a Git repository, run jobs using Azure Pipelines to build and unit test a Python wheel (*.whl), and deploy it for use in Databricks notebooks.
CI/CD development workflow
Databricks suggests the following workflow for CI/CD development with Azure DevOps:
- Create a repository, or use an existing repository, with your third-party Git provider.
- Connect your local development machine to the same third-party repository. For instructions, see your third-party Git provider’s documentation.
- Pull any existing updated artifacts (such as notebooks, code files, and build scripts) down to your local development machine from the third-party repository.
- As necessary, create, update, and test artifacts on your local development machine. Then, push any new and changed artifacts from your local development machine to the third-party repository. For instructions, see your third-party Git provider’s documentation.
- Repeat steps 3 and 4 as needed.
- Use Azure DevOps periodically as an integrated approach to automatically pulling artifacts from your third-party repository, building, testing, and running code on your Azure Databricks workspace, and reporting test and run results. While you can run Azure DevOps manually, in real-world implementations, you would instruct your third-party Git provider to run Azure DevOps every time a specific event happens, such as a repository pull request.
There are numerous CI/CD tools you can use to manage and execute your pipeline. This article illustrates how to use Azure DevOps. CI/CD is a design pattern, so the steps and stages outlined in this article’s example should transfer with a few changes to the pipeline definition language in each tool. Furthermore, much of the code in this example pipeline is standard Python code that can be invoked in other tools.
Tip
For information about using Jenkins with Azure Databricks instead of Azure DevOps, see CI/CD with Jenkins on Azure Databricks.
The rest of this article describes a pair of example pipelines in Azure DevOps that you can adapt to your own needs for Azure Databricks.
About the example
This article’s example uses two pipelines to gather, deploy, and run example Python code and Python notebooks that are stored in a remote Git repository.
The first pipeline, known as the build pipeline, prepares build artifacts for the second pipeline, known as the release pipeline. Separating the build pipeline from the release pipeline allows you to create a build artifact without deploying it or to simultaneously deploy artifacts from multiple builds. To construct the build and release pipelines:
- Create an Azure virtual machine for the build pipeline.
- Copy the files from your Git repository to the virtual machine.
- Create a gzip’ed tar file that contains the Python code, Python notebooks, and related build, deployment, and run settings files.
- Copy the gzip’ed tar file as a zip file into a location for the release pipeline to access.
- Create another Azure virtual machine for the release pipeline.
- Get the zip file from the build pipeline’s location and then unpackages the zip file to get the Python code, Python notebooks, and related build, deployment, and run settings files.
- Deploy the Python code, Python notebooks, and related build, deployment, and run settings files to your remote Azure Databricks workspace.
- Build the Python wheel library’s component code files into a Python wheel file.
- Run unit tests on the component code to check the logic in the Python wheel file.
- Run the Python notebooks, one of which calls the Python wheel file’s functionality.
About the Databricks CLI
This article’s example demonstrates how to use the Databricks CLI in a non-interactive mode within a pipeline. This article’s example pipeline deploys code, builds a library, and runs notebooks in your Azure Databricks workspace.
If you are using the Databricks CLI in your pipeline without implementing the example code, library, and notebooks from this article, follow these steps:
Prepare your Azure Databricks workspace to use OAuth machine-to-machine (M2M) authentication for authenticating a service principal. Before starting, confirm that you have a Microsoft Entra ID service principal with an Azure Databricks OAuth secret. See Authorize unattended access to Azure Databricks resources with a service principal using OAuth.
Install the Databricks CLI in your pipeline. To do this, add a Bash Script task to your pipeline that runs the following script:
curl -fsSL https://raw.githubusercontent.com/databricks/setup-cli/main/install.sh | shTo add a Bash Script task to your pipeline, see Step 3.6. Install the Databricks CLI and Python wheel build tools.
Configure your pipeline to enable the installed Databricks CLI to authenticate your service principal with your workspace. To do this, see Step 3.1: Define environment variables for the release pipeline.
Add more Bash Script tasks to your pipeline as needed to run your Databricks CLI commands. See Databricks CLI commands.
Before you begin
To use this article’s example, you must have:
- An existing Azure DevOps project. If you do not yet have a project, create a project in Azure DevOps.
- An existing repository with a Git provider that Azure DevOps supports. You will add the Python example code, the example Python notebook, and related release settings files to this repository. If you do not yet have a repository, create one by following your Git provider’s instructions. Then, connect your Azure DevOps project to this repository if you have not done so already. For instructions, follow the links in Supported source repositories.
- This article’s example uses OAuth machine-to-machine (M2M) authentication to authenticate a Microsoft Entra ID service principal to an Azure Databricks workspace. You must have a Microsoft Entra ID service principal with an Azure Databricks OAuth secret for that service principal. See Authorize unattended access to Azure Databricks resources with a service principal using OAuth.
Step 1: Add the example’s files to your repository
In this step, in the repository with your third-party Git provider, you add all of this article’s example files that your Azure DevOps pipelines build, deploy, and run on your remote Azure Databricks workspace.
Step 1.1: Add the Python wheel component files
In this article’s example, your Azure DevOps pipelines build and unit test a Python wheel file. An Azure Databricks notebook then calls the built Python wheel file’s functionality.
To define the logic and unit tests for the Python wheel file that the notebooks run against, in the root of your repository create two files named addcol.py and test_addcol.py, and add them to a folder structure named python/dabdemo/dabdemo in a Libraries folder, visualized as follows:
└── Libraries
      └── python
            └── dabdemo
                  └── dabdemo
                        ├── addcol.py
                        └── test_addcol.py
The addcol.py file contains a library function that is built later into a Python wheel file and then installed on Azure Databricks clusters. It is a simple function that adds a new column, populated by a literal, to an Apache Spark DataFrame:
# Filename: addcol.py
import pyspark.sql.functions as F

def with_status(df):
  return df.withColumn("status", F.lit("checked"))
The test_addcol.py file contains tests to pass a mock DataFrame object to the with_status function, defined in addcol.py. The result is then compared to a DataFrame object containing the expected values. If the values match, the test passes:
# Filename: test_addcol.py
import pytest
from pyspark.sql import SparkSession
from dabdemo.addcol import *

class TestAppendCol(object):

  def test_with_status(self):
    spark = SparkSession.builder.getOrCreate()

    source_data = [
      ("paula", "white", "paula.white@example.com"),
      ("john", "baer", "john.baer@example.com")
    ]

    source_df = spark.createDataFrame(
      source_data,
      ["first_name", "last_name", "email"]
    )

    actual_df = with_status(source_df)

    expected_data = [
      ("paula", "white", "paula.white@example.com", "checked"),
      ("john", "baer", "john.baer@example.com", "checked")
    ]
    expected_df = spark.createDataFrame(
      expected_data,
      ["first_name", "last_name", "email", "status"]
    )

    assert(expected_df.collect() == actual_df.collect())
To enable the Databricks CLI to correctly package this library code into a Python wheel file, create two files named __init__.py and __main__.py in the same folder as the preceding two files. Also, create a file named setup.py in the python/dabdemo folder, visualized as follows:
└── Libraries
      └── python
            └── dabdemo
                  ├── dabdemo
                  │     ├── __init__.py
                  │     ├── __main__.py
                  │     ├── addcol.py
                  │     └── test_addcol.py
                  └── setup.py
The __init__.py file contains the library’s version number and author. Replace <my-author-name> with your name:
# Filename: __init__.py
__version__ = '0.0.1'
__author__ = '<my-author-name>'

import sys, os

sys.path.append(os.path.join(os.path.dirname(__file__), "..", ".."))
The __main__.py file contains the library’s entry point:
# Filename: __main__.py
import sys, os

sys.path.append(os.path.join(os.path.dirname(__file__), "..", ".."))

from addcol import *

def main():
  pass

if __name__ == "__main__":
  main()
The setup.py file contains additional settings for building the library into a Python wheel file. Replace <my-url>, <my-author-name>@<my-organization>, and <my-package-description> with valid values:
# Filename: setup.py
from setuptools import setup, find_packages

import dabdemo

setup(
  name = "dabdemo",
  version = dabdemo.__version__,
  author = dabdemo.__author__,
  url = "https://<my-url>",
  author_email = "<my-author-name>@<my-organization>",
  description = "<my-package-description>",
  packages = find_packages(include = ["dabdemo"]),
  entry_points={"group_1": "run=dabdemo.__main__:main"},
  install_requires = ["setuptools"]
)
Step 1.2: Add a unit testing notebook for the Python wheel file
Later on, the Databricks CLI runs a notebook job. This job runs a Python notebook with the filename of run_unit_tests.py. This notebook runs pytest against the Python wheel library’s logic.
To run the unit tests for this article’s example, add to the root of your repository a notebook file named run_unit_tests.py with the following contents:
# Databricks notebook source

# COMMAND ----------

# MAGIC %sh
# MAGIC
# MAGIC mkdir -p "/Workspace${WORKSPACEBUNDLEPATH}/Validation/reports/junit/test-reports"

# COMMAND ----------

# Prepare to run pytest.
import sys, pytest, os

# Skip writing pyc files on a readonly filesystem.
sys.dont_write_bytecode = True

# Run pytest.
retcode = pytest.main(["--junit-xml", f"/Workspace{os.getenv('WORKSPACEBUNDLEPATH')}/Validation/reports/junit/test-reports/TEST-libout.xml",
                      f"/Workspace{os.getenv('WORKSPACEBUNDLEPATH')}/files/Libraries/python/dabdemo/dabdemo/"])

# Fail the cell execution if there are any test failures.
assert retcode == 0, "The pytest invocation failed. See the log for details."
Step 1.3: Add a notebook that calls the Python wheel file
Later on, the Databricks CLI runs another notebook job. This notebook creates a DataFrame object, passes it to the Python wheel library’s with_status function, prints the result, and report the job’s run results. Create the root of your repository a notebook file named dabdemo_notebook.py with the following contents:
# Databricks notebook source

# COMMAND ----------

# Restart Python after installing the Python wheel.
dbutils.library.restartPython()

# COMMAND ----------

from dabdemo.addcol import with_status

df = (spark.createDataFrame(
  schema = ["first_name", "last_name", "email"],
  data = [
    ("paula", "white", "paula.white@example.com"),
    ("john", "baer", "john.baer@example.com")
  ]
))

new_df = with_status(df)

display(new_df)

# Expected output:
#
# +------------+-----------+-------------------------+---------+
# │ first_name │ last_name │ email                   │ status  │
# +============+===========+=========================+=========+
# │ paula      │ white     │ paula.white@example.com │ checked │
# +------------+-----------+-------------------------+---------+
# │ john       │ baer      │ john.baer@example.com   │ checked │
# +------------+-----------+-------------------------+---------+
Step 1.4: Create the bundle configuration
This article’s example uses Databricks Asset Bundles to define the settings and behaviors for building, deploying, and running the Python wheel file, the two notebooks, and the Python code file. Databricks Asset Bundles, known simply as bundles, make it possible to express complete data, analytics, and ML projects as a collection of source files. See What are Databricks Asset Bundles?.
To configure the bundle for this article’s example, create in the root of your repository a file named databricks.yml. In this example databricks.yml file, replace the following placeholders:
- Replace
<bundle-name>with a unique programmatic name for the bundle. For example,azure-devops-demo. - Replace
<job-prefix-name>with some string to help uniquely identify the jobs that are created in your Azure Databricks workspace for this example. For example,azure-devops-demo. - Replace
<spark-version-id>with the Databricks Runtime version ID for your job clusters, for example13.3.x-scala2.12. - Replace
<cluster-node-type-id>with the cluster node type ID for your job clusters, for exampleStandard_DS3_v2. - Notice that
devin thetargetsmapping specifies the host and the related deployment behaviors. In real-world implementations, you can give this target a different name in your own bundles.
Here are the contents of this example’s databricks.yml file:
# Filename: databricks.yml
bundle:
  name: <bundle-name>

variables:
  job_prefix:
    description: A unifying prefix for this bundle's job and task names.
    default: <job-prefix-name>
  spark_version:
    description: The cluster's Spark version ID.
    default: <spark-version-id>
  node_type_id:
    description: The cluster's node type ID.
    default: <cluster-node-type-id>

artifacts:
  dabdemo-wheel:
    type: whl
    path: ./Libraries/python/dabdemo

resources:
  jobs:
    run-unit-tests:
      name: ${var.job_prefix}-run-unit-tests
      tasks:
        - task_key: ${var.job_prefix}-run-unit-tests-task
          new_cluster:
            spark_version: ${var.spark_version}
            node_type_id: ${var.node_type_id}
            num_workers: 1
            spark_env_vars:
              WORKSPACEBUNDLEPATH: ${workspace.root_path}
          notebook_task:
            notebook_path: ./run_unit_tests.py
            source: WORKSPACE
          libraries:
            - pypi:
                package: pytest
    run-dabdemo-notebook:
      name: ${var.job_prefix}-run-dabdemo-notebook
      tasks:
        - task_key: ${var.job_prefix}-run-dabdemo-notebook-task
          new_cluster:
            spark_version: ${var.spark_version}
            node_type_id: ${var.node_type_id}
            num_workers: 1
            spark_env_vars:
              WORKSPACEBUNDLEPATH: ${workspace.root_path}
          notebook_task:
            notebook_path: ./dabdemo_notebook.py
            source: WORKSPACE
          libraries:
            - whl: '/Workspace${workspace.root_path}/files/Libraries/python/dabdemo/dist/dabdemo-0.0.1-py3-none-any.whl'

targets:
  dev:
    mode: development
For more information about the databricks.yml file’s syntax, see Databricks Asset Bundle configuration.
Step 2: Define the build pipeline
Azure DevOps provides a cloud-hosted user interface for defining the stages of your CI/CD pipeline using YAML. For more information about Azure DevOps and pipelines, see the Azure DevOps documentation.
In this step, you use YAML markup to define the build pipeline, which builds a deployment artifact. To deploy the code to an Azure Databricks workspace, you specify this pipeline’s build artifact as input into a release pipeline. You define this release pipeline later.
To run build pipelines, Azure DevOps provides cloud-hosted, on-demand execution agents that support deployments to Kubernetes, VMs, Azure Functions, Azure Web Apps, and many more targets. In this example, you use an on-demand agent to automate building the deployment artifact.
Define this article’s example build pipeline as follows:
Sign in to Azure DevOps and then click the Sign in link to open your Azure DevOps project.
Note
If the Azure Portal displays instead of your Azure DevOps project, click More services > Azure DevOps organizations > My Azure DevOps organizations and then open your Azure DevOps project.
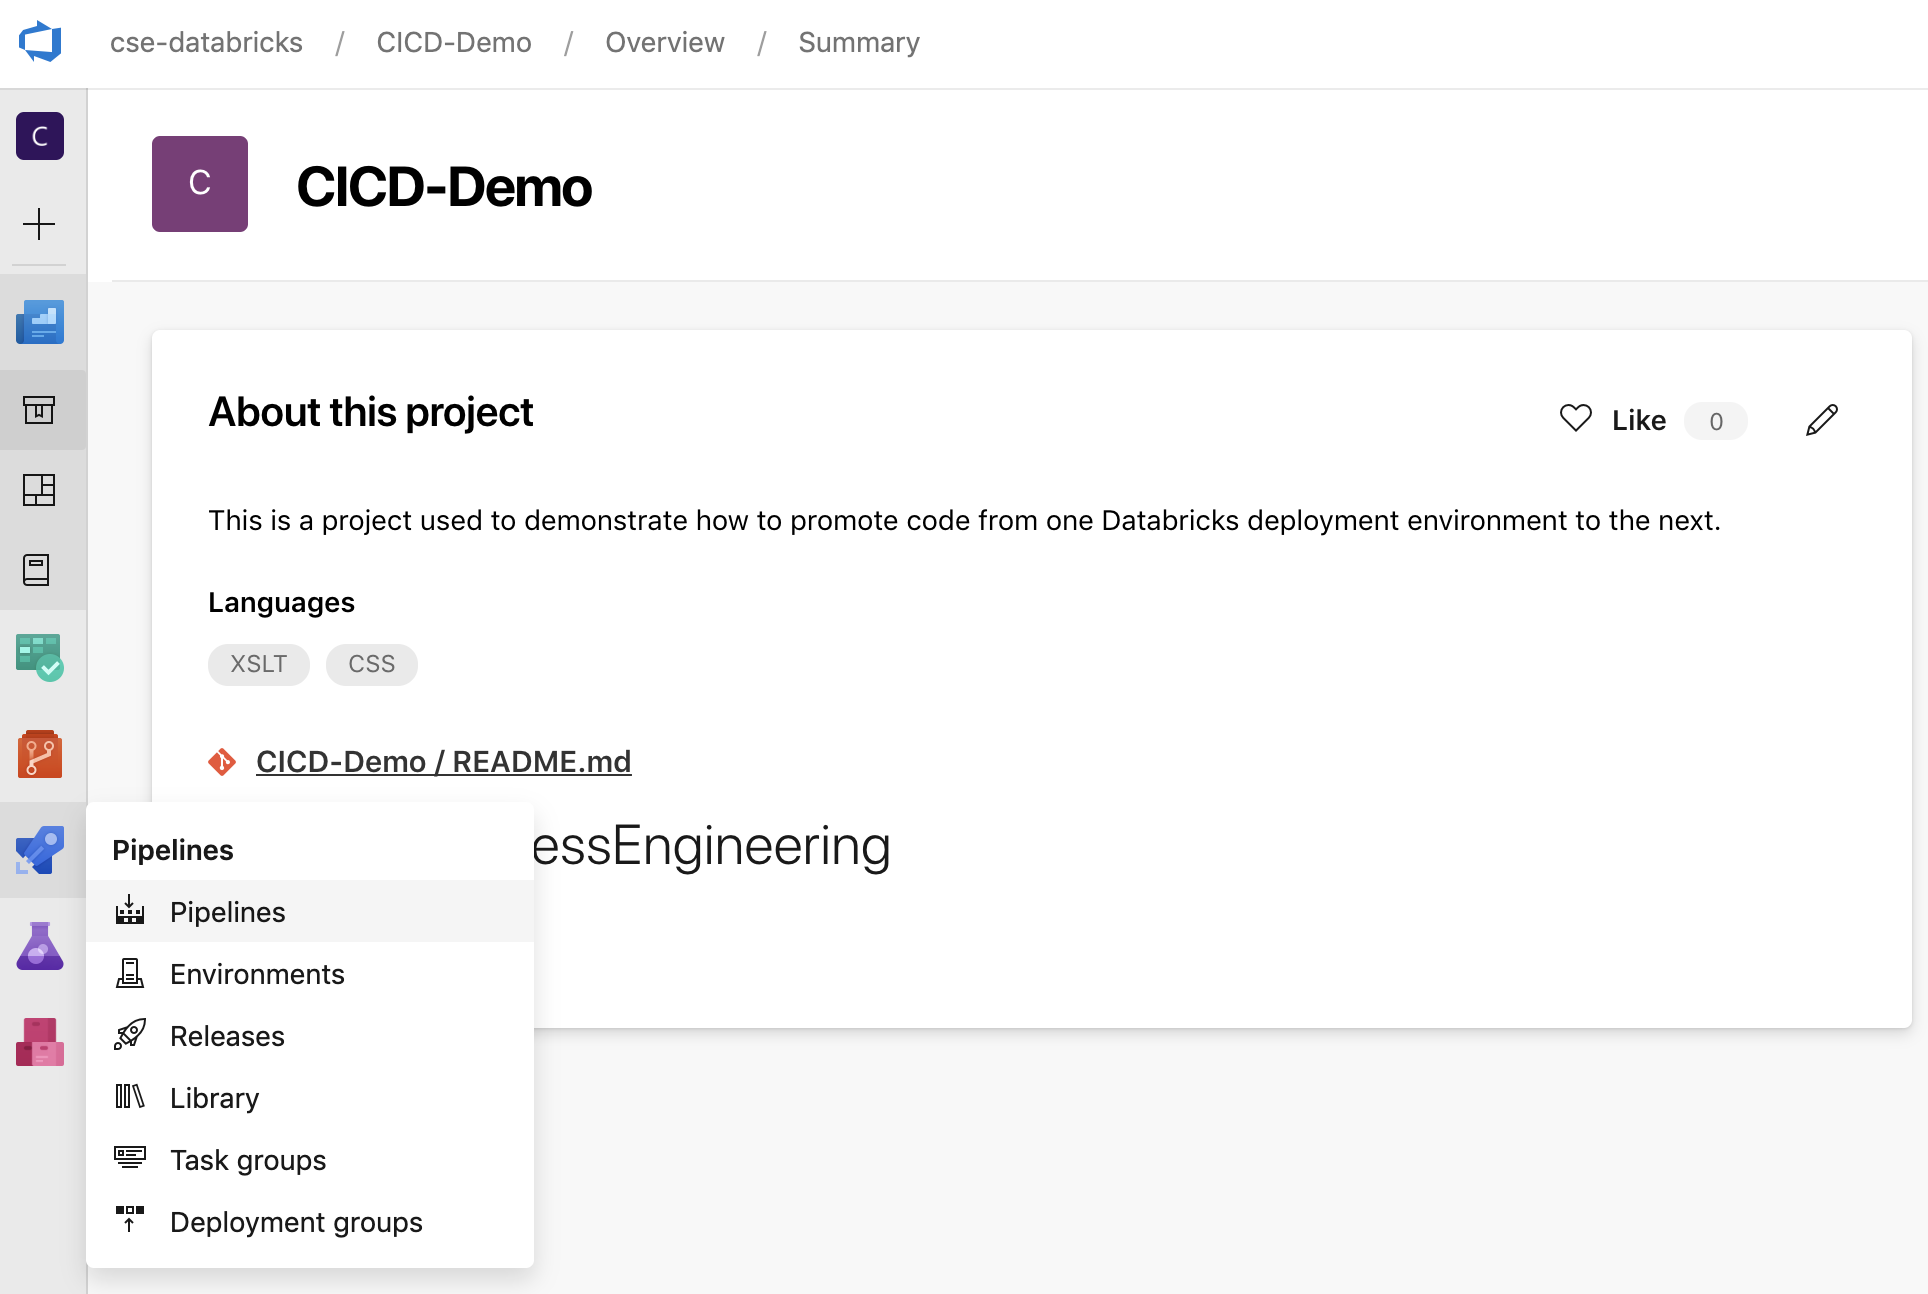
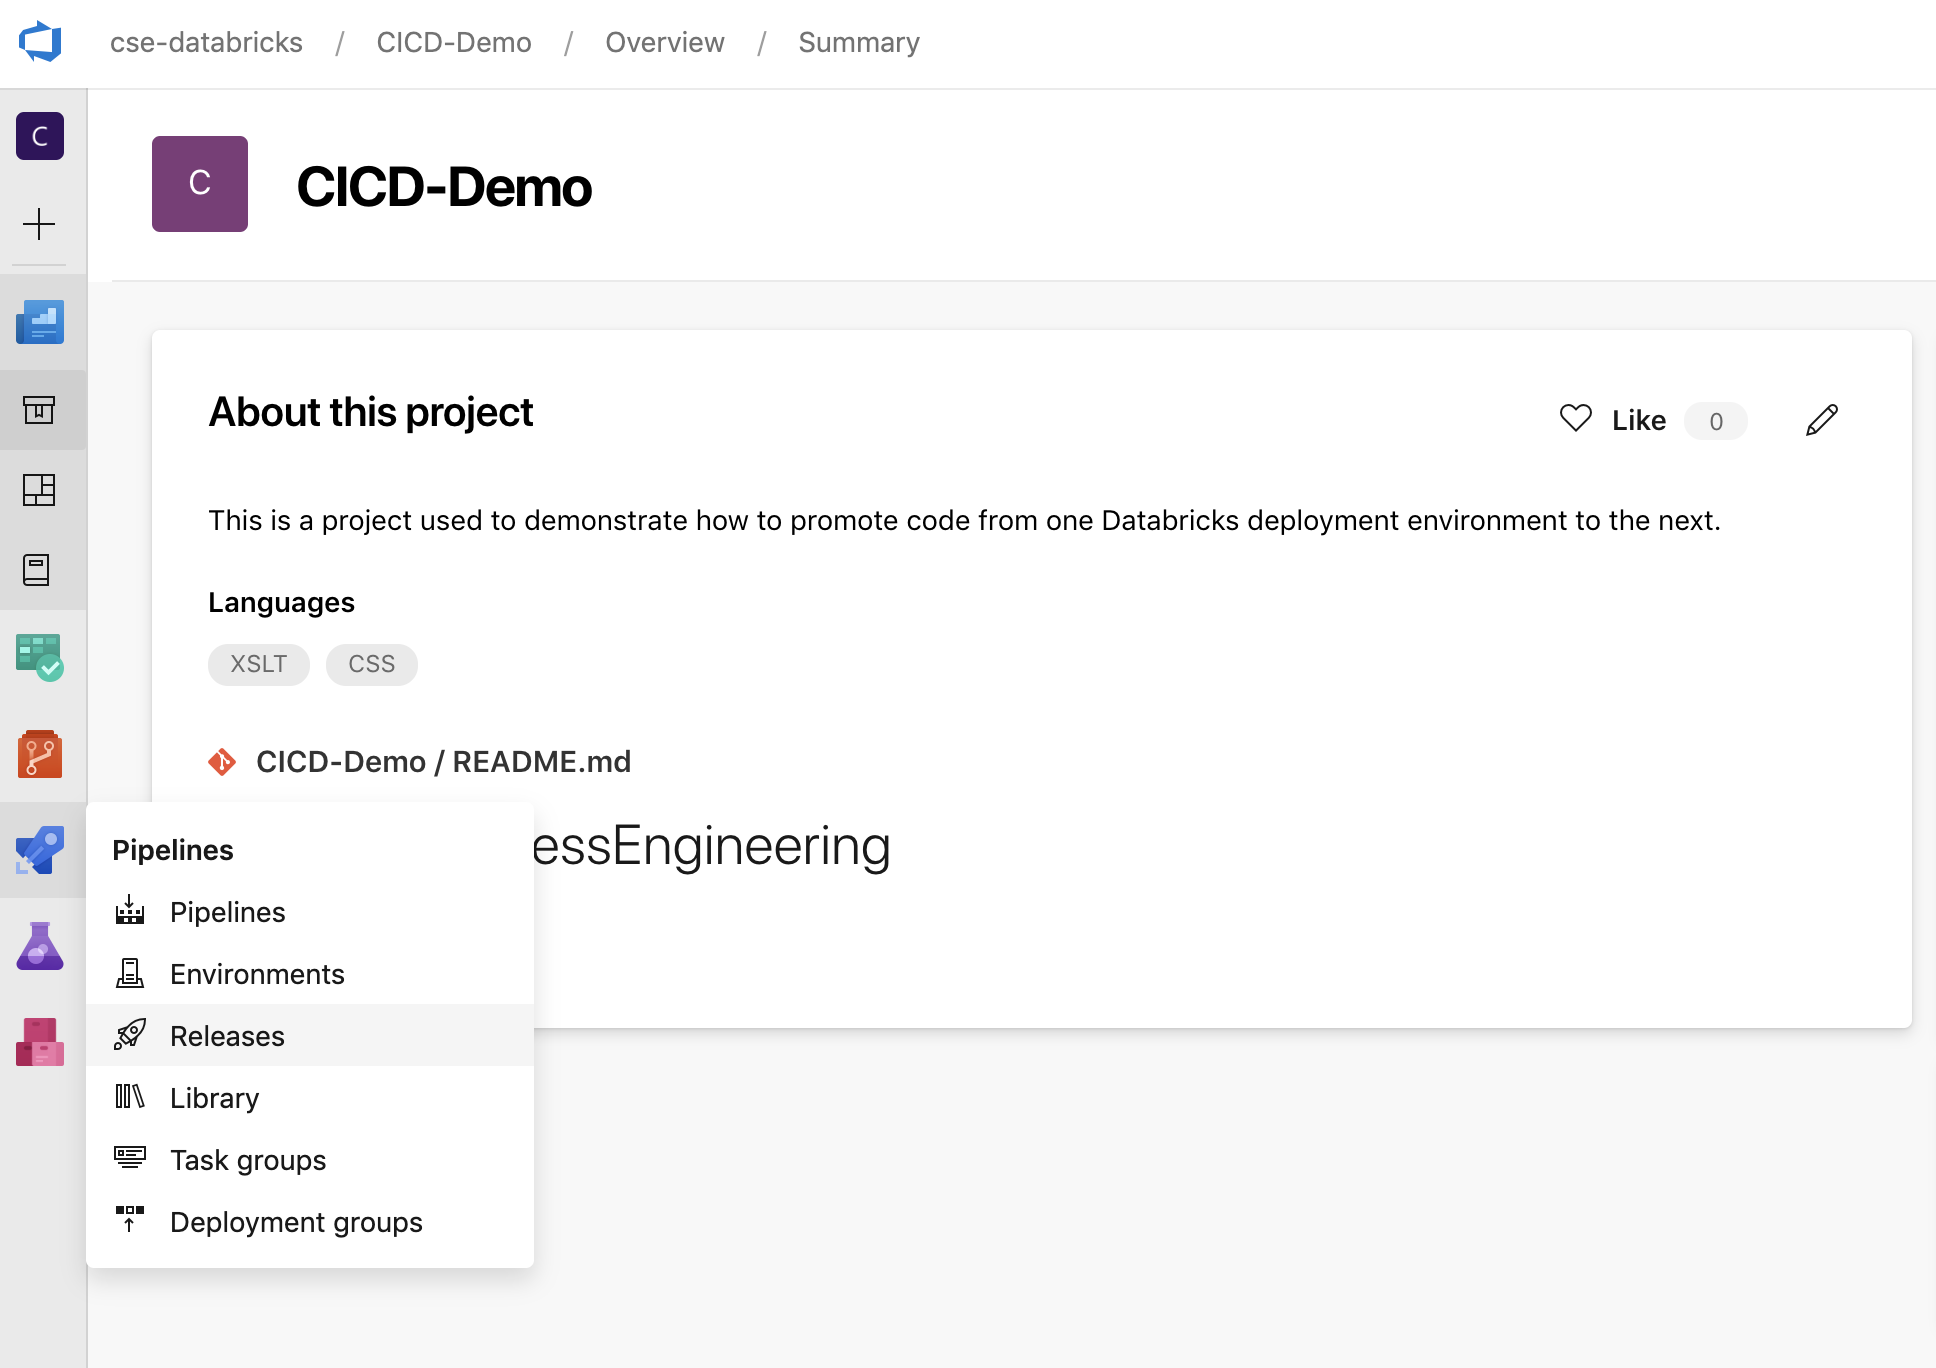
Click Pipelines in the sidebar, and then click Pipelines on the Pipelines menu.
Click the New Pipeline button and follow the on-screen instructions. (If you already have pipelines, click Create Pipeline instead.) At the end of these instructions, the pipeline editor opens. Here you define your build pipeline script in the
azure-pipelines.ymlfile that appears. If the pipeline editor is not visible at the end of the instructions, select the build pipeline’s name and then click Edit.You can use the Git branch selector
 to customize the build process for each branch in your Git repository. It is a CI/CD best practice to not do production work directly in your repository’s
 mainbranch. This example assumes a branch namedreleaseexists in the repository to be used instead ofmain.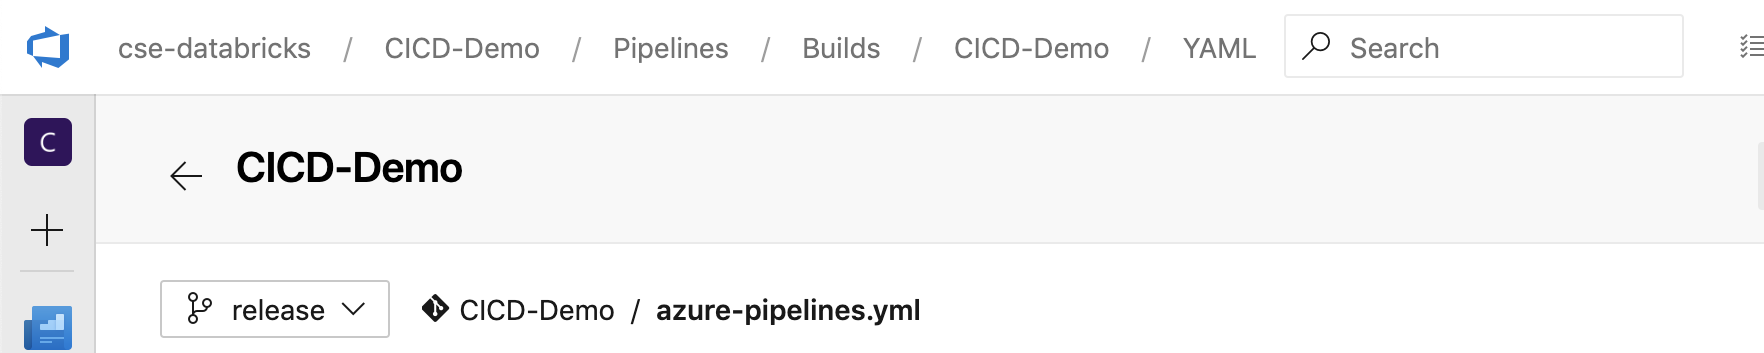
The
azure-pipelines.ymlbuild pipeline script is stored by default in the root of the remote Git repository that you associate with the pipeline.Overwrite your pipeline’s
azure-pipelines.ymlfile’s starter contents with the following definition, and then click Save.# Specify the trigger event to start the build pipeline. # In this case, new code merged into the release branch initiates a new build. trigger: - release # Specify the operating system for the agent that runs on the Azure virtual # machine for the build pipeline (known as the build agent). The virtual # machine image in this example uses the Ubuntu 22.04 virtual machine # image in the Azure Pipeline agent pool. See # https://learn.microsoft.com/azure/devops/pipelines/agents/hosted#software pool: vmImage: ubuntu-22.04 # Download the files from the designated branch in the remote Git repository # onto the build agent. steps: - checkout: self persistCredentials: true clean: true # Generate the deployment artifact. To do this, the build agent gathers # all the new or updated code to be given to the release pipeline, # including the sample Python code, the Python notebooks, # the Python wheel library component files, and the related Databricks asset # bundle settings. # Use git diff to flag files that were added in the most recent Git merge. # Then add the files to be used by the release pipeline. # The implementation in your pipeline will likely be different. # The objective here is to add all files intended for the current release. - script: | git diff --name-only --diff-filter=AMR HEAD^1 HEAD | xargs -I '{}' cp --parents -r '{}' $(Build.BinariesDirectory) mkdir -p $(Build.BinariesDirectory)/Libraries/python/dabdemo/dabdemo cp $(Build.Repository.LocalPath)/Libraries/python/dabdemo/dabdemo/*.* $(Build.BinariesDirectory)/Libraries/python/dabdemo/dabdemo cp $(Build.Repository.LocalPath)/Libraries/python/dabdemo/setup.py $(Build.BinariesDirectory)/Libraries/python/dabdemo cp $(Build.Repository.LocalPath)/*.* $(Build.BinariesDirectory) displayName: 'Get Changes' # Create the deployment artifact and then publish it to the # artifact repository. - task: ArchiveFiles@2 inputs: rootFolderOrFile: '$(Build.BinariesDirectory)' includeRootFolder: false archiveType: 'zip' archiveFile: '$(Build.ArtifactStagingDirectory)/$(Build.BuildId).zip' replaceExistingArchive: true - task: PublishBuildArtifacts@1 inputs: ArtifactName: 'DatabricksBuild'
Step 3: Define the release pipeline
The release pipeline deploys the build artifacts from the build pipeline to an Azure Databricks environment. Separating the release pipeline in this step from the build pipeline in the preceding steps allows you to create a build without deploying it or to deploy artifacts from multiple builds simultaneously.
In your Azure DevOps project, on the Pipelines menu in the sidebar, click Releases.
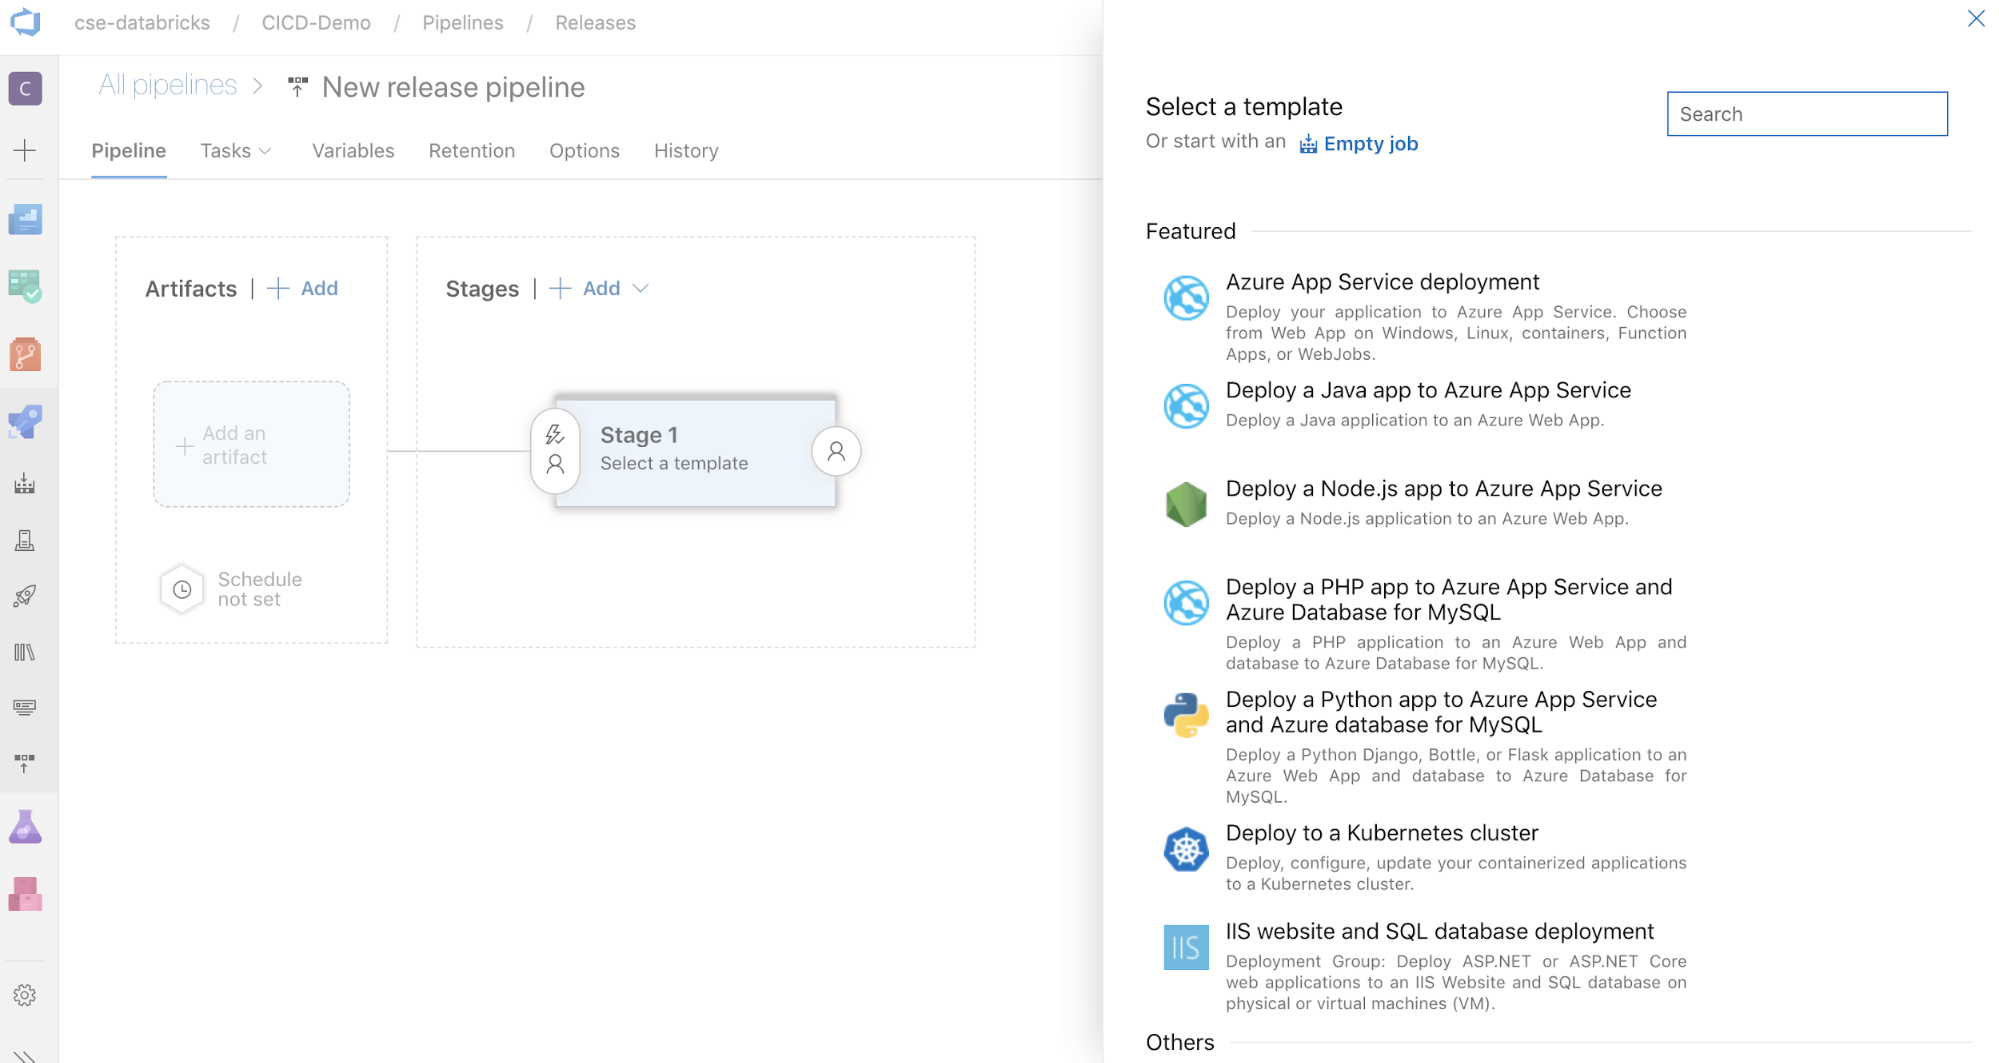
Click New > New release pipeline. (If you already have pipelines, click New pipeline instead.)
On the side of the screen is a list of featured templates for common deployment patterns. For this example release pipeline, click
 .
.
In the Artifacts box on the side of the screen, click
 . In the Add an artifact pane, for Source (build pipeline), select the build pipeline that you created earlier. Then click Add.
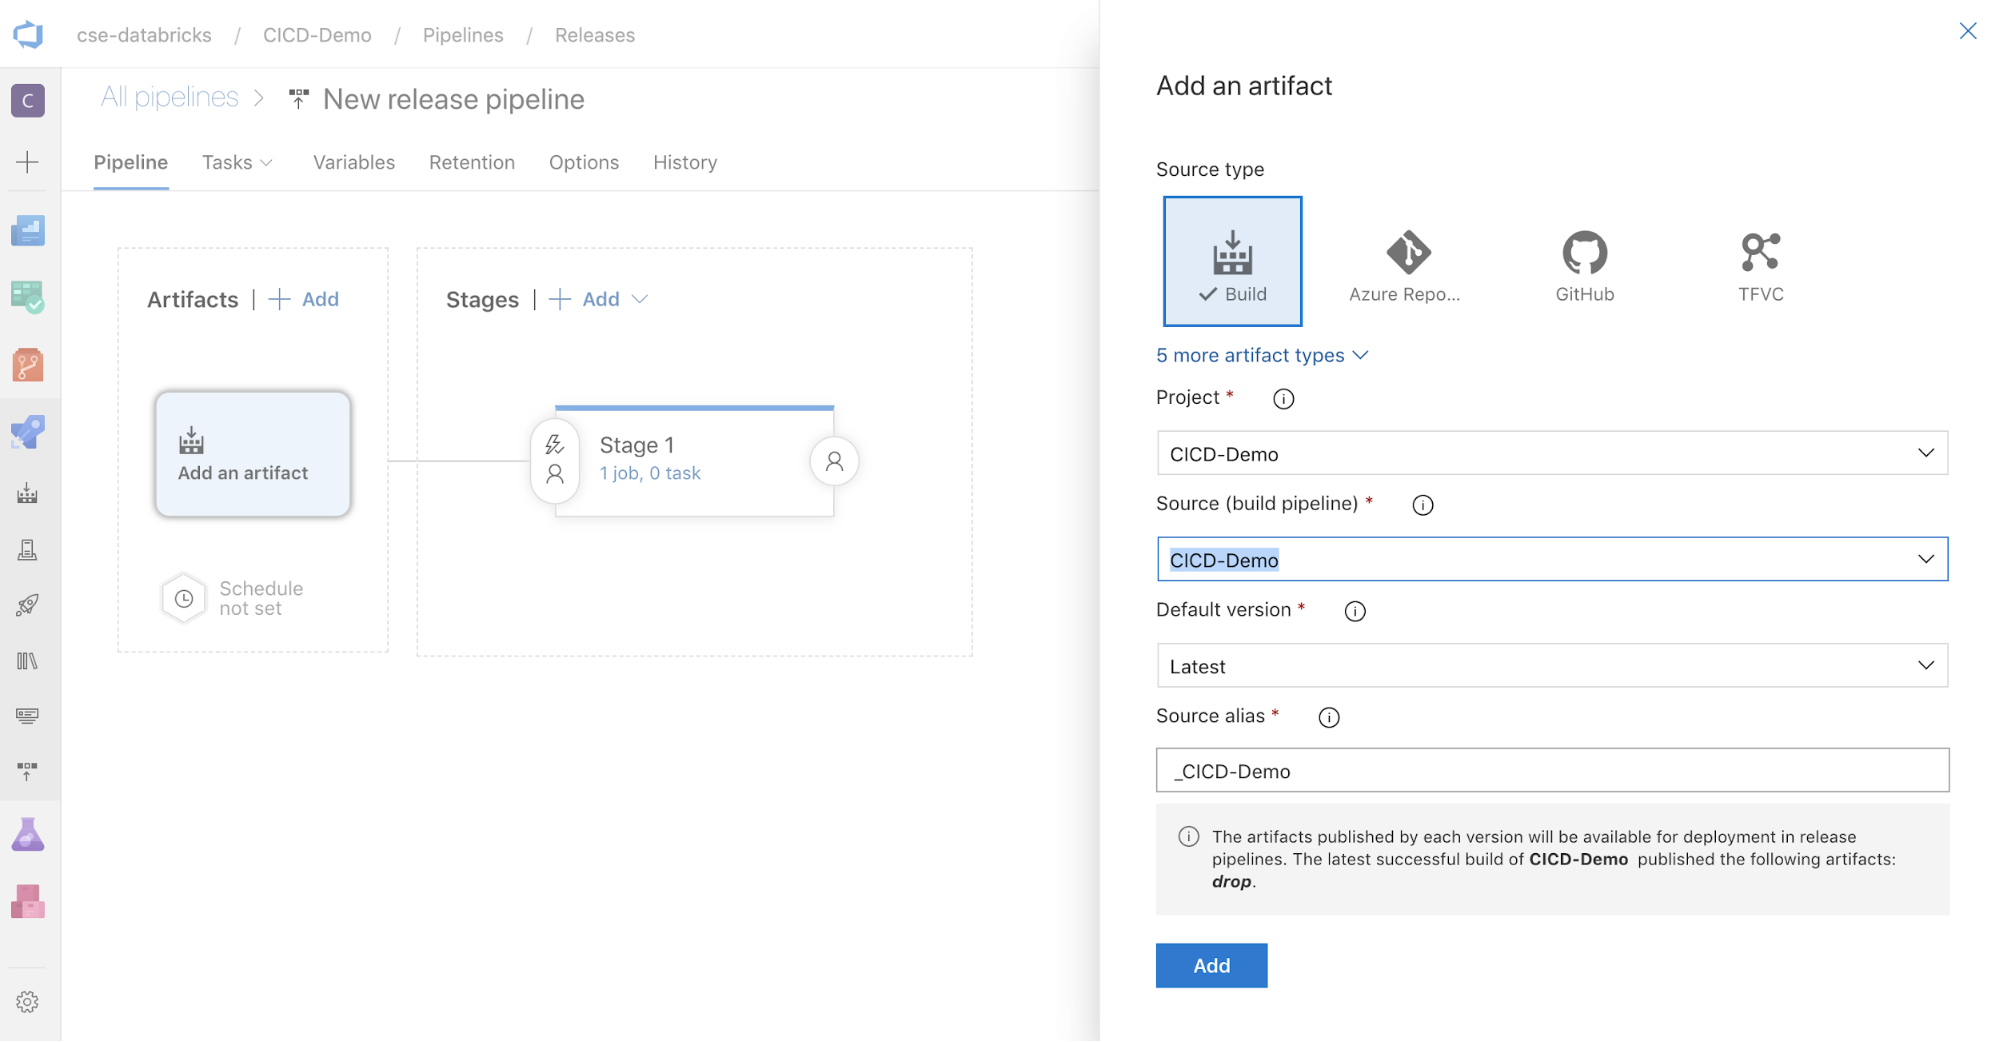
You can configure how the pipeline is triggered by clicking
 to display triggering options on the side of the screen. If you want a release to be initiated automatically based on build artifact availability or after a pull request workflow, enable the appropriate trigger. For now, in this example, in the last step of this article you manually trigger the build pipeline and then the release pipeline.
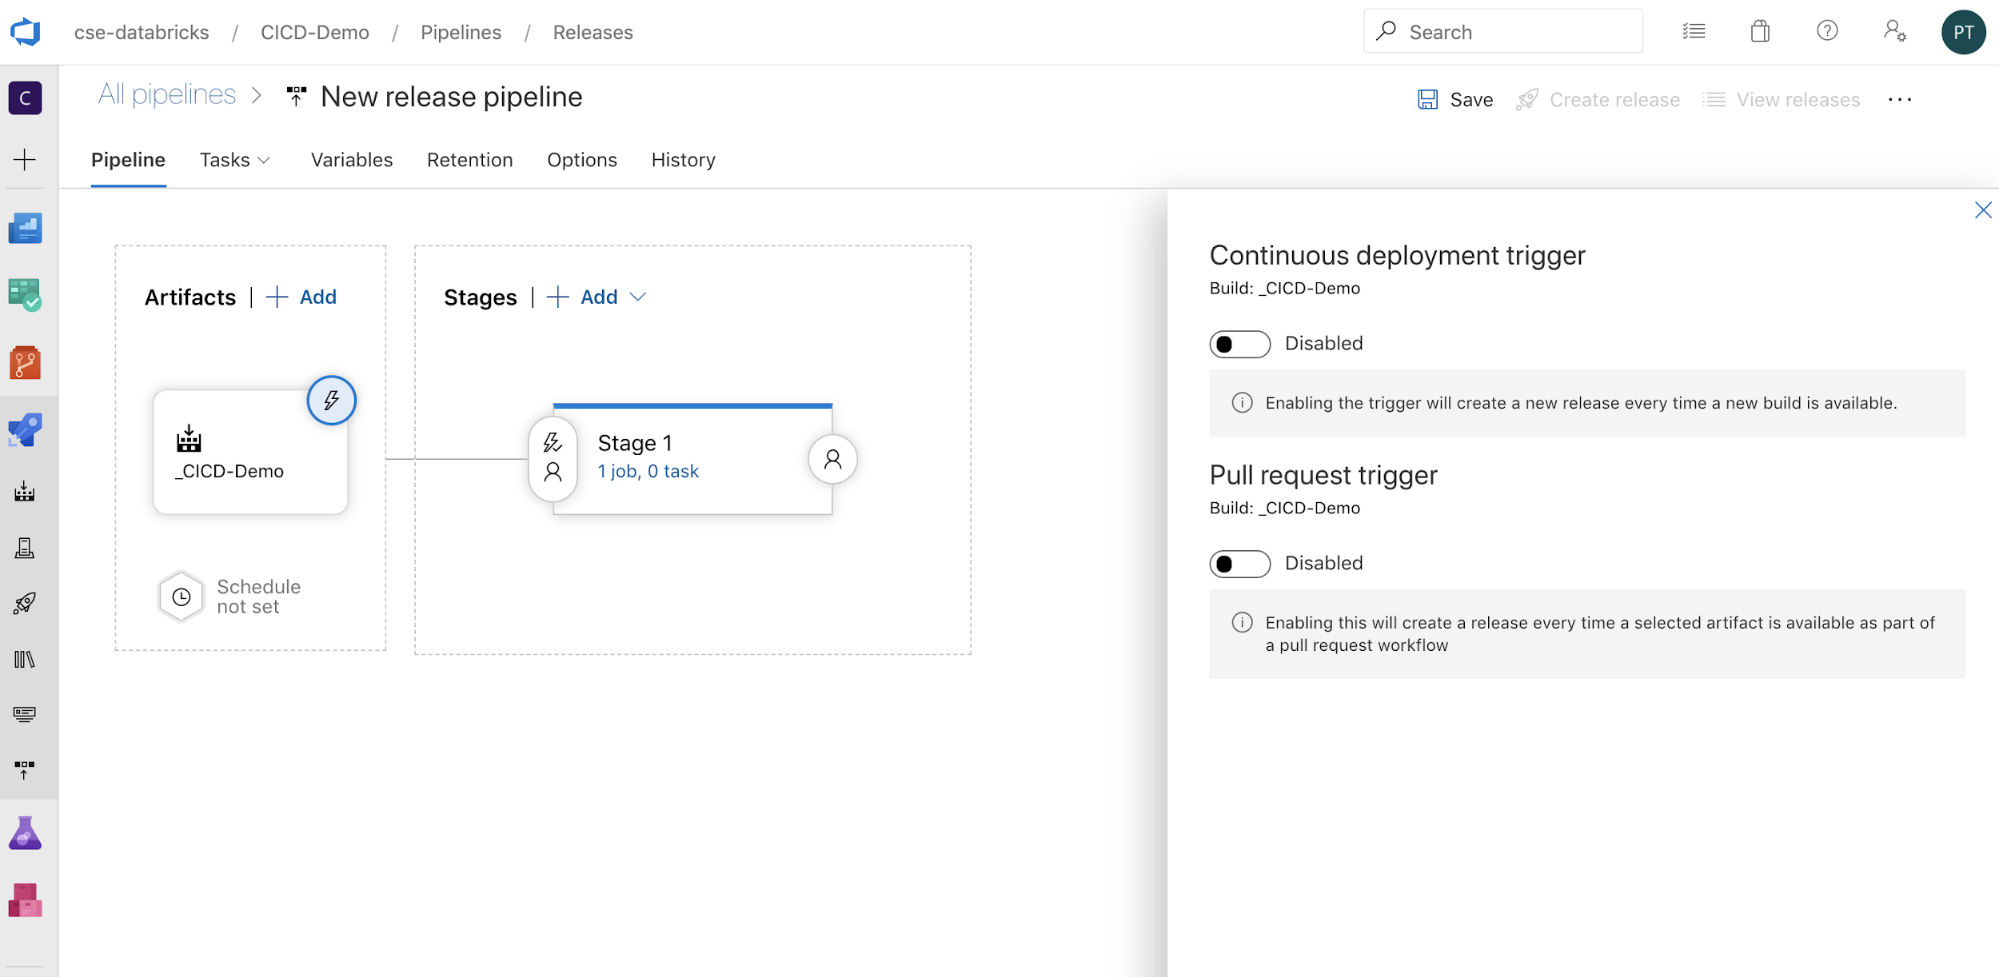
Click Save > OK.
Step 3.1: Define environment variables for the release pipeline
This example’s release pipeline relies on the following environment variables, which you can add by clicking Add in the Pipeline variables section on the Variables tab, with a Scope of Stage 1:
BUNDLE_TARGET, which should match thetargetname in yourdatabricks.ymlfile. In this article’s example, this isdev.DATABRICKS_HOST, which represents the per-workspace URL of your Azure Databricks workspace, beginning withhttps://, for examplehttps://adb-<workspace-id>.<random-number>.azuredatabricks.net. Do not include the trailing/after.net.DATABRICKS_CLIENT_ID, which represents the application ID for the Microsoft Entra ID service principal.DATABRICKS_CLIENT_SECRET, which represents the Azure Databricks OAuth secret for the Microsoft Entra ID service principal.
Step 3.2: Configure the release agent for the release pipeline
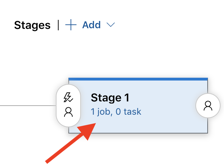
Click the 1 job, 0 task link within the Stage 1 object.
On the Tasks tab, click Agent job.
In the Agent selection section, for Agent pool, select Azure Pipelines.
For Agent Specification, select the same agent as you specified for the build agent earlier, in this example ubuntu-22.04.
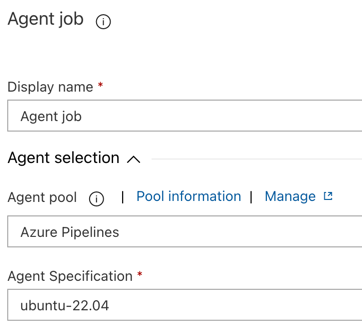
Click Save > OK.
Step 3.3: Set the Python version for the release agent
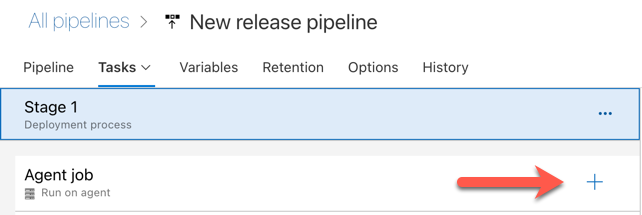
Click the plus sign in the Agent job section, indicated by the red arrow in the following figure. A searchable list of available tasks appears. There is also a Marketplace tab for third-party plug-ins that can be used to supplement the standard Azure DevOps tasks. You will add several tasks to the release agent during the next several steps.
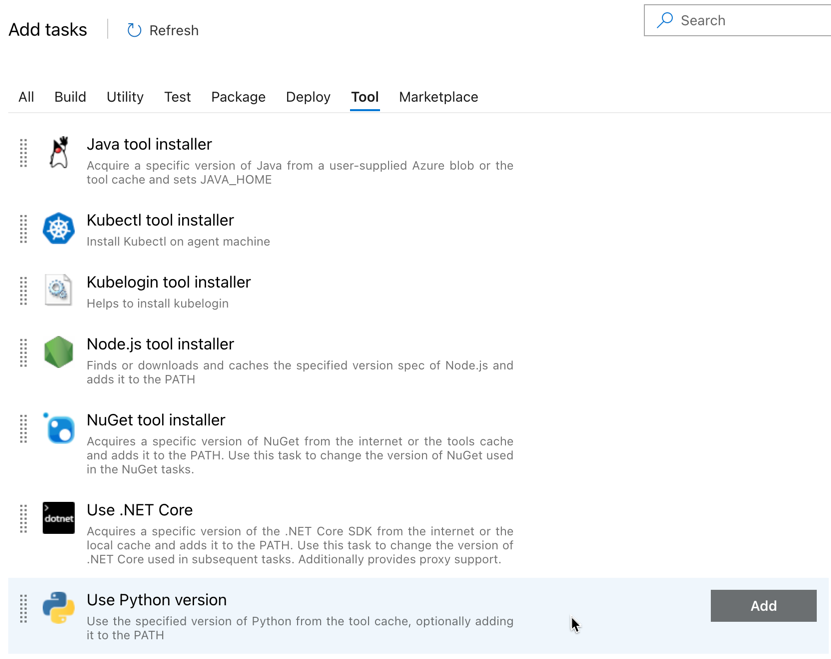
The first task you add is Use Python version, located on the Tool tab. If you cannot find this task, use the Search box to look for it. When you find it, select it and then click the Add button next to the Use Python version task.
As with the build pipeline, you want to make sure that the Python version is compatible with the scripts called in subsequent tasks. In this case, click the Use Python 3.x task next to Agent job, and then set Version spec to
3.10. Also set Display name toUse Python 3.10. This pipeline assumes that you are using Databricks Runtime 13.3 LTS on the clusters, which have Python 3.10.12 installed.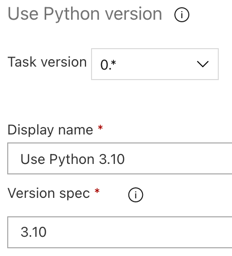
Click Save > OK.
Step 3.4: Unpackage the build artifact from the build pipeline
Next, have the release agent extract the Python wheel file, related release settings files, the notebooks, and the Python code file from the zip file by using the Extract files task: click the plus sign in the Agent job section, select the Extract files task on the Utility tab, and then click Add.
Click the Extract files task next to Agent job, set Archive file patterns to
**/*.zip, and set the Destination folder to the system variable$(Release.PrimaryArtifactSourceAlias)/Databricks. Also set Display name toExtract build pipeline artifact.Note
$(Release.PrimaryArtifactSourceAlias)represents an Azure DevOps-generated alias to identify the primary artifact source location on the release agent, for example_<your-github-alias>.<your-github-repo-name>. The release pipeline sets this value as the environment variableRELEASE_PRIMARYARTIFACTSOURCEALIASin the Initialize job phase for the release agent. See Classic release and artifacts variables.Set Display name to
Extract build pipeline artifact.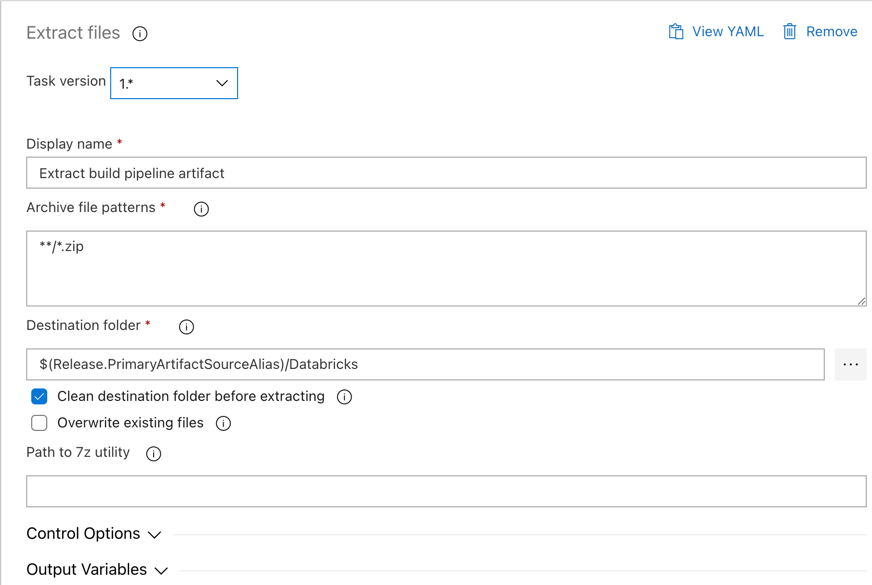
Click Save > OK.
Step 3.5: Set the BUNDLE_ROOT environment variable
For this article’s example to operate as expected, you must set an environment variable named BUNDLE_ROOT in the release pipeline. Databricks Asset Bundles uses this environment variable to determine where the databricks.yml file is located. To set this environment variable:
Use the Environment Variables task: click the plus sign again in the Agent job section, select the Environment Variables task on the Utility tab, and then click Add.
Note
If the Environment Variables task is not visible on the Utility tab, enter
Environment Variablesin the Search box and follow the on-screen instructions to add the task to the Utility tab. This might require you to leave Azure DevOps and then come back to this location where you left off.For Environment Variables (comma separated), enter the following definition:
BUNDLE_ROOT=$(Agent.ReleaseDirectory)/$(Release.PrimaryArtifactSourceAlias)/Databricks.Note
$(Agent.ReleaseDirectory)represents an Azure DevOps-generated alias to identify the release directory location on the release agent, for example/home/vsts/work/r1/a. The release pipeline sets this value as the environment variableAGENT_RELEASEDIRECTORYin the Initialize job phase for the release agent. See Classic release and artifacts variables. For information about$(Release.PrimaryArtifactSourceAlias), see the note in the preceding step.Set Display name to
Set BUNDLE_ROOT environment variable.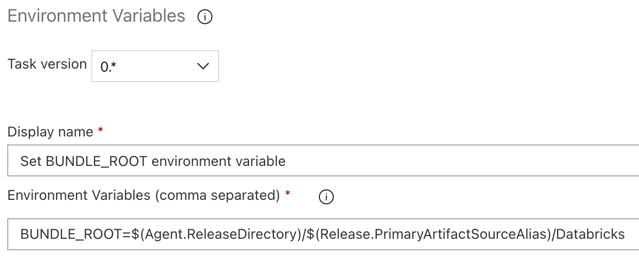
Click Save > OK.
Step 3.6. Install the Databricks CLI and Python wheel build tools
Next, install the Databricks CLI and Python wheel build tools on the release agent. The release agent will call the Databricks CLI and Python wheel build tools in the next few tasks. To do this, use the Bash task: click the plus sign again in the Agent job section, select the Bash task on the Utility tab, and then click Add.
Click the Bash Script task next to Agent job.
For Type, select Inline.
Replace the contents of Script with the following command, which installs the Databricks CLI and Python wheel build tools:
curl -fsSL https://raw.githubusercontent.com/databricks/setup-cli/main/install.sh | sh
pip install wheel
Set Display name to
Install Databricks CLI and Python wheel build tools.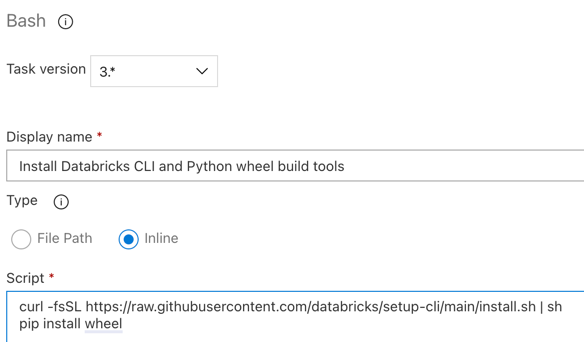
Click Save > OK.
Step 3.7: Validate the Databricks Asset Bundle
In this step, you make sure that the databricks.yml file is syntactically correct.
Use the Bash task: click the plus sign again in the Agent job section, select the Bash task on the Utility tab, and then click Add.
Click the Bash Script task next to Agent job.
For Type, select Inline.
Replace the contents of Script with the following command, which uses the Databricks CLI to check whether the
databricks.ymlfile is syntactically correct:databricks bundle validate -t $(BUNDLE_TARGET)Set Display name to
Validate bundle.Click Save > OK.
Step 3.8: Deploy the bundle
In this step, you build the Python wheel file and deploy the built Python wheel file, the two Python notebooks, and the Python file from the release pipeline to your Azure Databricks workspace.
Use the Bash task: click the plus sign again in the Agent job section, select the Bash task on the Utility tab, and then click Add.
Click the Bash Script task next to Agent job.
For Type, select Inline.
Replace the contents of Script with the following command, which uses the Databricks CLI to build the Python wheel file and to deploy this article’s example files from the release pipeline to your Azure Databricks workspace:
databricks bundle deploy -t $(BUNDLE_TARGET)Set Display name to
Deploy bundle.Click Save > OK.
Step 3.9: Run the unit test notebook for the Python wheel
In this step, you run a job that runs the unit test notebook in your Azure Databricks workspace. This notebook runs unit tests against the Python wheel library’s logic.
Use the Bash task: click the plus sign again in the Agent job section, select the Bash task on the Utility tab, and then click Add.
Click the Bash Script task next to Agent job.
For Type, select Inline.
Replace the contents of Script with the following command, which uses the Databricks CLI to run the job in your Azure Databricks workspace:
databricks bundle run -t $(BUNDLE_TARGET) run-unit-testsSet Display name to
Run unit tests.Click Save > OK.
Step 3.10: Run the notebook that calls the Python wheel
In this step, you run a job that runs another notebook in your Azure Databricks workspace. This notebook calls the Python wheel library.
Use the Bash task: click the plus sign again in the Agent job section, select the Bash task on the Utility tab, and then click Add.
Click the Bash Script task next to Agent job.
For Type, select Inline.
Replace the contents of Script with the following command, which uses the Databricks CLI to run the job in your Azure Databricks workspace:
databricks bundle run -t $(BUNDLE_TARGET) run-dabdemo-notebookSet Display name to
Run notebook.Click Save > OK.
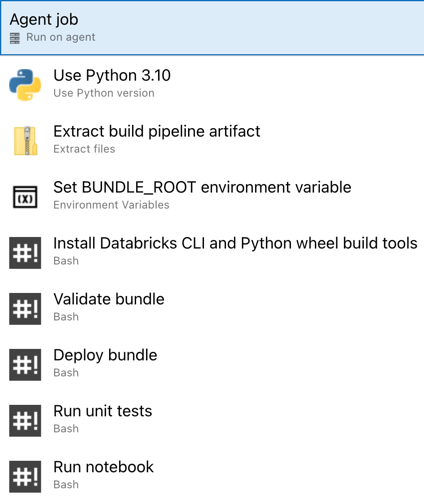
You have now completed configuring your release pipeline. It should look as follows:
Step 4: Run the build and release pipelines
In this step, you run the pipelines manually. To learn how to run the pipelines automatically, see Specify events that trigger pipelines and Release triggers.
To run the build pipeline manually:
- On the Pipelines menu in the sidebar, click Pipelines.
- Click your build pipeline’s name, and then click Run pipeline.
- For Branch/tag, select the name of the branch in your Git repository that contains all of the source code that you added. This example assumes that this is in the
releasebranch. - Click Run. The build pipeline’s run page appears.
- To see the build pipeline’s progress and to view the related logs, click the spinning icon next to Job.
- After the Job icon turns to a green check mark, proceed to run the release pipeline.
To run the release pipeline manually:
- After the build pipeline has run successfully, on the Pipelines menu in the sidebar, click Releases.
- Click your release pipeline’s name, and then click Create release.
- Click Create.
- To see the release pipeline’s progress, in the list of releases, click the name of the latest release.
- In the Stages box, click Stage 1, and click Logs.