Note
Access to this page requires authorization. You can try signing in or changing directories.
Access to this page requires authorization. You can try changing directories.
This article describes how to set up authorization and authentication between the Databricks extension for Visual Studio Code and your Azure Databricks workspace if you haven't already configured the extension through project setup. See Databricks extension for Visual Studio Code.
The Databricks extension for Visual Studio Code implements portions of the Databricks unified authentication standard, which enables you to configure Azure Databricks OAuth 2.0-based authorization once and then use that configuration across multiple Azure Databricks tools and SDKs without further authorization and authentication configuration changes. It also provides automatic refreshes of active access tokens, reducing your process complexity when developing.
Databricks recommends OAuth interactive user authorization, which is easy to configure using the Databricks extension for Visual Studio Code. See Set up OAuth authorization and authentication.
Otherwise if you are using Authenticate with Azure Databricks personal access tokens (legacy), Authorize service principal access to Azure Databricks with OAuth, or Authenticate with Microsoft Entra service principals, see Set up authentication with a configuration profile. For Authenticate with the Azure CLI, see Set up Azure CLI authentication.
Note
The Databricks extension for Visual Studio Code does not support authentication using Azure managed identities (formerly Azure Managed Service Identities (MSI)), but Databricks Connect used without the Databricks extension for Visual Studio Code does. To install Databricks Connect, see Install Databricks Connect for Python.
Set up OAuth authorization and authentication
Azure Databricks supports OAuth 2.0-based authorization and authentication, and simplifies access token management with Databricks unified authentication. For more details on user and service principal authorization with Azure Databricks, see Authorize access to Azure Databricks resources.
To complete the setup for OAuth authorization, open your VSCode project with the Databricks extension for Visual Studio Code enabled:
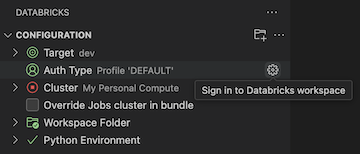
In the Configuration view, click Auth Type, and then click the gear (Sign in to Databricks workspace) icon.
If you already have an authentication configuration profile in this list that has the Authenticate using OAuth (User to Machine) label and that you know corresponds to the target Databricks host, select it from the list, and then do the following:
- If prompted, complete any on-screen instructions in your web browser to finish authenticating with Azure Databricks.
- If also prompted, allow all-apis access.
- Skip ahead to Select compute for running code and jobs.
In the Command Palette, for Select authentication method, click OAuth (user to machine).
For Select authentication method, select OAuth (user to machine).
Enter some name for the associated Azure Databricks authentication profile.
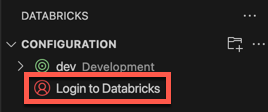
In the Configuration view, click Login to Databricks.
In the Command Palette, for Select authentication method, select the name of the authentication configuration profile that you just created.
If prompted, complete any on-screen instructions in your web browser to finish authenticating with Azure Databricks. If also prompted, allow all-apis access.
After you have successfully logged in, return to Visual Studio Code.
Set up authentication with a configuration profile
The following instructions assume that you have already set up an Azure Databricks configuration profile with the required fields for your Azure Databricks authentication type. To create a profile, see Azure Databricks configuration profiles. To configure settings for the profile, see the Profile tab or section for your authentication type in Authorize access to Azure Databricks resources.
To select the configuration profile that you want the extension to use, with your project and the extension open, do the following:
In the Configuration view, click Auth Type, and then click the gear (Sign in to Databricks workspace) icon.
In the Command Palette, select your target Azure Databricks configuration profile in the list.
Tip
The target workspace host can be changed later by modifying the target
workspacesetting in thedatabricks.ymlconfiguration file associated with the project. See targets.
If you do not have a configuration profile, you can create one that authenticates by using a Azure Databricks personal access token for example, as follows:
With your project and the extension open, in the Configuration view, click Auth Type or Login to Databricks, and then click the gear (Sign in to Databricks workspace) icon.
In the Command Palette, select Personal Access Token.
Complete the on-screen prompts to do the following:
- Enter some name for the associated Azure Databricks authentication profile.
- Generate the personal access token in your Azure Databricks workspace and then copy the token's value.
- Return to the extension and enter the copied token's value.
The extension creates a folder in your project named .databricks with a file named databricks.env, if it does not already exist. This file contains the workspace host that you entered, along with other Azure Databricks configuration details used by the Databricks extension for Visual Studio Code.
The extension also adds a hidden .gitignore file to the project if the file does not exist or if an existing .gitignore cannot be found in any parent folders. If a new .gitignore file is created, the extension adds a .databricks/ entry to this new file. If the extension finds an existing .gitignore file, it adds a .databricks/ entry to the existing file.
Set up Azure CLI authentication
Azure Databricks supports authentication with the Azure CLI installed locally. This enables you to generate short-lived (one hour) Microsoft Entra ID tokens, which eliminates the risk of accidentally exposing longer-lived tokens such as Azure Databricks personal access tokens through version control checkins or other means.
With your project and the extension opened, and the Azure CLI installed locally, do the following:
In the Configuration view, click Configure Databricks.
Note
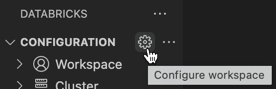
If Configure Databricks is not visible, click the gear (Configure workspace) icon next to Configuration instead.
In the Command Palette, for Databricks Host, enter your per-workspace URL, for example
https://adb-1234567890123456.7.azuredatabricks.net. Then press Enter.Select Azure CLI.