Note
Access to this page requires authorization. You can try signing in or changing directories.
Access to this page requires authorization. You can try changing directories.
Important
This feature is in Public Preview.
Note
The Azure Databricks Excel Add-in is not available in Azure Government or Azure China regions.
Scheduled refresh keeps data imported into an Excel workbook up to date by running the import automatically on a schedule. You can create a schedule for a saved query, table, or pivot table import, choose the SQL warehouse that runs each refresh, and review recent runs from the Azure Databricks Excel Add-in.
Prerequisites
Before you create a scheduled refresh, make sure that:
- The workbook is saved in Microsoft OneDrive or SharePoint.
- The query, table, or pivot table is already imported and appears under Saved imports. See Import and query data using the Azure Databricks Excel Add-in.
- You have permission to use the SQL warehouse that runs the refresh.
- Your Microsoft account is connected to the Azure Databricks Excel Add-in. See Set up the Azure Databricks Excel Add-in.
Scheduled refreshes run with the Azure Databricks identity and Microsoft credentials of the person who creates the schedule. Keep those credentials active so that Azure Databricks can query the data and update the workbook.
Microsoft permissions
Your Excel Add-in file must include the following domain in the AppDomains section. If you installed the Excel Add-in before scheduled refresh was released, add the domain to your Add-in file or download the file again. See Set up the Azure Databricks Excel Add-in.
<AppDomain>https://login.microsoftonline.com</AppDomain>
The Add-in requests the following Microsoft permissions, which you must consent to for scheduled refresh to access and update the workbook:
Files.ReadWrite: Read and update your workbook.offline_access: Keep scheduled refreshes running when you are not actively signed in.
Create a schedule
Create a scheduled refresh for any saved query, table, or pivot table import from the Azure Databricks Excel Add-in.
- Open the Azure Databricks Excel Add-in.
- Go to Saved imports.
- Find the import that you want to refresh automatically.
- Select the calendar button next to the import.
- Review Asset Details to confirm that you selected the correct query, table, or pivot table.
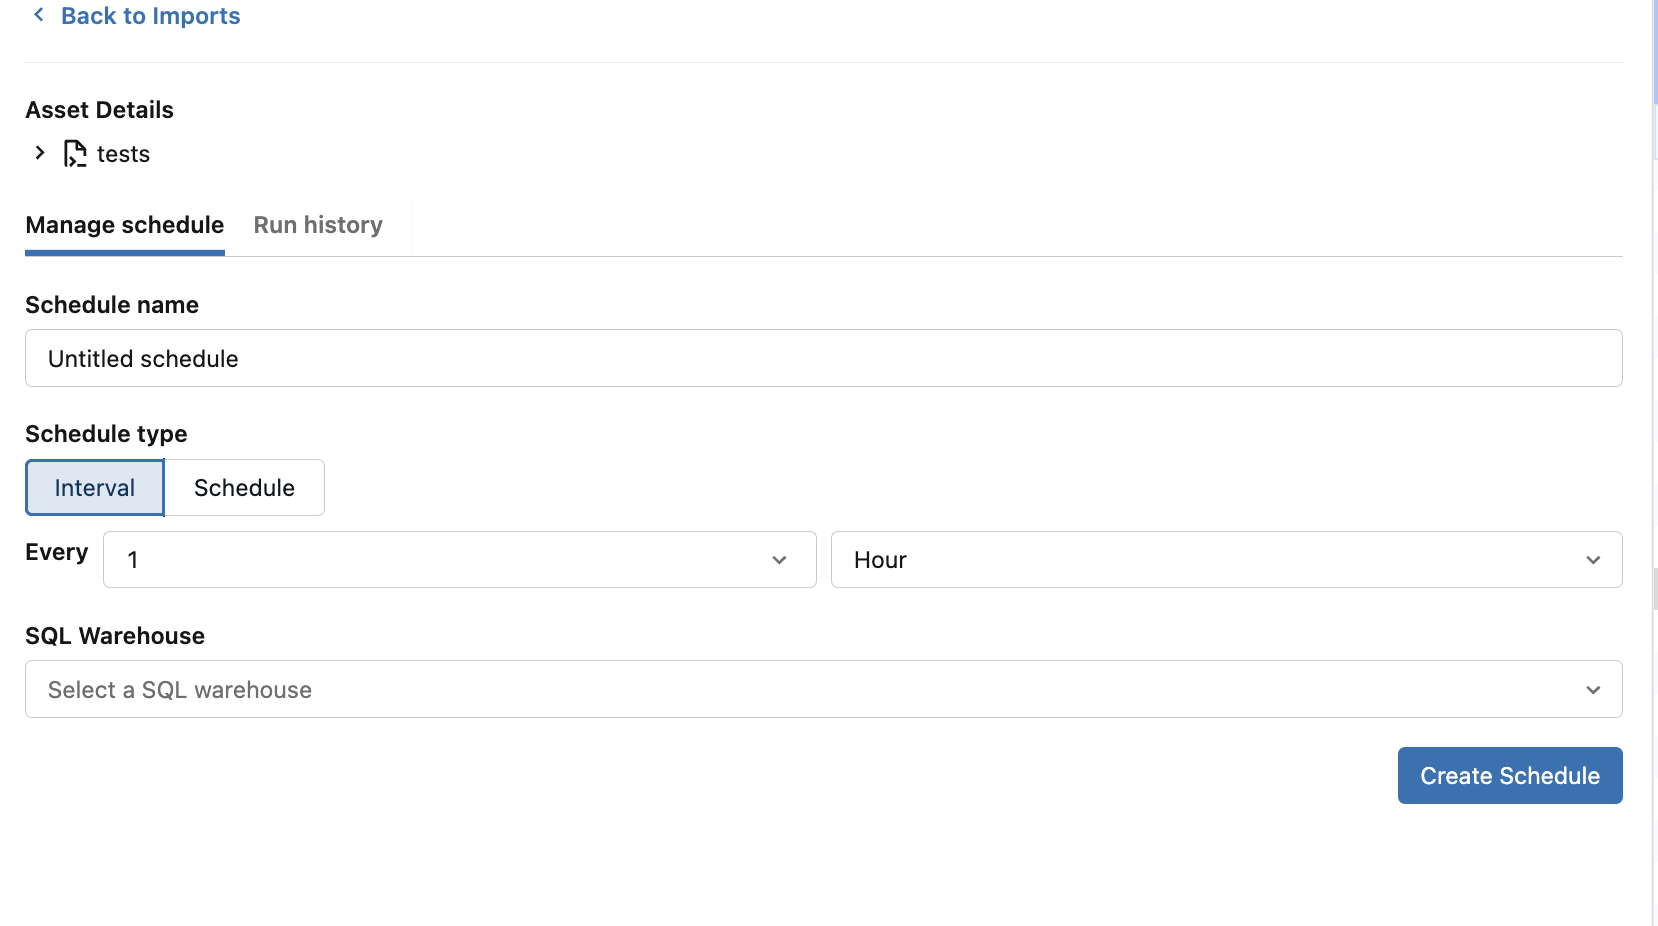
- On the Manage schedule tab, enter a descriptive Schedule name.
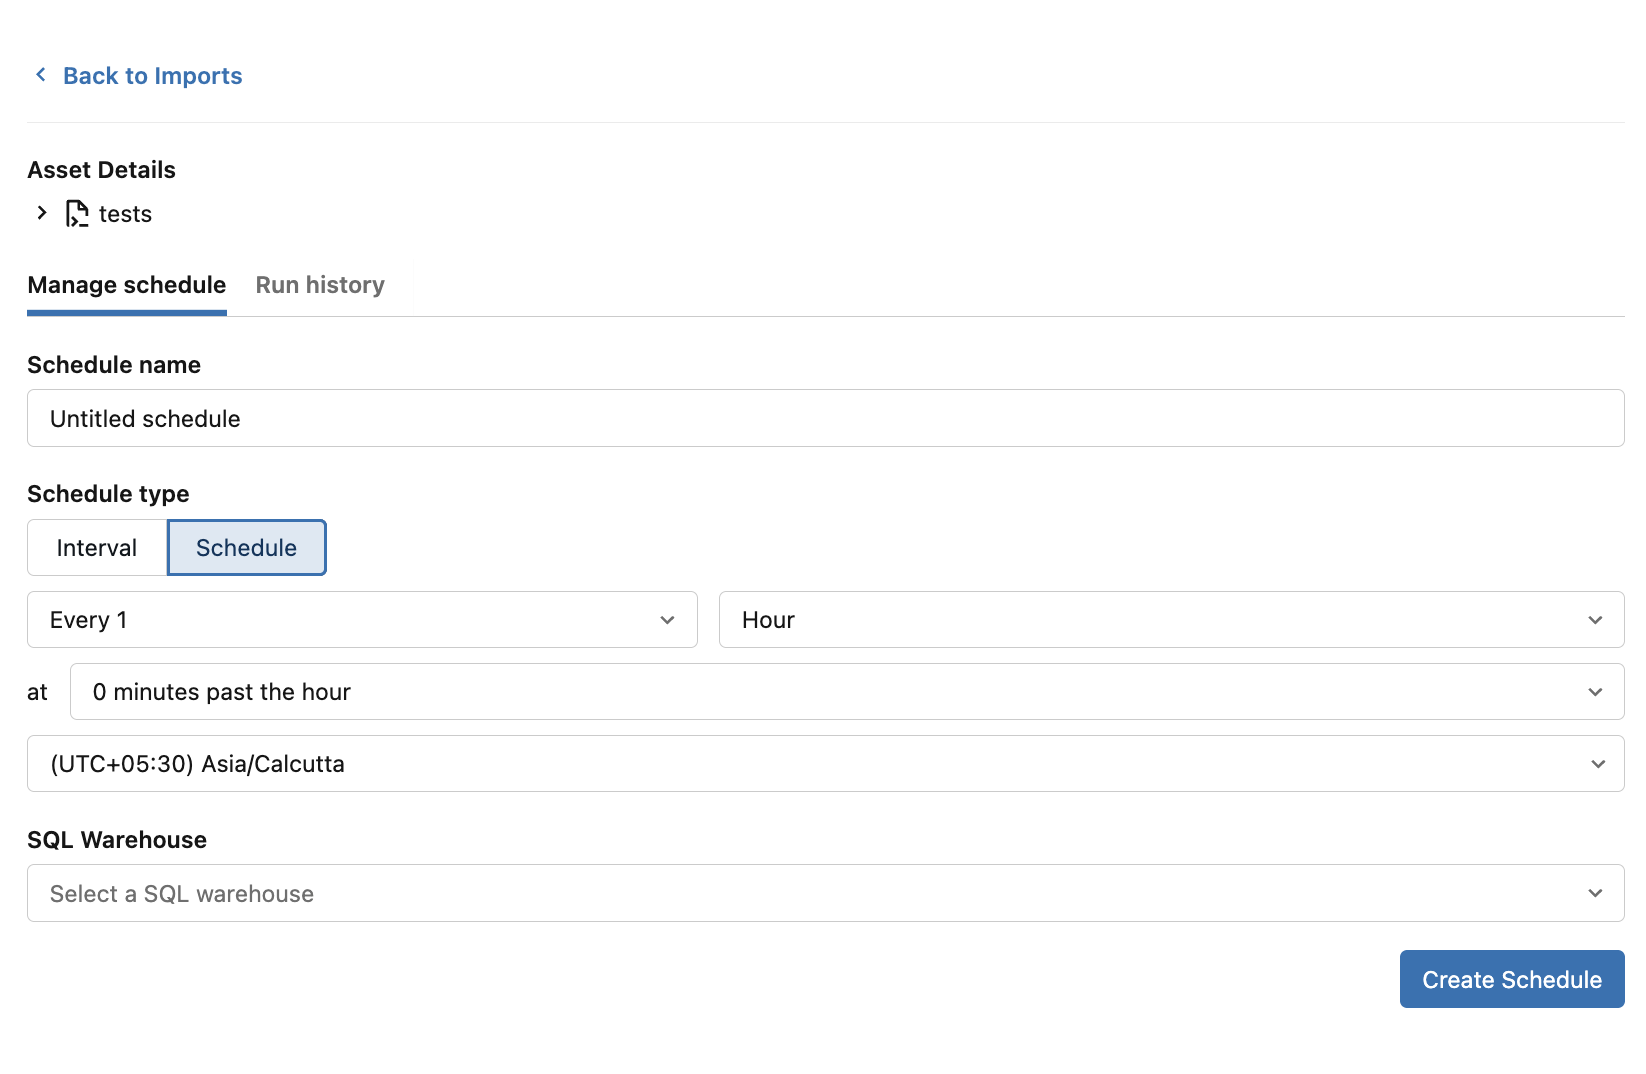
- Choose a Schedule type. See Interval and Schedule:
- Interval: Refresh every specified number of minutes, hours, days, or weeks.
- Schedule: Choose a calendar-based cadence and time, such as every day at a specific time or every week on a specific day.
- If you selected Schedule, confirm the Time zone. The initial time zone is based on your local browser settings.
- Under SQL Warehouse, select the warehouse that runs the query.
- Select Create Schedule.
After the schedule is created, the calendar button for the saved import changes to a calendar-with-clock icon.

Interval
Use Interval when the refresh should repeat after a regular period. Enter a number and select minutes, hours, days, or weeks.
The available interval ranges are:
- 1 to 120 minutes
- 1 to 72 hours
- 1 to 31 days
- 1 to 8 weeks
For a refresh that must run on a specific weekday and time, use Schedule instead of a weekly interval.
Schedule
Use Schedule when the refresh must run at a specific calendar time. Depending on the cadence, you can select:
- The frequency, such as minute, hour, day, week, or month
- The time of day
- The weekday for weekly schedules
- The day of the month for monthly schedules
- The time zone
Times are evaluated in the selected schedule time zone. Run-history timestamps are displayed using the viewer's locale.
Update an existing schedule
Change the name, cadence, time zone, or SQL warehouse of a schedule that you already created.
- From Saved imports, select the calendar-with-clock button for the import.
- On the Manage schedule tab, change the schedule name, cadence, time zone, or SQL warehouse.
- Select Update Schedule.
Updating the underlying saved import also synchronizes its query, parameters, filters, and row limit with the scheduled refresh. The next run uses the updated import definition.
Review run history
Check the outcome of recent refresh runs for a scheduled import, including each run's status, duration, and any failure details.
- Open the schedule for the saved import.
- Select the Run history tab.
- Review the recent runs. Each entry shows its completion time, status, and duration.
- Expand a run to see more details, including an error message when a refresh fails.
Run statuses include:
- OK: The refresh completed successfully.
- Running: The refresh is still in progress.
- Failed: The refresh did not complete. Expand the run to view the available failure details.
If the schedule has not run yet, the tab displays No run history yet.
Delete a scheduled import
Scheduled refresh does not provide a separate option to pause a schedule or delete only the schedule.
To stop the schedule from the Excel Add-in, delete the saved import:
- In Saved imports, open the actions menu for the import.
- Select Delete.
Deleting the saved import also deletes its associated scheduled refresh job and removes the saved import configuration from the workbook.
Troubleshooting
If a scheduled refresh does not run or the workbook does not update, use the following sections to identify and resolve the most common causes.
Your Microsoft credentials have expired
Scheduled refresh needs access to the workbook through your Microsoft account. If the Add-in displays the following message, your credentials have expired:
Your Microsoft credentials have expired. Sign in to keep scheduled refreshes running.
Select Microsoft login and complete the sign-in flow. A schedule can still appear configured while the credentials are expired, but refresh runs cannot update the workbook until access is restored.
A scheduled refresh fails
If a run shows a Failed status, work through the following checks to identify the cause:
- Open the schedule and select Run history.
- Expand the failed run and review its error message.
- Confirm that your Microsoft account is still connected.
- Confirm that the workbook still exists in OneDrive or SharePoint and that your account can edit it.
- Confirm that the selected SQL warehouse is available and that you can run the source query.
- Confirm that you still have access to the source table and other referenced data.
- If the import uses Excel cell references for parameters or filters, confirm that the referenced worksheet and cells still exist.
The workbook is not being updated
If runs report success but the workbook data is stale, confirm that the workbook is still in the expected location and accessible:
- Open the workbook from its OneDrive or SharePoint location.
- Confirm that the workbook has not been moved, renamed, or replaced since the schedule was last updated.
- Reconnect your Microsoft account if prompted.
- Review Run history for the latest status and error details.