Connect Power BI to Azure Databricks
Microsoft Power BI is a business analytics service that provides interactive visualizations with self-service business intelligence capabilities, enabling end users to create reports and dashboards by themselves without having to depend on information technology staff or database administrators.
When you use Azure Databricks as a data source with Power BI, you can bring the advantages of Azure Databricks performance and technology beyond data scientists and data engineers to all business users.
Publish to Power BI Online from Azure Databricks
When using Azure Databricks as a data source with Power BI Online, you can create PowerBI datasets from tables or schemas directly from the Databricks UI.
Requirements
- Your data must be on Unity Catalog, and your compute (cluster) must be Unity Catalog enabled. Hive metastore is not currently supported.
- You must have a premium (premium capacity or premium per-user license) Power BI license.
- You must enable “Users can edit data models in Power BI service (preview)” under Workspace settings and Data model settings to edit the Semantic Model after it is published. You can also edit the Semantic Model using Tabular Editor by making a connection using the XMLA endpoint.
- If you need to enable XML write in your PowerBI workspace, follow this link for instructions.
- If your workspace is under a private link, you will need to update the dataset’s datasource credentials manually in Power BI.
How to Use It
Publish Azure Databricks tables to a Power BI dataset
- Sign in to your Databricks workspace and navigate to the Catalog Explorer. Select the schema/tables to be published. Do not select from a hive metastore or the samples catalog.
- From the compute dropdown, select the data warehouse you want to use in this Power BI publish.
- With the desired table/schema to be published open in the Catalog Explorer, click the “Use with BI tools” button on the upper right.
- In the dropdown list that opens, click the “Publish to Power BI workspace” option.
At this point, a menu will open over the right side of the window. Follow the prompts given by the menu, detailed below:
- Click “Connect to Microsoft Entra ID” to authenticate with your Microsoft account.
- In the following menu, select the desired workspace to be published to in the “Power BI workspaces” dropdown. In the “Dataset Mode” dropdown, select either DirectQuery (selected by default) or Import mode.
- Click the blue “Publish to Power BI” button at the bottom of the menu.
- Wait for the dataset to publish. This normally takes about 10 to 20 seconds.
- When the dataset is published, the blue button will have a link labeled “Open Power BI”. Click this to open your new Power BI dataset in a new tab.
Features and Notes
- When publishing a schema containing multiple tables, all tables with columns will be published. If no columns are present in any table, the publishing will not be performed.
- Comments on a table’s columns in Databricks are copied to the descriptions of corresponding columns in Power BI.
- Foreign key relationships are preserved in the published dataset. However, Power BI only supports one active relationship path between any two tables. Thus, when multiple paths are present in the schema in Databricks, some of the corresponding relationships in Power BI will be set to inactive. You may later change which relationships are active/inactive in the data model view in Power BI.
- A Personal Access Token (PAT) is created on your behalf to allow Power BI to access the semantic model. This authentication method can be changed later in the Power BI datasource settings.
Connect Power BI Desktop to Azure Databricks
You can connect Power BI Desktop to your Azure Databricks clusters and Databricks SQL warehouses. You can also publish Power BI reports to the Power BI service and enable users to access the underlying Azure Databricks data using single sign-on (SSO), passing along the same Microsoft Entra ID (formerly Azure Active Directory) credentials they use to access the report.
Requirements
Power BI Desktop 2.85.681.0 or above. To use data managed by Unity Catalog with Power BI, you must use Power BI Desktop 2.98.683.0 or above (October 2021 release).
Note
Power BI Desktop requires Windows. An alternative for other operating systems is to run Power BI Desktop on a physical host or a Windows-based virtual machine and then connect to it from your operating system.
If you use a version of Power BI Desktop below 2.85.681.0, you also need to install the Databricks ODBC driver in the same environment as Power BI Desktop.
An Azure Databricks personal access token or your Microsoft Entra ID account credentials.
Note
As a security best practice when you authenticate with personal access tokens, Databricks recommends that you use personal access tokens belonging to service principals instead of workspace users. To create tokens for service principals, see Manage tokens for a service principal.
Connect Power BI Desktop to Azure Databricks using Partner Connect
You can use Partner Connect to connect to a cluster or SQL warehouse from Power BI Desktop in just a few clicks.
Make sure your Azure Databricks account, workspace, and the signed-in user meet the requirements for Partner Connect.
In the sidebar, click
 Partner Connect.
Click the Power BI tile.
In the Connect to partner dialog, for Compute, choose the name of the Azure Databricks compute resource that you want to connect.
Choose Download connection file.
Open the downloaded connection file, which starts Power BI Desktop.
In Power BI Desktop, enter your authentication credentials:
- Personal Access Token: Enter your Azure Databricks personal access token.
- Microsoft Entra ID: Click Sign in and then follow the on-screen instructions.
- Username / Password: Not applicable.
Click Connect.
Select the Azure Databricks data to query from the Power BI Navigator.
Connect Power BI Desktop to Azure Databricks manually
Follow these instructions, depending on your chosen authentication method, to connect to a cluster or SQL warehouse with Power BI Desktop. Databricks SQL warehouses are recommended when using Power BI in DirectQuery mode.
Note
To connect faster with Power BI Desktop, use Partner Connect.
Get the Server Hostname and HTTP Path.
Start Power BI Desktop.
Click Get data or File > Get data.
Click Get data to get started.
Search for Databricks, then click the connector:
- Azure Databricks
Click Connect.
Enter the Server Hostname and HTTP Path.
Select your Data Connectivity mode. For information about the difference between Import and DirectQuery, see Use DirectQuery in Power BI Desktop.
Click OK.
Click your authentication method:
- Personal Access Token: Enter your Azure Databricks personal access token.
- Microsoft Entra ID: Click Sign in and then follow the on-screen instructions.
- Username / Password: Not applicable.
Click Connect.
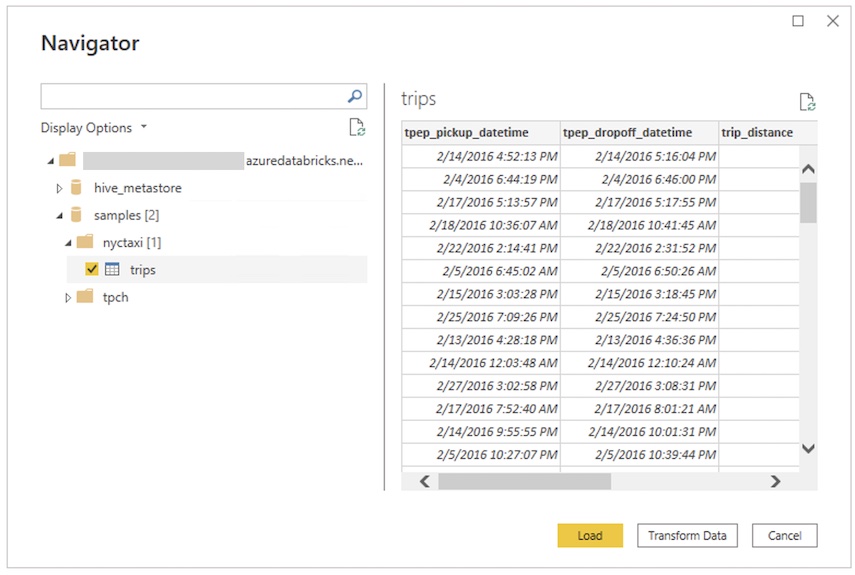
Select the Azure Databricks data to query from the Power BI Navigator. If Unity Catalog is enabled for your workspace, select a catalog before you select a schema and a table.
Using a custom SQL query
The Databricks connector provides the Databricks.Query data source that allows a user to provide a custom SQL query.
Follow the steps described in Connect with Power BI Desktop to create a connection, using Import as the data connectivity mode.
In the Navigator, right click the top-most item containing the selected host name and HTTP path and click Transform Data to open the Power Query Editor.
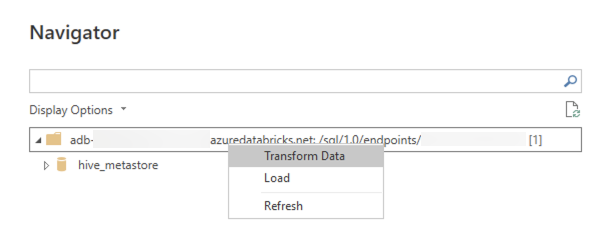
In the function bar, replace the function name
Databricks.CatalogswithDatabricks.Queryand apply the change. This creates a Power Query function that takes a SQL query as parameter.Enter the desired SQL query in the parameter field and click Invoke. This executes the query and a new table is created with the query results as its contents.
Access Azure Databricks data source using the Power BI service
When you publish a report to the Power BI service, you connect to Azure Databricks using a personal access token. In the Power BI service, you can also enable single sign on (SSO) so that users can access reports built using DirectQuery storage mode by passing their Microsoft Entra ID credentials to Azure Databricks.
Publish your Power BI report from Power BI Desktop to the Power BI service.
Enable single sign on (SSO) access to the report and underlying data source.
- Go to the underlying Azure Databricks dataset for the report in the Power BI service, expand Data source credentials, and click Edit credentials.
- On the configuration dialog, select Report viewers can only access this data source with their own Power BI identities using Direct Query and click Sign in.
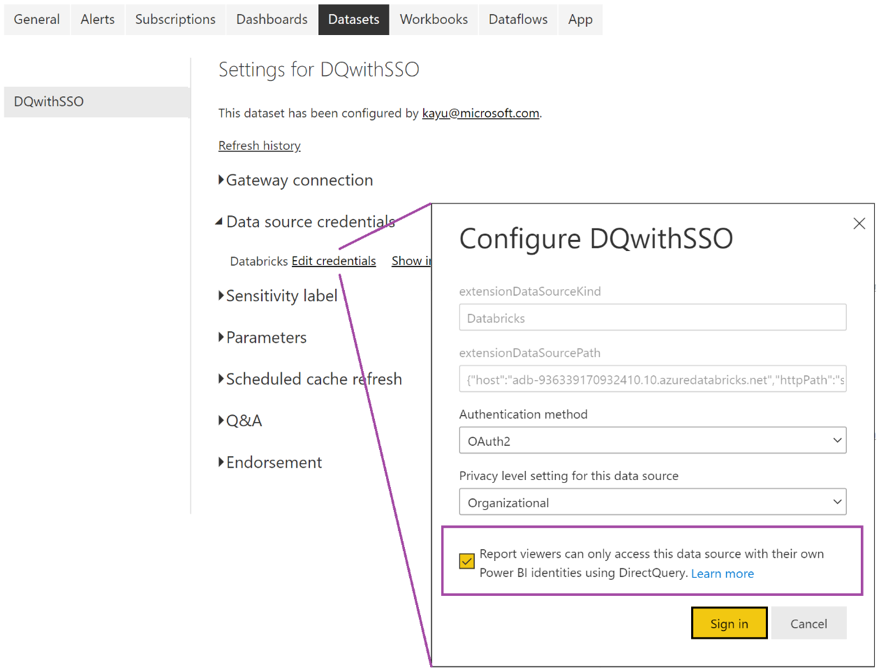
With this option selected, access to the data source is handled using DirectQuery and managed using the Microsoft Entra ID identity of the user who is accessing the report. If you don’t select this option, only you, as the user who published the report, have access to the Azure Databricks data source.
Automated HTTP proxy detection
Power BI Desktop version 2.104.941.0 and above (May 2022 release) has built-in support for detecting Windows system-wide HTTP proxy configuration.
Power BI Desktop can automatically detect and use your Windows system-wide HTTP proxy configuration.
If the proxy server does not provide a CRL distribution point (CDP), Power BI might show the following error message:
Details: "ODBC: ERROR [HY000] [Microsoft][DriverSupport] (1200)
-The revocation status of the certificate or one of the certificates in the certificate chain is unknown."
To fix this error, complete the following steps:
Create the file
C:\Program Files\Microsoft Power BI Desktop\bin\ODBC Drivers\Simba Spark ODBC Driver\microsoft.sparkodbc.iniif it does not exist.Add the following config to your
microsoft.sparkodbc.inifile:[Driver] CheckCertRevocation=0
Power BI Delta Sharing connector
The Power BI Delta Sharing connector allows users to discover, analyze, and visualize datasets shared with them through the Delta Sharing open protocol. The protocol enables secure exchange of datasets across products and platforms by leveraging REST and cloud storage.
For connection instructions, see Power BI: Read shared data.
Limitations
- The Azure Databricks connector supports web proxy. However, automatic proxy settings defined in .pac files aren’t supported.
- In the Azure Databricks connector, the
Databricks.Querydata source is not supported in combination with DirectQuery mode. - The data that the Delta Sharing connector loads must fit into the memory of your machine. To ensure this, the connector limits the number of imported rows to the Row Limit that was set earlier.
Additional resources
Feedback
Coming soon: Throughout 2024 we will be phasing out GitHub Issues as the feedback mechanism for content and replacing it with a new feedback system. For more information see: https://aka.ms/ContentUserFeedback.
Submit and view feedback for