Note
Access to this page requires authorization. You can try signing in or changing directories.
Access to this page requires authorization. You can try changing directories.
The article describes how to perform common Git operations in your Databricks workspace using Git folders, including cloning, branching, committing, and pushing.
Clone a repo connected to a remote Git repository
You can create Git folders using the Databricks UI or the web terminal.
Note
- You must have
CAN MANAGEpermission on the parent folder where you want to create the Git folder. - Your workspace must have Git credentials configured. See Configure Git credentials & connect a remote repo to Azure Databricks.
Clone from the UI
In the sidebar, select Workspace and then browse to the folder where you want to create the Git repo clone.
Click Create > Git folder.
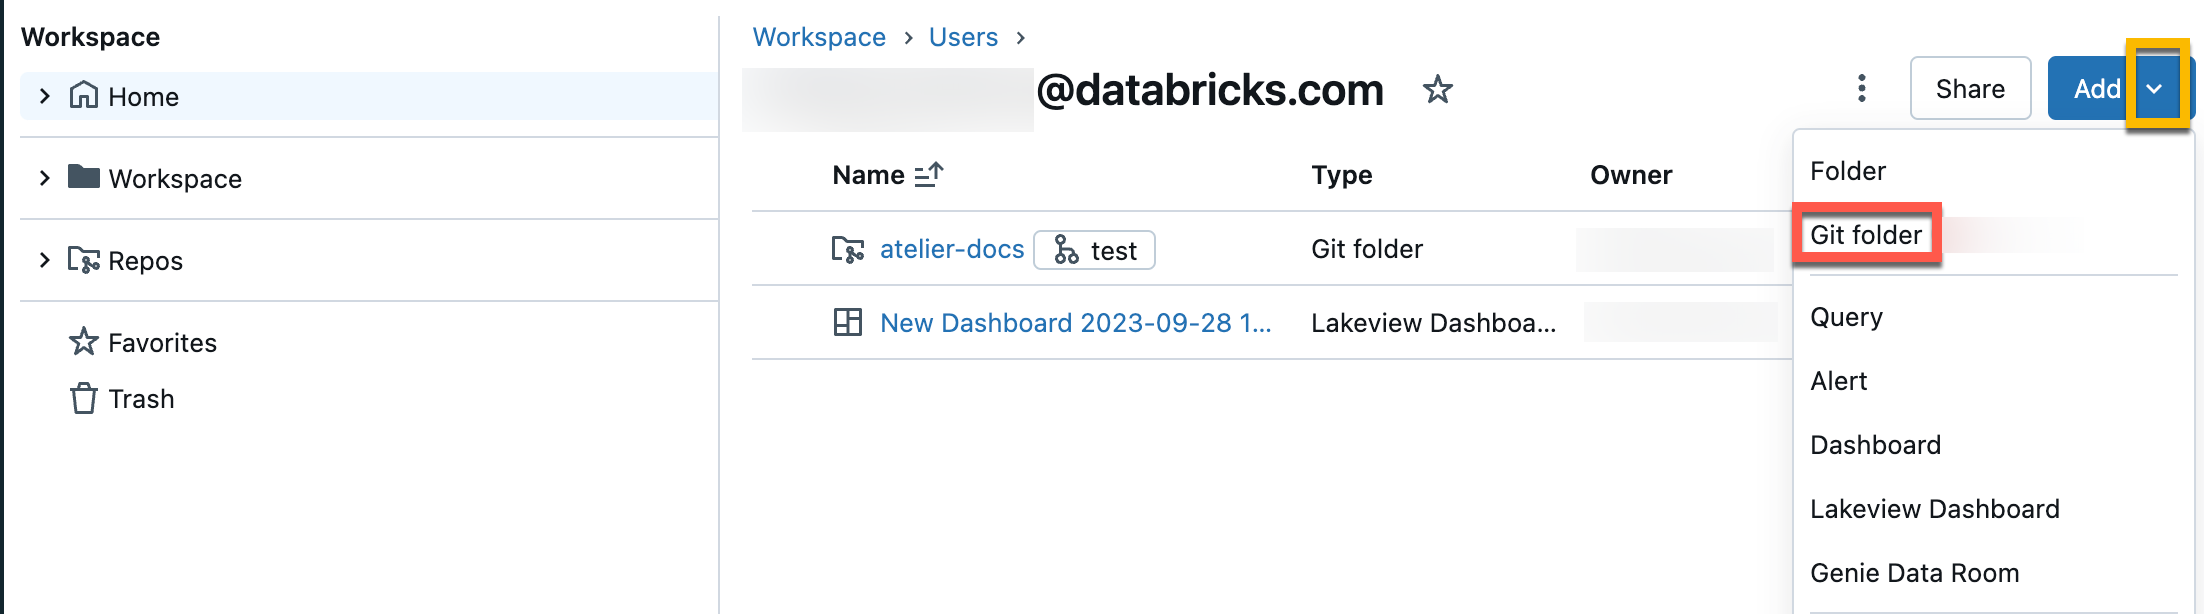
In the Create Git folder dialog, provide the following information:
Field Description Git repository URL The URL of the Git repository you want to clone, in the format https://example.com/organization/project.gitGit provider The Git provider for the repository you want to clone. Options include GitHub, GitHub Enterprise, GitLab, and Azure DevOps (Azure Repos) Git folder name The name of the folder in your workspace that will contain the contents of the cloned repo Sparse checkout Whether to use sparse checkout, in which only a subset of your repository's directories are cloned, specified using a cone pattern. This is useful if your repository is larger than Databricks supported limits. Use Git CLI (Beta) Enable to run standard Git commands directly from a Databricks terminal. This provides access to advanced operations like pre-commit hooks, Git submodules, and Large File Storage (LFS). See Use Git CLI commands (Beta). Click Create Git folder. The contents of the remote repository are cloned to the Databricks repo, and you can begin working with them using supported Git operations through your workspace.
Clone from the web terminal
You can also create Git folders with CLI access directly from the web terminal:
Access the web terminal. See Run shell commands in Azure Databricks web terminal.
Navigate to the parent directory in
/Workspace:cd /Workspace/Users/<your-email>/<project>Note
You can't create Git folders with Git CLI access in
/Reposor in existing Git folders.Clone your repository:
git clone <remote-url>The
git clonecommand uses the Git credentials configured in your workspace. See Configure Git credentials & connect a remote repo to Azure Databricks.Refresh your browser to see the new folder in the workspace file browser.
Use Git CLI commands (Beta)
Important
This feature is in Beta. Workspace admins can control access to this feature from the Previews page. See Manage Azure Databricks previews.
Git folders with Git CLI access let you run standard Git commands directly from a Databricks terminal. You can:
- Run any Git command including
git stash,git pull --force, andgit rebase -i. - Integrate linting and code scanning with pre-commit hooks.
- Work with repositories that exceed the 2 GB memory and 4 GB disk limits of standard Git folders.
- Use Git submodules and Large File Storage (LFS).
- Stage multiple commits locally before pushing to the remote repository.
To use Git CLI access, your workspace must have serverless compute enabled with environment version 4 or above.
Create a Git folder with Git CLI access
To create a Git folder with CLI access:
- When using the web terminal, any repository that you clone has Git CLI access automatically.
- When using the UI, you must enable the Use Git CLI preview when you create the Git folder.
After you create a Git folder with CLI access, run any standard Git command from the web terminal:
cd /Workspace/Users/<your-email>/<project>/my-repo

# Interactive rebase
git rebase -i main

# Stash uncommitted changes
git stash

# Work with submodules
git submodule update --init --recursive
Git CLI limitations
Git folders with CLI access have the following limitations:
- Workspaces with remote URL allowlists enabled can't use Git CLI features.
- Git CLI commands ignore the admin setting that blocks committing notebook outputs.
- The Repos API isn't supported for Git folders with CLI access.
- You can't enable Git CLI access for existing Git folders.
Troubleshooting Git CLI operations
- Terminal prompts for credentials on every operation: The Git CLI feature isn't enabled on your workspace. Contact your workspace admin to verify that the preview is enabled.
- Can't enable CLI access: Workspaces with remote URL allowlists can't use Git CLI features. Contact your workspace admin to review your workspace's network configuration.
- Git operations fail with permission errors: Verify that you have
CAN MANAGEpermission on the parent folder and that your workspace Git credentials are valid. See Configure Git credentials & connect a remote repo to Azure Databricks.
Best practice: Collaborating in Git folders
Databricks Git folders behave as embedded Git clients in your workspace, letting you collaborate through Git-based source control and versioning. For effective team collaboration:
- Each team member has their own Git folder mapped to the remote Git repository, where they work in their own development branch.
- Only one user performs Git operations on each Git folder. Multiple users performing Git operations on the same folder can cause branch management issues, such as one user unintentionally switching branches for everyone.
To share your Git folder configuration with a collaborator:
- Click Copy link to create Git folder in the banner at the top of your Databricks workspace.
- Send the URL to your collaborator.
- When your collaborator opens the URL, they see a Create Git folder dialog pre-populated with your Git folder configuration.
- They click Create Git folder to clone the repository into their own workspace under their current working folder.

To copy a Git folder from another user:
- Open the other user's Git folder in the shared workspace.
- Click Create Git folder in the banner at the top. The Create Git folder dialog opens with the Git repository configuration pre-populated.
- Click Create Git folder to clone the repository into your own workspace.

Access the Git dialog
You can access the Git dialog from a notebook or from the Databricks Git folders browser.
From a notebook, click the button next to the name of the notebook that identifies the current Git branch.

From the Databricks Git folders browser, click the button to the right of the repo name. You can also right-click the repo name and select Git… from the menu.
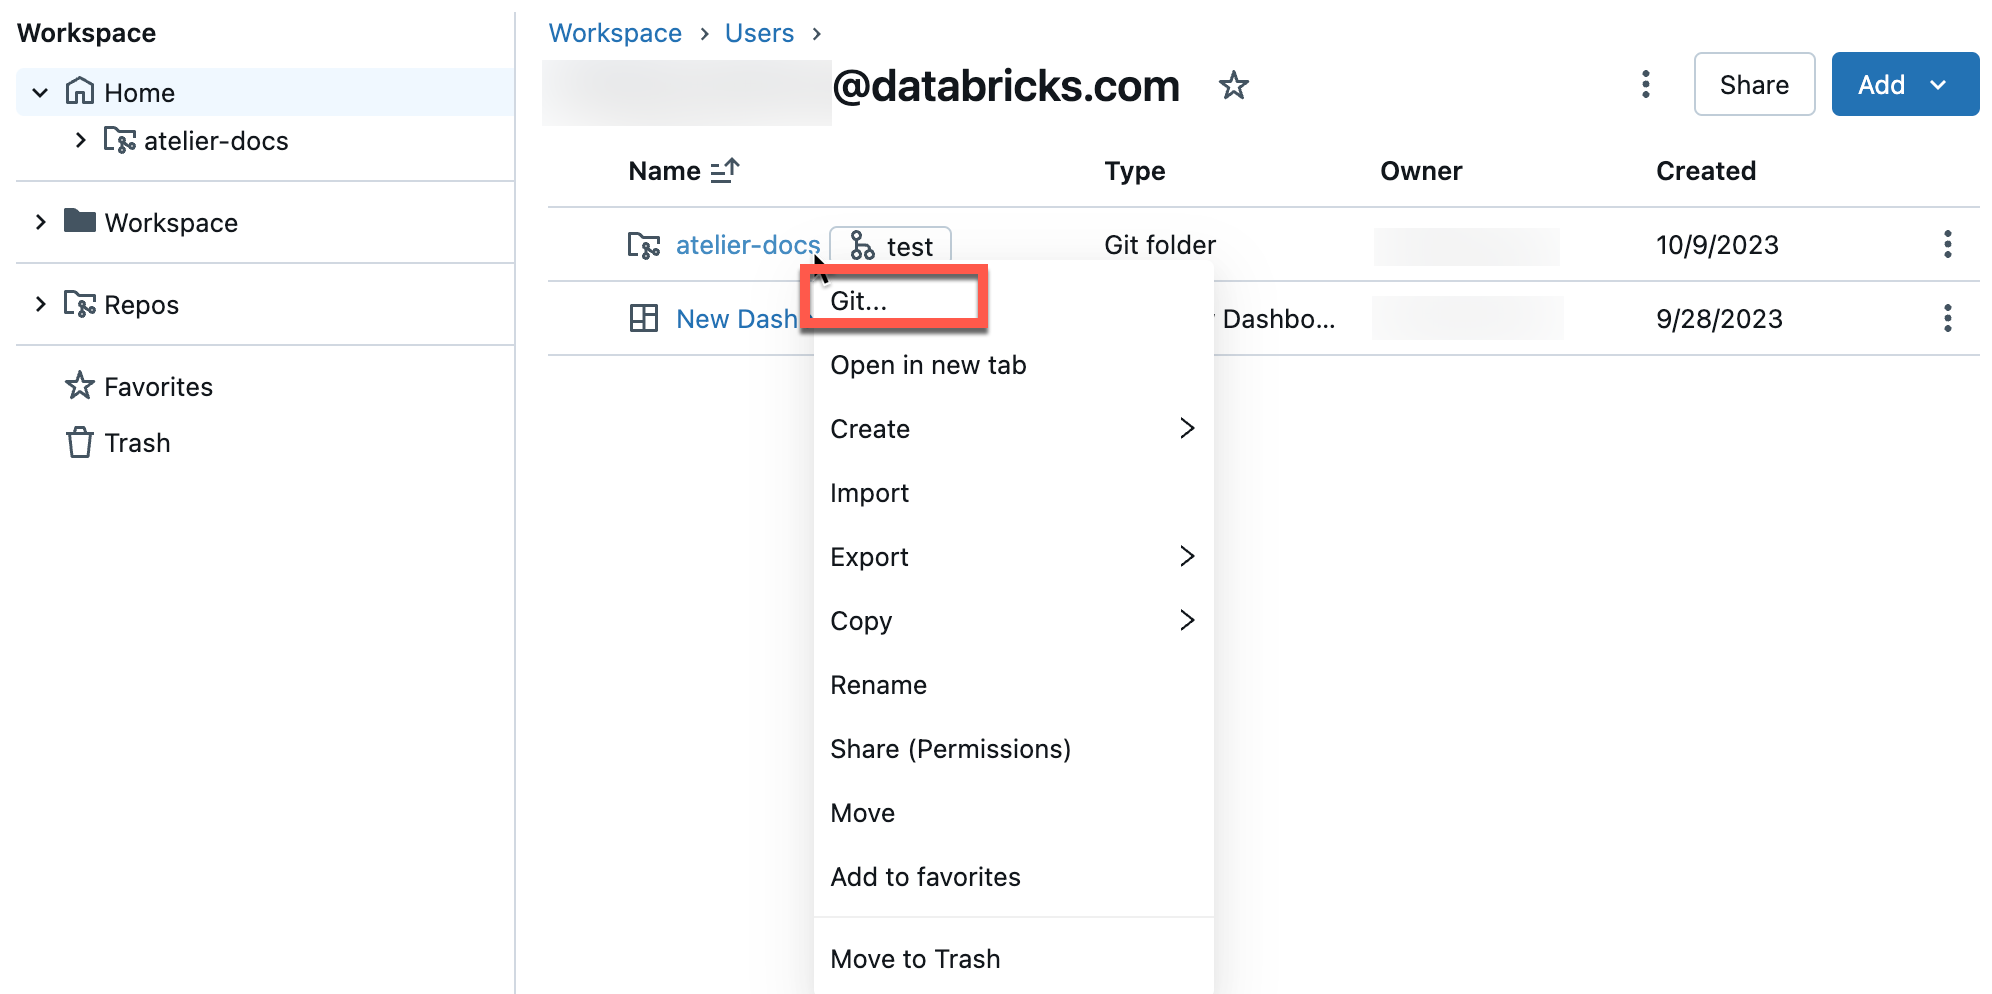
You will see a full-screen dialog where you can perform Git operations.
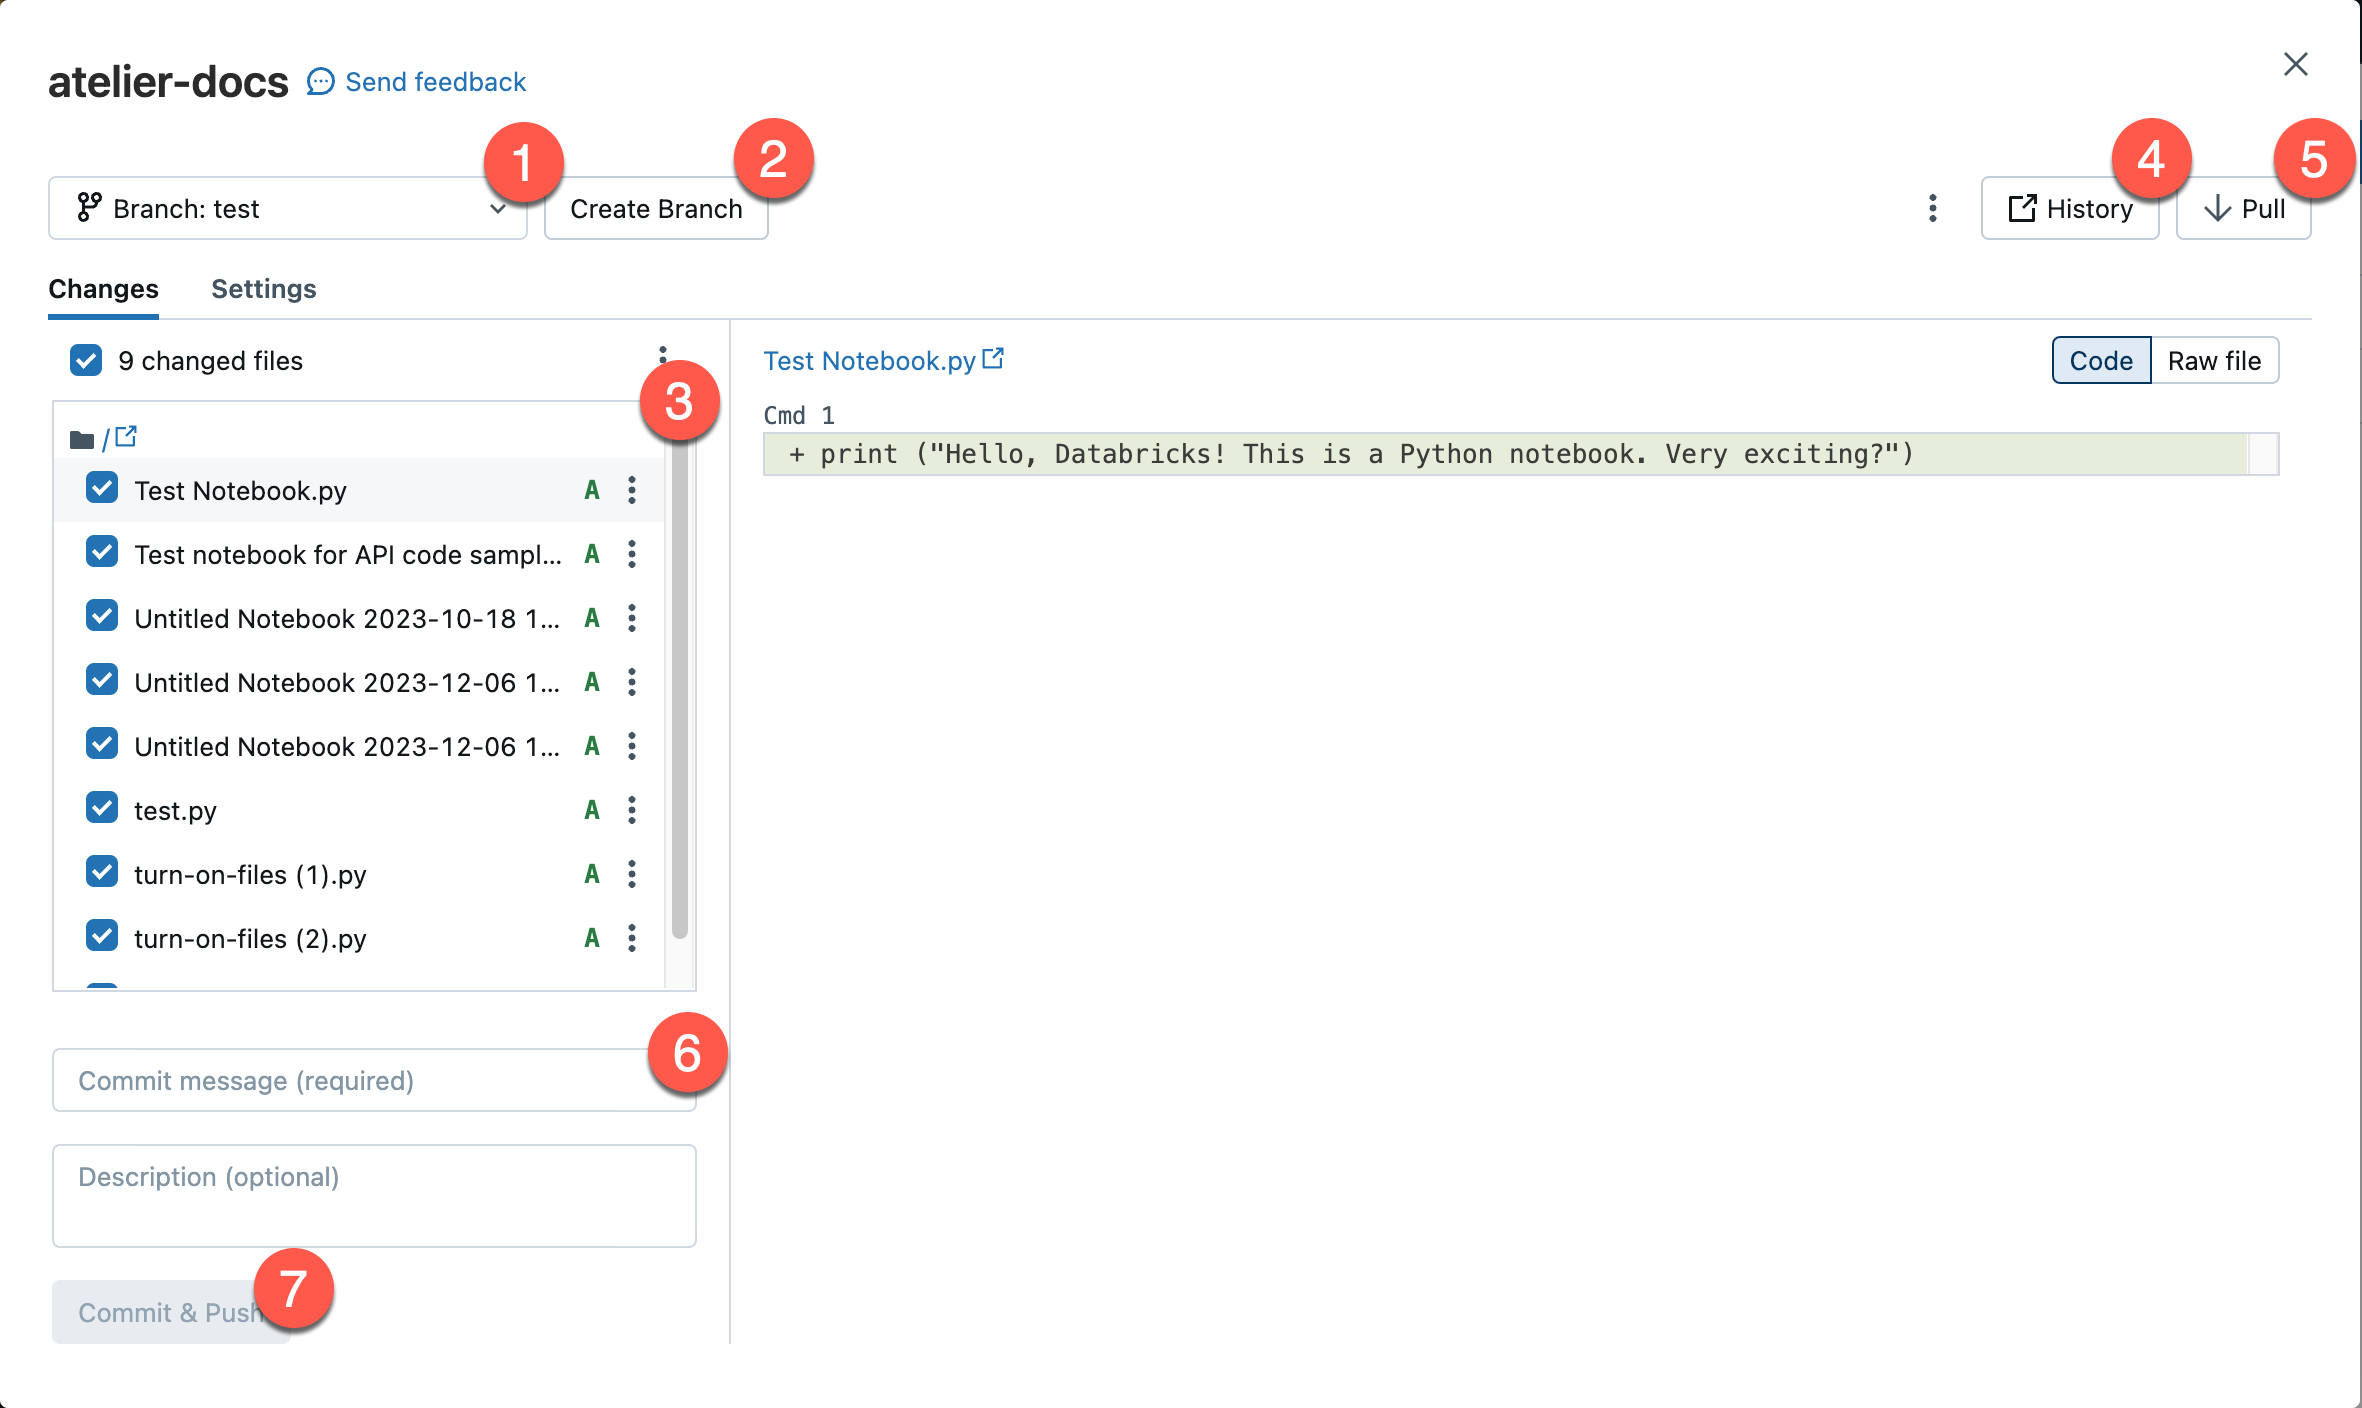
- Your current working branch. You can select other branches here. If other users have access to this Git folder, changing the branch will also change the branch for them if they share the same workspace. See a recommended best practice to avoid this problem.
- The button to create a new branch.
- The list of file assets and subfolders checked into your current branch.
- A button that takes you to your Git provider and shows you the current branch history.
- The button to pull content from the remote Git repository.
- Text box where you add a commit message and optional expanded description for your changes.
- The button to commit your work to the working branch and push the updated branch to the remote Git repository.
Click the ![]() kebab in the upper right to choose from additional Git branch operations, such as a hard reset, a merge, or a rebase.
kebab in the upper right to choose from additional Git branch operations, such as a hard reset, a merge, or a rebase.

This is your home for performing Git operations on your workspace Git folder. You are limited to the Git operations presented in the user interface.
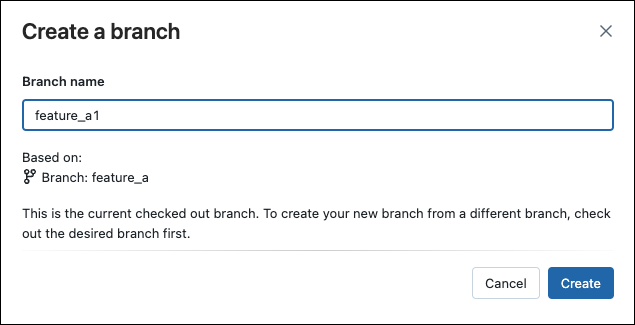
Create a new branch
You can create a new branch based on an existing branch from the Git dialog:
Switch to a different branch
You can switch to (checkout) a different branch using the branch dropdown in the Git dialog:
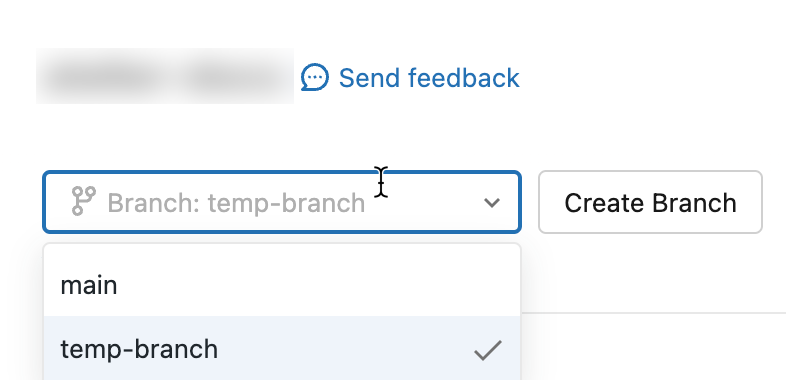
Uncommitted changes on the current branch will carry over and show as uncommitted changes on the new branch, if the uncommitted changes do not conflict with code on the new branch. Discard the changes before or after branch switches if you do not intend to carry over the uncommitted changes.
The local version of a branch can remain present in the associated Git folder for up to 30 days after the remote branch is deleted. To completely remove a local branch in a Git folder, delete the repository.
Important
Switching branches may delete workspace assets when the new branch does not contain these assets. Switching back to the current branch will recreate the deleted assets with new IDs and URLs. This change cannot be reversed.
If you shared or bookmarked assets from a Git folder, be sure the asset exists on the new branch before switching.
Commit and push changes to the remote Git repository
When you have added new notebooks or files, or made changes to existing notebooks or files, the Git folder UI highlights the changes.
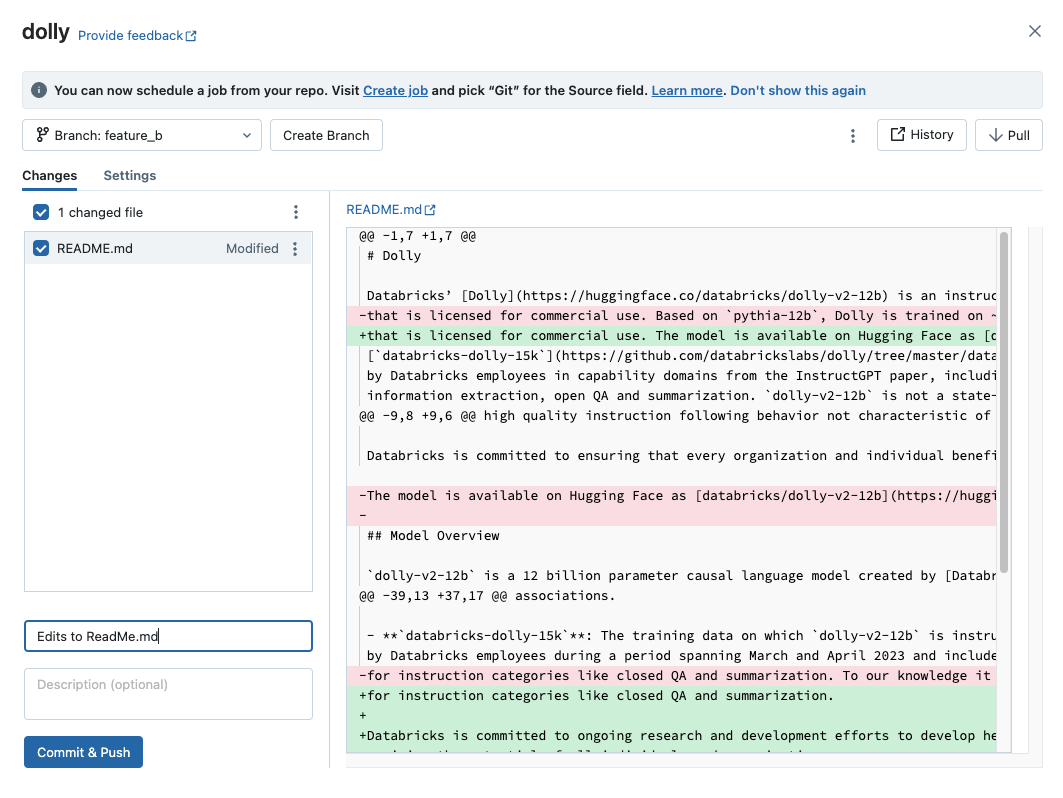
Add a required commit message for the changes, and click Commit & Push to push these changes to the remote Git repository.
If you don't have permission to commit to the default branch (such as the main branch), create a new branch and use your Git provider's interface to create a pull request (PR) to merge it into the default branch.
Note
- Notebook outputs are not included in commits by default when notebooks are saved in source file formats (
.py,.scala,.sql,.r). For information on committing notebook outputs using the IPYNB format, see Control IPYNB notebook output artifact commits
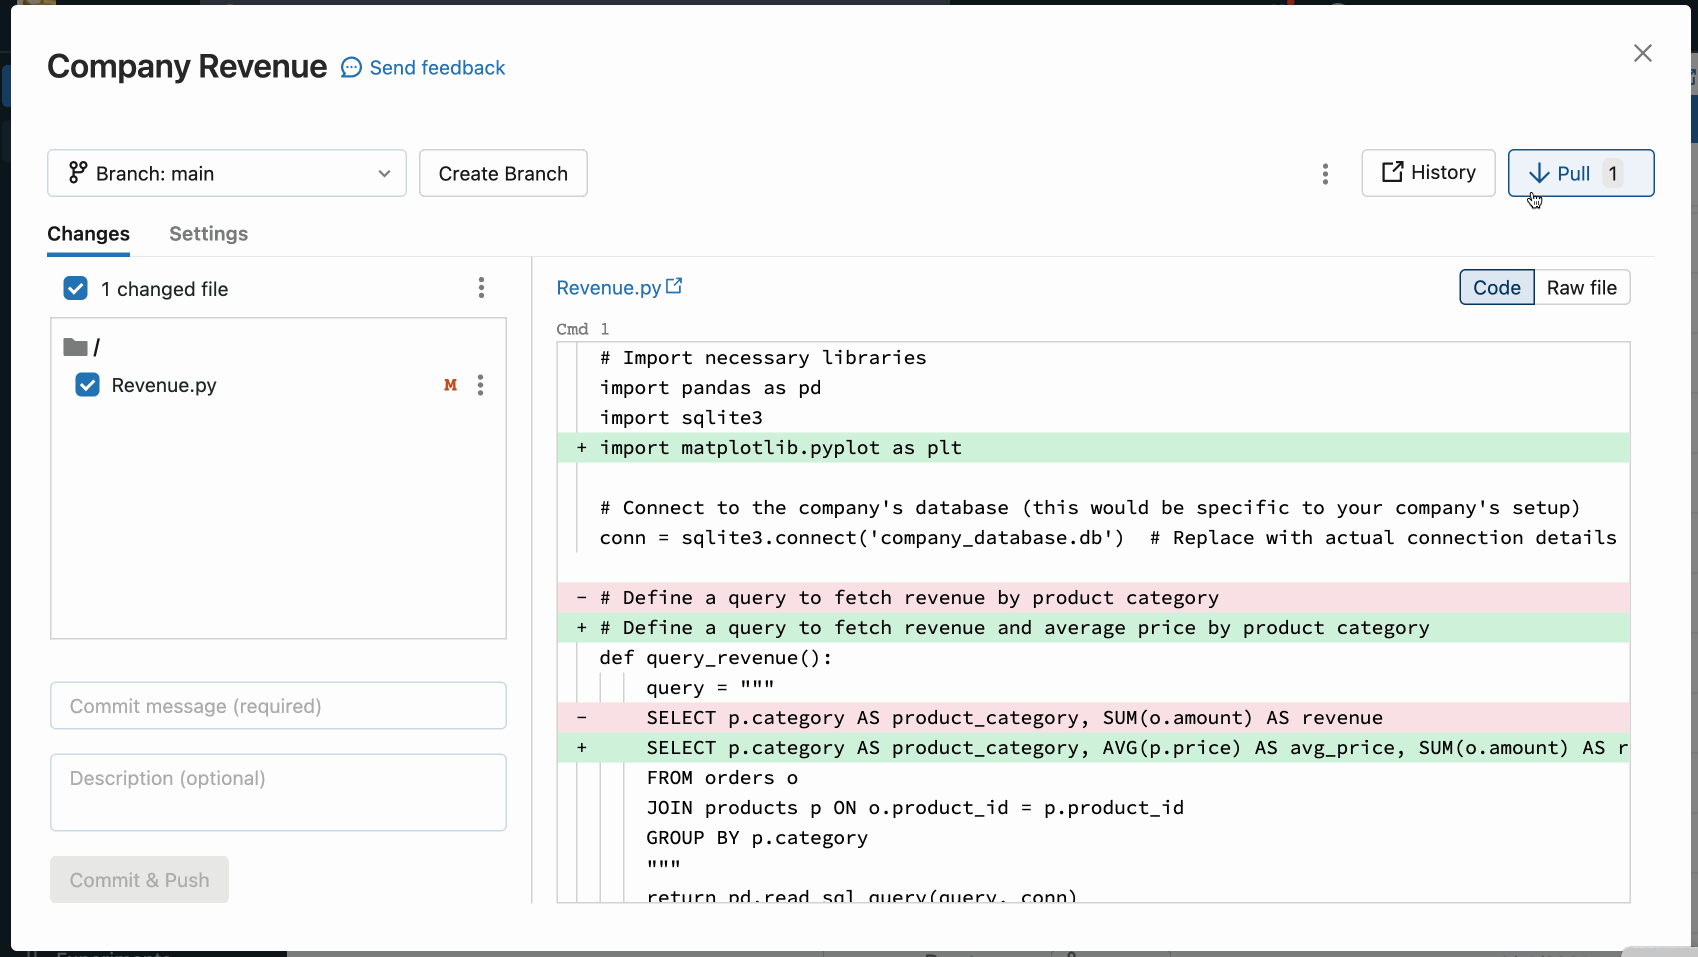
Pull changes from the remote Git repository
To pull changes from the remote Git repository, click Pull in the Git operations dialog. Notebooks and other files are updated automatically to the latest version in your remote Git repository. If the changes pulled from the remote repo conflict with your local changes in Databricks, you need to resolve the merge conflicts.
Important
Git operations that pull in upstream changes clear the notebook state. For more information, see Incoming changes clear the notebook state.
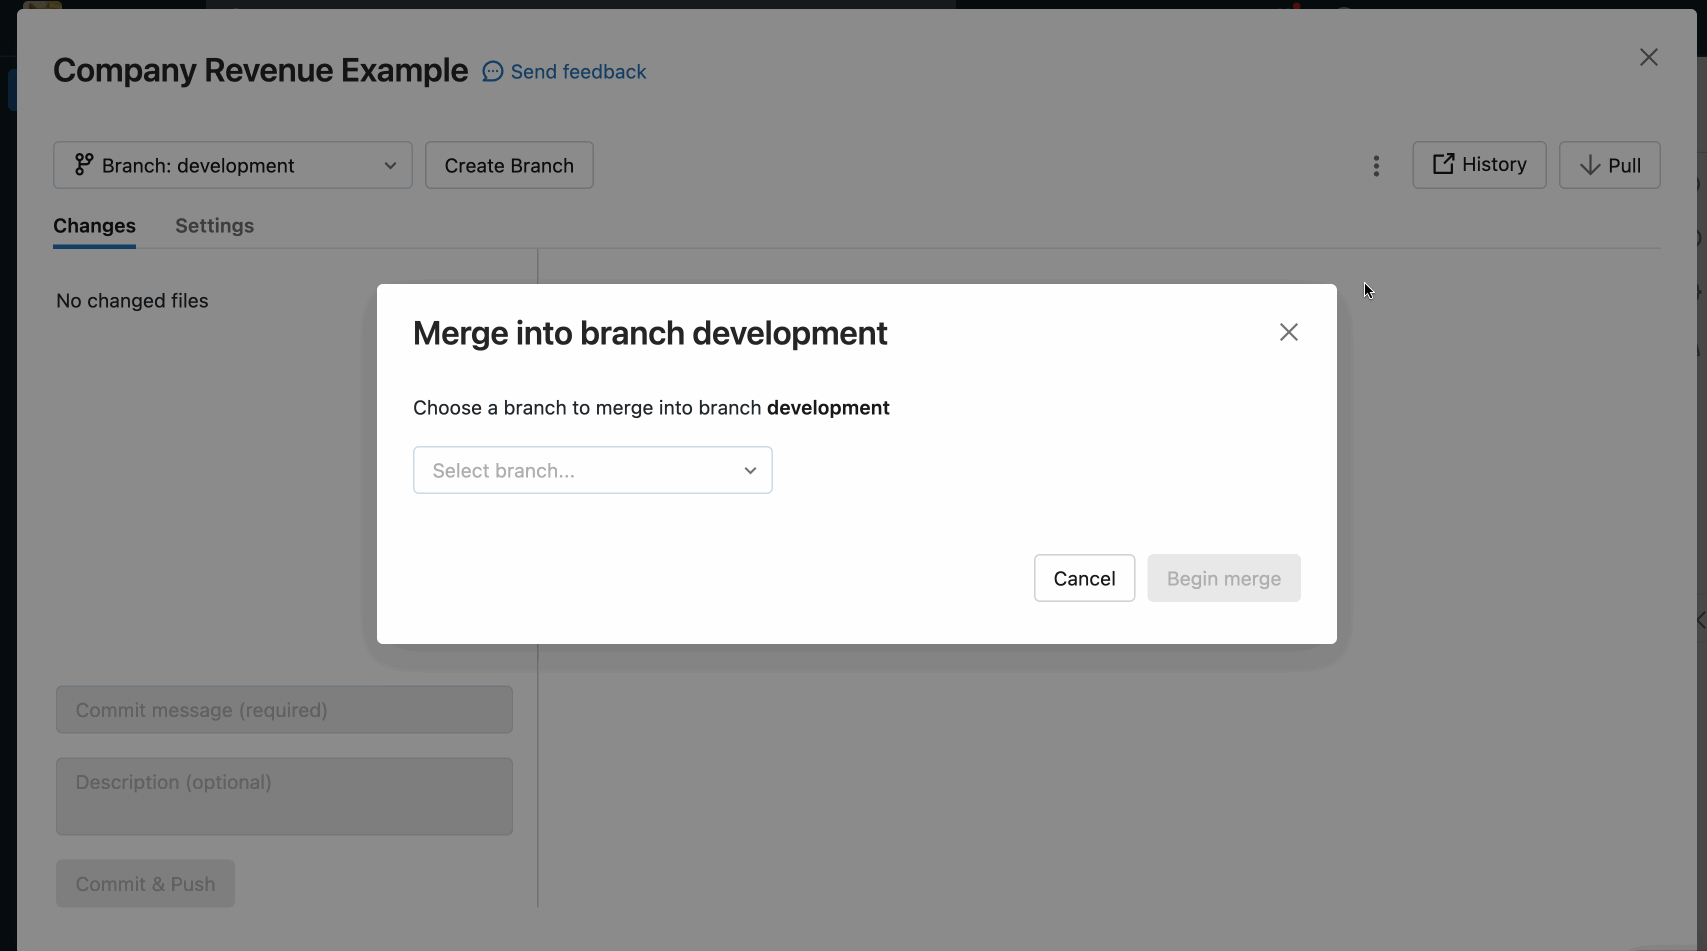
Merge branches
Access the Git Merge operation by selecting it from the ![]() kebab in the upper right of the Git operations dialog.
kebab in the upper right of the Git operations dialog.
The merge function in Databricks Git folders merges one branch into another using git merge. A merge operation is a way to combine the commit history from one branch into another branch; the only difference is the strategy it uses to achieve this. For Git beginners, we recommend using merge (over rebase) because it does not require force pushing to a branch and therefore does not rewrite commit history.
- If there's a merge conflict, resolve it in the Git folders UI.
- If there's no conflict, the merge is pushed to the remote Git repo using
git push.
Rebase a branch on another branch
Access the Git Rebase operation by selecting it from the ![]() kebab menu in the upper right of the Git operations dialog.
kebab menu in the upper right of the Git operations dialog.
Rebasing alters the commit history of a branch. Like git merge, git rebase integrates changes from one branch into another. Rebase does the following:
- Saves the commits on your current branch to a temporary area.
- Resets the current branch to the chosen branch.
- Reapplies each individual commit previously saved on the current branch, resulting in a linear history that combines changes from both branches.
Warning
Using rebase can cause versioning issues for collaborators working in the same repo.
A common workflow is to rebase a feature branch on the main branch.
To rebase a branch on another branch:
From the Branch menu in the Git folders UI, select the branch you want to rebase.
Select Rebase from the kebab menu.

Select the branch you want to rebase on.
The rebase operation integrates changes from the branch you choose here into the current branch.
Databricks Git folders runs git commit and git push --force to update the remote Git repo.
Resolve merge conflicts
Merge conflicts happen when 2 or more Git users attempt to merge changes to the same lines of a file into a common branch and Git cannot choose the “right” changes to apply. Merge conflicts can also occur when a user attempts to pull or merge changes from another branch into a branch with uncommitted changes.
If an operation such as pull, rebase, or merge causes a merge conflict, the Git folders UI shows a list of files with conflicts and options for resolving the conflicts.
You have two primary options:
- Use the Git folders UI to resolve the conflict.
- Abort the Git operation, manually discard the changes in the conflicting file, and try the Git operation again.
When resolving merge conflicts with the Git folders UI, you must choose between manually resolving the conflicts in the editor or keeping all incoming or current changes.
Keep All Current or Take Incoming Changes
If you know you only want to keep all of the current or incoming changes, click the kebab to the right of the file name in your notebook pane and select either Keep all current changes or Take all incoming changes. Click the button with the same label to commit the changes and resolve the conflict.

Tip
Confused about which option to pick? The color of each option matches the respective code changes that it will keep in the file.
Manually Resolving Conflicts
Manual conflict resolution lets you determine which of the conflicting lines should be accepted in the merge. For merge conflicts, you resolve the conflict by directly editing the contents of the file with the conflicts.
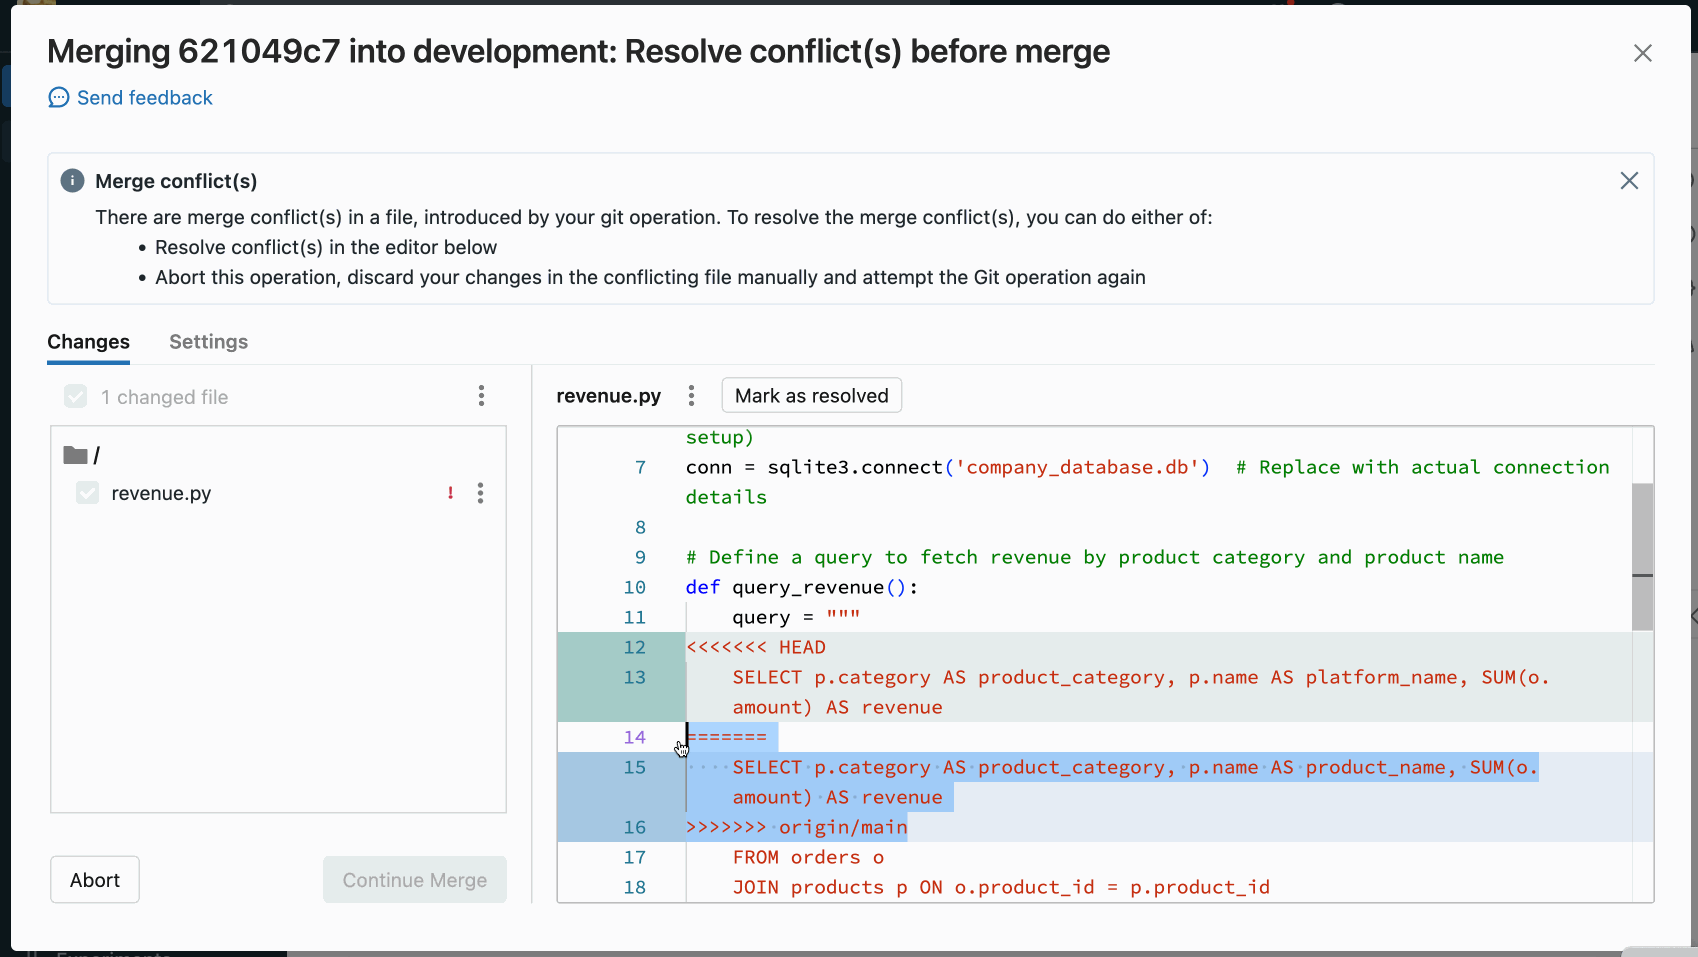
To resolve the conflict, select the code lines you want to preserve and delete everything else, including the Git merge conflict markers. When you're done, select Mark As Resolved.
If you decide you made the wrong choices when resolving merge conflicts, click the Abort button to abort the process and undo everything. Once all conflicts are resolved, click the Continue Merge or Continue Rebase option to resolve the conflict and complete the operation.
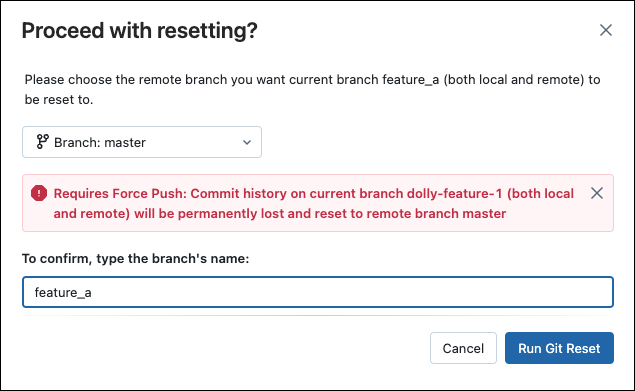
Git reset
In Databricks Git folders, you can perform a Git reset within the Azure Databricks UI. Git reset in Databricks Git folders is equivalent to git reset --hard combined with git push --force.
Git reset replaces the branch contents and history with the most recent state of another branch. You can use this when edits are in conflict with the upstream branch, and you don't mind losing those edits when you reset to the upstream branch. Read more about git reset –hard.
Reset to an upstream (remote) branch
With git reset in this scenario:
- You reset your selected branch (for example,
feature_a) to a different branch (for example,main). - You also reset the upstream (remote) branch
feature_ato main.
Important
When you reset, you lose all uncommitted and committed changes in both the local and remote version of the branch.
To reset a branch to a remote branch:
In the Git folders UI from the Branch menu, choose the branch you want to reset.

Select Reset from the kebab menu.

Select the branch to reset.
Configure sparse checkout mode
Sparse checkout is a client side setting which allows you to clone and work with only a subset of the remote repositories's directories in Databricks. This is especially useful if your repository's size is beyond the Databricks supported limits.
You can use the Sparse Checkout mode when adding (cloning) a new repo.
In the Add Git folder dialog, open Advanced.
Select Sparse checkout mode.
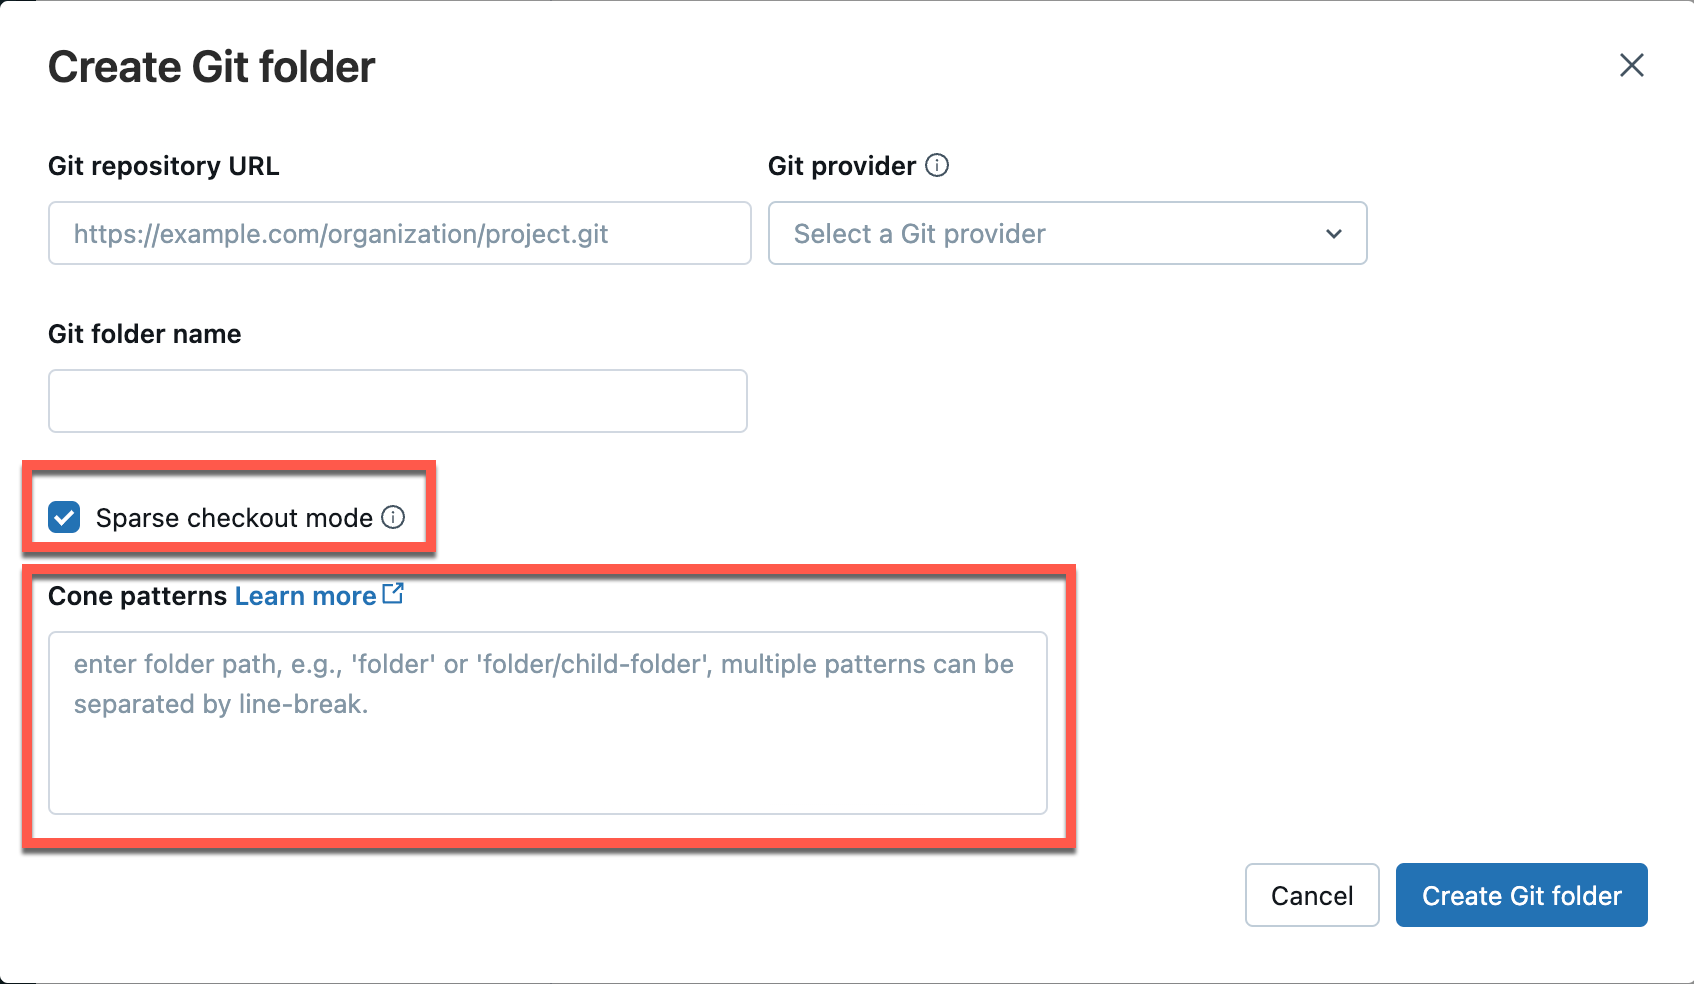
In the Cone patterns box, specify the cone checkout patterns you want. Separate multiple patterns by line breaks.
At this time, you can't disable sparse checkout for a repo in Azure Databricks.
How cone patterns work
To understand how cone pattern works in the sparse checkout mode, see the following diagram representing the remote repository structure.
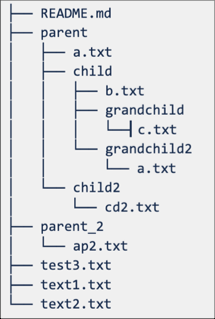
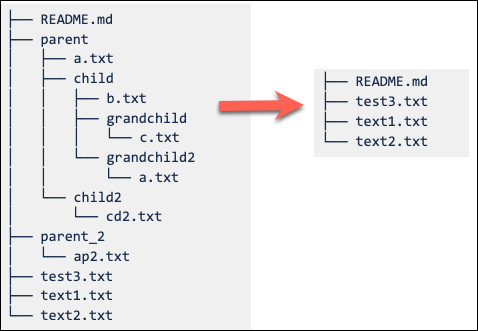
If you select Sparse checkout mode, but do not specify a cone pattern, the default cone pattern is applied. This includes only the files in root and no subdirectories, resulting in a repo structure as following:
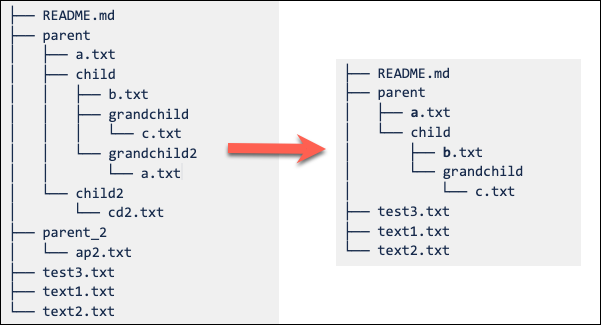
Setting the sparse checkout cone pattern as parent/child/grandchild results in all contents of the grandchild directory being recursively included. The files immediately in the /parent, /parent/child and root directory are also included. See the directory structure in the following diagram:
You can add multiple patterns separated by line breaks.
Note
Exclusion behaviors (!) are not supported in Git cone pattern syntax.
Modify sparse checkout settings
Once a repo is created, the sparse checkout cone pattern can be edited from Settings > Advanced > Cone patterns.
Note the following behavior:
Removing a folder from the cone pattern removes it from Databricks if there are no uncommitted changes.
Adding a folder via editing the sparse checkout cone pattern adds it to Databricks without requiring an additional pull.
Sparse checkout patterns cannot be changed to remove a folder when there are uncommitted changes in that folder.
For example, a user edits a file in a folder and does not commit changes. She then tries to change the sparse checkout pattern to not include this folder. In this case, the pattern is accepted, but the actual folder is not deleted. She needs to revert the pattern to include that folder, commit changes, and then reapply the new pattern.
Note
You can't disable sparse checkout for a repo that was created with Sparse Checkout mode enabled.
Make and push changes with sparse checkout
You can edit existing files and commit and push them from the Git folder. When creating new folders of files, include them in the cone pattern you specified for that repo.
Including a new folder outside of the cone pattern results in an error during the commit and push operation. To fix it, edit the cone pattern to include the new folder you are trying to commit and push.
Patterns for a repo config file
The commit outputs config file uses patterns similar to gitignore patterns and does the following:
- Positive patterns enable outputs inclusion for matching notebooks.
- Negative patterns disable outputs inclusion for matching notebooks.
- Patterns are evaluated in order for all notebooks.
- Invalid paths or paths not resolving to
.ipynbnotebooks are ignored.
Positive pattern: To include outputs from a notebook path folder/innerfolder/notebook.ipynb, use following patterns:
**/*
folder/**
folder/innerfolder/note*
Negative pattern: To exclude outputs for a notebook, check that none of the positive patterns match or add a negative pattern in a correct spot of the configuration file. Negative (exclude) patterns start with !:
!folder/innerfolder/*.ipynb
!folder/**/*.ipynb
!**/notebook.ipynb
Sparse checkout limitation
Sparse checkout currently does not work for Azure DevOps repos larger than 4GB in size.
Add a repo and connect remotely later
To manage and work with Git folders programmatically, use the Git folders REST API.
Delete a Git folder
To remove a Git folder from your workspace:
- Right-click the Git folder and select Move to trash.
- Type the Git folder name to confirm.
- Click Confirm and move to trash.