Note
Access to this page requires authorization. You can try signing in or changing directories.
Access to this page requires authorization. You can try changing directories.
Authorized support contacts can use the Get support form to open a Databricks support case without leaving the workspace. The form collects your issue details, fills in values it can infer, attaches diagnostic files for the affected resources, and suggests an AI-generated solution before you submit.
To open a case in other ways, or to manage cases after you submit them, see Databricks Support.
This page applies only if your organization has purchased a support contract directly from Databricks. If your organization gets support for Azure Databricks from Microsoft under an Azure support plan, open support requests with Microsoft. See Azure support options.
Prerequisites
- Your organization has a Databricks Support contract, and your email address is registered as an authorized support contact. See Requirements for Databricks support.
- You're signed in to a workspace that belongs to the account covered by the contract.
Note
The Get support form isn't available in Azure Government or Azure China workspaces. Open cases by email to help@databricks.com. See By email.
Open the Get support form
Open the form in either of these ways:
- Click your user icon in the top bar of the workspace, then click Get support.
- In the Genie Code pane, click Get Support in the Need additional help? banner.
When you open the form from a Genie Code conversation, the form can fill in more fields from that conversation. See What the form fills in automatically.
The form saves your entries for up to 30 days. If you close and reopen the form, it restores your entries, except for screenshots and attachments, which you must upload again. To start over, click Clear all fields.
What the form fills in automatically
The form fills in fields it can infer that you haven't already entered. You can change any filled-in value before you submit.
| Information | Source |
|---|---|
| Workspace, environment, business impact, and preferred time zone | The current workspace and default values. |
| Product | The page you opened the form from. For example, opening the form from a job run page selects Runs. |
| Product, sub-feature, issue, and description | Your Genie Code conversation, when you open the form from Genie Code with no saved entries. The form fills in these fields only when it's confident in the match. |
| Resource fields | The form looks for resource URLs and IDs in this order: your description, the page you opened the form from, and your Genie Code conversation if you opened the form from Genie Code. It verifies that each resource exists before filling it in. |
| Databricks Runtime version | The selected cluster. The form selects Not applicable when the run or notebook doesn't use classic compute, such as serverless compute. |
| Diagnostic files | The resources you identify. |
| Genie Code chat history | When you open the form from Genie Code, the current conversation. When you open the form from the user menu, your Genie Code conversations in the workspace from the past four hours. For long conversations, the form includes only the most recent messages. |
Before the form adds chat history to the case, it runs automated redaction designed to remove credentials, tokens, and other sensitive content. If redaction fails, the process is designed to leave out the chat history entirely.
To improve how the form fills in fields, include full resource URLs in your description, or open the form from the page of the affected resource, such as a job run or cluster.
Complete the form
The form has four steps: describe the issue, gather diagnostics, review the suggested solution, and review and submit.
Describe the issue
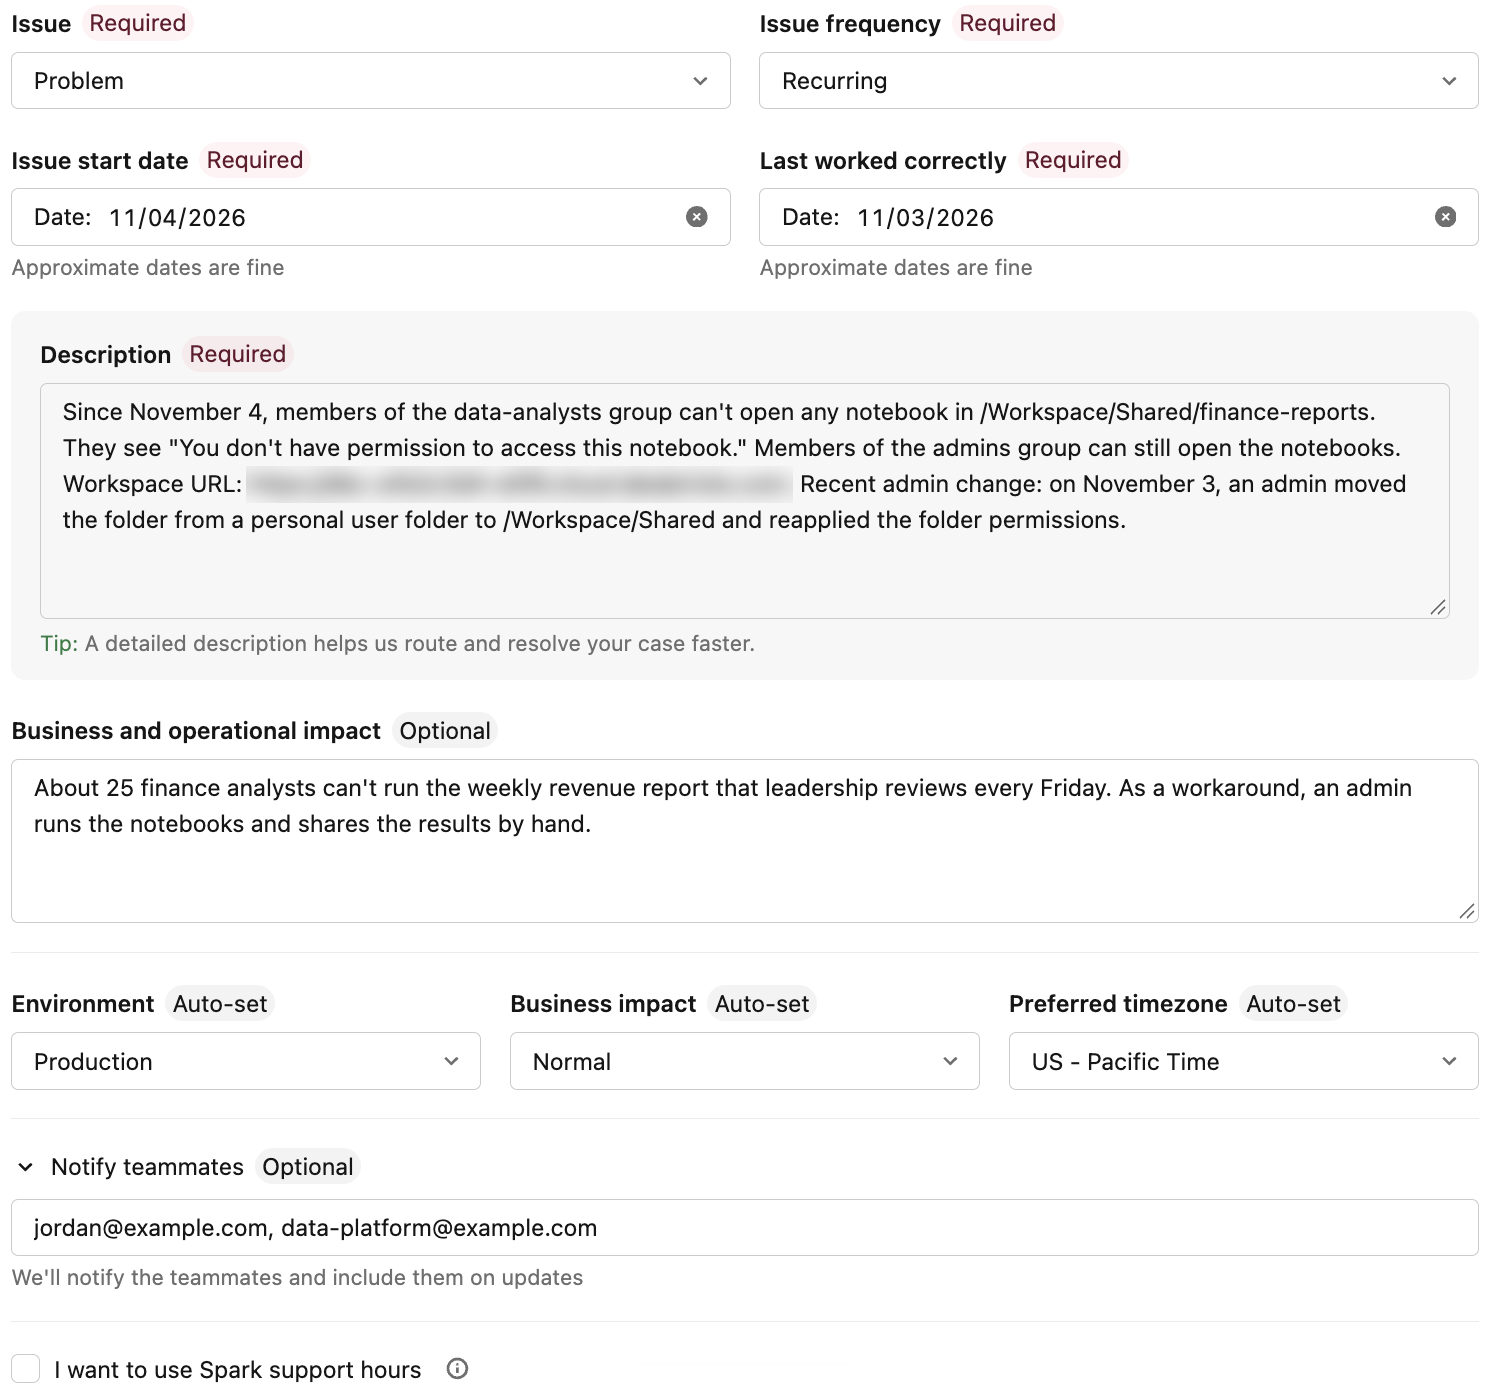
The Describe issue step has these fields:
| Field | Required | Description |
|---|---|---|
| Workspace | Yes | The affected workspace. Defaults to the current workspace. |
| Product | Yes | The area of Azure Databricks where the issue occurs. |
| Sub-feature | Yes, if available | The part of the product where the issue occurs. Required when the selected product has sub-features. |
| Issue | Yes | Problem, Question, Feature request, or Other. |
| Issue frequency | Yes | One-time, Recurring, Intermittent, or Not sure / other. |
| Issue start date and Last worked correctly | Yes | Approximate dates are acceptable. |
| Description | Yes | What happened, what you expected, and any error messages. Appears after you select a product and, if required, a sub-feature. Include resource URLs or IDs so the form can fill in the resource fields. See Gather diagnostics. You can paste screenshots into this field. |
| Business and operational impact | Yes, if business impact is High, Urgent, or Mission Critical | How the issue affects your business, such as the consequence, its scope, and the teams, processes, customers, or use cases affected. Appears with Description. |
| Environment | No (auto-set) | Proof of concept, Development, or Production (default). |
| Business impact | No (auto-set) | Low, Normal (default), High, or Urgent. Accounts with Mission Critical support can also select Mission Critical. For time-sensitive issues, select Urgent or higher, and describe the effect in Business and operational impact. See Escalate a support case. |
| Preferred timezone | No (auto-set) | The time zone Databricks Support uses to schedule engagement. Defaults to your saved preference, or to your browser's time zone if you don't have a saved preference. |
| Notify teammates | No | Email addresses of colleagues to add to the case. Added colleagues receive an email notification for each new comment on the case. |
To complete the step:
- Fill in the required fields, and change any auto-set values that don't match your issue.
- If you want help with your own code, such as debugging an Apache Spark application or tuning job performance, select I want to use Spark support hours. This option draws on your account's Spark and AI assistance hours. Leave it cleared for issues with the Azure Databricks platform itself.
- Click Next.
Gather diagnostics
Under Resource and execution details, the form shows resource fields for the product you selected:
| Product | Resource fields |
|---|---|
| Notebooks | Notebook URL, cluster ID, Databricks Runtime version |
| Compute, Pipelines | Cluster ID, Databricks Runtime version |
| Jobs, Runs, Data Ingestion | Job run URL, cluster ID, Databricks Runtime version |
| SQL Editor, Queries, Alerts, Query History | Query URL, SQL warehouse ID |
| Dashboards, Genie, SQL Warehouses | SQL warehouse ID |
| Unity Catalog | Securable type and name |
| Serving, Unity Gateway | Serving endpoint name |
| Agents | Serving endpoint name, registered model name |
| Playground, Models | Registered model name |
| Experiments | Experiment ID or path |
| Lakebase | Database instance name or ID |
| Databricks Apps | App name or URL |
| Connectivity | Cluster ID, SQL warehouse ID |
| Other | Job run URL, notebook URL, cluster ID, Databricks Runtime version, SQL warehouse ID |
Workspace, Discover, Marketplace, Features, Lakewatch, Billing, Security, and Authentication have no resource fields.
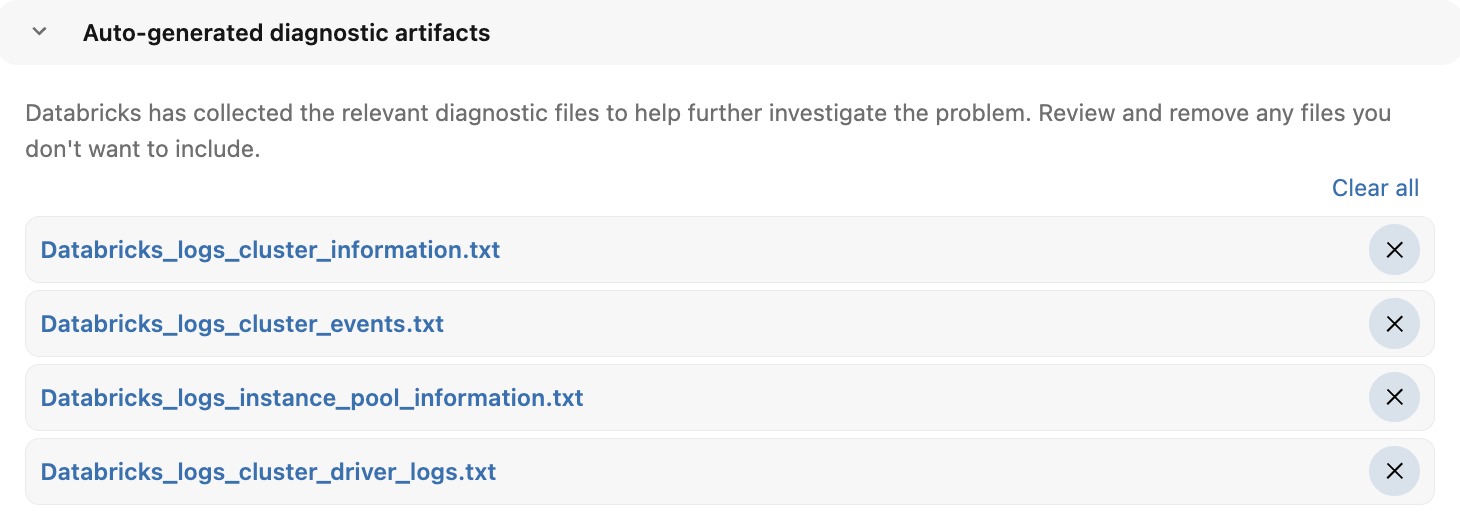
Resource fields are optional. When you identify a resource, the form generates diagnostic files that help Databricks Support resolve your case faster, and lists them under Auto-generated diagnostic artifacts:
| Resource | Diagnostic files include |
|---|---|
| Cluster | Cluster configuration, cluster events, instance pool information, and driver logs |
| Job run | Run information, task outputs, and SQL queries run by the job. Requires the full job run URL. |
| Query | Query information |
| SQL warehouse | Warehouse configuration, events, recent statements, failed queries, and a failure summary |
| Unity Catalog securable | Object information, effective permissions, and a metastore summary. Requires the full dotted name, such as my_catalog.my_schema.my_table. |
| Serving endpoint | Endpoint events, build logs, and serving logs |
To complete the step:
- Under Resource and execution details, identify the resources involved in the issue. The cluster, job run, SQL warehouse, and Databricks Runtime fields are searchable pickers that list matching resources in the workspace. If a resource doesn't apply, select Not applicable where available, such as for the Databricks Runtime version when the issue runs on serverless compute.
- Review the files under Auto-generated diagnostic artifacts. To view a file, click it. To exclude a file from the case, click
 next to it.
- Optionally, under Additional details, describe how to reproduce the issue in Repro details, and upload screenshots and attachments. Each file can be up to 10 MB.
- Click Next. If any resource fields are blank, the form asks you to fill them in. To add them, click Back to step 2. To skip them, click Continue to step 3.
Review the suggested solution
If Genie Code is enabled in your workspace, the form generates a suggested solution from the information you entered. The suggestion is AI-generated and might contain mistakes. Verify it before you act on it.
- To continue troubleshooting with Genie Code, click Try Solution with Genie. Genie Code opens a new conversation that contains your case details and the suggested solution. The form saves your entries.
- To continue to submission, click Next.
- If the form can't generate a suggestion, click Retry.
Review and submit
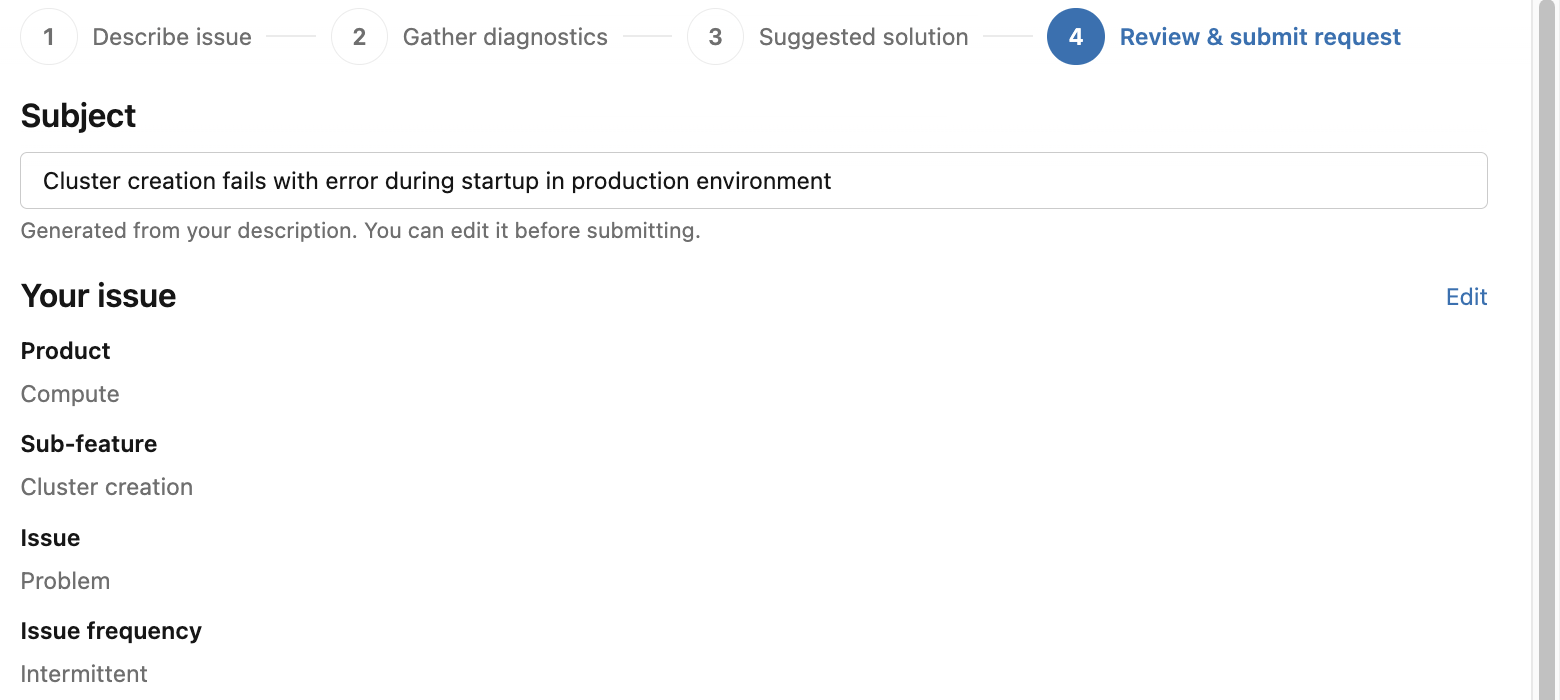
Review the Subject, which the form generates from your description. You can edit it before you submit. The subject can be up to 255 characters.
Review your entries and the diagnostic files the form collected. To change a section, click Edit.
If Genie Code is enabled and your description suggests a higher business impact than you selected, the form suggests a higher level. To accept it, click the button that names the suggested level, such as Change to High. To keep your selection, close the notice.
Click Submit request. The description and repro details have a combined limit of 32,000 characters, including details the form adds automatically. If you go over the limit, shorten either field.
Read the Terms and conditions carefully before you accept them, and then click Accept and submit.
Track your support case
After you submit your case, Databricks Support receives it, including the diagnostic files and any attachments. The Success dialog includes a View support case link that opens the case in the Help Center. You receive email updates for the case, and you can respond by email or in the Help Center.
To view, respond to, escalate, or close cases, see Databricks Support.