Note
Access to this page requires authorization. You can try signing in or changing directories.
Access to this page requires authorization. You can try changing directories.
Malware scanning can be configured to send scanning results to the following:
- Event Grid custom topic - for near-real time automatic response based on every scanning result.
- Log Analytics workspace - for storing every scan result in a centralized log repository for compliance and audit.
Learn more on how to set up response for malware scanning results.
Tip
We recommend you try the Ninja training instructions, a hands-on lab, to try out malware scanning in Defender for Storage, using detailed step-by-step instructions on how to test malware scanning end-to-end with setting up responses to scanning results. This is part of the 'labs' project that helps customers get ramped up with Microsoft Defender for Cloud and provides hands-on practical experience with its capabilities.
Set up logging for malware scanning
For each storage account enabled with malware scanning, you can define a Log Analytics workspace destination to store every scan result in a centralized log repository that is easy to query.
Before sending scan results to Log Analytics, create a Log Analytics workspace or use an existing one.
To configure the Log Analytics destination, navigate to the relevant storage account, open the Microsoft Defender for Cloud tab, and select the settings to configure.

This configuration can be performed using REST API as well:
Request URL:
PUT
https://management.azure.com/subscriptions/{subscriptionId}/resourceGroups/{resourceGroup}/providers/Microsoft.Storage/storageAccounts/{accountName}/providers/Microsoft.Security/DefenderForStorageSettings/current/providers/Microsoft.Insights/diagnosticSettings/service?api-version=2021-05-01-preview
Request Body:
{
    "properties": {
        "workspaceId": "/subscriptions/{subscriptionId}/resourcegroups/{resourceGroup}/providers/microsoft.operationalinsights/workspaces/{workspaceName}",
        "logs": [
            {
                "category": "ScanResults",
                "enabled": true,
                "retentionPolicy": {
                    "enabled": true,
                    "days": 180
                }
            }
        ]
    }
}
Note
The Azure portal lists Log Analytics workspaces from the same subscription as the storage account. The REST API can be used to configure a Log Analytics workspace from a different subscription of the same tenant, as described earlier.
Scan results are recorded in a table named StorageMalwareScanningResults. This table is created when the first scan result is recorded.
Set up Event Grid for malware scanning
For each storage account enabled with malware scanning, you can configure to send every scan result using an Event Grid event for automation purposes.
To configure Event Grid for sending scan results, you first need to create a custom topic in advance. Refer to the Event Grid documentation on creating custom topics for guidance. Ensure that the destination Event Grid custom topic is created in the same region as the storage account from which you want to send scan results.
To configure the Event Grid custom topic destination, go to the relevant storage account, open the Microsoft Defender for Cloud tab, and select the settings to configure.
Note
When you set an Event Grid custom topic, you should set Override Defender for Storage subscription-level settings to On to make sure it overrides the subscription-level settings.

Note
The Azure portal lists Event Grid topics from the same subscription as the storage account. The REST API can be used to configure an Event Grid topic from a different subscription of the same tenant, as described in the following section. This configuration can be performed using REST API as well:
Request URL:
PUT
https://management.azure.com/subscriptions/{subscriptionId}/resourceGroups/{resourceGroup}/providers/Microsoft.Storage/storageAccounts/{accountName}/providers/Microsoft.Security/DefenderForStorageSettings/current?api-version=2022-12-01-preview
Request Body:
{
    "properties": {
        "isEnabled": true,
        "malwareScanning": {
            "onUpload": {
                "isEnabled": true,
                "capGBPerMonth": 10000
            },
            "scanResultsEventGridTopicResourceId": "/subscriptions/{subscriptionId}/resourceGroups/{resourceGroup}/providers/Microsoft.EventGrid/topics/{EventGridTopicName}"
        },
        "sensitiveDataDiscovery": {
            "isEnabled": true
        },
        "overrideSubscriptionLevelSettings": true
    }
}
Override Defender for Storage subscription-level settings
The subscription-level settings inherit Defender for Storage settings on each storage account in the subscription. Use Override Defender for Storage subscription-level settings to configure settings for individual storage accounts different from those configured on the subscription level.
Overriding the settings of the subscriptions are used for the following scenarios:
- Enable/disable the Malware scanning or the Data sensitivity threat detection features.
- Configure custom settings for malware scanning.
- Disable Microsoft Defender for Storage on specific storage accounts.
Note
We recommend that you enable Defender for Storage on the entire subscription to protect all existing and future storage accounts in it. However, there are some cases where you would want to exclude specific storage accounts from Defender protection. If you decide to exclude specific storage accounts, follow the steps in the following section to use the override setting and then disable the relevant storage account. If you're using Defender for Storage (classic), you can also exclude storage accounts.
Azure portal
To configure the settings of individual storage accounts different from those configured on the subscription level using the Azure portal:
Sign in to the Azure portal.
Navigate to your storage account that you want to configure custom settings.
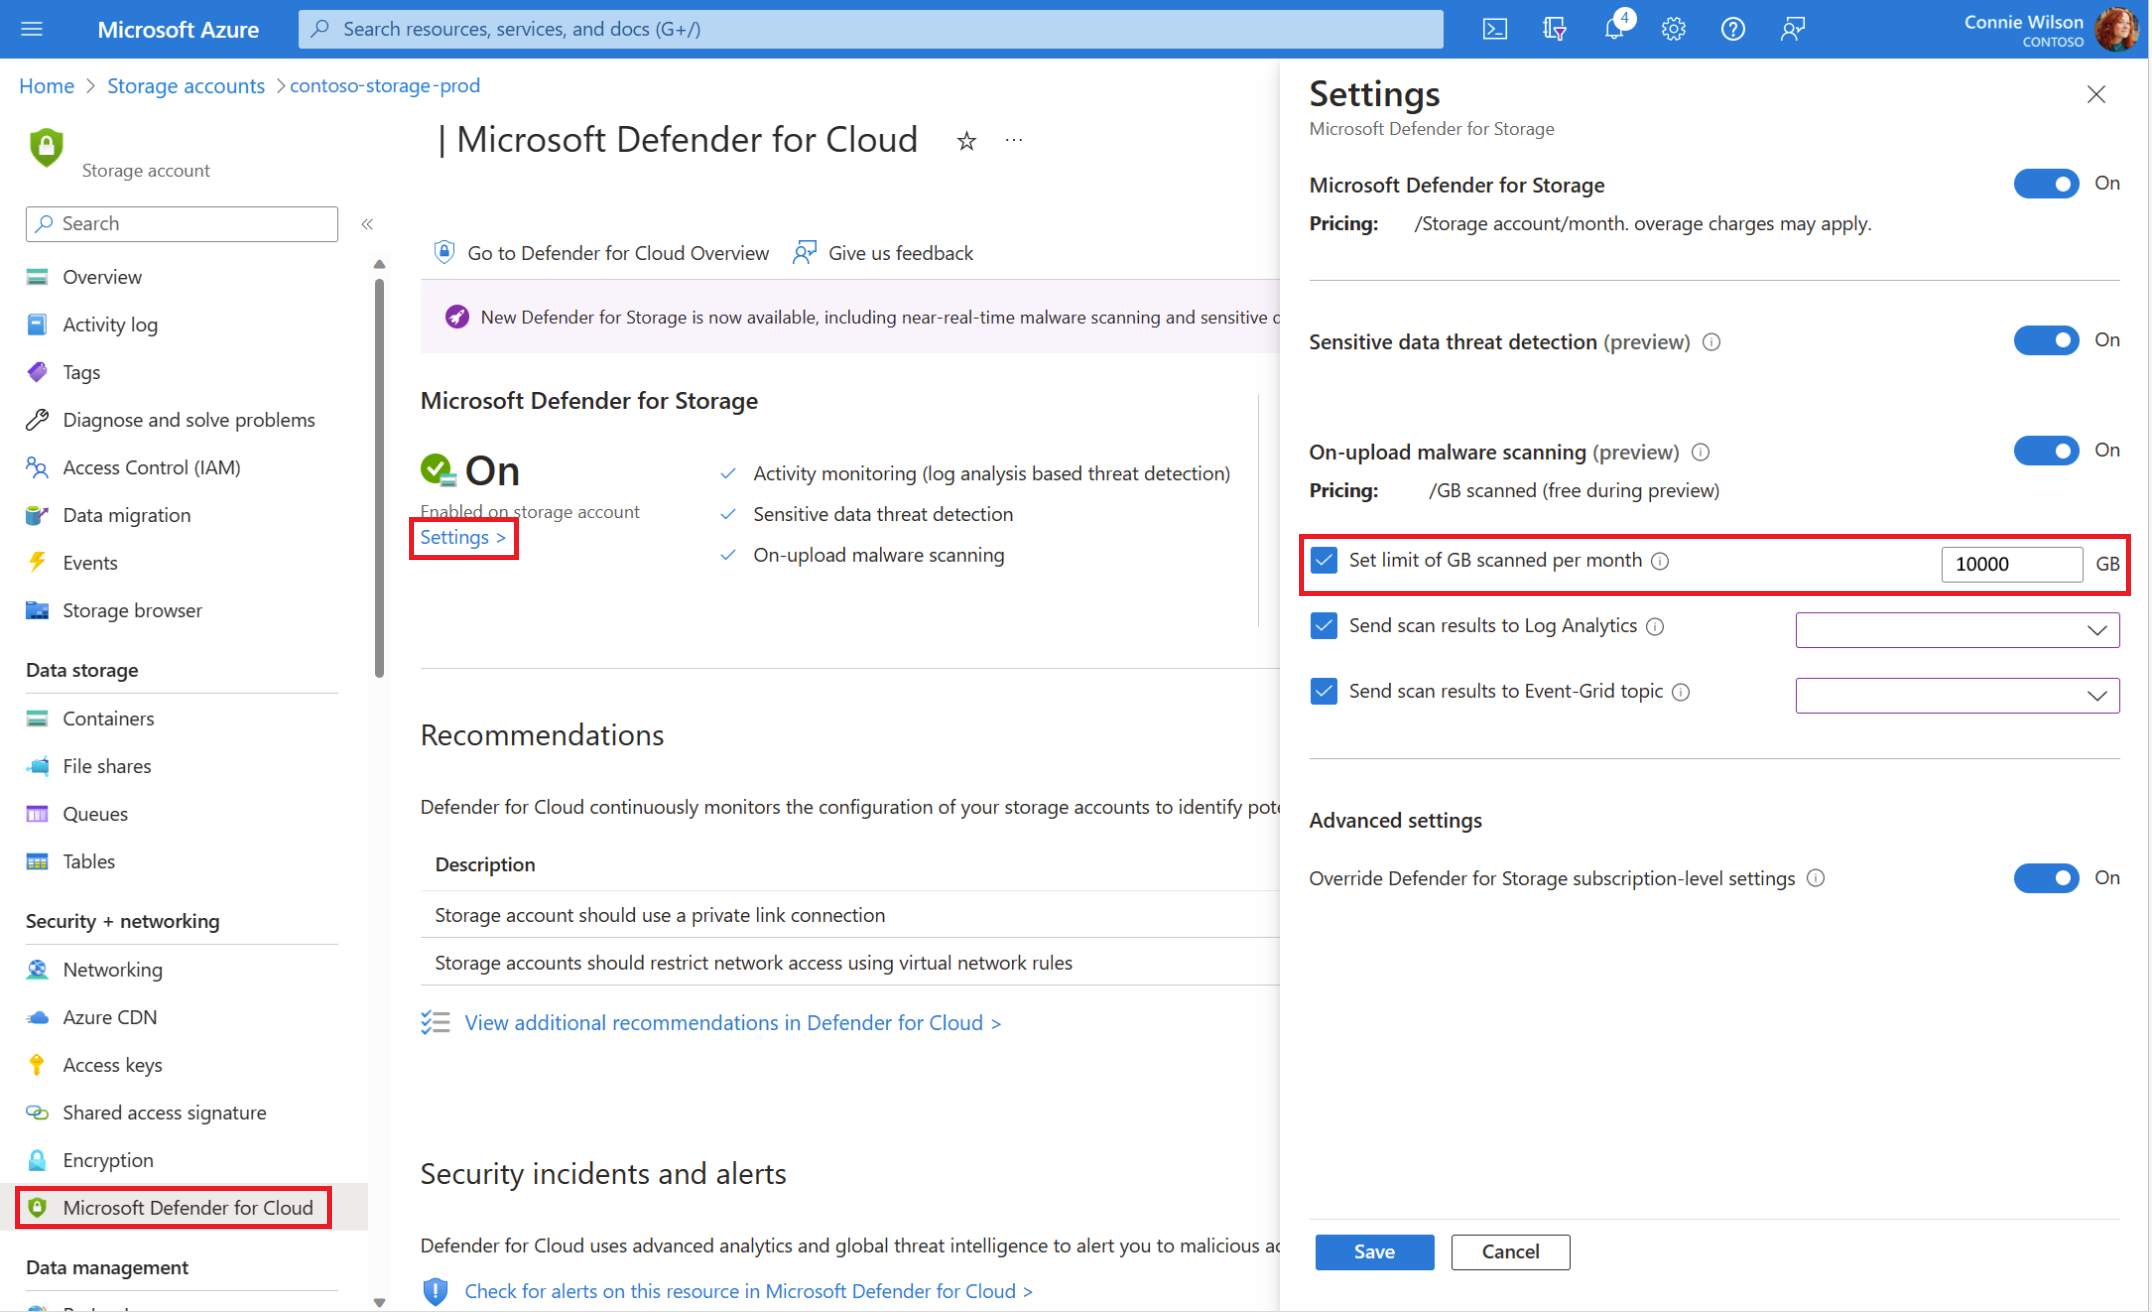
In the storage account menu, in the Security + networking section, select Microsoft Defender for Cloud.
Select Settings in Microsoft Defender for Storage.
Set the status of Override Defender for Storage subscription-level settings (under Advanced settings) to On. This ensures that the settings are saved only for this storage account and aren't overrun by the subscription settings.
Configure the settings you want to change:
To enable malware scanning or sensitive data threat detection, set the status to On.
To modify the settings of malware scanning:
Switch the On-upload malware scanning to On if it isn't already enabled.
To adjust the monthly threshold for malware scanning in your storage accounts, you can modify the parameter called Set limit of GB scanned per month to your desired value. This parameter determines the maximum amount of data that can be scanned for malware each month, specifically for each storage account. If you wish to allow unlimited scanning, you can uncheck this parameter. By default, the limit is set at 10,000 GB.
To disable Defender for Storage on this storage account, set the status of Microsoft Defender for Storage to Off.
Select Save.

REST API
To configure the settings of individual storage accounts different from those configured on the subscription level using REST API:
Create a PUT request with this endpoint. Replace the subscriptionId, resourceGroupName, and accountName in the endpoint URL with your own Azure subscription ID, resource group, and storage account names accordingly.
Request URL:
PUT
https://management.azure.com/subscriptions/{subscriptionId}/resourceGroups/{resourceGroupName}/providers/Microsoft.Storage/storageAccounts/{accountName}/providers/Microsoft.Security/DefenderForStorageSettings/current?api-version=2022-12-01-preview
Request Body:
{
    "properties": {
        "isEnabled": true,
        "malwareScanning": {
            "onUpload": {
                "isEnabled": true,
                "capGBPerMonth": 10000
            }
        },
        "sensitiveDataDiscovery": {
            "isEnabled": true
        },
        "overrideSubscriptionLevelSettings": true
    }
}
To enable malware scanning or sensitive data threat detection, set the value of isEnabled to true under the relevant features.
To modify the settings of malware scanning, edit the relevant fields under onUpload, make sure the value of isEnabled is true. If you want to permit unlimited scanning, assign the value -1 to the capGBPerMonth parameter.
To disable Defender for Storage on this storage accounts, use the following request body:
{
    "properties": {
        "isEnabled": false,
        "overrideSubscriptionLevelSettings": true
    }
}
Make sure you add the parameter overrideSubscriptionLevelSettings and its value is set to true. This ensures that the settings are saved only for this storage account and aren't overrun by the subscription settings.
Next step
Learn more about malware scanning settings.