Review security recommendations
In Microsoft Defender for Cloud, resources and workloads are assessed against built-in and custom security standards enabled in your Azure subscriptions, AWS accounts, and GCP projects. Based on those assessments, security recommendations provide practical steps to remediate security issues, and improve security posture.
Defender for Cloud proactively utilizes a dynamic engine which assesses the risks in your environment while taking into account the potential for the exploitation and the potential business impact to your organization. The engine prioritizes security recommendations based on the risk factors of each resource, which are determined by the context of the environment, including the resource's configuration, network connections, and security posture.
Prerequisites
- You must enable Defender CSPM on your environment.
Note
Recommendations are included by default with Defender for Cloud, but you will not be able to see risk prioritization without Defender CSPM enabled on your environment.
Review recommendation details
It's important to review all of the details related to a recommendation before trying to understand the process needed to resolve the recommendation. We recommend ensuring that all of the recommendation details are correct before resolving the recommendation.
To review a recommendation's details:
Sign in to the Azure portal.
Navigate to Defender for Cloud > Recommendations.
Select a recommendation.
In the recommendation page, review the details:
- Risk level - The exploitability and the business impact of the underlying security issue, taking into account environmental resource context such as: Internet exposure, sensitive data, lateral movement, and more.
- Risk factors - Environmental factors of the resource affected by the recommendation, which influence the exploitability and the business impact of the underlying security issue. Examples for risk factors include internet exposure, sensitive data, lateral movement potential.
- Resource - The name of the affected resource.
- Status - The status of the recommendation. For example, unassigned, on time, overdue.
- Description - A short description of the security issue.
- Attack Paths - The number of attack paths.
- Scope - The affected subscription or resource.
- Freshness - The freshness interval for the recommendation.
- Last change date - The date this recommendation last had a change
- Severity - The severity of the recommendation (High, Medium, or Low). More details below.
- Owner - The person assigned to this recommendation.
- Due date - The assigned date the recommendation must be resolved by.
- Tactics & techniques - The tactics and techniques mapped to MITRE ATT&CK.
Explore a recommendation
You can perform many actions to interact with recommendations. If an option isn't available, it isn't relevant for the recommendation.
To explore a recommendation:
Sign in to the Azure portal.
Navigate to Defender for Cloud > Recommendations.
Select a recommendation.
In the recommendation, you can perform the following actions:
Select Open query to view detailed information about the affected resources using an Azure Resource Graph Explorer query.
Select View policy definition to view the Azure Policy entry for the underlying recommendation (if relevant).
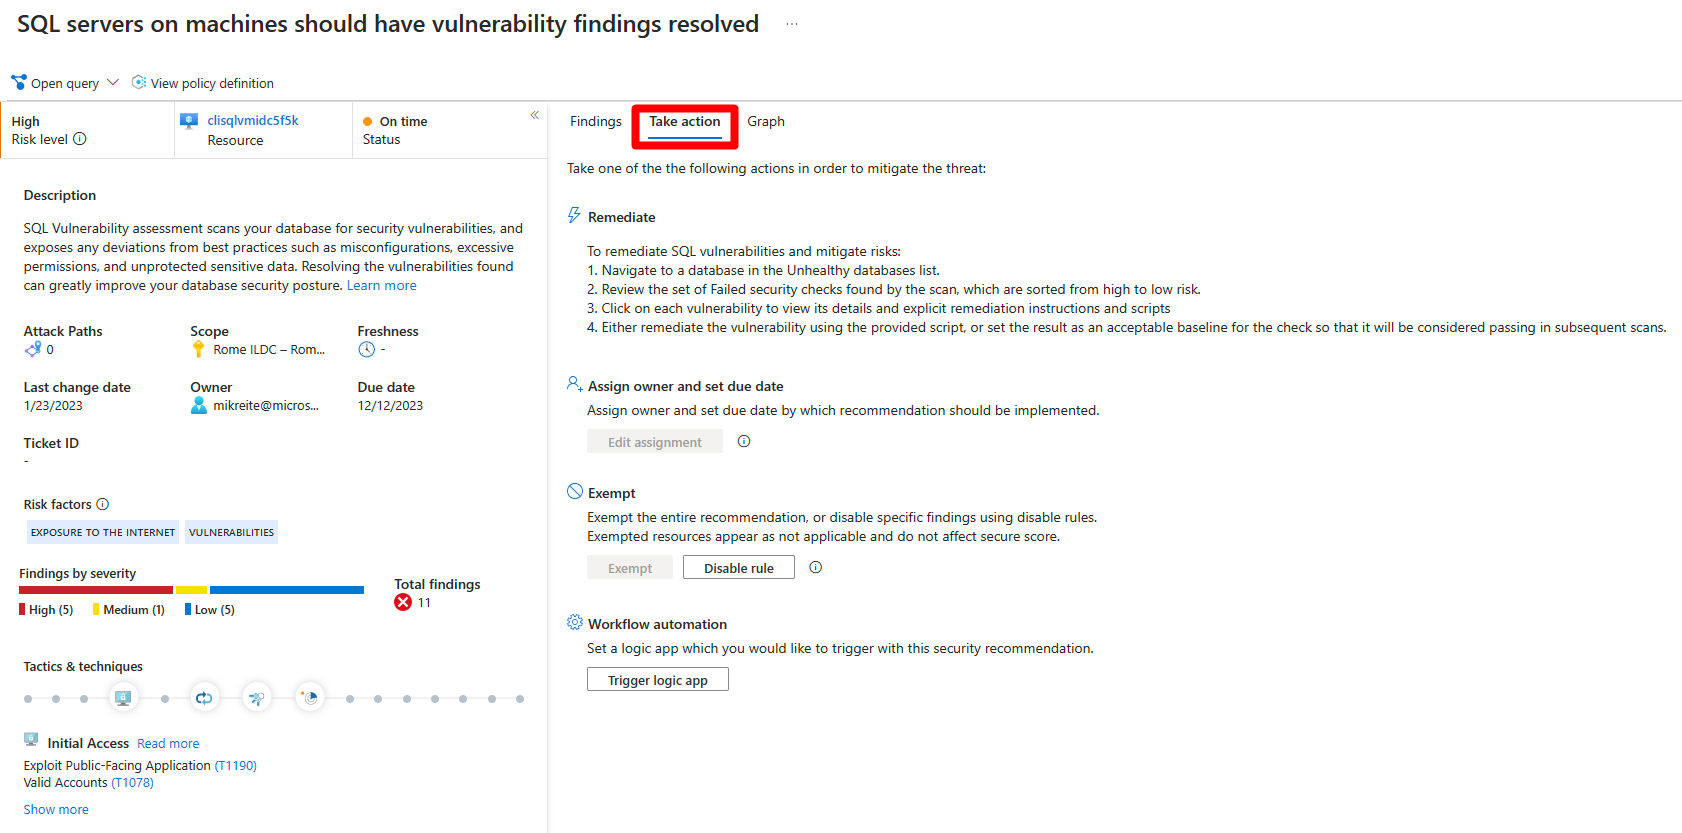
In Take action:
Remediate: A description of the manual steps required to remediate the security issue on the affected resources. For recommendations with the Fix option, you can select View remediation logic before applying the suggested fix to your resources.
Assign owner and due date: If you have a governance rule turned on for the recommendation, you can assign an owner and due date.
Exempt: You can exempt resources from the recommendation, or disable specific findings using disable rules.
Workflow automation: Set a logic app to trigger with this recommendation.
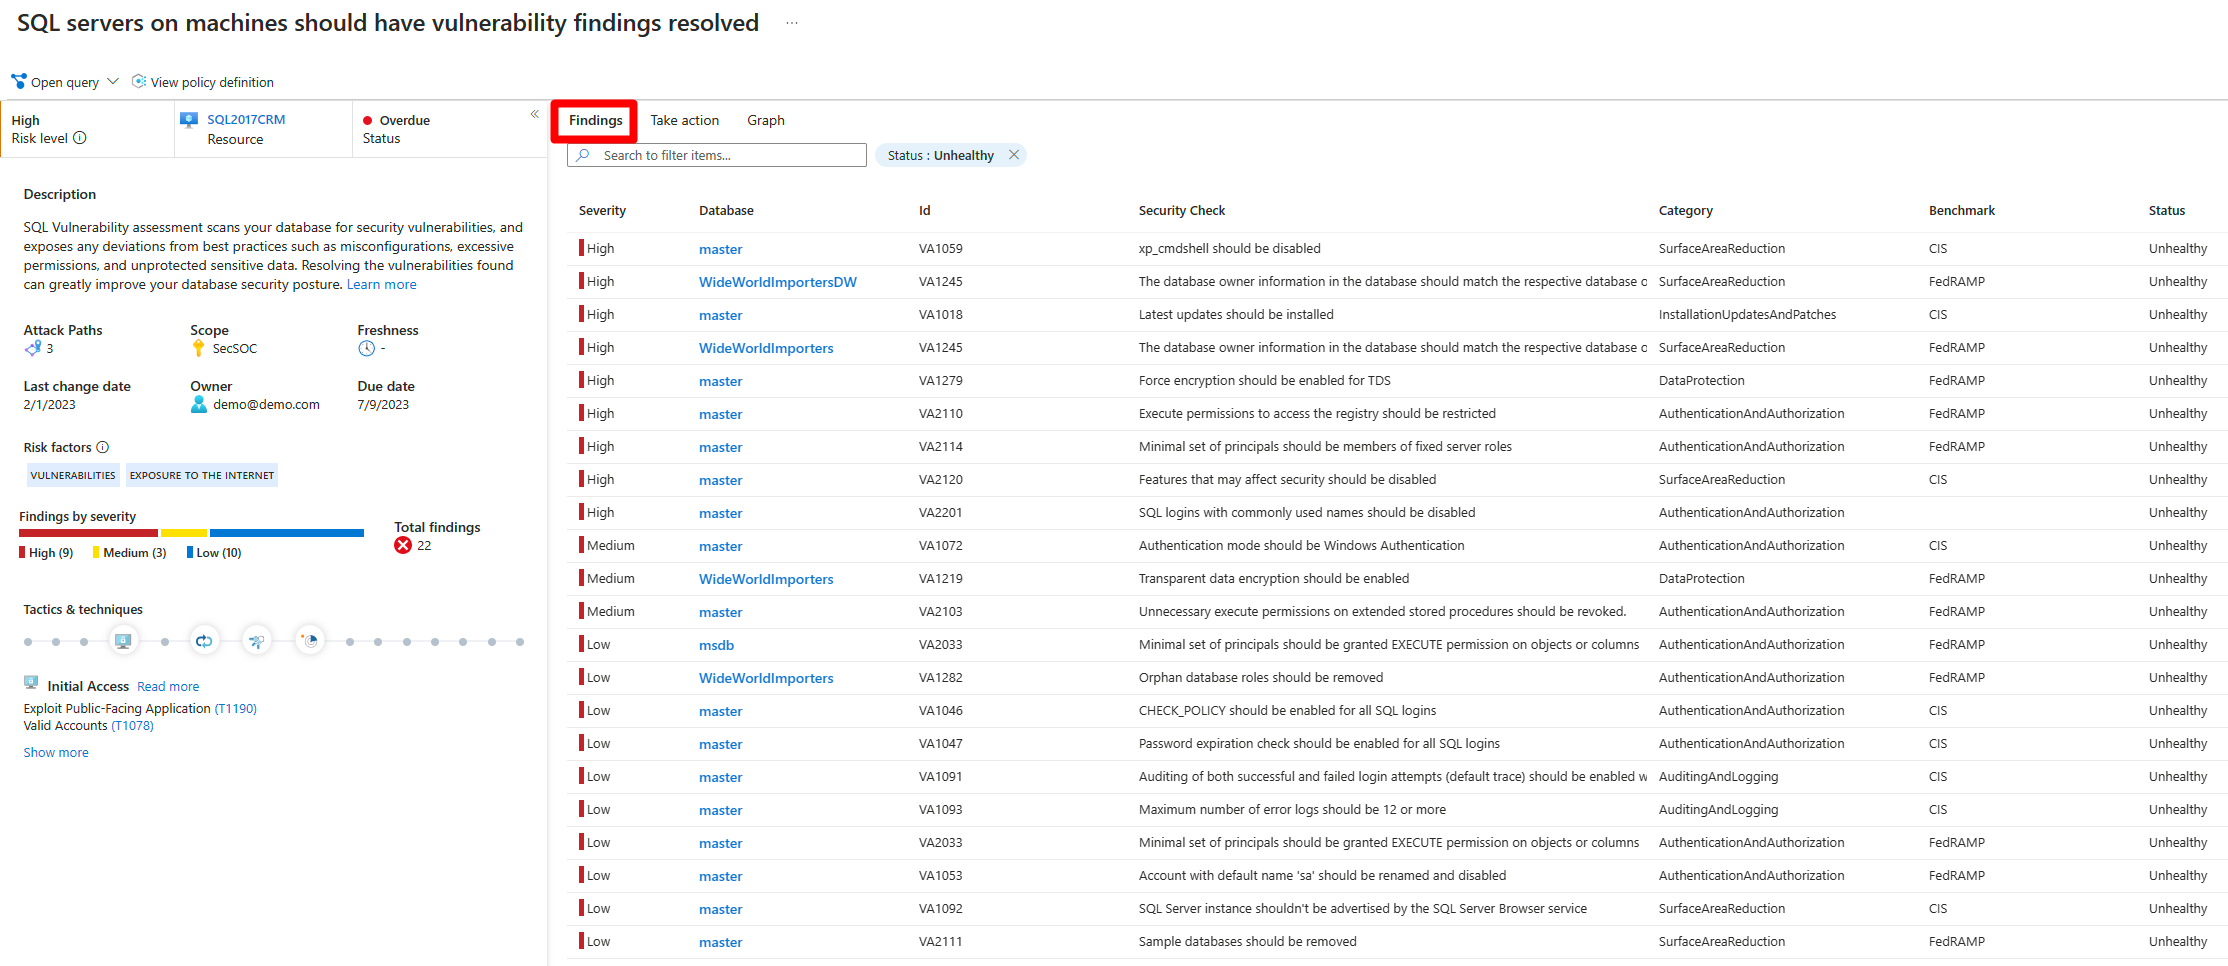
In Findings, you can review affiliated findings by severity.
In Graph, you can view and investigate all context that is used for risk prioritization, including attack paths. You can select a node in an attack path to view the details of the selected node.
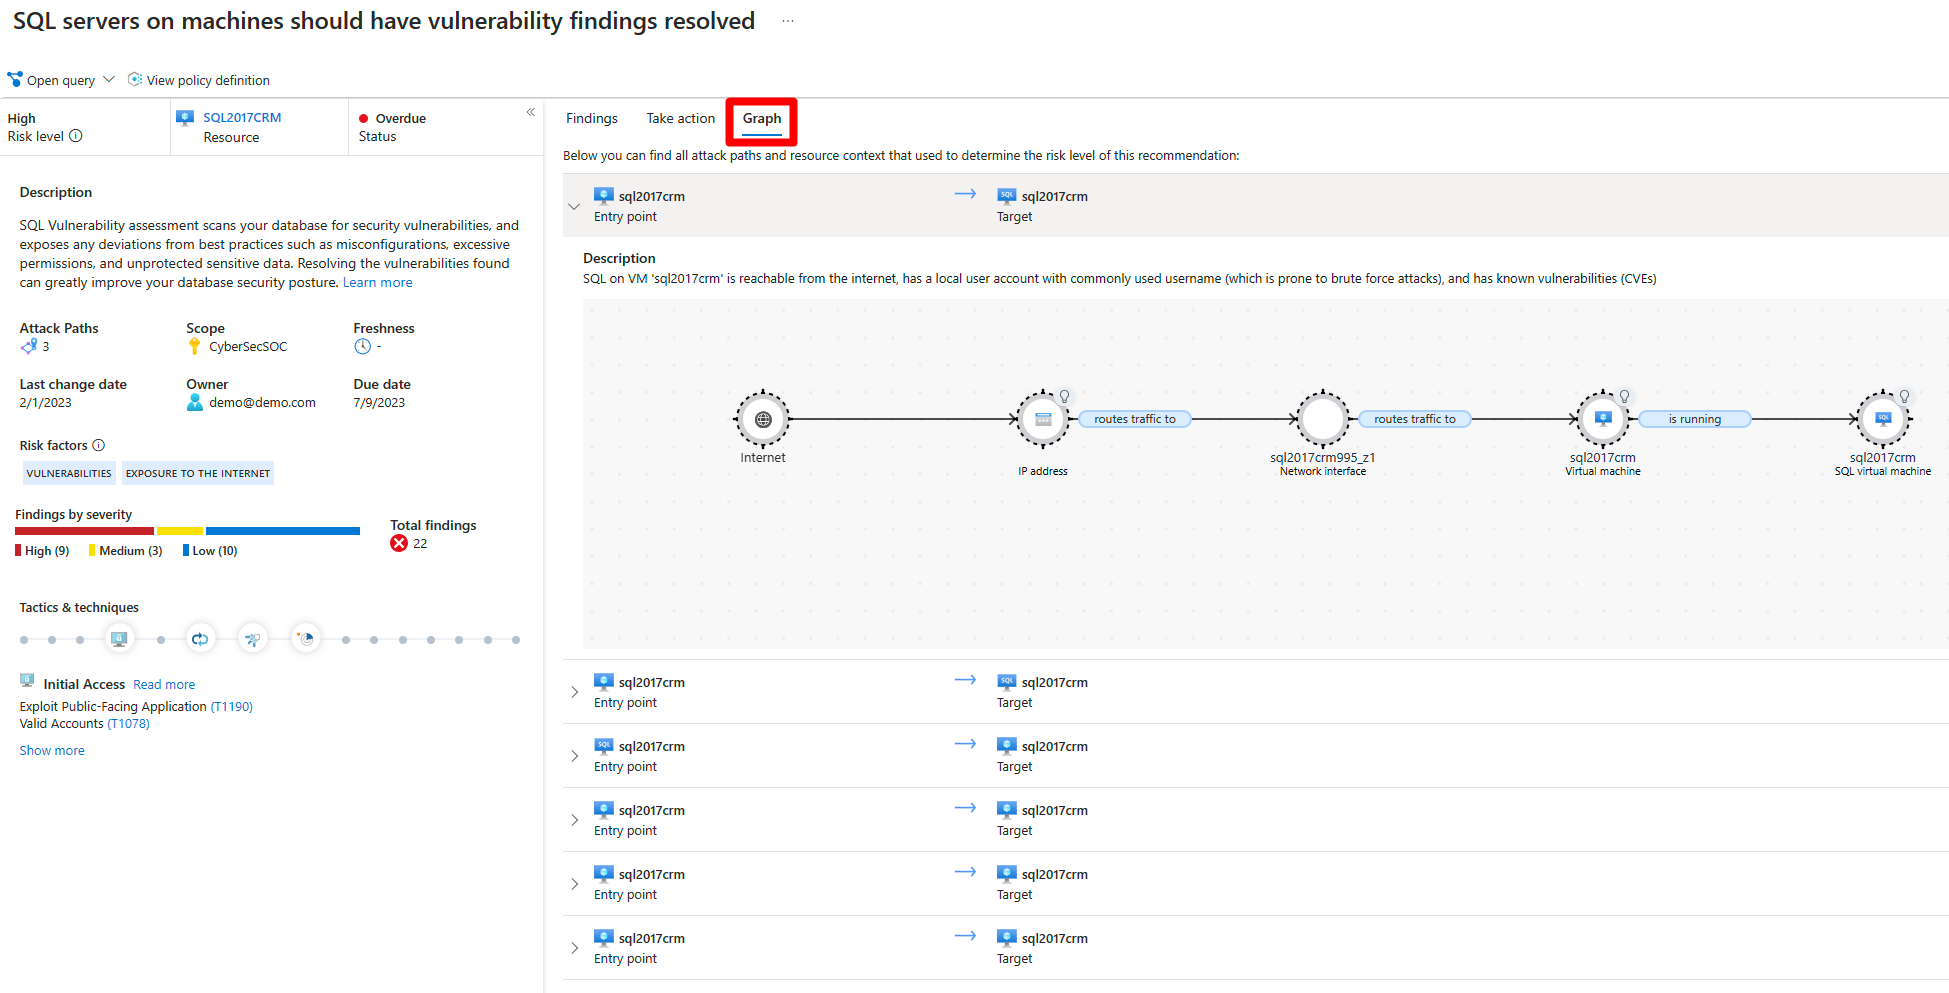
Select a node to view additional details.
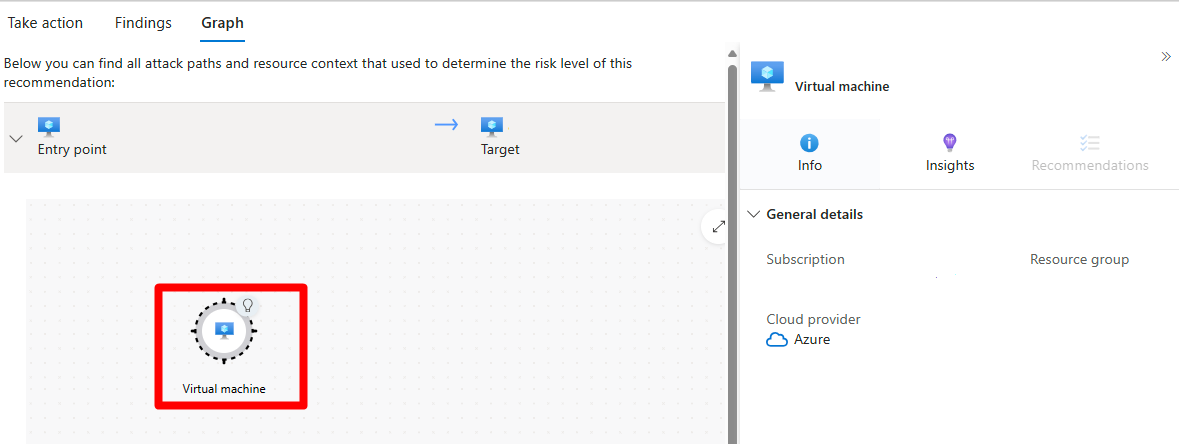
Select Insights.
In the vulnerability dropdown menu, select a vulnerability to view the details.
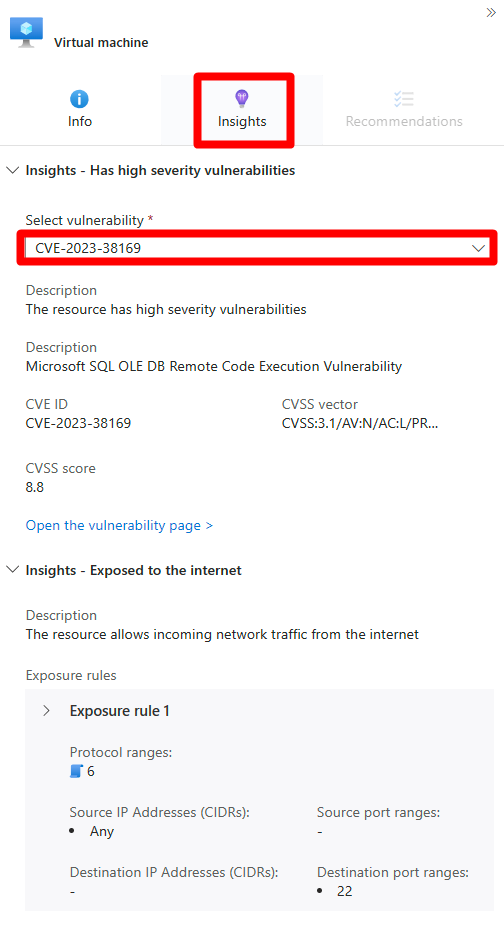
(Optional) Select Open the vulnerability page to view the associated recommendation page.


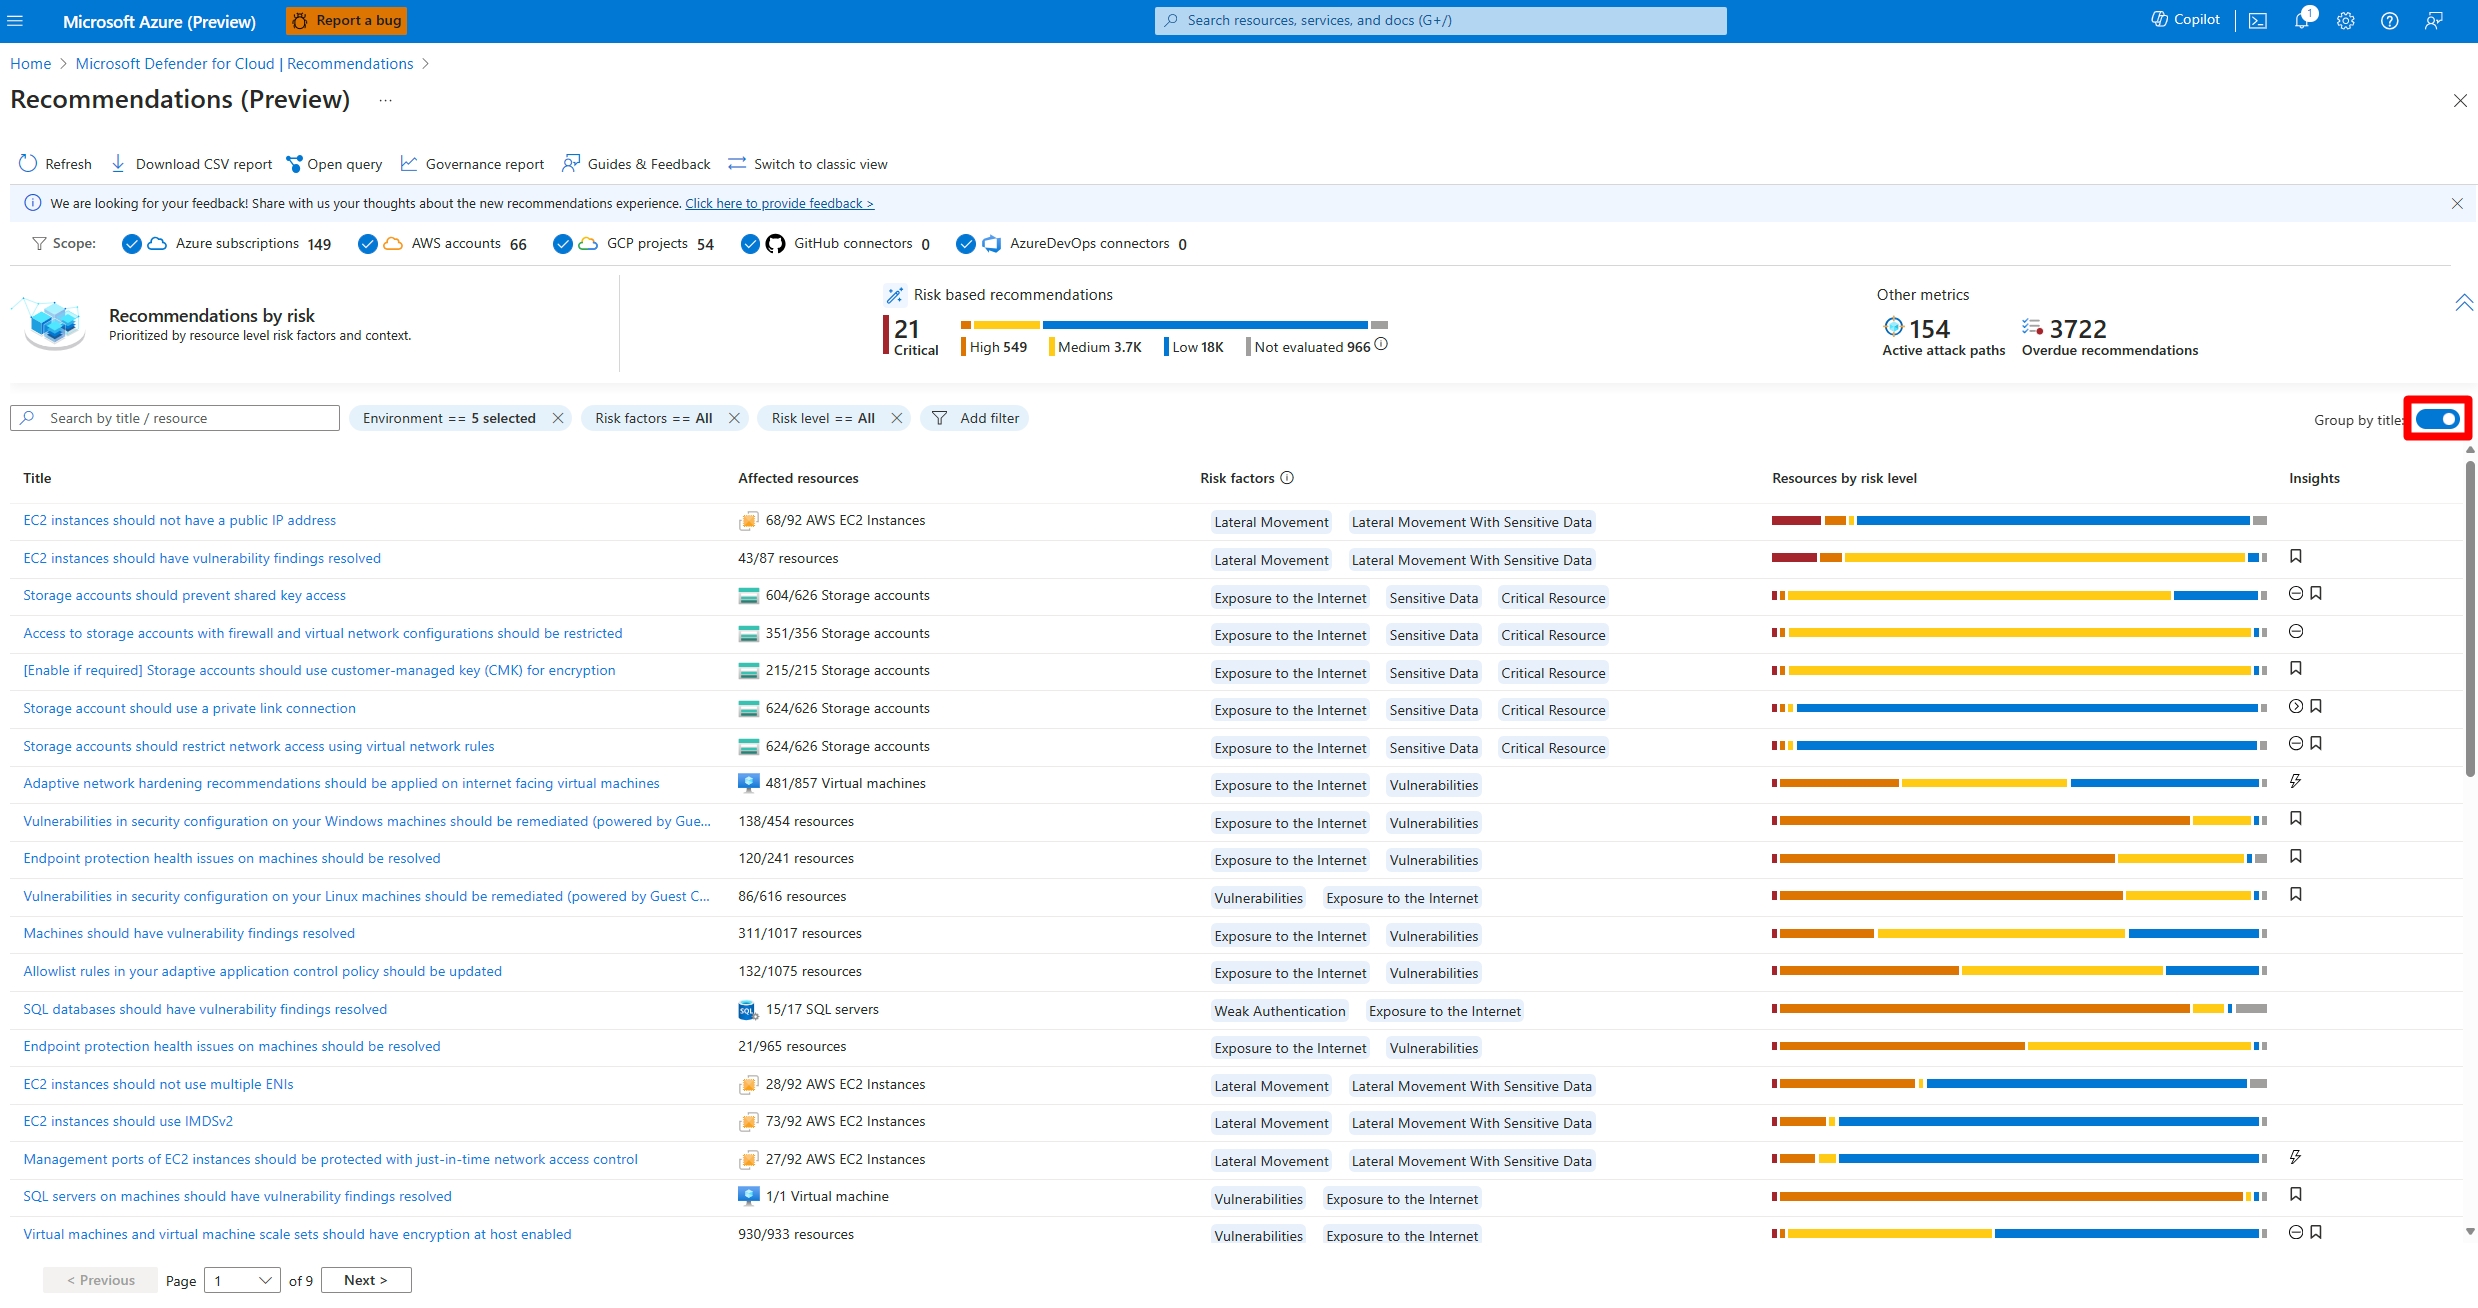
Group recommendations by title
Defender for Cloud's recommendation page allows you to group recommendations by title. This feature is useful when you want to remediate a recommendation that is affecting multiple resources caused by a specific security issue.
To group recommendations by title:
Sign in to the Azure portal.
Navigate to Defender for Cloud > Recommendations.
Select Group by title.

Manage recommendations assigned to you
Defender for Cloud supports governance rules for recommendations, to specify a recommendation owner or due date for action. Governance rules help ensure accountability and an SLA for recommendations.
- Recommendations are listed as On time until their due date is passed, when they're changed to Overdue.
- Before the recommendation is overdue, the recommendation doesn't affect the secure score.
- You can also apply a grace period during which overdue recommendations continue to not affect the secure score.
Learn more about configuring governance rules.
To manage recommendations assigned to you:
Sign in to the Azure portal.
Navigate to Defender for Cloud > Recommendations.
Select Add filter > Owner.
Select your user entry.
Select Apply.
In the recommendation results, review the recommendations, including affected resources, risk factors, attack paths, due dates, and status.
Select a recommendation to review it further.
In Take action > Change owner & due date, select Edit assignment to change the recommendation owner and due date if needed.
- By default the owner of the resource gets a weekly email listing the recommendations assigned to them.
- If you select a new remediation date, in Justification specify reasons for remediation by that date.
- In Set email notifications you can:
- Override the default weekly email to the owner.
- Notify owners weekly with a list of open/overdue tasks.
- Notify the owner's direct manager with an open task list.
Select Save.
Note
Changing the expected completion date doesn't change the due date for the recommendation, but security partners can see that you plan to update the resources by the specified date.
Review recommendations in Azure Resource Graph
You can use Azure Resource Graph to write a Kusto Query Language (KQL) to query Defender for Cloud security posture data across multiple subscriptions. Azure Resource Graph provides an efficient way to query at scale across cloud environments by viewing, filtering, grouping, and sorting data.
To review recommendations in Azure Resource Graph:
Sign in to the Azure portal.
Navigate to Defender for Cloud > Recommendations.
Select a recommendation.
Select Open query.
You can open the query in one of two ways:
- Query returning affected resource - Returns a list of all of the resources affected by this recommendation.
- Query returning security findings - Returns a list of all security issues found by the recommendation.
Select run query.
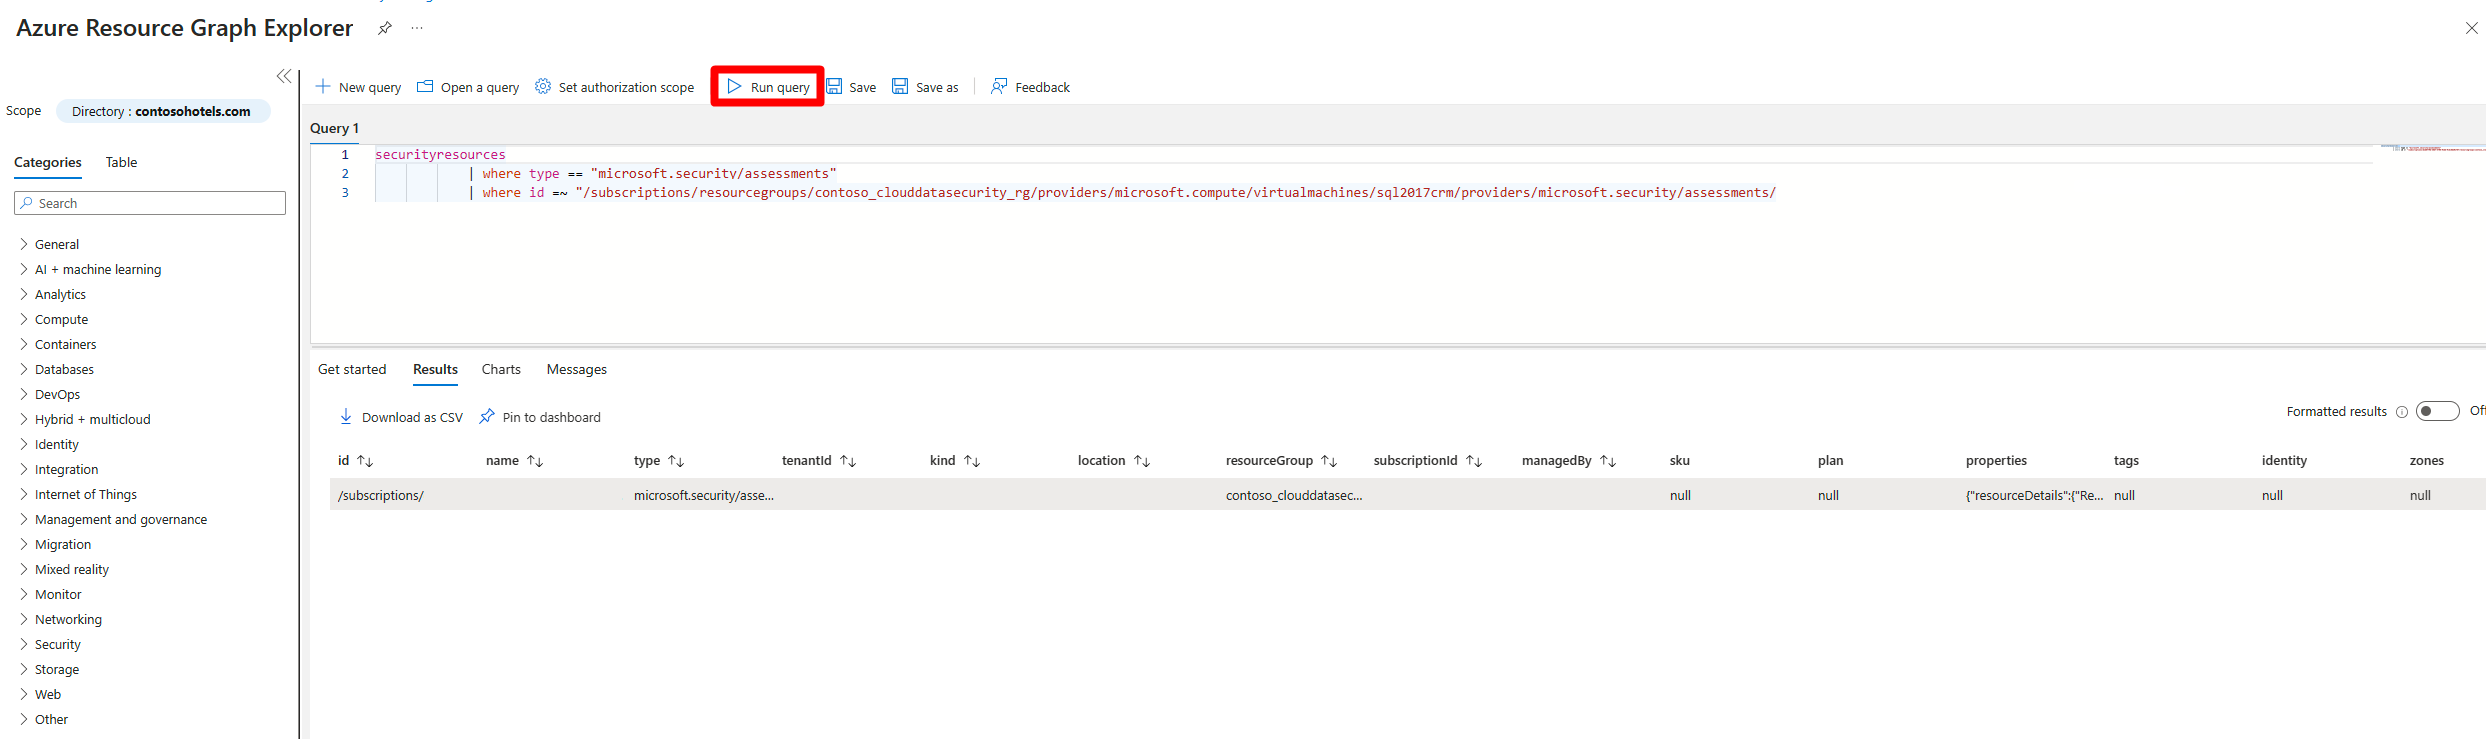
Review the results.

How are recommendations classified?
Every security recommendation from Defender for Cloud is assigned one of three severity ratings:
High severity: These recommendations should be addressed immediately, as they indicate a critical security vulnerability that could be exploited by an attacker to gain unauthorized access to your systems or data. Examples of high severity recommendations are when we’ve discovered unprotected secrets on a machine, overly-permissive inbound NSG rules, clusters allowing images to be deployed from untrusted registries, and unrestricted public access to storage accounts or databases.
Medium severity: These recommendations indicate a potential security risk that should be addressed in a timely manner, but may not require immediate attention. Examples of medium severity recommendations might include containers sharing sensitive host namespaces, web apps not using managed identities, Linux machines not requiring SSH keys during authentication, and unused credentials being left in the system after 90 days of inactivity.
Low severity: These recommendations indicate a relatively minor security issue that can be addressed at your convenience. Examples of low severity recommendations might include the need to disable local authentication in favor of Microsoft Entra ID, health issues with your endpoint protection solution, best practices not being followed with network security groups, or misconfigured logging settings that could make it harder to detect and respond to security incidents.
Of course, the internal views of an organization might differ with Microsoft’s classification of a specific recommendation. So, it's always a good idea to review each recommendation carefully and consider its potential impact on your security posture before deciding how to address it.
Note
Defender CSPM customers have access to a richer classification system where recommendations are shown a more dynamic Risk level that utilizes the context of the resource and all related resources. Learn more about risk prioritization.
Example
In this example, this recommendation details page shows 15 affected resources:

When you open the underlying query, and run it, Azure Resource Graph Explorer returns the same affected resources for this recommendation.
Next step
Feedback
Coming soon: Throughout 2024 we will be phasing out GitHub Issues as the feedback mechanism for content and replacing it with a new feedback system. For more information see: https://aka.ms/ContentUserFeedback.
Submit and view feedback for