Note
Access to this page requires authorization. You can try signing in or changing directories.
Access to this page requires authorization. You can try changing directories.
This article is one in a series of articles describing the deployment path for OT monitoring with Microsoft Defender for IoT, and describes how to create CA-signed certificates to use with Defender for IoT on-premises OT sensor appliances.

Each certificate authority (CA)-signed certificate must have both a .key file and a .crt file, which are uploaded to Defender for IoT appliances after the first sign-in. While some organizations may also require a .pem file, a .pem file isn't required for Defender for IoT.
Important
You must create a unique certificate for each Defender for IoT appliance, where each certificate meets required criteria.
Prerequisites
To perform the procedures described in this article, make sure that you have a security, PKI or certificate specialist available to oversee the certificate creation.
Make sure that you've also familiarized yourself with SSL/TLS certificate requirements for Defender for IoT.
Create a CA-signed SSL/TLS certificate
We recommend that you always use CA-signed certificates on production environments, and only use self-signed certificates on testing environments.
Use a certificate management platform, such as an automated PKI management platform, to create a certificate that meets Defender for IoT requirements.
If you don't have an application that can automatically create certificates, consult a security, PKI, or other qualified certificate lead for help. You can also convert existing certificate files if you don't want to create new ones.
Make sure to create a unique certificate for each Defender for IoT appliance, where each certificate meets required parameter criteria.
For example:
Open the downloaded certificate file and select the Details tab > Copy to file to run the Certificate Export Wizard.
In the Certificate Export Wizard, select Next > DER encoded binary X.509 (.CER) > and then select Next again.
In the File to Export screen, select Browse, choose a location to store the certificate, and then select Next.
Select Finish to export the certificate.
Note
You may need to convert existing files types to supported types.
Verify that the certificate meets certificate file requirements, and then test the certificate file you created when you're done.
If you aren't using certificate validation, remove the CRL URL reference in the certificate. For more information, see certificate file requirements.
Tip
(Optional) Create a certificate chain, which is a .pem file that contains the certificates of all the certificate authorities in the chain of trust that led to your certificate.
Verify CRL server access
If your organization validates certificates, your Defender for IoT appliances must be able to access the CRL server defined by the certificate. By default, certificates access the CRL server URL via HTTP port 80. However, some organizational security policies block access to this port.
If your appliances can't access your CRL server on port 80, you can use one of the following workarounds:
Define another URL and port in the certificate:
- The URL you define must be configured as
http: //and nothttps:// - Make sure that the destination CRL server can listen on the port you define
- The URL you define must be configured as
Use a proxy server that can access the CRL on port 80
For more information, see [Forward OT alert information].
If validation fails, communication between the relevant components is halted and a validation error is presented in the console.
Import the SSL/TLS certificate to a trusted store
After creating your certificate, import it to a trusted storage location. For example:
Open the security certificate file and, in the General tab, select Install Certificate to start the Certificate Import Wizard.
In Store Location, select Local Machine, then select Next.
If a User Allow Control prompt appears, select Yes to allow the app to make changes to your device.
In the Certificate Store screen, select Automatically select the certificate store based on the type of certificate, then select Next.
Select Place all certificates in the following store, then Browse, and then select the Trusted Root Certification Authorities store. When you're done, select Next. For example:
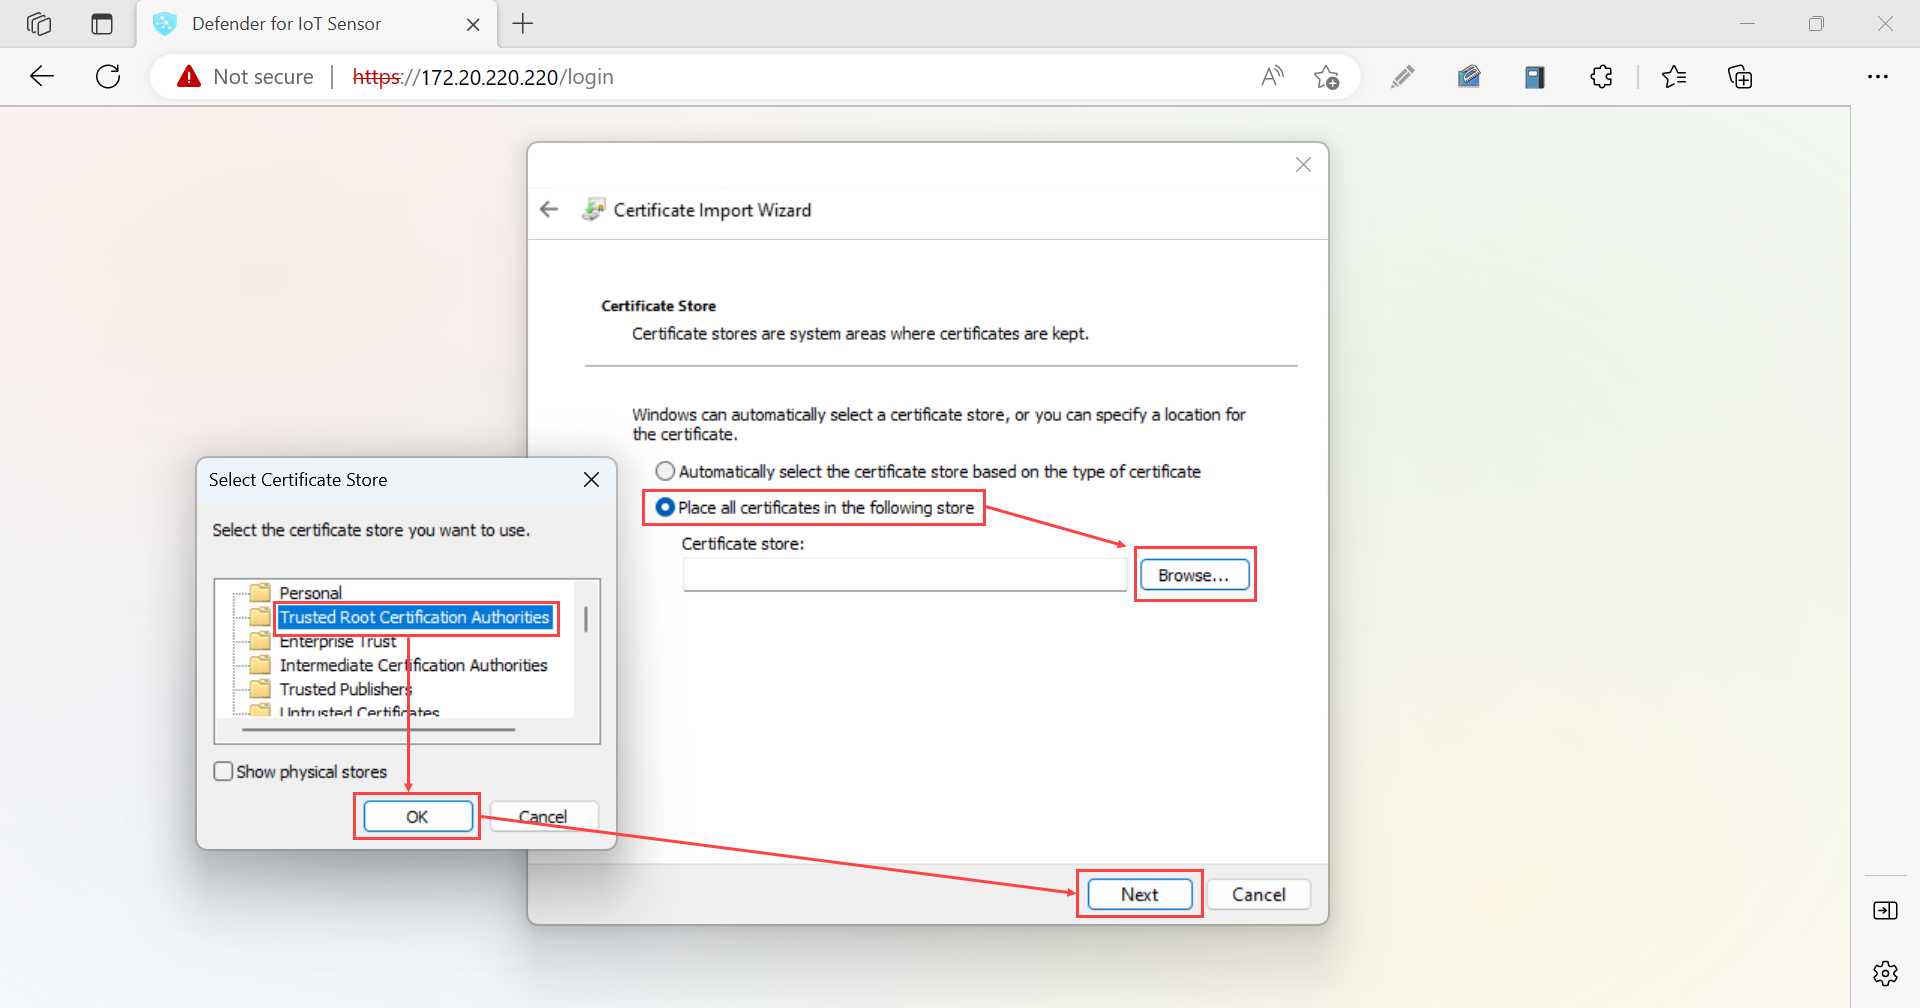
Select Finish to complete the import.

Test your SSL/TLS certificates
Use the following procedures to test certificates before deploying them to your Defender for IoT appliances.
Check your certificate against a sample
Use the following sample certificate to compare to the certificate you've created, making sure that the same fields exist in the same order.
Bag Attributes: <No Attributes>
subject=C = US, S = Illinois, L = Springfield, O = Contoso Ltd, OU= Contoso Labs, CN= sensor.contoso.com, E
= support@contoso.com
issuer C=US, S = Illinois, L = Springfield, O = Contoso Ltd, OU= Contoso Labs, CN= Cert-ssl-root-da2e22f7-24af-4398-be51-
e4e11f006383, E = support@contoso.com
-----BEGIN CERTIFICATE-----
MIIESDCCAZCgAwIBAgIIEZK00815Dp4wDQYJKoZIhvcNAQELBQAwgaQxCzAJBgNV
BAYTAIVTMREwDwYDVQQIDAhJbGxpbm9pczEUMBIGA1UEBwwLU3ByaW5nZmllbGQx
FDASBgNVBAoMCONvbnRvc28gTHRKMRUWEwYDVQQLDAXDb250b3NvIExhYnMxGzAZ
BgNVBAMMEnNlbnNvci5jb250b3NvLmNvbTEIMCAGCSqGSIb3DQEJARYTc3VwcG9y
dEBjb250b3NvLmNvbTAeFw0yMDEyMTcxODQwMzhaFw0yMjEyMTcxODQwMzhaMIGK
MQswCQYDVQQGEwJVUzERMA8GA1UECAwISWxsaW5vaXMxFDASBgNVBAcMC1Nwcmlu
Z2ZpZWxkMRQwEgYDVQQKDAtDb250b3NvIEX0ZDEVMBMGA1UECwwMQ29udG9zbyBM
YWJzMRswGQYDVQQDDBJzZW5zb3luY29udG9zby5jb20xljAgBgkqhkiG9w0BCQEW
E3N1cHBvcnRAY29udG9zby5jb20wggEiMA0GCSqGSIb3DQEBAQUAA4IBDwAwggEK
AoIBAQDRGXBNJSGJTfP/K5ThK8vGOPzh/N8AjFtLvQiiSfkJ4cxU/6d1hNFEMRYG
GU+jY1Vknr0|A2nq7qPB1BVenW3 MwsuJZe Floo123rC5ekzZ7oe85Bww6+6eRbAT
WyqpvGVVpfcsloDznBzfp5UM9SVI5UEybllod31MRR/LQUEIKLWILHLW0eR5pcLW
pPLtOW7wsK60u+X3tqFo1AjzsNbXbEZ5pnVpCMqURKSNmxYpcrjnVCzyQA0C0eyq
GXePs9PL5DXfHy1x4WBFTd98X83 pmh/vyydFtA+F/imUKMJ8iuOEWUtuDsaVSX0X
kwv2+emz8CMDLsbWvUmo8Sg0OwfzAgMBAAGjfDB6MB0GA1UdDgQWBBQ27hu11E/w
21Nx3dwjp0keRPuTsTAfBgNVHSMEGDAWgBQ27hu1lE/w21Nx3dwjp0keRPUTSTAM
BgNVHRMEBTADAQH/MAsGA1UdDwQEAwIDqDAdBgNVHSUEFjAUBggrBgEFBQcDAgYI
KwYBBQUHAwEwDQYJKoZIhvcNAQELBQADggEBADLsn1ZXYsbGJLLzsGegYv7jmmLh
nfBFQqucORSQ8tqb2CHFME7LnAMfzFGpYYV0h1RAR+1ZL1DVtm+IKGHdU9GLnuyv
9x9hu7R4yBh3K99ILjX9H+KACvfDUehxR/ljvthoOZLalsqZIPnRD/ri/UtbpWtB
cfvmYleYA/zq3xdk4vfOI0YTOW11qjNuBIHh0d5S5sn+VhhjHL/s3MFaScWOQU3G
9ju6mQSo0R1F989aWd+44+8WhtOEjxBvr+17CLqHsmbCmqBI7qVnj5dHvkh0Bplw
zhJp150DfUzXY+2sV7Uqnel9aEU2Hlc/63EnaoSrxx6TEYYT/rPKSYL+++8=
-----END CERTIFICATE-----
Test certificates without a .csr or private key file
If you want to check the information within the certificate .csr file or private key file, use the following CLI commands:
- Check a Certificate Signing Request (CSR): Run
openssl req -text -noout -verify -in CSR.csr - Check a private key: Run
openssl rsa -in privateKey.key -check - Check a certificate: Run
openssl x509 -in certificate.crt -text -noout
If these tests fail, review certificate file requirements to verify that your file parameters are accurate, or consult your certificate specialist.
Validate the certificate's common name
To view the certificate's common name, open the certificate file and select the Details tab, and then select the Subject field.
The certificate's common name appears next to CN.
Sign-in to your sensor console without a secure connection. In the Your connection isn't private warning screen, you might see a NET::ERR_CERT_COMMON_NAME_INVALID error message.
Select the error message to expand it, and then copy the string next to Subject. For example:
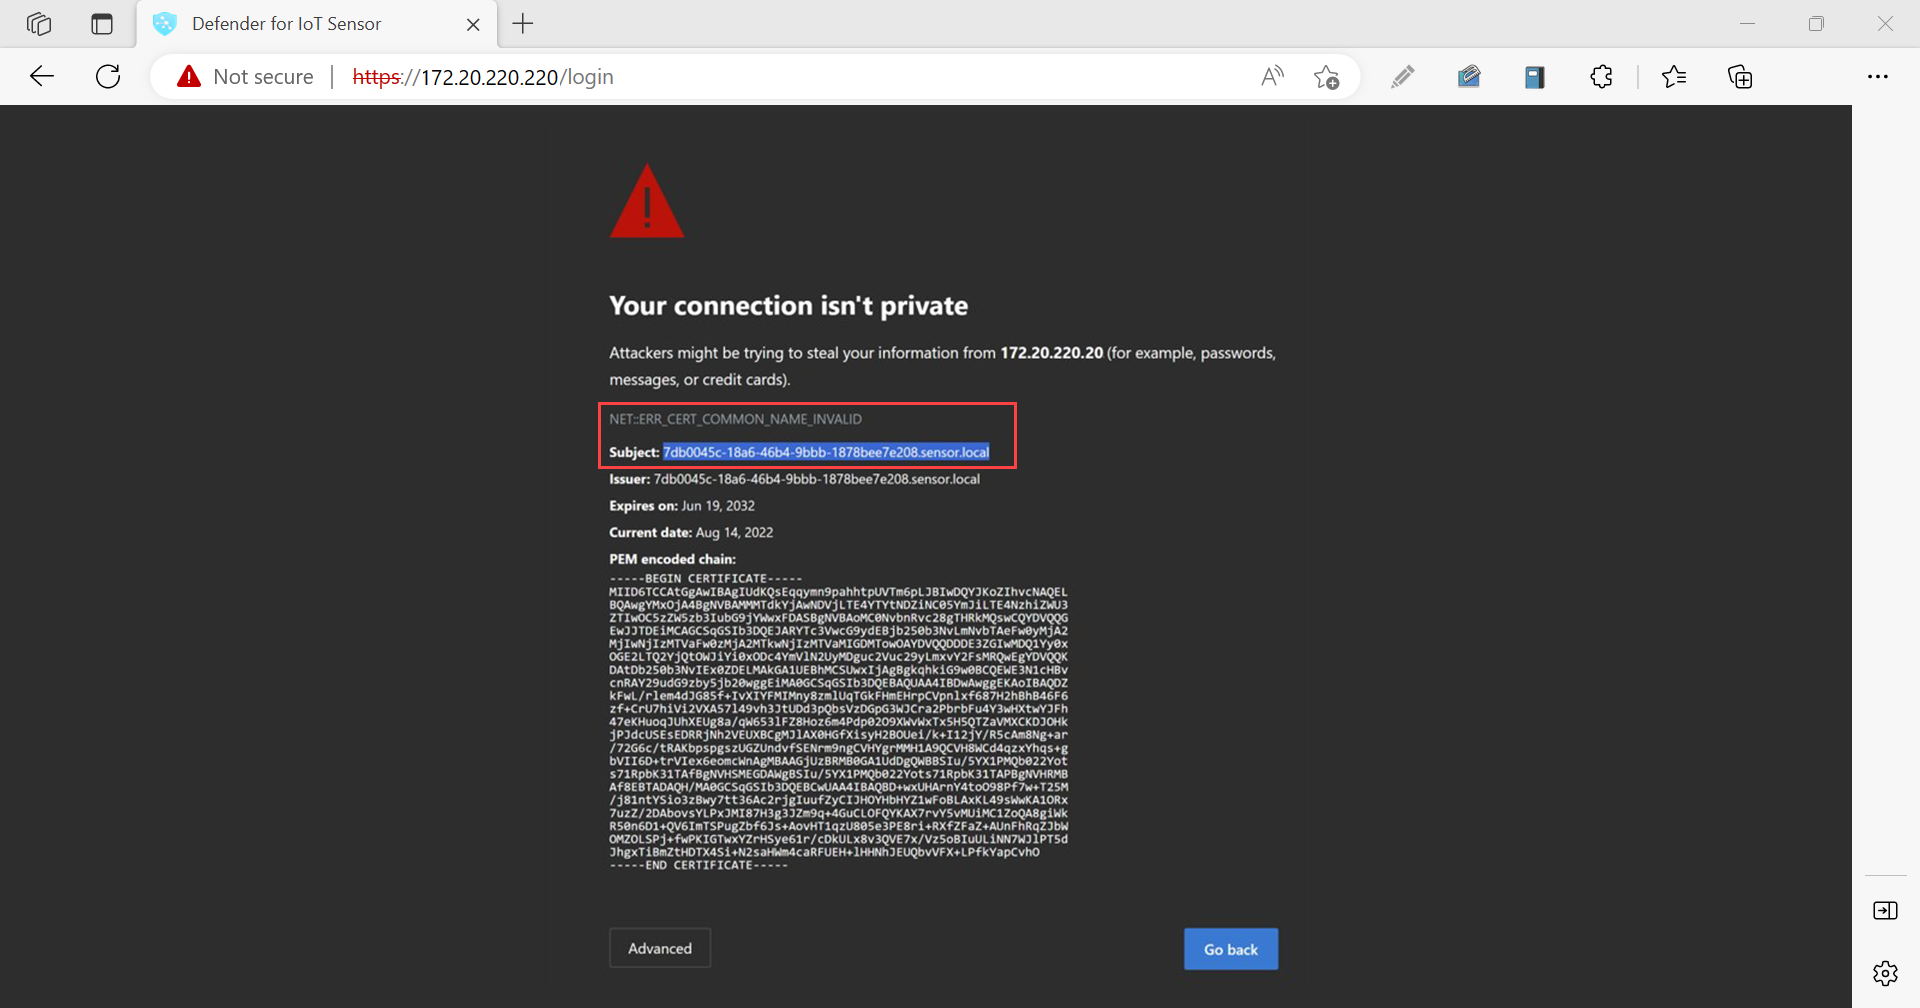
The subject string should match the CN string in the security certificate's details.
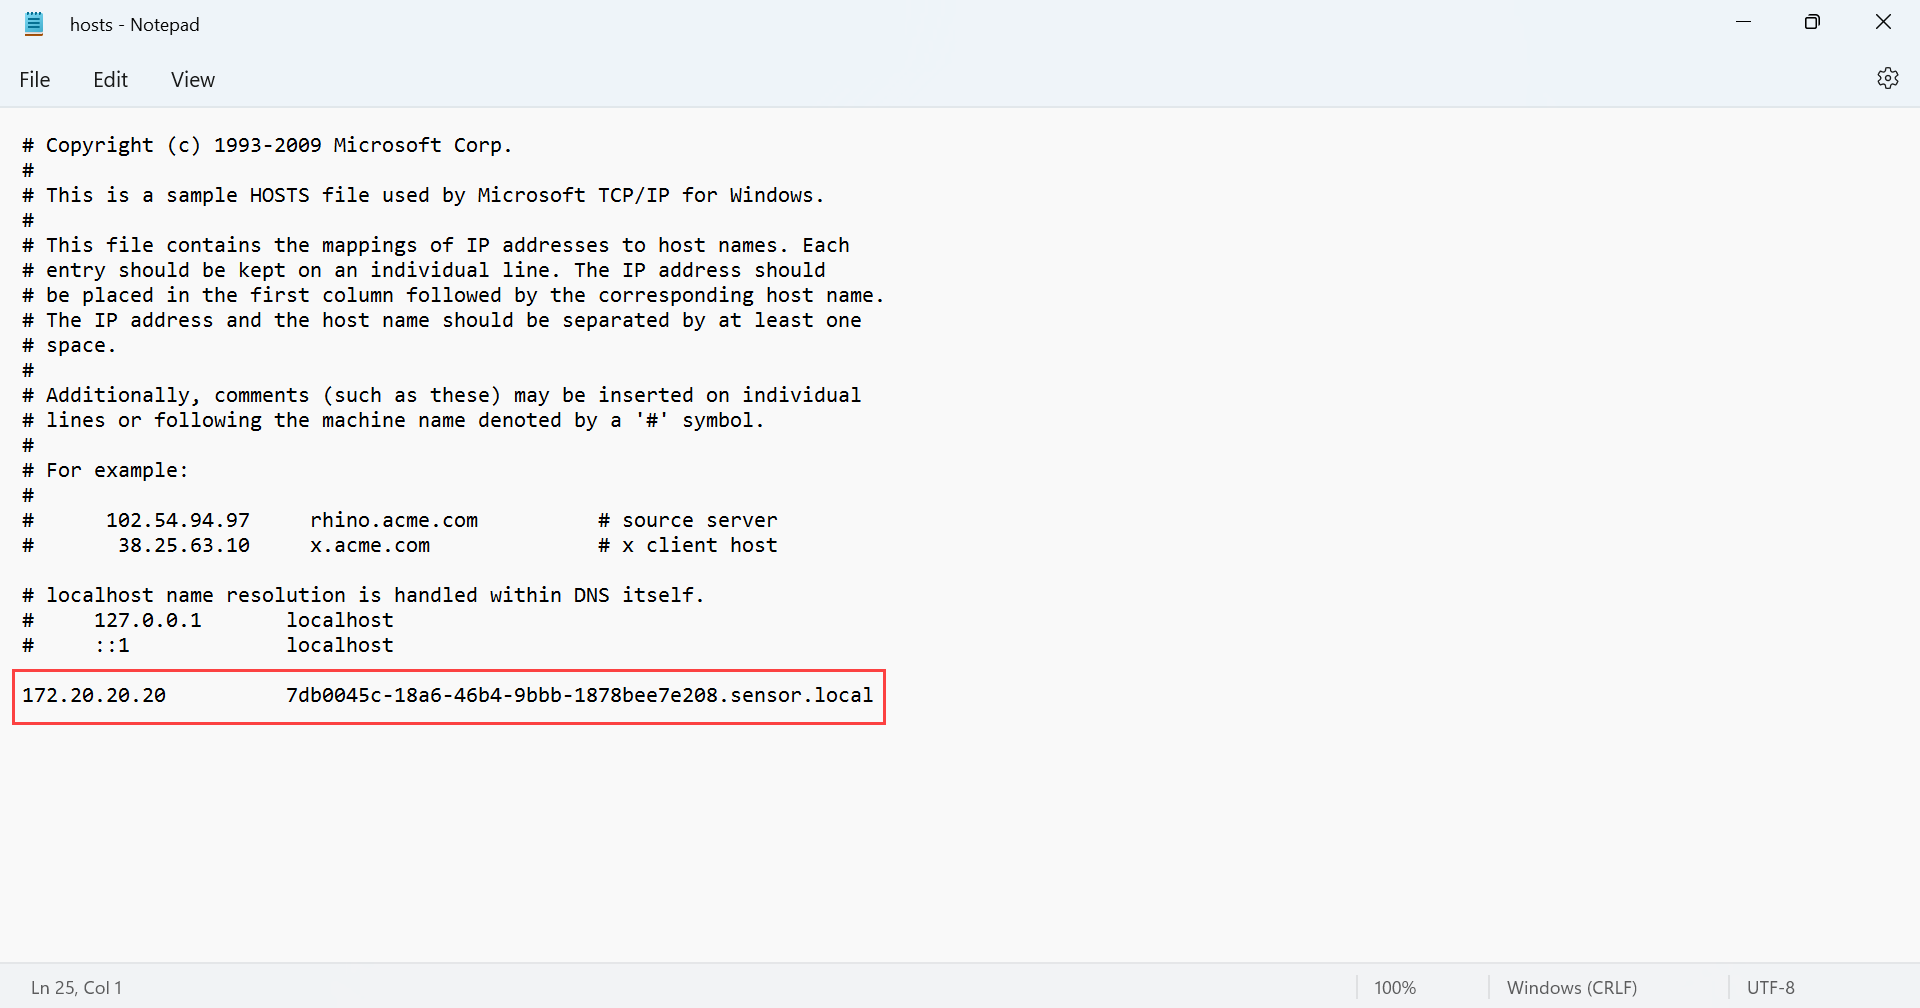
In your local file explorer, browse to the hosts file, such as at This PC > Local Disk (C:) > Windows > System32 > drivers > etc, and open the hosts file.
In the hosts file, add in a line at the end of document with the sensor's IP address and the SSL certificate's common name that you copied in the previous steps. When you're done, save the changes. For example:


Self-signed certificates
Self-signed certificates are available for use in testing environments after installing Defender for IoT OT monitoring software. For more information, see: