Note
Access to this page requires authorization. You can try signing in or changing directories.
Access to this page requires authorization. You can try changing directories.
In this tutorial, you learn how to integrate Azure Deployment Environments into your CI/CD pipeline. You can use any GitOps provider that supports CI/CD, like GitHub Actions, Azure Arc, GitLab, or Jenkins.
Continuous integration and continuous delivery (CI/CD) is a software development approach that helps teams automate the process of building, testing, and deploying software changes. CI/CD enables you to release software changes more frequently and with more confidence.
You use a workflow that features three branches: main, dev, and test.
- The main branch is always considered production.
- You create feature branches from the main branch.
- You create pull requests to merge feature branches into main.
The workflow in this tutorial is a simplified example. Real-world workflows might be more complex.
Before beginning this tutorial, you can familiarize yourself with Deployment Environments components and concepts by reviewing Key concepts for Azure Deployment Environments.
In this tutorial, you learn how to:
- Create and configure a dev center
- Create a key vault
- Create and configure a GitHub repository
- Connect the catalog to your dev center
- Configure deployment identities
- Configure GitHub environments
- Test the CI/CD pipeline
Prerequisites
| Product | Requirements |
|---|---|
| Azure | - An Azure subscription. - Owner permissions on the Azure subscription. - Azure CLI installed. |
| Git | - A GitHub account. - Git installed. |
1. Create and configure a dev center
In this section, you create an Azure Deployment Environments dev center and project with three environment types: Dev, Test, and Prod.
- The Prod environment type contains the single production environment.
- A new environment is created in Dev for each feature branch.
- A new environment is created in Test for each pull request.
1.1 Set up Azure CLI
To begin, sign in to Azure. Run the following command, and complete the authentication process by following the prompts:
az login
Next, install the Azure devcenter extension for Azure CLI:
az extension add --name devcenter --upgrade
Now that the current extension is installed, register the Microsoft.DevCenter namespace:
az provider register --namespace Microsoft.DevCenter
Tip
Throughout this tutorial, you save several values as environment variables to use later. You might also want to record these values elsewhere to ensure they're available when you need them.
Get your user ID and set it to an environment variable for later:
MY_AZURE_ID=$(az ad signed-in-user show --query id -o tsv)
Retrieve the subscription ID for your current subscription:
AZURE_SUBSCRIPTION_ID=$(az account show --query id --output tsv)
Retrieve the tenant ID for your current tenant:
AZURE_TENANT_ID=$(az account show --query tenantId --output tsv)
Set the following environment variables:
LOCATION="eastus"
AZURE_RESOURCE_GROUP=<resourceGroupName>
AZURE_DEVCENTER=<devcenterName>
AZURE_PROJECT=<projectName>
AZURE_KEYVAULT=<keyVaultName>
Note
You must use a globally unique key vault name. Otherwise, you might get the following error:
Code: VaultAlreadyExists Message: The vault name 'mykeyvaultname' is already in use. Vault names are globally unique so it is possible that the name is already taken.
1.2 Create a dev center
A dev center is a collection of projects and environments that have similar settings. Dev centers provide access to a catalog of templates and artifacts that can be used to create environments. Dev centers also provide a way to manage access to environments and projects.
Create a resource group:
az group create \
  --name $AZURE_RESOURCE_GROUP \
  --location $LOCATION
Create a dev center:
az devcenter admin devcenter create \
  --name $AZURE_DEVCENTER \
  --identity-type SystemAssigned \
  --resource-group $AZURE_RESOURCE_GROUP \
  --location $LOCATION
The previous command outputs JSON. Save the values for id and identity.principalId as environment variables to use later:
AZURE_DEVCENTER_ID=<id>
AZURE_DEVCENTER_PRINCIPAL_ID=<identity.principalId>
1.3 Assign the dev center identity owner role on the subscription
A dev center needs permissions to assign roles on subscriptions associated with environment types.
To reduce unnecessary complexity, in this tutorial, you use a single subscription for the dev center and all environment types. In practice, the dev center and target deployment subscriptions would probably be separate subscriptions with different policies applied.
az role assignment create \
  --scope /subscriptions/$AZURE_SUBSCRIPTION_ID \
  --role Owner \
  --assignee-object-id $AZURE_DEVCENTER_PRINCIPAL_ID \
  --assignee-principal-type ServicePrincipal
1.4 Create the environment types
At the dev center level, environment types define the environments that development teams can create, like dev, test, sandbox, preproduction, and production.
Create three new environment types: Dev, Test, and Prod:
az devcenter admin environment-type create \
  --name Dev \
  --resource-group $AZURE_RESOURCE_GROUP \
  --dev-center $AZURE_DEVCENTER
az devcenter admin environment-type create \
  --name Test \
  --resource-group $AZURE_RESOURCE_GROUP \
  --dev-center $AZURE_DEVCENTER
az devcenter admin environment-type create \
  --name Prod \
  --resource-group $AZURE_RESOURCE_GROUP \
  --dev-center $AZURE_DEVCENTER
1.5 Create a project
A project is the point of access for the development team. Each project is associated with a dev center.
Create a project:
az devcenter admin project create \
  --name $AZURE_PROJECT \
  --resource-group $AZURE_RESOURCE_GROUP \
  --location $LOCATION \
  --dev-center-id $AZURE_DEVCENTER_ID
The previous command outputs JSON. Save the value for id as an environment variable to use later:
AZURE_PROJECT_ID=<id>
Assign yourself the DevCenter Project Admin role on the project:
az role assignment create \
  --scope "$AZURE_PROJECT_ID" \
  --role "DevCenter Project Admin" \
  --assignee-object-id $MY_AZURE_ID \
  --assignee-principal-type User
1.6 Create project environment types
At the project level, platform engineers specify which environment types are appropriate for the development team.
Create a new project environment type for each of the environment types you created on the dev center:
az devcenter admin project-environment-type create \
  --name Dev \
  --roles "{\"b24988ac-6180-42a0-ab88-20f7382dd24c\":{}}" \
  --deployment-target-id /subscriptions/$AZURE_SUBSCRIPTION_ID \
  --resource-group $AZURE_RESOURCE_GROUP \
  --location $LOCATION \
  --project $AZURE_PROJECT \
  --identity-type SystemAssigned \
  --status Enabled
az devcenter admin project-environment-type create \
  --name Test \
  --roles "{\"b24988ac-6180-42a0-ab88-20f7382dd24c\":{}}" \
  --deployment-target-id /subscriptions/$AZURE_SUBSCRIPTION_ID \
  --resource-group $AZURE_RESOURCE_GROUP \
  --location $LOCATION \
  --project $AZURE_PROJECT \
  --identity-type SystemAssigned \
  --status Enabled
az devcenter admin project-environment-type create \
  --name Prod \
  --roles "{\"b24988ac-6180-42a0-ab88-20f7382dd24c\":{}}" \
  --deployment-target-id /subscriptions/$AZURE_SUBSCRIPTION_ID \
  --resource-group $AZURE_RESOURCE_GROUP \
  --location $LOCATION \
  --project $AZURE_PROJECT \
  --identity-type SystemAssigned \
  --status Enabled
2. Create a key vault
In this section, you create a new key vault. You use this key vault later in the tutorial to save a personal access token from GitHub.
az keyvault create \
  --name $AZURE_KEYVAULT \
  --resource-group $AZURE_RESOURCE_GROUP \
  --location $LOCATION \
  --enable-rbac-authorization true
Again, save the id from the previous command's JSON output as an environment variable:
AZURE_KEYVAULT_ID=<id>
Give yourself the Key Vault Administrator role on the new key vault:
az role assignment create \
  --scope $AZURE_KEYVAULT_ID \
  --role "Key Vault Administrator" \
  --assignee-object-id $MY_AZURE_ID \
  --assignee-principal-type User
Assign the dev center's identity the role of Key Vault Secrets User:
az role assignment create \
  --scope $AZURE_KEYVAULT_ID \
  --role "Key Vault Secrets User" \
  --assignee-object-id $AZURE_DEVCENTER_PRINCIPAL_ID \
  --assignee-principal-type ServicePrincipal
3. Create and configure a GitHub repository
In this section, you create a new GitHub repository to store a catalog. Azure Deployment Environments supports both GitHub and Azure Repos repositories. In this tutorial, you use GitHub.
3.1 Create a GitHub repository
In this step, you create a new repository in your GitHub account that has a predefined directory structure, branches, and files. These items are generated from a sample template repository.
Generate a new GitHub repository from the sample template:
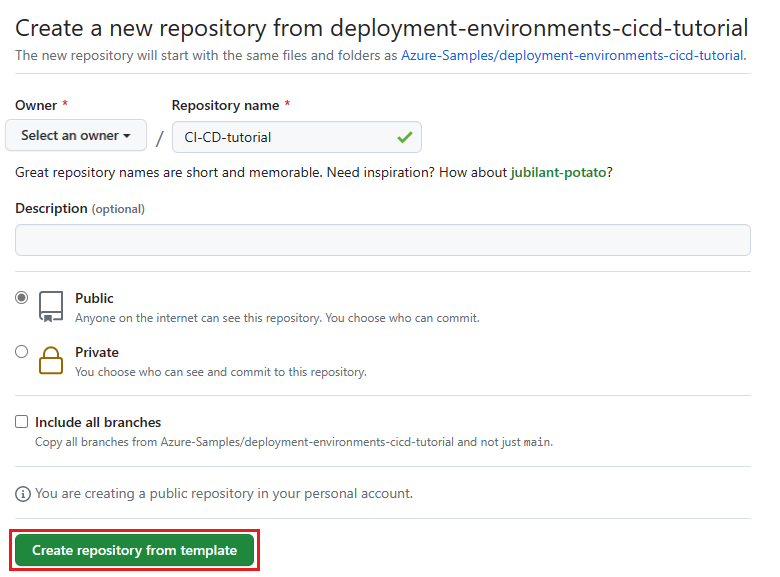
If you don't have a paid GitHub account, set your repository to Public.
Select Create repository.

3.2 Protect the repository's main branch
You can protect important branches by setting branch protection rules. Protection rules define whether collaborators can delete a branch or force push to the branch. They also set requirements for pushes to the branch, such as passing status checks or enforcing a linear commit history.
Note
Protected branches are available in public repositories with GitHub Free and GitHub Free for organizations. They're also available in public and private repositories with GitHub Pro, GitHub Team, GitHub Enterprise Cloud, and GitHub Enterprise Server. For more information, see GitHub plans.
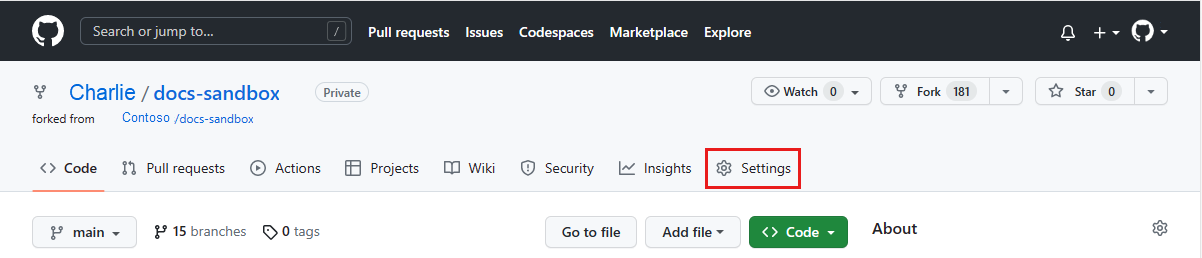
If it's not already open, go to the main page of your repository.
Select Settings in the menu at the top of the window:
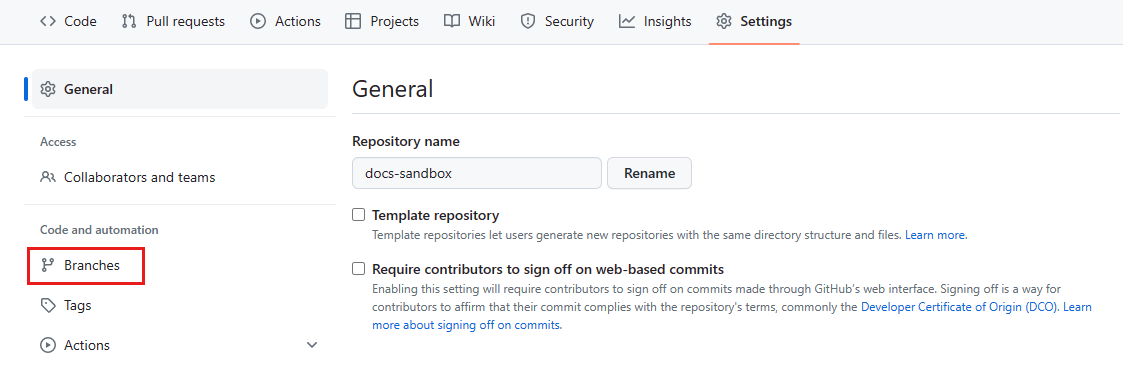
In the Code and automation section of the left sidebar, select Branches:
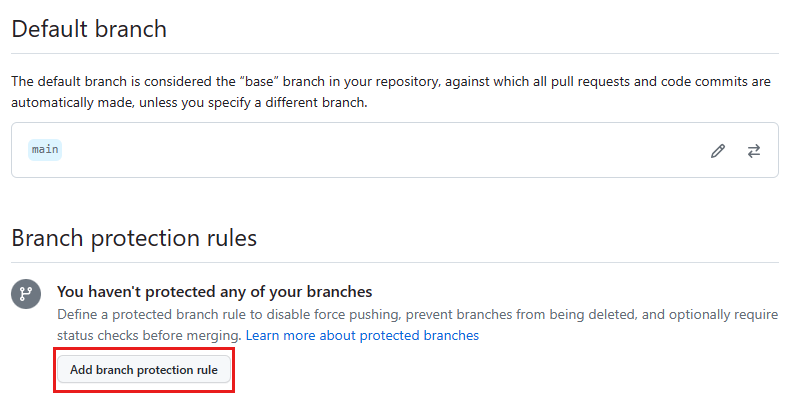
Under Branch protection rules, select Add branch ruleset:
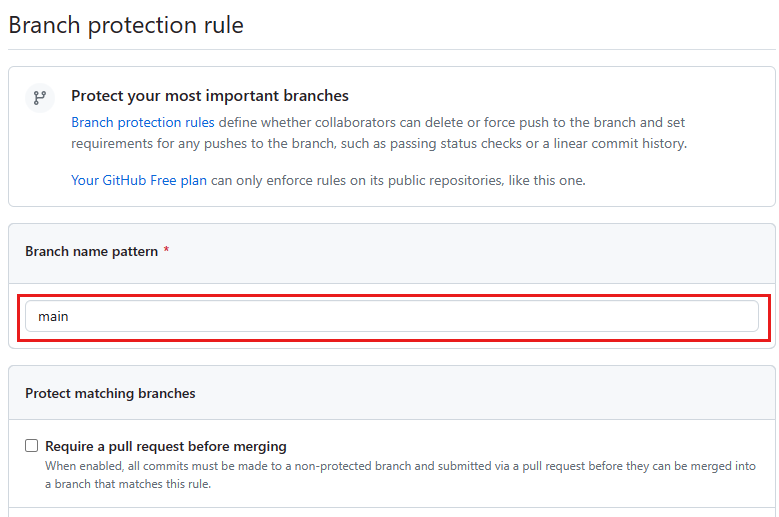
On the New branch ruleset page, in Ruleset Name, enter CI-CD-tutorial-ruleset:
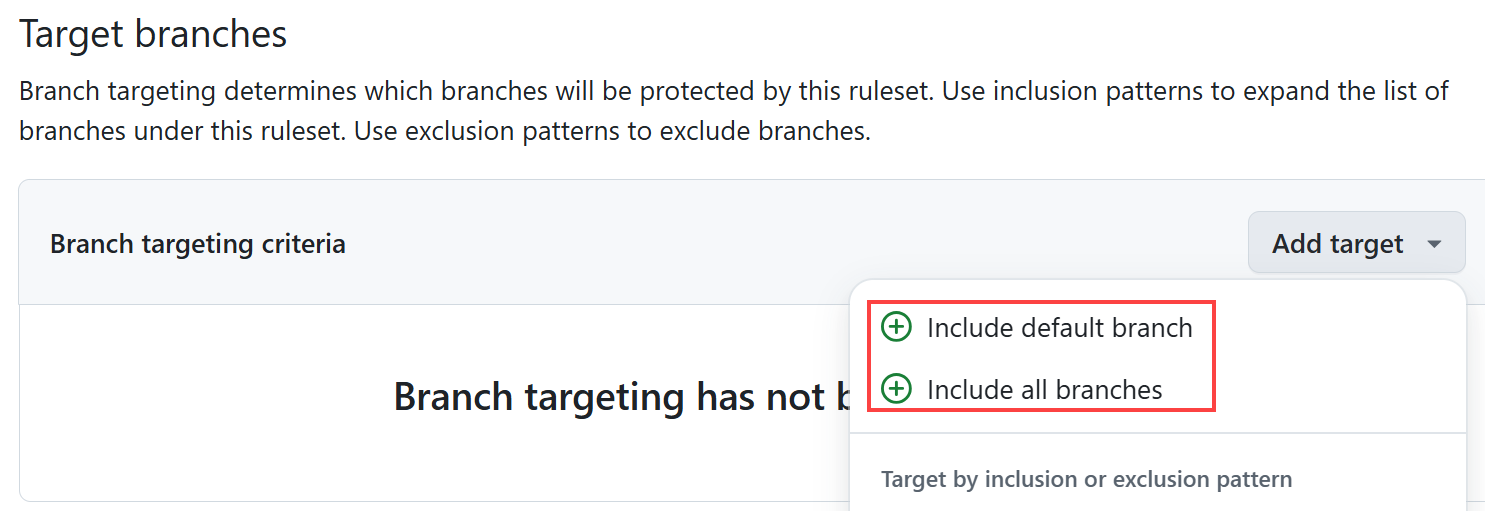
Under Target branches, select Add target, and then select either Include default branch or Include all branches:
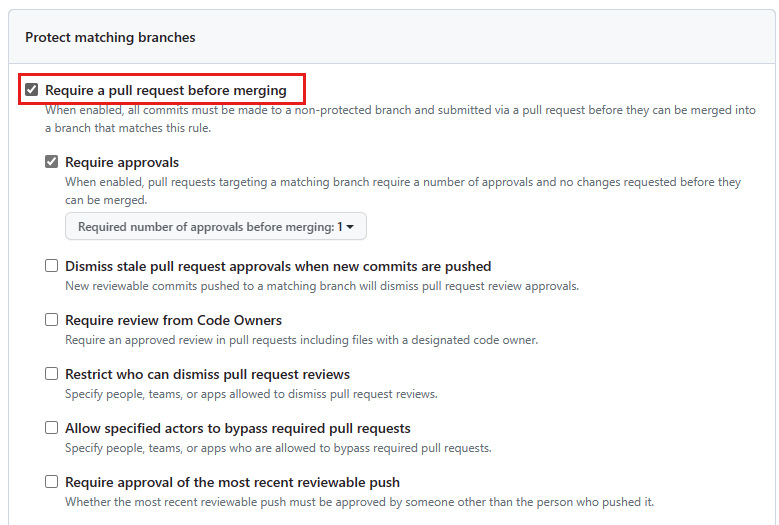
Under Branch rules, select Require a pull request before merging:
Optionally, you can enable more protection rules.
Select Create.


3.3 Configure repository variables
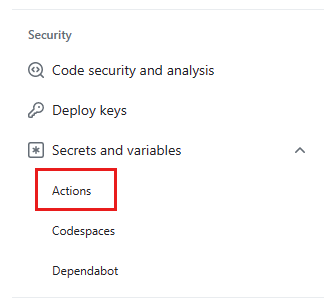
In the Security section of the sidebar, select Secrets and variables, and then select Actions:
Select the Variables tab.
For each item in the following table:
- Select New repository variable.
- In the Name field, enter the variable name.
- In the Value field, enter the value described in the table.
- Select Add variable.
Variable name Variable value AZURE_DEVCENTER Your dev center name AZURE_PROJECT Your project name AZURE_CATALOG Set to Environments AZURE_CATALOG_ITEM Set to FunctionApp AZURE_SUBSCRIPTION_ID Your Azure subscription ID AZURE_TENANT_ID Your Azure tenant ID 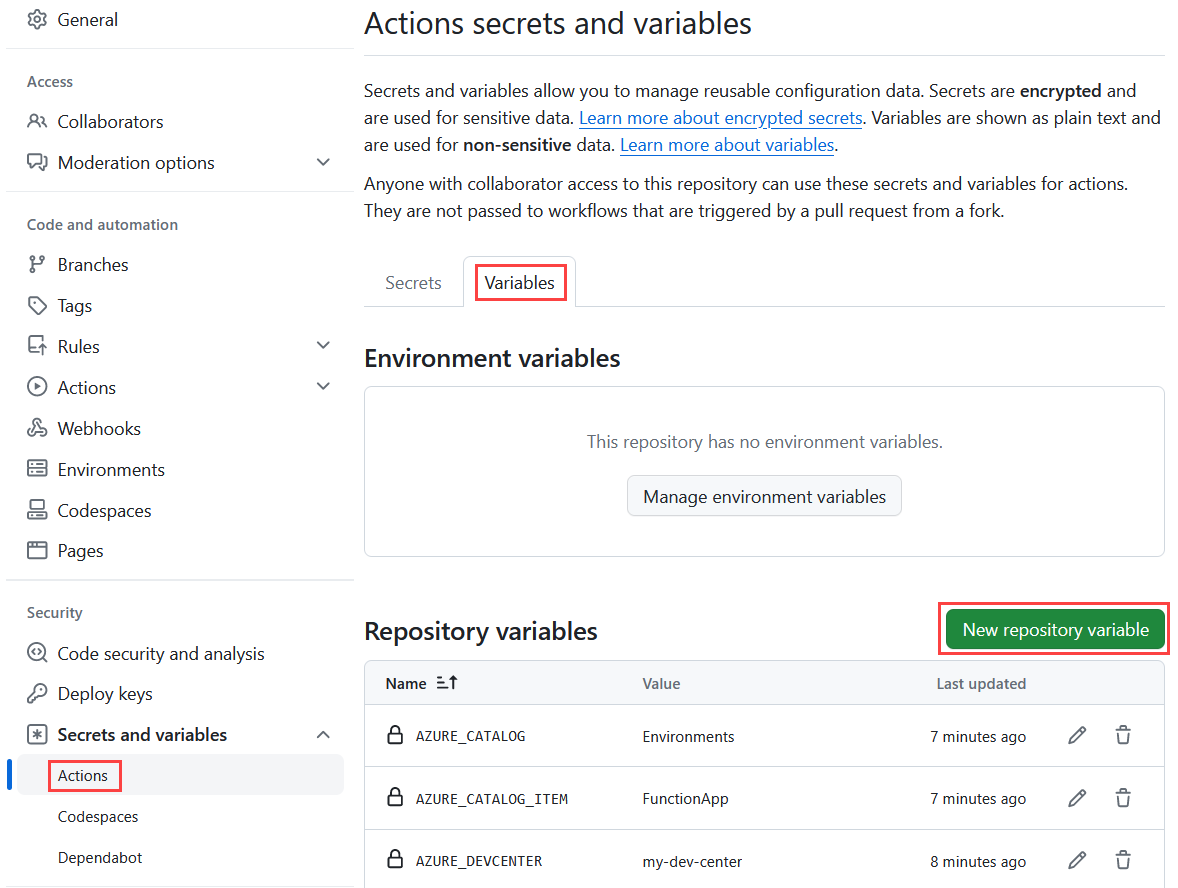


3.4 Create a GitHub personal access token
Next, create a fine-grained personal access token to enable your Azure Deployment Environments dev center to connect to your repository and consume the environment catalog.
Note
You can leave feedback on fine-grained personal access tokens in the feedback discussion.
In the upper-right corner of any page on GitHub.com, select your profile photo, and then select Settings.
In the left sidebar, select Developer settings.
In the left sidebar, under Personal access tokens, select Fine-grained tokens, and then select Generate new token:

On the New fine-grained personal access token page, under Token name, enter a name for the token.
Under Expiration, select an expiration for the token.
Under Resource owner, select your GitHub user name.
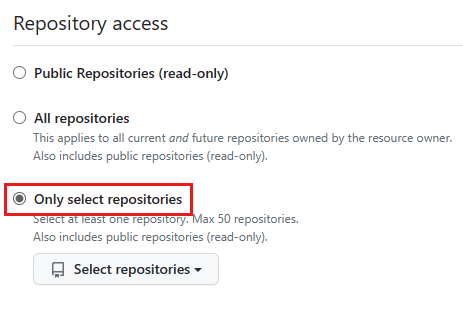
Under Repository access, select Only select repositories. Under Selected repositories, search for and select the repository you created:
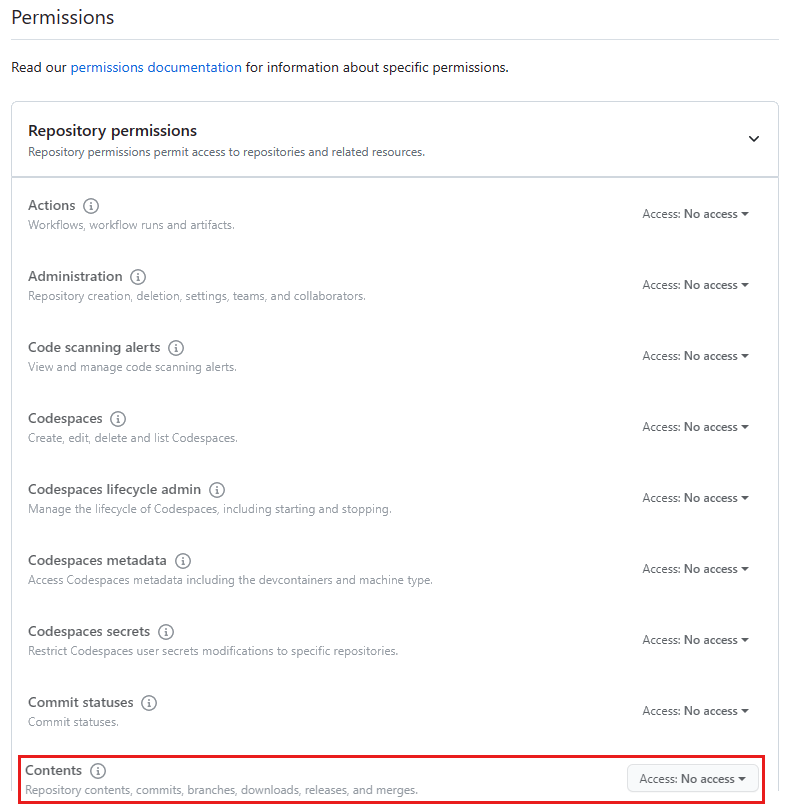
Under Permissions, select Repository permissions, and then change Contents to Read-only:
Select Generate token.
Copy and save your personal access token immediately. You aren't able to view it again.


3.5 Save your personal access token to the key vault
Next, save the personal access token as a key vault secret named pat:
az keyvault secret set \
    --name pat \
    --vault-name $AZURE_KEYVAULT \
    --value <personalAccessToken>
4. Connect the catalog to your dev center
In Azure Deployment Environments, a catalog is a repository that contains a set of environment definitions. Catalog items consist of an infrastructure-as-code (IaC) template and an environment file that acts as a manifest. The template defines the environment, and the environment file provides metadata about the template. Development teams use environment definitions from the catalog to create environments.
The template you used to create your GitHub repository contains a catalog in the Environments folder.
Add the catalog to your dev center
In the following command, replace < Organization/Repository > with your GitHub organization and repository name:
az devcenter admin catalog create \
    --name Environments \
    --resource-group $AZURE_RESOURCE_GROUP \
    --dev-center $AZURE_DEVCENTER \
    --git-hub path="/Environments" branch="main" secret-identifier="https://$AZURE_KEYVAULT.vault.azure.net/secrets/pat" uri="https://github.com/< Organization/Repository >.git"
5. Configure deployment identities
OpenID Connect with GitHub Actions is an authentication method that uses short-lived tokens to provide hardened security. It's the recommended way to authenticate GitHub Actions to Azure.
You can also authenticate a service principal directly by using a secret, but that's out of scope for this tutorial.
5.1 Generate deployment identities
Register Microsoft Entra applications and service principals for each of the three environment types.
Create the Microsoft Entra application for Dev:
az ad app create --display-name "$AZURE_PROJECT-Dev"This command outputs JSON with an
idthat you use when creating federated credentials with Graph API, and anappId(also called a client ID).Set the following environment variables:
DEV_AZURE_CLIENT_ID=<appId>
DEV_APPLICATION_ID=<id>
Repeat these steps for Test:
az ad app create --display-name "$AZURE_PROJECT-Test"TEST_AZURE_CLIENT_ID=<appId> TEST_APPLICATION_ID=<id>Repeat the steps again for Prod:
az ad app create --display-name "$AZURE_PROJECT-Prod"PROD_AZURE_CLIENT_ID=<appId> PROD_APPLICATION_ID=<id>Create a service principal for each application.
Run the following command to create a new service principal for Dev:
az ad sp create --id $DEV_AZURE_CLIENT_IDThis command generates JSON output with a different
idthat will be used in the next step.Set the following environment variable:
DEV_SERVICE_PRINCIPAL_ID=<id>Repeat these steps for Test:
az ad sp create --id $TEST_AZURE_CLIENT_IDTEST_SERVICE_PRINCIPAL_ID=<id>Repeat the steps again for Prod:
az ad sp create --id $PROD_AZURE_CLIENT_IDPROD_SERVICE_PRINCIPAL_ID=<id>Run the following commands to create a new federated identity credential for each Microsoft Entra application.
In each of the three following commands, replace
< Organization/Repository >with your GitHub organization and repository name.Create the federated identity credential for Dev:
az rest --method POST \
    --uri "https://graph.microsoft.com/beta/applications/$DEV_APPLICATION_ID/federatedIdentityCredentials" \
    --body '{"name":"ADEDev","issuer":"https://token.actions.githubusercontent.com","subject":"repo:< Organization/Repository >:environment:Dev","description":"Dev","audiences":["api://AzureADTokenExchange"]}'
Create the credential for Test:
az rest --method POST \
    --uri "https://graph.microsoft.com/beta/applications/$TEST_APPLICATION_ID/federatedIdentityCredentials" \
    --body '{"name":"ADETest","issuer":"https://token.actions.githubusercontent.com","subject":"repo:< Organization/Repository >:environment:Test","description":"Test","audiences":["api://AzureADTokenExchange"]}'
Create the credential for Prod:
az rest --method POST \
    --uri "https://graph.microsoft.com/beta/applications/$PROD_APPLICATION_ID/federatedIdentityCredentials" \
    --body '{"name":"ADEProd","issuer":"https://token.actions.githubusercontent.com","subject":"repo:< Organization/Repository >:environment:Prod","description":"Prod","audiences":["api://AzureADTokenExchange"]}'
5.2 Assign roles to deployment identities
Assign each deployment identity the Reader role on the project:
az role assignment create \
    --scope "$AZURE_PROJECT_ID" \
    --role Reader \
    --assignee-object-id $DEV_SERVICE_PRINCIPAL_ID \
    --assignee-principal-type ServicePrincipal
az role assignment create \ --scope "$AZURE_PROJECT_ID" \ --role Reader \ --assignee-object-id $TEST_SERVICE_PRINCIPAL_ID \ --assignee-principal-type ServicePrincipalaz role assignment create \ --scope "$AZURE_PROJECT_ID" \ --role Reader \ --assignee-object-id $PROD_SERVICE_PRINCIPAL_ID \ --assignee-principal-type ServicePrincipalAssign the Deployment Environments User role to the corresponding environment type of each deployment identity:
az role assignment create \
    --scope "$AZURE_PROJECT_ID/environmentTypes/Dev" \
    --role "Deployment Environments User" \
    --assignee-object-id $DEV_SERVICE_PRINCIPAL_ID \
    --assignee-principal-type ServicePrincipal
az role assignment create \ --scope "$AZURE_PROJECT_ID/environmentTypes/Test" \ --role "Deployment Environments User" \ --assignee-object-id $TEST_SERVICE_PRINCIPAL_ID \ --assignee-principal-type ServicePrincipalaz role assignment create \ --scope "$AZURE_PROJECT_ID/environmentTypes/Prod" \ --role "Deployment Environments User" \ --assignee-object-id $PROD_SERVICE_PRINCIPAL_ID \ --assignee-principal-type ServicePrincipal
6. Configure GitHub environments
With GitHub environments, you can configure environments with protection rules and secrets. A workflow job that references an environment must follow any protection rules for the environment before running or accessing the environment's secrets.
Create Dev, Test, and Prod environments that map to the environment types in the Azure Deployment Environments project.
Note
Environments, environment secrets, and environment protection rules are available in public repositories for all products. For access to environments, environment secrets, and deployment branches in private or internal repositories, you must use GitHub Pro, GitHub Team, or GitHub Enterprise. For access to other environment protection rules in private or internal repositories, you must use GitHub Enterprise. For more information, see GitHub plans.
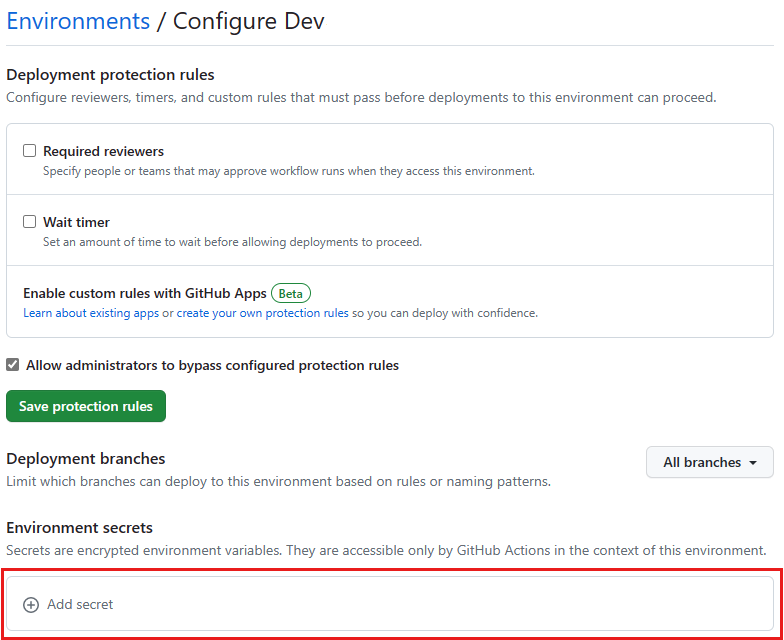
6.1 Create the Dev environment
In GitHub, go to the main page of your repository.
Under your repository name, select Settings. If you can't see the Settings tab, select the ... dropdown menu, and then select Settings.
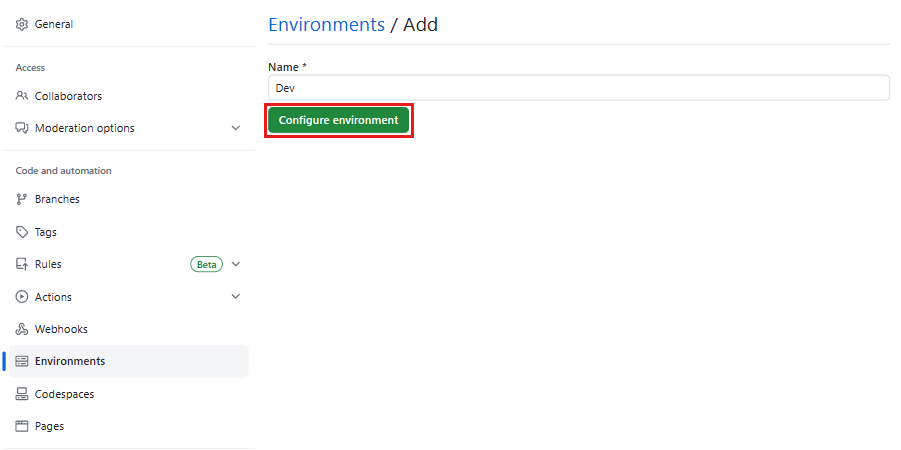
In the left sidebar, select Environments.
Select New environment and enter Dev for the environment name, and then select Configure environment:
Under Environment secrets, select Add environment secret, and then enter AZURE_CLIENT_ID in the Name box.
In the Value box, enter the client ID (
appId) for the Dev Microsoft Entra app you created earlier (saved as the$DEV_AZURE_CLIENT_IDenvironment variable):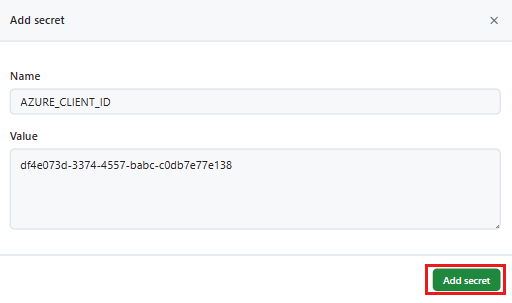
Select Add secret.


6.2 Create the Test environment
Return to the main environments page by selecting Environments in the left sidebar.
Select New environment, enter Test for the environment name, and then select Configure environment.
Under Environment secrets, select Add environment secret, and then enter AZURE_CLIENT_ID in the Name box.
In the Value box, enter the client ID (
appId) for the Test Microsoft Entra app you created earlier (saved as the$TEST_AZURE_CLIENT_IDenvironment variable).Select Add secret.
6.3 Create the Prod environment
Once more, return to the main environments page by selecting Environments in the left sidebar.
Select New environment, enter Prod for the environment name, and then select Configure environment.
Under Environment secrets, select Add environment secret, and then enter AZURE_CLIENT_ID in the Name box.
In the Value box, enter the client ID (
appId) for the Prod Microsoft Entra app you created earlier (saved as the$PROD_AZURE_CLIENT_IDenvironment variable).Select Add secret.
Next, set yourself as a required reviewer for this environment. When an attempt is made to deploy to Prod, GitHub Actions must have an approval before starting. While a job is awaiting approval, it has a status of Waiting. If a job isn't approved within 30 days, it automatically fails.
For more information about environments and required approvals, see Using environments for deployment.
Select Required reviewers.
Search for and select your GitHub user name. You can enter up to six people or teams. Only one of the required reviewers needs to approve the job for it to proceed.
Select Save protection rules.
Finally, configure main as the deployment branch:
In the Deployment branches and tags list, select Selected branches and tags.
Select Add deployment branch or tag rule. Ensure that Ref type: Branch is selected, and then enter main in the Name pattern box.
Select Add rule.
7. Test the CI/CD pipeline
In this section, you make some changes to the repository and test the CI/CD pipeline.
7.1 Clone the repository
In Git Bash, use
cdto switch to a folder where you want to clone your repository locally.Clone the repository. Be sure to replace
< Organization/Repository >in the following command with your GitHub organization and repository name.git clone https://github.com/< Organization/Repository >.gitNavigate into the cloned directory:
cd <repository>Create a new branch and publish it remotely:
git checkout -b feature1git push -u origin feature1A new environment, specific to this branch, is created in Azure.
In GitHub, go to the main page of your newly created repository.
Under your repository name, select Actions:
You should see a new Create Environment workflow running.
7.2 Make a change to the code
Open the locally cloned repo in Visual Studio Code.
In the ADE.Tutorial folder, make a change to a file.
Save your change.
7.3 Push your changes to update the environment
Stage your changes and push to the
feature1branch:git add . git commit -m '<commit message>' git pushOn your repository's Actions page, you see a new Update Environment workflow running.
7.4 Create a pull request
Create a GitHub pull request
main <- feature1.On your repository's Actions page, you see that a new workflow is started to create an environment that's specific to the pull request. The Test environment type is used.
7.5 Merge the pull request
In GitHub, go to the pull request you created.
Merge the pull request.
Your changes are published into the production environment, and the branch and pull request environments are deleted.
Clean up resources
If you don't plan to use any of the resources that you created, delete them so you don't incur any further charges. If you've deployed the sample application in a different resource group, you might want to repeat the following steps.
To delete resources by using the Azure portal:
Select the menu button in the upper-left corner, and then select Resource groups.
From the list, select the resource group that you created.
Select Delete resource group.
Enter the resource group name. Then select Delete.
To delete resources by using the Azure CLI, enter the following command:
az group delete --name <my-dev-center-rg>
Remember, deleting the resource group deletes all of the resources within it.
Related content
- Create and access an environment by using the Azure CLI
- For complete command listings, see the Microsoft Dev Box and Azure Deployment Environments Azure CLI documentation