Note
Access to this page requires authorization. You can try signing in or changing directories.
Access to this page requires authorization. You can try changing directories.
This article provides guidance on how to set up and use dev box with virtual switches. Virtual switches are used to connect dev boxes and other virtual machines (VMs) to both virtual networks and physical networks. They provide a way for dev boxes to communicate with each other and with external networks.
Dev box supports nested virtualization. You can create virtual machines inside a dev box and connect them to the default virtual switch Default Switch. If you want to create another virtual switch with internet access, set up a NAT network with an internal virtual switch. Use an IP address range that suits your required configuration.
Warning
Incorrect configuration of virtual switch will cause you to lose the connection to dev box immediately and this is NOT reversible. Please setup with extreme care.
Prerequisites
- A dev box with Hyper-V and Virtual Machine Platform installed.
Create virtual switch with NAT network
Create a virtual switch with a NAT network to enable internet access for your dev box and its guest VMs.
Create internal virtual switch:
New-VMSwitch -SwitchName "VM-Internal" -SwitchType InternalCreate an IP address for the NAT gateway
New-NetIPAddress -IPAddress 192.168.100.1 -PrefixLength 24 -InterfaceIndex 34To find the InterfaceIndex, run
Get-NetAdapter. Use the ifIndex of the adapter linked to the VM-Internal switch. If you choose a different IP range, ensure the IP address ends with “.1”.Create the NAT network
New-NetNat -Name VM-Internal-Nat -InternalIPInterfaceAddressPrefix 192.168.100.0/24
Configure guest VMs
Configure guest virtual machines (VMs) to use the virtual switch.
Create guest virtual machines (VMs) in your dev box, using the VM-Internal virtual switch. At this stage, the guest VM doesn't have internet access because it doesn't have an IP address.
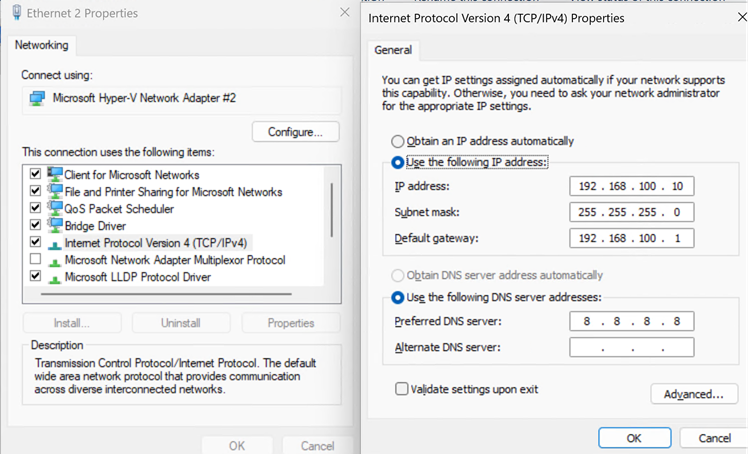
Assign IP addresses to the guest VM.
- On the guest VM, set the IP address to an available address in the range, like 192.168.100.10, 192.168.100.11, etc.
- Use the subnet mask 255.255.255.0, default gateway 192.168.100.1, and your desired DNS (for example, 8.8.8.8 for internet or your dev box's DNS).
- Open Network Connections, right-click the network adapter, select Properties > Internet Protocol Version 4 (TCP/IPv4).

After setting the IP address, the setup is complete. Verify that you have:
- Internet access from the guest VM.
- Access between guest VMs.
- Access to guest VMs from the dev box.