Note
Access to this page requires authorization. You can try signing in or changing directories.
Access to this page requires authorization. You can try changing directories.
The Azure Developer CLI (azd) utilizes templates to provision and deploy app resources to the cloud. Developers can add support for azd commands and features by converting their applications to templates. This article provides a contextual overview of the different options for building azd templates. Once you understand the concepts in this article, visit the following resources for more detailed implementation guides:
- Use an existing template for your app.
- Create a template from your app code
- Training - build and deploy
azdtemplates
Note
This article assumes a general understanding of azd templates. Visit the template overview doc for more information about templates.
Template creation concepts
Creating an azd template requires adding specific configuration and infrastructure assets to your existing code base, or starting a new app from an existing template those same assets. Both workflows are explained in later sections. All azd templates share a similar file structure based around azd conventions. The following diagram gives a quick overview of the process to create an azd template:
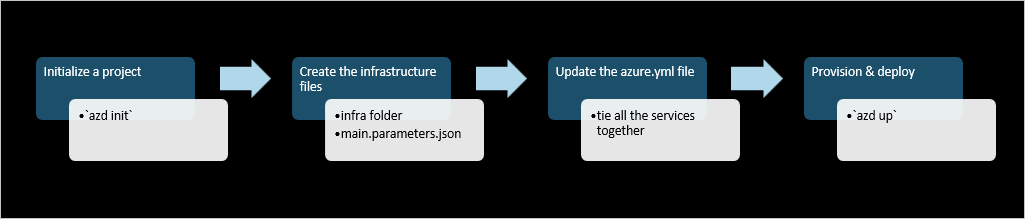
Every azd template requires the following minimum resources:
- An
infrafolder that holds the infrastructure as code (Bicep or Terraform) files. - An
azure.yamlconfiguration file that maps your application services to the provisioned infrastructure resources.
Other optional directories are often included as well, such as a .github folder with assets to create a CI/CD pipeline. Visit the template overview doc for more information about templates.
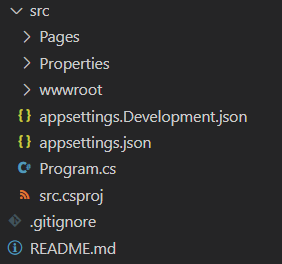
Consider the following sample app repository:
After converting this sample app to an azd template, the same app repository contains the following:
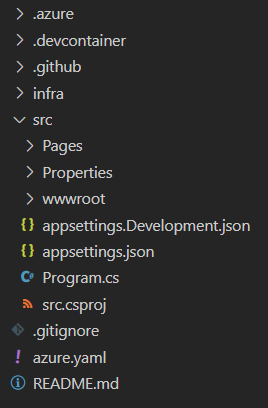
The original app resources are unchanged, but new assets were added that azd depends on for commands such as azd up:
- An
infrafolder was added that includes Bicep files to create Azure resources. - An
azure.yamlconfiguration file was added to map the app code in thesrcdirectory to the provision Azure resources. - A
.azurefolder was created to holdazdenvironment variables. - A
.githubfolder (optional) was added to support CI/CD pipelines through GitHub actions.
Template creation workflows
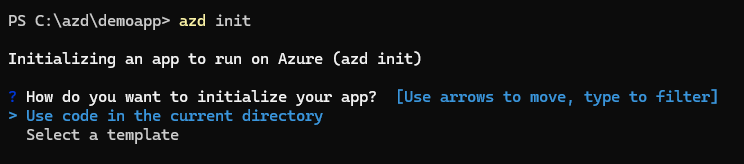
The azd init command is used to initialize an azd template for provisioning and deploying the app resources on Azure. The command prompts you to choose between two different workflows to initialize a template that are outlined in the following sections - Use code in the current directory and Use an existing template.
Run the azd init command in the root of the directory you'd like to convert to an azd template:
azd init
Use code in the current directory
This option instructs azd to analyze the code in your directory to identity which technologies it uses, such as the programming language, framework and database system. azd automatically generates template assets for you, such as the azure.yaml service definition file and the infra folder with infrastructure-as-code files. The generated assets are a starting point for additional modifications. Use this approach if you plan to use common Azure services supported by azd scaffolding features.
Visit the Start with your app code to create a template tutorial for details on how to implement this approach and more information on which Azure resources support automatic detection and scaffolding.
Select a template
Select this option to use an existing template that defines many of your Azure resources and architectural goals as a starting point. azd will prompt you to select a starter template or another template from the awesome-azd gallery. When you select a template, the assets of that template are added to your existing project directory to use as a starting point. Some templates include sample app code that you can replace with your own, while some (called "starter templates") are infrastructure only.
Use the azd init command to pull down an existing template to an empty directory and use it as a starting point for your own app. If the template includes app source code, you can either build off of that code or replace the source code directory with your own.
Visit the Start with an existing template tutorial for details on how to implement this approach.
See also
Request help
For information on how to file a bug, request help, or propose a new feature for the Azure Developer CLI, please visit the troubleshooting and support page.