You can manage the performance and cost of your Managed DevOps Pools instance by configuring scaling settings. For information on pricing and performance, see Manage cost and performance.
Agent state
You can configure pools as:
- Stateless: Provide a fresh agent for every job.
- Stateful: Allow sharing of agents between multiple jobs.
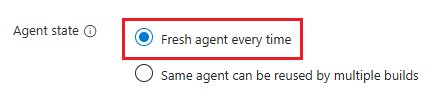
The default setting for a pool is stateless, which you can achieve by using the Fresh agent every time setting. In some cases, teams might want to reuse agents to reuse the packages or files created during the previous pipeline run. Build workload is a common scenario where teams want to preserve state and reuse agents. You can achieve stateful pools through Managed DevOps Pools while balancing it with security best practices. An agent can be reused for a maximum of seven days by default, but you can configure it to be recycled sooner.
Note
Security agents recommend that users use stateless pools as a defense against supply chain attacks. Use the agent state setting Fresh agent every time.
Stateless pools
When you configure a stateless agent, a new agent is procured for each job. The agent is discarded after the job finishes.
To learn more about the lifecycle of stateless agents and how they're used in Azure Pipelines, see the Lifecycle of agents and potential delays in allocation section.
You can configure agents by using the agentProfile property in the Managed DevOps Pools resource. The following example specifies a Stateless agent.
{
    "$schema": "https://schema.management.azure.com/schemas/2019-04-01/deploymentTemplate.json#",
    "contentVersion": "1.0.0.0",
    "resources": [
        {
            "name": "fabrikam-managed-pool",
            "type": "microsoft.devopsinfrastructure/pools",
            "apiVersion": "2025-09-20",
            "location": "eastus",
            "properties": {
                ...
                "agentProfile": {
                    "kind": "Stateless"
                }
            }
        }
    ]
}
You can configure agents by using the agent-profile parameter when you create or update a pool.
The following example specifies a Stateless agent with no standby agents.
az mdp pool create \
   --agent-profile agent-profile.json
   # other parameters omitted for space
The following example shows the contents of the agent-profile.json file.
{
    "Stateless": {}
}
You can configure agents by using the agentProfile property in the Managed DevOps Pools resource. The following example specifies a Stateless agent.
resource managedDevOpsPools 'Microsoft.DevOpsInfrastructure/pools@2025-09-20' = {
  name: 'fabrikam-managed-pool'
  location: 'eastus'
  properties: {
    ...
    agentProfile: {
      kind: 'Stateless'
    }
  }
}
When you set Agent state to Fresh agent every time, a new agent is procured for each job. The agent is discarded after the job finishes.
Stateful pools
{
    "$schema": "https://schema.management.azure.com/schemas/2019-04-01/deploymentTemplate.json#",
    "contentVersion": "1.0.0.0",
    "resources": [
        {
            "name": "fabrikam-managed-pool",
            "type": "microsoft.devopsinfrastructure/pools",
            "apiVersion": "2025-09-20",
            "location": "eastus",
            "properties": {
                ...
                "agentProfile": {
                    "maxAgentLifetime": "7.00:00:00",
                    "gracePeriodTimeSpan": "00:30:00",
                    "kind": "Stateful"
                }
            }
        }
    ]
}
You can configure agents by using the agent-profile parameter when you create or update a pool.
The following example specifies a Stateful agent with a seven-day maximum lifetime and a thirty-minute grace period.
az mdp pool create \
   --agent-profile agent-profile.json
   # other parameters omitted for space
The following example shows the contents of the agent-profile.json file.
{
    "Stateful":
    {
        "maxAgentLifetime": "7.00:00:00",
        "gracePeriodTimeSpan": "00:30:00"
    }
}
resource managedDevOpsPools 'Microsoft.DevOpsInfrastructure/pools@2025-09-20' = {
  name: 'fabrikam-managed-pool'
  location: 'eastus'
  properties: {
    ...
    agentProfile: {
      kind: 'Stateful'
      maxAgentLifetime: '7.00:00:00'
      gracePeriodTimeSpan:'00:30:00'
    }
  }
}
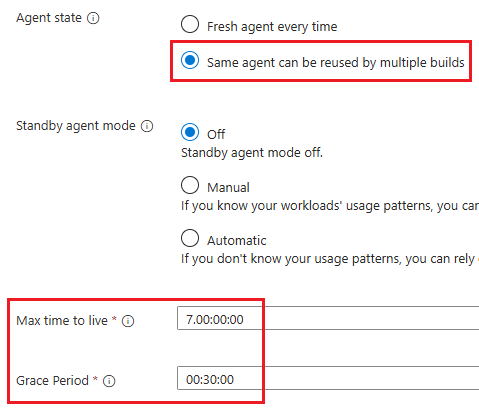
When you enable Same agent can be used by multiple builds (the "kind": "stateful" setting in resources templates or the { "stateful": {...} } setting in the Azure CLI), agents in the pool are stateful. You can configure stateful pools by using the following settings:
Max time to live for standby agents (maxAgentLifetime) configures the maximum duration an agent in a stateful pool can run before it's shut down and discarded. The format for Max time to live for standby agents is dd.hh:mm:ss. The default value of Max time to live for standby agents is set to the maximum allowed duration of seven days (7.00:00:00).
Grace Period (gracePeriodTimeSpan) configures the amount of time an agent in a stateful pool waits for new jobs before shutting down after all current and queued jobs finish. The format for Grace Period is dd.hh:mm:ss and the default is no grace period.
Important
If a job is running when the Max time to live for standby agents interval expires, the agent won't shut down until the job finishes, unless the job takes longer than two days to run. Individual jobs in Managed DevOps Pools can run for a maximum of two days, even if they're running on a standby agent with more than two days configured for Max time to live for standby agents. (Managed DevOps Pool supports pipelines that run longer than two days, by splitting them into multiple shorter jobs that each complete in two days or less.)
Agents in stateless pools are shut down and discarded after every job. Agents in stateful pools continue running if any of the following conditions are met:
- If another job is queued when the first job finishes, Managed DevOps Pools sends the queued job to the agent that ran the first job instead of shutting it down.
- If there's a grace period configured for the pool, agents wait for new jobs for the duration specified by the grace period before shutting down.
- If standby agents are enabled, and the agent image meets the criteria of the active provisioning period, the agent continues to run and wait for jobs.
Agents that are running in stateful pools are shut down and discarded if they run continuously for the duration specified by Max time to live for standby agents, even if the previous conditions are true. For example, if Max time to live for standby agents is configured for three days, and Standby agent mode is set to Manual, All Week Scheme (Machines available 24/7), the agents restart after three continuous days of uptime.
Important
Agents in stateful pools can still be shut down and discarded after a job finishes if there's no grace period, no active provisioning period for standby agents, and no queued jobs that match the agent. When an agent is discarded, any state is lost.
Grace periods enable the most cost-effective way of running stateful pools for pipelines with consistent load. Grace periods don't require the use of standby agent mode to keep agents online and ready to accept jobs.
Standby agent mode
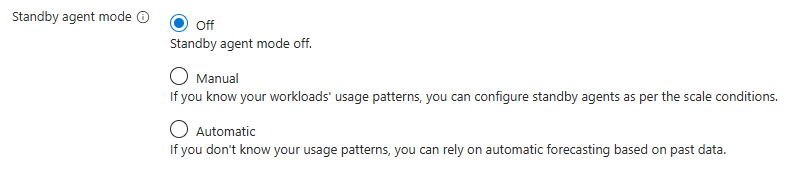
When you create a pool, Standby agent mode is off by default. When Standby agent mode is off, there are no standby agents to immediately assign to your pipelines. Your pipelines might have to wait anywhere from a few moments to 15 minutes for an agent to be provisioned on demand. For better performance, enable Standby agent mode and configure a standby agent schedule that provides capacity for your workload.
When you configure a standby agent schedule, Managed DevOps Pools periodically compares the count of provisioned agents with the standby agent count that you specify in the current provisioning scheme. It starts new agents as required to maintain the standby agent count. You can view the current status and count of the agents in your pool by using the Agents pane.
Important
The provisioning count in a scheme can't be greater than the Maximum agents value that you configure in Pool settings.
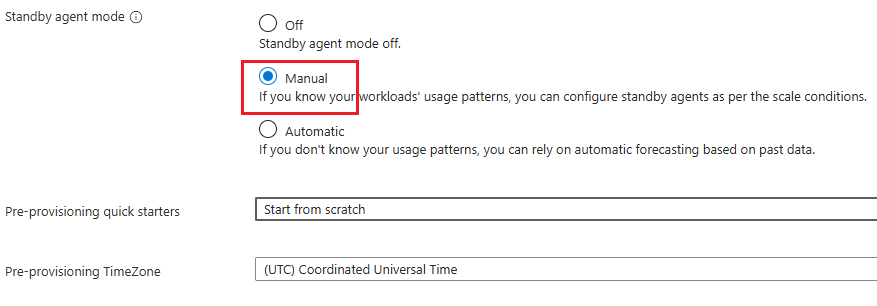
You can configure standby agent mode by using the following settings:
- Off: Standby agent mode is off and agents are provisioned on demand when jobs are queued.
- Manual: Configure a manual standby schedule.
- Automatic: Use an automatic standby schedule based on agent usage history. You can configure it for cost and performance.
You can configure standby agents by using the resourcePredictionsProfile section of the agentProfile property. Set "kind": "Manual" to configure a start from scratch, weekday scheme, or all-week scheme, and specify the details of the scheme in the resourcePredictions section. To configure automatic standby agents, set "kind": "Automatic". Disable standby agents by omitting the ResourcePredictionsProfile section. See the following sections for details on how to configure each scaling type.
{
    "$schema": "https://schema.management.azure.com/schemas/2019-04-01/deploymentTemplate.json#",
    "contentVersion": "1.0.0.0",
    "resources": [
        {
            "name": "fabrikam-managed-pool",
            "type": "microsoft.devopsinfrastructure/pools",
            "apiVersion": "2025-09-20",
            "location": "eastus",
            "properties": {
                ...
                "agentProfile": {
                    "kind": "Stateless",
                    "resourcePredictionsProfile": {
                        "kind": "Manual"
                    },
                    "resourcePredictions": {...}
                }
            }
        }
    ]
}
You can configure agents by using the agent-profile parameter when you create or update a pool.
You can configure standby agents by using the resourcePredictionsProfile section of the agent-profile parameter. Use the "Manual": {} setting to configure a start from scratch, weekday scheme, or all-week scheme, and specify the details of the scheme in the resourcePredictions section. To configure automatic standby agents, use the "Automatic": {} setting. See the following sections for details on how to configure each scaling type.
az mdp pool create \
   --agent-profile agent-profile.json
   # other parameters omitted for space
The following example shows the contents of the agent-profile.json file:
{
    "Stateless": {},
    "resourcePredictionsProfile": {
        "Manual": {}
    },
    "resourcePredictions": {...}
}
You can configure standby agents by using the resourcePredictionsProfile section of the agentProfile property. Use the "kind": "Manual" setting to configure a start from scratch, weekday scheme, or all-week scheme, and specify the details of the scheme in the resourcePredictions section. To configure automatic standby agents, use the kind: 'Automatic' setting. Disable standby agents by omitting the ResourcePredictionsProfile section. See the following sections for details on how to configure each scaling type.
resource managedDevOpsPools 'Microsoft.DevOpsInfrastructure/pools@2025-09-20' = {
  name: 'fabrikam-managed-pool'
  location: 'eastus'
  properties: {
    ...
    agentProfile: {
      kind: 'Stateless'
      resourcePredictionsProfile: {
        kind: 'Manual'
      }
      resourcePredictions: {...}
    }
  }
}
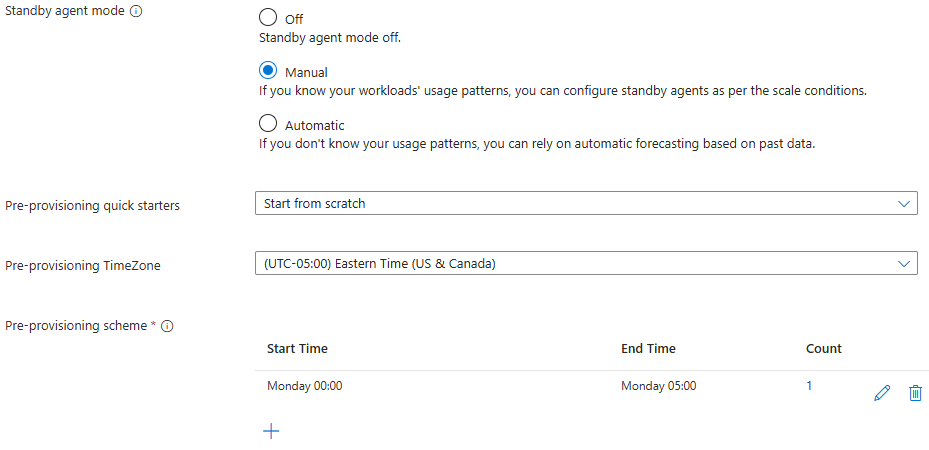
Manual
Manual mode is best for teams who know their continuous integration and continuous delivery (CI/CD) pipeline usage patterns. When you use the manual option, you need to define your pre-provisioning scheme. You define your scheme based on your understanding of what agents in the pool are most likely to be used and how many agents are likely to be used. You specify a provisioning count of agents that meet the projected demand.
You can create your own provisioning schedule or choose from one of the predefined schedules. You can configure the time zone to use to specify the schedules. The default value for Pre-provisioning TimeZone is (UTC) Coordinated Universal Time.
You can configure manual standby agents in one of the following three ways:
Each of the pre-provisioning quickstarts has the following common settings (in addition to the settings that are specific to that quickstart):
- Pre-provisioning TimeZone: Allows you to configure the time zone for the time periods in your pre-provisioning scheme. The default value for Pre-provisioning TimeZone is (UTC) Coordinated Universal Time.
- Standby agent percentage: Configures the percentage of standby agents that you want for each image. You can enter
* to ensure all images are provisioned equally, or you can specify an integer from 0 to 100 to represent a percentage. If you specify a percentage, the total for all images must equal 100. If you have a single image, specify * or 100. When you use Azure Resource Manager templates (ARM templates), you can configure the Standby agent percentage setting in the images section. For more information, see Configure images.
You can specify manual standby agent provisioning in the resourcePredictionsProfile section of agentProfile. You can configure the details in the resourcePredictions section.
{
    "$schema": "https://schema.management.azure.com/schemas/2019-04-01/deploymentTemplate.json#",
    "contentVersion": "1.0.0.0",
    "resources": [
        {
            "name": "fabrikam-managed-pool",
            "type": "microsoft.devopsinfrastructure/pools",
            "apiVersion": "2025-09-20",
            "location": "eastus",
            "properties": {
                ...
                "agentProfile": {
                    "kind": "Stateless",
                    "resourcePredictionsProfile": {
                        "kind": "Manual"
                    },
                    "resourcePredictions": {
                        "timeZone": "Eastern Standard Time",
                        "daysData": [
                            {},
                            {
                                "00:00:00": 1,
                                "04:00:00": 0
                            },
                            {},
                            {},
                            {},
                            {},
                            {}
                        ]
                    }
                }
            }
        }
    ]
}
Specify the desired time zone for your scheme by using the timeZone property. The default value is UTC. To retrieve a list of time zone names for this property, see TimeZoneInfo.GetSystemTimeZones Method.
You can define the schedule for standby agents by using the daysData list. The daysData list can have either one or seven items.
A daysData list with seven items maps to the days of the week, starting with Sunday. Each of these seven items can have zero or more "time": count entries, specifying a time in 24-hour format, and a standby agent count. The specified count of standby agents is maintained until the next "time": count entry, which can be on the same day or on a following day.
A daysData list with a single item defines an All-week scheme, where the single "time": count entry corresponds to the standby agent count for the entire week.
The following example is a manual standby agent scheme. It uses the value Eastern Standard Time with a single agent provisioned Monday through Friday, from 9:00 AM (standby agent count 1) through 5:00 PM (standby agent count 0).
{
    "kind": "Stateless",
    "resourcePredictions": {
        "timeZone": "Eastern Standard Time",
        "daysData": [
            {},
            {
                "09:00:00": 1,
                "17:00:00": 0
            },
            {
                "09:00:00": 1,
                "17:00:00": 0
            },
            {
                "09:00:00": 1,
                "17:00:00": 0
            },
            {
                "09:00:00": 1,
                "17:00:00": 0
            },
            {
                "09:00:00": 1,
                "17:00:00": 0
            },
            {}
        ]
    },
    "resourcePredictionsProfile": {
        "kind": "Manual"
    }
}
A single daysData item contains a dictionary of times and standby agent counts. Each "time" : count entry specifies the number of standby agents to schedule starting at the specified time, in 24-hour format. Consecutive "time" : count entries specify a sequence of scheduled agent counts for that day.
"daysData": [
    {}, # Schedule of standby agent count adjustments for Sunday
    {   # Schedule of standby agent count adjustments for Monday
        "09:00:00": 1, # Adjust standby agent count to 1
        "17:00:00": 0  # Adjust standby agent count to 0
    },
    {  # Schedule of standby agent count adjustments for Tuesday
        "09:00:00": 1,
        "17:00:00": 0
    },
    {  # Schedule of standby agent count adjustments for Wednesday
        "09:00:00": 1,
        "17:00:00": 0
    },
    {  # Schedule of standby agent count adjustments for Thursday
        "09:00:00": 1,
        "17:00:00": 0
    },
    {  # Schedule of standby agent count adjustments for Friday
        "09:00:00": 1,
        "17:00:00": 0
    },
    {} # Schedule of standby agent count adjustments for Saturday
]
Standby agent counts don't automatically reset back to zero at the end of a day or at the end of the week. Specifying an empty daysData item doesn't disable standby agents for that day. An empty daysData item means that there are no changes to the standby agent count schedule for that day. To set the standby agent to zero starting at a specific time period, you must explicitly provide a "time" : count entry with a count of 0.
Examples
To make no adjustment to the standby agent count specified at the conclusion of the previous day (or week if you're configuring the first period of the week), specify a daysData item with zero entries:
{}
To schedule a single standby agent to start at 09:00:00 and stop at 17:00:00 (by using the time zone specified by the resourcePredictions property), specify the following configuration:
{
    "09:00:00": 1,
    "17:00:00": 0
}
To schedule a single standby agent starting from midnight through 09:00:00, followed by 10 standby agents until 17:00:00, specify the following configuration:
{
    "00:00:00": 1,
    "09:00:00": 10,
    "17:00:00": 0
}
To schedule a standby agent to be available starting at 09:00:00 on the specified day, and stopping at 17:00:00 the following day, use two consecutive daysData items:
{
    "09:00:00": 1
},
{
    "17:00:00": 0
}
You can configure agents by using the agent-profile parameter when you create or update a pool.
az mdp pool create \
   --agent-profile agent-profile.json
   # other parameters omitted for space
The following example shows the contents of the agent-profile.json file. You can specify manual standby agent provisioning in the resourcePredictionsProfile section of the agent-profile parameter. Configure the details in the resourcePredictions section:
{
    "Stateless": {},
    "resourcePredictionsProfile": {
        "Manual": {}
    },
    "resourcePredictions": {
        "timeZone": "Eastern Standard Time",
        "daysData": [
            {},
            {
                "00:00:00": 1,
                "04:00:00": 0
            },
            {},
            {},
            {},
            {},
            {}
        ]
    }
}
Specify the time zone for your scheme by using the timeZone property. The default value is UTC. To retrieve a list of time zone names for this property, see TimeZoneInfo.GetSystemTimeZones Method.
The daysData list defines the schedule for the standby agents. The daysData list can have either one or seven items.
A daysData list with seven items maps to the days of the week, starting with Sunday. Each of these seven items can have zero or more "time": count entries, specifying a time in 24-hour format, and a standby agent count. The specified count of standby agents is maintained until the next "time": count entry, which can be on the same day or on a following day.
A daysData list with a single item defines an all-week scheme, where the single "time": count entry corresponds to the standby agent count for the entire week.
The following example is a manual standby agent scheme. The scheme uses the value Eastern Standard Time with a single agent provisioned Monday through Friday, from 9:00 AM (standby agent count 1) through 5:00 PM (standby agent count 0):
{
    "Stateless": {},
    "resourcePredictionsProfile": {
        "Manual": {}
    },
    "resourcePredictions": {
        "timeZone": "Eastern Standard Time",
        "daysData": [
            {},
            {
                "09:00:00": 1,
                "17:00:00": 0
            },
            {
                "09:00:00": 1,
                "17:00:00": 0
            },
            {
                "09:00:00": 1,
                "17:00:00": 0
            },
            {
                "09:00:00": 1,
                "17:00:00": 0
            },
            {
                "09:00:00": 1,
                "17:00:00": 0
            },
            {}
        ]
    }
}
A single daysData item contains a dictionary of times and standby agent counts. Each "time" : count entry specifies the number of standby agents to schedule starting at the specified time, in 24-hour format. Consecutive "time" : count entries specify a sequence of scheduled agent counts for that day.
"daysData": [
    {}, # Schedule of standby agent count adjustments for Sunday
    {   # Schedule of standby agent count adjustments for Monday
        "09:00:00": 1, # Adjust standby agent count to 1
        "17:00:00": 0  # Adjust standby agent count to 0
    },
    {  # Schedule of standby agent count adjustments for Tuesday
        "09:00:00": 1,
        "17:00:00": 0
    },
    {  # Schedule of standby agent count adjustments for Wednesday
        "09:00:00": 1,
        "17:00:00": 0
    },
    {  # Schedule of standby agent count adjustments for Thursday
        "09:00:00": 1,
        "17:00:00": 0
    },
    {  # Schedule of standby agent count adjustments for Friday
        "09:00:00": 1,
        "17:00:00": 0
    },
    {} # Schedule of standby agent count adjustments for Saturday
]
Standby agent counts don't automatically reset back to zero at the end of a day or at the end of the week. Specifying an empty daysData item doesn't disable standby agents for that day. An empty daysData item means that there are no changes to the standby agent count schedule for that day. To set the standby agent to zero starting at a specific time period, you must explicitly provide a "time" : count entry with a count of 0.
Examples
If you don't want to adjust the specified standby agent count at the conclusion of the previous day (or week if you're configuring the first period of the week), specify a daysData item with zero entries:
{}
To schedule a single standby agent to start at 09:00:00 and stop at 17:00:00 (by using the time zone you specify in the resourcePredictions property), specify the following configuration:
{
    "09:00:00": 1,
    "17:00:00": 0
}
To schedule a single standby agent starting from midnight through 09:00:00, followed by 10 standby agents until 17:00:00, specify the following configuration:
{
    "00:00:00": 1,
    "09:00:00": 10,
    "17:00:00": 0
}
To schedule a standby agent to be available starting at 09:00:00 on the specified day, and stopping at 17:00:00 the following day, use two consecutive daysData items:
{
    "09:00:00": 1
},
{
    "17:00:00": 0
}
You can specify manual standby agent provisioning in the resourcePredictionsProfile section of agentProfile. You can configure the details in the resourcePredictions section:
resource managedDevOpsPools 'Microsoft.DevOpsInfrastructure/pools@2025-09-20' = {
  name: 'fabrikam-managed-pool'
  location: 'eastus'
  properties: {
    ...
    agentProfile: {
      kind: 'Stateless'
      resourcePredictionsProfile: {
        kind: 'Manual'
      }
      resourcePredictions: {
        timeZone: 'Eastern Standard Time'
        daysData: [
          {}
          {
            '00:00:00': 1
            '04:00:00': 0
          }
          {}
          {}
          {}
          {}
          {}
        ]
      }
    }
  }
}
Specify the desired time zone for your scheme by using the timeZone property. The default value is UTC. To retrieve a list of time zone names for this property, see TimeZoneInfo.GetSystemTimeZones Method.
The daysData list defines the schedule for the standby agents. The daysData list can have either one or seven items.
A daysData list with seven items maps to the days of the week, starting with Sunday. Each of these seven items can have zero or more 'time': count entries, specifying a time in 24-hour format, and a standby agent count. The specified count of standby agents is maintained until the next 'time': count entry, which can be on the same day or on a following day.
A daysData list with a single item defines an all-week scheme, where the single 'time': count entry corresponds to the standby agent count for the entire week.
The following example is a manual standby agent scheme that uses the value Eastern Standard Time, with a single agent provisioned Monday through Friday, from 9:00 AM (standby agent count 1) through 5:00 PM (standby agent count 0):
{
    kind: 'Stateless'
    resourcePredictions: {
        timeZone: 'Eastern Standard Time'
        daysData: [
          {}
          {
            '09:00:00': 1
            '17:00:00': 0
          }
          {
            '09:00:00': 1
            '17:00:00': 0
          }
          {
            '09:00:00': 1
            '17:00:00': 0
          }
          {
            '09:00:00': 1
            '17:00:00': 0
          }
          {
            '09:00:00': 1
            '17:00:00': 0
          }
          {}
        ]
    }
    resourcePredictionsProfile: {
        kind: 'Manual'
    }
}
A single daysData item contains a dictionary of times and standby agent counts. Each 'time' : count entry specifies the number of standby agents to schedule starting at the specified time, in 24-hour format. Consecutive 'time' : count entries specify a sequence of scheduled agent counts for that day.
daysData: [
    {} // Schedule of standby agent count adjustments for Sunday
    {   // Schedule of standby agent count adjustments for Monday
        '09:00:00': 1 // Adjust standby agent count to 1
        '17:00:00': 0  // Adjust standby agent count to 0
    }
    {  // Schedule of standby agent count adjustments for Tuesday
        '09:00:00': 1
        '17:00:00': 0
    }
    {  // Schedule of standby agent count adjustments for Wednesday
        '09:00:00': 1
        '17:00:00': 0
    }
    {  // Schedule of standby agent count adjustments for Thursday
        '09:00:00': 1
        '17:00:00': 0
    }
    {  // Schedule of standby agent count adjustments for Friday
        '09:00:00': 1
        '17:00:00': 0
    }
    {} // Schedule of standby agent count adjustments for Saturday
]
Standby agent counts don't automatically reset back to zero at the end of a day or at the end of the week, and specifying an empty daysData item doesn't disable standby agents for that day. An empty daysData item means that there are no changes to the standby agent count schedule for that day. To set the standby agent to zero starting at a specific time period, you must explicitly provide a "time" : count entry with a count of 0.
Examples
To make no adjustment to the standby agent count specified at the conclusion of the previous day (or week if you're configuring the first period of the week), specify a daysData item with zero entries:
{}
To schedule a single standby agent to start at 09:00:00 and stop at 17:00:00 (by using the time zone specified in the resourcePredictions property), specify the following configuration:
{
    '09:00:00': 1
    '17:00:00': 0
}
To schedule a single standby agent starting from midnight through 09:00:00, followed by 10 standby agents until 17:00:00, specify the following configuration:
{
    '00:00:00': 1
    '09:00:00': 10
    '17:00:00': 0
}
To schedule a standby agent to be available starting at 09:00:00 on the specified day, and stopping at 17:00:00 the following day, use two consecutive daysData items:
{
    '09:00:00': 1
}
{
    '17:00:00': 0
}
Start from scratch
If you choose to start from scratch, you can add a list of provisioning periods as your provisioning scheme. Each provisioning period consists of a start day, end day, time zone, start time, end time, and count. Provisioning periods can't overlap each other.
| Property |
Description |
| Multi-Day |
When you select this option, you can configure both Start Day and End Day for your provisioning scheme. |
| Until next period |
When you select this option, the provisioning period runs from the Start Time value until the start of the next provisioning period. |
| Start Day |
The day that the provisioning period starts. |
| End Day |
The day that the provisioning period ends. Required if Multi-Day is selected. |
| Start Time |
The time when the provisioning period starts. |
| End Time |
The time when the provisioning period ends. Required unless Until next period is selected. |
| Count |
The number of standby agents to provision. This number must be greater than zero, and must not be greater than the Maximum agents value in Pool settings. |
After you create a provisioning period, you can delete or edit the period from the Pre-provisioning scheme list.
The following example shows how to configure a manual scheme with one agent provisioned on Monday mornings from 12:00 AM to 5:00 AM EST.
{
    "$schema": "https://schema.management.azure.com/schemas/2019-04-01/deploymentTemplate.json#",
    "contentVersion": "1.0.0.0",
    "resources": [
        {
            "name": "fabrikam-managed-pool",
            "type": "microsoft.devopsinfrastructure/pools",
            "apiVersion": "2025-09-20",
            "location": "eastus",
            "properties": {
                ...
                "agentProfile": {
                    "kind": "Stateless",
                    "resourcePredictionsProfile": {
                        "kind": "Manual"
                    },
                    "resourcePredictions": {
                        "timeZone": "Eastern Standard Time",
                        "daysData": [
                            {},
                            {
                                "00:00:00": 1,
                                "04:00:00": 0
                            },
                            {},
                            {},
                            {},
                            {},
                            {}
                        ]
                    }
                }
            }
        }
    ]
}
{
    "Stateless": {},
    "resourcePredictionsProfile": {
        "Manual": {}
    },
    "resourcePredictions": {
        "timeZone": "Eastern Standard Time",
        "daysData": [
            {},
            {
                "00:00:00": 1,
                "04:00:00": 0
            },
            {},
            {},
            {},
            {},
            {}
        ]
    }
}
resource managedDevOpsPools 'Microsoft.DevOpsInfrastructure/pools@2025-09-20' = {
  name: 'fabrikam-managed-pool'
  location: 'eastus'
  properties: {
    ...
    agentProfile: {
      kind: 'Stateless'
      resourcePredictionsProfile: {
        kind: 'Manual'
      }
      resourcePredictions: {
        timeZone: 'Eastern Standard Time'
        daysData: [
          {}
          {
            '00:00:00': 1
            '04:00:00': 0
          }
          {}
          {}
          {}
          {}
          {}
        ]
      }
    }
  }
}
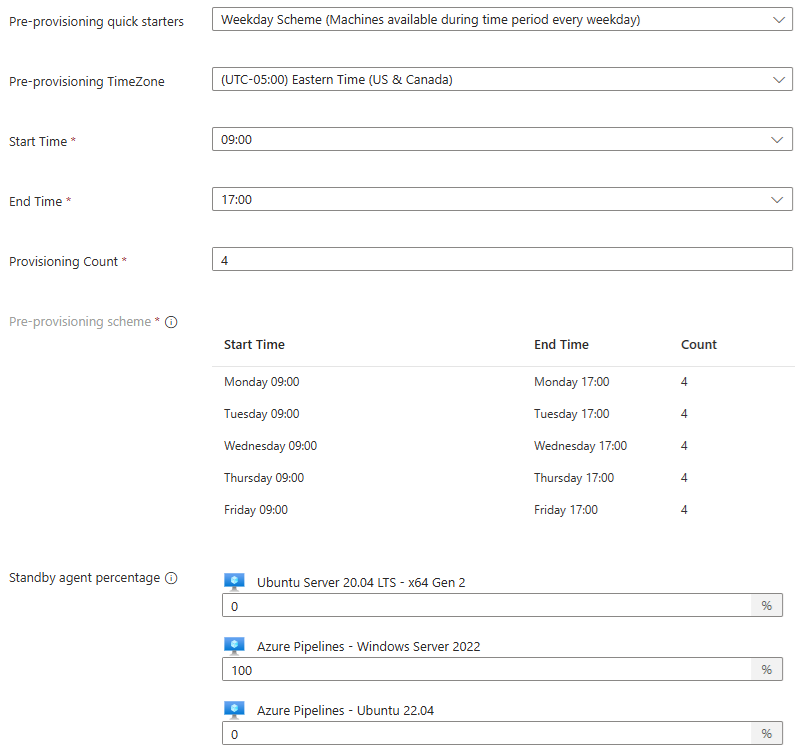
Weekday scheme
If you select the weekday scheme, you can specify a start time and end time, between which the specified number of standby agents are on standby each weekday.
| Property |
Description |
| Start Time |
The time when the provisioning period starts. |
| End Time |
The time when the provisioning period ends. |
| Provisioning Count |
The number of standby agents to provision. This number must be greater than zero, and must not be greater than the Maximum agents value configured in Pool settings. |
The following example configures four agents to be used during working hours, and no agents during nonworking hours and weekends, using Eastern Time (UTC-5).
{
    "$schema": "https://schema.management.azure.com/schemas/2019-04-01/deploymentTemplate.json#",
    "contentVersion": "1.0.0.0",
    "resources": [
        {
            "name": "fabrikam-managed-pool",
            "type": "microsoft.devopsinfrastructure/pools",
            "apiVersion": "2025-09-20",
            "location": "eastus",
            "properties": {
                ...
                "agentProfile": {
                    "kind": "Stateless",
                    "resourcePredictionsProfile": {
                        "kind": "Manual"
                    },
                    "resourcePredictions": {
                        "timeZone": "Eastern Standard Time",
                        "daysData": [
                            {},
                            {
                                "09:00:00": 4,
                                "17:00:00": 0
                            },
                            {
                                "09:00:00": 4,
                                "17:00:00": 0
                            },
                            {
                                "09:00:00": 4,
                                "17:00:00": 0
                            },
                            {
                                "09:00:00": 4,
                                "17:00:00": 0
                            },
                            {
                                "09:00:00": 4,
                                "17:00:00": 0
                            },
                            {}
                        ]
                    }
                }
            }
        }
    ]
}
{
    "Stateless": {},
    "resourcePredictionsProfile": {
        "Manual": {}
    },
    "resourcePredictions": {
        "timeZone": "Eastern Standard Time",
        "daysData": [
            {},
            {
                "09:00:00": 4,
                "17:00:00": 0
            },
            {
                "09:00:00": 4,
                "17:00:00": 0
            },
            {
                "09:00:00": 4,
                "17:00:00": 0
            },
            {
                "09:00:00": 4,
                "17:00:00": 0
            },
            {
                "09:00:00": 4,
                "17:00:00": 0
            },
            {}
        ]
    }
}
resource managedDevOpsPools 'Microsoft.DevOpsInfrastructure/pools@2025-09-20' = {
  name: 'fabrikam-managed-pool'
  location: 'eastus'
  properties: {
    ...
    agentProfile: {
      kind: 'Stateless'
      resourcePredictionsProfile: {
        kind: 'Manual'
      }
      resourcePredictions: {
        timeZone: 'Eastern Standard Time'
        daysData: [
          {}
          {
            '09:00:00': 4
            '17:00:00': 0
          }
          {
            '09:00:00': 4
            '17:00:00': 0
          }
          {
            '09:00:00': 4
            '17:00:00': 0
          }
          {
            '09:00:00': 4
            '17:00:00': 0
          }
          {
            '09:00:00': 4
            '17:00:00': 0
          }
          {}
        ]
      }
    }
  }
}
All-week scheme
If you choose the all-week scheme, you can specify the number of agents that you want available all the time.
{
    "$schema": "https://schema.management.azure.com/schemas/2019-04-01/deploymentTemplate.json#",
    "contentVersion": "1.0.0.0",
    "resources": [
        {
            "name": "fabrikam-managed-pool",
            "type": "microsoft.devopsinfrastructure/pools",
            "apiVersion": "2025-09-20",
            "location": "eastus",
            "properties": {
                ...
                "agentProfile": {
                    "kind": "Stateless",
                    "resourcePredictionsProfile": {
                        "kind": "Manual"
                    },
                    "resourcePredictions": {
                        "timeZone": "Eastern Standard Time",
                        "daysData": [
                            {
                                "00:00:00": 1
                            }
                        ]
                    }
                }
            }
        }
    ]
}
{
    "Stateless": {},
    "resourcePredictionsProfile": {
        "Manual": {}
    },
    "resourcePredictions": {
        "timeZone": "Eastern Standard Time",
        "daysData": [
            {
                "00:00:00": 1
            }
        ]
    }
}
resource managedDevOpsPools 'Microsoft.DevOpsInfrastructure/pools@2025-09-20' = {
  name: 'fabrikam-managed-pool'
  location: 'eastus'
  properties: {
    ...
    agentProfile: {
      kind: 'Stateless'
      resourcePredictionsProfile: {
        kind: 'Manual'
      }
      resourcePredictions: {
        timeZone: 'Eastern Standard Time'
        daysData: [
          {
            '00:00:00': 1
          }
        ]
      }
    }
  }
}
Automatic
If you don't know your usage patterns and want to rely on automatic forecasting based on past data, select Automatic. You can balance between cost and agent performance by using a slider with the following five options. Managed DevOps Pools runs a query over your past three weeks of historical data (if available). It organizes queued sessions of the pool into five-minute periods and assigns the specified percentile (to avoid spikes) to each hour.
- Most cost effective (
MostCostEffective): 10th percentile.
- More cost effective (
MoreCostEffective): 25th percentile.
- Balanced (default) (
Balanced): 50th percentile.
- More performance (
MorePerformance): 75th percentile.
- Best performance (
BestPerformance): 90th percentile.
{
    "$schema": "https://schema.management.azure.com/schemas/2019-04-01/deploymentTemplate.json#",
    "contentVersion": "1.0.0.0",
    "resources": [
        {
            "name": "fabrikam-managed-pool",
            "type": "microsoft.devopsinfrastructure/pools",
            "apiVersion": "2025-09-20",
            "location": "eastus",
            "properties": {
                ...
                "agentProfile": {
                    "kind": "Stateless",
                    "resourcePredictionsProfile": {
                        "predictionPreference": "Balanced",
                        "kind": "Automatic"
                    }
                }
            }
        }
    ]
}
{
    "Stateless": {},
    "resourcePredictionsProfile": {
        "Automatic": {
            "predictionPreference": "Balanced"
        }
    }
}
resource managedDevOpsPools 'Microsoft.DevOpsInfrastructure/pools@2025-09-20' = {
  name: 'fabrikam-managed-pool'
  location: 'eastus'
  properties: {
    ...
    agentProfile: {
      kind: 'Stateless'
      resourcePredictionsProfile: {
        kind: 'Automatic'
        predictionPreference: 'Balanced'
      }
    }
  }
}
Lifecycle of agents and potential delays in allocation
When you enable standby agents by using a stateless scheme, you need to install and configure the Azure Pipelines agent before you transition from the ready state to the allocated state and run a pipeline.
When Managed DevOps Pools provisions new agents, it attempts to download the latest Azure Pipelines agent so that it's already downloaded on standby agents before they transition into ready status. Startup, connection, and beginning the job can take anywhere from 10 seconds to a minute depending on the pool's SKU speed, the image used, and the networking load. Additionally, when you specify certain settings in a pipeline job, it can cause a redownload and running of a different agent. Regressions and rollbacks of the agent can also cause a redownload of the agent.
Ready agents always have a potential delay because Managed DevOps Pools uses this agent in an "ephemeral" manner, which means we start and run the task agent one time per job. If you see delays in ready agents picking up jobs from Azure DevOps, consider the following questions:
- Do you have ready agents? The most common issue is a misunderstanding of when agents should be pre-provisioned. Machines must be spun up from scratch when the following conditions are met:
- The number of jobs queued is greater than the standby agent count on a pool.
- Jobs are queued outside of the pre-provisioning schedule.
- The standby agent count is set to be empty.
- Are you properly configuring standby agents that have multiple images? If you aren't specifying which image to use in your pipeline by using the ImageOverride demand, jobs target the first image. Depending on your scaling settings, you might not have as many agents available as you expect, because some are allocated to other images.
- Are you using the
ImageVersionOverride demand in your pipelines? When you use the ImageVersionOverride demand to specify a different image version than what's configured in your pool settings, each agent starts on demand by using the specified image version. Standby agents are provisioned by using the image versions specified in your pool's configuration. If you use ImageVersionOverride, any standby agents won't match that version and a fresh agent starts.
- Are proxy, virtual network, or firewall settings slowing down your pool? Potential slowness from any network setting results in agents taking longer to start the agent and connect it to Azure DevOps.
- Are you overriding the agent version? By default, Managed DevOps Pools runs on the most recent Azure DevOps task agent version. Settings in the pipeline YAML (such as the
Agent.Version demand) and Azure DevOps organization settings can force pipelines to use older versions of the task agent, which requires a redownload after a machine is allocated.
Related content