Note
Access to this page requires authorization. You can try signing in or changing directories.
Access to this page requires authorization. You can try changing directories.
This article focuses on team preparation and file generation required by the Data Migration Tool.

Prerequisites
Complete the Validate phase before you begin to prepare for test run migration.
Generate migration settings
Do the following steps to generate the migration specification and related files to queue the migration of your collection database.
Run the Data Migration Tool prepare command with the following parameters:
/collection:http://localhost:8080/tfs/DefaultCollection/ tenantDomainName:contoso.com /Region:CUS- The tenant domain name option is the name of your company’s Microsoft Entra ID tenant.
- The prepare command requires internet access. If your Azure DevOps Server lacks internet connectivity, run the command from a different computer.
- The term "organization region" refers to the location where you plan to migrate your collection into Azure DevOps Services. You previously selected a region and recorded its shorthand code. Use this code in the prepare command.
Sign in with a user from the tenant who has permission to read information about all users in the Microsoft Entra ID tenant.
Configure the migration specification file
The migration specification file is a JSON file that instructs the Data Migration Tool how to do the following actions.
- Configure your migrated organization
- Specify the source locations
- Customize the migration
Many of the fields are auto populated during the prepare step but you must configure the following fields:
- Organization name: The name of the organization you want to create for migrating your data.
- Location: A backup of your database and migration files to be uploaded to an Azure storage container. This field specifies the SAS key used by the migration tool to securely connect to and read the source files from the Azure storage container. Creating the storage container is covered later in Phase 5 and generating a SAS key is covered in Phase 6 before you queue for a new migration.
- DACPAC: A file that packages up your collection’s SQL database.
- Migration type: The type of migration: Test run or Production run.
Each migration specification file is meant for a single collection. If you try to use a migration specification file generated for another collection, the migration doesn’t start. You need to prepare a test run for each collection you wish to migrate and use the generated migration specification file to queue the migration.
Review the identity map log file
The identity map log is crucial, as important as the actual data that you migrate. When you examine the log file, understand how identity migration functions and the potential outcomes. When you migrate an identity, it can be either active or historical. Active identities can sign in to Azure DevOps Services, while historical identities can't. The service decides which type gets used.
Note
Once an identity gets migrated as a historical identity, there's no way to convert it to an active one.
Active identities
Active identities refer to user identities in Azure DevOps Services post-migration. In Azure DevOps Services, these identities are licensed and are displayed as users in the organization. The identities are marked as active in the Expected Import Status column in the identity map log file.
Historical identities
Historical identities are mapped as such in the Expected Import Status column in the identity map log file. Identities without a line entry in the file also become historical. An example of an identity without a line entry might be an employee who no longer works at a company.
Unlike active identities, historical identities:
- Don't have access to an organization after migration.
- Don't have licenses.
- Don't show up as users in the organization. All that persists is the notion of that identity's name in the organization, so that its history can be searched later. We recommend that you use historical identities for users who no longer work at the company or who don't need further access to the organization.
Note
After an identity migrates as historical, you can't make it active.
Licenses
During migration, licenses get assigned automatically for all users displayed as "active" in the Expected Import Status column of identity mapping log. If automatic license assignment is incorrect, you can change it by editing the "access level" of one or more users after migration completes.
Assignment might not always be perfect, so you have until the first of the following month to reassign licenses as needed. If by the first of the next month you don't link a subscription to your organization and purchased the correct number of licenses, all your grace period licenses get revoked. Alternatively, if auto assignment assigned more licenses than you purchased for next month, then we don't charge you for the extra licenses, but we revoke all unpaid licenses.
To avoid losing access, we recommend you link a subscription and purchase needed licenses before the first of the month, as billing runs monthly. For all test runs, licenses are free for as long as the organization is active.
Azure DevOps subscriptions
Visual Studio Subscriptions aren’t assigned by default for migrations. Instead, users with Visual Studio Subscriptions automatically get upgraded to use that license. If a user’s work organization is linked correctly, Azure DevOps Services automatically applies their Visual Studio subscription benefits on their first sign-in post migration.
You don’t need to repeat a test run migration if users don’t automatically get upgraded to use their Visual Studio Subscription in Azure DevOps Services. Visual Studio Subscription linking is something that happens outside of the scope of a migration. If the work organization gets linked correctly before or after the migration, then the user automatically has their license upgraded on the next sign in. Once they’re upgraded, next time you migrate the user automatically gets upgraded upon initial sign-in to the organization.
Restrict access to Azure DevOps Services IPs only
Restrict access to your Azure Storage account to only IPs from Azure DevOps Services. You can restrict access by only allowing connections from Azure DevOps Services IPs that are involved in the collection database migration process. The IPs that need to be granted access to your storage account depend on the region you're migrating into.
Option 1: Use Service Tags
You can easily allow connections from all Azure DevOps Services regions by adding the azuredevops Service Tag to your network security groups or firewalls either through the portal or programmatically.
Option 2: Use IP List
Use the IpList command to get the list of IPs that need to be granted access to allow connections from a specific Azure DevOps Services region.
Included in the help documentation are instructions and examples for running Migrator from the Azure DevOps Server instance itself and a remote machine. If you're running the command from one of the Azure DevOps Server instance's application tiers, your command should have the following structure:
Migrator IpList /collection:{CollectionURI} /tenantDomainName:{name} /region:{region}
You can add the list of IPs to your network security groups or firewalls either through the portal or programmatically.
Configure IP firewall exceptions for SQL Azure
This section only applies to configuring firewall exceptions for SQL Azure. For DACPAC migrations, see Configure Azure Storage firewalls and virtual networks.
The Data Migration Tool requires the Azure DevOps Services IPs get configured for inbound connections only on port 1433.
Do the following steps to grant exceptions for the necessary IPs handled at the Azure networking layer for your SQL Azure VM.
- Sign in to the Azure portal.
- Go to your SQL Azure VM.
- In Settings, select Networking.
- Select Add inbound port rule.
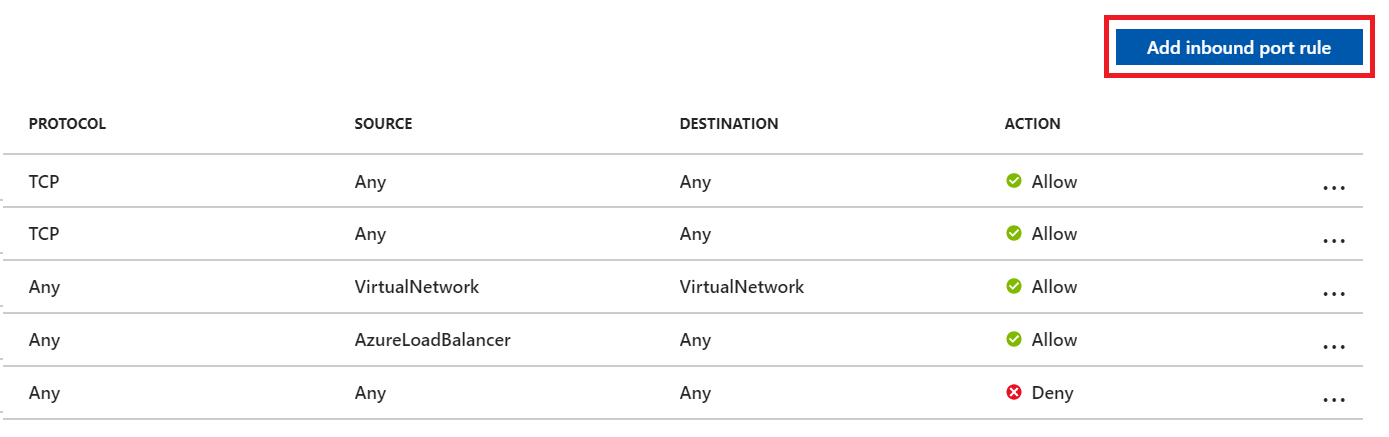
- Select Advanced to configure an inbound port rule for a specific IP.
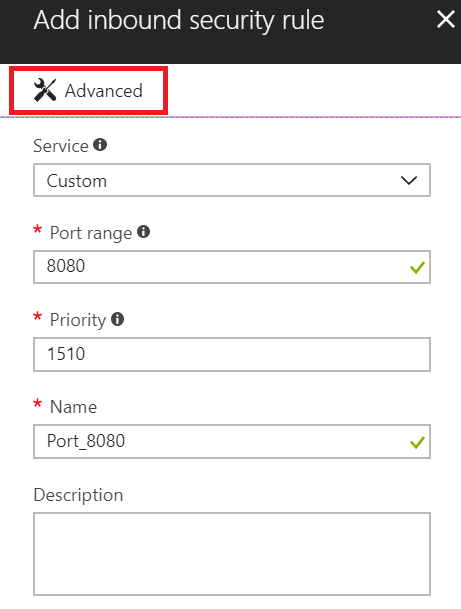
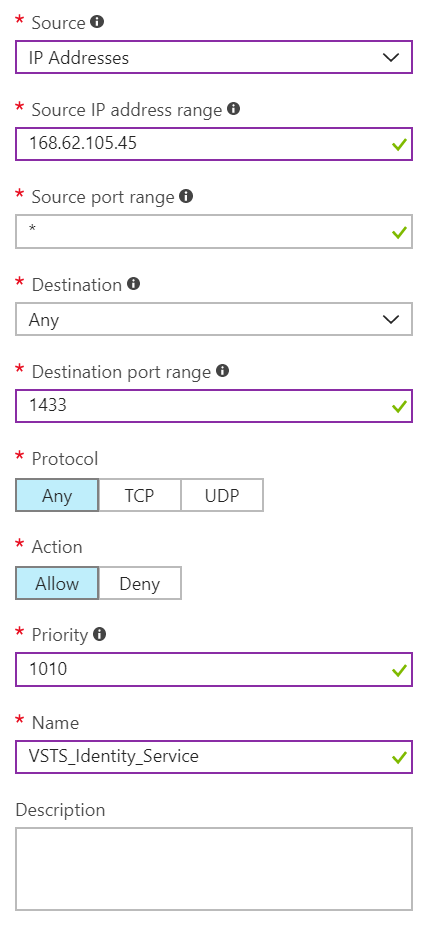
- In the Source drop-down list, select IP Addresses, enter an IP address that needs to be granted an exception, set the Destination port range to
1433and, in the Name box, enter a name that best describes the exception you're configuring.
Depending on other configured inbound port rules, you might need to change the default priority for the Azure DevOps Services exceptions, so they don't get ignored. For example, if you have a "deny on all inbound connections to 1433" rule with a higher priority than your Azure DevOps Services exceptions, the Data Migration Tool might be unable to make a successful connection to your database.
Repeat adding inbound port rules until all necessary Azure DevOps Services IPs are granted an exception. Missing one IP could result in your migration failing to start.
Migrate large collections
For databases that the Data Migration Tool warns are too large, a different data packaging approach is required to migrate to Azure DevOps Services. If you're unsure whether your collection exceeds the size threshold, you should run a Data Migration Tool validation on the collection. The validation lets you know whether you need to use the SQL Azure VM method for migration.
Determine if you can reduce the collection size
Check to see whether you can clean up old data. Over time, collections can build up large volumes of data. This growth is a natural part of the DevOps process, but you might find you don't need to retain all the data. Some common examples of no longer relevant data are older workspaces and build results.
The Data Migration Tool scans your collection and compares it to the limits mentioned previously. It then reports whether your collection is eligible for DACPAC or SQL migration method. In general, the idea is that if your collection is small enough to fit within the DACPAC limits, you can use the faster and simpler DACPAC approach. However, if your collection is too large, you need to use the SQL migration method, which involves setting up a SQL Azure VM and migrating the database manually.
Size limits
The current limits are:
- 150 GB total database size (database metadata + blobs) for DACPAC, if you exceed this limit, then you need to perform the SQL migration method.
- 30 GB individual table size (database metadata + blobs) for DACPAC, if any single table exceeds this limit, then you need to perform the SQL migration method.
- 1,536 GB database metadata size for SQL migration method. Exceeding this limit issues a warning, we advise that you keep under this size to have a successful migration.
- 2,048 GB database metadata size for SQL migration method. Exceeding this limit results in an error, so you can't perform a migration.
- No limit for blob sizes for SQL migration method.
When you clean older, no-longer-relevant artifacts, it could remove a lot more space than you might expect, and it could determine whether you use the DACPAC migration method or a SQL Azure VM.
Important
Once you delete older data, you can't recover it unless you restore an older backup of the collection.
If you're under the DACPAC threshold, follow the instructions to generate a DACPAC for migration. If you still can't get the database under the DACPAC threshold, you need to set up a SQL Azure VM to migrate to Azure DevOps Services.
Set up a SQL Azure VM to migrate to Azure DevOps Services
Do the following high-level steps to set up a SQL Azure virtual machine (VM) to migrate to Azure DevOps Services.
- Set up a SQL Azure VM
- Configure IP firewall exceptions
- Restore your database on the VM
- [Configure your collection for migration
- Configure the migration specification file to target the VM
Set up a SQL Azure VM
You can set up a SQL Azure VM from the Azure portal quickly. For more information, see Use the Azure portal to provision a Windows virtual machine with SQL Server.
The performance of your SQL Azure VM and attached data disks have a significant impact on the performance of the migration. For this reason, we highly recommend doing the following tasks:
- Select a VM Size at the level of
D8s_v5_*or greater. - Use managed disks.
- Consult virtual machine and disk performance. Ensure your infrastructure is configured so that the VM IOPS (input/output per second) and storage IOPS don't become a bottleneck on the performance of the migration. For example, ensure the number of data disks attached to your VM is sufficient to support the IOPS from the VM.
Azure DevOps Services is available in several Azure regions across the globe. To ensure that the migration starts successfully, it's critical to place your data in the correct region. If you set up your SQL Azure VM in a wrong location, the migration fails to start.
Important
The Azure VM requires a public IP address.
If you're using this migration method, create your VM in a supported region. Although Azure DevOps Services is available in multiple regions in the United States (US), only the Central United States region accepts new organizations. You can't migrate your data into other US Azure regions now.
Note
DACPAC customers should consult the region table in the "Step 3: Upload the DACPAC file](migration-test-run.md#)" section. The preceding guidelines are for SQL Azure VMs only. If you're a DACPAC customer, see supported Azure regions for migration.
Use the following SQL Azure VM configurations:
- Configure the SQL temporary database to use a drive other than drive C. Ideally the drive should have ample free space; at least equivalent to your database's largest table.
- If your source database is still over 1 terabyte (TB) after you reduced its size, you need to attach more 1-TB disks and combine them into a single partition to restore your database on the VM.
- If your collection databases are over 1 TB in size, consider using an SSD (solid state hard drives) for both the temporary database and collection database. Also, consider using larger VMs with 16 virtual CPUs (vCPUs) and 128 GB (gigabytes) of RAM (random access memory).
Restore your database on the VM
After you set up and configure an Azure VM, you need to take your detached backup from your Azure DevOps Server instance to your Azure VM. The collection database needs to be restored on your SQL instance and doesn't require Azure DevOps Server to be installed on the VM.
Configure your collection for migration
After your collection database restores on your Azure VM, configure a SQL sign-in to allow Azure DevOps Services to connect to the database to migrate the data. This sign-in allows only read access to a single database.
Open SQL Server Management Studio on the VM, and then open a new query window against the database to be migrated.
Set the database's recovery to simple:
ALTER DATABASE [<Database name>] SET RECOVERY SIMPLE;Create a SQL sign-in for the database, and assign that sign-in the 'TFSEXECROLE', like the following example.
USE [<database name>]
CREATE LOGIN <pick a username> WITH PASSWORD = '<pick a password>'
CREATE USER <username> FOR LOGIN <username> WITH DEFAULT_SCHEMA=[dbo]
EXEC sp_addrolemember @rolename='TFSEXECROLE', @membername='<username>'
See the following example of the SQL command:
    ALTER DATABASE [Foo] SET RECOVERY SIMPLE;

    USE [Foo]
    CREATE LOGIN fabrikam WITH PASSWORD = 'fabrikampassword'
    CREATE USER fabrikam FOR LOGIN fabrikam WITH DEFAULT_SCHEMA=[dbo]
    EXEC sp_addrolemember @rolename='TFSEXECROLE', @membername='fabrikam'
Important
Enable SQL Server and Windows authentication mode in SQL Server Management Studio on the VM. If you don't enable authentication mode, the migration fails.
Configure the migration specification file to target the VM
Update the migration specification file to include information about how to connect to the SQL Server instance. Open your migration specification file and make the following updates:
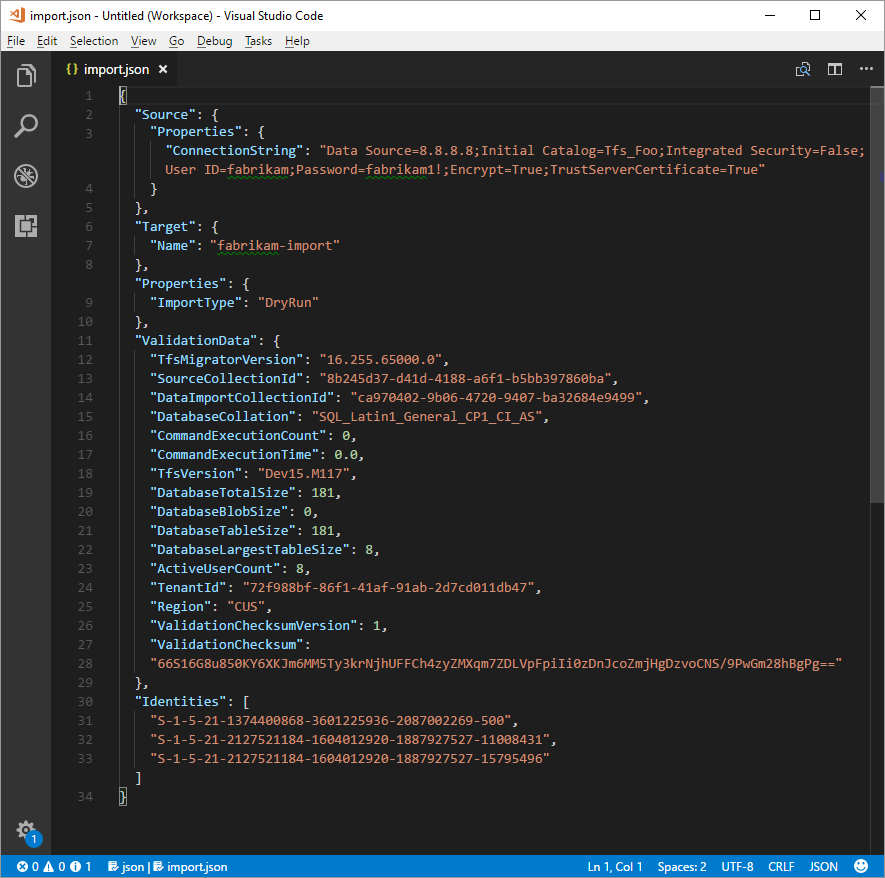
Remove the DACPAC parameter from the source files object. The migration specification before the change looks like the following example code.

The migration specification after the change looks like the following example code.

Enter the required parameters and add the following properties object within your source object in the specification file.
"Properties":
{
    "ConnectionString": "Data Source={SQL Azure VM Public IP};Initial Catalog={Database Name};Integrated Security=False;User ID={SQL Login Username};Password={SQL Login Password};Encrypt=True;TrustServerCertificate=True"
}
After you apply the changes, the migration specification looks like the following example.
Your migration specification is now configured to use a SQL Azure VM for migration. Proceed with the rest of the preparation steps for migration. After the migration finishes, be sure to delete the SQL sign-in or rotate the password. Microsoft doesn't retain the sign-in information after the migration completes.
Create an Azure Storage Container in chosen data center
Using the Data Migration Tool for Azure DevOps requires having an Azure Storage container in the same Azure data center as the final Azure DevOps Services organization. For example, if you intend for your Azure DevOps Services organization to be created in the Central United States data center, then create the Azure Storage container in that same data center. This action drastically speeds up the time that it takes to migrate the SQL database, since the transfer occurs within the same data center.
For more information, see Create a storage account.
Set up billing
A grace period is placed on the newly migrated Azure DevOps Services organization to allow your team to finish any steps it needs and correct license assignments. If you anticipate that you might want to purchase any more user plans, build or deployment pipelines, hosted build services, hosted load test services, for example, we highly recommend that you sure you have an Azure Subscription ready for linking to your migrated organization. The grace period ends on the first day of the following month after you completed your migration.
We remind you again in the Post-migration phase(link) for when you need to do the linking. This preparation step is more about making sure that you know which Azure Subscription you use in that later step. For more information, see Set up billing for your organization.