Note
Access to this page requires authorization. You can try signing in or changing directories.
Access to this page requires authorization. You can try changing directories.
Azure DevOps Services | Azure DevOps Server | Azure DevOps Server 2022
You can add virtual machines as resources within Azure Pipelines environments and target them for deployments. For a continuous integration and continuous deployment (CI/CD) workflow, the environment's deployment history provides traceability for each VM back to the triggering commit.
This article shows you how to set up an Azure DevOps pipeline for deployments to multiple Linux virtual machine (VM) resources in an environment. These instructions build and deploy either a JavaScript or Java app, but you can adapt them for any app that publishes a web deployment package.
For more information about environments and resources targeted by a deployment job, see the jobs.deployment.environment YAML schema definition. For more information about deployment jobs, see the jobs.deployment definition.
Prerequisites
- An Azure account with an active subscription. Create an account for free.
- An Azure DevOps organization and project. Sign up for Azure Pipelines.
Also, for JavaScript or Node.js apps:
- At least two Linux VMs set up with Nginx on Azure.
- Your own fork of the GitHub sample code repo at https://github.com/MicrosoftDocs/pipelines-javascript. If you already have an app in GitHub that you want to deploy, you can use your code instead.
Important
- To deploy apps, target environment VM resources must have all necessary software, dependencies, permissions, and logins installed and configured.
- To use GitHub source code, you need a GitHub service connection. GitHub might also prompt you to sign in, install the Azure Pipelines GitHub app, or authorize Azure Pipelines. To complete each process, follow the onscreen instructions. For more information, see Access to GitHub repositories.
Create an environment and add Linux VMs
In your Azure Pipelines project, create an environment and add your Linux VMs as environment resources by following the instructions at Create an environment and add a VM.
Run the copied agent registration script on each VM to register it in the environment. You can also assign tags to the individual VMs by responding to the interactive prompts.
Create and run the build pipeline
Create a CI pipeline that builds and deploys your app whenever there's a commit to the main branch of your code repo.
Create the YAML pipeline
- In your Azure DevOps project, select Pipelines > New pipeline or Create Pipeline, and then select GitHub as the location of your source code.
- On the Select a repository screen, select your forked sample repository.
- On the Configure your pipeline screen, select Starter pipeline.
- On the Review your pipeline YAML screen, replace the generated starter code with the following code, depending on your runtime.
Add the build job
The Build job runs tasks to build and test your project, and uploads the build output to a drop location. This job runs on the build agents specified in the pipeline pool, not on your Linux environment VMs.
The following pipeline builds and tests your Node.js project with npm, then packages the output and uploads it to a drop location.
trigger:
- main

pool:
  vmImage: ubuntu-latest

jobs:
- job: Build
  displayName: Build
  steps:
  - task: UseNode@1
    inputs:
      version: '16.x'
    displayName: 'Install Node.js'
  - script: |
      npm install
      npm run build --if-present
      npm run test --if-present
    displayName: 'npm install, build and test'
  - task: ArchiveFiles@2
    displayName: 'Archive files'
    inputs:
      rootFolderOrFile: '$(System.DefaultWorkingDirectory)'
      includeRootFolder: false
      archiveType: tar
      tarCompression: gz
      archiveFile: $(Build.ArtifactStagingDirectory)/$(Build.BuildId).gz
      replaceExistingArchive: true
  - upload: $(Build.ArtifactStagingDirectory)/$(Build.BuildId).gz
    artifact: drop
For more information, review the steps for creating a build in Build your Node.js app with gulp.
Run the pipeline
To save your azure-pipelines.yml file to your repo and kick off the CI/CD pipeline, select Save and run, and then select Save and run again.
When the pipeline finishes, view the job Summary page to verify that the build job ran successfully and that 1 published artifact appears under Related.
Add and run the deployment job
A deployment job executes preDeploy, deploy, routeTraffic, and postRouteTraffic lifecycle hooks once, and then executes either on: success or on: failure. If you deploy to environment VMs, the preDeploy phase runs on the build agent, not on the environment VMs. All the other steps run on registered VMs in the environment.
- The optional
preDeploystep runs before deployment. You can use this step for orchestration, VM and artifact preparation, and health checks. - The
deploystep deploys the deployment object to the target environment VMs. - The optional
routeTrafficstep can apply traffic switching. - The optional
postRouteTrafficstep can do health checks and notifications. - The custom
on.failureandon.successsteps can provide notifications or recovery.
A deployment job to an environment with resourceType: VirtualMachine requires the environment VMs to be able to run all pipeline tasks, such as Bash or Azure CLI. You can use the preDeploy step to install necessary software and permissions on target VMs.
For example, if a deployment step uses Azure CLI, the agent VMs must have Azure CLI installed and available on the PATH for the agent user. The agent user must have permission to run the CLI and must authenticate to Azure. You might need to add the agent user to sudoers, or set up environment variables to automate installation.
You could use a preDeploy script to install Azure CLI on the target VMs. To authenticate to Azure, you can run az login, or for automation, define a service principal and run az login --service-principal in a preDeploy step.
Add the deployment job
The following example deployment job starts when the Build job completes successfully. To add the job to your pipeline:
Select the More actions icon at upper right on the Summary page, select Edit pipeline, and add the following code to the end of your pipeline. Replace
<environment-name>with the name of the environment you created.Optionally, you can select specific VMs from the environment to receive the deployment by using the
tagsparameter and specifying the<VMtag>you defined for the VM.- deployment: VMDeploy displayName: Web deploy dependsOn: Build condition: succeeded() environment: name: <environment-name> resourceType: VirtualMachine tags: <VMtag> # VMs to deploy toAdd a
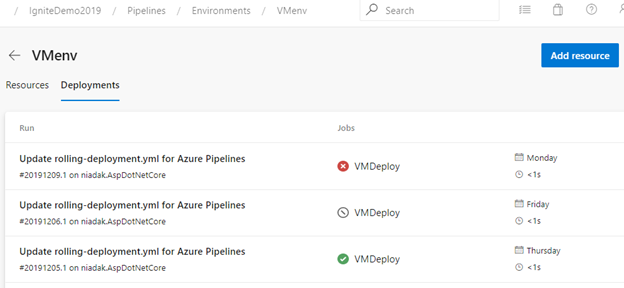
strategyto thedeploymentjob. The runOnce deployment strategy is the simplest and runs by default if you don't specifystrategy. This strategy executes the deploy steps once on each VM in the environment, without any parallelism or traffic management.strategy: runOnce: deploy: steps: - script: echo my first deploymentAfter you add the deployment job, select Validate and save, then select Save, select Run, and select Run again. With each run of this job, deployment history records against the environment.
Note
The first time you run the pipeline that uses the environment, you must grant permission for all runs of the pipeline to access the agent pool and the environment. Select the Waiting symbol next to the job on the pipeline run Summary screen, and then select Permit to grant the necessary permissions.
Rolling deployment strategy
You can use a rolling instead of runOnce deployment strategy . A rolling deployment strategy can orchestrate parallelism, health checks, and traffic routing. While the runOnce strategy executes on a single VM at a time, a rolling deployment can run in parallel on rolling sets of up to five target VMs, depending on the maxParallel setting.
The maxParallel parameter sets the number or percentage of VMs that must remain available, ensuring that the app can handle requests and reducing overall downtime during deployments. This parameter also determines success and failure conditions for the deployment.
For more information about the rolling deployment strategy, see the jobs.deployment.strategy.rolling schema definition.
Deployment job example
Deployments to VM resources require the VMs to have all required apps, dependencies, and permissions installed and configured. You must manually preinstall these requirements, or the pipeline must install or implement them.
The Java app deployment to VM resources is easier to implement because it's self-contained. The Java Virtual Machine (JVM) is often preinstalled on VM agents, and you don't need to worry about app dependencies, permissions, or package management. You can just download the JAR file and then run it with java -jar.
The Node.js app requires Node, possibly npm dependencies, and a service manager like systemd to be present and configured on each agent VM. To be automated, the pipeline deployment script must be noninteractive and able to restart and manage the app's service.
The following YAML rolling deployment job for the JavaScript app depends on successful Build stage completion. The deployment job assumes that the following requirements are already preinstalled or preconfigured on each agent VM. For full automation, you can install and configure these apps and services on the VMs as part of the pipeline.
- Node.js 16.x installed, and npm available on the build agent's PATH.
- Systemd with a systemd service file configured for the service that starts the Node.js app, such as /etc/systemd/system/pipelines-javascript.service.
- Passwordless sudo for the agent user for necessary commands, set with
NOPASSWD:in /etc/sudoers. - Write permissions for the agent user to /opt/pipelines-javascript or other deployment target.
Tip
For most Node.js apps, consider deploying to Azure App Service or using regular pipeline jobs with Microsoft-hosted agents, instead of using deployment jobs. This approach is simpler and avoids the operational overhead of managing VM environments. Deployment to specific VM resources is best suited for scenarios requiring direct control of the VM servers, advanced orchestration, or legacy infrastructure.
- stage: Deploy
  displayName: Rolling Deploy to VMs
  dependsOn: Build
  condition: succeeded()
  jobs:
  - deployment: RollingDeploy
    displayName: Rolling deploy to Ubuntu VMs
    environment:
      name: <environment-name>
      resourceType: VirtualMachine
    strategy:
      rolling:
        maxParallel: 1   #or 2 for parallel. For percentages, use x%
        preDeploy:
          steps:
          - download: current
            artifact: drop
          - script: echo "Pre-deploy on $(hostname)"
        deploy:
          steps:
          - script: |
              echo "Unpacking Node.js app on $(hostname)"
              sudo mkdir -p /opt/pipelines-javascript
              sudo tar -xzf $(Pipeline.Workspace)/drop/$(Build.BuildId).tar.gz -C /opt/pipelines-javascript --strip-components=1
              cd /opt/pipelines-javascript
              echo "Installing production dependencies"
              sudo npm ci --only=production
              echo "Restarting Node.js service"
              sudo systemctl restart pipelines-javascript
            displayName: 'Extract, install, and restart Node.js service'
        routeTraffic:
          steps:
          - script: echo "Routing traffic on $(hostname)"
        postRouteTraffic:
          steps:
          - script: echo "Post-route health check on $(hostname)"
        on:
          failure:
            steps:
            - script: echo "Deployment failed on $(hostname)"
          success:
            steps:
            - script: echo "Deployment succeeded on $(hostname)"
Access pipeline traceability in environment
The environment Deployments tab provides complete traceability of commits and work items and a cross-pipeline deployment history for the environment.