Note
Access to this page requires authorization. You can try signing in or changing directories.
Access to this page requires authorization. You can try changing directories.
Azure DevOps Services | Azure DevOps Server | Azure DevOps Server 2022
Use an Azure DevOps multistage pipeline to divide your CI/CD process into stages that represent different parts of your development cycle. A multistage pipeline gives more visibility into your deployment process and makes it easier to integrate approvals and checks.
In this article, you'll create two App Service instances and build a YAML pipeline with three stages:
In a real-world scenario, you may have another stage for deploying to production depending on your DevOps process.
The example code in this exercise is for a .NET web application for a pretend space game that includes a leaderboard to show high scores. You'll deploy to both development and staging instances of Azure Web App for Linux.
Prerequisites
| Product | Requirements |
|---|---|
| Azure DevOps | - An Azure DevOps organization and project. Create one for free. - Permissions: - To grant access to all pipelines in the project: You must be a member of the Project Administrators group. - To create service connections: You must have the Administrator or Creator role for service connections. - An ability to run pipelines on Microsoft-hosted agents. You can either purchase a parallel job or you can request a free tier. |
| GitHub | - A GitHub account. |
Fork the project
Fork the following sample repository on GitHub.
https://github.com/MicrosoftDocs/mslearn-tailspin-spacegame-web-deploy
Create the App Service instances
Before you can deploy your pipeline, you need to first create an App Service instance to deploy to. You'll use Azure CLI to create the instance.
Sign in to the Azure portal.
From the menu, select Cloud Shell and the Bash experience.
Generate a random number that makes your web app's domain name unique. The advantage of having a unique value is that your App Service instance won't have a name conflict with other learners completing this tutorial.
webappsuffix=$RANDOMOpen a command prompt and use a
az group createcommand to create a resource group named tailspin-space-game-rg that contains all of your App Service instances. Update thelocationvalue to use your closest region.az group create --location eastus --name tailspin-space-game-rgUse the command prompt to create an App Service plan.
az appservice plan create \
  --name tailspin-space-game-asp \
  --resource-group tailspin-space-game-rg \
  --sku B1 \
  --is-linux
In the command prompt, create two App Service instances, one for each instance (Dev and Staging) with the
az webapp createcommand.az webapp create \ --name tailspin-space-game-web-dev-$webappsuffix \ --resource-group tailspin-space-game-rg \ --plan tailspin-space-game-asp \ --runtime "DOTNET|8.0" az webapp create \ --name tailspin-space-game-web-staging-$webappsuffix \ --resource-group tailspin-space-game-rg \ --plan tailspin-space-game-asp \ --runtime "DOTNET|8.0"With the command prompt, list both App Service instances to verify that they're running with the
az webapp listcommand.az webapp list \ --resource-group tailspin-space-game-rg \ --query "[].{hostName: defaultHostName, state: state}" \ --output tableCopy the names of the App Service instances to use as variables in the next section.
Create your Azure DevOps project and variables
Set up your Azure DevOps project and a build pipeline. You'll also add variables for your development and staging instances.
Your build pipeline:
- Includes a trigger that runs when there's a code change to branch
- Defines two variables,
buildConfigurationandreleaseBranchName - Includes a stage named Build that builds the web application
- Publishes an artifact you'll use in a later stage
Add the Build stage
In your Azure DevOps project, select Pipelines from the left navigation menu.
Select New pipeline or Create pipeline if this pipeline is the first in the project.
On the Where is your code screen, select GitHub.
You might be redirected to GitHub to sign in. If so, enter your GitHub credentials.
On the Select a repository screen, select the repository your .NET app is in.
You might be redirected to GitHub to install the Azure Pipelines app. If so, select Approve & install.
When the Configure tab appears, select Starter pipeline.
Replace the contents of azure-pipelines.yml with this code.
trigger:
- '*'

variables:
  buildConfiguration: 'Release'
  releaseBranchName: 'release'

stages:
- stage: 'Build'
  displayName: 'Build the web application'
  jobs:
  - job: 'Build'
    displayName: 'Build job'
    pool:
      vmImage: 'ubuntu-22.04'
      demands:
      - npm

    variables:
      wwwrootDir: 'Tailspin.SpaceGame.Web/wwwroot'
      dotnetSdkVersion: '8.x'

    steps:
    - task: UseDotNet@2
      displayName: 'Use .NET SDK $(dotnetSdkVersion)'
      inputs:
        version: '$(dotnetSdkVersion)'

    - task: Npm@1
      displayName: 'Run npm install'
      inputs:
        verbose: false

    - script: './node_modules/.bin/node-sass $(wwwrootDir) --output $(wwwrootDir)'
      displayName: 'Compile Sass assets'

    - task: gulp@1
      displayName: 'Run gulp tasks'

    - script: 'echo "$(Build.DefinitionName), $(Build.BuildId), $(Build.BuildNumber)" > buildinfo.txt'
      displayName: 'Write build info'
      workingDirectory: $(wwwrootDir)

    - task: DotNetCoreCLI@2
      displayName: 'Restore project dependencies'
      inputs:
        command: 'restore'
        projects: '**/*.csproj'

    - task: DotNetCoreCLI@2
      displayName: 'Build the project - $(buildConfiguration)'
      inputs:
        command: 'build'
        arguments: '--no-restore --configuration $(buildConfiguration)'
        projects: '**/*.csproj'

    - task: DotNetCoreCLI@2
      displayName: 'Publish the project - $(buildConfiguration)'
      inputs:
        command: 'publish'
        projects: '**/*.csproj'
        publishWebProjects: false
        arguments: '--no-build --configuration $(buildConfiguration) --output $(Build.ArtifactStagingDirectory)/$(buildConfiguration)'
        zipAfterPublish: true

    - publish: '$(Build.ArtifactStagingDirectory)'
      artifact: drop
When you're ready, select Save and run.
Add instance variables
In Azure DevOps, go to Pipelines > Library.
Select + Variable group.
Under Properties, add Release for the variable group name.
Create a two variables to refer to your development and staging host names. Replace the value
1234with the correct value for your instance.Variable name Example value WebAppNameDev tailspin-space-game-web-dev-1234 WebAppNameStaging tailspin-space-game-web-staging-1234 Select Save to save your variables.
Add the Dev stage
Next, you'll update your pipeline to promote your build to the Dev stage.
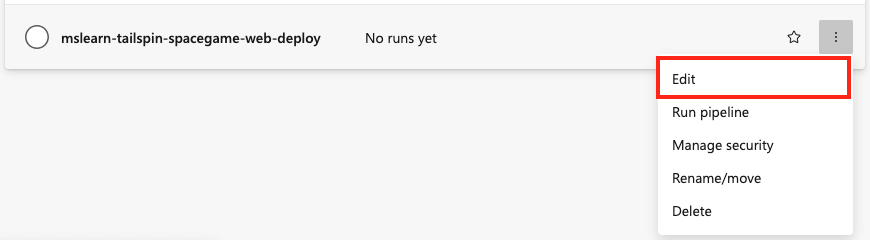
In Azure Pipelines, go to Pipelines > Pipelines.
Select Edit in the contextual menu to edit your pipeline.
Update azure-pipelines.yml to include a Dev stage. In the Dev stage, your pipeline will:
- Run when the Build stage succeeds because of a condition
- Download an artifact from
drop - Deploy to Azure App Service with an Azure Resource Manager service connection
trigger:
- '*'

variables:
  buildConfiguration: 'Release'
  releaseBranchName: 'release'

stages:
- stage: 'Build'
  displayName: 'Build the web application'
  jobs:
  - job: 'Build'
    displayName: 'Build job'
    pool:
      vmImage: 'ubuntu-22.04'
      demands:
      - npm

    variables:
      wwwrootDir: 'Tailspin.SpaceGame.Web/wwwroot'
      dotnetSdkVersion: '8.x'

    steps:
    - task: UseDotNet@2
      displayName: 'Use .NET SDK $(dotnetSdkVersion)'
      inputs:
        version: '$(dotnetSdkVersion)'

    - task: Npm@1
      displayName: 'Run npm install'
      inputs:
        verbose: false

    - script: './node_modules/.bin/node-sass $(wwwrootDir) --output $(wwwrootDir)'
      displayName: 'Compile Sass assets'

    - task: gulp@1
      displayName: 'Run gulp tasks'

    - script: 'echo "$(Build.DefinitionName), $(Build.BuildId), $(Build.BuildNumber)" > buildinfo.txt'
      displayName: 'Write build info'
      workingDirectory: $(wwwrootDir)

    - task: DotNetCoreCLI@2
      displayName: 'Restore project dependencies'
      inputs:
        command: 'restore'
        projects: '**/*.csproj'

    - task: DotNetCoreCLI@2
      displayName: 'Build the project - $(buildConfiguration)'
      inputs:
        command: 'build'
        arguments: '--no-restore --configuration $(buildConfiguration)'
        projects: '**/*.csproj'

    - task: DotNetCoreCLI@2
      displayName: 'Publish the project - $(buildConfiguration)'
      inputs:
        command: 'publish'
        projects: '**/*.csproj'
        publishWebProjects: false
        arguments: '--no-build --configuration $(buildConfiguration) --output $(Build.ArtifactStagingDirectory)/$(buildConfiguration)'
        zipAfterPublish: true

    - publish: '$(Build.ArtifactStagingDirectory)'
      artifact: drop

- stage: 'Dev'
  displayName: 'Deploy to the dev environment'
  dependsOn: Build
  condition:  succeeded()
  jobs:
  - deployment: Deploy
    pool:
      vmImage: 'ubuntu-22.04'
    environment: dev
    variables:
    - group: Release
    strategy:
      runOnce:
        deploy:
          steps:
          - download: current
            artifact: drop
          - task: AzureWebApp@1
            displayName: 'Azure App Service Deploy: dev website'
            inputs:
              azureSubscription: 'your-subscription'
              appType: 'webAppLinux'
              appName: '$(WebAppNameDev)'
              package: '$(Pipeline.Workspace)/drop/$(buildConfiguration)/*.zip'
Change the
AzureWebApp@1task to use your subscription.Select Settings for the task.

Update the
your-subscriptionvalue for Azure Subscription to use your own subscription. You may need to authorize access as part of this process. If you run into a problem authorizing your resource within the YAML editor, an alternate approach is to create a service connection.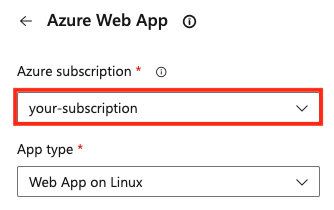
Set the App type to Web App on Linux.
Select Add to update the task.
Save and run your pipeline.
Add the Staging stage
Last, you'll promote the Dev stage to Staging. Unlike the Dev environment, you want to have more control in the staging environment you'll add a manual approval.
Create staging environment
From Azure Pipelines, select Environments.
Select New environment.
Create a new environment with the name staging and Resource set to None.
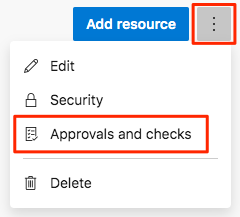
On the staging environment page, select Approvals and checks.
Select Approvals.
In Approvers, select Add users and groups, and then select your account.
In Instructions to approvers, write Approve this change when it's ready for staging.
Select Save.
Add new stage to pipeline
You'll add new stage, Staging to the pipeline that includes a manual approval.
Edit your pipeline file and add the
Stagingsection.trigger: - '*' variables: buildConfiguration: 'Release' releaseBranchName: 'release' stages: - stage: 'Build' displayName: 'Build the web application' jobs: - job: 'Build' displayName: 'Build job' pool: vmImage: 'ubuntu-22.04' demands: - npm variables: wwwrootDir: 'Tailspin.SpaceGame.Web/wwwroot' dotnetSdkVersion: '8.x' steps: - task: UseDotNet@2 displayName: 'Use .NET SDK $(dotnetSdkVersion)' inputs: version: '$(dotnetSdkVersion)' - task: Npm@1 displayName: 'Run npm install' inputs: verbose: false - script: './node_modules/.bin/node-sass $(wwwrootDir) --output $(wwwrootDir)' displayName: 'Compile Sass assets' - task: gulp@1 displayName: 'Run gulp tasks' - script: 'echo "$(Build.DefinitionName), $(Build.BuildId), $(Build.BuildNumber)" > buildinfo.txt' displayName: 'Write build info' workingDirectory: $(wwwrootDir) - task: DotNetCoreCLI@2 displayName: 'Restore project dependencies' inputs: command: 'restore' projects: '**/*.csproj' - task: DotNetCoreCLI@2 displayName: 'Build the project - $(buildConfiguration)' inputs: command: 'build' arguments: '--no-restore --configuration $(buildConfiguration)' projects: '**/*.csproj' - task: DotNetCoreCLI@2 displayName: 'Publish the project - $(buildConfiguration)' inputs: command: 'publish' projects: '**/*.csproj' publishWebProjects: false arguments: '--no-build --configuration $(buildConfiguration) --output $(Build.ArtifactStagingDirectory)/$(buildConfiguration)' zipAfterPublish: true - publish: '$(Build.ArtifactStagingDirectory)' artifact: drop - stage: 'Dev' displayName: 'Deploy to the dev environment' dependsOn: Build condition: succeeded() jobs: - deployment: Deploy pool: vmImage: 'ubuntu-22.04' environment: dev variables: - group: Release strategy: runOnce: deploy: steps: - download: current artifact: drop - task: AzureWebApp@1 displayName: 'Azure App Service Deploy: dev website' inputs: azureSubscription: 'your-subscription' appType: 'webAppLinux' appName: '$(WebAppNameDev)' package: '$(Pipeline.Workspace)/drop/$(buildConfiguration)/*.zip' - stage: 'Staging' displayName: 'Deploy to the staging environment' dependsOn: Dev jobs: - deployment: Deploy pool: vmImage: 'ubuntu-22.04' environment: staging variables: - group: 'Release' strategy: runOnce: deploy: steps: - download: current artifact: drop - task: AzureWebApp@1 displayName: 'Azure App Service Deploy: staging website' inputs: azureSubscription: 'your-subscription' appType: 'webAppLinux' appName: '$(WebAppNameStaging)' package: '$(Pipeline.Workspace)/drop/$(buildConfiguration)/*.zip'Change the
AzureWebApp@1task in the Staging stage to use your subscription.Select Settings for the task.
Update the
your-subscriptionvalue for Azure Subscription to use your own subscription. You may need to authorize access as part of this process.
Set the App type to Web App on Linux.
Select Add to update the task.
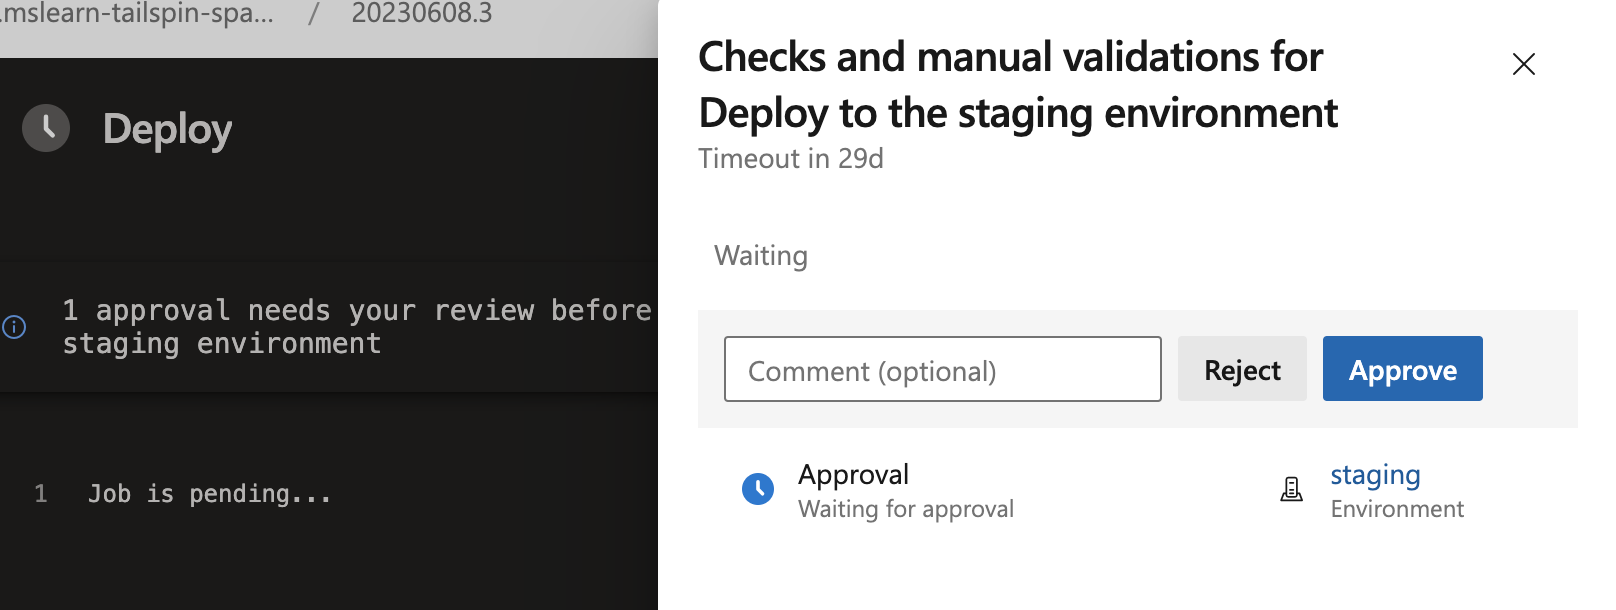
Go to the pipeline run. Watch the build as it runs. When it reaches
Staging, the pipeline waits for manual release approval. You'll also receive an email that you have a pipeline pending approval.
Review the approval and allow the pipeline to run.
Clean up resources
If you're not going to continue to use this application, delete the resource group in Azure portal and the project in Azure DevOps with the following steps:
To clean up your resource group:
Go to the Azure portal and sign in.
From the menu bar, select Cloud Shell. When prompted, select the Bash experience.

Run the following az group delete command to delete the resource group that you used,
tailspin-space-game-rg.az group delete --name tailspin-space-game-rg
To delete your Azure DevOps project, including the build pipeline, see Delete project.