Resources in YAML pipelines
Azure DevOps Services | Azure DevOps Server 2022 - Azure DevOps Server 2019
This article discusses resources for YAML pipelines. A resource is anything used by a pipeline that exists outside the pipeline. After you define a resource, you can consume it anywhere in your pipeline.
Resources provide full traceability for the services your pipeline uses, including the version, artifacts, associated commits, and work items. You can fully automate your DevOps workflows by subscribing to trigger events on your resources.
Resources schema
Resources in YAML represent sources of pipelines, builds, repositories, containers, packages, and webhooks. For complete schema information, see the resources definition in the YAML schema reference for Azure Pipelines.
When a resource triggers a pipeline, the following variables get set:
resources.triggeringAlias
resources.triggeringCategory
The variable Build.Reason must be ResourceTrigger for these values to get set. The values are empty if a resource didn't trigger the pipeline run.
Pipelines resource definition
If you have a pipeline that produces artifacts, you can consume the artifacts by defining a pipelines resource. Only Azure Pipelines can use the pipelines resource. You can set triggers for your continuous deployment (CD) workflows on a pipeline resource.
In your resource definition, pipeline is a unique value that you can use to reference the pipeline resource later in your pipeline. The source is the name of the pipeline that produced the pipeline artifact. For complete schema information, see the resources.pipelines.pipeline definition.
You use the label defined by pipeline to reference the pipeline resource from other parts of your pipeline, such as when using pipeline resource variables or downloading artifacts. For an alternative way to download pipeline artifacts, see Download artifacts.
Important
When you define a pipeline resource trigger:
- If the
pipelineresource is from the same repository as the current pipeline, orself, triggering follows the same branch and commit on which the event is raised. - If the pipeline resource is from a different repository, the current pipeline triggers on the default branch of the
pipelineresource repository.
Example pipeline resource definitions
The following example consumes artifacts from a pipeline within the same project.
resources:
  pipelines:
  - pipeline: SmartHotel-resource # identifier to use in pipeline resource variables
    source: SmartHotel-CI # name of the pipeline that produces the artifacts
To consume a pipeline from another project, you include the project name and source name. The following example uses branch to resolve the default version when the pipeline is triggered manually or scheduled. The branch input can't have wildcards.
resources:
  pipelines:
  - pipeline: SmartHotel
    project: DevOpsProject
    source: SmartHotel-CI
    branch: releases/M142
The following example shows a pipeline resource with a simple trigger.
resources:
  pipelines:
  - pipeline: SmartHotel
    project: DevOpsProject
    source: SmartHotel-CI
    trigger: true
The following example shows a pipeline resource trigger with branch conditions.
resources:
  pipelines:
  - pipeline: SmartHotel
    project: DevOpsProject
    source: SmartHotel-CI
    trigger:
      branches:
      - releases/*
      - resources.triggeringAlias
The following example uses stages filters for evaluating trigger conditions for CD pipelines. Stages use the AND operator. On successful completion of all the provided stages, the CD pipeline triggers.
resources:
  pipelines:
  - pipeline: MyCIAlias
    project: Fabrikam
    source: Farbrikam-CI
    trigger:
      stages:
      - PreProduction
      - Production
The following example uses tags filters for default version evaluation and for triggers. Tags use the AND operator.
The tags are set on the continuous integration (CI) or CD pipeline. These tags differ from the tags set on branches in the Git repository.
resources:
  pipelines:
  - pipeline: MyCIAlias
    project: Fabrikam
    source: Farbrikam-CI
    tags:
    - Production
    trigger:
      tags:
      - Production
      - Signed
Pipelines artifact version evaluation
The resource pipeline's artifact version depends on how the pipeline triggers.
Manual or scheduled trigger
If the pipeline run is manually triggered or scheduled, the values of the version, branch, and tags properties define the artifact version. The branch input can't have wildcards. The tags properties use the AND operator.
| Specified properties | Artifact version |
|---|---|
version |
The artifacts from the build that have the specified run number |
branch |
The artifacts from the latest build done on the specified branch |
tags list |
The artifacts from the latest build that has all the specified tags |
branch and tags list |
The artifacts from the latest build done on the specified branch that has all the specified tags |
| None | The artifacts from the latest build across all the branches |
The following pipeline resource definition uses the branch and tags properties to evaluate the default version when the pipeline is triggered manually or scheduled. When you manually trigger the pipeline to run, the MyCIAlias pipeline artifacts version is the latest build done on the main branch that has the Production and PrepProduction tags.
resources:
  pipelines:
  - pipeline: MyCIAlias
    project: Fabrikam
    source: Farbrikam-CI
    branch: main
    tags:
    - Production
    - PreProduction
Resource pipeline completion trigger
When a pipeline triggers because one of its resource pipelines completes, the artifacts version is the version of the triggering pipeline. The values of the version, branch, and tags properties are ignored.
| Specified triggers | Outcome |
|---|---|
branches |
A new pipeline run triggers whenever the resource pipeline successfully completes a run on one of the include branches. |
tags |
A new pipeline run triggers whenever the resource pipeline successfully completes a run tagged with all of the specified tags. |
stages |
A new pipeline run triggers whenever the resource pipeline successfully executes the specified stages. |
branches, tags, and stages |
A new pipeline run triggers whenever the resource pipeline run satisfies all branch, tags, and stages conditions. |
trigger: true |
A new pipeline run triggers whenever the resource pipeline successfully completes a run. |
| Nothing | No new pipeline run triggers when the resource pipeline successfully completes a run. |
The following pipeline runs whenever the SmartHotel-CI resource pipeline:
- Runs on one of the
releasesbranches or on themainbranch - Is tagged with both
VerifiedandSigned - Completes both the
ProductionandPreProductionstages
resources:
  pipelines:
  - pipeline: SmartHotel
    project: DevOpsProject
    source: SmartHotel-CI
    trigger:
      branches:
        include:
        - releases/*
        - main
        exclude:
        - topic/*
      tags:
      - Verified
      - Signed
      stages:
      - Production
      - PreProduction
Pipeline artifact download
The download step downloads artifacts associated with the current run or with another pipeline resource.
All artifacts from the current pipeline and all its pipeline resources are automatically downloaded and made available at the beginning of each deployment job. You can override this behavior by setting download to none, or by specifying another pipeline resource identifier.
Regular job artifacts aren't automatically downloaded. Use download explicitly when needed.
Artifacts from the pipeline resource are downloaded to the $(PIPELINE.WORKSPACE)/<pipeline-identifier>/<artifact-identifier> folder. For more information, see Publish and download pipeline artifacts.
The optional artifact property specifies artifact names. If not specified, all available artifacts are downloaded. The optional patterns property defines patterns that represent files to include. For full schema information, see the steps.download definition.
- job: deploy_windows_x86_agent
  steps:
  - download: SmartHotel
    artifact: WebTier1
    patterns: '**/*.zip'
Pipeline resource variables
In each run, the metadata for a pipeline resource is available to all jobs as predefined variables. These variables are available to your pipeline only at runtime, and therefore can't be used in template expressions, which are evaluated at pipeline compile time.
For more information, see Pipeline resource metadata as predefined variables. To learn more about variable syntax, see Define variables.
The following example returns the predefined variable values for the myresourcevars pipeline resource.
resources:
  pipelines:
  - pipeline: myresourcevars
    source: mypipeline
    trigger: true

steps:
- script: |
    echo $(resources.pipeline.myresourcevars.pipelineID)
    echo $(resources.pipeline.myresourcevars.runName)
    echo $(resources.pipeline.myresourcevars.runID)
    echo $(resources.pipeline.myresourcevars.runURI)
    echo $(resources.pipeline.myresourcevars.sourceBranch)
    echo $(resources.pipeline.myresourcevars.sourceCommit)
    echo $(resources.pipeline.myresourcevars.sourceProvider)
    echo $(resources.pipeline.myresourcevars.requestedFor)
    echo $(resources.pipeline.myresourcevars.requestedForID)
Builds resource definition
If you have an external CI build system that produces artifacts, you can consume artifacts with builds resources. A build resource can be from any external CI system like Jenkins, TeamCity, or CircleCI.
The builds category is extensible. You can write an extension to consume artifacts from your build service, and introduce a new type of service as part of builds.
In the build definition, version defaults to the latest successful build. The trigger isn't enabled by default and must be explicitly set. For complete schema information, see the resources.builds.build definition.
In the following example, Jenkins is the resource type.
resources:
  builds:
  - build: Spaceworkz
    type: Jenkins
    connection: MyJenkinsServer
    source: SpaceworkzProj   # name of the Jenkins source project
    trigger: true
Important
Triggers are supported for hosted Jenkins only where Azure DevOps has line of sight with the Jenkins server.
The downloadBuild task
The build resource artifacts aren't automatically downloaded in your jobs/deploy-jobs. To consume artifacts from the build resource as part of your jobs, you need to explicitly add the downloadBuild task. You can customize the download behavior for each deployment or job.
This task automatically resolves to the corresponding download task for the type of build resource the runtime defines. Artifacts from the build resource are downloaded to the $(PIPELINE.WORKSPACE)/<build-identifier>/ folder.
In the downloadBuild definition, you specify the resource to download artifacts from. The optional artifact property specifies artifacts to download. If not specified, all artifacts associated with the resource are downloaded.
The optional patterns property defines a minimatch path or list of minimatch paths to download. If blank, the entire artifact is downloaded. For example, the following snippet downloads only the *.zip files.
- job: deploy_windows_x86_agent
  steps:
  - downloadBuild: Spaceworkz
    patterns: '**/*.zip'
For complete schema information, see the steps.downloadBuild definition.
Repository resource definition
The repository keyword lets you specify an external repository. You can use this resource if your pipeline has templates in another repository or you want to use multi-repo checkout with a repository that requires a service connection. You must let the system know about these repositories.
For example:
resources:
  repositories:
  - repository: common
    type: github
    name: Contoso/CommonTools
    endpoint: MyContosoServiceConnection
For complete schema information, see the resources.repositories.repository definition.
Repository resource types
Azure Pipelines supports the following values for the repository type: git, github, githubenterprise, and bitbucket.
- The
gittype refers to Azure Repos Git repos. - GitHub Enterprise repos require a GitHub Enterprise service connection for authorization.
- Bitbucket Cloud repos require a Bitbucket Cloud service connection for authorization.
| Type | Name value | Example |
|---|---|---|
type: git |
Another repository in the same project or same organization. | Same project: name: otherRepoAnother project in the same organization: name: otherProject/otherRepo. |
type: github |
Full name of the GitHub repository including the user or organization. | name: Microsoft/vscode |
type: githubenterprise |
Full name of the GitHub Enterprise repository including the user or organization. | name: Microsoft/vscode |
type: bitbucket |
Full name of the Bitbucket Cloud repository including the user or organization. | name: MyBitbucket/vscode |
Repository resource variables
In each run, the following metadata for a repository resource is available to all jobs in the form of runtime variables. The <Alias> is the identifier that you give your repository resource.
resources.repositories.<Alias>.name
resources.repositories.<Alias>.ref
resources.repositories.<Alias>.type
resources.repositories.<Alias>.id
resources.repositories.<Alias>.url
The following example has a repository resource with an alias of common, so the repository resource variables are accessed using resources.repositories.common.*.
resources:
  repositories:
    - repository: common
      type: git
      ref: main
      name: Repo

variables:
  ref: $[ resources.repositories.common.ref ]
  name: $[ resources.repositories.common.name ]
  id: $[ resources.repositories.common.id ]
  type: $[ resources.repositories.common.type ]
  url: $[ resources.repositories.common.url ]

steps:
- bash: |
    echo "name = $(name)"
    echo "ref = $(ref)"
    echo "id = $(id)"
    echo "type = $(type)"
    echo "url = $(url)"
In each run, the following metadata for a repository resource is available to all jobs in the form of runtime variables. The <Alias> is the identifier that you give your repository resource.
resources.repositories.<Alias>.name
resources.repositories.<Alias>.ref
resources.repositories.<Alias>.type
resources.repositories.<Alias>.id
resources.repositories.<Alias>.url
resources.repositories.<Alias>.version
The following example has a repository resource with an alias of common, so the repository resource variables are accessed using resources.repositories.common.*.
resources:
  repositories:
    - repository: common
      type: git
      ref: main
      name: Repo

variables:
  ref: $[ resources.repositories.common.ref ]
  name: $[ resources.repositories.common.name ]
  id: $[ resources.repositories.common.id ]
  type: $[ resources.repositories.common.type ]
  url: $[ resources.repositories.common.url ]
  version: $[ resources.repositories.common.version ]

steps:
- bash: |
    echo "name = $(name)"
    echo "ref = $(ref)"
    echo "id = $(id)"
    echo "type = $(type)"
    echo "url = $(url)"
    echo "version = $(version)"
Checkout keyword for repositories
Repos from the repository resource aren't automatically synced in your jobs. Use the checkout keyword to fetch a repository defined as part of the repository resource. For complete schema information, see the steps.checkout definition.
For more information, see Check out multiple repositories in your pipeline.
Containers resource definition
If you need to consume container images as part of your CI/CD pipelines, you can use containers resources. A container resource can be a public or private Docker registry or an Azure Container Registry instance.
You can consume a generic container resource image as part of your job, or use the resource for container jobs. If your pipeline requires the support of one or more services, you need to create and connect to service containers. You can use volumes to share data between services.
If you need to consume images from a Docker registry as part of your pipeline, you can define a generic container resource. No type keyword is required. For example:
resources:
  containers:
  - container: smartHotel
    endpoint: myDockerRegistry
    image: smartHotelApp
For complete schema information, see the resources.containers.container definition.
Note
The enabled: 'true' syntax to enable container triggers for all image tags is different from the syntax for other resource triggers. Be sure to use the correct syntax for specific resources.
Azure Container Registry resource type
To consume your Azure Container Registry images, you can use the first-class container resource type acr. You can use this resource type as part of your jobs and to enable automatic pipeline triggers.
You need Contributor or Owner permissions for Azure Container Registry to use automatic pipeline triggers. For more information, see Azure Container Registry roles and permissions.
To use the acr resource type, you must specify the azureSubscription, resourceGroup, and repository values for your Azure container registry. For example:
resources:
  containers:
  - container: petStore
    type: acr
    azureSubscription: ContosoConnection
    resourceGroup: ContosoGroup
    registry: petStoreRegistry
    repository: myPets
    trigger:
      tags:
        include:
        - production*
Note
Service connections that use Workload identity federation aren't supported in azureSubscription.
Container resource variables
Once you define a container as a resource, container image metadata passes to the pipeline as variables. Information like image, registry, and connection details are accessible across all the jobs used in your container deployment tasks.
Container resource variables work with Docker and Azure Container Registry. You can't use container resource variables for local image containers. The location variable applies only to the acr type of container resources.
The following example has an Azure Resource Manager service connection named arm-connection. For more information, see Azure container registries, repositories, and images.
resources:
  containers:
  - container: mycontainer
    type: ACR
    azureSubscription: arm-connection
    resourceGroup: rg-storage-eastus
    registry: mycontainerregistry
    repository: hello-world
    trigger:
      tags:
      - latest

steps:
- script: echo |
    echo $(resources.container.mycontainer.type)
    echo $(resources.container.mycontainer.registry)
    echo $(resources.container.mycontainer.repository)
    echo $(resources.container.mycontainer.tag)
    echo $(resources.container.mycontainer.digest)
    echo $(resources.container.mycontainer.URI)
    echo $(resources.container.mycontainer.location)
Packages resource definition
You can consume NuGet and npm GitHub packages as resources in YAML pipelines. To enable automated pipeline triggers when a new package version gets released, set the trigger property to true.
When you define package resources, specify the package <Repository>/<Name> in the name property, and set the package type as NuGet or npm. To use GitHub packages, use personal access token (PAT)-based authentication and create a GitHub service connection that uses the PAT.
For complete schema information, see the resources.packages.package definition.
By default, packages aren't automatically downloaded into jobs. To download, use getPackage.
The following example has a GitHub service connection named pat-contoso to a GitHub npm package named contoso. For more information, see GitHub packages.
resources:
  packages:
    - package: contoso
      type: npm
      connection: pat-contoso
      name: myname/contoso
      version: 7.130.88
      trigger: true

pool:
  vmImage: 'ubuntu-latest'

steps:
- getPackage: contoso
Webhooks resource definition
Note
Webhooks were released in Azure DevOps Server 2020.1.
You can consume artifacts and enable automated triggers with pipeline, container, build, and package resources. However, you can't use these resources to automate your deployments based on external events or services.
The webhooks resource in YAML pipelines lets you integrate your pipelines with external services like GitHub, GitHub Enterprise, Nexus, and Artifactory to automate workflows. You can subscribe to any external events through webhooks and use the events to trigger your pipelines.
Webhooks automate your workflow based on any external webhook event that isn't supported by first-class resources like pipelines, builds, containers, or packages. Also, for on-premises services where Azure DevOps doesn't have visibility into the process, you can configure webhooks on the service and trigger your pipelines automatically.
To subscribe to a webhook event, you define a webhook resource in your pipeline and point it to an incoming webhook service connection. You can also define more filters on the webhook resource, based on the JSON payload data, to customize the triggers for each pipeline.
Whenever the incoming webhook service connection receives a webhook event, a new run triggers for all the pipelines subscribed to the webhook event. You can consume the JSON payload data in your jobs as variables by using the format ${{ parameters.<WebhookAlias>.<JSONPath>}}.
For complete schema information, see the resources.webhooks.webhook definition.
The following example defines a webhook resource:
resources:
  webhooks:
    - webhook: WebHook
      connection: IncomingWH

steps:
- script: echo ${{ parameters.WebHook.resource.message.title }}
Webhook triggers
To configure webhook triggers, you first set up a webhook on your external service, providing the following information:
- Request Url:
https://dev.azure.com/<Azure DevOps organization>/_apis/public/distributedtask/webhooks/<webhook name>?api-version=6.0-preview - Secret (Optional): If you need to secure your JSON payload, provide a secret value.
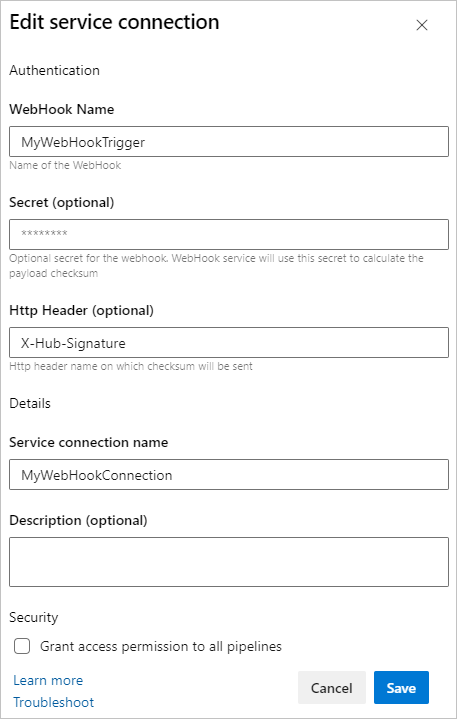
Next, you create a new incoming webhook service connection. For this service connection type, you define the following information:
- WebHook Name: Same as the webhook created in your external service.
- Secret (Optional): Used to verify the payload's HMAC-SHA1 hash for verification of the incoming request. If you used a secret when creating your webhook, you must provide the same secret.
- Http Header: The HTTP header in the request that contains the payload's HMAC-SHA1 hash value for request verification. For example, the GitHub request header is
X-Hub-Signature.
To trigger your pipeline using a webhook, you make a POST request to https://dev.azure.com/<org_name>/_apis/public/distributedtask/webhooks/<webhook_connection_name>?api-version=6.0-preview. This endpoint is publicly available, and needs no authorization. The request should have a body like the following example:
{
    "resource": {
        "message": {
            "title": "Hello, world!",
            "subtitle": "I'm using WebHooks!"
        }
    }
}
Note
Accessing data from the webhook's request body can lead to incorrect YAML. For example, the pipeline step - script: echo ${{ parameters.WebHook.resource.message }} pulls in the entire JSON message, which generates invalid YAML. Any pipeline triggered via this webhook doesn't run, because the generated YAML became invalid.
The following snippet shows another example that uses webhook filters.
resources:
  webhooks:
    - webhook: MyWebhookTrigger
      connection: MyWebhookConnection
      filters:
        - path: repositoryName
          value: maven-releases
        - path: action
          value: CREATED
steps:
- task: PowerShell@2
  inputs:
    targetType: 'inline'
    script: |
      Write-Host ${{ parameters.MyWebhookTrigger.repositoryName}}
      Write-Host ${{ parameters.MyWebhookTrigger.component.group}}
Manual version picker for resources
When you manually trigger a CD YAML pipeline, Azure Pipelines automatically evaluates the default versions for the resources defined in the pipeline, based on the inputs provided. However, Azure Pipelines considers only successfully completed CI runs when evaluating the default version for scheduled triggers, or if you don't manually choose a version.
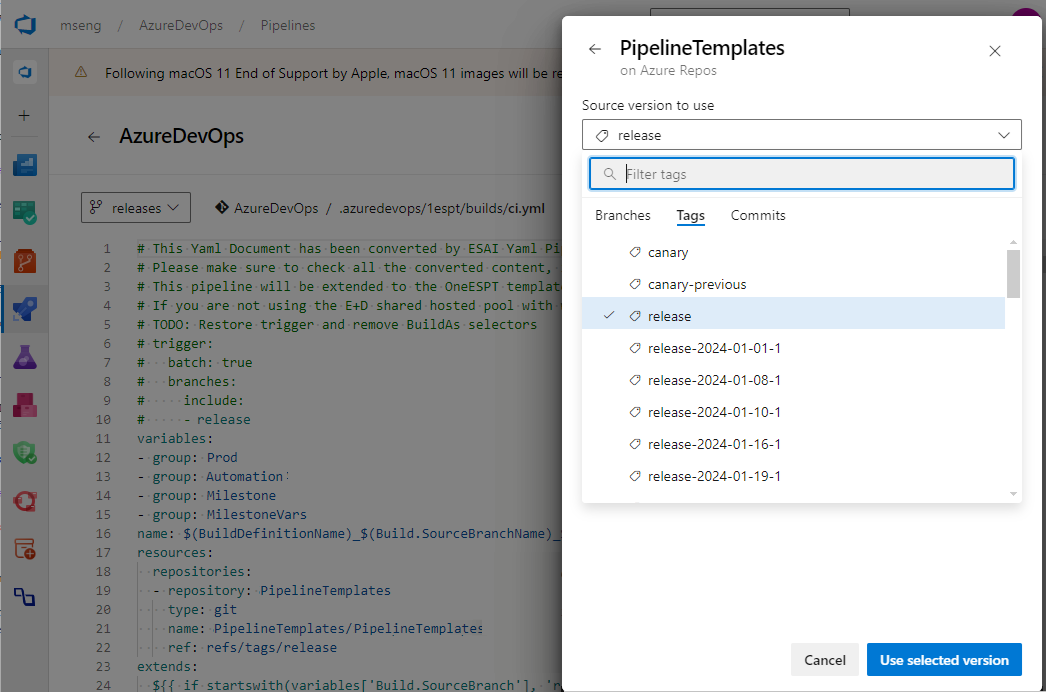
You can use the resource version picker to manually choose a different version when you create a run. The resource version picker is supported for pipeline, build, repository, container, and package resources.
For pipeline resources, you can see all the available runs across all branches, search them based on the pipeline number or branch, and pick a run that's successful, failed, or in progress. This flexibility ensures that you can run your CD pipeline if you're sure a run produced all the artifacts you need. You don't need to wait for a CI run to complete, or rerun it because of an unrelated stage failure.
To use the resource version picker, in the Run pipeline pane, select Resources, then select a resource and pick a specific version from the list of available versions.
For resources where you can't fetch available versions, like GitHub packages, the version picker provides a text field so you can enter the version for the run to pick.
Resource authorization in YAML pipelines
Resources must be authorized before they can be used in pipelines. Resource owners control the users and pipelines that can access their resources. There are several ways to authorize a YAML pipeline to use resources.
Use the resource administration experience to authorize all pipelines to access the resource. For example, variable groups and secure files are managed in the Library page under Pipelines, and agent pools and service connections are managed in Project settings. This authorization is convenient if you don't need to restrict access to resources, such as for test resources.
When you create a pipeline, all the resources referenced in the YAML file are automatically authorized for use by the pipeline if you have the User role for those resources.
If you add a resource to a YAML file and the build fails with an error like
Could not find a <resource> with name <resource-name>. The <resource> does not exist or has not been authorized for use., you see an option to authorize the resources on the failed build.If you're a member of the User role for the resource, you can select this option and authorize the resource on the failed build. Once the resource is authorized, you can start a new build.
Verify that the agent pool security roles for your project are correct.
Approval checks for resources
You can use approval checks and templates to manually control when a resource runs. With the required template approval check, you can require that any pipeline using a resource or environment extends from a specific YAML template.
Setting a required template approval ensures that your resource is used only under specific conditions, and enhances security. To learn more about how to enhance pipeline security with templates, see Use templates for security.
Traceability
Azure Pipelines provides full traceability for any resource consumed at a pipeline or deployment job level.
Pipeline traceability
Azure Pipelines shows the following information for every pipeline run:
- If a resource triggered the pipeline, the resource that triggered the pipeline.
- The resource version and the artifacts consumed.
- Commits associated with each resource.
- Work items associated with each resource.
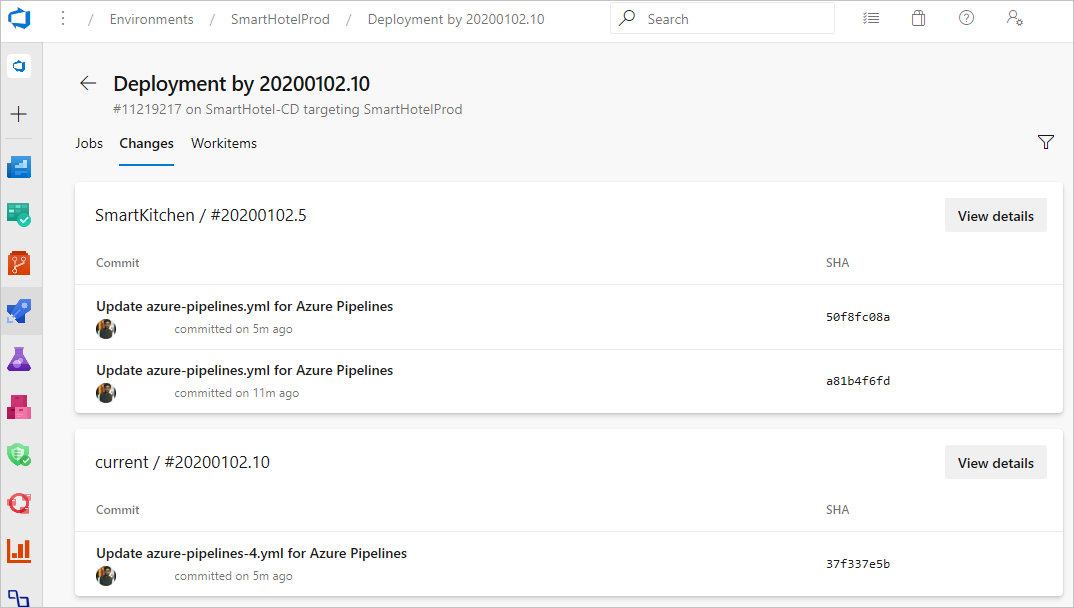
Environment traceability
Whenever a pipeline deploys to an environment, you can see a list of resources that are consumed. The view includes resources consumed as part of the deployment jobs and their associated commits and work items.
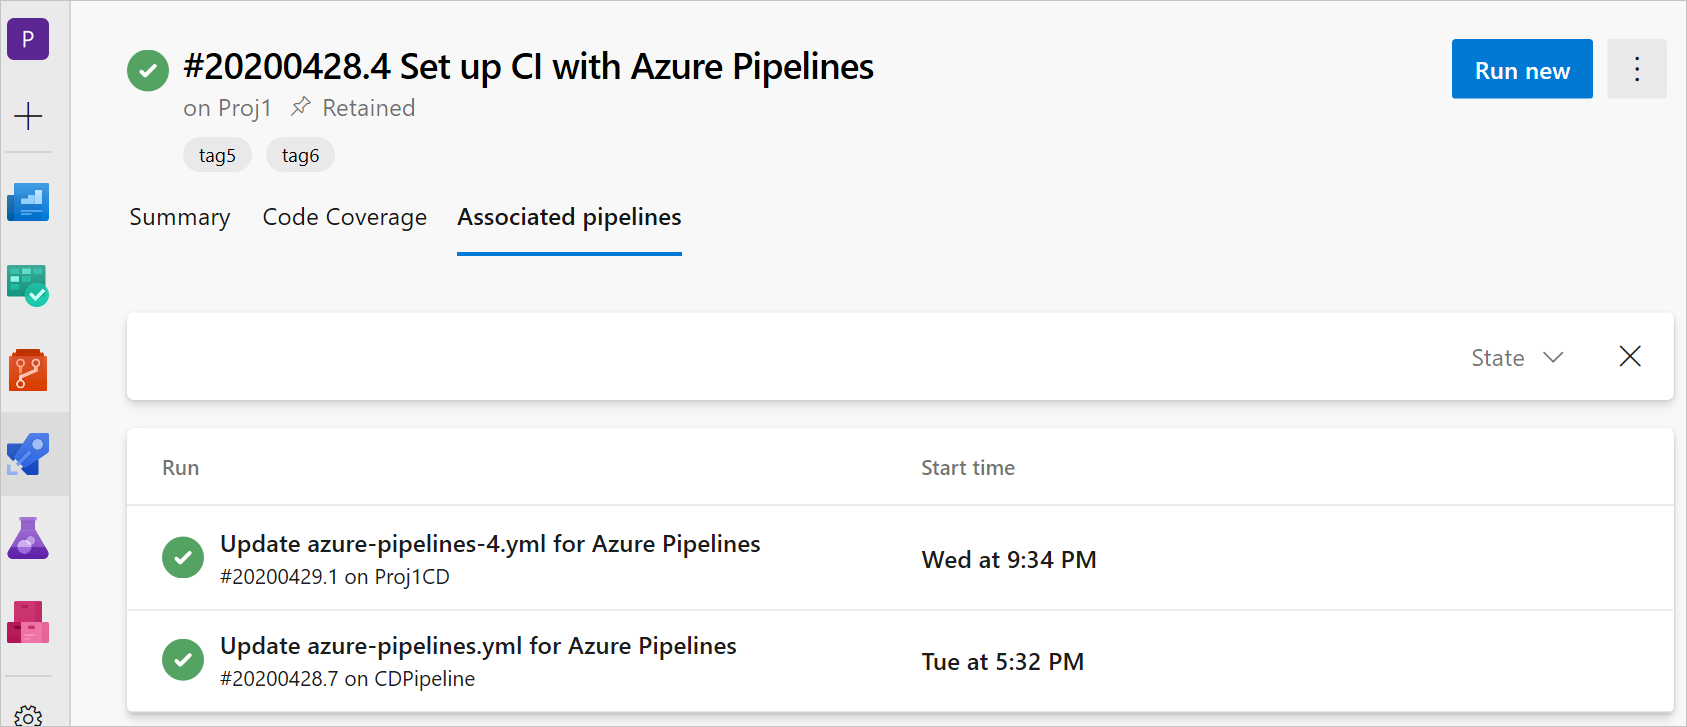
Associated CD pipelines information in CI pipelines
To provide end-to-end traceability, you can track which CD pipelines consume a specific CI pipeline through the pipelines resource. If other pipelines consume your CI pipeline, you see an Associated pipelines tab in the Run view. The view shows all the CD YAML pipeline runs that consumed your CI pipeline and the artifacts from it.
Resource trigger issues
Resource triggers can fail to execute because:
- The source of the provided service connection is invalid, there are syntax errors in the trigger, or the trigger isn't configured.
- Trigger conditions aren't matched.
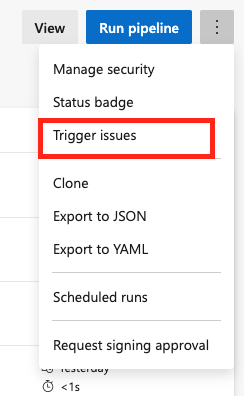
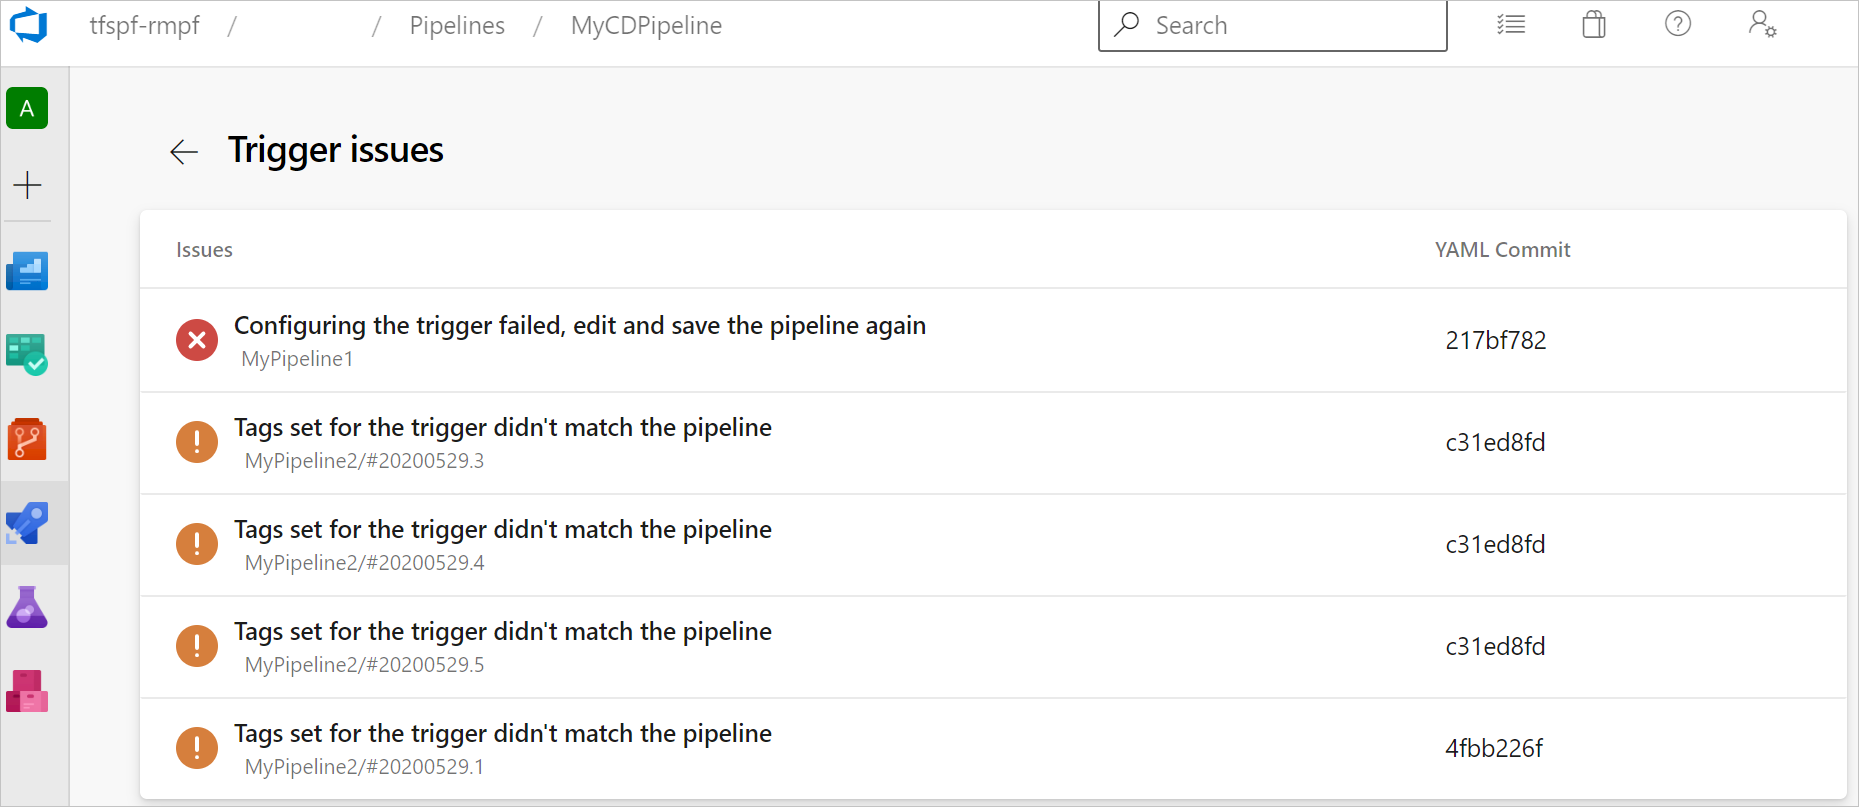
To see why pipeline triggers failed to execute, select the Trigger issues menu item on the pipeline definition page. Trigger issues is available only for nonrepository resources.
On the Trigger issues page, the error and warning messages describe why the trigger failed.
FAQ
When should I use pipelines resources, the download shortcut, or the Download Pipeline Artifacts task?
Using a pipelines resource is a way to consume artifacts from a CI pipeline and also configure automated triggers. A resource gives you full visibility into the process by displaying the version consumed, artifacts, commits, and work items. When you define a pipeline resource, the associated artifacts are automatically downloaded in deployment jobs.
You can use the download shortcut to download the artifacts in build jobs or to override the download behavior in deployment jobs. For more information, see the steps.download definition.
The Download Pipeline Artifacts task doesn't provide traceability or triggers, but sometimes it makes sense to use this task directly. For example, you might have a script task stored in a different template that requires artifacts from a build to be downloaded. Or, you might not want to add a pipeline resource to a template. To avoid dependencies, you can use the Download Pipeline Artifacts task to pass all the build information to a task.
How can I trigger a pipeline run when my Docker Hub image gets updated?
The container resource trigger isn't available for Docker Hub for YAML pipelines, so you need to set up a classic release pipeline.
- Create a new Docker Hub service connection.
- Create a classic release pipeline and add a Docker Hub artifact. Set your service connection and select the namespace, repository, version, and source alias.
- Select the trigger and toggle the continuous deployment trigger to Enable. Every Docker push that occurs to the selected repository creates a release.
- Create a new stage and job. Add two tasks, Docker login and Bash.
- The Docker task has the
loginaction and signs you in to Docker Hub. - The Bash task runs
docker pull <hub-user>/<repo-name>[:<tag>].
- The Docker task has the
How can I validate and troubleshoot my webhook?
Create a service connection.
Reference your service connection and name your webhook in the
webhookssection.resources: webhooks: - webhook: MyWebhookTriggerAlias connection: MyServiceConnectionRun your pipeline. The webhook is created in Azure as a distributed task for your organization.
Perform a
POSTAPI call with valid JSON in the body tohttps://dev.azure.com/<organization>/_apis/public/distributedtask/webhooks/<webhook-name>?api-version=<apiversion>. If you receive a 200 status code response, your webhook is ready for consumption by your pipeline.
If you receive a 500 status code response with the error Cannot find webhook for the given webHookId ..., your code might be in a branch that's not your default branch. To address this issue:
- Select Edit on your pipeline page.
- From the More actions menu, select Triggers.
- Select the YAML tab and then select Get sources.
- Under Default branch for manual and scheduled builds, update your feature branch.
- Select Save & queue.
- After this pipeline runs successfully, perform a
POSTAPI call with valid JSON in the body tohttps://dev.azure.com/<organization>/_apis/public/distributedtask/webhooks/<webhook-name>?api-version=<apiversion>. You should now receive a 200 status code response.
Related content
Feedback
Coming soon: Throughout 2024 we will be phasing out GitHub Issues as the feedback mechanism for content and replacing it with a new feedback system. For more information see: https://aka.ms/ContentUserFeedback.
Submit and view feedback for